Memorex MVDR2102 User Manual Download Page 2

OPERATION

OPERATION

TUNER OPERATION:

1. Press the STANDBY ON/OFF button to turn on the unit.

2. Press the SOURCE button to select TV, “Input Tuner” and a channel number will appear on the TV.

3. Set channels into memory as described previously. Press and release the CHANNEL Up or Down

button. The TV automatically stops at the next channel set into memory. 

4. Direct Program Selection buttons (0- 9). Use these buttons to select a channel. For ANTENNA, enter

a two digit channel number; i.e., enter "02" for Channel 2, enter "69" for Channel 69, etc. For CATV,

enter a three digit channel number; i.e., enter "002" for Channel 2, enter "125" for Channel 125, etc.

BASIC DVD OPERATION:

DISPLAY BUTTON (DVD MODE) - See page 35 for more details:

While playing a DVD, press the DISPLAY button. Press the Navigation (

,

®

) buttons to select the

desired icon, then press the ENTER button to select it. Once selected, press the Navigation (

π

,

)

buttons or the Number buttons to change the option, then the ENTER button, if required, to confirm the

change. You can select and change the following modes:

Title: 

Select a title to start playing.

Chapter: 

Select a chapter to start playing.

Elapsed Time: 

The Title's elapsed time will appear. Press the Navigation (

) button repeatedly to cycle

through Title's remaining time, Chapter's elapsed time and Chapter's remaining time. For the Title's

elapsed time and the Chapter's elapsed time, you can press the ENTER button to select. Enter the

desired Title's or Chapter's time to playback using the Number buttons.

Audio Setting: 

Select a desired audio setting.

Subtitle: 

Select the desired Subtitle language.

Repeat: 

Select desired Repeat setting (Off, CH-Chapter, TT-Title or All).

A-B Repeat: 

Select this option and press the Navigation (

) button when the desired starting segment

is playing to set point A. Press the Navigation (

) button again when the desired ending segment is

playing to set point B; the unit will then automatically start playing this segment repeatedly. To cancel,

press the  Navigation (

) button again.

Random: 

Select to turn the Random feature On or Off.

Language: 

Select the desired Language (English or Spanish) the menus will be in.

OSD (On-Screen Display) Language: 

Select this option and select the desired Language (English or

Spanish) the menus will be in using the Navigation (

π

,

) buttons followed by pressing the ENTER

button.

AUDIO MODE: For DVD

, Press the MTS AUDIO button

repeatedly to cycle through the audio languages available on

the playing DVD. 

MUTE: 

Press the Mute button to turn off the sound. The

sound can be turned back on by pressing this button again.

SKIP Button: 

Press to skip ahead or skip backward through

the tracks/chapters.

SEARCH: 

Repeatedly press to search forward or backwards

through the disc at high speeds.

PAUSE: 

Press once to pause the DVD/CD.For DVD and

VCD playback, repeatedly press to advance the picture one

frame.

RECORDING:

INSERTING A BLANK DVD-R, DVD-RW, DVD+R, DVD+RW:

After inserting a blank recordable DVD disc, after loading, "Init Disc" (Initialize Disc) or "Erase" (Format

Disc) menu will appear on the screen. Using the Navigation (

,

®

) button to select OK and press the

ENTER button to format or initialize the disc. Then the disc will be ready to be recorded by this

recorder.

NOTE:

If the blank DVD-R, DVD-RW, DVD+R or DVD+RW disc was already formatted or initialized by

this recorder, after loading the disc, you can record onto the disc as described below.

MANUALLY RECORDING:

After the DVD is inserted (see above), manually record a program as follows:

1. With the unit on and a recordable DVD inserted, press the SOURCE button repeatedly to select the

desired recording source. 

2. To start recording, press the RECORD button once. If desired, repeatedly press the RECORD button

to activate One Touch Recording, which will allow you to increase the recording time in intervals of

30 minutes.

3. Press the DISPLAY button to show the recording message box. To pause recording, press the

PAUSE/STEP button once. To resume recording, press the RECORD button.

4. To stop recording, press the STOP (

X

) button.

FOR MORE RECORDING OPERATIONS

, such as Timer Recording and Auto restore, see pages 60

and 65..

OPERATION

DVD TITLE MENU:

When a prerecorded DVD+RW or DVD+R disc which was previously recorded by this model of recorder

unit is inserted, a special DVD Title menu will be displayed.

1. Functional Block–see below for how to navigate the Title operations within this block.

2. Recorded Titles–shows recorded titles available for play/edit.

3. Title Page Number–shows DVDRW Title Page Number.

4. Disc Remains information–shows Disc Remains information.

DISC OPERATION MENU:

While playing a recordable disc or while in the Stop mode, press the DISC OPER(ATION) button. The

list of functions that can be performed from the Disc

Operation menu are shown below: 

Disc Info: 

Choose the Disc Info icon using the

Navigation (

π

,

) buttons; the Disc Info menu will

appear (as shown left) showing information regarding

the disc.

Format: 

Choose the Format icon using the Navigation

(

π

,

) buttons. Select OK (to format the disc) or

CANCEL using the Navigation (

,

®

) buttons then

press the ENTER button. If you  select OK, after

several seconds, the disc will be formatted.

Finalize (For DVD+/-R and DVD-RW discs only) or Unfinalize (For DVD-RW discs only): 

For the

DVD+/-Rs, they must be FINALIZED before being used in a standard DVD player. Unlike DVD+/-RWs,

DVD+/-Rs cannot be moved back and forth between the recorder and standard DVD players. You must

finish all recordings on the disc and finalize the disc before it will be usable on any other player.

However, for DVD-RWs, you also need to finalize the disc before it will be usable on any other player;

but, you can unfinalize the disc and edit/record/erase the disc again. To unfinalize a disc, please see

below.

To Finalize the Discs:

Choose the Finalize icon using the Navigation (

π

,

) buttons. Select OK (to

finalize the disc) or CANCEL (to NOT finalize the disc) using the Navigation (

,

®

) buttons then press

the ENTER button. If you select OK, then the unit will finalize the disc (this will take several seconds).

NOTE:

For DVD+/-Rs, once the disc is finalized, no further recordings/edits can be made on the disc.

For DVD-RWs, if the disc is finalized and you need to record/edit the disc, follow the Unfinalize

procedure described below:

Unfinalize (For DVD-RWs only):

With a finalized DVD-RW disc inserted, press the Disc Oper(ation)

button, the Unfinalize option will be available instead of the option "Finalize". Choose the Unfinalize icon

using the Navigation (

π

,

) buttons. Select OK (to unfinalize the disc) or CANCEL (to cancel

unfinalizing the disc) using the Navigation (

,

®

) buttons then press the ENTER button. If you select

OK, then the unit will unfinalize the disc (this will take several seconds). After you unfinalize the DVD-

RW, then the disc will be editable/recordable again.

Protect/Unprotect Disc: 

Choose the Protect Disc icon using the Navigation (

π

,

) buttons. Select OK

(to confirm) or Cancel using the Navigation (

,

®

) button then press the ENTER button. The unit will

automatically protect the disc. Once the disc is protected, you cannot edit the disc or record on the disc.

For DVD+/-RW discs, you cannot erase the disc as well. If you want to edit, erase or record the disc again,

then you need to Unprotect the disc. With a protected disc loaded, enter the DVD Operation menu, choose

the Unprotect Disc icon using the Navigation (

π

,

) buttons. Select OK (to confirm) or Cancel using the

Navigation (

,

®

) button then press the ENTER button. The unit will automatically unprotect the disc.

Once the disc is unprotected, you can edit, record or erase the disc again.

Make Comp(atible) (for DVD+/-RW discs only): 

This function makes your edits–such as hidden

chapters–compatible with standard DVD players. Use this option before distributing any recordings that

you have edited to clients or friends. Before a RW disc is made compatible, all edits will only be visible

when the disc is used in this unit. You can use this option multiple times, moving a RW disc back and

forth between the DVD Recorder and a standard DVD player. Each time a disc is edited, it must be

made compatible again. Choose the Make Compatible icon using the Navigation (

,

®

,

π

,

) buttons.

Select OK (to confirm) or Cancel using the Navigation (

,

®

) button then press the ENTER button.

Adapt: 

For a DVD-RW or DVD+RW disc, where the disc is recorded with some program by another

brand DVD recorder, if the disc isn't made compatible or finalized, then you can use the ADAPT function

to adapt the disc so the disc can continuously record programs with this unit. Also, you can edit the title

and edit the disc. Further, this function will change the DVD+/-RW disc/titles menu format to the format

that this unit  uses, so, you can edit the disc or continue to record scenes/titles on the disc. 

NOTES:

If the DVD+/-RW disc has already been finalized or made compatible on the previous DVD recorder,

then, you cannot ADAPT the disc anymore and you won't be able to select this function inside the

DISC OPERATION menu.

For this unit, the video recording format is DVD+VR. If the DVD+/-RWs that are recorded by another

DVD recorder which is using a non-DVD+VR video format, such as DVD-Video, DVD-VR, then the

discs will not be able to be adapted.

To Adapt the DVD+/-RW, choose the ADAPT icon using the Navigation (

π

,

) buttons. Select OK (to

adapt the disc) or CANCEL using the Navigation (

,

®

) buttons then press the ENTER button. If you

select OK, then the unit will adapt the disc (this will take several seconds).

AUDIO:

Select the language the DVD will be played back in.

SUBTITLE: 

Select the language the subtitles will be in.

TV TYPE: 

Select the desired setting to match your TV set (NTSC or PAL M).

CLOCK SETTING: 

Set the year using the Number buttons or the Navigation (

π

,

) buttons, then

press the Navigation (

®

) button; the Month field will be highlighted. Set the month, day, hour, minute

and AM/PM (if using 12 Hour Time System) fields following this same procedure, and then press the

ENTER button; the date and time will be set.

TIME SYSTEM: 

Select 12 HOUR (USA Standard) or 24 HOUR.

SCREEN SAVER:

When this option is set to ON, the screen saver will come on when a disc is

paused for approx. 5 minutes. When this option is OFF, the screen saver will not come on.

AUTO GO TO (For DV Input): 

When this option is set to ON, the unit will automatically switch to

the DV input when a DV plug is inserted (with the power on) into the front DV jack. When this option

is OFF, the feature is not activated.

USER DEFAULT: 

Performing this step will reset the unit’s options (time, preferences, etc.) to their

factory settings. Once you have selected OK to reset the unit, all the Timer Recording programs will

be erased. Also, you will have to set the Initial Setup again.
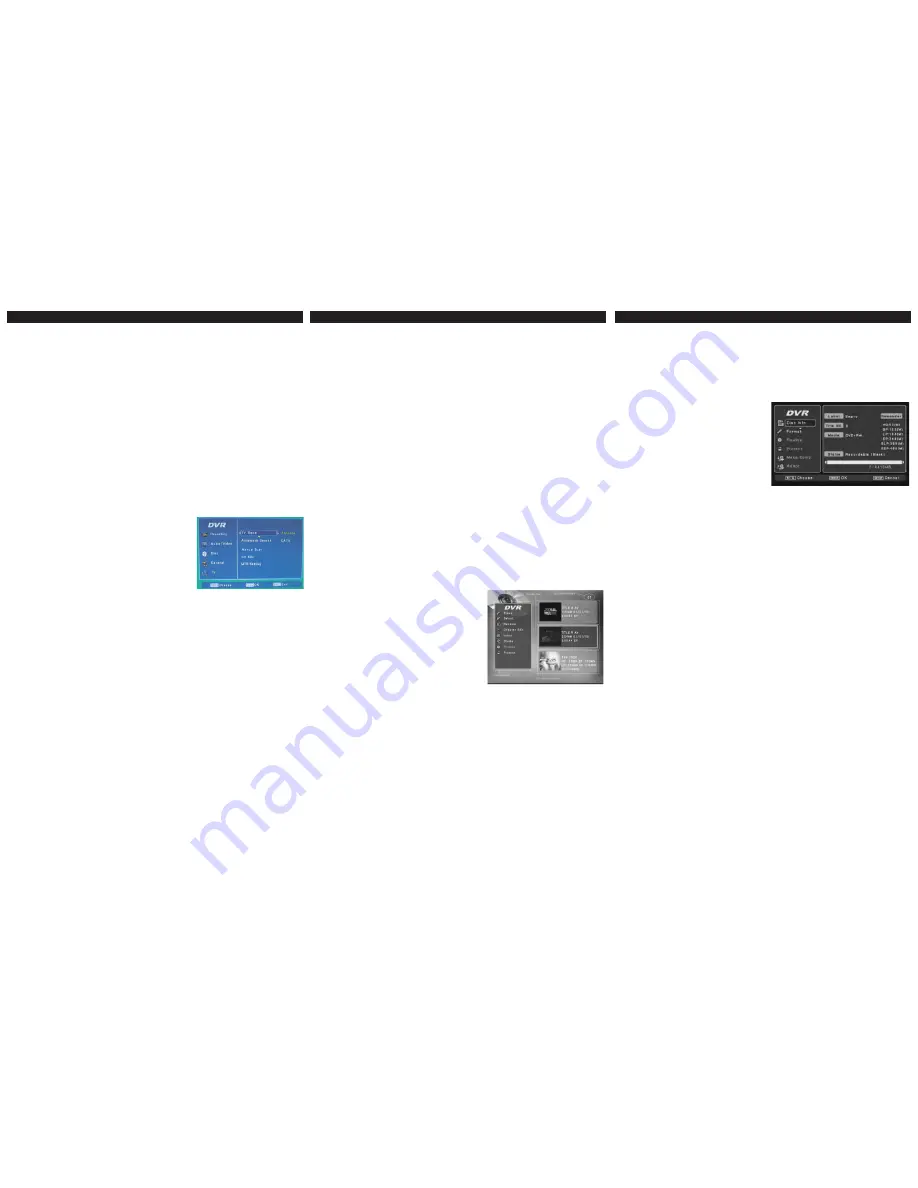
TV SETUP PAGE:

While in the TV Tuner mode, enter the Setup menu, then select

the TV Setup page using the Navigation (

π

,

) buttons followed

by the Navigation (

®

) button, then select/change the setup

option. 

TV SIGNAL: 

Select CATV if using cable television or ANTENNA

if using an outdoor antenna.

AUTO CHANNEL SCAN: 

Select CATV or ANTENNA as shown

above. Follow the steps in the TV SIGNAL section (above), then select AUTOMATIC SEARCH.

Select OK using the Navigation (

,

®

) buttons followed by the ENTER button ; the unit will then

automatically cycle through all the channels and store active channels into memory. During

AUTOMATIC SEARCH, press the ENTER button to cancel searching.

EDITING TV CHANNELS

1. While in the TV Tuner mode, enter the TV Setup page as described previously, then select CH

Edit

2. To Skip the currently viewed channel select SKIP using the Navigation (

π

,

) buttons, then press

the  Navigation (

®

) button to select ON to skip the channel when using the Channel Up or Down

buttons. 

To Add the currently viewed channel select SKIP and select OFF to not skip the channel when

using the Channel Up or Down buttons. 

3. Follow Step 1. To Fine Tune the currently viewed channel select Ch Fine Tune using the

Navigation (

π

,

) buttons, then press the  Navigation (

,

®

) buttons repeatedly to fine tune the

selected station as desired. 

4. Follow Step 1. To Copy the currently viewed channel into another channel number, select COPY

TO using the Navigation (

π

,

) buttons then select the desired channel number using the

Navigation (

,

®

) buttons. When done, press the ENTER button to make the change.

To Exchange the currently viewed channel with another channel number, select EXCHANGE

FROM using the Navigation (

π

,

) buttons then select the desired channel number using the

Navigation (

,

®

) buttons. When done, press the ENTER button to make the change.

MTS SETTING

: Enter the TV Setup page as described on the previous page. Then, select MTS

SETTING. Select the desired setting:

Stereo

: record TV program in stereo.

SAP

(Secondary Audio Program): record TV program in SAP.

Dual

: record TV program in Dual.

MTS SETTING

: Enter the TV Setup page as described on the previous page. Then, select MTS

SETTING. Select the desired setting:

Stereo

: record TV program in stereo.

SAP

(Secondary Audio Program): record TV program in SAP.

Dual

: record TV program in Dual.

Summary of Contents for MVDR2102

Page 1: ...d information will be lost SPDIF OUTPUT Select the desired setting SPDIF Off Digital audio output is off SPDIF RAW Dolby Digital signals are going out unchanged to the digital output MPEG 2 multi chan...

Page 2: ...on will be available instead of the option Finalize Choose the Unfinalize icon using the Navigation buttons Select OK to unfinalize the disc or CANCEL to cancel unfinalizing the disc using the Navigat...

Page 3: ...Before operating this product please read these instructions completely User s Guide DVD VIDEO RECORDER M MV VD DR R2 21 10 02 2 S Su uf ff fi ix x A A...

Page 4: ...Display Button DVD Mode 35 Playback of a DVD 36 Playback of a Prerecorded and Finalized DVD RW or DVD R 37 Skip 38 Search 38 Pause Step 38 Slow F 38 Repeat 39 Repeat A B 39 Random 39 Angle 39 Audio 4...

Page 5: ...nerates uses and can radiate radio frequency energy and if not installed and used in accordance with the instructions may cause harmful interference to radio communications However there is no guarant...

Page 6: ...surface This product should never be placed near or over a radiator or heat source This product should not be placed in a built in installation such as a bookcase or rack unless proper ventilation is...

Page 7: ...airs to this product ask the service technician to perform safety checks to determine that the product is in proper operating condition 21 WALL OR CEILING MOUNTING The product should be mounted to a w...

Page 8: ...unit follow that product s instructions Warning Cleaning and adjustment of lenses and or other components of playback mechanism should be performed by a qualified service technician NOTES ON MOISTURE...

Page 9: ...EN CLOSE Button 10 SKIP o n Buttons 11 STOP X Button 12 PLAY PAUSE p Button FRONT 1 RF IN Jack 2 Rear Video IN 3 Right Audio IN Rear Video S Video 4 Component Y Output 5 Component Cb Pb Output 6 Video...

Page 10: ...ton 19 BOOKMARK Button 20 MUTE Button 21 Number 0 9 Buttons 22 OPEN CLOSE Button 23 STANDBY ON OFF Button 24 RECORD Button 25 TIMER Button 26 SKIP o Button 27 SKIP n Button 28 STOP X X Button 29 SEARC...

Page 11: ...eo Left Right Channel Indicator 8 Program Mode Indicator 9 Random Play Indicator 10 Multi Angle Indicator 11 Zoom Indicator 12 Repeat A B indicator 13 Repeat Mode Indicator 14 Playing Information Time...

Page 12: ...lling the batteries as indicated in the battery compartment Reversed batteries may cause damage to the device 3 Do not mix different types of batteries together e g Alkaline Rechargeable and Carbon zi...

Page 13: ...manual When connecting the DVD Recorder to the TV make sure the power is off and both units are unplugged before making any connections Connect the DVD recorder to your TV directly If you connect the...

Page 14: ...r to the owner s manual of the TV as well as this manual When connecting the DVD Recorder to the TV make sure the power is off and both units are unplugged before making any connections If your TV onl...

Page 15: ...ell as this manual When connecting the DVD Recorder to the TV make sure the power is off and both units are unplugged before making any connections If your TV only has one audio input the use of a Y c...

Page 16: ...ovie on DVD Video on a progressive scan compatible TV While in the Stop mode press the I P button on the remote control to switch between Progressive Scan and Interlace Scan or change the settings in...

Page 17: ...with a blue screen option turn the option off on the TV for best results If you place the DVD recorder near a tuner the radio broadcast sound might be distorted In this case move the DVD recorder awa...

Page 18: ...xternal unit only has one audio output the use of a Y connector may be necessary Visit your local electronics supply store You can also connect the unit to the front jacks for both of the above scenar...

Page 19: ...ff and both units are unplugged before making any connections After connecting plug the AC cord into an AC outlet then press the STANDBY ON OFF button to turn the unit on Press the SOURCE button repea...

Page 20: ...ear in the root directory IMPORTANT It is important that you read the manual that accompanies the DVD disc as there are features that are on the DVD recorder that cannot be used with certain DVDs Ther...

Page 21: ...gement Information This DVD recorder is designed and manufactured to respond to the Region Management Information that is recorded on a DVD disc If the Region number described on the DVD disc does not...

Page 22: ...our minute and AM PM Then press the ENTER button 3 To go back to the previous page select BACK using the Navigation buttons 1 then press the ENTER button 3 The Tuner Mode selection will appear Select...

Page 23: ...gation buttons 2 then press the Navigation button 2 to select it 3 Use the Navigation buttons 2 to select one of the setup options then press the Navigation button 2 to select it 4 Use the Navigation...

Page 24: ...ng mode to define the picture quality of recordings and the maximum recording time for a disc For playback the correct picture quality will automatically be selected NOTE While you are not in the Setu...

Page 25: ...function then if you insert a recorded DVD RW into this unit and start recording while recording the existing titles programs on the disc will be overwritten by the new titles programs 2 1 1 TIMER RE...

Page 26: ...unchanged to the digital output MPEG 2 multi channel signals are converted to PCM Pulse Code Modulation SPDIF PCM Dolby Digital and MPEG 2 multi channel signals are converted to PCM Pulse Code Modulat...

Page 27: ...you Dynamic Range Compression will compress the dynamic range of the DVD s audio track DRC 2 1 1 2 Enter the AUDIO VIDEO Setup page as described on the previous page Then select HDCD using the Naviga...

Page 28: ...the screen Wide use when you connect a wide screen TV to the system Please see additional information in NOTES below TV DISPLAY 2 1 1 NOTES Some wide screen discs that do not permit Pan Scan mode pla...

Page 29: ...tton 2 When this option is set to ON during playback of a DVD or VCD if you change the unit to another source or stop playback when you playback the disc again it will resume to the last segment befor...

Page 30: ...button 2 The DVD s DISC MENU must be made in the selected language otherwise the default language of the DVD will be shown DISC MENU LANGUAGE 2 1 1 Enter the GENERAL Setup page as described above The...

Page 31: ...ear using the Number buttons 3 or the Navigation buttons 1 then press the Navigation button 1 the Month field will be highlighted Set the month day hour minute and AM PM if using 12 Hour Time System f...

Page 32: ...g the Navigation buttons 1 then the Navigation button 1 to select it Turn AUTO GOTO ON or OFF using the Navigation buttons 1 then press the ENTER button 2 When this option is set to ON the unit will a...

Page 33: ...n AUTO CHANNEL SCAN below TV SIGNAL AUTO CHANNEL SCAN 2 1 2 1 1 1 It is recommended to perform AUTO SCAN instead of MANUAL SCAN You can perform Manual Scan which will scan through the channels and all...

Page 34: ...the currently viewed channel select CH FINE TUNE using the Navigation buttons then press the Navigation buttons repeatedly to fine tune the selected station as desired Follow procedure in step 1 To C...

Page 35: ...dcast additional audio In most cases this means an additional language is available For example if a program is available in English and Spanish Spanish can be broadcast as the additional audio progra...

Page 36: ...2 for Channel 2 enter 125 for Channel 125 etc 4 Press the SOURCE button to select TV Input Tuner and a channel number will appear on the TV If there is no signal for the channel No signal will appear...

Page 37: ...e languages must be recorded on the DVD to use this feature For CD VCD Press the MTS AUDIO button repeatedly to cycle through L Mono Mono Left R Mono Mono Right Stereo and Mix Mono 1 1 AUDIO MODE You...

Page 38: ...pter s elapsed time and Chapter s remaining time For the Title s elapsed time and the Chapter s elapsed time you can press the ENTER button to select Enter the desired Title s or Chapter s time to pla...

Page 39: ...age 26 4 PLAYBACK OF A DVD IMPORTANT NOTES will appear on the TV screen during operation if you try to access a function that is not available on the disc Some discs may take a few seconds to load If...

Page 40: ...ease refer to page 64 for the Adapt function PLAYBACK OF A PRERECORDED AND FINALIZED DVD RW OR DVD R 2 1 3 Press the OPEN CLOSE button 1 to close the disc tray LOADING will appear on the screen After...

Page 41: ...t high speed until the PLAY button 3 is pressed normal playback will resume at that point 1 2 3 1 SKIP SEARCH Press the PAUSE STEP button 1 once to pause the picture Repeatedly press the PAUSE STEP bu...

Page 42: ...eat A B button again NOTE Each time you press the Repeat A B button the display icons will appear at the top of the screen for five seconds then disappear 1 REPEAT PLAYBACK While playing back a DVD th...

Page 43: ...Main Menu of the disc will appear Use the Navigation buttons 2 to select the desired option and then press the ENTER button 3 This is not available on all discs 2 1 3 1 While in the Play mode press th...

Page 44: ...r select the desired program s Title using the Navigation buttons 1 then enter the new Title number using the Number buttons 2 then press the Navigation button 1 to move to the Chapter column and ente...

Page 45: ...Title Digest screen will appear Use the Navigation buttons 2 to highlight the desired title then press the ENTER button 3 to start playback of the title If there are more than six titles press the Ski...

Page 46: ...me screen then press the ENTER button 3 to start playback of the Interval Press the Skip button n button 4 or o button 5 to skip to the next previous page if it is available to view the other Interval...

Page 47: ...e first track enter 0001 To pause playback press the PAUSE STEP button 5 the Pause indicator will appear on the top on the screen Press the PAUSE STEP button 5 again to resume playback Press the STOP...

Page 48: ...enient to download and share Can I record my own MP3 CDs Yes but you need a CD recorder which is available from your local computer store Where can I find MP3 files MP3 files are available on the Inte...

Page 49: ...nter the desired time of the track for playback using the Number buttons Audio Setting While in the Play mode select this option and enter the desired audio setting L Mono R Mono Stereo Mix Mono using...

Page 50: ...rating procedure may differ according to the VCD 1 Press the OPEN CLOSE button to open the disc tray OPEN will appear on the screen Insert a disc with the label side facing up on the disc tray 2 Press...

Page 51: ...l then play the selected area continuously Press the REPEAT A B button once again to cancel Repeat A B playback mode 2 1 REPEAT A B PLAY During playback press the SKIP n 1 or o 2 button to skip to the...

Page 52: ...s the ENTER button 3 the Track Digest screen will appear Use the Navigation buttons 2 to highlight the desired track then press the ENTER button 3 to start playback of the track If there are more than...

Page 53: ...n the total playback time of the track 2 3 4 5 1 3 BOOKMARK DIGEST During playback of a VCD disc press the Digest button 1 the Digest menu will appear IMPORTANT Make sure you have marked the bookmarks...

Page 54: ...ion playback the sound will be muted The player will move forward in slow motion until the PLAY button 2 is pressed normal playback will resume at that point 1 2 1 SLOW F Use this feature to move the...

Page 55: ...To delete the last programmed track use the Navigation buttons 1 to highlight the last programmed track number Press the STOP X button 2 to delete it 1 2 4 To program more than 10 tracks after enteri...

Page 56: ...e track press again to view the track s elapsed time again Audio Setting Select this option and enter the desired audio setting using the Navigation buttons if available on the MPEG 4 disc You can als...

Page 57: ...e enter 0001 then press the ENTER button 2 twice To pause playback press the PAUSE STEP button 5 the Pause indicator will appear on the top on the screen Press the PLAY button 6 to resume playback 2 1...

Page 58: ...ly start playing this segment repeatedly To cancel press the Repeat A B button again 1 SEARCH During playback press the SKIP n 1 or o 2 button to skip to the next or previous file to be played 1 2 3 1...

Page 59: ...ow motion playback the sound will be muted The player will move forward in slow motion until the PLAY button 2 is pressed normal playback will resume at that point 1 2 1 SLOW F Use this feature to mov...

Page 60: ...ns 1 to select the desired picture and press the ENTER button 2 to playback the desired picture again To view the next or previous page of the Pictures Index menu select or icon at the right bottom si...

Page 61: ...time channel recording quality and remaining recording time 3 1 2 Press the DISPLAY button 1 to show the recording message box To remove the recording message box press the DISPLAY button 1 again To p...

Page 62: ...eatedly press the RECORD button to increase recording time in 30 minute intervals up to the time allowed on the DVD 2 3 1 3 To stop recording before it reaches the recording stop OTR setting time pres...

Page 63: ...delete or edit the Timer Recording program use the Navigation button 1 to select the program that you want to delete or edit then press the ENTER button 2 Use the Navigation button 1 to select Edit ed...

Page 64: ...DVD Title menu will be displayed as shown below 1 Functional Block see the next page for how to navigate the Title operations within this block 2 Recorded Titles shows recorded titles available for pl...

Page 65: ...hen press the ENTER button to select the chapter Press the ENTER button again to cancel the Chapter selection NOTE If you do not select the Chapter s some options described below will not be able to b...

Page 66: ...tion buttons then press the ENTER button Select OK to finalize the disc or CANCEL to NOT finalize the disc using the Navigation buttons followed by pressing the ENTER button If you select OK then afte...

Page 67: ...se the disc as well If you want to edit erase or record the disc again then you need to Unprotect the disc With a protected disc loaded enter the DVD Operation menu choose the Unprotect Disc icon usin...

Page 68: ...ng if program time has not expired or Timer mode waiting for next preset program Timer Recording When the power failure occurs during the timer recording the unit will recover automatically and a Reco...

Page 69: ...he disc This is normal on some discs Select the correct TV type 16 9 Panscan or Letterbox which matches the TV Install fresh batteries Install batteries according to the diagram Aim the remote at the...

Page 70: ...LE CAUSE DVD not inserted or inserted upside down A non playback disc is inserted The disc is not placed in the guide The disc is dirty Some features and functions are not available on all discs If th...

Page 71: ...the disc to the outer edge of the disc Never wipe in circular motions Discs should be stored in their cases after each use to avoid damage Do not expose discs to direct sunlight high humidity high tem...

Page 72: ...d single layer 8cm single sided single layer 8cm single sided dual layer 8cm double sided single layer COMPACT DISC VIDEO CD 12cm disc 8cm disc Video Output Level 1Vp p Audio Output Level 1Vrms 1 KHz...

Page 73: ...Memcorp Inc Weston FL Printed in Hong Kong Visit our website at www memorexelectronics com...

Reviews: