SECTION 2
TROUBLESHOOTING
9
Color Mixing Issues:
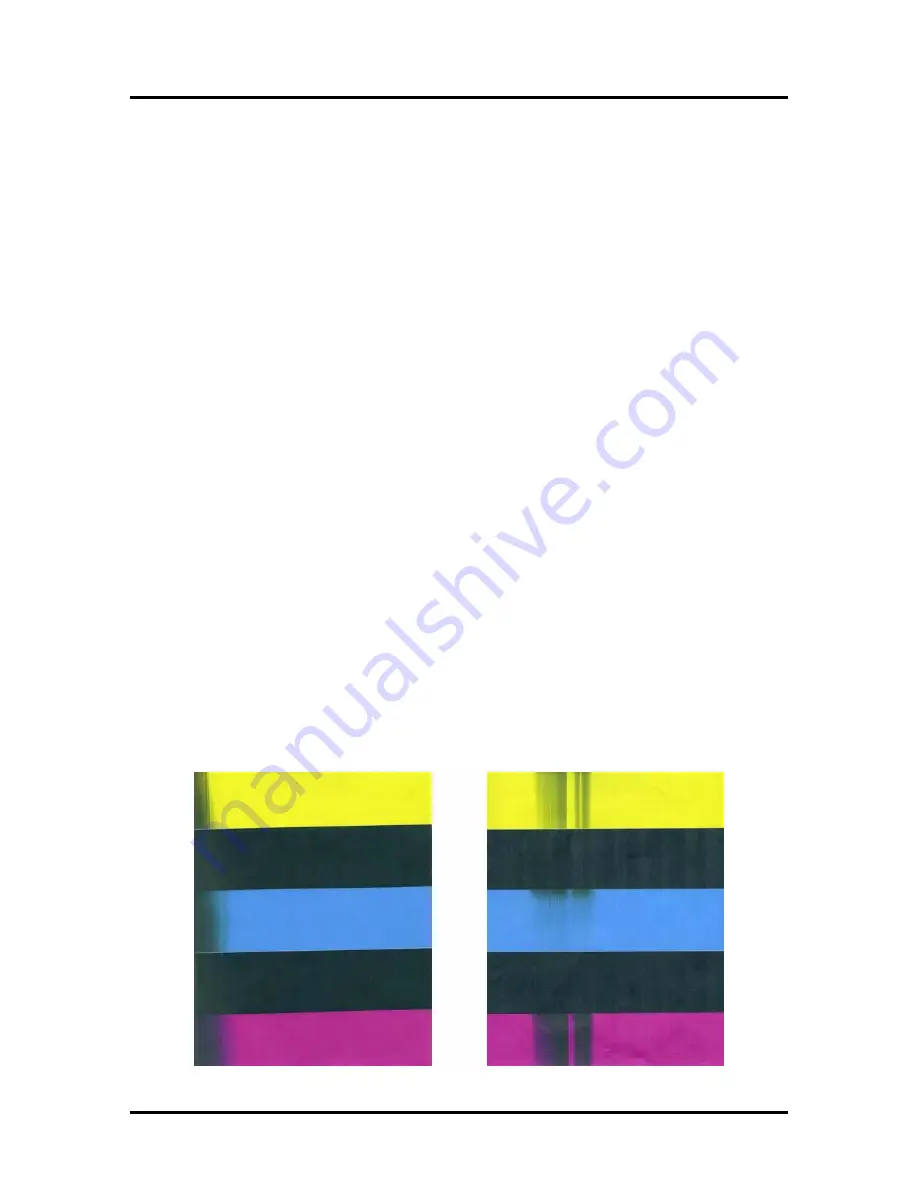
Color mixing will show as muddy, mottled or distorted (grainy) colors.
Color mixing occurs when the ink from one color channel crosses over into another color channel. Since
the inkjet nozzle rows are located very close to one another (ten rows of 7,040 nozzles, located within a 0.8
mm space), it is easy for partials or fibers to create bridges across color channels. These bridges allow ink
to flow (wick) from one color channel to another; resulting in a “localized” color mixing event; as shown in
the examples below.
Color mixing can occur for a number of reasons (here are some common ones)
•
Printhead Cartridge just installed. It is common to see some color mixing immediately after the
system is primed with ink.
•
Ink wicking due to fibers bridging (crossing) inkjet nozzles. This can also occur if media is left in
contact with the printhead (after a paper misfeed or jam).
•
Wiper roller saturation (too much ink on wiper roller). This can occur if the cleaning features
(Quick/Normal/Full Clean Printhead) are run too frequently. The printer needs time between
cleanings to desiderate the wiper roller.
•
Ink flooding on the nozzle plate; due to printer not being level.
•
Ink flooding on the nozzle plate; due to excessive back-pressure in the ink system.
•
Wiper Roller is not being cleaned properly by the system. This can also occur if there is a
problem with the squeegee blade in the Wiper Motor Assembly. The squeegee blade and
squeegee roller are responsible for removing ink and debris from the wiper roller.
Tip:
Muddy, mottled, distorted (grainy) colors can also be caused by the media you are printing onto.
Test the printer, using a compatible “inkjet suitable” media, to determine if this could be the cause.
Possible Solutions:
•
Remove media from under printhead.
•
Wipe printhead using a lint-free cloth, dampened with distilled water.
•
Perform a “Printhead Cartridge Conditioning” routine.
•
Allow the printer to sit, powered on, for 2-3 hours to give it time to clean/desaturate the wiper
roller.
•
Make sure printer is on a sturdy/level floor surface and the Print Engine is level.
•
Instead of powering the printer off, when not in use, leave the print engine powered-up; so it can
perform automatic maintenance routines. This also allows the pressures in the system to be
routinely equalized.
•
Inspect/clean the service station. If necessary; they may need to replace the wiper roller, wiper
motor assembly or Service Station.
Summary of Contents for AS-1180C
Page 75: ...SECTION 4 DISASSEMBLY AND ASSEMBLY 73 a J1002 Cable J1002 Socket Location Connection ...
Page 76: ...SECTION 4 DISASSEMBLY AND ASSEMBLY 74 b J1000 Cable J1000 Socket Location Connection ...
Page 77: ...SECTION 4 DISASSEMBLY AND ASSEMBLY 75 c J551 Cable J551 Socket Location Connection ...
Page 78: ...SECTION 4 DISASSEMBLY AND ASSEMBLY 76 d J703 Cable J703 Socket Location Connection ...
Page 79: ...SECTION 4 DISASSEMBLY AND ASSEMBLY 77 e P2002 Cable P2002 Socket Location Connection ...
Page 80: ...SECTION 4 DISASSEMBLY AND ASSEMBLY 78 f P2004 Cable P2004 Socket Location Connection ...
Page 81: ...SECTION 4 DISASSEMBLY AND ASSEMBLY 79 g P2006 Cable P2006 Socket Location Connection ...
Page 82: ...SECTION 4 DISASSEMBLY AND ASSEMBLY 80 h J35 Cable J35 Socket Location Connection ...
Page 83: ...SECTION 4 DISASSEMBLY AND ASSEMBLY 81 i P1 Cable P1 Socket Location Connection ...
Page 84: ...SECTION 4 DISASSEMBLY AND ASSEMBLY 82 j P2005 Cable P2005 Socket Location Connection ...
Page 85: ...SECTION 4 DISASSEMBLY AND ASSEMBLY 83 k P2003 Cable P2003 Socket Location Connection ...
Page 86: ...SECTION 4 DISASSEMBLY AND ASSEMBLY 84 l J20 Cable J20 Socket Location Connection ...
Page 87: ...SECTION 4 DISASSEMBLY AND ASSEMBLY 85 m J2001 Cable J2001 Socket Location Connection ...
Page 180: ......
Page 181: ...Copyright Neopost USA 2014 ...


