


Automatic Measurement (AVM-510A)
9-16
Sending Reports to a PC
To send measurement reports from the AVM-510A to a PC:
1.
Follow the procedures previously described in “Automatically Reporting Measurements.”
2.
Press the
Mesmnt
button.
3.
Select REPORT and then press the
Entr
button.
4.
Select ERROR REPORTING and then press the
Entr
button to select ON.
5.
Select REPORT SUSTAINED ERRORS and then turn the knob until it shows 1 Minute.
6.
Press the
Prev Mnu
button.
7.
Select SELECT SET and then then press the
Entr
button.
8.
Select SYSTEM VIDEO and then press the
Entr
button.
9.
Select SYS VIDEO LIMITS and then press the
Entr
button.
10.
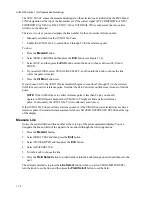
Select SYNC AMPL and then press the
Entr
button to place the cursor in the MIN column.
11.
Turn the knob clockwise until the reading is well above 40 IRE (300 mV). Press the
Clr Mnu
button, and then press the
Mesmnt
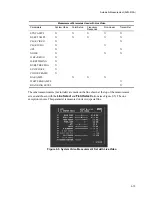
button to display the automeasure screen. An error should
appear in the SYNC AMPL line.
In approximately 20 seconds you should see on your PC screen a series of measurements with the title
“New Error.” Every minute after this you should see a new list of measurements with the title
“Sustained Error.” If, after 2 minutes, you do not see anything on the PC screen, something is set up
wrong between the AVM-510A and the PC. Check the cabling and all the settings in the AVM-510A
menus and the PC’s communications program.
Sending Reports to a Printer
To send measurement reports from the AVM-510A to a printer:
1.
Follow the procedures previously described in “Automatically Reporting Measurements.”
2.
Press the
Mesmnt
button.
3.
Select REPORT and then press the
Entr
button.
4.
Select ERROR REPORTING and then press the
Entr
button to select ON.
5.
Select REPORT SUSTAINED ERRORS and then turn the knob until it shows 1 Minute.
6.
Press the
Prev Mnu
button.
7.
Select SELECT SET and then then press the
Entr
button.
8.
Select SYSTEM VIDEO and then press the
Entr
button.
9.
Select SYS VIDEO LIMITS and then press the
Entr
button.
10.
Select SYNC AMPL and then press the
Entr
button to place the cursor in the MIN column.
11.
Turn the knob clockwise until the reading is well above 40 IRE (300 mV). Press the
Clr Mnu
button, and then press the
Mesmnt
button to display the automeasure screen. An error should
appear in the SYNC AMPL line.
Summary of Contents for MM-410
Page 16: ...About This Manual 1 4 Notes...
Page 34: ...Installation 4 6 Notes...
Page 48: ...Front Panel Operation 5 14 Notes...
Page 102: ...Viewing Waveforms Vectors and Pictures 7 30 Notes...
Page 126: ...Automatic Measurement AVM 510A 9 20 Notes...
Page 148: ...AVM 510A C For Component Measurements 12 4 Notes...
Page 158: ...Connector Pinouts B 4 Notes...
Page 162: ...Calibration D 2 Notes...