background image

7

If the battery cover sticks when sliding into the battery cover, apply a thin
film of petroleum jelly to the “O” rings on the battery holder.

IMPORTANT!

There are arrows molded into the bottom of the battery cover and battery
holder. Make certain the arrows are properly aligned! Otherwise, the bat-
tery holder won’t slide all the way into the cover and the battery pack
won’t slide onto the unit.

Slide the battery pack onto the unit and the GlobalMap Sport™ is ready
for use.

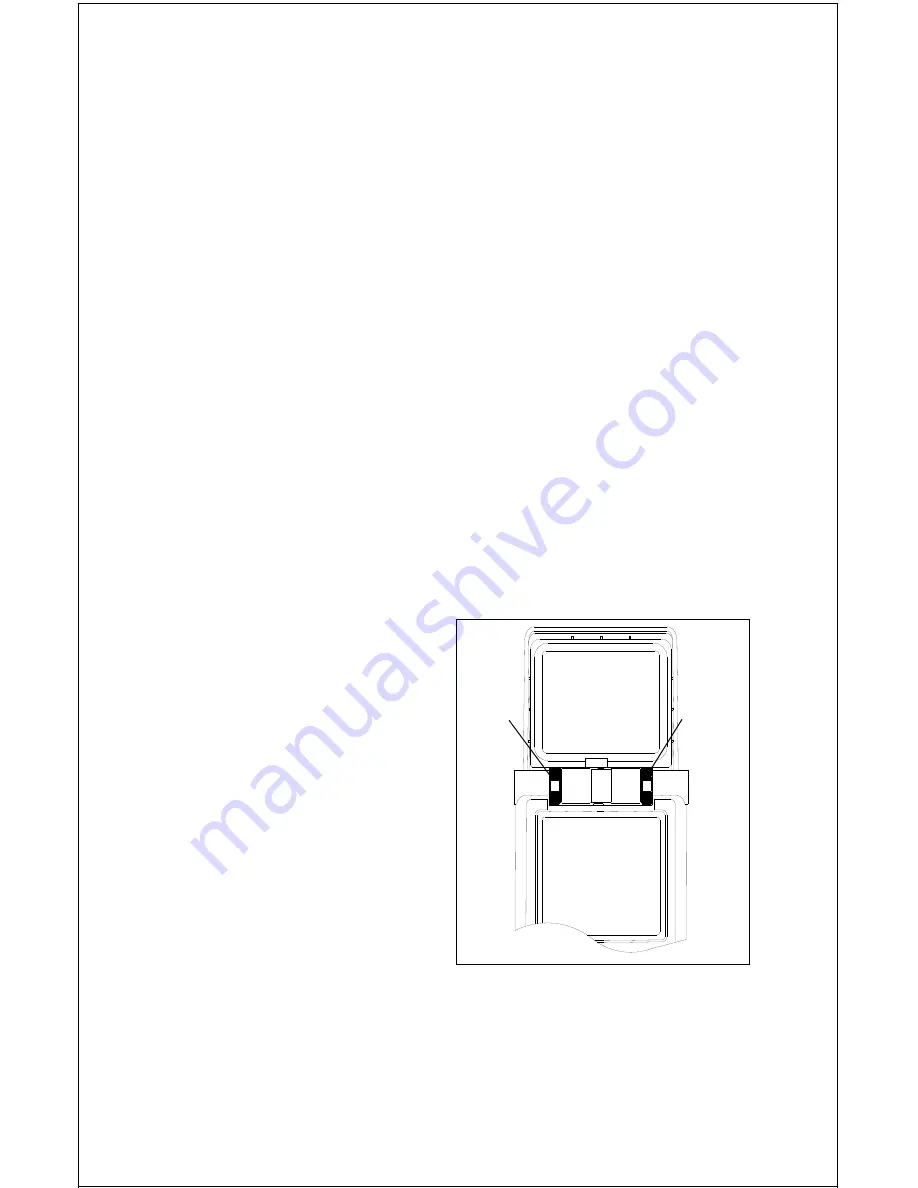
ANTENNA
The GlobalMap Sport™ has a re-
movable antenna that folds over the
display when the unit is not in use.
To open it, simply lift on an edge of
the antenna and raise it to the de-
sired height.

Two thumbscrews on the antenna’s
hinge let you adjust the tension on
the antenna. This helps keep the
antenna in the desired position. The
thumbscrews work in opposite direc-
tions. To tighten the right thumb-
screw, rotate it 

away

 from the dis-

play. To tighten the left thumbscrew,
rotate it 

toward

 the display.

Caution - Always make certain the left thumbwheel is tight when using
the GlobalMap Sport™. The connector for the antenna is inside the left
thumbwheel. If it isn’t tight, a poor connection can occur. This can prevent
the unit from operating properly, if at all.

EXTERNAL POWER
Instead of batteries, the GlobalMap Sport™ can operate on 6 to 35 volts
DC from an external power source. To use external power, an adapter
cable is supplied with your unit that will plug into your vehicle’s cigarette
lighter. To use this cable, simply plug one end into the GlobalMap Sport™
and the other end into the cigarette lighter. A rubber plug is supplied with
your GlobalMap Sport™ to cover the external power jack on the side of
the unit when it’s not in use.

LEFT

SCREW

RIGHT

SCREW

Summary of Contents for GlobalMap Sport

Page 1: ...1 INSTALLATION AND OPERATION INSTRUCTIONS GlobalMap Sport TM LOWRANCE ELECTRONICS INC 12000 E SKELLY DR TULSA OK 74128 ...

Page 2: ...gation sys tem use caution when using this product CAUTION When showing navigation data to a position waypoint this unit will show the shortest most direct path to the waypoint It provides navigation data to the waypoint regardless of obstructions Therefore the prudent naviga tor will not only take advantage of all available navigation tools when trav elling to a waypoint but will also visually ch...

Page 3: ...URRENT PLOTTRAIL 18 SAVE CURRENT PLOT TRAIL 18 SET PLOTTER UPDATE CRITERIA 19 MAP OPTIONS 19 TEXT LABELS 20 MAP BOUNDARIES 20 FILWITH GRAY 20 COURSE UP MODE 21 DETAIL CARTRIDGE 21 ICONS 22 PLACE ICON AT PRESENT POSITION 22 PLACE ICON AT CURSOR POSITION 23 ERASE ICONS 23 WINDOWS 24 SATELLITE INFORMATION SCREEN 24 STEERING SCREEN 25 DUAL MAPPING 26 CLOCK 26 CLOCK SET 26 CLOCK ALARM 27 TIMERS 28 REPR...

Page 4: ...T NAMES 44 WAYPOINT ICONS 45 DELETE AWAYPOINT 45 MOVE AWAYPOINT 46 DISTANCE BETWEENWAYPOINTS 46 NAVIGATETO A WAYPOINT 47 NAVIGATINGTO A WAYPOINT USINGTHE MAP 47 NAVIGATINGTO A WAYPOINT USINGTHE STEERING SCREEN 48 WAYPOINT OPTIONS 49 ROUTES 49 SELECTWAYPOINTS WAYPOINT LIST 50 SELECTWAYPOINTS FROM MAP 51 FINISHINGTHE ROUTE 51 FOLLOWING A ROUTE 52 WAYPOINT DETAIL 52 DELETE A ROUTE 53 NAVIGATETO CURSO...

Page 5: ...n a car however you may need to place the unit on the dash or have a friend hold it near the window so the antenna can pick up the signals The PA 1 remote antenna kit is available that lets you mount the antenna away from the unit Like most GPS receivers your GlobalMap Sport doesn t have a com pass or any other navigation aid built into it It relys solely on the signals from the satellites to dete...

Page 6: ...ones listed above Do not mix different types of batteries For example don t use both alkaline and ni cad batteries at the same time To install the batteries first turn the GlobalMap Sport so that it is fac ing you Now grasp the bottom part of the case and push it to the right until it comes completely off the unit The bottom part of the case holds the batteries Next push the battery holder out the...

Page 7: ...p the antenna in the desired position The thumbscrews work in opposite direc tions To tighten the right thumb screw rotate it away from the dis play To tighten the left thumbscrew rotate it toward the display Caution Always make certain the left thumbwheel is tight when using the GlobalMap Sport The connector for the antenna is inside the left thumbwheel If it isn t tight a poor connection can occ...

Page 8: ...umbwheel in the opposite direction from the left Tighten the thumbwheels to get the desired tension on the antenna Caution do not overtighten the thumbwheels ANTENNA ANGLE When using the GlobalMap Sport try to make certain the antenna is parallel with the ground or nearly so as shown below Since the signals from the satellites are line of sight a flat antenna gives you a better ability to receive ...

Page 9: ...cover most of the world with detailed views of coastal waters Over 500 cartridges are available The GlobalMap Sport can hold up to two map cartridges in any combi nation Two Lowrance IMS SmartMaps or two C Maps one of each or only one To install a cartridge into the GlobalMap Sport first make certain the unit is turned off Never install or remove a cartridge with the unit turned on You can damage ...

Page 10: ...to modify functions press the MENU key The Z OUT and Z IN keys zoom out and zoom in your view on the mapping screen The ENT and EXIT keys let you enter or erase selections The PWR key turns the GlobalMap Sport on and off Note To turn the unit off you must hold the PWR key down for a few seconds MODE MENU Z OUT Z IN ENT PWR EXIT WPT REMOVING A CARTRIDGE If you have difficulty removing a cartridge u...

Page 11: ...he GlobalMap Sport is turned on for the very first time it doesn t know where it is nor what the local time or date is If you tell it your posi tion time and date the unit will take much less time to lock on to the satellites and give you a fix or position However if you don t want to push buttons at this time that s fine The GlobalMap Sport will lock onto the satellites and give you a position wi...

Page 12: ...een press the MODE key to switch screens while it s searching If you switch to another screen you ll see numbers flashing on the display Anytime you see flashing numbers it means the GlobalMap Sport does not have a position Do not rely on any data that is flashing When the numbers stop flashing the unit has locked on to the satellites and the position is good That s all you have to do to find your...

Page 13: ...ge the position press the right arrow key while the EDIT LAT LON box is high lighted The screen shown below appears Using the down arrow key move the black box to the Initialize GPS Receiver menu then press the right arrow key The screen shown below appears If your latitude is south press the up or down arrow key to change it If it is north press the right arrow key to move the change box to the f...

Page 14: ...e numbers on the display Note Altitude will still flash until the unit locks on to the fourth satellite It takes four satellites to determine altitude It also sounds a tone letting you know that it has completed the search and is giving position data IMPORTANT If the data shown in digital numbers on any screen is flashing it means that data is invalid DO NOT RELY ON ANY NUMBERSTHAT ARE FLASH ING U...

Page 15: ...the EXIT key to erase the mode menu This screen is composed of eight digital display boxes showing your track TRK direction of travel ground speed GS and local time The other boxes show navigation data when a waypoint is recalled Although this is not a windows screen all of the digital boxes can be changed See the Reprogram Groups section for more information Mapping The GlobalMap Sport has a map ...

Page 16: ... and 4 as shown above have navigation data displayed using digital numbers Press the EXIT key to erase the mode menu The digital displays on map 4 can be rearranged or changed to other displays See the Reprogram Groups section for more information As you move the map slides past your present position which always remains at the center of the screen A line extends from your position showing the pat...

Page 17: ...out keys work from the cursor s position not the present position so you can zoom in on any detail anywhere while navigating The latitude longitude of the cursor shows in the box at the top of the screen whenever the cursor is activated To center the cursor on the map press both the Z IN and Z OUT keys at the same time Remove the cursor by simply pressing the EXIT key The GlobalMap Sport moves the...

Page 18: ...rent PlotTrail To erase the plot trail extending from your present position move the black box to the Clear Current PlotTrail menu then press the right arrow key A message box appears asking you if you really want to erase the plot trail Follow the directions on this message box The GlobalMap Sport returns to the mapping screen after the message box clears Save Current PlotTrail You can save up to...

Page 19: ...date to time only or distance only press the left arrow key until the black box is on the desired setting Change the update rate by moving the black box to the Plot Update Rate menu then press the left or right arrow keys until the desired time ap pears The distance update is changed in the same manner Move the black box to the Update Distance menu then press the left or right arrow keys until the...

Page 20: ...klahoma East Inland Mapping System cartridge FillWith Gray When the GlobalMap Sport is first turned on all water is filled with gray to distinguish it from land which is clear To make the land fill with gray and water remain clear press the down arrow key until the FillWith Gray menu is surrounded by the black box then press the left arrow key Press the EXIT key to return to the mapping screen FIL...

Page 21: ...the above example we re travelling southwest on Interstate 44 In the north up view the present position indicator appears to move towards the lower left corner of the display In the track up view the present position moves towards the top of the display A N shows to help you see which direction is north when the track up mode is on Note the track up mode does not work when the unit is zoomed in on...

Page 22: ... you must first turn the icons on To do this first press the MENU key then use the up or down arrow keys to move the black box to the ICON OP TIONS box Now press the right arrow key The screen shown at right appears The black box is on the Icon Symbols menu Press the right arrow key This turns the icons on Press the EXIT key to erase this menu and return to the mapping screen Place Icon Present Po...

Page 23: ... icons move the black box to the Delete All Icons menu then press the right arrow key A message appears asking you if you want to delete all icons Press the left arrow key to erase them The unit returns to the mapping screen with all icons deleted To remove only icons of a certain type move the black box on the Icon Options menu to the Delete Icons By Type label Press the right arrow key The icon ...

Page 24: ...oup shows in the background as you press the arrow keys When you see the group you want to use simply press the EXIT key to erase the mode menu SpecialWindows Although most of the windows used in the GlobalMap Sport are self explanatory there are several windows that have special features or can be used in unique ways The following section describes these windows Satellite Information Screen Group...

Page 25: ...een shows a pictorial view of your course and the dis tance to the side of the desired track to a waypoint You must recall a waypoint to use the steering screen Your present position is shown by a pointer near the center of the steering screen as shown in group O above It shows the direction you re head ing in relation to the waypoint If you keep the pointer aimed at the top of the display and cen...

Page 26: ...ns on one map without affecting the other When you press the menu zoom in or out or ent keys a message appears asking you which display you want to affect On the screen shown at right the menu key was pressed The unit wants to know which map you want to change Press the left arrow key for the left map the right arrow key for the right map The main menu then appears CLOCK Whenever a clock is showin...

Page 27: ...ress the MENU key then move the black box to the Clk Alm Set label Press the right arrow key A screen similar to the one below appears Using the right and left arrow keys move the black box to the first number in the time that you want to set Now press the up or down arrow keys until the desired number shows Continue until the time shown in the display is correct then press the ENT key The unit re...

Page 28: ...and left arrow keys move the black box to the first number in the time that you want to set The time is in hours minutes and seconds Now press the up or down ar row keys until the desired number shows Con tinue until the time shown in the display is cor rect then press the ENT key The unit returns to the navigation mapping or windows dis play To start the timer press the MENU key then move the bla...

Page 29: ...ong with it s description Continue pressing the right arrow key to see more windows When you re finished press the EXIT key To customize a group first switch to a windows group It doesn t have to be the group you want to customize Next press the MENU key then press the up or down arrow key until the Re program Groups menu is surrounded by the black box Press the right arrow key A screen similar to...

Page 30: ...m off press the PWR key again If the unit is operating from the battery pack it automatically turns the lights off after 30 seconds This helps conserve battery power The time is adjustable from 5 seconds to 240 seconds Press the PWR key to turn the lights on after the unit turns them off To change the backlight s delay time press the MENU key then press the up or down arrow keys until the Delay me...

Page 31: ...f the settings on this page When you re finished press the EXIT key Note See the following on the position format and UTM s Position Format To change the position format move the black box to the Position For mat label on the Units of Measure menu then press the right arrow key A screen similar to the one below appears The GlobalMap Sport can show the posi tion in degrees minutes and hundredths of...

Page 32: ... in the track up mode It always affects the navigational displays To turn the track holding feature off press the MENU key then move the black box to the GPS Corrections label and press the right arrow key The screen shown at right appears Press the left arrow key to turn track holding off Press the EXIT key to erase this menu DATUM Maps and charts are based on a survey of the area that s covered ...

Page 33: ...d only be used if your map indicates what the possible error is PCF should always be reset to zero when you re finished with the chart For example suppose you are stopped at a location that is accurately marked on a chart Your unit shows a longitude position that is 244 min utes east of the one on the chart and 047 minutes north latitude Using the PCF feature you can make the GlobalMap Sport match...

Page 34: ...until the System Info menu is surrounded by the black box Now press the right arrow key A screen similar to the one below appears Press the EXIT key when you re finished reading this screen GPS COMMANDS The GPS Commands menu has five sub menus that affect the GPS re ceiver From these menus you can turn the simulator on or off set the update rate initialize the GPS receiver do a self test on the re...

Page 35: ...black box over the desired rate 1 2 3 4 or 5 seconds Press the EXIT key to activate your selection Execute GPS SelfTest If you suspect a problem with the GPS receiver or just wish to test it move the black box on the GPS Commands menu to the Execute GPS Self Test label then press the right ar row key A screen similar to the one at right appears after several seconds Messages at the bottom of the d...

Page 36: ... when your track drifts too far to the right or left of the line to the waypoint For example if the alarm is set to 1 mile then the alarm will sound if you drift 1 of a mile or more to the right or left of the line to the waypoint The anchor alarm sounds a warning when you drift outside of a preset radius Again using the 1 mile as an example if you re anchored and the boat moves more than 1 of a m...

Page 37: ...en move the black box to the desired message and press the right arrow key to turn it on Press the EXIT key to erase this screen NMEA DGPS The GlobalMap Sport transmits data through the data port in the back of the unit using NMEA 0183 format version 1 5 or 2 0 This data is used by other electronic devices such as autopilots for position and steering information DGPS on the other hand is a data in...

Page 38: ...to the NMEA 0183 OUTPUT menu then press the right arrow key If your other equipment works then no setup will need to be performed If your other equipment doesn t recognize the NMEA data being sent by the GlobalMap Sport and the wiring is correct then you may need to change the NMEA or the serial communication settings NDC 1 TO GLOBALMAP SPORT OTHER DEVICE 12 VOLT BATTERY IF NEEDED SHIELDWIRE GROUN...

Page 39: ...erent sentence The GlobalMap Sport s default setting for these sentences is on In other words it automatically sends these sen tences when NMEA is turned on To turn any of these off move the black box to the desired menu and press the left arrow key Press the EXIT key when everything on this screen is the way you want it NDC 1TO GLOBALMAP SPORT DGPS RECEIVER 12 VOLT BATTERY IF NEEDED SHIELD WIRE G...

Page 40: ...ey A screen similar to the one at right appears These menus select the beacon receiver s fre quency and bit rate in bits per second If you are using a Starlink re ceiver turning the auto mode on causes the GlobalMap Sport to auto detect the frequency and bit rate To change one of these settings simply move the black box to the menu item you wish to change then press the right or left arrow key unt...

Page 41: ...ters you entered and start over if you need to Pressing the EXIT key erases this screen without accepting any input When the first name is correct press the ENT key Now enter your last name using the same method as shown above When it s the way you want it press the ENT key You I D is saved in permanent memory To see your I D see the System Information screen Your identification will be permanentl...

Page 42: ...t just used This also places you in the waypoint menu as shown below Anytime this menu is showing simply press theWPT key and the unit will store your present position in the waypoint list Wait a few seconds and the menu will clear auto matically or press the EXIT key to erase the waypoint menu SavingThe Cursor Position as a Waypoint When the cursor is showing on the map and you press the WPT key ...

Page 43: ...key until the black box is on the Save Position As label When you re at the location you wish to save press the right arrow key This saves your present position under the waypoint number you selected on the first page Saving Cursor Position as aWaypoint Select Number Method To save the cursor position under a specific waypoint number first posi tion the cursor at the desired position Then follow t...

Page 44: ...ow keys then press the up or down arrow keys until the desired number appears If you make a mistake simply move the black box back to the number you need to change and change it If you want to change the entire latitude number press theWPT key to erase it and start over To exit completely out of this screen without saving the position press the EXIT key When the latitude is the way you want it pre...

Page 45: ...erent icon first press the down arrow key until the black box is on the EDIT ICON label Now press the right arrow key The screen shown at right appears Press the arrow keys to move the black box to the desired icon then press the ENT key to assign it to your waypoint The unit returns to the waypoint screen Delete aWaypoint To remove all information from a waypoint first select the waypoint num ber...

Page 46: ...e moving the information FROM then you need to choose the waypoint number that you re going to move that information TO Move the black box back to the Select label at the top of the screen then press the right arrow key to se lect TO Now choose the waypoint number that you wish to move the information to Distance BetweenWaypoints The GlobalMap Sport can easily give you the distance between two way...

Page 47: ... measure at this time or press the EXIT key to erase this screen Navigate To a Waypoint Once you have waypoints stored in the GlobalMap Sport s memory you ll want to recall and navigate to them To do this press the WPT key then move the black box to the NAME or WPT label Now press the right or left arrow keys to select the desired waypoint In this example we re navigating to waypoint number 40 Onc...

Page 48: ...s represented by the arrow in the center of the window As long as the arrow is pointing towards the top center of the win dow you ll be on course for the recalled waypoint Numbers on the left side of the win dow show the remaining distance to the waypoint Numbers at the bottom of the window show the cross track error range This is the distance to the right or left of the desired track line In the ...

Page 49: ...ation informa tion to the first waypoint in the route then when you reach that waypoint it switches to the next waypoint and so on until you reach the last waypoint in the route To create a route first press theWPT key then move the black box to the Next Page label and press the right arrow key Now move the black box to the Route Planning label and press the right arrow key The screen shown at rig...

Page 50: ...heir date and time saved icon position dis tance and bearing from your present position show at the bottom of the screen When the desired waypoint appears that you want to use as the first waypoint on the route move the black box to the Add WPT To Route label then press the right arrow key The unit returns to the route planning screen with this waypoint at the top of the stack You can place a wayp...

Page 51: ... route list When it s there press the ENT key As you move the cursor a line moves with it This line shows you the path from the last waypoint on the list You can continue to save waypoints on the map by moving the cursor and pressing the ENT key to save the location When you re done a line connects all the waypoints on the route graphically showing you a diagram of your route When you re fin ished...

Page 52: ...the Start at NO 01 label then pressing the left or right arrow keys to change the starting waypoint number As you change the number the START label moves down the list of waypoints in the lower half of the screen When you have everything on this screen set as desired press the ENT key to start the GlobalMap Sport navigating to the first waypoint on the route As you travel to the first waypoint the...

Page 53: ...rsor Now move the cursor to the desired location on the map that you want to navigate to Now press the MENU key then move the black box to the Go To Cursor label Press the right arrow key A mes sage appears on the screen When it disap pears you ll see that the GlobalMap Sport is navigating to the cursor position Press the EXIT key to erase the cursor Delete a Route To erase a route from the Global...

Page 54: ...at right appears on the display When the battery voltage drops below a certain level the unit automatically turns itself off A mes sage shows on the screen about a minute be fore it shuts down When switching from external power to the batteries a tone sounds which alerts you to the fact that you re now on battery power Store your unit with the battery pack attached Do not remove the batter ies Thi...

Page 55: ...GPS is the latest in high tech navigation systems Conceived by the United States military the GPS system is an answer to their need of a highly accurate 24 hour 365 day a year global positioning system Basically the system works by using a constellation of satellites orbiting Earth 11 000 miles in space As of this writing there are 25 satellites in orbit Before satellites reach the end of their li...

Page 56: ...ne Theoretically C A code can give accurate position fixes of up to 15 meters However as of this writing the military isn t satisfied with C A s potential accuracy in the hands of the world So it uses Selective Availability S A to degrade the accuracy further S A is small random errors intentionally added to the system so your accuracy will typically be within 100 meters of your true position Of c...

Page 57: ...R REFUND AS JUST DESCRIBED IS THE EXCLUSIVE REMEDY AVAILABLE TO YOU AGAINST US FOR ANY DEFECT MALFUNCTION OR NON CON FORMITY CONCERNING THE PRODUCT OR FOR ANY LOSS OR DAMAGE RESULT ING FROM ANY OTHER CAUSE WHATSOEVER WE WILL NOT UNDER ANY CIR CUMSTANCES BE LIABLE TO ANYONE FOR ANY SPECIAL CONSEQUENTIAL INCI DENTAL OR OTHER INDIRECT DAMAGE OF ANY KIND Some states do not allow the exclusion or limit...

Page 58: ...m you re having with the unit Please include your name address and daytime telephone number 4 Please include payment for non warranty repairs Check money order Visa or MasterCard may be used 5 Fill in your name address zip code date and RA number in the blanks provided on the UPS form included with your unit 6 Attach the label to the shipping box tear off the tab for your receipt and give the pack...

Page 59: ...ler Most quality dealers that handle marine elec tronic equipment should be able to assist you with these items Consult your local telephone directory for listings 2 LEI Extras Inc P O Box 129 Catoosa OK 74015 0129 or call 800 324 0045 USA orders only Lowrance Electronics may find it necessary to change or end our ship ping policies regulations and special offers at any time We reserve the right t...

Page 60: ...rief note with the product describing the problem Be sure to include your name return shipping address and a daytime telephone number How to Obtain Service International Customers Only Except Canada If you need service or repairs contact the dealer in the country you purchased your unit WARRANTY REPAIR WILL BE HONORED ONL Y IN THE COUNTRY UNITWAS PURCHASED Please follow the shipping instructions s...

Page 61: ...ed with the unit at the factory There is a 180 day warranty on all non warranty repairs from the factory which is similar to the original warranty but is for 180 days rather than one year For further details please call us at the above number On factory repairs we guarantee your unit will be repaired in three work ing days from the time it is received This does not include shipping time If for som...

Reviews: