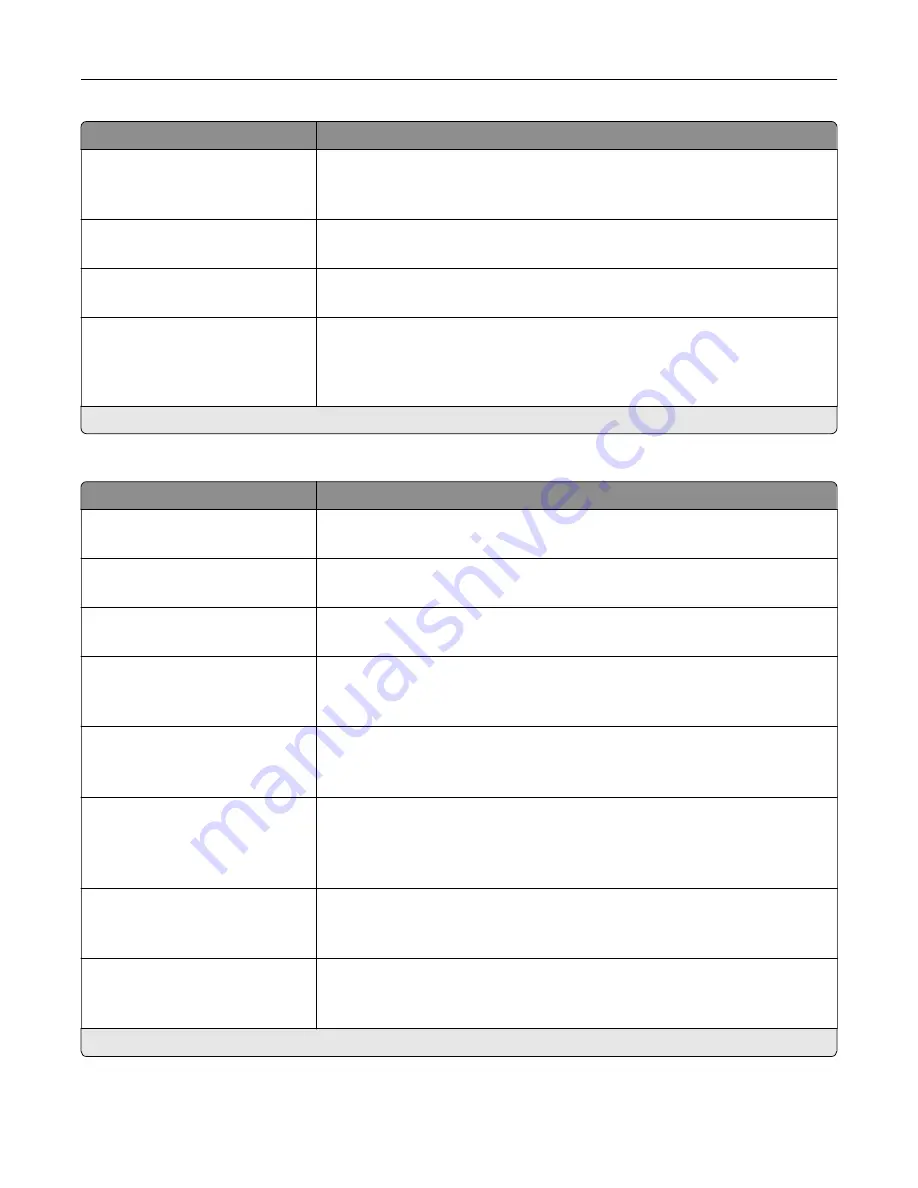
Menu item
Description
Scan Edge to Edge
Off*
On
Allow edge
‑
to
‑
edge scanning of the original document.
Sharpness
1–5 (3*)
Adjust the sharpness of a scanned image.
Temperature
‑
4 to 4 (0*)
Specify whether to generate a cooler or warmer output.
Blank Pages
Blank Page Removal (Do Not
Remove*)
Blank Page Sensitivity (5*)
Specify whether to include blank pages.
Note:
An asterisk (*) next to a value indicates the factory default setting.
Admin Controls
Menu item
Description
Text Default
5–95 (75*)
Set the quality of text on a scanned image.
Text/Photo Default
5–95 (75*)
Set the quality of text or photo image on a scanned image.
Photo Default
5–95 (50*)
Set the quality of a photo image on a scanned image.
Use Multi
‑
Page TIFF
On*
Off
Choose between single- and multiple
‑
page TIFF files.
TIFF Compression
LZW*
JPEG
Set a compression option for TIFF files.
Transmission Log
Print Log*
Do Not Print Log
Print Only For Error
Print a log for successful FTP scan transmission.
Log Paper Source
Tray [x] (1*)
Multipurpose Feeder
Specify the paper source for printing FTP logs.
Log Output Bin
Standard Bin*
Bin [x]
Specify the output bin for printed FTP logs.
Note:
An asterisk (*) next to a value indicates the factory default setting.
Understanding the printer menus
132
Summary of Contents for XC9225
Page 168: ... Scanner glass Scanner glass pad 3 Close the scanner cover Maintaining the printer 168 ...
Page 176: ...5 Insert the new toner cartridge 6 Remove the waste toner bottle Maintaining the printer 176 ...
Page 181: ...8 Insert the waste toner bottle and then close the door Maintaining the printer 181 ...
Page 211: ... Below the fuser area Duplex area Clearing jams 211 ...
Page 216: ...2 Open door J Clearing jams 216 ...
Page 218: ... Areas H1 and H2 Area H6 Clearing jams 218 ...
Page 222: ...2 Remove the staple cartridge holder 3 Remove the loose staples Clearing jams 222 ...
Page 224: ...2 Remove the staple cartridge holder 3 Remove the loose staples Clearing jams 224 ...
Page 226: ...2 Remove the staple cartridge holder 3 Remove the loose staples Clearing jams 226 ...
Page 280: ...6 Remove the controller board shield Upgrading and migrating 280 ...
Page 283: ...4 Remove the controller board shield Upgrading and migrating 283 ...
Page 289: ...7 Connect the tray connector to the printer 8 Open trays 2 and 3 Upgrading and migrating 289 ...
Page 294: ...9 Remove the stabilizing feet from the tray Upgrading and migrating 294 ...
Page 298: ...17 Secure the tray cable with the clamp Upgrading and migrating 298 ...
Page 305: ...7 Remove the paper guides 8 Attach the sensor cover Upgrading and migrating 305 ...
Page 311: ...8 Attach the finisher to the printer Upgrading and migrating 311 ...


