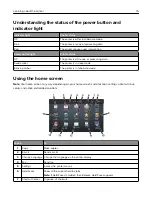
Touch
To
8
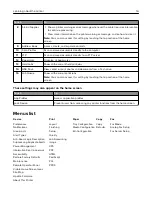
Status/Supplies
•
Show a printer warning or error message whenever the printer requires intervention
to continue processing.
•
View more information on the printer warning or message, and on how to clear it.
Note:
You can also access this setting by touching the top section of the home
screen.
9
Address Book
Access, create, and organize contacts.
10
Scan Profiles
Scan and save documents directly to the computer.
11
FTP
Scan and save documents directly to an FTP server.
12
Bookmarks
Organize all bookmarks.
13
Held Jobs
Show all the current held print jobs
14
USB Drive
View, select, or print photos and documents from a flash drive.
15
Job Queue
Show all the current print jobs.
Note:
You can also access this setting by touching the top section of the home
screen.
These settings may also appear on the home screen
Touch
To
App Profiles
Access application profiles.
Lock Device
Prevent users from accessing any printer functions from the home screen.
Menus list
Device
Paper
Copy
Fax
Preferences
Notifications
Group Lists
Alert Types
Anti
‑
Spam Logic Description
Suppressing Duplicate Alerts
Power Management
Information Sent to Lexmark
Accessibility
Restore Factory Defaults
Maintenance
Remote Operator Panel
Visible Home Screen Icons
Site Map
Update Firmware
About This Printer
Layout
Finishing
Setup
Quality
Job Accounting
Image
XPS
HTML
PostScript
PCL
PPDS
Tray Configuration
Media Configuration
Bin Configuration
Copy
Defaults
Fax Mode
Analog Fax Setup
Fax Server Setup
Learning about the printer
16
Summary of Contents for XC6100 Series
Page 1: ...XC6100 Series User s Guide January 2016 www lexmark com Machine type s 7563 Model s 196 197 ...
Page 66: ...2 Open door A 3 Remove the waste toner bottle Maintaining the printer 66 ...
Page 69: ...2 Open door A 3 Remove the waste toner bottle Maintaining the printer 69 ...
Page 73: ...3 Remove the pick roller 4 Unpack the new pick roller Maintaining the printer 73 ...
Page 92: ...2 Open door G 3 Pull out the staple cartridge holder Maintaining the printer 92 ...
Page 111: ...2 Open door G 3 Pull out the staple cartridge holder Clearing jams 111 ...
Page 162: ...4 Remove the paper bail 5 Remove the standard bin insert Upgrading and migrating 162 ...


