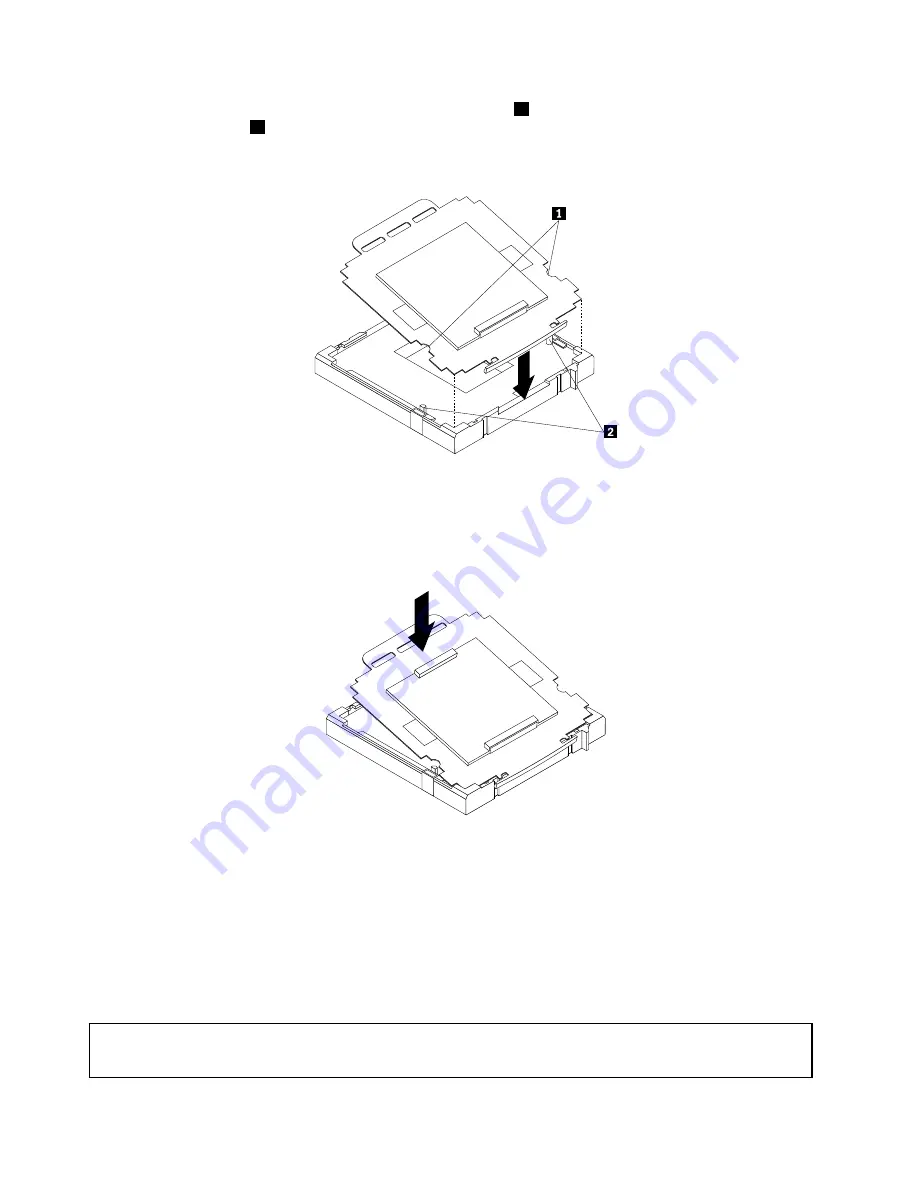
3. Note the orientation of the socket cover. Align the notches
1
of the microprocessor socket cover with
the alignment keys
2
of the microprocessor socket.
4. Install one side of the socket cover into the microprocessor socket as shown.
Figure 87. Installing the socket cover
Note:
Your microprocessor socket and cover might look slightly different from the illustration.
5. Carefully press the other side of the socket cover downwards until the socket cover snaps into place.
Figure 88. Securing the socket cover
6. Carefully check the four corners of the socket cover to make sure that the cover is secured in the
microprocessor socket.
7. Close the microprocessor retainer and then lower the lever to secure the retainer. Ensure that the
lever is locked into position.
8. Follow any additional instructions included with the replacement part you received.
Replacing the system fan assembly
Attention:
Do not open your computer or attempt any repair before reading and understanding “Important safety information”
on page 1.
146
ThinkCentre Edge Hardware Maintenance Manual
Summary of Contents for 3376
Page 1: ...ThinkCentre Edge Hardware Maintenance Manual Machine Types 3376 3377 3378 3386 3387 and 3388 ...
Page 6: ...2 ThinkCentre Edge Hardware Maintenance Manual ...
Page 13: ...Chapter 2 Safety information 9 ...
Page 17: ...Chapter 2 Safety information 13 ...
Page 18: ...1 2 14 ThinkCentre Edge Hardware Maintenance Manual ...
Page 19: ...1 2 Chapter 2 Safety information 15 ...
Page 24: ...1 2 20 ThinkCentre Edge Hardware Maintenance Manual ...
Page 25: ...1 2 Chapter 2 Safety information 21 ...
Page 28: ...24 ThinkCentre Edge Hardware Maintenance Manual ...
Page 32: ...28 ThinkCentre Edge Hardware Maintenance Manual ...
Page 58: ...54 ThinkCentre Edge Hardware Maintenance Manual ...
Page 122: ...118 ThinkCentre Edge Hardware Maintenance Manual ...
Page 164: ...160 ThinkCentre Edge Hardware Maintenance Manual ...
Page 173: ......


