background image


iNEX User Manual 

Page 

17 Rev 

2


3.4


 Basic 

Menu 

Layout 


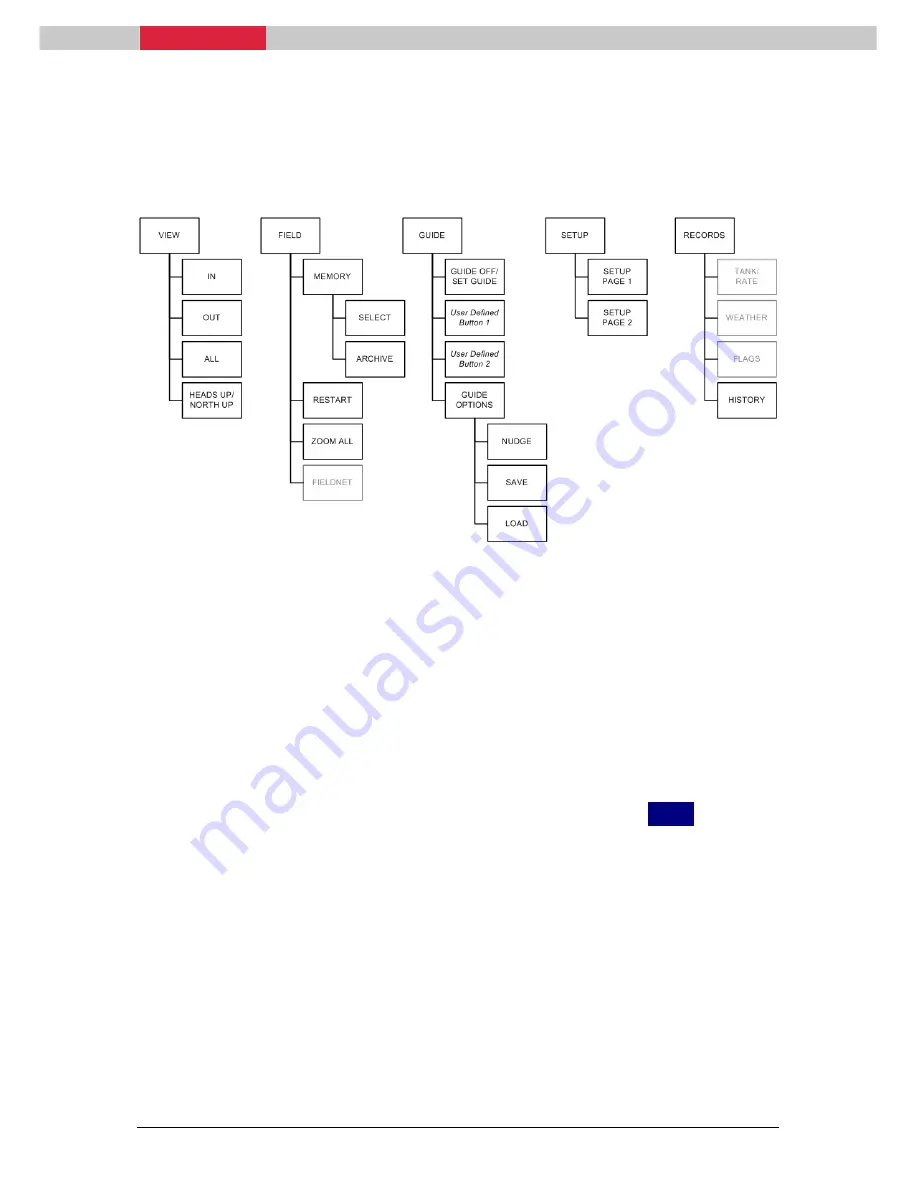
The iNEX is operated and configured by a menu system.  The menus are 
accessed by touching the appropriate part of the screen. 

Touching any one of the menu buttons will either activate the function 
associated with the button or lead to a sub-menu.  A sub-menu is similar 
to the main menu whereby touching the button may either activate a 
function or lead to a further sub-menu. 

This manual refers to the Main menu as that which is shown when the 
system is first started.   

A useful rule of thumb is that if the menu does not show a 

BACK

 button 

then the system is at the Main menu. 

One of the integral philosophies of the iNEX is that regardless of the 
software options purchased the menu system should be essentially the 
same.  This is to ensure that as users’ requirements are expanded there is 
a common structure and immediate recognition of the menu layout. 

Consequently some of the buttons will have no effect in particular 
configurations.  In these cases the button colour is grey indicating to the 
user that the button is not available or has no effect. 

Summary of Contents for iNEX

Page 1: ...User Manual Mapping Guidance Display...

Page 2: ...use of the information contained herein Further this publication and features described herein are subject to change without notice Use of this system is strictly limited to providing steering assist...

Page 3: ...isplay Part number 1 1345 Revision 2 Publication Date March 2009 Copyright 2009 Leica Geosystems Pty Ltd All rights reserved Acknowledgements Windows XP is registered to Microsoft Corp Other products...

Page 4: ...rting the iNEX 11 3 2 Shutting the iNEX Down 12 3 3 Screen Layout 13 3 4 Basic Menu Layout 17 3 5 Creating A Basic Vehicle 18 3 6 Treating A Field 25 4 Guidance 29 4 1 Different Types Of Guidance Avai...

Page 5: ...te Support 77 9 3 Upgrading Software Remotely 78 10 AutoSPRAY 79 10 1 Setting Up AutoSPRAY 79 10 2 Calibrating AutoSPRAY 80 10 3 Using AutoSPRAY 84 11 FieldNET 86 11 1 Configuring the System for Field...

Page 6: ...4 International Limited Warranty Software Licence Agreement 107 15 Appendix 109 15 1 Equipment Measurement Examples 109 15 2 Setting the FieldNET Radio Group ID 122 15 3 GPS Receiver Settings 123 15 4...

Page 7: ...iNEX User Manual Page vi Rev 2...

Page 8: ...X is a robust single body computer system manufactured specifically for use in agriculture It incorporates an intelligent power system which protects the computer from abnormal input power often found...

Page 9: ...Up Press repeatedly to turn iNEX Display backlight brightness down or up Remote Buttons 1 To 4 Four separate buttons which can be assigned shortcut functions from within the system Speaker Emits sound...

Page 10: ...such as steering or rate controllers Port B yellow Serial connection for GPS receivers or mojoRTK Also used for 3rd party devices when CANbus used for GPS source Remote Master Switch brown Detects 12...

Page 11: ...ects to a clean 12 volt power source such as directly to a battery Black Wire negative ground Connects to the vehicle s earth 1 2 4 AS310 Optional Component The AS310 is an optional component which is...

Page 12: ...ll responsibility for any incorrect information in the iNEX Installation Manual The following instructions are to be used as a general guide during the installation of the iNEX For more specific instr...

Page 13: ...e the RAM mount ball is to be mounted on the vehicle Note There are a number of different RAM mounts available including clamp on brackets which may simplify the installation RAM mount arms are also a...

Page 14: ...cting to a 24 volt DC or a positive to earth system will cause damage which is not covered by warranty Do not connect the power cable to only one battery of a 24 volt system as this may cause damage t...

Page 15: ...ered 3 If using serial NMEA GPS or a mojoRTK connect the device to Port B yellow cable on the vehicle cable using the appropriate serial cable 4 If using a CANbus NMEA2000 GPS connect the device to th...

Page 16: ...n configuring the system to use the Remote Master Switch as the master switch source Note The iNEX will detect 12 volt positive as the master switch being on and no power as the master switch being of...

Page 17: ...rate controllers and other section control equipment 1 Mount the AS310 in a suitable out of the way location 2 Connect Port C on the iNEX Vehicle Cable to the Data Port on the AS310 The connectors ma...

Page 18: ...ing the power button on the top of the iNEX Display Vehicle ignition using the optional 3 wire power cable Part 1 2406 3 1 1 Using the Power button Using the standard 2 wire power cable Part 1 2408 th...

Page 19: ...ignition key is turned OFF No user intervention is required Note Do not turn the iNEX off by disconnecting cables Shutting down the system in this way may cause the loss of important information Note...

Page 20: ...escribed in the following pages 3 3 1 Menu Buttons The Menu Buttons are the main controls for the operator Pressing the buttons will cause another menu to appear or an action to occur such as starting...

Page 21: ...tatus The Master Switch Status is the green triangle at the bottom of the Virtual Road Window When the master switch is OFF the triangle will be shown as a green outline and equally when the master sw...

Page 22: ...ovide access to the AutoSPRAY override menu 3 3 7 GPS Status The GPS Status displays the health of the GPS position information When the system is operating normally a continually scrolling satellite...

Page 23: ...ependant upon the options configured on the system Note Pressing on the Status Bar will advance the display to the next Status Message Which Status Messages are to be displayed can be configured in Di...

Page 24: ...he Main menu as that which is shown when the system is first started A useful rule of thumb is that if the menu does not show a BACK button then the system is at the Main menu One of the integral phil...

Page 25: ...calculations it is imperative that the measurements of the vehicle and GPS antenna are accurately recorded The iNEX uses specific terminology to describe the parts of plant and equipment which make u...

Page 26: ...e Equipment Type by repeatedly pressing the Equipment Type button If unsure of which equipment type would best suit your vehicle check the examples in Appendix 15 1 Equipment Measurement Examples 6 Pr...

Page 27: ...ent items to form a Rig the iNEX can accurately model the movements of the vehicle and the treatment being applied 1 Press SELECT EQUIPMENT 2 Define the number of equipment items in the Rig by pressin...

Page 28: ...ank on the rig and hence how much product needs to be loaded or mixed when completely filling the tank 1 On the Edit Rig screen see 3 5 2 Define Rig Details press TANK SETTINGS 2 Press on the Tank Siz...

Page 29: ...d treatment the iNEX has a Master Switch and Section Switches These switches can be triggered by touching the screen or sensing the state from external hardware 3 5 3 1 Master Switch By default the sy...

Page 30: ...Switch Sense Dipole Similar to Sense the Sense Dipole setting can be used to sense an existing master switch in a vehicle In this case Sense Dipole will sense a switch which operates by reversing the...

Page 31: ...e all of the sections will be set to ON causing the treatment to always be recorded as a full swath width External When configured for External the Section state will be updated from a compatible flow...

Page 32: ...PS receiver the scrolling satellite will be replaced with either a blank square or an alert icon Pressing on the GPS Status will display a screen with more information from the GPS receiver such as st...

Page 33: ...there is previous treatment in the memory slot it will be cleared from the screen and the new vehicle swath width will be configured 3 6 3 Recording Treatment By default the iNEX will be setup to rec...

Page 34: ...ng steps assume the defaults have not been changed See section 4 2 Selecting Active Guidance Types for steps on changing the Guidance types displayed on the Guide menu 1 Position the vehicle along a f...

Page 35: ...the red line representing the centre of the road and the guideline the optimum path to follow Note The Guide menu can be customised to display the two most frequently used Guidance types in place of...

Page 36: ...fferent Guidance types have been developed Parallel Perfectly straight lines parallel to each other separated by the defined vehicle swath width A parallel line is defined by marking two points in the...

Page 37: ...r Manual Page 30 Rev 2 RePLAY RePLAY will provide guidance along the path of a previous treatment After loading an archived treatment as a RePLAY file guidance will be provided along the nearest previ...

Page 38: ...s off from within the Guide menu 1 From the Main menu press GUIDE 2 Ensure Guidance is OFF If required press the GUIDE OFF button 3 Press SET GUIDE 4 Select the desired Guidance type to be on Button1...

Page 39: ...ther large black dot is marked on the screen indicating the B Point 4 Press PARALLEL a third time to activate Guidance The Map Screen shows a red line which passes though the A B Points The Virtual Ro...

Page 40: ...ction in which the guideline will be created 4 Press A HEAD a second time to activate the guideline The Map Screen shows a red line which passes though the two points The Virtual Road Window shows the...

Page 41: ...reatment is shown on the Map Screen The Virtual Road Window shows the path to be followed by the operator Note The ADAPTIVE button can be pressed at any time to put the system into ADAPTIVE Guidance m...

Page 42: ...ss PIVOT A large black dot is marked on the screen to indicate the A Point 3 Drive partially around the circle and press PIVOT Another large black dot is marked on the screen indicating the B Point 4...

Page 43: ...not essential to space these points as evenly around the circle as possible to maximise accuracy in the key guideline Note A new Pivot guideline can be created by pressing the PIVOT button when Pivot...

Page 44: ...uidance Types 4 3 5 1 Generating a RePLAY File Before a RePLAY file can be created a treatment must have been completed and Archived See section 5 2 2 Archiving a Field 1 From the Main menu press RECO...

Page 45: ...Road Window shows the path to be followed by the operator 2 To follow the guideline simply drive to any track and the Guidance automatically jumps to that guideline No other action is required by the...

Page 46: ...atment width 1 From the Main menu press SETUP 2 Press MORE 3 Press GUIDE OPTIONS 4 Press the Guide Overlap value button 5 Enter the desired amount and press TICK 4 4 2 Defining A Guide Offset A Guide...

Page 47: ...ment swath on the right first If no previous treatment swath is found the left is searched This setting is typically used when usually travelling anti clockwise around a paddock and sometimes changing...

Page 48: ...om the Main menu press GUIDE 2 If Guidance is not active press the required Guidance button to start the relevant Guidance and position the vehicle on top of a previous pass in the field 3 Press OPTIO...

Page 49: ...elevant Guidance button 3 Press OPTIONS 4 Press SAVE 5 Enter a name for the guideline and press TICK 4 5 2 Loading a Guideline To load a guideline the same Guidance type should first be selected as an...

Page 50: ...the Main menu press GUIDE 2 Press OPTIONS 3 Press LOAD 4 Select the guideline to be renamed and press EDIT 5 Enter a new name and press TICK 4 5 4 Deleting a Guideline Unwanted guidelines can easily...

Page 51: ...uideline first select it from the list then press TRANSFER There is no need to select a guideline first if transferring all lines 6 Choose to either transfer Selected or All guidelines by pressing on...

Page 52: ...ds The Field Memory can be thought of as nine separate memory slots While the system is being used treatment is being stored in the current memory slot Each memory slot is labelled M1 through to M9 By...

Page 53: ...mory slot with the partly completed treatment by pressing on the relevant square 4 Press SELECT 5 Press BACK 5 1 3 Clearing a Suspended Field From time to time a field may be suspended but is no longe...

Page 54: ...d that a new season is created with each new cropping season or on an annual basis When a new season is created all partially completed fields should be Archived see section 5 2 2 Archiving a Field or...

Page 55: ...ss ARCHIVE 5 Select the field name from the list and press SELECT Note When selecting the field name if it is not already in the list a new field name can be added by pressing the NEW button Note When...

Page 56: ...ss HISTORY 3 Select the treatment from the list which is to be viewed and press DETAILS 5 2 4 Un Archiving a Field It may be necessary to load a treatment from the Field History back into a memory slo...

Page 57: ...6 Importing Archived Fields Fields which have been archived and exported from another iNEX can be imported using the same process as importing Advanced Data Records planning and field information fro...

Page 58: ...n be deleted When deleting a whole season the operator is given an option to delete all information for the season or keep a summary Choosing to keep a summary will retain the basic information about...

Page 59: ...Weather Recording and the option to store treatment records by Client and Farm Name 6 1 Adding a New Client Farm When the Advanced Data Recording option has been purchased the iNEX can store treatmen...

Page 60: ...rm name by pressing on it in the list then press SELECT 6 3 AutoFIELD AutoFIELD is automatically enabled when the Advanced Data Recording option is purchased AutoFIELD automatically selects the curren...

Page 61: ...s to be created 1 Start a new field see 3 6 2 Starting A New Field 2 An outside perimeter will automatically be created when a treatment is recorded and the end point is within twice the vehicle swath...

Page 62: ...Manage Treatments When field boundaries have been created the iNEX will use these to determine which field the vehicle is currently in and in turn automatically load the appropriate Memory slot When l...

Page 63: ...stick generally suits larger farms where treatment plans are made ahead of time using PlanIT The operator can then load the plan to determine the products with which to fill the tank 6 4 1 Recording...

Page 64: ...uct if required see 6 4 2 Creating a New Product and press SELECT 12 Set the product application rate by pressing on the Rate button or set the amount of product being added to the tank by pressing on...

Page 65: ...the tank 18 When complete press ACCEPT to return to the Map Screen and begin work The tank volume recorded on the iNEX will run down at a similar rate to the real tank volume on the vehicle When the...

Page 66: ...eps in 6 4 1 Recording Products Applied or 6 4 3 Adding a Product Batch to reach the Select Product screen 2 Select the type of product by pressing the appropriate tab 3 Press NEW 4 To set any require...

Page 67: ...product when the field is archived 1 From the Main Menu press RECORDS 2 Press TANK 3 Press STORE 4 Select the type of product by pressing the appropriate tab 5 Press ADD 6 Press the Product button an...

Page 68: ...e field 1 From the Main Menu press RECORDS 2 Press WEATHER 3 Press NEW 4 Press WIND Enter wind speed value and the wind direction and press TICK 5 Press OTHER Enter the temperature humidity and cloud...

Page 69: ...dvanced Data Records option has been purchased four different flag shapes are available to use Once flags have been marked on the screen they are stored with the treatment which can be later transferr...

Page 70: ...driver to log into the iNEX has the added advantage of recording the driver name with the treatment information which can then be viewed in the History 6 7 1 Adding a Driver Depending on the level of...

Page 71: ...out Security Levels Each driver User Level being High Medium or Low determines how much access the operator will have to the system Low is typically used for temporary operators who have little knowle...

Page 72: ...he password entry screen Upon entering the supplied password all features purchased with the original system will be enabled When any additional features are purchased it will be necessary to enter a...

Page 73: ...om the Main menu press SETUP 2 Press MORE 3 Press GPS SETUP 4 Press the Connection Type button repeatedly until the desired setting is displayed 5 If connection type is serial press the GPS Baud butto...

Page 74: ...s been set to operate in an unknown language these steps can be followed without being able to read the on screen language 1 Turn the iNEX on and wait for it to display the Main menu 2 Press SETUP But...

Page 75: ...hat north is always at the top of the screen and the vehicle will move around the screen for example heading down the screen when travelling south When in North Up mode the treatment map will display...

Page 76: ...or EXIT SETUP 7 4 3 Setting Up a Map Grid The iNEX can be configured to display a grid along with the treatment on the Map Screen The grid size can be defined by the operator to help provide a percep...

Page 77: ...s the Position Units button repeatedly until the desired setting is displayed 7 4 5 Select Status Bar Details The Status Bar displays information about the current treatment and connected devices The...

Page 78: ...of the Display The fifth remote button labelled Remote Input can be connected to detect any momentary switch See the iNEX Installation Manual Part No 1 1296 for further instruction 1 From the Main me...

Page 79: ...gh the onboard speaker The options enabled will determine which alarms or warnings can be configured 1 From the Main menu press SETUP 2 Press MORE 3 Press SOUNDS 4 Press the volume button repeatedly u...

Page 80: ...1 Configuring AutoSTEER 8 1 1 Set Up the Vehicle Once the AutoSTEER feature has been enabled the steer controller needs to be selected and AutoSTEER turned ON 1 Configure the Steer Controller setting...

Page 81: ...stationary or too far from the guideline the AutoSTEER Status button will be RED to indicate Not Ready status Pressing the AutoSTEER Status Button when Not Ready status is active will do nothing When...

Page 82: ...E to indicate Ready status Pressing the AutoSTEER Status button in this state will engage the steering Alternatively a Remote Button can be configured to engage the steering See section 7 5 Configurin...

Page 83: ...erator to request support or to perform remote software upgrades 9 1 Connecting to Virtual WrenchTM In order to connect to the Virtual WrenchTM service the iNEX must be connected to a powered mojoRTK...

Page 84: ...atively the operator may manually disconnect 1 Press the GPS Status button 2 Press OPTIONS 3 Press DISCONNECT 9 2 Requesting Remote Support Once connected to the Virtual WrenchTM service Remote Suppor...

Page 85: ...the GPS Status button 2 Press OPTIONS 3 Press CHECK FOR UPGRADE If any upgrades are available the iNEX will download the required files automatically restart and install the upgrade Note If phone rece...

Page 86: ...greatly reduces the need for manually switching implement sections ON or OFF when going over a previously treated area by automatically controlling the state of the sections 10 1 Setting Up AutoSPRAY...

Page 87: ...a second and hard to measure accurately A more accurate measure of latency can be performed by measuring the distance travelled at a given speed 1 Drive slowly in a straight line for 200m with the sp...

Page 88: ...ming the operator was travelling at 12mph and the distance from the rope to where the sprayer reacted is 16ft 16ft 12mph x 0 68 0 9 seconds Latency 10 2 1 1 Troubleshooting Latency Problem Solution Th...

Page 89: ...ff When set to its default of 0 the system will turn the valves on whenever any part of the sensed area has not been sprayed It is effectively the percent of miss that the system will tolerate If the...

Page 90: ...re will not be required unless the vehicle has custom wiring which is different to most normal installations 1 From the Main Menu press SETUP 2 Press and hold the AUTOSPRAY button for four seconds unt...

Page 91: ...ly turn the overlapping sections OFF On leaving the treated area the iNEX will automatically turn the relevant sections back ON 10 3 2 Switching to Manual Control From time to time it may be necessary...

Page 92: ...oSPRAY Override Menu is displayed 2 Press OVERRIDE until the required type of override is displayed When ticks are displayed overridden sections will be forced ON When crosses are displayed overridden...

Page 93: ...e mapping functionality in the iNEX is transmitted to the other vehicles with FieldNET so all vehicles will be able to see exactly which areas have been treated regardless of the vehicle that applied...

Page 94: ...NET Radio Group ID After connecting the FieldNET radio and enabling the FieldNET option the next step is to configure the settings in the iNEX 1 From the Main Menu press SETUP 2 Press MORE 3 Press FIE...

Page 95: ...k Type 11 2 2 Understanding the Link Type There are three Link Types available Guide Display and Hidden By default when a new link is set up with a vehicle the Link Type selected will be Guide Each of...

Page 96: ...creating a link with a vehicle or after treatment has been received 1 Press FIELD 2 Press FIELDNET 3 Select the vehicle from the list to set the Link Type and press OPTIONS 4 Repeatedly press LINK TYP...

Page 97: ...contact White indicates that there is no current link to that vehicle Red indicates that there may be missing data or that there has been a long time since contact with the other vehicle In other word...

Page 98: ...des access to a menu of system maintenance tools such as calibrating the touch screen or performing a software update 1 To start into Launcher mode the iNEX must first be OFF 2 When turning ON press a...

Page 99: ...ck start the iNEX into Launcher mode see 12 1 Starting Up in Launcher Mode 2 Press SOFTWARE 3 Press UPGRADE 12 3 Downgrading Software When the iNEX is updated a backup of the current software will be...

Page 100: ...the system becomes unusable there are a number of steps that can be taken to recover the iNEX A forced shutdown will make unresponsive systems turn off In most cases when the iNEX is then turned on ag...

Page 101: ...play for 30 seconds Or Press and hold the Power button for five seconds until three long beeps are heard 12 5 2 Check Disk Running Check Disk will cause the iNEX to scan the drive for any corruption a...

Page 102: ...or settings 1 Start the iNEX into Launcher mode see 12 1 Starting Up in Launcher Mode 2 Press SYSTEM TOOLS 3 Press REPAIR DATABASE 12 5 4 Soft Reset Running Soft Reset will cause the iNEX to clear al...

Page 103: ...ld be used as a last resort to recover the iNEX as running Hard Reset will cause the system to clear all data returning it to factory default condition 1 Start the iNEX into Launcher mode see 12 1 Sta...

Page 104: ...e to them 13 1 Precautions and Safety Measures Review all safety information specific to the manufacturer and model of your vehicle before installing or operating the iNEX in it Do not disassemble or...

Page 105: ...notices Opening the product using tools for example screwdriver unless this is specifically permitted for certain functions Modification or conversion of the product Use after misappropriation Use of...

Page 106: ...e ask the machine manufacturer for instructions before mounting or installing the product 13 3 Limits of Use Environment Suitable for use in an atmosphere appropriate for permanent human habitation no...

Page 107: ...in combination with the Leica Geosystems product Person in charge of the product The person in charge of the product has the following duties To understand the safety instructions on the product and...

Page 108: ...ods or transported Precautions Periodically carry out test measurements and perform the field adjustments indicated in the user manual particularly after the product has been subjected to abnormal use...

Page 109: ...abling to vehicles or transporters poses the risk of the equipment being broken by mechanical influence vibration This may result in accident and injury Precautions Attach the controller and cabling p...

Page 110: ...close proximity to power lines If it is essential to work in such an environment contact the safety authorities responsible for electrical installations and follow their instructions To prevent damage...

Page 111: ...le to contamination Precautions The product must not be disposed with household waste Dispose of the product appropriately in accordance with the national regulations in force in your country Always p...

Page 112: ...disturbed Caution There is a risk that disturbances may be caused in other equipment if the product is used in conjunction with accessories from other manufacturers for example non standard cables or...

Page 113: ...iNEX User Manual Page 106 Rev 2 Precautions While the product is in use connecting cables for example product to external battery product to external devices must be connected at both ends...

Page 114: ...f which are expressly disclaimed Software Licence Agreement This product contains software that is pre installed on the product or that is supplied to you on a data carrier medium or that can be downl...

Page 115: ...eemed to be an acceptance of all the terms and conditions of such licence agreement If you do not agree to all or some of the terms of such licence agreement you may not download install or use the so...

Page 116: ...t Trailer with Front Pivoting Axle The main principal when entering equipment into the iNEX is that measurements are intended to define the antenna point in relation to the equipments pivoting point s...

Page 117: ...ear axle centreline to GPS antenna If GPS antenna is behind the axle then enter value as a negative 3 Vehicle centreline to GPS antenna If GPS antenna is left of the centreline then enter value as a n...

Page 118: ...eline to GPS antenna If GPS antenna is behind track centreline as shown then enter value as a negative 3 Vehicle centreline to GPS antenna If GPS antenna is left of the centreline then enter value as...

Page 119: ...antenna If GPS antenna is left of the centreline then enter value as a negative Equipment 2 Rear Half 1 Hitch or flow point to rear axle centreline 2 Rear axle centreline to articulation point Icon Me...

Page 120: ...front of rear axle as shown then enter value as a negative 2 Rear axle centreline to GPS antenna 3 Vehicle centreline to GPS antenna If GPS antenna is left of the centreline then enter value as a nega...

Page 121: ...centreline 2 Rear axle centreline to GPS antenna 3 Vehicle centreline to GPS antenna If GPS antenna is left of the centreline then enter value as a negative Icon Measurement Value 1 Flow point to rear...

Page 122: ...e Value should be entered as a negative to indicate a front boom 2 Rear axle centreline to GPS antenna 3 Vehicle centreline to GPS antenna If GPS antenna is left of the centreline then enter value as...

Page 123: ...2 Half way between steered wheels to GPS antenna 3 Vehicle centreline to GPS antenna If GPS antenna is left of the centreline then enter value as a negative Icon Measurement Value 1 Flow point to hal...

Page 124: ...Front axle centreline to gps antenna If GPS antenna is behind front axle centreline then enter value as a negative 3 Cutter bar centreline to GPS antenna If GPS antenna is left of the cutter bar cent...

Page 125: ...Physical Measurement Value 1 Flow point to axle centreline 2 Axle centreline to hitch point Icon Measurement Value 1 Flow point to axle centreline Same value as Physical Measurement 1 above 2 Trailer...

Page 126: ...e 2 Half way between tractor rear wheels boom axle centreline to hitch point Icon Measurement Value 1 Flow point to half way between tractor rear wheels boom axle centreline Same value as Physical Mea...

Page 127: ...n Tank or Air Cart Physical Measurement Value 1 Rear hitch point to axle centreline 2 Axle centreline to front hitch point Icon Measurement Value 1 Back of trailer to axle centreline 2 Trailer body wi...

Page 128: ...ear Half 1 Rear hitch or flow point to rear axle centreline 2 Rear axle centreline to front axle centreline Icon Measurement Value Equipment 1 Front Half 1 Enter value as zero 0 2 Trailer body width 3...

Page 129: ...the Group ID on one radio then all radios that are intended to work together must be changed to match 1 Start the iNEX into Launcher mode see 12 1 Starting Up in Launcher Mode 2 Press UTILITIES 3 Ente...

Page 130: ...Required GPGGA 5Hz Baud Rate 4800 9600 or 19200 Default 19200 Note Receive baud rate can be configured on the GPS Setup screen see section 7 2 Setting the GPS Source Options 15 3 2 NMEA 2000 CANbus Me...

Page 131: ...nts Port A Pin Function 1 2 Receive Data RxD 3 Transmit Data TxD 4 Data Terminal Ready DTR 5 Data Drain GND 6 Data Set Ready DSR 7 Request to Send RTS 8 Clear to Send CTS 9 Port B Pin Function 1 2 Rec...

Page 132: ...ge 125 Rev 2 CANbus Pin Function 1 2 CAN A Low 3 CAN A Drain 4 5 6 7 CAN A High 8 9 Power Input Pin Function 1 Battery Negative 2 Vehicle Ignition Sense Input 3 Battery Positive For AS310 High Current...

Reviews: