background image

Page 83

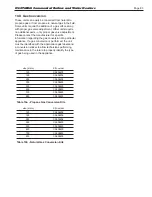
size (mbtu) 

Kit number

150 

CA006203

199  

CA006204

285 

CA006205

399 

CA008600

500 

CA008600

600 

CA008600

750 

CA008600

850 

CA008600

Table 16a - Propane Gas Conversion Kits

size (mbtu) 

Kit number

150 

CA006206

199  

CA006206

285 

CA006206

399 

CA008600

500 

CA008600

600 

CA008600

750 

CA008600

850 

CA008600

Table 16b - Natural Gas Conversion Kits

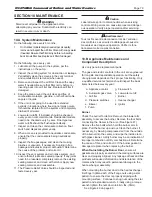
10.D  Gas Conversion

These units can easily be converted from natural to 

propane gas or from propane to natural gas in the field. 

Some units require the addition of a gas orifice along 

with proper gas valve adjustment. Other units require 

no additional parts - only proper gas valve adjustment. 

Please contact the manufacturer for specific 

information regarding the gas conversion of a particular 

appliance. If a gas conversion is performed, the unit 

must be identified with the appropriate gas labels and 

a conversion sticker to allow technicians performing 

maintenance in the future to properly identify the type 

of gas being used in the appliance.

N

EO

T

HERM

 Commercial Boilers and Water Heaters

Summary of Contents for Neotherm NTH

Page 1: ...If you cannot reach your gas supplier call the fire department Installation and service must be performed by a qualified installer service agency or gas supplier AVERTISSEMENT Assurez vous de bien su...

Page 2: ...32 5 B Water Heater Flow and Head Requirements Heater 32 SECTION 6 WATER CONNECTIONS 6 A Boiler 34 6 A 1 Boiler Water Piping 34 6 A 2 Boiler Cold Water Make Up 34 6 A 3 Condensate Drain 35 6 A 4 Free...

Page 3: ...figuration 59 8 G 2 a CH Central Heat Configuration 59 8 G 2 b Setting Up 4 20 mA Setpoint 59 8 G 3 Outdoor Reset Configuration 60 8 G 4 DHW Domestic Hot Water Config 60 8 G 5 Warm Weather Shutdown Co...

Page 4: ...LAARS Heating Systems...

Page 5: ...m Some NeoTherms may require that the PRV be installed prior to filling the system Refer to Figures 2 9 for PRV locations Consult the Rating Plate on the side of the unit The following information des...

Page 6: ...ld scald if too hot such as domestic hot water use adjust the outlet control limit or use temperature limiting valves to obtain a maximum water temperature of 125 F 52 C WARNING Fire or Explosion Haza...

Page 7: ...air these substances become airborne and if inhaled may be hazardous to your health Do not remove or replace RCF parts or attempt any service or repair work involving RCF without wearing the following...

Page 8: ...hertight enclosure that hides the touchscreen Whereas the indoor model is not fully weathertight and the touchscreen can be accessed without having to open the unit See Figure 1 through Figure 9 Both...

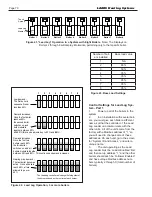
Page 9: ...AIR PRESSURE SWITCH DRAIN VALVE CONDENSATE TRAP AIR TRANSITION ON OFF SWITCH Figure 2 Location of Components Sizes 150 199 EXHAUST VENT CONNECTION GAS CONNECTION AIR PRESSURE SWITCH TOUCHSCREEN HEAT...

Page 10: ...GAS VALVE ON OFF SWITCH Figure 4 Location of Components Indoor Size 399 Figure 5 Location of Components Indoor Size 500 EXHAUST VENT CONNECTION PRESSURE RELIEF VALVE TOUCHSCREEN HEAT EXCHANGER MANUAL...

Page 11: ...OUTLET AIR INLET CONNECTION DRAIN VALVE CONDENSATE TRAP GAS VALVE MANUAL SHUTOFF GAS VALVE ON OFF SWITCH Figure 7 Location of Components Sizes 750 and 850 WATER INLET WATER OUTLET AIR INLET DRAIN VALV...

Page 12: ...able 1 on page 14 GAS CONNECTION CONDENSATE TRAP OUTLET Trap is built in RATING PLATE Figure 8 Connection piping is on the BACK for ALL Outdoor Sizes GAS CONNECTION EXHAUST VENT WATER INLET WATER OUTL...

Page 13: ...ation RATING PLATE For piping dimensions locations for all Outdoor units See Table 2 on page 16 CONDENSATE TRAP OUTLET Trap is built in RATING PLATE WATER INLET WATER OUTLET AIR INLET FILTER BOX GAS C...

Page 14: ...0 4 11 15 38 20 51 20 52 19 48 26 66 18 48 13 33 600 29 76 5 13 19 50 4 11 15 38 20 51 3 8 19 48 26 66 18 48 8 21 750 35 90 6 15 19 50 5 13 19 48 40 103 3 8 19 48 30 78 18 48 8 21 850 39 101 6 15 19 5...

Page 15: ...y similiar component design with piping dimensions locations that increase as the unit size increases Water and gas piping is always on the left side of the unit Table 1 gives the exact dimensions for...

Page 16: ...m in cm in cm in cm in cm in cm in cm in cm 150 6 1 4 16 11 28 13 33 17 1 4 43 8 23 1 2 60 18 45 7 27 69 23 1 2 60 5 1 4 13 199 6 1 4 16 11 28 13 33 17 1 4 43 8 23 1 2 60 18 45 7 27 69 24 1 2 60 5 1 4...

Page 17: ...8 1 4 21 24 61 19 48 29 1 4 74 12 30 5 5 5 14 600 33 1 2 85 3 0 8 5 13 8 1 4 21 24 61 19 48 29 1 4 74 12 30 5 5 3 4 14 6 750 32 3 4 83 2 3 0 8 5 1 4 13 4 17 1 4 43 8 24 61 19 48 29 1 4 74 12 30 5 5 3...

Page 18: ...ndoor Pump Kit 1 H The Installation Kit installation parts box The Indoor models are shipped in a single crate with the Installation Kit cardboard box Check the contents of the Installation Kit with t...

Page 19: ...NEL PUMP COVER NTOD 4 1 1 1 50D7605 HARNESS PUMP NTOD 150 500 3 D C B 2 DWG NO 50D4140 SH 1 REV A CJ 5 17 16 REVISIONS REV CHANGE APPR ENGR APPR ECN DRAFT CHECK REMOVED ITEM 2 A2116100 FROM 50D4140 A...

Page 20: ...tion system components are protected from water dripping spraying rain etc during operation and service circulator replacement control replacement etc When vented vertically the unit must be located a...

Page 21: ...id debris pick up falling into the appliance is required For any combination of vent and intake lengths up to 40 equivalent feet any even or uneven combination of length is allowed For overall lengths...

Page 22: ...xPPF 4 83x040 2ZDCPVCx Horizontal Termination bird screen IASPPxx 2 4 IASSSxx 5 12 xPPS BG 2 6 83x050 2ZDESx Vertical Termination IASPPxx 2 4 IASSSxx 5 12 xPPS VKL 5 xPPS VTML 5 8 83x050 2ZDESx Air In...

Page 23: ...d Flush Mount CA010102 Standard 80 incl opt opt opt opt opt 105 incl opt opt opt opt opt 150 incl opt opt 199 210 incl opt opt 285 opt opt opt incl opt n a 399 n a n a n a incl opt n a 500 n a n a n a...

Page 24: ...lypropylene that complies with ULC S636 Class IIb or a stainless steel venting system that complies with UL 1738 Standard See Table 6 The unit s vent can terminate through the roof or through an outsi...

Page 25: ...more than 245 C Class II venting systems are suitable for gas fired appliances producing flue gas temperatures of 135 C or less Class II venting systems are further classified into four temperature ra...

Page 26: ...walkway or over an area where condensate or vapor could create a nuisance or hazard 3 Locate the vent terminal so that vent gases cannot be drawn into air conditioning system inlets 4 Locate the vent...

Page 27: ...ust terminate at least 12 30cm below the vent terminal Installations in the Commonwealth of Massachusetts In Massachusetts the following items are required if the side wall exhaust vent termination is...

Page 28: ...te 5 See Note 5 r e n r o c e d i s n i o t e c n a r a e l C G H Clearance to each side of centerline extended above meter regulator assy 3 ft 91 cm within a height of 15 ft 4 6 m m c 1 9 t f 3 t e l...

Page 29: ...height of eight 8 feet above grade directly in line with the exhaust vent terminal for horizontally vented gas fueled heating appliance or equipment The sign shall read in Figure 21 Multiple Side Wal...

Page 30: ...que appareil reste connect la syst me de ventilation commun mis en op ration alors que les autres appareils connect s restants la politique commune de syst me d a ration ne sont pas en op ration 1 Joi...

Page 31: ...k tested before placing it in operation 11 Purge all air from gas lines Notes Consult and confirm with Applicable Fuel Gas Code before beginning work Verify gas inlet pressure is correct using Table 8...

Page 32: ...74 1 4 1 155 2 40 15 20 25 30 35 8 11 14 17 19 22 Commercial table 12 Flow and Head Requirements Flow H L Flow H L Flow H L Flow H L Flow H L Flow gpm feet gpm feet gpm feet gpm feet gpm feet gpm 150...

Page 33: ...35 9 8 7 32 3 7 3 29 4 6 2 26 9 5 3 ow H L Flow H L Flow H L Flow H L Flow H L Flow H L pm m lpm m lpm m lpm m lpm m lpm m 0 7 2 8 26 9 2 2 23 8 1 8 21 6 1 5 19 7 1 3 18 2 1 1 2 8 1 5 37 5 1 1 33 7 0...

Page 34: ...jurisdiction must be provided with a low water cutoff device either as a part of the boiler or at the time of boiler installation 6 A 3 Condensate Drain A condensate drain trap is built into the unit...

Page 35: ...fire and or the water is not able to circulate there is a risk of freezing in the boiler or in the pipes in the system When water freezes it expands which may result in bursting of pipes or damage to...

Page 36: ...Page 36 Figure 22 Hydronic Piping Single Boiler Zoning with Circulators LAARS Heating Systems...

Page 37: ...Page 37 Figure 23 Hydronic Piping Single Boiler Low Temp Radiant Space Heating Using Low Loss Header and Zone Valves NEOTHERM Commercial Boilers and Water Heaters...

Page 38: ...Page 38 Figure 24 Hydronic Piping Multiple Boilers Zoning with Circulators Figure 25 Hydronic Piping Multiple Boilers with Indirect DHW Tank Piped from System Loop LAARS Heating Systems...

Page 39: ...Page 39 Figure 26 Hydronic Piping Multiple Boilers Reverse Return Multi Temp Zones Zoning with Circulators NEOTHERM Commercial Boilers and Water Heaters...

Page 40: ...re 27 Hydronic Piping Heating Zones with Indirect DHW Tank Piped with Zone Pumps The indirect DHW tank is piped directly off of the boiler The boiler pump must shut down during DHW operation LAARS Hea...

Page 41: ...Page 41 Figure 28 Hydronic Piping Multiple Boilers with Indirect DHW Off of One Boiler The boiler pump must shut down during DHW operation NEOTHERM Commercial Boilers and Water Heaters...

Page 42: ...h are designed exclusively for volume water domestic hot water applications Refer to the proper section for instructions on installing and piping your product Refer to Table 15 on page 34 for the conn...

Page 43: ...ion and valving Check with local codes and ordinances for additional requirements Figure 29 DHW Piping One Heater One Vertical Tank NOTES 1 Optional CWMU Recirc line location 2 Locate Heater DHW senso...

Page 44: ...job site WARNING This drawing shows suggested piping configuration and valving Check with local codes and ordinances for additional requirements NOTES 1 Optional CWMU Recirc line location 2 Locate Hea...

Page 45: ...interlock terminals the unit will remain in low fire when it sees 4mA as a modulating signal See Section 7 4 for more details 7 B Main Power Connections The size of the main power supply should be det...

Page 46: ...pump controller that is optional equipment for all commercial NeoTherm boilers Pump speed is controlled to maintain a user chosen temperature rise between the inlet and outlet of the unit VARI PRIME...

Page 47: ...ycle feature to prevent hunting and possible premature component failure Table 16 Boiler and Pump Electrical Data Table 17 Water Heater and Pump Electrical Data If amp draw exceeds 7 4A max an externa...

Page 48: ...nections These units can be connected in a Lead Lag series up to a total of 8 controllers One as the Lead control and 7 more as the following controllers See Figure 34 For general info and menu set up...

Page 49: ...em to terminal block 7 TB7 in the control panel See Figure 33 The connections are labeled Remote Analog Input When making the connections follow the polarity designations shown on the label Signals fr...

Page 50: ...IONS SAFETY CHAIN TB4 24V COMMON TB3 24V HOT Y R TN TN Y BR BR WH R Y R GY R Y DKB Y BLK WH R Y GY BL Y GY R LOW WATER CUTOFF FIELD INSTALLED OPTIONS WH GY GR VT GR BL Y BL ADD L HIGH LIMIT R FLOW SWI...

Page 51: ...L DKB DKB Y DKB FS 2 DKB DKB WH BL WH BL WH R WH R FS 1 DKB Y PK R BLK WH GN GR R WH CL CL CL CL CL WH R GN TN BRN OR TN BL TN R Y VT WH WH BLK BLK BLK TO XFORMER WH TO XFORMER WH R BRN WH BRN R Y PUR...

Page 52: ...Page 52 Figure 36 Ladder Diagram 7 H Ladder Diagram LAARS Heating Systems...

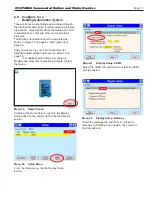
Page 53: ...peration the Touch Screen will automatically present this Home Screen See Menu 1 Menu 1 Home Screen Menu 2 Status Summary The home screen shows a picture of the unit s controller The color of the cont...

Page 54: ...djustments and functions including adjusting the Central Heat and Domestic Hot Water setpoints monitoring the input and output variables reading parameters from the controller and reading the error lo...

Page 55: ...group that could affect the safe operation of the unit the control system will ask you to verify the change before it is accepted 3 Once all parameters have been changed return to the configure menu I...

Page 56: ...conds or the verification will be cancelled A count down timer is shown at the bottom of the screen 8 E Checking Individual Parameters 1 From the Home screen Menu 9 press the icon for the controller M...

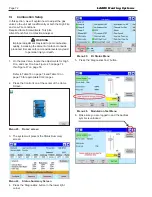
Page 57: ...Setup button on the lower right corner of the screen The system will present the Setup screen Menu 12 Setup Screen 3 Press the Display Setup button at the bottom of the screen Menu 13 Display Setup Sc...

Page 58: ...the Configuration Menu there are 18 Configuration Sub Menus Use the scroll tab on the right to view them all The next section of this manual will show the installer these sub menus and the basics on...

Page 59: ...upplied to the T T terminals found on TB7 labeled T T or Interlock Once a call for heat is established the control will start the appropriate selected pumps and begin the ignition process 8 G 1 System...

Page 60: ...to each and adjusting their setpoints in those sub menus 8 G 4 DHW Domestic Hot Water Config DHW Domestic Hot Water is used to configure the DHW temperature parameters for water heaters Heater and fo...

Page 61: ...Demand Priority Configuration From the Demand Priority Configuration the installer can adjust the priority of the different demand types Central Heat Lead Lag Domestic Hot Water The control uses arrow...

Page 62: ...Verification 8 G 11 Stack Limits 8 G 12 Anti Condensation Configuration Anti condensation frost protection is enabled disabled on this screen 8 G 13 Frost Protection Frost protection will assist in ke...

Page 63: ...e fan control loop reacts to an increase in fan speed adjust the Fan gain up parameter The minimum duty cycle is a view only parameter To set a fixed RPM at which the fan should ramp up or down adjust...

Page 64: ...er is operating as part of a Lead Lag system it does not use the normal CH set point it uses the Lead Lag CH set point on the Master control It is STRONGLY recommended to start each boiler to complete...

Page 65: ...figuration menu by pressing the Back arrow Next you will need to confirm that the master configuration is Disabled Then you will need to confirm that the Follower configuration is Enabled Repeat these...

Page 66: ...labeled MB1 and MB2 MB1 has the wiring connections to the User Interface display on each unit and MB2 is used to communicate with the other boilers in the Lead Lag system For wiring connections to Lea...

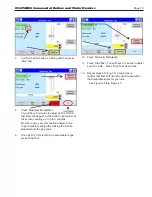
Page 67: ...een Adjust the Base Load Common value to the number of boilers in the cascade system See chart for values Chart for base values From this screen use the Left or Right arrows to scroll to other screens...

Page 68: ...on Follower Enable From the Status Summary Screen press the Config ure button Scroll down and press Lead Lag Follower Configura tion Press Disabled Choose Enable Follower for built in Lead Lag Master...

Page 69: ...initiated when the system temperature falls to the Lead Lag Central Heat setpoint Actually this is the LL CH setpoint less the On Hysteresis value The default setting for On Hysteresis is 5 F but thi...

Page 70: ...ion in a System with Eight Boilers Note The Displays on Boilers 2 through 8 will display information pertaining only to that specific boiler Touch Screen Lead Lag Master Addr 1 Addr 2 Addr 3 Boiler 4...

Page 71: ...and Modulation as shown on Menu 18 on page 59 For additional information on setting up Modbus and other communication protocols contact the factory Starting at the Home Screen tap onto the Display Se...

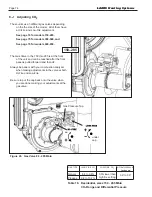
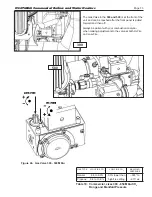
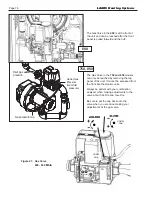
Page 72: ...injury or death 1 On the Gas Valve locate the adjustments for High Fire and Low Fire See Figure 45 on page 74 thru Figure 47 on page 76 Refer to Table 18 on page 74 and Table 19 on page 75 for appropr...

Page 73: ...zer time to get a stable reading after making the Hi Fire adjustment at the gas valve 9 Once Hi Fire CO2 is within an acceptable range press Stop Test 12 Repeat steps 6 through 11 a few times to confi...

Page 74: ...pulled forward and then off Always be patient with your combustion analyzer when making adjustments to the valve at both Hi Fire and Low Fire Be sure to put the cap back onto the valve when you are d...

Page 75: ...5 wc Table 19 Commercial sizes 399 850 Mbtu CO2 Range and Manifold Pressure 399 500 The Gas Valve in the 399 and 500 is at the front of the unit and can be reached after the front panel is pulled forw...

Page 76: ...unit and can be reached after the front panel is pulled forward and then off The Gas Valve in the 750 and 850 models can only be reached by removing the top panel of the unit It cannot be accessed fr...

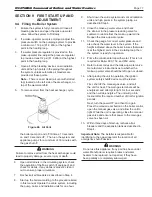
Page 77: ...ency shutoff devices WARNING Do not use this appliance if any part has been under water Manufacturer requires boilers and water heaters to be replaced not repaired if they have been partially or compl...

Page 78: ...ll follow Each cycle will include pre purge ignitor on valve flame on and post purge Ignition will not occur because the gas is off The ignition control will lockout after a single try or a third try...

Page 79: ...ssure Relief Valve should be inspected and tested every year 10 B Appliance Maintenance and Component Description Use only genuine replacement parts The gas and electric controls in the unit are engin...

Page 80: ...manual gas valves and check for gas leaks Turn on the 120 Volt power Place the unit in operation following the instructions in Section 9 Once the boiler is operating check for leaks again and confirm...

Page 81: ...added or a short occurs during installation the integral circuit breaker may trip If this happens be sure to reset the circuit breaker before replacing the transformer The transformer is mounted unde...

Page 82: ...his will be diverted into the separate container 11 Install all components removed in the reverse order to place the appliance back in operation Be sure all gaskets are in place as the components are...

Page 83: ...ne gas or from propane to natural gas in the field Some units require the addition of a gas orifice along with proper gas valve adjustment Other units require no additional parts only proper gas valve...

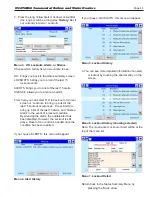
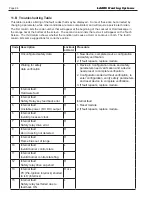
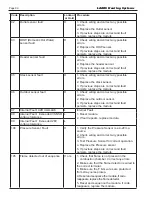
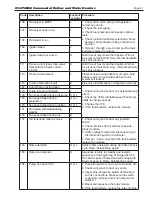
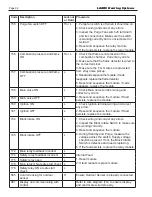
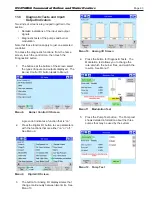
Page 84: ...control system is waiting for a condition to be satis ed No Reset is required to recover from an alert The system maintains a history of the 15 most recent alerts Sometimes it can be helpful to check...

Page 85: ...Alerts to bring up a list of the last 15 Alerts and Silence Alarm in the event of a lockout condition By silencing the alarm the audible alert has been disabled However the Lockout is still active Re...

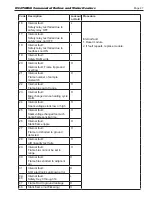
Page 86: ...safety data veri cation L 1 Device in Con guration mode and safety parameters need veri cation and a device needs reset to complete veri cation 2 Con guration ended without veri cation re enter con gu...

Page 87: ...nternal fault Bias changed since heating cycle starts H 24 Internal fault Spark voltage stuck low or high H 25 Internal fault Spark voltage changed too much during ame sensing time H 26 Internal fault...

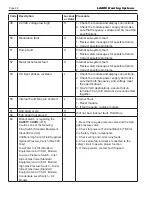
Page 88: ...ult Mux pin shorted L Internal Fault 1 Reset module 2 If fault repeats replace module 61 Anti short cycle H Will not be a lockout fault Hold Only 62 Fan speed not proved H 63 Rollout switch is regardi...

Page 89: ...he module 79 Outlet high limit H or L 1 Check wiring and correct any possible errors 2 Replace the outlet high limit 3 If previous steps are correct and fault persists replace the module 80 DHW Domest...

Page 90: ...3 If previous steps are correct and fault persists replace the module 97 Internal Fault A2D mismatch L Internal Fault 1 Reset module 2 If fault repeats replace module 98 Internal Fault Exceeded VSNSR...

Page 91: ...VFD 4 If the fault persists replace the module 123 Purge rate proving failed L 128 Fan speed failed during prepurge H or L 129 Fan speed failed during preignition H or L 130 Fan speed failed during i...

Page 92: ...replace the module 159 Main valve OFF L 160 Ignition ON L 1 Check Ignition terminal wiring and correct any errors 2 Reset and sequence the module If fault persists replace the module 161 Ignition OFF...

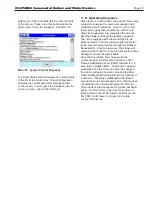
Page 93: ...utton leads to Menu 8 Menu 8 Burner Control I O Screen A green dot indicates a function that is on 2 Press the Digital I O button to see parameters with the functions that are either on or off See Men...

Page 94: ...e for several different parameters fan speed outlet temperature inlet temperature etc Menu 15 Analysis Setup Screen To use this function select the parameter you want to track from the pull down list...

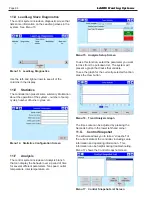
Page 95: ...r pressure switch The unit will pre purge at 65 fan for 30 seconds and prove fan through the blocked intake switch Once fan is proven the blower will proceed to 24 and the 10 second Pre ignition timer...

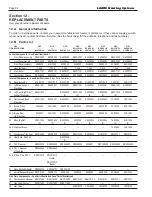
Page 96: ...5D1002 75D1002 Stanchion 24 Brace Front 20D1005 20D1005 85D1005 85D1005 85D1005 60D1005 85D1005 85D1005 HX Stanchion 24A Brace Rear 20D1007 20D1007 R50D1005 85D1005 85D1005 85D1005 85D1005 85D1005 HX...

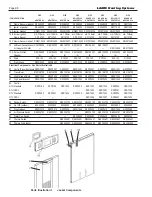
Page 97: ...iler Not Shown A2114400 A2135410 A2133621 A2133621 A2133621 Pump Optional Heater Not Shown A2135600 A2135700 A2135500 A2135420 A2135420 A2133616 A2133616 A2133616 62 Low Water Cutoff Switch CA004805 C...

Page 98: ...R50D2020 R50D2020 R50D2020 Electrical Components See Parts Illustration 8 80 Control Panel Enclosure R50D7001 R50D7001 R50D7001 R50D7001 R50D7001 R50D7001 R50D7001 R50D7001 81 Transformer RE2108700 RE...

Page 99: ...Page 99 Parts Illustration 2 Internal Components Sizes 150 199 Parts Illustration 3 Internal Components Sizes 285 600 NEOTHERM Commercial Boilers and Water Heaters...

Page 100: ...Page 100 Parts Illustration 4 Internal Components Sizes 750 850 LAARS Heating Systems...

Page 101: ...Page 101 Parts Illustration 5 Gas Train Components Sizes 150 500 Sizes 150 285 NEOTHERM Commercial Boilers and Water Heaters...

Page 102: ...Page 102 Parts Illustration 6 Gas Train Components Sizes 600 850 LAARS Heating Systems...

Page 103: ...Page 103 Parts Illustration 7 Heat Exchanger Components 68A Sizes 285 NEOTHERM Commercial Boilers and Water Heaters...

Page 104: ...contained Artwork is provided for your use in vario Select the appropriate file for use based on the app please contact AHRI s Certification Program Admin Product Labels PMS 300 C 100 M HTML 0065BD or...

Reviews: