3MZ
1-6-1
1-6 Requirements on PWB Replacement
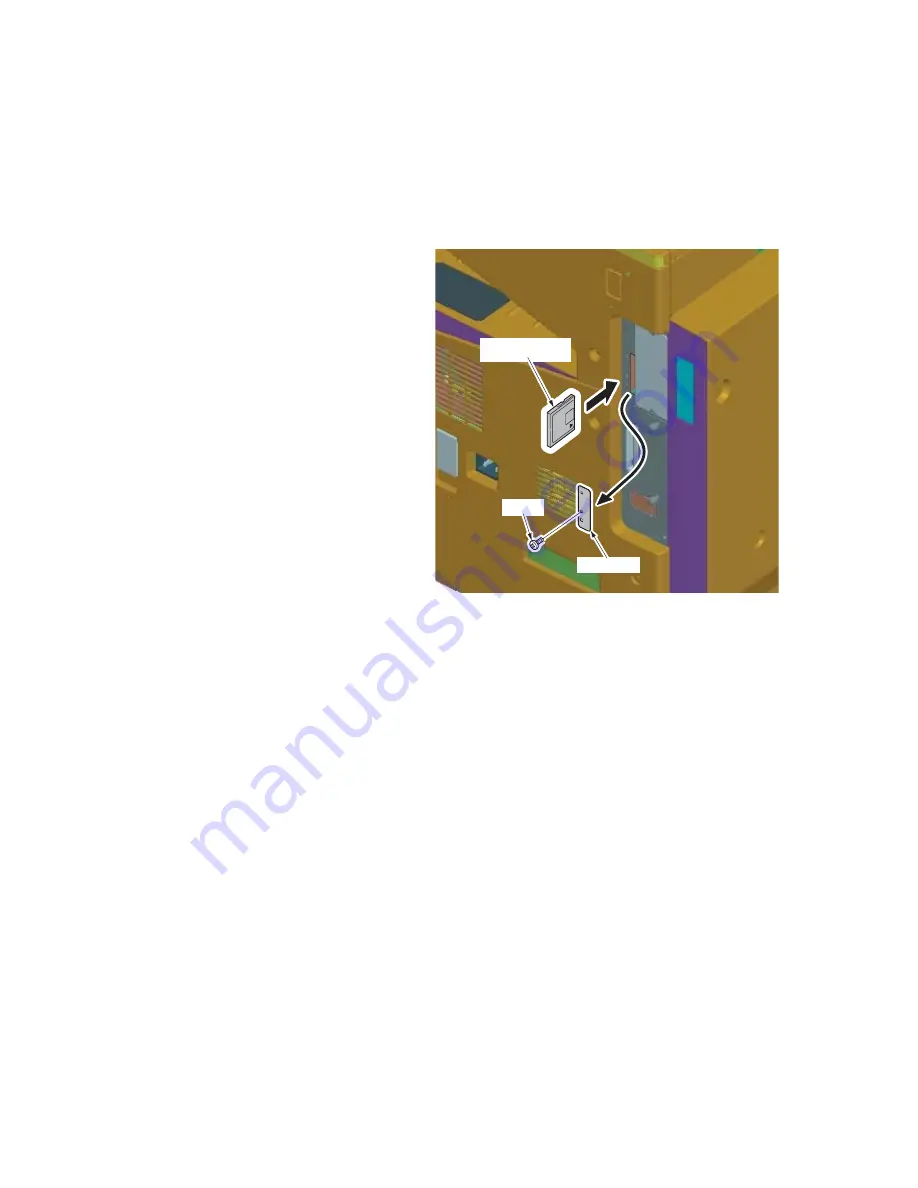
1-6-1 Upgrading the firmware on the fax control PWB
Firmware upgrading requires the following tools:
Compact Flash (Products manufactured by SANDISK are recommended.)
Procedure
1. Enter the maintenance mode and run main-
tenance item U680 (Displaying the fax
board ROM version). Check the version of
the ROM on the fax control PWB (see page
1-3-32).
2. Press the power key on the operation panel
to off. Make sure that the Power lamp is off
before turning off the main power switch.
And then unplug the power cable from the
wall outlet.
3. Remove the screw and remove the slot
cover.
4. Insert Compact Flash in a notch hole of the
machine.
Insert the surface of Compact Flash toward
the machine rear.
5. Insert the power plug and turn the main
power switch on.
6. Enter the maintenance mode and run main-
tenance item U926 (Rewriting FAX program)
(see page 1-3-38).
Downloading of the fax program and fax
fonts start.
Caution:
Never turn the main power switch off during
upgrading.
Figure 1-6-1
7. Turn the main power switch off and unplug
the power cable from the wall outlet.
8. Remove Compact Flash from the machine.
9. Refit the slot cover.
10. Insert the power plug and turn the main
power switch on.
11. Enter the maintenance mode and run main-
tenance item U680 (Displaying the fax
board ROM version). Check that the version
of the ROM is going up.
Compact Flash
Screw
Slot cover
Summary of Contents for DF-420
Page 3: ...Revision history Revision Date Replaced pages Remarks ...
Page 4: ...This page is intentionally left blank ...
Page 10: ...This page is intentionally left blank ...
Page 11: ...First Edition DP 420 ...
Page 17: ...3MX 1 1 4 This page is intentionally left blank ...
Page 21: ...3MX 1 2 4 This page is intentionally left blank ...
Page 65: ...3MX 1 5 10 This page is intentionally left blank ...
Page 69: ...3MX 2 1 4 This page is intentionally left blank ...
Page 82: ...First Edition PF 420 ...
Page 87: ...3MH 1 1 3 1 1 3 Machine cross section Figure 1 1 2 Machine cross section Paper path ...
Page 88: ...3MH 1 1 4 This page is intentionally left blank ...
Page 94: ...3MH 1 2 6 This page is intentionally left blank ...
Page 128: ...3MH 1 4 12 This page is intentionally left blank ...
Page 136: ...3MH 1 5 8 This page is intentionally left blank ...
Page 142: ...3MH 2 2 4 This page is intentionally left blank ...
Page 146: ...3MH 2 3 4 This page is intentionally left blank ...
Page 149: ...First Edition DF 420 ...
Page 151: ...3MJ This page is intentionally left blank ...
Page 155: ...3MJ 1 1 4 This page is intentionally left blank ...
Page 159: ...3MJ 1 2 4 3 Remove the tape from the process table Figure 1 2 4 Tape Process table ...
Page 175: ...3MJ 1 5 4 This page is intentionally left blank ...
Page 181: ...3MJ 2 1 6 This page is intentionally left blank ...
Page 185: ...3MJ 2 2 4 This page is intentionally left blank ...
Page 192: ...First Edition JS 420 ...
Page 194: ...3MK This page is intentionally left blank ...
Page 196: ...3MK 1 1 2 1 1 2 Parts names Figure 1 1 1 1 2 1 Job separator tray 2 LED ...
Page 197: ...3MK 1 1 3 1 1 3 Machine cross section Figure 1 1 2 Machine cross section Paper path ...
Page 198: ...3MK 1 1 4 This page is intentionally left blank ...
Page 212: ...3MK 2 2 2 This page is intentionally left blank ...
Page 215: ...First Edition FAX System R ...
Page 217: ...3MZ This page is intentionally left blank ...
Page 227: ...3MZ 1 2 4 This page is intentionally left blank ...
Page 285: ...3MZ 1 6 2 This page is intentionally left blank ...
Page 287: ...3MZ 2 1 2 This page is intentionally left blank ...
Page 293: ...3MZ 2 2 6 This page is intentionally left blank ...
Page 295: ...3MZ 2 3 2 This page is intentionally left blank ...
Page 296: ......


