115
PERIODIC SERVICE
A
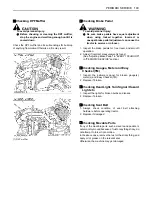
If the fuel line is removed, be sure to properly bleed the
fuel system.
(See "Bleeding Fuel System" in "SERVICE AS
REQUIRED" in "PERIODIC SERVICE" section.)
B
Adjusting Brake Pedal
To avoid personal injury:
A
Stop the engine and chock the wheels before
checking brake pedal.
A
To prevent uneven braking, the specification
must be within the recommended limit. If found
out of the specifications, contact your local
KUBOTA Dealer for adjusting the brakes.
C
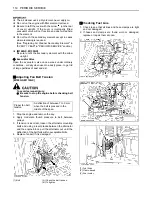
Checking the brake pedal free travel
1. Set the parking brake.
2. Slightly depress the brake pedals and measure free
travel at the top of pedal stroke.
A
Brake pedals should be equal when depressed.
C
Checking the brake pedal stroke
1. Disengage the brake pedal lock.
2. Depress the brake pedal several times.
3. Step on the right-hand pedal and measure the level
difference (pedal stroke) between this pedal and the
left-hand pedal.
4. Do the same for the left-hand pedal.
C
Checking the equalizer working level
(anti-imbalance device)
1. Gently step on both brake pedals at once.
2. Further step on the right-hand pedal (the left-hand
pedal slightly raises itself) and measure the level
difference between the pedals.
3. Do the same for the left-hand pedal.
B
Adjusting Parking Brake Lever
To avoid personal injury:
A
Stop the engine and chock the wheels before
checking parking brake.
1. Raise the parking brake lever to the parking position
while counting the ratchet sound made by the parking
brake lever.
2. If adjustment is needed, loosen the lock nut and adjust
the parking brake cable length with in acceptable limit.
Proper brake pedal
free travel
3 to 7 mm on the pedal
Keep the free travel in the right
and left brake pedals equal.
(1) Brake pedals
(A) "FREE TRAVEL"
Pedal stroke
Less than 100 mm at each pedal
(1) Brake pedal (LH)
(2) Brake pedal (RH)
(3) Brake pedal lock
(A) "PEDAL STROKE"
Equalizer working
level
Level difference of over 10 mm
between both pedals
Proper parking brake
lever free travel
2 notches (Ratchet sound 2)
Summary of Contents for M100GX
Page 17: ... 7 SAFE OPERATION 7 DANGER WARNING AND CAUTION LABELS ...
Page 18: ...SAFE OPERATION 8 ...
Page 19: ... 9 SAFE OPERATION ...
Page 20: ...SAFE OPERATION 10 ...
Page 21: ... 11 SAFE OPERATION ...

