Konica Minolta bizhub C200 User Manual Download Page 122

C200

4-14

Troubleshooting

4

4.2.6

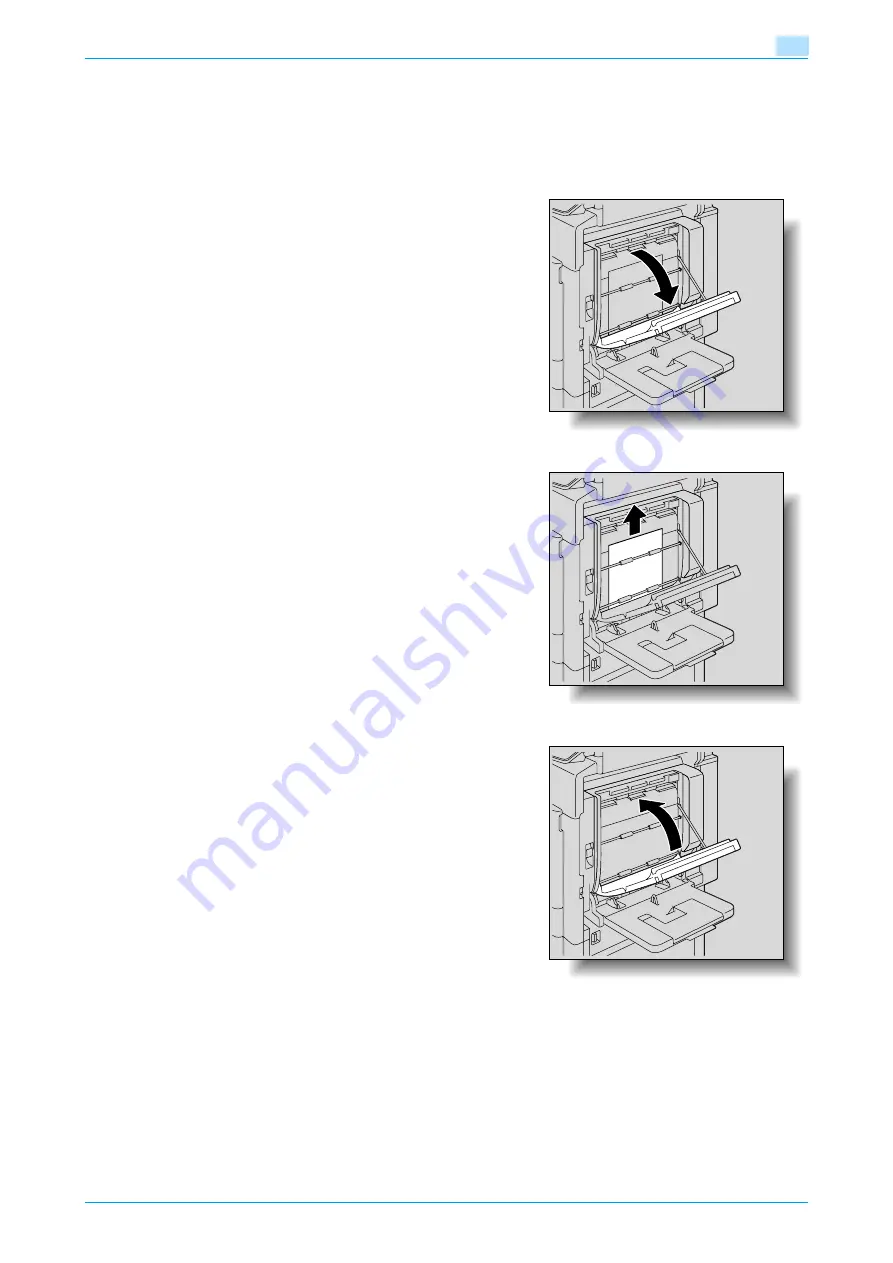
Clearing a paper misfeed in the duplex unit

!

Detail 

For details on the positions of paper misfeeds, refer to 

"Paper misfeed indications" on page 4-3

.

1

Open the door of the duplex unit.

2

Slowly remove any misfed paper from the duplex unit.

3

Close the door of the duplex unit.

Summary of Contents for bizhub C200

Page 1: ...User s Guide Copy Operations...

Page 2: ...edures In order to ensure that this machine is used correctly and efficiently carefully read this manual as needed In order to operate the machine safely and properly be sure to read the Quick Guide C...

Page 3: ...Before making copies 1 1 Part names and their functions 1 2 1 1 1 Options 1 2 1 1 2 Outside of machine 1 4 1 1 3 Inside of machine 1 7 1 1 4 Job separator JS 505 1 8 1 1 5 Control panel 1 8 1 1 6 Bas...

Page 4: ...2 24 2 7 5 Selecting a preset zoom ratio Reduce and Enlarge settings 2 25 2 7 6 Typing in separate X and Y zoom ratios Individual Zoom settings 2 25 2 7 7 Selecting a stored zoom ratio 2 27 2 7 8 Sto...

Page 5: ...on 4 18 4 2 9 Clearing a paper misfeed in tray 1 4 20 4 2 10 Clearing a paper misfeed in tray 2 4 23 4 2 11 Clearing a paper misfeed in paper feed cabinet Tray 3 4 4 25 4 2 12 Clearing a paper misfeed...

Page 6: ...rmation about color 7 3 7 1 2 Red parameter 7 5 7 1 3 Green parameter 7 6 7 1 4 Blue parameter 7 7 7 1 5 Color Balance parameter CMYK color adjustment 7 8 7 1 6 Brightness parameter 7 10 7 1 7 Contras...

Page 7: ...nter Settings 11 7 11 2 6 Account Track Registration 11 7 11 2 7 Displaying the User Settings screen 11 8 11 3 Specifying User Management settings 11 10 11 3 1 Confirmation Beep 11 10 11 3 2 Alarm Vol...

Page 8: ...ion Adjust 11 23 11 7 1 Adjusting the color registration for cyan magenta and yellow 11 23 11 8 Gradation Adjustment 11 26 11 9 Printer Adjustment 11 28 11 9 1 Media adjustment 11 28 11 10 Authenticat...

Page 9: ...nal and the specified paper size For details refer to Automatically selecting the zoom ratio Auto Zoom Setting on page 2 21 Specifying separate horizontal and vertical zoom ratios By specifying separa...

Page 10: ...ty You can adjust color copies to the quality for the desired image For details refer to Adjusting the copy color quality Color Adjustment parameters on page 7 19 Managing jobs The print status of cop...

Page 11: ...C200 x 10 Introduction Explanation of manual conventions...

Page 12: ...C200 x 11 Introduction...

Page 13: ...in this manual the value shown as Y in the illustration refers to the width and the value shown as X refers to the length Lengthwise w If the width Y of the paper is shorter than the length X the pap...

Page 14: ...ing procedures on using the printing functions User s Guide Network Scan Fax Network Fax Operations This manual contains details on the network scan G3 fax and network fax operations Refer to this man...

Page 15: ...1 Before making copies...

Page 16: ...nning Referred to as the ADF throughout the manual 3 Original cover OC 508 Presses down on the loaded document to keep it in place Referred to as the original cover throughout the manual 4 Working tab...

Page 17: ...e set up on the floor Referred to as the desk throughout the manual 12 Job separator JS 505 When installed onto the output tray it can be used for separating printed pag es Referred to as the separato...

Page 18: ...paper 2 thick paper 3 OHP transparencies postcards or label sheets or 10 envelopes 4 LCT Can be loaded with up to 2 500 sheets of plain paper Can be loaded with up to 1 000 sheets of thick paper 1 th...

Page 19: ...in the duplex unit 19 Upper right side door re lease lever Used to open the upper right side door 20 Center right side door Opened when clearing paper misfeeds from the paper transport section of tray...

Page 20: ...achine is used for network printing and network scanning 28 USB port type B USB 2 0 1 1 Used for making connections when the machine is used as a USB printer 29 Telephone jack 2 LINE PORT2 Used for co...

Page 21: ...ng an imaging unit 6 Imaging unit Creates the print image 7 Print head glass cleaning tool Used to clean the surface of the print head glass for example when replacing the imaging unit 8 Waste toner b...

Page 22: ...ay 1 Collects printed pages 5 Tray extension Pulled out when feeding papers longer than A4 w size Reset Stop Start Copy Fax Scan Utility Counter Mode Check ABC DEF JKL GHI MNO TUV PQRS WXYZ Access Pow...

Page 23: ...t key lights up in green and the message Now in Inter rupt mode appears on the touch panel To cancel Interrupt mode press the Interrupt key again 10 Stop key Press while copying to stop the operation...

Page 24: ...buttons for displaying screens containing various functions are dis played Touch a tab or button to display the corresponding screen for specifying the settings 3 Icon display area Icons indicating th...

Page 25: ...being sent from the machine regardless of the current mode Indicates that a user is logged on to an account after user authentication or account track set tings have been applied Indicates that paper...

Page 26: ...tware switch settings refer to the User s Guide Network Administrator Indicator on Enlarge Display key is flashing Indicator on Enlarge Display key is lit Touch in this area to scroll up and to the le...

Page 27: ...to any of three angles Adjust the control panel to the angle that allows for easy operation 1 2 1 To adjust the angle of the control panel 1 Slightly raise the control panel to unlock it The control p...

Page 28: ...on to the lower position raise the control panel to the upper position unlock it and then return it to the lower position The control panel stops at the middle position 3 To raise the control panel fr...

Page 29: ...the sub power switch is turned on the indicator on the Start key lights up in orange and a screen indicating that the machine is starting up appears After a few seconds the message Warming up Ready to...

Page 30: ...ils on turning on the machine refer to Turning off the machine on page 1 17 The indicator on the Start key lights up in orange After the warm up message is displayed the Basic screen appears The indic...

Page 31: ...er switch or the sub power switch while it is scanning or sending or receiving data otherwise all scan data or transmission data will be deleted Do not turn off the machine with the main power switch...

Page 32: ...machine enters Low Power mode can be changed For details refer to System Settings on page 11 14 1 3 6 Automatically conserving energy Sleep mode If no operation is performed for a specified length of...

Page 33: ...have been specified by the administrator only users of registered accounts can use this machine In addition the number of prints produced with each account can be controlled This is account track 0 W...

Page 34: ...ed the user can log on without entering the password 4 Type in the password and then touch OK 5 Touch Login or press the Access key The Basic screen appears 6 Make copies using the desired copy settin...

Page 35: ...uch Yes The account track screen appears Detail The accounts can be managed in Administrator Management settings available from the Utility mode Settings should be specified by the administrator For d...

Page 36: ...ray 1 2 Press down on the paper lifting plate until it locks into place 3 Slide the lateral guides to fit the size of paper to be loaded If the lateral guides are not positioned correctly for the load...

Page 37: ...ces up Do not place paper on the paper guide otherwise a paper misfeed may occur How is curled paper loaded Flatten the paper before loading it How many sheets of paper and other media can be loaded D...

Page 38: ...f special paper is loaded the paper type setting must be specified For details refer to Specifying a setting for special paper on page 6 14 2 Reminder Be careful not to touch the roller If media other...

Page 39: ...ly pressed otherwise the envelopes may become wrinkled or a paper misfeed may occur When loading envelopes load them with the flap side down as shown in the illustration If the envelopes are loaded wi...

Page 40: ...oned correctly for the loaded paper the paper size will not be correctly detected Be sure to adjust the lateral guides to the size of the loaded paper 3 Load the paper into the tray so that the side o...

Page 41: ...fer to Copy paper on page 6 2 If special paper is loaded the paper type setting must be specified For details refer to Specifying a setting for special paper on page 6 14 2 Reminder Be careful not to...

Page 42: ...switch 0 LCT is an option 1 Press the tray release button The LCT is unlocked and the LCT tray slides out slightly to the front 2 Pull out the LCT 3 Load the paper into the right side of the LCT so t...

Page 43: ...per on page 6 2 If special paper is loaded the paper type setting must be specified For details refer to Specifying a setting for special paper on page 6 14 2 Reminder Be careful not to touch the film...

Page 44: ...en the bypass tray When loading large sized paper pull out the tray extension 2 With the side to be printed on facing down insert the paper as much as possible into the feed slot 3 Slide the lateral g...

Page 45: ...h the end held up the paper size may not be detected correctly Push the paper guides firmly up against the edges of the paper After postcards have been loaded set Size Setting to A6 Card w When loadin...

Page 46: ...become wrinkled or a paper misfeed may occur When loading envelopes load them with the flap side up as shown in the illustration If the envelopes are loaded with the flap side down a paper misfeed may...

Page 47: ...l be printed on the surface of the paper facing down when the paper is loaded into the bypass tray Detail For details on specifying the paper size for the bypass tray refer to Selecting a paper size s...

Page 48: ...2 Basic copy operations...

Page 49: ...e software switch settings refer to the User s Guide Network Administrator Some settings cannot be used together For details on the settings that cannot be combined refer to Operations that cannot be...

Page 50: ...to page 2 36 For details on selecting a copy density setting refer to page 2 38 For details on specifying combined copy settings refer to page 2 33 For details on selecting Finishing settings refer to...

Page 51: ...ic copy operations 2 Detail The length of time for displaying the screen confirming the reception can be changed For details on changing the setting refer to Setting the Notification Screen function o...

Page 52: ...The setting specified first is given priority A warning message appears 2 2 1 Operations where the setting specified last is given priority The procedure for setting the Mixed Original function after...

Page 53: ...for selecting the Offset setting after setting the Mixed Original function is described below 1 Set the Mixed Original function 2 Select the Offset setting The message Cannot be set with Mixed Origin...

Page 54: ...machine may occur 0 If the original is not loaded correctly it may not be fed in straight or an original misfeed or damage to the original may occur 1 Slide the lateral guides to fit the size of the o...

Page 55: ...ot be detected 0 Do not place objects weighing more than 2 kg on the original glass In addition do not press down extremely hard on a book spread on the original glass otherwise the original glass may...

Page 56: ...lti page original from the original glass When sorting or making double sided or combined copies using the original glass place each page of a multi page document on the original glass to scan it The...

Page 57: ...uplex screen appears 5 Touch 1 2 If 1 2 is selected specify the position of the binding margin for the loaded original If the position of the binding margin is not specified the copies will not be pri...

Page 58: ...ning begins 7 Position the second page or second side of the original onto the original glass and then press the Start key To scan the remaining pages in the original repeat step 7 8 After all origina...

Page 59: ...t be fed in straight or an original misfeed or damage to the original may occur 1 Slide the adjustable lateral guides of the ADF to fit the size of the largest page The possible combinations of origin...

Page 60: ...C200 2 13 Basic copy operations 2 4 In the Basic screen touch Mixed Original To cancel the setting touch Mixed Original again to deselect it...

Page 61: ...ginal into the ADF 1 Position the original to be copied Unfold folded originals before loading them into the ADF If the original is copied without being unfolded a paper misfeed may occur For details...

Page 62: ...nal by specifying the binding margin position for the original 2 Note As the factory default Left is selected as the position of the binding margin Original binding margin position Original binding ma...

Page 63: ...g margin position the top of the original toward the back of the machine For details on loading the original refer to Feeding the original on page 2 7 2 In the Basic screen touch Combine Originals The...

Page 64: ...ack Select this setting to print the copy in black and white regardless of whether the scanned original is in color or in black and white Single Color Select this setting to print copies in the specif...

Page 65: ...ged In this step touch the button for the second color If the Single Color setting was selected touch the button for the desired color and then touch OK Touch or to display other available colors To u...

Page 66: ...ll Size Zoom setting is specified The Auto Paper setting cannot be combined with the Auto Zoom Setting For details on specifying the priority of paper trays refer to System Settings on page 11 5 2 6 1...

Page 67: ...C200 2 20 Basic copy operations 2 1 In the Basic screen touch Paper The Paper screen appears 2 Select the paper tray loaded with the desired paper...

Page 68: ...er Setting 2 7 1 Automatically selecting the zoom ratio Auto Zoom Setting The most appropriate zoom ratio is automatically selected based on the size of the loaded original and the specified paper siz...

Page 69: ...the zoom ratio Zoom setting By using the keypad a zoom ratio between 0 250 and 4 000 can be typed in directly without changing the height to width ratio 0 Touch to enlarge the zoom ratio and touch to...

Page 70: ...C200 2 23 Basic copy operations 2 2 Touch Zoom 3 Using the keypad type in the desired zoom ratio between 0 250 and 4 000 4 Touch OK...

Page 71: ...o enlarge the zoom ratio and touch to reduce the zoom ratio in 0 001 increments 0 The zoom ratio of the Minimal setting can be changed between 0 900 and 0 999 For details on changing the zoom ratio fo...

Page 72: ...riate zoom ratio beside Reduce and Enlarge depending on the original and paper sizes 2 7 6 Typing in separate X and Y zoom ratios Individual Zoom settings By using the keypad separate zoom ratios can...

Page 73: ...h Individual Zoom 4 Touch X and then use the keypad to type in the desired zoom ratio between 0 250 and 4 000 for the X direction 5 Touch Y and then use the keypad to type in the desired zoom ratio be...

Page 74: ...os can be changed 0 Touch to enlarge the zoom ratio and touch to reduce the zoom ratio in 0 001 increments 0 Stored zoom ratios can be changed to desired zoom ratios For details on storing zoom ratios...

Page 75: ...ress the C clear key to erase the value and then specify the correct value 0 To store a Minimal zoom ratio type in the desired zoom ratio between 0 900 and 0 999 0 The default zoom ratios 2 000 and 0...

Page 76: ...esired zoom ratio between 0 250 and 4 000 5 Touch 1 2 or Minimal where the new zoom ratio is to be stored To cancel the setting and select the default press the Reset key The specified zoom ratio is s...

Page 77: ...it and ADF have been installed The following procedures describe how to select Simplex Duplex settings Simplex Duplex settings Description 1 1 Select this setting to produce single sided copies from s...

Page 78: ...e position of the binding margin for the loaded document If the position of the binding margin is not specified the copies will not be printed as desired For details on specifying the binding margin r...

Page 79: ...e position of the binding margin for the loaded original If the position of the binding margin is not specified the copies will not be printed as desired For details on specifying the binding margin r...

Page 80: ...cted can be changed manually 2 Note As the factory default recommended zoom ratio is selected The Auto Zoom for Combine parameter in Utility mode can be set so that the recommended zoom ratios are not...

Page 81: ...f the binding margin refer to Selecting the position of the binding margin Margin settings on page 2 15 1 In the Basic screen touch Combine Originals The Combine Originals screen appears 2 Select the...

Page 82: ...touch Horizontal or Vertical to select the page arrangement If 4in1 was selected the pages will be arranged with Horizontal or Vertical selected as shown below Horizontal Vertical To cancel the combin...

Page 83: ...providing an image that is easy to read Photo Select this setting when copying printed originals such as pamphlets or catalogs Select this setting to produce better reproductions of halftone original...

Page 84: ...touch Quality Density The Quality Density screen appears 3 Touch the button for the quality setting most appropriate for the loaded original For an original that contains only text touch Text For an o...

Page 85: ...els Background Adjust The density of the background color of the original can be adjusted to one of nine lev els Each time Light or Dark is touched the background density is lightened or darkened by o...

Page 86: ...o cancel the setting and select the default press the Reset key 4 Touch OK 2 11 2 Adjusting the background density Background Adjust settings 1 In the Basic screen touch Quality Density The Quality De...

Page 87: ...the Reset key 4 Touch OK 2 11 3 Printing with a glossy finish Glossy setting 1 In the Basic screen touch Quality Density The Quality Density screen appears 2 Touch Glossy To cancel the Glossy setting...

Page 88: ...pears 3 Select the desired text density setting Each time Lighter Text or Darker Text is touched the density is lightened or darkened by one level To select the middle setting of the nine levels 0 tou...

Page 89: ...ument page that is scanned If no separator is installed and all of the following conditions are met printed copies are fed out and sorted in an alternating crisscross pattern Either two or more copies...

Page 90: ...The Auto Paper setting is selected The Mixed Original setting is not selected Paper of size A4 A5 B5 B6 or 16K is used The size of paper that can be used differs depending on the paper tray that is lo...

Page 91: ...he w orientation and with the v orientation in at least two different paper trays including the bypass tray The Auto Paper setting is selected The Mixed Original setting is not selected Paper of size...

Page 92: ...C200 2 45 Basic copy operations 2 3 Touch OK The Basic screen appears again...

Page 93: ...the original and stop the printing operation Press the Stop key while an original is being scanned or a job is being printed Scanning printing is stopped 2 Note The copy job being performed is deleted...

Page 94: ...3 Additional copy operations...

Page 95: ...l copy operations 3 1 Checking the Copy Settings Check Job From the Check Job Details screens the current copy settings can be checked and changed if desired 3 1 1 To check the settings 1 Press the Mo...

Page 96: ...en appears to the left below of the screen Touch or until the desired screen is displayed 3 1 2 To change the settings 1 Press the Mode Check key The Check Job Settings screen appears 2 Touch or until...

Page 97: ...b stops What settings are selected when the Interrupt key is pressed When the Interrupt key is pressed all functions and settings are reset to their defaults Why is the Interrupt key not available The...

Page 98: ...Check key to check the currently specified copy settings For details refer to Checking the Copy Settings Check Job on page 3 2 To stop registering the default setting press the Reset key No matter wh...

Page 99: ...and control panel keys specify the copy settings to be registered in the copy program Press the Mode Check key to check the currently specified copy settings For details refer to Checking the Copy Se...

Page 100: ...sary copy program For details on deleting copy programs refer to Deleting a copy program on page 3 7 If a program is already registered with the button a message requesting confirmation to overwrite t...

Page 101: ...ted The Check Program screen appears 3 Touch Delete A message appears requesting confirmation to delete the copy program 4 Touch Yes The copy settings registered in the copy program are erased and the...

Page 102: ...program press the Reset key If OK is touched with no copy program selected the Basic screen appears again without a copy program being recalled The Check Program screen appears 4 Check the copy settin...

Page 103: ...Enable or Disable To enable the Accessibility mode functions touch OK or Enable or press the Accessibility key When the Accessibility mode functions are enabled the indicator on the Accessibility key...

Page 104: ...pears The Basic screen appears again 3 5 3 Setting the Key Speed Settings functions Specify the length of time Time To Start until the value begins to change after or is held down in a screen and the...

Page 105: ...n is performed for a specified length of time an automatic panel reset operation is performed and all settings in the touch panel return to their default settings It is possible to specify the length...

Page 106: ...operation is 5 minutes or less 5 minutes If the time specified for the automatic panel reset operation is more than 5 minutes Specified automatic panel reset time The factory default setting is OFF 4...

Page 107: ...be selected for the tone produced when a touch panel button is touched 1 Display the Accessibility Settings screen For details on displaying the Accessibility Settings screen refer to Displaying the...

Page 108: ...he Accessibility Settings screen For details on displaying the Accessibility Settings screen refer to Displaying the Accessibility Settings screen on page 3 10 2 Touch Key Sound Tones The Key Sound To...

Page 109: ...4 Troubleshooting...

Page 110: ...ntative screen 2 Reminder Since the machine may be damaged contact the service representative according to the procedure described below as soon as the call service representative screen appears 1 Wri...

Page 111: ...ay have been misfed and that should be checked Example Screen when a paper misfeed occurs in tray 1 2 Note The procedure for clearing misfed paper differs depending on where the misfeed occurs Determi...

Page 112: ...6 Paper misfeed in the paper transport section p 4 18 7 Paper misfeed in tray 1 p 4 20 8 Paper misfeed in tray 2 p 4 23 9 Paper misfeed in tray 3 p 4 25 10 Paper misfeed in tray 4 p 4 25 11 Paper mis...

Page 113: ...For details on the positions of paper misfeeds refer to Paper misfeed indications on page 4 3 1 Remove all document pages remaining in the original feed tray 2 Pull the left side cover release lever...

Page 114: ...ument is misfed at a lateral guide lift the lever at the front of the lateral guide to open it 5 Slowly remove any misfed document pages 6 Return the lateral guide to its original position 7 Raise the...

Page 115: ...C200 4 7 Troubleshooting 4 8 Slowly remove any misfed document pages 9 Return the original feed tray to its original position and then close the left side cover...

Page 116: ...ight side door release lever and then open the upper right side door 2 Slowly remove any misfed paper from the fusing unit Pull down any misfed paper from the fusing unit Toner that did not pass throu...

Page 117: ...bleshooting 4 If the paper is zigzag folded and jammed in the fusing unit open the fusing cover and then remove the paper 3 Close the upper right side door 4 Pull out the tray being used 5 Remove any...

Page 118: ...toner gets in your eyes immediately flush them with water and then seek professional medical attention 2 Reminder If the paper is misfed as described below contact your service representative The pape...

Page 119: ...e positions of paper misfeeds refer to Paper misfeed indications on page 4 3 1 Pull up the upper right side door release lever and then open the upper right side door 2 Slowly remove any misfed paper...

Page 120: ...r from the timing roller Toner that did not pass through the fusing unit may get on your hands or clothes Be extremely careful when removing the paper 5 Close the upper right side door 6 Pull out the...

Page 121: ...y wash them with soap and water If toner gets in your eyes immediately flush them with water and then seek professional medical attention 2 Reminder If the paper is misfed as described below contact y...

Page 122: ...isfeed in the duplex unit Detail For details on the positions of paper misfeeds refer to Paper misfeed indications on page 4 3 1 Open the door of the duplex unit 2 Slowly remove any misfed paper from...

Page 123: ...r 6 Close the tray 2 Reminder Be careful not to touch the roller or the film with your hands 4 2 7 Clearing a paper misfeed in the bypass tray Detail For details on the positions of paper misfeeds ref...

Page 124: ...C200 4 16 Troubleshooting 4 2 Open the upper right side door 3 Open the internal cover M1 4 Slowly remove any misfeed paper 5 Close the upper right side door...

Page 125: ...me soiled with toner immediately wash them with soap and water If toner gets in your eyes immediately flush them with water and then seek professional medical attention 2 Reminder If the paper is misf...

Page 126: ...port section Detail For details on the positions of paper misfeeds refer to Paper misfeed indications on page 4 3 1 Pull up the center right side door release lever and then open the center right side...

Page 127: ...oting 4 Press the area marked with a hand to securely close the center right side door 4 Pull out the tray being used 5 Remove any misfed paper 6 Close the tray 2 Reminder Be careful not to touch the...

Page 128: ...tray 1 Detail For details on the positions of paper misfeeds refer to Paper misfeed indications on page 4 3 1 Pull up the upper right side door release lever and then open the upper right side door 2...

Page 129: ...C200 4 21 Troubleshooting 4 4 Close the upper right side door 5 Pull out tray 1 6 Remove any misfed paper 7 Close the tray...

Page 130: ...or get toner on your clothes or hands If your hands become soiled with toner immediately wash them with soap and water If toner gets in your eyes immediately flush them with water and then seek profe...

Page 131: ...2 Detail For details on the positions of paper misfeeds refer to Paper misfeed indications on page 4 3 1 Pull up the center right side door release lever and then open the center right side door 2 Ca...

Page 132: ...bleshooting 4 Press the area marked with a hand to securely close the center right side door 4 Pull out tray 2 5 Remove any misfed paper 6 Close the tray 2 Reminder Be careful not to touch the film wi...

Page 133: ...binet Tray 3 4 Detail For details on the positions of paper misfeeds refer to Paper misfeed indications on page 4 3 1 Pull up the lower right side door release lever and then open the lower right side...

Page 134: ...2 Reminder Be careful not to touch the film with your hands 4 2 12 Clearing a paper misfeed in the LCT Detail For details on the positions of paper misfeeds refer to Paper misfeed indications on page...

Page 135: ...C200 4 27 Troubleshooting 4 2 Carefully remove any misfed paper 3 Close the lower right side door 4 Press the tray release button and then pull out the LCT 5 Remove any misfed paper...

Page 136: ...film with your hands 4 2 13 Clearing a paper misfeed in the separator Detail For details on the positions of paper misfeeds refer to Paper misfeed indications on page 4 3 1 Open the misfeed clearing...

Page 137: ...C200 4 29 Troubleshooting 4 4 Close the misfeed clearing door...

Page 138: ...Replenish paper appears Check which paper tray appears highlighted in the touch panel and then load it with paper Detail For details on loading paper refer to Loading paper into tray 1 on page 1 22 Lo...

Page 139: ...ns are being performed the message Scanning stopped due to insufficient memory appears 2 Note If the amount of memory available becomes limited while copy operations are being performed unprinted jobs...

Page 140: ...he message appears replace the specified consumables or part according to your maintenance agreement After the message XXXX needs to be replaced appears the message Need to replace XXXX appears and th...

Page 141: ...a part within this machine a message similar to the one shown below appears 2 Note When the message appears replace the specified consumables or part according to your maintenance agreement Detail Do...

Page 142: ...e done Please wait a while appears This message appears when the machine is being accessed in Administrator mode of Assistant tool for C200 2 Reminder Do not turn off the machine while this message is...

Page 143: ...the original glass Position the original so that it is pressed closely against the origi nal glass See p 2 8 The printed output is blurry Is the paper damp Replace the paper with new paper See p 1 22...

Page 144: ...lean the original pad with a soft cloth dampened with a mild deter gent See p 9 4 Was the selected paper size larger than the original with a Zoom set ting of Full Size 1 000 Select a paper size that...

Page 145: ...s not availa ble Select the paper size Paper of a suitable size is not loaded in a paper tray Either select paper of a different size or load paper of a suitable size Paper setting is not correct Plea...

Page 146: ...5 Specifications...

Page 147: ...tput tray capacity Plain paper 250 sheets Thick paper 10 sheets OHP transparencies 1 sheet Warm up time The time from when the sub power switch is turned on with the main power switch on until the mac...

Page 148: ...ain paper 64 g m2 to 90 g m2 thick paper 1 91 g m2 to 150 g m2 thick paper 2 151 g m2 to 209 g m2 thick paper 3 210 g m2 to 256 g m2 Paper sizes A3 w to A5 w 12 1 4 18 w 1 12 18 w 1 to 5 1 2 8 1 2 w 8...

Page 149: ...er sizes A3 w to A5 w 11 17 w to 8 1 2 11 w v 8 13 w 16K v 8K w Tray paper capacity Tray 3 Plain paper 500 sheets thick paper 1 2 3 150 sheets Power requirements Supplied from main unit Power consumpt...

Page 150: ...equirements Supplied from main unit Power consumption Less than 27 W Dimensions 472 mm W 456 mm D 102 mm H Weight Approx 2 85 kg Specifications Output tray Output tray 1 Output tray 2 Feed settings Gr...

Page 151: ...6 Copy paper originals...

Page 152: ...176 mm to 457 2 mm Paper source Paper size Bypass tray A3 w to B6 w A6 w A6 Card w 12 1 4 18 w 1 12 18 w 1 to 5 1 2 8 1 2 w v 8 13 w 2 16K w v 8K w Tray 1 A3 w to B6 w A6 w A6 Card w 12 1 4 18 w 1 12...

Page 153: ...per setting is specified A paper tray with this setting is not automatically selected during double sided printing Special Paper Select this setting when special paper for example high quality paper i...

Page 154: ...d be kept wrapped or placed in a plastic bag and stored in a cool dark location with little humidity Store the paper laying flat not standing on its edge Curled paper may cause paper misfeeds Keep pap...

Page 155: ...s tray are installed Tray 1 Tray 2 Bypass tray When a single paper feed cabinet and the bypass tray are installed Tray 1 Tray 2 Tray 3 Bypass tray When a double paper feed cabinet and the bypass tray...

Page 156: ...1 30 6 2 1 Automatically detecting the paper size Auto Detect setting The size of the paper loaded into tray 1 and the bypass tray can be detected automatically The following procedure describes how...

Page 157: ...eful for example when the size of the paper that is loaded cannot be automatically detected such as with postcards or paper in inch sizes The following procedure describes how to specify the setting f...

Page 158: ...then touch OK The paper size for the tray 1 is set 2 Reminder If paper other than the specified paper size is loaded a paper misfeed may occur since the paper size is not automatically detected Detail...

Page 159: ...bypass tray touch the button for the bypass tray 3 Touch Change Settings 4 Touch Custom Size The Custom Size screen appears 5 Type in the length X and width Y of the paper Make sure that X is selected...

Page 160: ...C200 6 10 Copy paper originals 6 If the value was incorrectly entered press the C clear key in the keypad to erase the value and then specify the correct value 6 Touch OK and then touch OK...

Page 161: ...ving to re enter the setting The following procedure describes how to store a setting for non standard sized paper loaded into the tray 1 1 In the Basic screen touch Paper The Paper screen appears 2 S...

Page 162: ...ear key in the keypad to erase the value and then specify the correct value 7 Touch OK and then touch OK in the next two screens that appear 6 2 5 Selecting a setting for oversized paper Wide Paper se...

Page 163: ...to the bypass tray touch the button for the bypass tray 3 Touch Change Settings 4 Touch Wide Paper The Wide Paper screen appears 5 Select the size of the paper to be loaded For wide paper sizes in inc...

Page 164: ...creens that appear 2 Note The selected size button is programmed with the entered paper size so that the paper size is available to be selected again without being typed in In addition the size can be...

Page 165: ...specified with the same paper type setting 3 Touch Change Settings 4 Touch Paper Type The Paper Type screen appears 5 Select the appropriate setting for the type of special paper that is loaded Touch...

Page 166: ...ide can be loaded into the tray 1 and the bypass tray 1 In the Basic screen touch Paper The Paper screen appears 2 Touch the button for the tray 1 A paper tray set to 2nd Side is not selected when the...

Page 167: ...C200 6 17 Copy paper originals 6 Touch or until the button for the desired paper size is displayed...

Page 168: ...aper Originals printed on paper thicker than 128 g m2 Originals that are bound for example with staples or paper clips Originals that are bound in a book or booklet Originals with pages bound together...

Page 169: ...and Auto Zoom setting cannot be used since the original size cannot be detected automatically If an original of a non standard paper size is loaded select the paper tray and zoom ratio If highly tran...

Page 170: ...7 Application functions...

Page 171: ...d hues p 7 5 Saturation Parameter Provides information on the adjustment of the vividness p 7 12 Green Parameter Provides information on the adjustment of the green hues p 7 6 Sharpness Parameter Prov...

Page 172: ...e yellow of a grapefruit it is obvious that the yellow of the lemon is brighter But what about when comparing the yellow of a lemon and the red of a bean Obviously the yellow of the lemon is brighter...

Page 173: ...ss and the horizontal axis from the center is the saturation Assigning colors to the solid object representing the three attributes of color shown in figure 1 produces the color model shown in figure...

Page 174: ...lication functions 7 7 1 2 Red parameter This parameter can be used to adjust the degree of red in the image to one of 19 levels For details on the setting procedure refer to page 7 19 Sample images 3...

Page 175: ...cation functions 7 7 1 3 Green parameter This parameter can be used to adjust the degree of green in the image to one of 19 levels For details on the setting procedure refer to page 7 19 Sample images...

Page 176: ...ication functions 7 7 1 4 Blue parameter This parameter can be used to adjust the degree of blue in the image to one of 19 levels For details on the setting procedure refer to page 7 19 Sample images...

Page 177: ...a full color copy the colors of the original can be reproduced Changing the amount of each color of toner enables the tints in the copy to be finely adjusted Each color can be adjusted to any of 19 le...

Page 178: ...tinge Increasing the amount of cyan Increasing the green tinge Decreasing the amount of yellow Increasing the red tinge Original Magenta Cyan Yellow Decreasing the amount of cyan Increasing the amount...

Page 179: ...ion functions 7 7 1 6 Brightness parameter This parameter can be used to finely adjust the brightness of the image to one of 19 levels For details on the setting procedure refer to page 7 19 3 3 Origi...

Page 180: ...unctions 7 7 1 7 Contrast parameter This parameter can be used to finely adjust the image to one of 19 levels between soft smooth and crisp For details on the setting procedure refer to page 7 19 3 3...

Page 181: ...tion functions 7 7 1 8 Saturation parameter This parameter can be used to finely adjust the vividness of the image to one of 19 levels For details on the setting procedure refer to page 7 19 3 3 Origi...

Page 182: ...n functions 7 7 1 9 Sharpness parameter This parameter can be used to adjust the amount of contours in text and images to one of 7 levels For details on the setting procedure refer to page 7 19 3 3 Or...

Page 183: ...unctions 7 7 1 10 Copy Density parameter This parameter can be used to finely adjust the light and shading of the image to one of 19 levels For details on the setting procedure refer to page 7 19 3 3...

Page 184: ...s you to copy an original using only one of the 21 colors available For details on the setting procedure refer to page 2 17 Yellow Magenta Cyan Red Green Pumpkin Yellow Green Teal Blue Aquamarine Pink...

Page 185: ...ed in black and the color areas of the original printed in one of the six colors available For details on the setting procedure refer to page 2 17 Yellow Magenta Cyan Red Green Blue H A P P Y BIRT H D...

Page 186: ...e light colored areas and the dark colored areas of the image inversed For details on the setting procedure refer to page 7 18 Single Color copy Full Color copy Yellow Magenta Cyan Red Green Vermilion...

Page 187: ...color 1 Position the original to be copied For details on positioning the original refer to Feeding the original on page 2 7 2 Touch Application and then touch Neg Pos Reverse To cancel changes to th...

Page 188: ...screen appears 2 Touch Brightness From the Color Adjustment screen select the desired parameter The Brightness screen appears Parameter Description Brightness This parameter can be used to make the im...

Page 189: ...eset key The settings can be adjusted in 1 or 1 3 step increments between 3 and 3 The Sharpness parameter can only be specified in single increments 4 Touch OK and then touch OK 2 Note Even though the...

Page 190: ...ount of yellow Increasing the yellow tinge increases the amount of yellow or decreases the amount of magenta and cyan Increasing the black tinge increases the amount of black As an example the procedu...

Page 191: ...C200 7 22 Application functions 7 2 Note Even though the setting can be specified in 1 3 step increments the setting will appear at the nearest full increment in the Color Balance screen...

Page 192: ...8 Replacing toner cartridges waste toner box imaging unit...

Page 193: ...er is empty a message similar to the one shown below appears warning that the toner cartridge should be replaced 2 Note After the message appears the machine stops operating Replace the toner cartridg...

Page 194: ...or toner spills Be careful not to spill toner inside the machine or get toner on your clothes or hands If your hands become soiled with toner immediately wash them with soap and water If toner gets in...

Page 195: ...e of the same color as the one to be replaced has been prepared 2 Pull up the locking tab of the empty toner cartridge to unlock it Pull out the toner cartridge as far as possible and then pull it up...

Page 196: ...the toner cartridge may have become compacted If it has be sure to shake the toner cartridge until the toner is mostly broken up before installing the cartridge 5 Align the toner cartridge with the sl...

Page 197: ...ail The number of copies that can be made from the time that the message Waste Toner Box needs to be replaced appears until the time that the message Waste toner box needs to be replaced Replace it fo...

Page 198: ...Do not throw toner or the waste toner box into a fire Toner expelled from the fire may cause burns 7 CAUTION Precautions for toner spills Be careful not to spill toner inside the machine or get toner...

Page 199: ...waste toner box imaging unit 8 2 Reminder Do not tilt the removed waste toner box otherwise waste toner may spill Do not throw away used waste toner boxes Instead keep them in their boxes to be colle...

Page 200: ...ce the imaging unit and if it is replaceable by the user a message appears indicating that the part should be replaced and the machine stops operating 2 Note When the message appears replace the imagi...

Page 201: ...ch Check that the touch panel is turned off 2 Open the front door and then set the main power switch to o Check that an imaging unit of the same color as the one to be replaced has been prepared 3 Pre...

Page 202: ...it is to be installed Do not hold the top part of the imaging unit otherwise the PC drum may be damaged resulting in decreased image quality 6 Peel off the tape and then remove the packing material 7...

Page 203: ...nd the mark of the machine Insert the imaging unit into the machine Make sure that the imaging unit is the same color as the label on the imaging unit compartment Do not insert the imaging unit into i...

Page 204: ...ush the imaging unit until it bottoms 14 Set the main power switch to n and then close the front door 15 Press the sub power switch Check that the touch panel is turned on 16 Insert the used imaging u...

Page 205: ...reful not to spill toner inside the machine or get toner on your clothes or hands If your hands become soiled with toner immediately wash them with soap and water If toner gets in your eyes immediatel...

Page 206: ...9 Care of the machine...

Page 207: ...tergent 2 Reminder Be sure to turn off the machine set the main power switch to o before cleaning it For details on how to turn off the machine refer to Turning off the machine on page 1 17 Never use...

Page 208: ...glass cleaner 9 1 4 Control panel Clean the control panel by wiping it with a soft dry cloth 2 Reminder Pressing too hard on a key in the control panel or on the touch panel may damage them In additio...

Page 209: ...of the machine 9 9 1 5 Original pad Clean the original pad by wiping it with a soft cloth dampened with a mild household detergent 2 Reminder Never use solvents such as benzene or thinner to clean the...

Page 210: ...clean the print head according to the following procedure 1 Open the machine s front door 2 Remove the print head glass cleaning tool from the front door of the machine 3 Insert the print head glass...

Page 211: ...total number of prints since counting started can be viewed In addition the list of counters can be printed 1 Press the Utility Counter key 2 Touch Check Details The Meter Count screen appears Can th...

Page 212: ...was used can be viewed in the Coverage Rate screen 1 Press the Utility Counter key 2 Touch Coverage Rate The Coverage Rate screen appears Can the list of coverage rate be printed Touch Print List 3 To...

Page 213: ...hen the message It is time for the scheduled inspection of the device appears If the message It is time for the scheduled inspection of the device appears contact your service representative and reque...

Page 214: ...10 Managing jobs...

Page 215: ...ey were registered and are queued to be performed printed 2 Note The job number identifies the job it does not indicate the printing order 10 1 2 Job List screens Jobs are classified by the following...

Page 216: ...obs jobs being printed and jobs queued to be printed can be checked 1 Touch Job List The Job List screen appears 2 Check the job being performed Up to four jobs are displayed in one screen To view oth...

Page 217: ...e Job List screen appears 2 Under Status select the job to be deleted Up to four jobs are displayed in one screen To select other jobs touch or A screen for checking the job details appears 3 Touch De...

Page 218: ...nting order appears 3 Check the printing order and then touch OK The printing order for up to four jobs is displayed in one screen To view other jobs touch or 10 2 4 Checking the printing status 1 Tou...

Page 219: ...C200 10 6 Managing jobs 10 3 Check the printing status and then touch OK To view other jobs touch or...

Page 220: ...11 Utility mode...

Page 221: ...Screen Refer to Display Set tings on page 11 6 Default Fax Screen 1 Default Settings Copy Refer to Default Set tings on page 11 6 Fax Scan 1 Copier Settings Small Originals Refer to Copier Set tings...

Page 222: ...fer to Printer Set tings on page 11 17 Fax Settings 4 Self ID Refer to Fax Settings on page 11 17 RX Functions Password Communication Self Telephone Informa tion 1 Self Telephone Informa tion 2 TX Set...

Page 223: ...d the Utility Counter key is pressed without a user being logged on with an account only the buttons marked with 5 appear 6 This parameter does not appear if Account Track in the Authentication Settin...

Page 224: ...h panel mm inch Num Value inch Fraction mm Parameter Description Default Setting Priority Tray Select the paper tray given priority when the auto tray switch operation is performed Tray 1 Auto Tray Sw...

Page 225: ...ed as the default screen Copy Description Select the Fax mode screen displayed as a default For details refer to the User s Guide Network Scan Fax Network Fax Operations Description Default Setting Sp...

Page 226: ...ort setting is automatically selected when 2 or more copies are set to be printed in a single job ON When a document is loaded into the ADF and the Start key is pressed the Group setting is automatica...

Page 227: ...lishing an SMTP connection mode 350 POP3 Password appears For details on the software switch settings refer to the User s Guide Network Administrator 11 2 7 Displaying the User Settings screen Follow...

Page 228: ...To finish specifying settings in the Utility mode touch OK in each screen until the screen for the Copy or Fax Scan mode appears Account Track Registration appears if an account is registered and a us...

Page 229: ...xample when a misfeed occurs Select a setting between 0 and 5 3 Description Default Setting Select the volume of the sounds produced from the monitor speaker during a fax transmis sion Select a settin...

Page 230: ...mode 477 One Touch Box Reg and Print Lists do not appear For details on the software switch settings refer to the User s Guide Network Administrator If Account Track in the Authentication Settings scr...

Page 231: ...g the One Touch Box Reg screen The following procedure describes how to display the One Touch Box Reg screen 1 Press the Utility Counter key Description Register recipients of faxes and scan data with...

Page 232: ...software switch settings refer to the User s Guide Network Administrator If Account Track in the Authentication Settings screen has been set to ON and the Utility Counter key is pressed without a user...

Page 233: ...sired length of time between 1 and 240 min utes until the touch panel backlight goes off 1 minute Enter Power Save Mode Specify settings for faxing and printing For details refer to the User s Guide N...

Page 234: ...ck 0 Black Image Den sity 0 Image Stabilization Perform an image stabilization if the image is in correct even after the gradation levels have been adjusted Initialize Stabilization Select when a good...

Page 235: ...Network Scan Fax Network Fax Operations Description Register the addresses that appear in Domain when e mail addresses are entered For details refer to the User s Guide Network Scan Fax Network Fax O...

Page 236: ...this machine can be forwarded to the recipient specified as the ad ministrator For details refer to the User s Guide Network Scan Fax Network Fax Opera tions RX Document Specify how documents are rece...

Page 237: ...x transmission reception reports For details refer to the User s Guide Network Scan Fax Network Fax Operations Activity Report Parameter Description Setting List The list of machine settings can be pr...

Page 238: ...stering one touch dial destinations mode 477 One Touch Box Reg and Print Lists do not appear For details on the software switch settings refer to the User s Guide Network Administrator If Account Trac...

Page 239: ...tings have been set to limit registering one touch dial destinations mode 477 Account Track Registration appears For details on the software switch settings refer to the User s Guide Network Administr...

Page 240: ...ist Description The report that provides a record of fax transmissions can be printed For details refer to the User s Guide Network Scan Fax Network Fax Operations Description The report that provides...

Page 241: ...477 One Touch Box Reg and Print Lists do not appear For details on the software switch settings refer to the User s Guide Network Administrator If Account Track in the Authentication Settings screen...

Page 242: ...wing sizes listed in order of priority A3 w 11 17 w A4 v or 8 1 2 11 v Paper in the bypass tray cannot be selected 1 Display the Administrator Management screen For details on displaying the Administr...

Page 243: ...hown below touch under X to increase the adjustment If the lines are shifted in the Y direction as shown below touch Y and then touch under Y to reduce the adjustment If the lines are shifted in the Y...

Page 244: ...C200 11 25 Utility mode 11 11 Touch OK To cancel the setting and select the default press the Reset key...

Page 245: ...urned off then on again with the main power switch wait at least 10 seconds to turn the machine on after turning it off The machine may not operate correctly if it is turned on immediately after being...

Page 246: ...t pattern page Why are blank pages placed on top of the test pattern Place 10 sheets of blank paper on top of the test pattern to prevent it from becoming transparent Otherwise the gradation levels ma...

Page 247: ...4 Touch Printer Adjustment The Printer Adjustment screen appears 5 Touch Media adjustment The Media adjustment screen appears 6 Touch the button for the paper type to be set If the image is distorted...

Page 248: ...then touch OK in the next screen that appears Try performing the copy cycle again 9 Check the printed image and finish the adjustment if there are no flaws If more adjustment is necessary repeat steps...

Page 249: ...n Settings Check that the following conditions are met before specifying authentication settings When authentication settings are specified information stored in the memory is erased No communication...

Page 250: ...Track screen appears 3 Touch Account Track Settings Account Track Settings appears if Account Track in the Authentication Settings screen is set to ON The Account Track Settings screen appears 4 Touc...

Page 251: ...logon screen The Change Password screen appears 9 Touch New Password The Password screen appears 10 Type in the password up to 8 characters and then touch OK 11 Touch Confirm New Password The Password...

Page 252: ...share the SMTP authentication user name and password with the POP3 user name and password mode 380 SMTP Authentication User Name and SMTP Authentication Password appear If the software switch settings...

Page 253: ...not specify a maximum number of pages for Color or Black touch No Limit The maximum number of pages allowed can be set between 1 and 999 999 To change an entered value touch or to move the cursor to t...

Page 254: ...pages printed on large sized paper using the Black setting the Full Color setting the Single Color setting the 2 Color setting and the total color Max Limits specified during account registration for...

Page 255: ...en refer to Displaying the Administrator Management screen on page 11 19 2 Touch Account Track The Account Track screen appears 3 Touch Account Track Settings Account Track Settings appears if Account...

Page 256: ...C200 11 37 Utility mode 11 8 Touch OK...

Page 257: ...irmware version for this machine 1 Display the Administrator Management screen For details on displaying the Administrator Management screen refer to Displaying the Administrator Management screen on...

Page 258: ...ppears 4 Touch Maximum Job Allowance The Maximum Job Allowance screen appears 5 Use the keypad to type in the maximum number of copies and then touch OK To not specify a maximum number of copies touch...

Page 259: ...12 Appendix...

Page 260: ...Caps again to deselect it To switch between entering letters or symbols touch the button for switching the input mode Detail To change a character in the entered text touch or to move the cursor to th...

Page 261: ...C200 12 3 Appendix 12 12 1 2 List of Available Characters Input screen Alphanumeric characters symbols...

Page 262: ...zoom ratio B Background Adjust Select a setting to adjust the density of the background color of the original to one of nine levels Blue Set this parameter to adjust the level of blue in the image fo...

Page 263: ...l with different page sizes is loaded together into the ADF N Neg Pos Reverse Set this function to copy the original with the light and dark colored areas or the colors gradations of the image inverse...

Page 264: ...C200 12 6 Appendix 12 Z Zoom Specify the zoom ratio of the copy Zoom setting Touch this button to use the keypad to specify the zoom ratio for producing an enlarged reduced copy of the loaded original...

Page 265: ...13 Index...

Page 266: ...23 Combined pages 2 33 Conserving energy 1 18 Consumables 8 2 8 6 8 9 Contrast 7 11 Control panel 1 8 1 13 9 3 Copier Settings 11 6 11 7 Copy Density 7 14 Coverage rate 9 7 D Default Settings 11 6 Del...

Page 267: ...nt colors 2 17 Print head 9 5 Print Lists 11 18 11 21 Printer Adjustment 11 15 11 28 Printer Settings 11 7 11 17 R Recall Copy Program 3 9 Red 7 5 Registering program 3 6 Replacement period 4 32 Repor...

Page 268: ...http konicaminolta com Copyright 2008 2008 11 A02F 9587 11...

Reviews: