


37
Step 1
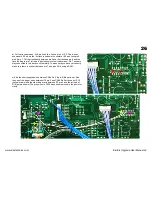
Remove the power supply unit from the Polysix
. This is done by removing the four
screws that are nearest the KORG sign on the rear of the Polysix
Then unplug all the power connectors and the transformer wires and unsolder the blue
+5v wire to the front panel.
Warning: the metal plate between the Power supply board and the
rear of the Polysix has heat transfer paste on it. This paste is also
on the rear of the top metal rail of the power supply board. Some
early heat transfer pastes were fairly toxic and can contain Beryllium
so either wash with IPA or wear gloves and clean up carefully after
you are finished.
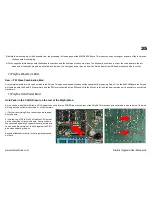
Step 2
Remove the existing circuit board and mount the
upgrade board
. Remove the four screws holding
the transistors to the metal rail and keep these
screws together as they will be used again, then
remove the 5 screws holding the two metal rails to
the circuit board. Fit these two rails to the new
board in the same position using the same screws
and washers. Using the supplied heat transfer pads
and insulating washers mount the four regulators to
the metal rail. These should be screwed up fairly
tight but don't overdo it or you will strip the thread.
These regulators must all be isolated from the
metal rail so check using a multimeter that there is
no contact.
www.kiwitechnics.com
KiwiSix Upgrade User Manual v3


