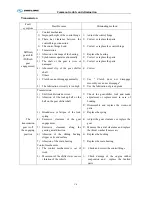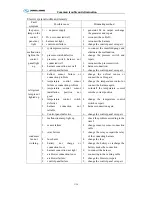
Common trouble and elimination
C-10
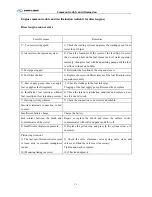
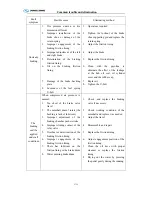
Rear axle
Fault
symptom
Possible cause
Eliminating method
Abnormal
sound from
the rear
axle
(abnormal
sound)
When the vehicle is starting
1)
Excessive clearance between
the differential gear
2)
Excessive clearance between
the driving and the driven gear
3)
Looseness of the connecting
flange and the propeller shaft
4)
Too small pretightening force of
the drive gear bearing
5)
Looseness of the fixing bolt and
nut of the driving gear
When the vehicle turning
1)
There has abrasion or damage
to the axle shaft gear, driving
gear, spider, thrust shim and the
axle shaft bearing and etc
2)
Too low oil level
1
)
Adjust the clearance
2
)
Adjust the clearance
3
)
Tighten it to specified torque
4
)
Adjust the pretightening force
5
)
Tighten it to specified torque
1
)
Adjust or replace the faulted parts
2
)
Fill up the lubrication
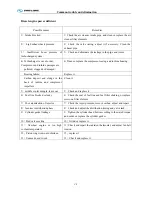
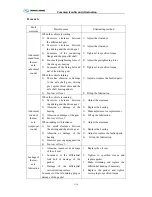
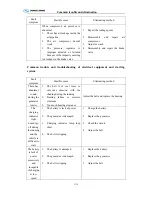
Abnormal
sound of
the rear
axle
( improper
sound)
When the vehicle is running:
1)
Excessive clearance between
the driving and the driven gear
2)
Abrasion or damage of the
bearing
3)
Abrasion or damage of the gear
4)
Too low oil level
When running with inertance
1)
Too small clearance between
the driving and the driven gear
2)
Abrasion or damage of the
bearing
3)
Incorrect gear engaging position
4)
Too low oil level
1)
Adjust the clearance
2)
Replace the bearing
3)
Make adjustment or replacement
4)
Fill up the lubrication
1)
Adjust the clearance
2)
Replace the bearing
3)
Adjust or replace the faulted parts
4)
Fill up the lubrication
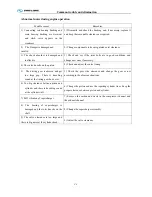
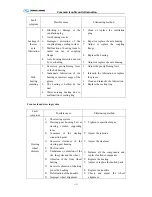
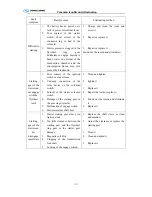
Leakage of
the rear
axle
lubrication
1.
Abrasion, looseness or damage
of the oil seal
2.
Looseness of the differential
lock bolt or damage of the
gasket
3.
Damage of the differential
carrieer mating surface
Looseness of the oil draining plug or
damage of the gasket
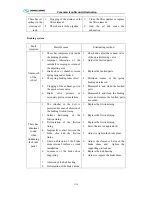
1.
Replace the oil seal
2.
Tighten to specified torque and
replace gasket
3.
Make trimming and replace the
differential housing if necessary
4.
Replace the gasket and tighten
screw plug to specified torque
Summary of Contents for XMQ6127 series
Page 18: ...Operation Instruction CI 1 Figure 17 Set MotPPR Figure 18 Clear Trip A Figure 19 Clear Trip B...
Page 32: ...Operation Instruction P A 1 2 Control panel operation...
Page 33: ...Operation Instruction P A 1...
Page 34: ...Operation Instruction P A 1...
Page 35: ...Operation Instruction P A 1...
Page 36: ...Operation Instruction P A 1...
Page 41: ...Operation Instruction 0 G 1 1 1 2 2 Pushbutton Settings...
Page 42: ...Operation Instruction 0 G 1 1 2 Starting the Engine 1 3 Selecting the Gear...
Page 43: ...Operation Instruction 0 G 1 1 4 Setting Off 1 5 Driving Ranges...
Page 44: ...Operation Instruction 0 G 1 1 5 1 Downhill Travel 1 5 2 Downhill Travel 1 5 3 Kickdown...
Page 46: ...Operation Instruction 0 G 1 1 6 Stopping Parking...
Page 51: ...Operation Instruction 0 G 1 1 11 1 Limp Home Mode 1 12 Auxiliary Control Unit...
Page 52: ...Operation Instruction 0 G 1 1 12 1 Operating Instructions for the Auxiliary Control Unit...
Page 53: ...Operation Instruction 0 AB 1 WABCO ABS BASIC INTRODUCTION...
Page 54: ...Operation Instruction 0 AB 1...
Page 55: ...Operation Instruction 0 AB 1...
Page 56: ...Operation Instruction 0 AB 1...
Page 57: ...Operation Instruction 0 AB 1...
Page 58: ...Operation Instruction 0 EC 1 ECAS System Introduction 1 System introduction...
Page 59: ...Operation Instruction 0 EC 1 3 System function...
Page 60: ...Operation Instruction 0 EC 1...
Page 77: ...Operation Instruction 0 E 1 CAN bus module...
Page 158: ...Appendix A 4 Air braking schematic diagram...
Page 159: ...A 5 Electric schematic diagram of the complete vehicle 1...
Page 160: ...A 6 Electric schematic diagram of the complete vehicle 2...
Page 161: ...A 7 Electric schematic diagram of the complete vehicle 3...
Page 162: ...A 8 Electric schematic diagram of the complete vehicle 4...


