Assemble units as described herein only. To do otherwise
may result in instability. All screws, nuts and bolts must be
tightened securely and must be checked periodically after
assembly. Failure to assemble properly, or to secure parts
may result in assembly failure and personal injury.
19
4. Align the first modesty panel
between a leg set and corner leg.
If optional horizontal wireways
are to be installed to unit, place
the wireways between mounting
flange of modesty panel and
the worksurface, aligning the
mounting holes as illustrated.
Insert two #10 x ½” screws per
left and right side of the modesty
panel into the leg set and corner
leg. Attach modesty panel to
worksurface with two #12 x 1”
screws. Do not tighten at this
time. Repeat this step for second
modesty panel. Tighten all screws
attaching the leg sets, corner leg
and modesty panel (Figure 1).
Note:
If assembling stand
alone corner keyboard unit see
instructions A through D and then
continue on to steps 5 though 9.
If assembling stand alone unit
without keyboard, skip now to
steps 5 through 9.
Keyboard Pad Only
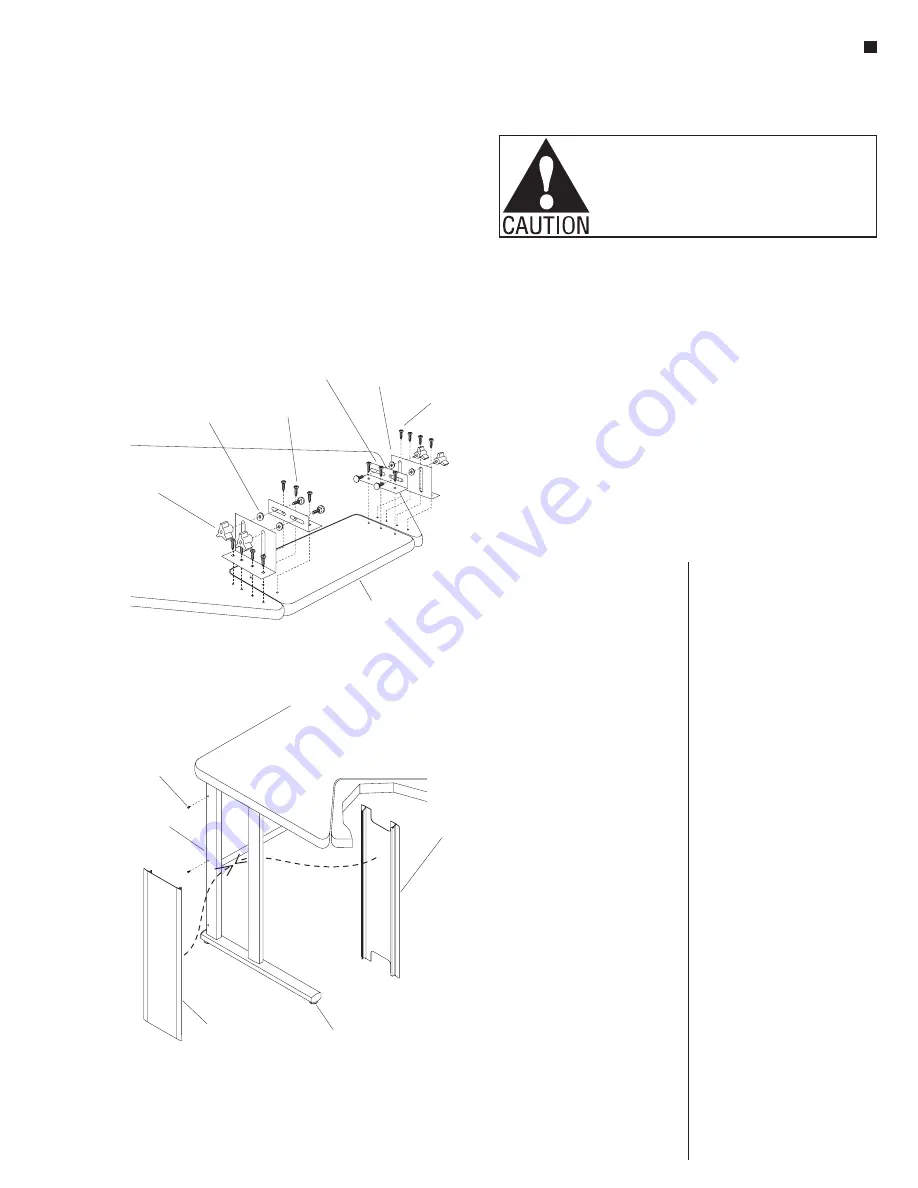
A. Attach two small brackets to the
keyboard pad by first aligning
holes in the keyboard pad. Insert
six #12 x 1” screws, three per
small bracket, but do not tighten
completely (Figure 2).
B. Attach the two large brackets
to the pre-drilled holes in
worksurface with four #12 x 1”
screws per bracket, but do not
tighten completely (Figure 2).
C. Assemble and tighten four
adjustment knobs, connecting the
small brackets on the keyboard
pad to the large brackets on the
corner worksurface. These knobs
consist of carriage bolt, washer
and tightening knob for each set
(Figure 2).
D. Center the keyboard pad to the
opening in the worksurface.
Tighten all bracket screws
completely, starting with the large
brackets on the worksurface.
(Figure 2).
5. Carefully stand assembly right
side up and install two leg plugs
into the two exposed holes at
the outside of each leg set as
illustrated (Figure 3).
6. Level the worksurface by turning
the four adjustable glides either
in or out. The jambnuts between
the glides and the bottom of the
leg sets must be tightened up
against the bottom of the leg to
secure the glide (Figure 3).
7. Press worksurface grommet into
wireway hole at rear corner of
worksurface.
WorkZone
®
Stand Alone Corner Worksurface with Keyboard Pad
Assembly Instructions
4. Align the first modesty panel between
a leg set and corner leg. If optional
horizontal wireways are to be installed to
unit, place the wireways between
mounting flange of modesty panel and
the worksurface, aligning the mounting
holes as illustrated. Insert two
#10 x ½”screws per left and right side of
the modesty panel into the leg set and
corner leg. Attach modesty panel to
worksurface with two #12 x 1” screws.
Do not tighten at this time. Repeat this
step for second modesty panel. Tighten
all screws attaching the leg sets, corner
leg and modesty panel (Figure 1).
If assembling stand alone corner
keyboard unit see instructions A through
D and then continue on to steps 5 though
9. If assembling stand alone unit without
keyboard, skip now to steps 5 through 9.
A. Attach two small brackets to the
keyboard pad by first aligning holes in the
keyboard pad. Insert six #12 x 1”
screws, three per small bracket, but do
not tighten completely (Figure 2).
B. Attach the two large brackets to the
pre-drilled holes in worksurface with four
#12 x 1” screws per bracket, but do not
tighten completely (Figure 2).
C. Assemble and tighten four adjustment
knobs, connecting the small brackets on
the keyboard pad to the large brackets on
the corner worksurface. These knobs
consist of carriage bolt, washer and
tightening knob for each set (Figure 2).
D. Center the keyboard pad to the
opening in the worksurface. Tighten all
bracket screws completely, starting with
the large brackets on the worksurface.
(Figure 2).
Note:
Keyboard Pad Only
#12 x 1"
screw
large
bracket
small
bracket
#12 x 1”
screw
washer
adjustment
knob
corner
worksurface
WorkZone Stand Alone Corner Worksurface with Keyboard Pad
Figure 2
Figure 3
leg plug
vertical
wireway - outer
vertical
wireway - inner
leg set
adjustable
glide
5. Carefully stand assembly right side up
and install two leg plugs into the two
exposed holes at the outside of each leg
set as illustrated (Figure 3).
6. Level the worksurface by turning the
four adjustable glides either in or out. The
jambnuts between the glides and the
bottom of the leg sets must be tightened
up against the bottom of the leg to
secure the glide (Figure 3).
7. Press worksurface grommet into
wireway hole at rear corner of
worksurface.
Figure 2
Figure 3
keyboard pad


