12
Assemble units as described herein only. To do otherwise
may result in instability. All screws, nuts and bolts must be
tightened securely and must be checked periodically after
assembly. Failure to assemble properly, or to secure parts
may result in assembly failure and personal injury.
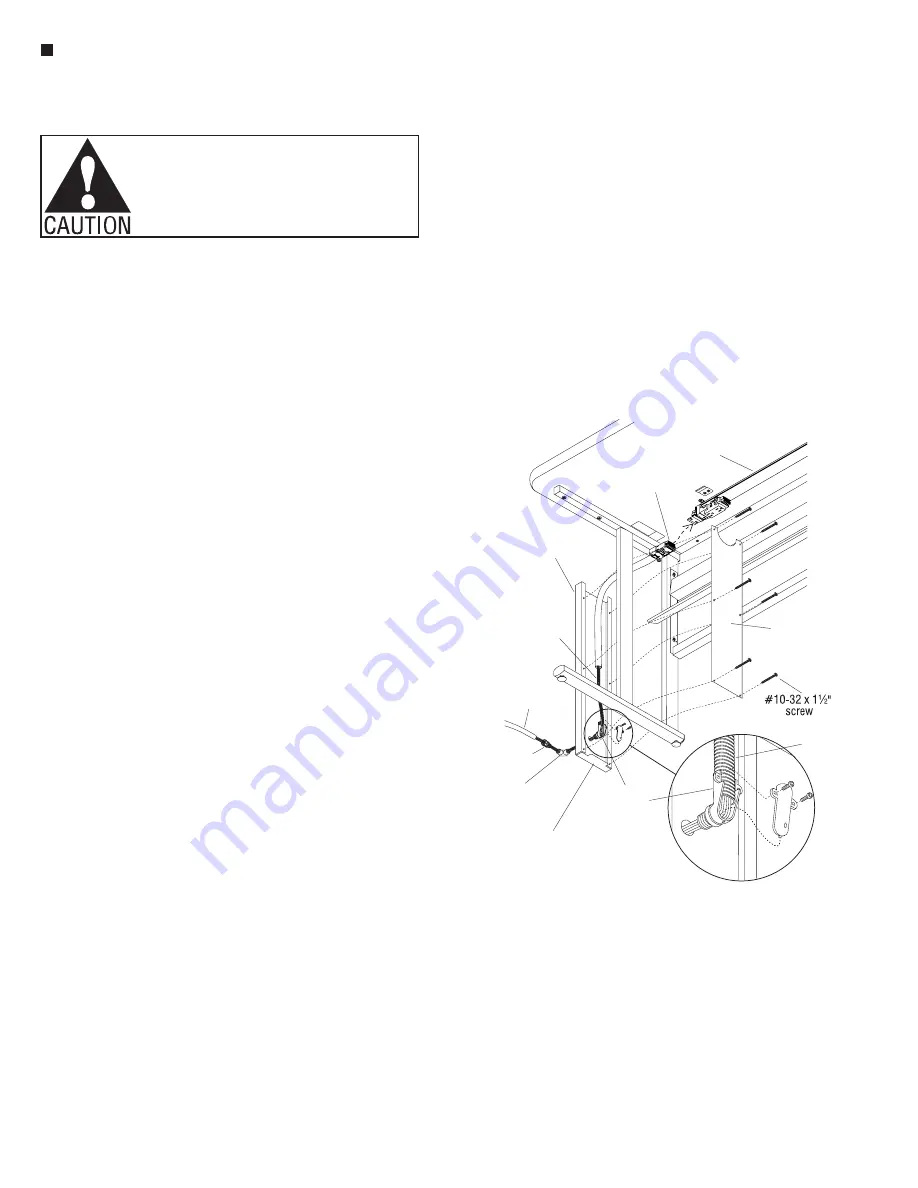
14. For 10-wire power infeed,
position the flexible conduit
between the vertical leg members
and plug the power infeed
connection into the 10-wire
harness under the table. Route
the uncased 10-wire through 90°
metal connector and through the
access hole of the infeed outer
wireway. Lay the oval conduit
flat (not on edge) into the bottom
half of the round 90° metal
connector. Assure the maximum
amount of conduit is inside the
fitting and connect the top half
of the fitting to the bottom. Use
screws supplied and assure that
the two sections are properly
connected, securely capturing
the flexible oval conduit
(Figure 5).
Note:
The conduit and
connector assembly has been UL
Listed in KI’s UL file to meet the
requirements of UL 1286
“Office Furnishings”. The 90°
metal connector is limited to the
following models: EGS Appleton
AC96 or Cooper Crouse 738.
Substitutions are not allowed.
15. Route the uncased 10-wire
through the 90° pulling elbow.
Next screw or thread the 90°
metal connector into the 90°
pulling elbow, sandwiching the
steel infeed panel. Slide the
liquid-tight connector onto the
10-wires and connect it to the
90° pulling elbow (Figure 5)
16. Set the infeed outer wireway up
against the outside of the vertical
leg members with support lip
resting on the foot of the leg.
Position the infeed inner wire
way up against the inside of the
vertical leg members. Fasten
infeed inner wireway to infeed
outer wireway with six #10-32 x
1½”screws (Figure 5).
17. Determine the appropriate length
for the liquid-tight conduit (to
power source) and cut it to size.
Slide the liquid-tight conduit
onto the 10-wires and connect
the conduit to the connector on
the elbow. Finally the liquid-tight
conduit may be fastened to a
junction box (customer supplied)
and the 10-wires can be cut to
size and connected to the power
source (Figure 5).
Important:
The Listed conduit
of the power infeed is intended to
be terminated with a commonly
available Listed conduit fitting
appropriate for the type and trade
size of the conduit.
Note:
The power infeeds
are to be connected to the
power source by a qualified
electrician who must also check
the electrical integrity of the
finished system. These steps are
intended as a guideline for the
installation.
18. The power/data door that is
attached to the modesty panel
snaps onto the two pre-installed
door clips at the underside of
the worksurface. The S-shaped
power/data divider that was
installed into the power/data
door is in place to separate
power from data lines (optional).
Note: This channel is not
to be used for routing
extension cords. Power
supply cords are not to be
routed across or through
more than one complete
unit/worksurface.
Data lines
can be run through worksurface
grommets and exit through
knockout in infeed outer wireway
or notch on inside of center
vertical wireway. Snap the power/
data door to the door clips when
power and data lines have been
run.
WorkZone
®
Desks - 24”, 30” x 30” through 54” Tops with Power & Data
Assembly Instructions
10-wire
harness
power infeed
infeed
inner
wireway
infeed
outer
wireway
uncased
10-wire
liquid-tight
connector
liquidtight conduit
(to power source)
90 pulling elbow
o
round
90 metal
connector
o
support lip
oval
flexible
conduit
Figure 5


