11
Pegue las piezas F29 - F33 como se muestra arriba.
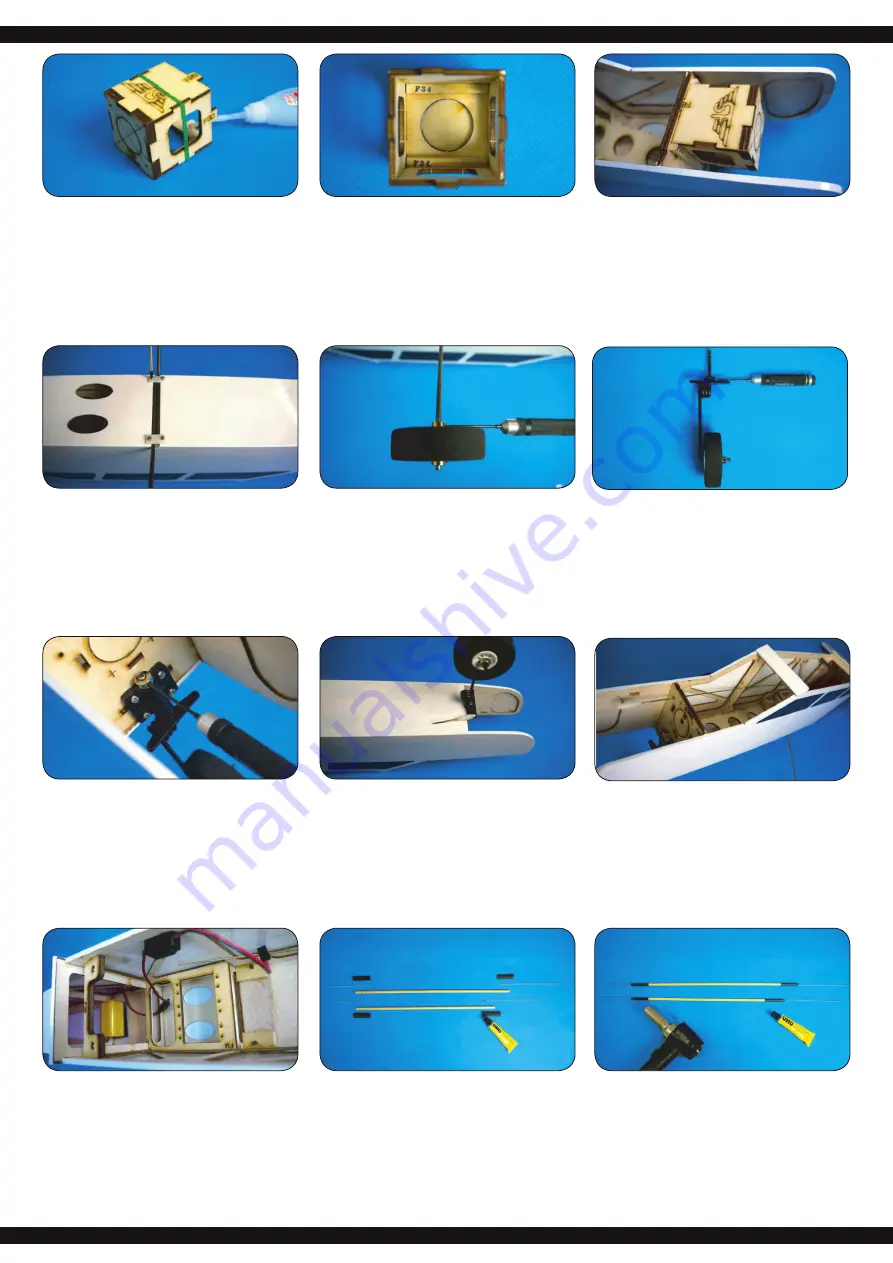
Use instant glue to secure F29-F33 in place with SF logo facing
top.
Cuando el pegamento se haya secado, cubra las piezas F34 con
pegamento y péguelas en el soporte del motor para reforzarlas
(véase la imagen).
When the glue is dried enough; spread some epoxy on F34 and
secure F34 inside the motor mount; spread some epoxy on the
corners of F34 for reinforcement.
Después de que el pegamento se haya secado, pegue el so-
porte del motor a la parte delantera del fuselaje. Para asegurar,
pegue un F35 a la derecha e izquierda del soporte del motor.
When the glue is dried enough; install the motor mount inside the
head of fuselage, use instant glue to secure the motor mount in
place. Place F35 inside the motor mount and use epoxy to secu-
re it in place. Spread some epoxy on two sides of motor mount.
Atornille el morro del tren de aterrizaje en el soporte del tren de
aterrizaje en la parte delantera del mamparo, asegurándose de
que la capacidad de dirección no se vea afectada.
Install nose gear assembly into the nose gear mount, place a
collar on top of it and secure with M3x4mm hex screw. Install
nose gear assembly into the nose gear mount, place a collar on
top of it and secure with M3x4mm hex screw.
Retire una varilla roscada M2 x 450 mm, atornille la cabeza de
la horquilla y deslice un pequeño pieza de tubo de silicona sobre
la varilla roscada. Enganche la horquilla a la parte delantera del
timón del tren de atterizaje delantero.
Take on piece of M2 x 450mm rod out of the hardware bag;
screw in clevis on one end; slide in a small piece of silicon tube,
pull the rod through the fuselage, and screw in clevis on another
end for connecting with nose gear control horn.
Ejemplo de instalación cuando se utiliza un motor de com-
bustión
A Retire una varilla roscada M2 x 450 mm del kit e
introdúzcala a través del hueco en la parte delantera del
fuselaje. Coloque una tubo de silicona en la parte delantera
y atornille la cabeza de la horquilla a la varilla roscada.
Installation example when using a combustion motor:
A Take one piece of M2 x 450mm rod out of the hardware bag
and insert through the pre-served holes inside the fuselage.
Thread the clevis on the end of rod and slide in one piece of
silicone tube.
El tren de aterrizaje principal se presiona en la ranura de la parte
inferior del fuselaje y se atornilla con los soportes suministrados.
Use 2.6 x 8 mm tapping screws and gear plates to secure the
main gear in main gear slot.
Fije las ruedas al tren de aterrizaje respectivo utilizando dos anil-
los de ajuste cada uno. Preste atención al buen funcionamiento
de las ruedas.
Assemble wheel with collars on the main gear and secure with
M3 x 4 mm hex screw. Make sure the wheels can turn easily.
Montar el tren de aterrizaje delantero.
Install nose gear control horn on the top of nose gear; secure
with M3x4mm hex screw.
B
Instale la batería del receptor y el cable del interruptor.
B Install the receiver battery and switch.
Observe la imagen de arriba y monte las varillas para el timón
de profundidad y dirección. Usar el pegamento para asegurar
la construcción.
Please refer to the drawing and assemble the rods for the eleva-
tor and rudder. Use UHU glue to secure the conjunctions.
Deslice el tubo retráctil sobre las conexiones y encájelas con un
secador de aire caliente.
Slide in shrinking tube on the conjunction. Use heat gun to make
the tube shrinking for reinforcement.


