background image

星火全自动缝纫控制系统使用说明书

Operation Instruction for Xing Huo Automatic Sewing Control System

35

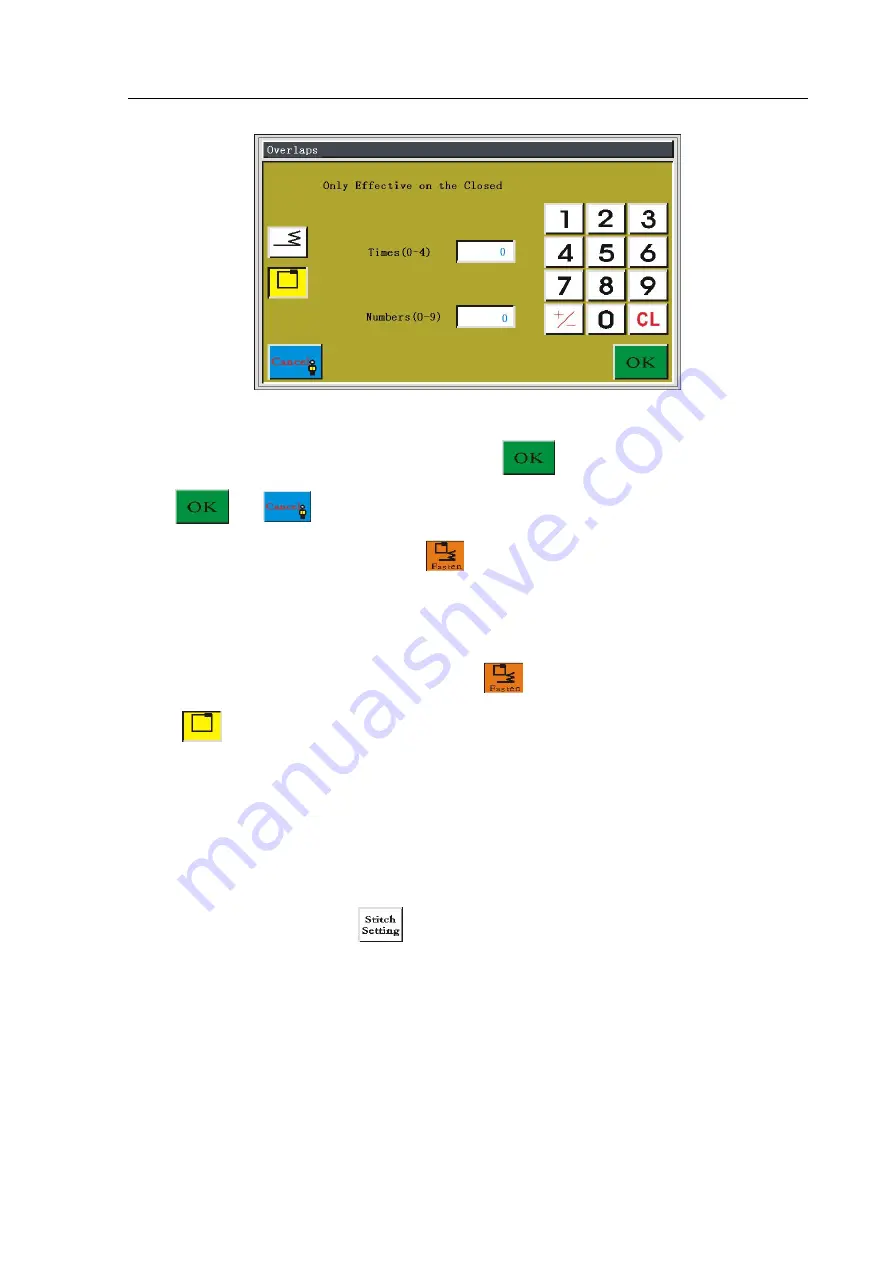
Set number of times and number of stitches to overlap according to the need, 0 means

invalid. After the setting is completed, press the

key to save the current settings.

Press

or

key once again to return to the collect file main interface. Then the

background of reinforcing becomes red

, which shows that reinforcing will be used for

each subsequent collection section. The display line width of reinforcing segment area

becomes thick.

If you want to cancel the reinforcing, click

to enter reinforcing setting page; click

on the

icon with yellow background to make it become white, click "OK" to return to

collection.

4.12 Collection Speed and Stitch

In file collection, if the current and subsequent collection section need to change the

sewing speed or stitch, press

key to enter the speed function setting interface, as

shown in figure:

Summary of Contents for 6040-D

Page 1: ...Automatic Sewing Control System Operation Instruction Human Machine Interface October 2014 Version V3 1 All rights reserved Shenzhen Xing Huo CNC Co Ltd ...

Page 2: ...tion of Manual Frame Moving Interface 12 2 2 4 Display Specification of Base Settings Interface 13 2 2 5 Display Specification of Processing Statistics Interface 15 2 3 Main Menu Interface 17 Chapter III File Management 18 3 1 Memory File Management 18 3 2 U Disk File Management 19 Chapter IV File Collection 21 4 1 Main Interface of File Collection 21 4 2 Empty Sending Collection 24 4 3 Single Nee...

Page 3: ... Position 51 5 9 2 Modify All Needle Positions after Current Point 52 5 10 Section Offset 52 5 11 Section Speed Modification 54 5 12 Overall Offset 55 5 13 Secondary Origin Modification 56 5 14 Section Modification 57 Chapter VI User Settings 59 6 1 User Settings Interface 59 6 2 User Settings Parameters Introduction 61 Chapter VII Auxiliary Operation 66 7 1 Auxiliary Operation Interface 66 7 2 Co...

Page 4: ...hall prevail 1 2 Functional Description 1 One machine with multi purpose simple operation Full automatic template sewing machine can replace many kinds of special machinery such as traditional flat sewing machine long arm sewing machine bartack sewing machine embroidery machine etc in certain circumstances to achieve multi usage After placing the template well the operating personnel only needs to...

Page 5: ...s comprehensive graphics editing functions supports layer editing and adding various kinds of special sewing stitch lines With common control instruction set customizable control instruction functional code high dexterity of action For each layer each graphic each stitch point a variety of mechanical control commands can be inserted into to meet the diversified and precise automatic sewing require...

Page 6: ...ng remove dust on the surface of control box and the filter regularly so as to keep good ventilation for the system which is good for heat dissipation Without authorization of the company please do not make any change to the product arbitrarily and the company shall not hold any responsibility for the consequences Warning If it really needs to open the case cover it must be carried out5 minutes af...

Page 7: ...d with the voltage regulation equipment when the power grid voltage fluctuation is more than 10 Equipment power is between 1 0 to 2 0KW according to different machine configuration 1 3 4 Grounding Requirement In order to prevent electric shock or fire accident of electrical equipment due to causes such as electric leakage over voltage insulation etc please make sure the electronic control with rel...

Page 8: ...ically Processing main interface is shown as below Figure 2 1 Processing Main Interface Functions of keys on processing main interface are introduced as follows Processing file preview area displays the currently selected graphical file when clicked switches between Full Figure zoom to best display and In Proportion actual proportion with processing range modes Memory file list displays the memory...

Page 9: ... set maximum speed It sews one stitch by one round of the spindle It can be prohibited to modify rotational speed arbitrarily through setting a password Slow down key reduces the spindle speed at 100 r min decreasing reduces continuously if long press until the set minimum speed It can be prohibited to modify rotational speed arbitrarily through setting a password Bobbin thread statistics key show...

Page 10: ...fore modifying cancel the current modification confirm the current modification Left page key turn to the left page to check memory file Right page key turn to the right page to check memory file Reset key press the key to make each axis return to the absolute origin Base key press the key to enter setting page of XY axis base point Manual presser frame rise fall key every press to switch the pres...

Page 11: ...winding duration is over winding will stop Forbid shows that winding is prohibited shows the spindle winding speed Spindle inversion key press the key then the spindle starts inversion and slow moving Spindle corotation key press the key then the spindle starts corotation and slow moving Needle bar up down key every press to switch needle bar between upper positioning highest point of needle and l...

Page 12: ... to return to processing main interface Manual frame moving key press the key to enter manual frame moving operation interface 2 2 3 Display Specification of Manual Frame Moving Interface In the processing main interface click and then click it can enter the manual frame moving interface In the manual frame moving interface operations such as manual frame moving controlling the rotation of each ax...

Page 13: ...s interface template base point can be set up Reasons of base point settings As to the processing files edited and generated using upper computer software in the import into memory and preview show for the first time the system will place this file at the right middle position within the scope of processing visible when clicking on the Processing File Preview Area to switch display mode specific a...

Page 14: ...ace the system will move the frame to the base point 1 position automatically 2 If upper computer editing software has set double base points Set the First Base Point will be prompted the top left of the interface check whether base point 1 is in template slot position A at this time if there is any deviation click the direction keys to move for overlap 3 Click on and complete base point 1 setting...

Page 15: ...oint 1 and will return to processing main interface after aligning to the base point 1 At the same time through setting system parameters there is no need to align to base when used for the first time Please consult the manufacturer for the detail settings 2 2 5 Display Specification of Processing Statistics Interface In the processing main interface click or to enter processing statistics interfa...

Page 16: ... Full Counting will be prompted Press the key to enable the bobbin thread statistics press it again then shut down If User Parameters Count Setting Counter Setting Valid Yes it will enable the bobbin thread statistics always this key can t be used to close Initial Len of Bobbin Thread mm refers to the bobbin thread length which has been used up when a file is finished processing it will reduce the...

Page 17: ...nt manages memory files and the U Disk files carries out input output file operations Collect File generates processing files through track collection pattern making Modify File modifies the currently selected processing file User Param sets the parameters need to be adjusted in the user processing Machine Param only for the use by machine assembly personnel Auxiliary Setting used for processing a...

Page 18: ...ile management by default as shown in figure The memory can store 999 processing files at most the total size of no more than 256 M or 128 M total storage space It supports Chinese and English names display It uses 8 3 naming rules that is the primary file name cannot be more than eight characters not more than four Chinese characters if Chinese characters If more than that it will take the first ...

Page 19: ...to the specified position For example select 002 TEST2 FLW click on in the pop up dialog box amend the current sequence number 2 to be 1 click on Confirm It will change to be 001 TEST2 FLW Output file copies selected single or multiple files from memory files to the root directory of U Disk If there is any file of the same name in U Disk it will be replaced Memory U Disk switch press the key once ...

Page 20: ...t the way of subfolders for classification management when there are a lot of files Click to select file the selected file name will be changed into red carry out operations for the selected file according to the need Keys descriptions input file copies the selected single or multiple files from U Disk to memory space files with the same names will be replaced Return key back to the main menu inte...

Page 21: ...ed of the section to collect corresponding to High Rate Middle High Rate Middle Low Rate Low Rate in parameter settings page The default is H Stitch sets the distance between each needle in sewing the default is 3 0 mm Mode New Mode File click the choice box to switch between the two New to create a new collect file File for adding collection for selected files in processing main interface The def...

Page 22: ... collection section is empty sending Display in a dotted line Single needle collection key press the key once when the background becomes yellow the current collection section is single needle the longest stitch of single needle collection is 12 7 MM and the current collection will be invalid after exceeding the length Press the key once when the background becomes yellow the current collection se...

Page 23: ...nsert functional code operation Save file key press the key to save the current file Reinforcing functional key press the key to enter into reinforcing sewing settings Multiple and complementary functional key press the key to enter into multiple and complementary sewing settings Zig zag functional key press the key to enter into the zig zag sewing bartack setting interface Preview collection key ...

Page 24: ...n two points generate a section of empty sending Absolute origin or the end point of previous collection section is the first point of empty sending collection displayed by red cursor Press keys to move the black cursor to the needed position press the key to generate empty sending section If it needs to insert the functional code at the end of the section please refer to functional code setting o...

Page 25: ...When single needle moving distance is greater than 12 7 MM collection of the section is invalid and it will return to the starting point of collection automatically If it needs to insert the functional code at the end of the section please refer to functional code setting operations This operation may be done at any time before the graphics generation 4 4 Straight Line Collection In file collectio...

Page 26: ...fore the graphics generation 4 5 Arc Collection In file collection main interface press the key the key background becomes yellow shows that the current section of collection is arc mode as shown in figure In arc collection any 3 points collections which are not on the same straight line generate a circular arc the first point as the starting point of the arc the second point as the height referen...

Page 27: ... in figure In round collection any 3 points collections which are not on the same straight line generate a round Processing order the first point starting point the second point the third point the first point end point Absolute origin or the end point of previous collection section is the first point of round collection Start point and end point of the round Press keys to move the cursor to the n...

Page 28: ... yellow shows that the current section of collection is multi segment mode as shown in figure In multi segment collection it can collect 127 points continuously at most to generate line segments by the way of two points a straight line Absolute origin or the end point of previous collection section is the first point of multi segment collection Press keys to move the cursor to the needed position ...

Page 29: ...if the collection points are intensive as far as possible on corners Less than three points of collection can t generate a curve Absolute origin or the end point of previous collection section is the first point of curve collection Press keys to move the black cursor to the needed position press the key to determine the collection point move for many times and determine the collection point after ...

Page 30: ... side of the collection direction is zig zag sewing along the center line of the collection direction is zig zag sewing along the right side of the collection direction Choose zig zag ways according to need the key background becomes yellow when selected set the width and gap of zig zag click OK to return to collect file main interface the bartack background becomes red at the moment which shows t...

Page 31: ... kinds of multiple sewing ways as shown below Homodromous multiple sewing sewing does not trim thread after sewing of the first thread and sews continuously to the sewing start point of the second thread to carry out homodromous continuous sewing Homodromous multiple sewing empty sending after trimming thread of sewing of the first thread empty sending to the sewing start point of the second threa...

Page 32: ...ncrease input range is 0 9 0 means no increase Select multiple sewing way and direction according to the need and make background of both icons to become yellow set up thread distance and the number of times of sewing After the setting is completed press the key to save the current settings and press or key once again to return to the collect file main interface Then the background of multiple sew...

Page 33: ...licable to the unclosed graph Forward and backward reinforcing is the reverse stitching of the head and the tail In reinforcing setting interface press the key to enter the forward and backward reinforcing setting interface key background will become yellow As shown in figure There are four kinds of ways for beginning reinforcing means to carry out reverse stitching to the beginning for 1 2 3 4 ti...

Page 34: ...n section The display line width of reinforcing segment area becomes thick If you want to cancel the reinforcing click to enter reinforcing setting page click on the icon with yellow background to make it become white click OK to return to collection 4 11 2 Closed Reinforcing Closed reinforcing is only applicable to closed graphs a closed graphs or round generated by polygons b end point of the la...

Page 35: ...ing becomes red which shows that reinforcing will be used for each subsequent collection section The display line width of reinforcing segment area becomes thick If you want to cancel the reinforcing click to enter reinforcing setting page click on the icon with yellow background to make it become white click OK to return to collection 4 12 Collection Speed and Stitch In file collection if the cur...

Page 36: ...ration of current section 4 13 Insert Functional Code In file collection if you need to add functional code after the end point of last completed collection section press the key to enter functional code setting interface as shown in figure There are six kinds of functional codes P Up Pause functional code the spindle stops at the Up Pause needle position when meeting the functional code P Down Pa...

Page 37: ...nctional code will work only when the following conditions are met a it must be added at the end point of the empty sending section b there isn t any sewing start point before the empty sending section Press keys to add functional code according to need the characters of selected functional code will be red after the setting is completed press the key to complete a functional code adding and retur...

Page 38: ... Xing Huo Automatic Sewing Control System 38 Press the alphanumeric key to input file name press the key to save the file The system will select the currently saved file automatically as processing file and jump to work interface for processing ...

Page 39: ...menu interface press the key to enter edit file interface as shown in figure Select the way needed to modify to edit after the completion press the key to return to the processing main interface Functions of keys are introduced as follows Add needle point key used to add a needle point between the needle point of the current cursor and the next point graphics unchanged Stitch length of the adding ...

Page 40: ...hanged Modify functional code key used to insert a functional code at the current cursor position Needle position modify key used to modify the needle point position at current cursor position graphics unchanged or to modify all stitches after current needle point graphics changed If the straight line length of forward and backward 2 needles of modification is greater than 12 7 MM it fails to modi...

Page 41: ...add the needle point If you need to add a stitch between the 4th 5th threads and 1 5 mm from the 4th thread move the cursor to the 4th thread Press the key to enter the stitch setting interface as shown in figure Coordinates relative to previous needle Coordinates relative to absolute origin Collection stitching of the current section Number of threads of the current cursor The speed of the curren...

Page 42: ... otherwise it will be invalid It is set to be 1 5 mm here Press the key to confirm adding Return to the select stitch interface automatically you can continue to add or press the button to save changes and return to the edit file main interface 5 3 Delete Needle Point In the edit file main interface press the button to enter select stitch interface as shown in figure Press the Single Step or Conti...

Page 43: ...utomatically and you can continue to edit or click button to save the changes and return to the edit file main interface 5 4 Forward and Backward Reinforcing In the edit file main interface press the button to enter select stitch interface as shown in figure Press the Single Step or Continue key to move the cursor forward and backward to the needed position Press the key to enter the edit operatio...

Page 44: ...mber of times and number of stitches to reverse stitching according to the need After the setting is completed press the key to save the current settings Return to the select stitch interface automatically reinforcing part will become thick You can continue to edit or click button to save the changes and return to the edit file main interface 5 5 Closed Reinforcing In the edit file main interface ...

Page 45: ...and sewing start point of empty sending section end or absolute origin overlap for other positions it will prompt This point is an unclosed intersection Set number of times and number of stitches to overlap according to the need After the setting is completed press the key to save the current settings Return to the select stitch interface automatically reinforcing part will become thick You can co...

Page 46: ...o delete press the button to delete specified number of threads after the cursor point If the deleted stitches are more than the remaining stitches all the subsequent stitches will be deleted It will return to the select stitch interface automatically and you can continue to edit or click button to save the changes and return to the edit file main interface The following is the before and after co...

Page 47: ...ursor forward and backward to the needed position press the key to enter append single needle operation interface by default After the completion of appending subsequent stitches will move as a whole There are two ways to append stitch Append one stitch Append multiple stitches 5 7 1 Append Single Needle In the append stitch interface press the button to enter append single needle operation interf...

Page 48: ...pending It will return to the select stitch interface automatically and you can continue to edit or click button to save the changes and return to the edit file main interface 5 7 2 Append Multi Needle In the append stitch interface press the button to enter append multi needle operation interface and the icon background will become yellow As shown in figure Press numeric keys to input the number ...

Page 49: ...ace The following is the before and after contrast figures of appending 4 needles at the 6th needle position 5 8 Modify Functional Code In the edit file main interface press the button to enter select stitch interface as shown in figure Press the Single Step or Continue key to move the cursor forward and backward to the needed position check CODE Y N to judge whether the current point has function...

Page 50: ...rent setting and the text becomes gray After the setting is completed press the key to save the current settings It will return to the select stitch interface automatically and you can continue to edit or click button to save the changes and return to the edit file main interface 5 9 Modify Needle Position In the edit file main interface press the button to enter select stitch interface as shown i...

Page 51: ...l offset as a whole after the modification 5 9 1 Modify Current Point Needle Position In the modify needle position interface press the button to enter to modify the current point needle operation interface the icon background becomes yellow As shown in figure Press the direction keys to move the cursor to the position where it needs to modify the stitch point and the moved distance should be not ...

Page 52: ...on keys to move the cursor to the position where it needs to modify the stitch point and the moved distance should be not greater than 12 7 MM press the key to complete modification The subsequent stitches will offset as a whole after the modification It will return to the select stitch interface automatically and you can continue to edit or click button to save the changes and return to the edit ...

Page 53: ...ess the key to enter the modify setting interface as shown in figure Section offset will shift the area between the above two selected red cursors overall towards the location of the movement of direction keys other parts of the original graphics unchanged and ways of or can be used for line segment to connect offset area and the original figure If way is used the line segment will be processed ac...

Page 54: ...on In the edit file main interface press the button to enter select stitch interface as shown in figure Press the Single Step or Continue key to move the cursor forward and backward to the starting point of sewing speed modification and press the key mark with red cursor press the Single Step or Continue key to move the cursor forward and backward to the final position of speed modification again ...

Page 55: ...t or click button to save the changes and return to the edit file main interface Section speed modification will not change graphics and you can see the processing speed of corresponding point at SPEED position in the select stitch interface 5 12 Overall Offset In the edit file main interface press key to enter graphics offset interface as shown in figure Press the direction keys to move the curso...

Page 56: ...ondary origin in the graphic it will prompt No secondary origin found please return directly if yes it will enter the modify secondary origin offset point interface as shown in figure Press the direction keys to move the cursor to the starting position where it needs to modify and press the key to complete modification It will return to the select stitch interface automatically and you can continu...

Page 57: ...n Modification Section modification can modify the selected stitch section to be tracing lines such as empty sending straight line round curve multiple sewing etc In the edit file main interface press the button to enter select stitch interface as shown in figure Press the Single Step or Continue key to move the cursor forward and backward to the starting point of sewing speed modification and pre...

Page 58: ...to use Press key to enter the corresponding interface If you choose it will be done directly if you choose it will enter the graphics collection interface if you choose it will enter multiple sewing setting interface It will return to the select stitch interface after modification automatically and you can continue to edit or click button to save the changes and return to the edit file main interf...

Page 59: ...o meet the convenient processing requirements and improve processing efficiency 6 1 User Settings Interface In the main menu interface press button to enter the user setting interface there are two pages of the user setting totally as shown in figure Parameters classification declaration Needle Starting Speed Frame Setting Speed Magnification Method of Feeding Broken Threads Detection Trimming Set...

Page 60: ...fied section in collection file Reset Setting Set the parameters related to the origin Pause Setting Set the parameters used in pause Stat Setting Set related parameters of statistical processing Method of Feeding Set related parameters needed by feeding Broken Threads Detection Set related parameters of broken threads detection Trimming Setting Set related parameters of trimming Counting Setting ...

Page 61: ...ew the first needle position repeatedly for once or twice and then sew the next needle position Off is not repeat sewing Threads for Loosening 0 255 0 Nee dle Start ing Spee d Speed of the First Stitch 100 3000 300 Adjust on demand Accelerate from stationary to maximum sewing speed which can be divided into 5 stages of acceleration process at most Increasing speed too quickly may result in stitche...

Page 62: ...on Sequence Normal Special Normal Pedal Plate Operation Sequence 1ST 2ST 3S T 2ST The pedal switch for different mechanical structures with self locking without self locking etc with different ways of operation Reserve 1 Pressing Plate 1ST 2ST 3S T 1ST Reserve 2 Pressing Plate 1ST 2ST 3S T 1ST Delayed of the Single Pedal 0 1 12 0 6 Ignored for Uplifting the Frame 0 255 0 Win ding Setti ng Operatio...

Page 63: ...use Yes NO Yes Yes automatic trimming threads No without automatic trimming threads Needle Position in Pause Up Pos Down Pos Up Pos Pause Two stage Motions Yes NO Yes Two stage motions press to pause first and then loosen for automatic trimming threads Delayed Pause Op 0 1 12 0 8 Uplifting the Plate in Pause Yes NO Yes Pause Switch Type S_locked Nor S_locke d S_locked is not to pop up automaticall...

Page 64: ... 255 00 0 20 Delay setting time and then carry out broken threads processing after confirming broken threads Trim ming Setti ng Speed of Trimming rpm 10 2000 260 Starting Delay of Trimming 0 01 6 55 0 12 Duration of Drawing Threads 0 01 6 55 0 12 Drawing Threads the Delay s 0 01 6 55 0 12 Delay for Loosening Threads 0 01 6 55 0 00 If Trims Threads After Sewing Yes NO Yes If Open the Wiper Yes NO Y...

Page 65: ...Total circulation processing time stop circulation processing when time out Circular Work Gap S 0 20 3 Interval from processing finish to start of the next processing Graphical Preview All Commo n All Set the default display mode of file preview in the processing main interface Full Figure scale to display in the best shape of processing files In Proportion actual proportion of file in the scope o...

Page 66: ...duced as follows Combine File combines multiple up to 8 files into one file for processing Exp Param exports all parameters of the system to save in U disk Output Test tests whether the output control is normal Locking Setting sets management password use time limit export password etc Date Setting sets the system time Input Test tests whether the input control is normal Version Info displays the ...

Page 67: ...e right after clicking to select the selected files will be added to the left and the same file can be selected for many times to combine Related functional specifications are as follows click the file name on the left side the text will be red click on this icon will delete the selected file choose the file name on the left side click this icon to enter Offset Setting interface the selected file ...

Page 68: ...rent models The detailed steps to export parameters are as follows a Insert U disk b Enter the Aided Design interface click Export Parameters c In the pop up Machine Type dialog box enter the number as file name of the exported parameters click OK d Wait for several seconds until the pop up prompts Export parameters successfully please return click Exit It means that parameters are exported succes...

Page 69: ...omagnetic valve For the output of presser frame and presser foot click it once for cylinder movement once and click it again to return the original state For the OUT1 and OUT2 functions are depending on the specific equipment load part of the output is not used If clicking on the the icon will become which means that it is in a total output test and the icon will return upspring status after the t...

Page 70: ...whether to carry out timing lock machine management lock machine password and other related operations Limited time use such as installment payment function can be realized If the use limit is set for the equipment upon reaching the setting time the processing main interface will pop up dialog box to prompt for entering a specific unlock password to remove the lock Clicking on the Remove Limit can...

Page 71: ...used to set system time displayed on the upper right corner of the screen such as year month date hour and minute Super password is needed to enter 7 8 Version Information It displays system relevant information including name of the electronic control system version driver version etc System information interface is as follows 7 9 System Update In auxiliary operation interface press the button to...

Page 72: ...nd click OK 4 Prompt Updating please do not power off pops up At this point make sure not to power off otherwise you may need to return to the factory to solve 5 Wait for about 1 minute the system will restart the buzzer beeps once which suggests the update is successful Or it will suggest other error message and exit the update automatically Introductions to relevant error messages 1 No update fu...

Page 73: ... factory parameter setting interface as shown The interface will display the parameter files which has been stored in system click on the file name to make it to become red and then click it will pop up tip File saved exit which means that the selected parameters has been effective Set values and other hidden parameters within User Parameters Mechanical Parameters can be modified by this parameter...

Page 74: ...e machine before click and this file will be copied into the memory space And select the file again and click to make the parameters take effect Note parameter files are different for different devices The same type of equipment may also have different optimum ex factory parameter configuration due to nuances of mechanical structure Therefore it is suggested to export ex factory parameters for eac...

Page 75: ...Power off and reinsert machine head plate interface 4 Prompt Using Up Line Reason the bobbin threads required by preprocessing file is more than the remaining bobbin threads the total length in processing statistics interface the initial length of bobbin threads Solution a Use the bobbin threads statistical functions replace the bobbin threads and modify the related length information b If you don...

Page 76: ...as pulled out Solution when U disk is transferring please do not pull out U disk 8 Prompt A file is deleted by error Reason when copying files from memory to U disk an error occurs such as U disk not inserted or U disk damaged Solution insert U disk or replace an undamaged U disk 9 Prompt Out range Please Restting Reason a Length and width dimension of processing file is too big exceeding the scop...

Page 77: ...t Test interface trigger position input signal manually to check whether it can be detected c power off pull the frame manually to check whether the load is too big or stuck 12 Prompt Error Servo Reason a the set spindle speed is too fast which cannot adapt to the current processing files b system overload operation leads to alarm because of the spindle stuck or thread winding Solution a if the se...

Page 78: ... click the file names to be processed to make them to become red and then click to copy to memory Click to return to the processing main interface Select files to be processed on the left side the processing pattern will be previewed in central interface If you use File Collection function to generate processing file see Chapter 4 3 Put in the template Put cloth to be processed into the produced t...

Page 79: ...lign at base and used the template automatic recognition function there are just two steps put in the template start processing 2 If there is other information prompt see Appendix I 3 In case of repeated processing after the processing click the other button after just completing a processing and enter the parameter setting interface to cancel the circulation processing ...

Reviews: