background image


User Guide


51


VersiCam Processor Video Status Flags: 


VIDEO ENABLE - This is a status flag indicating that the system processor frame grabber is working 
properly. 


SYNC - This is a flag indicating that the system has video sync. 

4.10


Mode Menu 

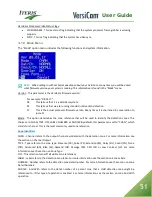
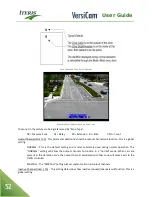
The "Mode" option menu includes the following functions and system information. 


Note:


When calling in with technical questions about your VersiCam, many times you will be asked 

what firmware version your system is running. This information is found in the "Mode" menu.


Version - This parameter is the VersiCam firmware version. 


For example: "08.01.17". 
08 

This tells us that it is a VersiCam system. 


01 

This tells us that we are running standard intersection detection. 

17 

This is the actual processor firmware version. Many times it is shortened in conversation to 
just x.17. 

Mode  -  This option determines the zone reference that will be used to identify the detection zones. The 
choices are: CHAN, TYPE, OFF, LABEL, NUMBER, or AND/W. By default, this parameter is set to "CHAN", which 
stands for channel. This is the most commonly used zone reference. 

Zone Identifiers 

CHAN - Channel refers to the output channel associated with the detection zone. For more information see 
the section on Channel Output. 
TYPE - Type refers to the zone type: Presence (PR), Pulse (PS), Extension (EX), Delay (DL), Count (CN), None 
(NO),  Advanced (AD), Bike (BI), Demand (DE), Passage (PA), CSO (CS) or Low Contrast (LC). For more 
information see the section on Zone Type. 
OFF - This selection turns off all visible zone references. 
LABEL - Label refers to the detection zone label. For more information see the section on Zone Labels. 
NUMBER - Number refers to the detection zone detail number. For more information see the section on zone 
Detail Numbers. 
AND/W  -  And With refers to the detail number of a parent zone that a child detection zone might be 
referenced to, if this type of operation is enabled.  For more information see the section on zone And With 
operation. 

Summary of Contents for VersiCam

Page 1: ...Part Number 493432201 Rev F ...

Page 2: ... and the author make no claim to these trademarks While every precaution has been taken in the preparation of this document the publisher and the author assume no responsibility for errors or omissions or for damages resulting from the use of information contained in this document or from the use of programs and source code that may accompany it In no event shall the publisher and the author be li...

Page 3: ...nd the transferee gives written notice to Iteris of its approval of this license In the event that the System is sold or transferred to a third party other than as set forth in the preceding paragraph the transferee shall apply in writing to Iteris Service Manager for approval of the transfer of the license A license to use the Software installed in the System at the time of the sale or transfer s...

Page 4: ...licensee for any damages claims or losses whatsoever including but not limited to lost profits lost savings or other special incidental or consequential damages arising out of the use or inability to use the Software Documentation and or the System regardless of the circumstances In no case shall Iteris liability exceed the purchase price of the System Controlling Law This Agreement shall be gover...

Page 5: ...ry level video detection and output presence detection at a cost efficient price Your investment is future proofed by VersiCam s flexible design that can support simple firmware upgrades Benefits Optimized for outdoor traffic situations that aids video detection Integrated mounting brackets reduce installation and setup time Connectors located on back faceplate simplifies cable connection Proporti...

Page 6: ...the Camera Processor unit thus eliminating the need for a traditional lens adjustment module LAM This also allows the camera Zoom and Focus operations to be performed from the cabinet using the ICC module system menu and a USB mouse The installer will no longer need to make use of the dark focusing film filter or welders glass to open the camera iris during the focusing procedure VersiCam opens th...

Page 7: ...tomer installer of the system IMSA 39 2 40 2 3 Pair Stranded 19AWG Example Belden 581718 Stainless Steel Banding Material Cable Strain Relief for IMSA cable Miscellaneous Supplies Electrical Tape Tie Wraps Tools Required for Installation The following tools are required for installation of the VersiCam system Various Screwdrivers Adjustable Wrench and Nut Drivers Wire Strippers and Wire Cutters Ba...

Page 8: ...take the time to read all the sections to become thoroughly familiar with all the system details CAUTION The Vantage equipment must be grounded Failure to ground the Vantage equipment can cause the Vantage equipment to fail Test your power outlet socket and power strip to ensure it is grounded CAUTION The Vantage equipment is sensitive to static use correct ESD procedures when handling the modules...

Page 9: ...hield adjusted Pulled out Extended Camera tilted slightly downward d ICC Installation Switches properly set Plug the ICC Module into the appropriate slot of the detector rack or input file Connect the monitor and mouse to the ICC Module Press and hold the ICC Module Menu button in for approximately one second and then release it This will bring up the VersiCam main menu e Camera Field of View FOV ...

Page 10: ... 3 6m long from top line to bottom line of zone Vertical markings curbs and gutters out of zone area Symbol markings contained in zone LC zones properly drawn And W number same as zone number if not being used It s Easy Left click the mouse button when the cursor is over the Add menu item which is the first choice on the left side of the main menu bar The sub menu will be displayed showing the var...

Page 11: ...k the mouse to anchor the final corner Vehicle detection zones should be drawn the length of a medium size vehicle from back to front bumper a single zone should not encompass the entire length of the vehicle and the width should be slightly narrower than the lane lines Multiple or overlapping zones will increase the detection sensitivity Realize that excessive overlapping may also increase false ...

Page 12: ... normal h Archive snapshots and configurations using VRAS i Observe operation During critical times o Morning and evening transition o Midday and night time After saving the configuration the new zones will go into a three minute learn mode during which time they will place constant calls An will appear next to each zone that is learning After the three minutes are up the will disappear and zones ...

Page 13: ...User Guide 13 2 1 Menu Tree ...

Page 14: ...e cable transmits data and provides power from the ICC module to the Camera Processor unit A USB mouse and a video monitor provide the necessary user interface to the ICC module The module can also be configured using a laptop computer and Iteris VRAS software The VersiCam System 3 1 Camera Installation The Camera Processor unit integrates the camera and video processor into one Communication data...

Page 15: ...tely 1 4 inch Important If wire color pairs are not uniquely color coded or marked be sure to label or number the wire pairs ahead of time so they can easily be identified at the other end Use of mismatched pairs and wires can lead to installation issues and possible damage to the VersiCam equipment Also make note of which wire pairs are being used for what purpose i e camera power video or commun...

Page 16: ...low Push Cable Through Cap Assembly Back of Camera With Cap and Plug Removed Re assemble the cord grip After the cord grip is securely installed back on the cap assembly tighten the nylon nut down until it the inner rubber grommet firmly grips the cable body Hand tight is usually sufficient Camera Processor Unit Connector Plug Connection Function Color SDIO Communications White SDIO Communications...

Page 17: ...the picture above Pull the camera sun shield back and snug down the camera bracket set screws Final adjustment of the sun shield will be done later during the Field of View FOV setup procedure Mount the camera bracket to the pole arm using stainless steel banding material Do not use hose clamps they tend to loosen over time and may result in the camera moving and slipping on the pole The luminare ...

Page 18: ... using the center bolt to secure both pieces together Snug the center bolt and the two side camera mount bolts down temporarily Final camera aiming will be done during the Field of View FOV setup procedure and all bolts will be permanently secured then Camera Installed on Pedestal Bracket 3 2 The ICC Module The VersiCam ICC Module ...

Page 19: ...rocessor unit are terminated to the ICC module One pair each for power output video and communication three pair total AC Power Wire Terminations the ICC module requires a source of 120 VAC power If AC power is not available from the detector rack on pins L M and N then power should be hooked up here If power is provided on pins L M and N the front plug is automatically disabled Channel 1 2 Call L...

Page 20: ...se Up of the DIP Switches Both Shown in the ON Position These switches are used to configure the ICC module for use in a NEMA TS 2 type detector rack Both of the DIP switches should be in the UP toward the top card edge ON position for use in a TS 2 type detector rack For other rack types the DIP switches should remain in the DOWN away from the top card edge OFF position The position of these swit...

Page 21: ...ir 19 AWG stranded multi conductor cable and install the grounding lug per manufacturer s instructions Carefully strip back the cable jacket sheath a total of about 2 inches Scoring the outer jacket lightly with a sharp knife and bending the outer jacket sheath back and forth until it parts is the safest method Cut away the corrugated copper shield flush with the cable sheath being very careful no...

Page 22: ... provided Run the ground wire the shortest distance without severe bends to the cabinet equipment grounding buss Inserting Connector Bottom Tap Finished Grounding Lug Assembly ICC Module Wire Terminations You will require three 19 gauge stranded wire pairs After the grounding lug has been installed separate the three wire pairs and strip each of the wires insulation back approximately 1 4 inch ICC...

Page 23: ...k on pins L M and N the front panel connector is disabled If the rack does not provide AC power on pins L M and N use the pre wired AC power cord Plug it into a suitable 120 VAC source and plug the other end into the socket on the front of the ICC module Typically NEMA users will need to use the front plug for AC power while 332 170 type users will have AC power supplied from the cabinet input fil...

Page 24: ...tand alone operation Make sure the ICC module has AC power and DC power if AC power is being brought in through the front Make sure the correct polarity has been observed on DC video and communication wire pairs The ICC module should power up and the green ON LINE LED should come on solid If the Camera Processor unit is properly hooked up to the ICC module the Yellow VIDEO IN OK LED should also il...

Page 25: ...lure to install surge protection or using non approved surge protection devices will void the Vantage equipment warranties Important The surge protection device must be grounded to operate correctly Failure to correctly ground the surge protection device may result in damage to the VersiCam system The attached 12 gauge wire should run the shortest distance to ground without severe bends and to a c...

Page 26: ...l to bottom of screen Adequate area left for advanced detection Occlusion A major issue with camera FOV is occlusion If large vehicles block lanes or smaller vehicles then detection will not be possible Horizon You never want the horizon to be included as part of your camera field of view If the horizon is visible as part of your field of view on East and West approaches the camera maybe blinded b...

Page 27: ...s and should be the size of a medium vehicle Examples of Good FOVs Physical Camera Adjustment Centering the Camera The camera should be mounted so that it is centered as much as possible in relation to the field of view vehicle approach Extreme side shooting can result in reduced performance and vehicle occlusion See the section in this manual on Occlusion for more information Very Poor Mounting S...

Page 28: ...ce when dealing with a short luminaire arm on a very wide roadway it might be a better choice to mount the camera on the mast arm with a suitable extension bracket With the right extension bracket you should be able to achieve a mounting height of about 25 feet While this is less than the 30 feet you would achieve with a luminaire mounting the ability to center the camera over the roadway in this ...

Page 29: ...ow from the top of the screen to the bottom of the screen By loosening the two hose clamp set screws the camera body can rotate to better square up the FOV image The car bumpers should also end up being parallel with the bottom of the screen The Camera Body Should Be Rotated Acceptable Camera Alignment Proper Camera Focus Adjustment When you are sure that you can obtain the desired FOV you will ne...

Page 30: ...User Guide 30 ...

Page 31: ...inatory This means that an increased opportunity to detect vehicles may also increase the opportunity to detect undesirable artifacts It is therefore a wise policy to avoid excessive overlapping especially over a troublesome area since increased opportunity to detect may lead to false calls under some circumstances Lane Structure Background Starting with firmware revision 08 01 15SP1 VersiCam proc...

Page 32: ...ne This though lane will help the algorithm determine the difference between a vehicle and a shadow from a vehicle in the though lane it must still be drawn to create the lane structure Again the zones in the through lane should have a valid detector output for example Proc 1 and the zone type should be set to none This is an example of the Lane Zone Structure when only the left turn detection is ...

Page 33: ...nt to properly detect this truck Drawing detection zones too small can create a new set of additional problems For instance extremely small zones that ended up on a car roof or just the middle of the car s hood would have the same adverse consequences Remember when resizing zones or making any other zone adjustments always be mindful of how these changes might affect edge content which in turn has...

Page 34: ...unt zone area it is counted The count data for that zone is then stored in an internal processor bin Bin interval length can be set from the Utility Utl menu option Vantage Remote Access Software VRAS or VantageView can be used to retrieve the stored count data Channel Output Ch Out is recommended to be set to NONE Draw the count zone using the same guidelines as you would for a normal detection z...

Page 35: ...he area used for LC zone contrast is not located in the near field of view The object or region selected for LC zone placement must not only be in the top 1 3 of the field of view but it also must be physically located and originate in the far region For example signal heads or luminaire poles that originate in the near field of view but also extend into the top 1 3 of the field of view are not a ...

Page 36: ...will most likely always be clearly visible even in heavy fog This improper LC zone setup and placement may result in the system not going into a Low Contrast mode even when the conditions might benefit from this feature Note It is also worth noting that this FOV is also very poor It looks like there is probably horizon included as part of the FOV this should also be corrected Low Contrast zones ar...

Page 37: ...f the time The demand zones borrow information from the passage zones to improve algorithm performance Note This feature is active from between 7 00 AM and 8 00 PM Ensure the processors clock is set correctly How to setup new demand and passage zones For a heavily congested approach the demand zone is used just like a presence zone Draw the demand zone just like you would draw a normal presence zo...

Page 38: ...ough the count zone Only one vehicle should occupy the zone at any one time This camera is mounted on a safety light mast arm This location creates a good FOV for both vehicle detection and counting CSO zones Direction is set to down and is 15 feet from the top of the zone to the bottom of the zone Notice the zones are set in the path the vehicles travel This camera is mounted on the safety light ...

Page 39: ... but it is not necessary to overlap them The zone should be about the length of a bicyclist Refer to the figure below Be careful not to draw the zones on the lane lines as this may increase the possibility of false calls Key The camera in this illustration is mounted on the signal mast arm centered over the three lanes of departing traffic The CSO zone has to be programmed down for it to collect d...

Page 40: ...Bike Detection operation During operation the zones will activate as traffic passes through For a Bike Zone the label Bike will be displayed in the center of the zone when a bike passes through For a Vehicle Zone the outline of the zone will be displayed when any vehicle or bicycle is detected If a Bike Zone is drawn inside a Vehicle Zone as described in the above section both the zone outline and...

Page 41: ...Vantage detection zone is to press and hold the menu button for two or more seconds and then release it this brings up the main menu bar Next move the mouse cursor to the Add option and left click the mouse to select it The last step is to set the various zone parameters and then select Exit to start drawing the detection zone At this point a Place Corner prompt is seen on the screen and the curso...

Page 42: ... have an existing zone and you wish to create new zones with those same properties you may by following this procedure First select the zone with the properties you want to clone by left clicking in the inside of that zone The selected zone s outline will change from yellow to white Then select ADD from the menu bar The newly created zone will have the properties of the existing zone Note The zone...

Page 43: ...l config label camera cycle and unit id Use the mouse s middle click button to bring up the onscreen keyboard To get out of the onscreen keyboard left click the Ent key or middle click The on screen keyboard allows or restricts characters as needed for the field to be edited For example spaces are not allowed in the unit id field When the onscreen keyboard is active using the right click button or...

Page 44: ...ble ASCII characters Physically moving the mouse to the right will move the cursor to the next character position Physically moving the mouse to the left will move the cursor to the left When you are finished customizing the label characters either press both left and right mouse buttons simultaneously or press the mouse wheel button to set your label The default value for the zone label is normal...

Page 45: ... move the mouse cursor to Type and left or right click the mouse buttons until the desired zone type is displayed Move the cursor to a different zone parameter item in the menu to set your zone type choice Attributes And With AND W This function allows the user to AND zones together for special operation Zones that are AND ed together will only place a vehicle call when there is a vehicle placing ...

Page 46: ... be used when you want to minimize the effects of tall trucks or tree shadows causing false calls in the left turn lanes Desensitize If a zone is desensitized it will no longer participate in the dynamic three stage algorithm most of the time If the camera is in LC then the desensitized zone will go into S3 mode Care should be exercised when turning on the desensitized option because it could lead...

Page 47: ...he zone parameters for a specified zone Click on Edit from the VersiCam menu bar a screen prompt appears saying Select Zone Move the cursor somewhere inside of the zone that you want to view or to change the zone detail parameters and left click the mouse button The same screen that you saw when you originally created the zone will appear in the lower left corner of the screen Now you will be able...

Page 48: ...orner of a single zone Select the zone by left clicking in the middle of the zone Move the cursor to the corner of the zone and left click move the corner and left click to place it To move multiple zones Left click on Mov Left click on Multi Select the zones you wish to move by left clicking on them Next middle click then move the mouse to position the zones Left click to place the zones in their...

Page 49: ... this configuration will load it and make it the current configuration Config 2 Selecting this configuration will load it and make it the current configuration Config 3 Selecting this configuration will load it and make it the current configuration Move the cursor to the configuration that you want to load and run as the current configuration Left click the mouse button to make your selection the ...

Page 50: ...rsor to the left When you are finished customizing the camera name characters either press both left and right mouse buttons simultaneously or press the mouse wheel button to save your changes and to exit out of the editing mode 4 9 Diagnostic Menu The Diagnostic option menu includes the following functions and system information Reset Zone Reset This option is rarely used This option allows the u...

Page 51: ... be used to identify the detection zones The choices are CHAN TYPE OFF LABEL NUMBER or AND W By default this parameter is set to CHAN which stands for channel This is the most commonly used zone reference Zone Identifiers CHAN Channel refers to the output channel associated with the detection zone For more information see the section on Channel Output TYPE Type refers to the zone type Presence PR ...

Page 52: ...lobal setting NORMAL This is the default setting and is most commonly used during normal operation The NORMAL setting will allow the output channels to function in a normal mode When cars are present in the detection zone the output channel associated with that zone will place a call to the traffic controller MAXCALL The MAXCALL setting places constant calls on all output channels Inactive Channel...

Page 53: ...lay parameter to ON instead of OFF RS 232 Port Communication Parameters Baud Baud rate The default is 38400 this is the most commonly used baud rate setting for Vantage applications Other settings are available however it is recommended that the setting be set to the default value unless you have been instructed to do otherwise Parity The default is NONE this is the most commonly used parity setti...

Page 54: ...ay parameter to set the correct day Year Left or right click your mouse after selecting the Year parameter to set the correct year Hour Left or right click your mouse after selecting the Hour parameter to set the correct hour Minute Left or right click your mouse after selecting the Minute parameter to set the correct minute Daylight Savings Time Day Save Left or right click your mouse after selec...

Page 55: ...risk will be displayed while the settings are being saved Failure to Set Save the camera settings before exiting will result in the camera returning to factory default settings once the camera power is removed or interrupted Exit when selected this function will exit the Adjust Lens menu and return the user back to the Utilities menu Counter When the counter is on you will see the counts for CSO o...

Page 56: ...y four alphanumeric character string consisting of numbers or characters The primary reason to change Unit ID is for multi drop applications if you are not using multi drop it is strongly recommended that you leave your Unit ID set to factory default which is 0000 More Hemisphere The internal Real Time Clock is used by the algorithm to estimate when day night and night day transitions occur throug...

Page 57: ...e The default designation is Config 1 Config 2 and Config 3 however this can easily be changed using the On Screen Keyboard Configuration names can be up to 10 characters in length 4 14 VRAS Setup Iteris provides a PC based application called Vantage Remote Access Software VRAS which can be used to perform all the configuration functions described above This can either be in real time connected to...

Page 58: ...he zone will light up Constant Call If the algorithm determines that a zone is not detecting it will go into failsafe mode The output associated with the zone will be turned on and a symbol will be displayed above the zone The system continues to monitor conditions and if detection quality improves the system will exit this mode If the system determines that the whole image is a problem due to per...

Page 59: ...tage System Operation The following information is a high level look at the Vantage Three Stage System This section is designed to give the user further insight into their Vantage Edge2 processor operation Note The following system was being used in VersiCam firmware version 08 01 17 the current VersiCam firmware version at the time of this manual s publication The following section is somewhat fi...

Page 60: ...also results in learn mode Iteris was one of the pioneers of DZR Dynamic Zone Reconfiguration This means that when you make a change to a zone only the channel associated with that individual zone enters into a learn mode When a zone is in Learn Mode there will be an next to the zone that is learning The learn time on the VersiCam camera processors is three minutes Note Notice the zone identifiers...

Page 61: ...n the left potion of the camera label Low Contrast Mode Low Contrast LC mode is a failsafe mode that the VersiCam processor will default to during low contrast conditions that could adversely affect the system s ability to adequately detect vehicles Low Contrast LC operates independently of the three stage detection system S1 S3 When a camera view is in LC mode all channels associated with that ca...

Page 62: ...eo and Video wires reversed Swap Video and Video wires On line LED on Video in LED off Picture on monitor No menu SDIO or SDIO wires broken not connected or reversed Swap SDIO and SDIO wires Troubleshoot SDIO or SDIO connection Symptom A VersiCam has no video display on monitor Is the video in LED on solid Yes Check the coax flex cable that goes from the processors video out to the monitor Check t...

Page 63: ...tem has constant calls i Under the MOD menu is out ch set for maxcall If it is set the output channel to normal ii Does the ICC Module have a good video source If the video in LED is on then the ICC Module is seeing sync from the camera If the video in LED is off then the video signal is missing or bad and the processor will output constant calls iii Does the camera label display LC or low contras...

Page 64: ...constant calls on unused channels i The processor may place constant calls on all channels for 3 minutes when first powered up until a quit and save is done ii Check to make sure under the MOD menu that inactive channel is set to no call If inactive channel is set to call then all unused channels will be on iii If these step fail to remedy the situation the processor maybe bad and needs to be sent...

Page 65: ...roblems when the install the VSU for 04 01 17 and they try to connect to a VersiCam system Symptom O Bike Missed Calls Bike Night Sensitivity Because of lighting conditions bicycles are harder to detect at night Turning this attribute on may help with missed calls in poor lighting conditions as it increases the sensitivity of the zone The proper solution is to improve the lighting at the intersect...

Page 66: ...cing to does not have extra inputs for extending the minimum green time you can use the following method i Program a spare phase in the controller with the bike minimum green timing ii Program the Bike Zone to output to this phase iii Overlap the new phase with the existing phase iv When a vehicle only is present the standard minimum green time will activate through the normal phase v When a bicyc...

Page 67: ...e Before upgrading firmware in the Edge2 processor the Vantage Software Upgrade Tool must be installed on your PC Download the VSU program file from the Iteris Resource web page Unzip the file Double click on setup exe to install the 12 3 VSU base program on the computer Follow the onscreen prompts to complete the installation of the software Vantage Software Upgrade Program 12 3 installation file...

Page 68: ...e Software Upgrade Program The Upgrade program is found in the C Program Files Iteris Inc Vantage Software Upgrade Program directory The program will display a splash screen for a few seconds and then show the beginning form Vantage Software Upgrade Program Splash Screen ...

Page 69: ...ommunications port you wish to use and click on OK d Connect serial file transfer cable null modem cable from the computers DB9 RS232 port to the Vantage processor s DB9 RS232 port Belkin sells this cable and the part number is F3B207 10 e Make sure that the target Vantage processor is set to 38400 baud hardware flow control and parity none This information is under the Mod menu in the processor ...

Page 70: ...User Guide 70 f Under the Call menu select Connect or click on the icon g To start the upgrade click on Upgrade and then Start Upgrade or click the icon ...

Page 71: ... for upgrade are listed below Select a file and click on Open Note If no firmware choices exist at this point firmware files must be installed Firmware Upgrade Choices i Now the VSU process begins The VSU program automatically saves the current configuration to a file named VSUUpgrade vcf This file is located in the VSU directory C Program Files Iteris ...

Page 72: ...ogress bar j The progress bar shows what percentage of the file has been sent k You may see one two or three progress bars appear during the VSU process The firmware on the Edge2 processor has three parts to it boot loader FPGA and application Depending on what version of firmware you start with you may need all three areas to be upgraded After the files are sent they are burned to flash ...

Page 73: ...rocess Sending and saving configuration files Under the config menu there are two choices send config or save config To save a configuration select save config Choose a name and click on save The config file is stored in the C program files Iteris Inc Vantage software upgrade program directory These saved configuration files are compatible with VRAS Save config message Save Config dialog box ...

Page 74: ... cable is used you will not be able to connect to the VersiCam system and transfer data effectively Make sure the correct comm settings are set in the VersiCam system before attempting to upgrade firmware using the VSU program The VersiCam camera processor comm settings under the Mode menu should be Baud 38400 Parity NONE FlowCtrl HRDWRE It is a good habit to save your zone configuration on your c...

Page 75: ...ter is the recommended method for camera glass cleaning Avoid leaving streaks on the glass Avoid anything that might scratch the glass cloud the glass or leave an undesirable residue Connector and Cable Inspection Periodically it is wise to check camera power and video connections Look for connector corrosion or moisture damage Replace any defective connectors Cabinet power and video cable and con...

Page 76: ...Vantage products Please do not hesitate to contact us at Toll free 888 254 5487 For more information on Iteris as well as the products and services that we provide visit our website at www iteris com Additional Training Materials Iteris has created a set of interactive training modules which covers the whole range of Vantage products Contact you Iteris Dealer for more details on this program and h...

Page 77: ...User Guide 77 10 TECHNICAL INFORMATION IMSA 39 2 40 2 Cable ...

Page 78: ...VDC Total Peak Surge Current Rating 10 kA SPD Technology GDT SAD Series Element Connection 5 08mm Terminal Block Plug Video Protection Clamping Voltage 2 VDC Total Peak Surge Current Rating 10 kA SPD Technology GDT SAD Series Element Connection 5 08mm Terminal Block Plug BNC Model Female BNC Jack Physical Data Ground Wire 12 AWG 36 0â Long Size 3 3 L x 3 3 W x 1 35 H inches Material High Impact Pl...

Page 79: ...User Guide 79 VersiCam Specification Sheet ...

Page 80: ...User Guide 80 Phase Information ...

Page 81: ...User Guide 81 Detector Rack Configurations ...

Page 82: ...The chart below identifies the maximum number of days of intersection count data that can be stored for the following scenarios 1 One 1 zone per camera at a one 1 hour interval 2 Six 6 zones per camera at fifteen 15 minute intervals Platform Count Bins B Scenario 1 Scenario 2 VersiCam 83 968 3 487 days 145 days For scenarios other than shown above the following formula may be used D B Zt x 60 I x ...

Page 83: ...User Guide 83 ...

Page 84: ...1700 Carnegie Avenue Santa Ana CA 92705 Phone 949 270 9400 Fax 949 270 9401 ...

Reviews: