a.
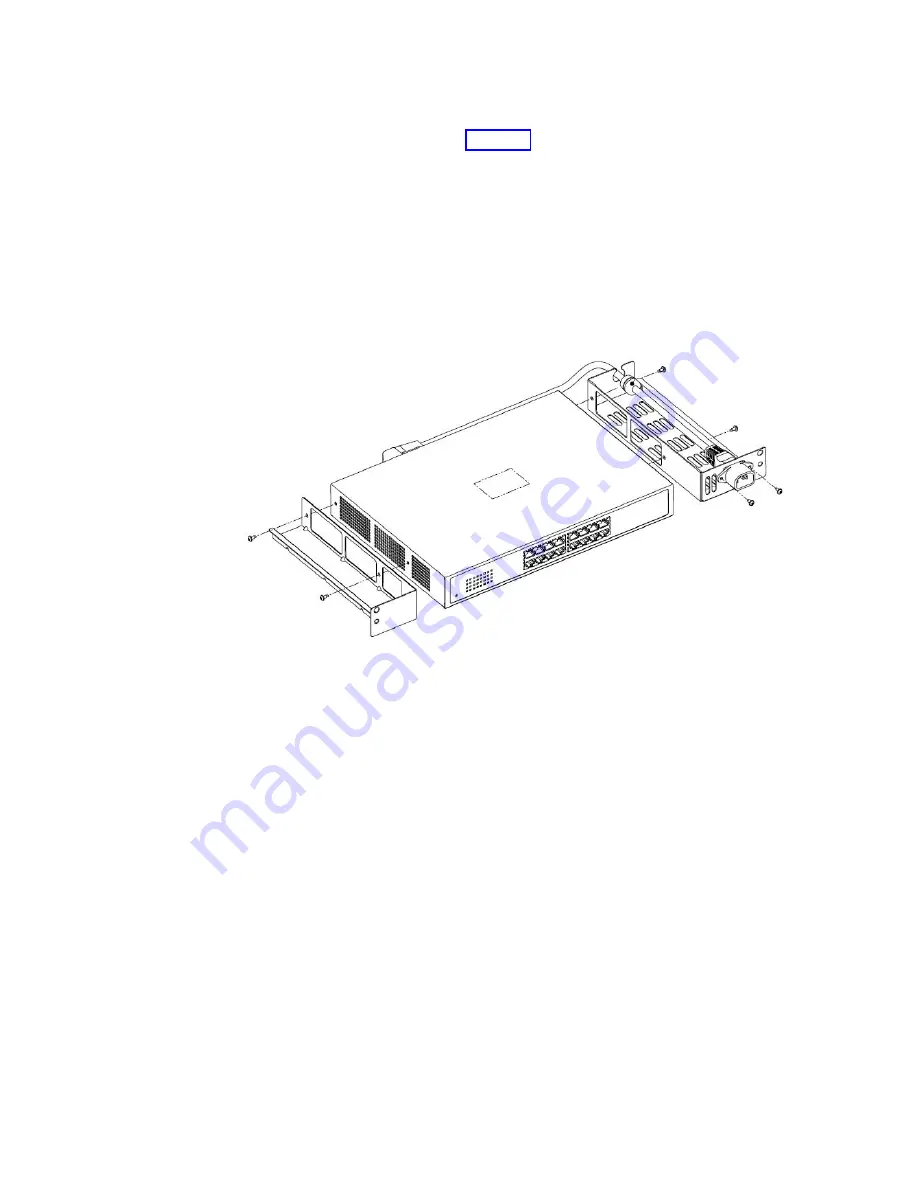
Attach the mounting brackets to the short-sides of the Ethernet switch,
making sure to align the perforated fan vents on the switch with the cut-out
areas on the brackets. See Figure 10.
b.
Thread the power cord through the holes in the mounting bracket, making
sure that the tab extensions on the power cord are positioned on the outside
of the bracket.
c.
Attach a protective grommet to the power cord, and fit the grommeted part
of the cord into the retention slot on the top of mounting bracket.
d.
Plug the power cord into the power receptacle on the Ethernet switch.
e.
Insert screws through the tab extensions on the power cord and into the
mounting bracket. Tighten the screws to attach the power cord to the
bracket.
f.
Place the air baffle on top of the mounting bracket without the power cord
(the left side bracket in the above illustration). Do not screw the air baffle to
the mounting bracket.
g.
Repeat the above steps for the other Ethernet switch.
2.
Attach the side rails to the server frame. To do so, working from the front side
of the frame:
a.
Align the holes in the left side rail with the holes at positions 3 and 4 of the
frame. The guide pins on the side rail should point toward the back of the
server frame.
b.
Insert one flanged screw into the hole at position 4 of the frame, tightening
the screw just enough to hold the rail in place.
c.
Insert a second screw into the hole at position 3 of the frame, but do not
screw it in. Temporarily inserting this screw allows you to make sure that
both holes in the rail are properly aligned with both holes in the frame.
d.
Tighten the screw in position 4, and then remove the temporary screw from
position 3.
e.
Repeat the above steps for the right side rail and ensure that both side rails
are secure.
3.
Install the air duct housing in the frame. To do so, working from the front side
of the frame:
ts760226
Figure 10. Attaching the mounting brackets and power cord
34
IBM System Storage TS7600 with ProtecTIER: Installation Roadmap Guide
Summary of Contents for System Storage TS7650G 3958 DD4
Page 2: ......
Page 7: ...Russia Electromagnetic Interference EMI Class A Statement 189 Index 191 Contents v...
Page 8: ...vi IBM System Storage TS7600 with ProtecTIER Installation Roadmap Guide...
Page 10: ...viii IBM System Storage TS7600 with ProtecTIER Installation Roadmap Guide...
Page 12: ...x IBM System Storage TS7600 with ProtecTIER Installation Roadmap Guide...
Page 16: ...xiv IBM System Storage TS7600 with ProtecTIER Installation Roadmap Guide...
Page 30: ...xxviii IBM System Storage TS7600 with ProtecTIER Installation Roadmap Guide...
Page 38: ...xxxvi IBM System Storage TS7600 with ProtecTIER Installation Roadmap Guide...
Page 44: ...6 IBM System Storage TS7600 with ProtecTIER Installation Roadmap Guide...
Page 46: ...8 IBM System Storage TS7600 with ProtecTIER Installation Roadmap Guide...
Page 54: ...16 IBM System Storage TS7600 with ProtecTIER Installation Roadmap Guide...
Page 89: ...Figure 20 Clustered TS7650G power cabling Chapter 4 Installing the TS7650G hardware 51...
Page 120: ...82 IBM System Storage TS7600 with ProtecTIER Installation Roadmap Guide...
Page 148: ...110 IBM System Storage TS7600 with ProtecTIER Installation Roadmap Guide...
Page 150: ...112 IBM System Storage TS7600 with ProtecTIER Installation Roadmap Guide...
Page 156: ...118 IBM System Storage TS7600 with ProtecTIER Installation Roadmap Guide...
Page 172: ...134 IBM System Storage TS7600 with ProtecTIER Installation Roadmap Guide...
Page 192: ...154 IBM System Storage TS7600 with ProtecTIER Installation Roadmap Guide...
Page 198: ...160 IBM System Storage TS7600 with ProtecTIER Installation Roadmap Guide...
Page 210: ...172 IBM System Storage TS7600 with ProtecTIER Installation Roadmap Guide...
Page 220: ...182 IBM System Storage TS7600 with ProtecTIER Installation Roadmap Guide...
Page 228: ...190 IBM System Storage TS7600 with ProtecTIER Installation Roadmap Guide...
Page 231: ......
Page 232: ...Part Number 46X6052 Printed in USA or Mexico GC53 1154 09 1P P N 46X6052...


