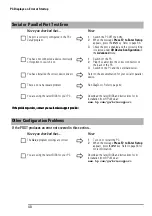


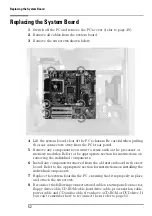


Replacing the System Board
52
Replacing the System Board
1
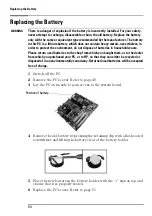
Switch off the PC and remove the PC’s cover (refer to page 49).
2
Remove all cables from the system board.
3
Remove the six screws shown below.
4
Lift the system board clear of the PC’s chassis. Be careful when pulling
the rear connectors away from the PC’s rear panel.
5
Remove any components you want to reuse such as the processor or
memory modules. Refer to the appropriate section for instructions on
removing the individual components.
6
Install any components removed from the old system board in the new
board. Refer to the appropriate section for instructions on installing the
individual components.
7
Replace the system board in the PC, ensuring that it is properly in place
and attach the six screws.
8
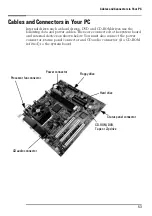
Reconnect the following connectors and cables: status panel connector,
floppy drive cable, CD-ROM cable, hard drive cable, processor fan cable,
power cable and CD audio cable, if you have a CD-ROM or DVD drive. If
you can’t remember how to reconnect them, refer to page 53.
Summary of Contents for Brio BA210
Page 2: ......
Page 16: ...Comfort and Safety Checklist 8 ...
Page 54: ...Support and Information Services 46 ...
Page 80: ...Technical Characteristics 72 ...
Page 98: ...Other Services 90 ...
Page 101: ......


