


50
1. Base pointer can be adjusted by changing the value of
header and margin.
2. Header: Please adjust it according to the production
need.
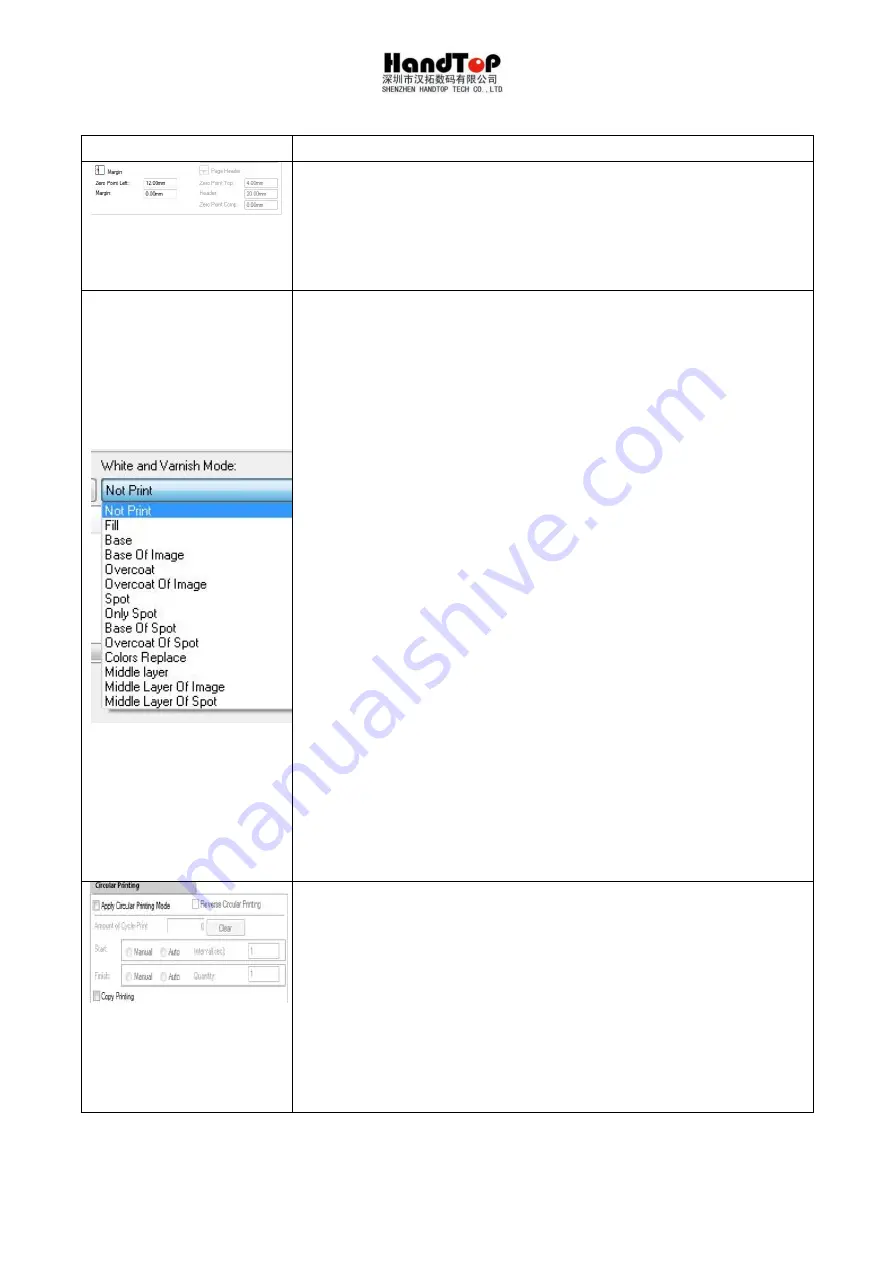
1. Fill: Filling white ink in the blank area within the image
size.
2. Base: Print a full format layer of white before CMYK
printing.
3. Base of image: Print the white under the CMYK area.
4. Overcoat: Cover a full format layer after CMYK printing.
5. Overcoat of image: Cover white color on the CMYK
area.
6. Spot: Print color and white together.
7. Only spot: Print only white in the spot channel.
8. Base of spot: Print white base in the spot channel
before CMYK print.
9. overcoat of spot: Print white cover in the spot channel
on CMYK.
10. Colors replace: Color replacement: Replace the CMYK
area with white ink information for printing.
11. Middle layer: Print a full format white layer between 2
CMYK layers.
12. Middle layer of image: Print white between 2 CMYK
layers.
13. Middle layer of spot: Make spot channel for the image,
within the area of spot information, print CMYK, then
print white and print CMYK for the last layer.
1. Loop Circle printing-Manual: After each printing, the
operator can choose continue printing in the dialog
box, the printer will repeat printing the same content. If
need to finish printing, manual click stop button will be
needed.
2. Loop printing-Auto: Operator can set the interval time
between each printing and times of loop. The software
will exit printing after the printing finished.
3. Cannot be chosen with copy printing at the same time!
Summary of Contents for HT3200-UV K Series
Page 1: ...3200 Hybrid UV printer installation instruction HT3200 UV_K...
Page 16: ...15...
Page 39: ...38 Select the communication port Select the printer model...
Page 40: ...39 Select lamp type Browse a path for TopJet...
Page 42: ...41 Install Click finish to continue...
Page 43: ...42 Install the driver for PCIE card...
Page 44: ...43 Accept and click next Continue...
Page 50: ...49...
Page 59: ...58 5 2 6 Heads parameter Setting...
Page 64: ...63 Clean all tubes with flush Connect the tubes with the heads As shown in pictures below...
Page 66: ...65 Put the head to the right position Discharge the protective fluid of the head...
Page 75: ...74 Modify the page header base point based on the margin...
Page 110: ...109 Cable diagram of HT3200D head configuration 2X5 Mode DA_YMCKKCMYWW Mode DA_YMCKKCMY_...
Page 111: ...110 Mode DA_CMYKW Mode DA_ _CMYKW...
Page 112: ...111 Mode DA_YMCKKCMYWW Mode DS_CMYK...
Page 113: ...112...


