background image


18


Creating a New Project File or Opening an Existing Project File 


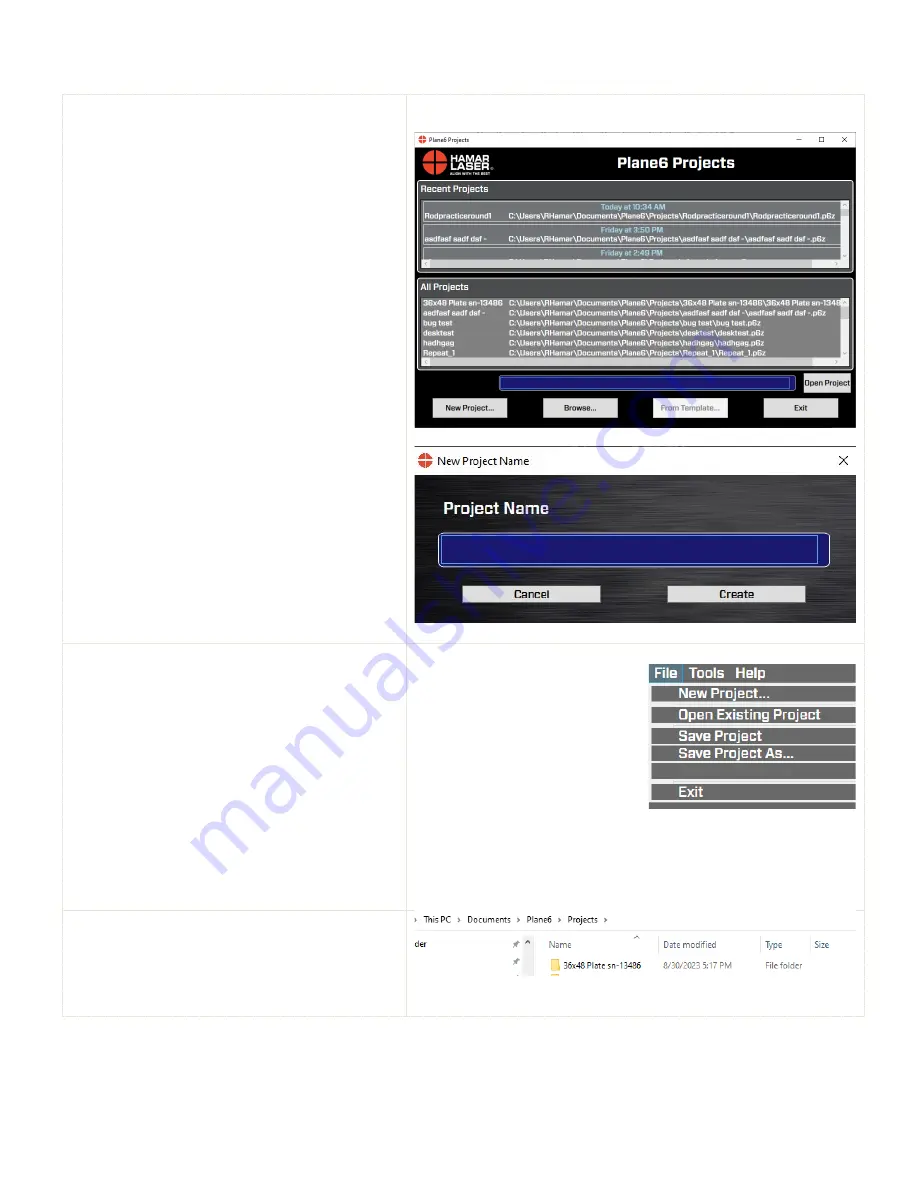
When Plane6 opens, the 

Project Selection


screen displays.  


Recent Projects – 

This will list the most recent 

projects that were saved. 


Open Project

 – select one of the recently saved 

projects and click 

Open Project

 to open the 

project.  You can also double-click the filename 

to open it.


New Project

 – click here to enter a filename and 

create a new project.


Browse


– Click here to open the Windows File 

Open dialog box and browse for a saved file, 

either from another folder or from a USB drive.  


Exit Plane6 

– this closes Plane6.


Note:

  This screen can also be accessed by clicking 

Open Project 

from the 

File 

menu.


File Menu 


New Project

 – see above 

Open Existing Project

 – same as above 

Save Project

 – saves the project. 

Save Project As

 –allows you to save an existing 

project as a new project.  It keeps all the data from 

the existing project.  


Save Project As Template

 –allows you to save 

an existing project as a new project.  It keeps only 

the  information entered in Step 1.  All the data 

from Step 2 is erased.  


Exit

 – exits Plane6 and if the project has not been 

saved will prompt you to save it. 


File Location 


Files are saved in the 

Documents/Plane6/Projects 

folder.  


Summary of Contents for L-703SP

Page 1: ......

Page 2: ...r articles of equipment manufactured by other companies and limited by a warranty extending for less than one year In such an event the more limited warranty applies to said instrument or article of e...

Page 3: ...ng Straight Edge Length 143 Preparing for an Alignment 15 Cleaning the Plate 15 Maintenance and Cleaning of L 703SP T 1297 15 Plane6 Surface Plate Calibration Software System Requirements 16 Installin...

Page 4: ...a Flatness Quick Check on a Line Segment after Lapping 47 Appendix A Installing Additional Microsoft Software 52 Installing Microsoft NET Framework 4 52 Appendix B ANSI B89 3 7 2013 Standard Toleranc...

Page 5: ...03 L 705 Spindle Extruder Systems A 819 Shipping Case for L 703SP Straight Edges and A 703SP LM Computer System Requirements Physical memory RAM 8 GB recommended Processor Intel Pentium4 or later vers...

Page 6: ...include Surface plate calibration Linear guideway straightness Flatness straightness of large parts L 703S Laser Control Panel and Functions The I O and Status LEDs Battery Status LED green normally i...

Page 7: ...m Centering to Mount 0003 in 0 008 mm Angular Range slope 08 in ft 6 6 mm m Angular Range deg 0 38 deg Angular Resolution 00002 in ft 0 0016 mm m L 703S Angular Adjustments Returning Adjustments to th...

Page 8: ...the laser to help you know if the laser is directly at 12 00 or 6 00 However this is not typically used in surface plate calibration so they are not used in this application To use the level rotate t...

Page 9: ...target is right at the face plate of mounting stud so when used with the A 1297 High Accuracy Flatness Measuring Base it achieves the highest accuracy possible Accelerometer rotation axis 3rd axis hel...

Page 10: ...converted in the software displays to in ft mm m when you click on the Angle Button Note if the displays are left in Center Mode then the values shown in the displays are raw values and will be in th...

Page 11: ...et is detecting the laser beam in Center Mode On Tgt LED Continuous Red means the target is not detecting the laser beam in Center Mode On Tgt LED Blinking Green means the target is detecting the lase...

Page 12: ...oth icon in the system tray and click on Add a Bluetooth Device 3 Make sure the Bluetooth toggle is in the On position You ll know it is working because you ll notice the message that reads Your PC is...

Page 13: ...9 6 Enter 1280 for the passcode when prompted and hit Connect Your Target is now paired and ready to be used Exit Settings window...

Page 14: ...nt the L 703S see Figure 11 on flat surfaces for measuring Flatness measurements of surfaces such as surface plates Flatness straightness squareness measurements of machine tool axes To secure the las...

Page 15: ...inches 611 mm there is a second mounting foot pad location that is approximately 10 inches 250 mm from the back mounting foot so the A 703SP LM can be used on plates as small as 12x12 in Figure 13 A...

Page 16: ...reness measurements of machine tool axes Insert the T 1297 Target into the 4995 in 12 7 mm mounting hole making sure to insert the alignment pin see Figure 14 and Step 4 starting on Page 37 into the s...

Page 17: ...on and Ruler for 72 90 in 1 8 2 3 m lengths A 703SP SE D EXT B 18 in 457 mm Target Straight Edge Extension and Ruler for 90 108 in 2 3 2 7 m lengths A 703SP SE D EXT C 18 in 457 mm Target Straight Edg...

Page 18: ...resents the total length needed for the measurements for that line segment Diag Angle this is the angle of the diagonal relative to the edges and is generally not needed for a measurement but is for i...

Page 19: ...Grade A tolerance and can significantly impact the flatness data Run your hand over the plate to feel for dust and make sure it s ready to check the flatness Maintenance and Cleaning of L 703SP T 129...

Page 20: ...Windows Vista all version releases Windows XP all version releases Before installing Plane6 ensure that your computer has the latest Windows Service Pack and critical updates To find security updates...

Page 21: ...mar Laser Support Support hamarlaser com A Hamar representative will issue a Product Registration Code via email to complete the registration process see Figure 21 Enter the Product Registration Code...

Page 22: ...either from another folder or from a USB drive Exit Plane6 this closes Plane6 Note This screen can also be accessed by clicking Open Project from the File menu File Menu New Project see above Open Ex...

Page 23: ...ivide all values by 1000 to get millimeters Warning Do not delete or modify the P6z files in these folders as Plane6 will be unable to open the project Converting Raw Data Values in CSV files to Inche...

Page 24: ...es Next select the plate grade enter the plate serial number and top and bottom temperature if measured Figure 22 Plane6 Step 1 Dimensions Tolerances Step 2 Data Collection This is the main data recor...

Page 25: ...erance or out You can also view the data for each line segment and a 3d graph of the alignment Figure 24 Plane6 Step 3 Results Step 4 3D Graph In Step 4 you can view and adjustable 3D graph of the ali...

Page 26: ...references Opens the Preferences window to change units decimals target type etc Preferences Change data display units resolution target setup and typical setup items See more details below Export Lin...

Page 27: ...with the Status Bar Software Steps In the upper right part of the screens is the Navigation Bar It lists the number of steps in the software along with arrows to move to the left or the right You can...

Page 28: ...ction up and down Project Information Enter a project description company contact information and notes that will be displayed in the reports here Units Select Imperial in or Metric mm and units for t...

Page 29: ...orizontal 030 in 30 000 in Vertical 0 25 mm 250 m Horizontal 0 75 mm 750 m If the display values are higher than these the values will start to become slightly less accurate If you are working on a B...

Page 30: ...ecify and set up a target type and computer interface if needed There will be dropdown list of target types supported by Plane6 Pick the T 1297 target type by clicking on it 3 Select Target Type T 129...

Page 31: ...Scan for Bluetooth Targets You will need to pair the targets with the laptop see Page 8 How to Pair the T 1297 Target s Bluetooth to a PC After pairing click on Scan for Bluetooth Targets to see if yo...

Page 32: ...rrection feature that improves accuracy This requires that the target be set to the existing electrical frequency Normally the U S is 60 Hz and Asia Europe is 50 Hz Note the target must be turned on a...

Page 33: ...s pacing Horizontal Dimension Outside horizontal dimension of the physical plate in inches or mm s Vertical Dimension Outside vertical dimension of the physical plate in inches or mm s Horizontal Vert...

Page 34: ...nd it suggested that the data be retaken Plate Serial Number Enter the plate s serial number for the report Label Location on Plate Location of the manufacturer s label applied to the plate The letter...

Page 35: ...a point is recorded the point location icon will turn green indicating it has recorded data After recording the last point for a given line segment Plane6 will move the target icon to the next line se...

Page 36: ...g enter values from 1 to 500 and this will change the number of samples Plane6 uses to average for each of the values shown in the data displays This also changes the amount of sampling the software t...

Page 37: ...een set up in Preferences to allow you to change the target if using your laptop with a different set of laser target This is normally not changed unless you are switching laptops and laser target kit...

Page 38: ...or green check mark is displayed to indicate if the overall flatness is in or out of tolerance A graph is also shown giving a snap shot of the flatness data A more dynamic graphic of the flatness is...

Page 39: ...y the results To rotate the graph use a mouse to click and drag left right or up down To make the elevation of the graph lines larger click on Scale Factor To zoom in out on the whole image slide the...

Page 40: ...A V angular value indicates the back of the target is lower than the front of the target Side View Horizontal Axis A H center value indicates the target is to the right of the laser beam when looking...

Page 41: ...ottom of the plate and the alignment tolerance Step 2 Set Corner and Mid Point Locating Tools To make the process go faster a corner locating tool is supplied to help align the straight edge to the li...

Page 42: ...orner locator when viewed from the Laser End See image In other words you always want the scale side of the ruler to be touching the locator tool c Position the end of the straight edge to line up wit...

Page 43: ...g the channel cutout on the bottom to the straight edge Then holding the straight edge slide the laser fixture against the straight edge to make it parallel to the straight edge and line segment You c...

Page 44: ...an alignment ball This will insert into the slot on the A 1297 SP to align the target to the A 1297 SP base s measuring feet Tighten the thumb screw very tight Step 4a Place T 1297 Target and Base on...

Page 45: ...30 000 V Axis 10 000 This aligns the laser beam to the straight edge and puts it on the most accurate part of the PSD sensor Step 4c Move the T 1297 back to Near Position and Start Recording Move the...

Page 46: ...can be moved fairly easily Moving the fixture can cause the laser beam to move causing measurement errors If the A 703SP LM moves we strongly recommend clearing the data the line segment and re recor...

Page 47: ...straight edge be no longer than 1 3 of the edge of the plate This is to ensure that the straight edge does not move around when you are taking data This can happen because as the straight edge gets l...

Page 48: ...he mark on the locating tool with the mark on the plate Position the straight edge to the right of the Corner Locating Tool when looking from the Laser End of the straight edge toward far end As befor...

Page 49: ...traight edge If not then move them together again Move the target to the end of the straight edge and see if the orange color disappears If so this means it s back in spec Then hit Clear Line XX to re...

Page 50: ...results from the data A green check mark or red X tells whether it s in or out of tolerance There is also an additional check for the center point elevation difference as is directed in the B89 Standa...

Page 51: ...d Typically you ll pick the line segment with the highest flatness error and focus on it as you lap the plate Here is the procedure to do a quick check of a line segment for flatness after you have fi...

Page 52: ...T 1297 A 1297 SP Base to the far end of the straight edge Adjust the Pitch and Yaw knobs on the laser until you get as close to zero as you can go Again due to very high resolution and the limited an...

Page 53: ...n t be any calculations unless you have all the data recorded Note you can easily export this data to a CSV file to open in Excel by clicking the Export Line menu item under the Tools menu You can the...

Page 54: ...50 An example on how to do the Math to get the exact flatness values...

Page 55: ...51 Plane6 Sample Report...

Page 56: ...d software to locate Microsoft NET Framework 4 If the program is not installed follow the instructions below Windows 10 Windows 11 Microsoft Net is preinstalled and user should not need to install Fol...

Page 57: ...tness tolerance for surface plates whose sizes are not listed in Table 1 is obtained from the following formula Overall flatness tolerance m 1 1 6 D2 Overall flatness tolerance in 40 D2 25 Where D dia...

Reviews: