background image


GBM-3080/3300 User Manual 

34


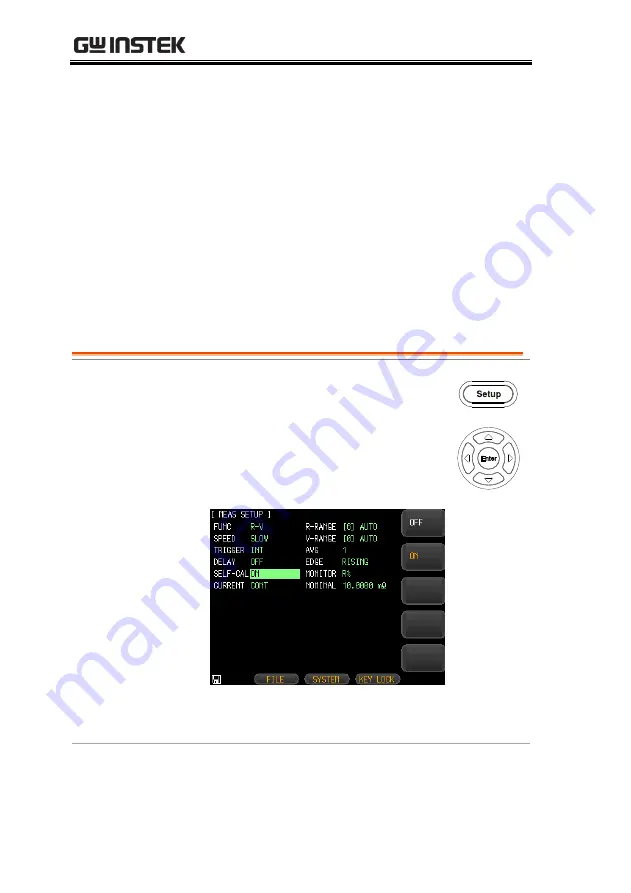
Setting self-calibration function 

The self-calibration function can remove the bias voltage and gain 
drift of the internal circuit of the instrument to improve the 
measurement accuracy. 
The device always performs self-calibration at slow speed, 
regardless of whether the self-calibration is enabled or disabled. 
Above medium speed, if the self-calibration is enabled, the 
instrument will automatically perform a calibration every 30 
minutes. 
If you use an external trigger, self-calibration will not be performed. 
Use only the Handler's external calibration feature to avoid 
influence of measurement process. 


Steps 

1.


Press the 

Setup

 button to enter 

[MEAS SETUP] page. 


2.


Use arrow keys to move cursor and 
select

 SELF-CAL 

on the [MEAS 

SETUP] page. 


3.


Use option key on the right of the LCD screen 
to select an available parameter.  

Summary of Contents for GBM-3080

Page 1: ...Battery Meter GBM 3080 3300 USER MANUAL Rev 1 02 ISO 9001 CERTIFIED MANUFACTURER ...

Page 2: ...er language without prior written consent of Good Will company The information in this manual was correct at the time of printing However Good Will continues to improve products and reserves the rights to change specification equipment and maintenance procedures at any time without notice Good Will Instrument Co Ltd No 7 1 Jhongsing Rd Tucheng Dist New Taipei City 236 Taiwan ...

Page 3: ...sk 44 MEASUREMENT 48 How to enter MEAS DISPLAY page 49 Setting up measurement function 51 Setting up corresponding measurement range 52 Setting up measurement speed 55 DATA LOGGING AND STATISTICS 56 Data logging function 57 Statistics function 66 SYSTEM CONFIGURATION 74 System configuration page 75 System info page 86 OTHER FUNCTIONS 88 Offset adjustment by short test 89 Short circuit test 94 Hand...

Page 4: ...anual 4 REMOTE CONTROL 104 Configure Interface 105 COMMAND OVERVIEW 118 Command Syntax 119 Command List 123 APPENDIX 177 GBM 3300 Factory Default Settings 178 Specifications 180 Dimensions 183 Declaration of Conformity 184 ...

Page 5: ...in the best possible condition Safety Symbols These safety symbols may appear in this manual or on the instrument WARNING Warning Identifies conditions or practices that could result in injury or loss of life CAUTION Caution Identifies conditions or practices that could result in damage to the GBM 3000 series or to other properties DANGER High Voltage Attention Refer to the Manual Protective Condu...

Page 6: ...GBM 3080 3300 User Manual 6 Do not dispose electronic equipment as unsorted municipal waste Please use a separate collection facility or contact the supplier from which this instrument was purchased ...

Page 7: ...ess you are qualified as service personnel Remove all test leads before disconnecting the mains power cord from the socket If the equipment is used in a manner not specified by the manufacturer the protection provided by the equipment may be impaired The device should be placed in a place where the plug connected to it can be removed easily Note EN 61010 1 2010 specifies the measurement categories...

Page 8: ...C 50 RH non condensing Altitude 2000m Note EN 61010 1 2010 specifies the pollution degrees and their requirements as follows The GBM 3000 SERIES falls under degree 2 Pollution refers to addition of foreign matter solid liquid or gaseous ionized gases that may produce a reduction of dielectric strength or surface resistivity Pollution degree 1 No pollution or only dry non conductive pollution occur...

Page 9: ... 80 RH non condensing Disposal Do not dispose this instrument as unsorted municipal waste Please use a separate collection facility or contact the supplier from which this instrument was purchased Please make sure discarded electrical waste is properly recycled to reduce environmental impact ...

Page 10: ...nnected to the terminal which is marked with the letter N or coloured Blue or Black The wire which is coloured Brown must be connected to the terminal marked with the letter L or P or coloured Brown or Red If in doubt consult the instructions provided with the equipment or contact the supplier This cable appliance should be protected by a suitably rated and approved HBC mains fuse refer to the rat...

Page 11: ...uding accessories package contents its main features and front rear panel introduction GBM Series Overview 12 Series lineup 12 Characteristics 12 Accessories 15 Package Contents 16 Appearance 17 Front Panel 17 Rear Panel 19 Set Up 20 Tilting the Stand 20 Power UP 22 Connect to the test terminal 22 ...

Page 12: ... can be used to test resistance ranging from 0 0001mΩ to 3 2kΩ and test DC voltage ranging from 0 00001V to 300 000V The GBM 3000 series has several characteristics such as high accuracy high resolution and ultra high speed measurement with 0 5 resistance accuracy and 0 01 voltage accuracy and up to measurement speed of 60 times per second Comparator function and Handler PLC interface can be used ...

Page 13: ... channels opened and measurement in manual mode 4 times per second for slow speed mode 11 times per second for medium speed mode 25 times per second for fast speed mode 60 times per second for exfast mode 2 trigger modes including internal and external Calibration function Short circuit clearing for full ranges is to eliminate the influence of lead resistance System configuration including data re...

Page 14: ...ower limits setting Interface RS 232 USB remote control Support up to maximum 115200bps serial transmission rate compatible SCPI agreement and ASCII transmission Handler I O interface All isolation with opt coupler It equipped with built in input and output port to pull up resistance Input Trigger signal Output All result signal after sorting comparison measuring synchronization signal EOC and hig...

Page 15: ...CD 82BM 01000M01 Safety Instruction Sheet Region dependent Power Cord GBM 01 Test Fixture Kelvin Clip Optional Accessories Part number Description GBM 02 Test Fixture Single Needle GBM 03 Test Fixture Twin Needle GBM S1 Short Board GTL 232 RS232C cable GTL 246 USB cable GRA 422 Rack Adapter Panel 19 2U ...

Page 16: ...r Manual 16 Package Contents Check the contents before using the instrument Opening the box Contents single unit Main unit Test Fixture Kelvin Clip Power cord x1 region dependent User manual CD Safety instruction sheet ...

Page 17: ...unction 2 USB port The Host port is a type A USB port for logging data and connecting USB memory devices only USB disk type Flash drive only Format FAT FAT32 exFAT Max memory size 128GB 3 Test terminals Test terminals are used to connect test fixture 4 Setup key This key is used for entering measurement setup page 5 Measure key This key is used for entering measurement display page ...

Page 18: ...nput from the numeric keypad When a flash drive is inserted from the USB port on the front panel A message USB disk ready Press Enter to save screen appears on the lower part of the LCD screen At this moment Enter key can be used to take a screenshot 9 ESC key Press this button to return the cursor to the top left corner of the currently displayed page or cancel current setting 10 Numeric keys The...

Page 19: ..._ RN G O_ VN G O_ OK I_ SE LF _C AL 3 2 1 4 5 1 Power Cord Socket Power Socket 100 240V 50 60Hz 10W 2 USB Device Port Type B USB port This port is used for remote control 3 RS232 RS 232 port 4 Handler interface Handler I O port 5 Frame terminal This terminal is used for grounding ...

Page 20: ...3080 3300 User Manual 20 Set Up Tilting the Stand From the base of the handle gently pull the handle out sideways and then rotate it to one of the following positions Horizontal position Tilt stand position ...

Page 21: ...GETTING STARTED 21 Carry position ...

Page 22: ...the GBM 3000 series will start to boot up Connect to the test terminal Background Please use the GBM 01 test cable which comes with the device to connect to the test terminal for testing Please follow the procedure list below to connect Steps Please insert correctly the test cable to Sense and Source terminals of the device Insert the red cable ends to terminals that marked in H positive and the b...

Page 23: ...uracy of the instrument please use the GBM 3000 optional accessories test cable for test Warning Do not connect the AC current source and voltage source directly to the test terminals Warning Before connecting the test leads make sure the test leads are not connected to any batteries to avoid personal injury or damage to the instrument ...

Page 24: ...ing up the measurement item 25 Setting measurement function and corresponding range 26 Setting measurement speed 29 Setting trigger mode 30 Setting average measurement frequency AVG 32 Setting delay timer 33 Setting self calibration function 34 Setting the output current mode 36 Setting up monitor parameter and nominal value 37 Setting edge 39 Setting up comparator 40 Setting USB disk 44 ...

Page 25: ...device doesn t display the test result Setting measurement function and its range from page 26 Setting measurement speed from page 29 Setting trigger mode from page 30 Setting measurement frequency from page 32 Setting delay timer from page 33 Setting self calibration from page 34 Setting output current mode from page 36 Setting monitoring parameter from page 37 Setting edge from page 39 ...

Page 26: ...Setup button to enter MEAS SETUP page 2 Use arrow keys to move the cursor and select FUNC item on the MEAS SETUP page 3 Use option key on the right of the LCD screen to select a parameter for this measurement item Parameter R V Measure and display both the resistance and voltage of battery under test ...

Page 27: ...y on the right of the LCD screen to select a desired measurement range Measurement range AUTO RANGE The device will automatically select the best range to test HOLD RANGE The device will always performe test with a user specified range NOM RANGE The device will automatically select the best range to test based on the nominal value INCR Increase the range number and set to hold range DECL Decrease ...

Page 28: ...80 3300 User Manual 28 Note Among the measurement items the FUNC RANGE and SPEED measurement items can also be set from MEAS DISPLAY page Please refer to page 51 for details about setting these setting items ...

Page 29: ...e the response and sampling time for enabling the comparator is as follows Test Speed Slow 4 times sec 250ms Medium 11 times sec 91ms Fast 25 times sec 40ms Exfast 60 times sec 16 6ms Steps 1 Press the Setup button to enter MEAS SETUP page 2 Use arrow keys to move cursor and select SPEED item on the MEAS SETUP page 3 Use option key on the right of the LCD screen to select a test speed for this mea...

Page 30: ...r and select TRIGGER item on the MEAS SETUP page 3 Use option key on the right of the LCD screen to select a trigger mode for this measurement item Available parameter INT Internal trigger mode is also known as continuous test The trigger signal performs continuous test in accordance with the original cycle of the device EXT External trigger mode including Manual Handler Remote control mode Manual...

Page 31: ...e is received from the handler interface on the rear panel the device performs a measurement cycle and standby for the rest of the time Please refer to Handler interface on page 97 for details Remote control mode When a measurement command is sent from the RS 232 or USB interface the device performs a measurement cycle and returns the measured value ...

Page 32: ...g this function The measurement frequencies can be set from 1 to 256 Steps 1 Press the Setup button to enter MEAS SETUP page 2 Use arrow keys to move cursor and select AVG on the MEAS SETUP page 3 Use option key on the right of the LCD screen to increase or decrease average measurement frequency Available parameter INCR Increase the measurement frequencies with frequency 1 2 4 8 16 32 64 128 and 2...

Page 33: ...e 2 Use arrow keys to move cursor and select DELAY on the MEAS SETUP page 3 Use option key on the right of the LCD screen to turn on delay timer function 4 Use key pad to input delay timer value and option key on the right of the LCD screen to select corresponding unit Available parameter ON Enable the delay timer function The maximum delay time is 10s and the minimum delay time is 1ms OFF Disable...

Page 34: ...nabled or disabled Above medium speed if the self calibration is enabled the instrument will automatically perform a calibration every 30 minutes If you use an external trigger self calibration will not be performed Use only the Handler s external calibration feature to avoid influence of measurement process Steps 1 Press the Setup button to enter MEAS SETUP page 2 Use arrow keys to move cursor an...

Page 35: ... Note When self calibration is performed the measurement will pause briefly to respond to the self calibration A self calibration takes 40ms It is necessary to disable the self calibration function when performing high speed measurement and use external I O control cord for self calibration To ensure accuracy the device performs a self calibration each time when it is turned on In addition to regu...

Page 36: ...h will turn off the current source after the test is completed to minimize the interference of multiple devices Steps 1 Press the Setup button to enter MEAS SETUP page 2 Use arrow keys to move cursor and select CURRENT on the MEAS SETUP page 3 Use option key on the right of the LCD screen to select an available parameter Available parameter CONTINUOUS Output current continuously PAUSE Output curre...

Page 37: ...hile measuring the primary and secondary parameters Steps 1 Press the Setup button to enter MEAS SETUP page 2 Use arrow keys to move cursor and select MONITOR on the MEAS SETUP page 3 Use option key on the right of the LCD screen to select a monitor parameter or turn off monitor function by pushing OFF button ...

Page 38: ...om R Resistance relative deviation value R Rx Rnom Rnom 100 VΔ Voltage absolute deviation value VΔ Vx Vnom V Voltage relative deviation value V Vx Vnom Vnom 100 Note The additional monitoring parameter don t increase processing time of the device The default setting is OFF Since the monitoring parameters are related to the nominal value once the monitoring parameter is enabled the NOMINAL field wi...

Page 39: ...teps 1 Press the Setup button to enter MEAS SETUP page 2 Use arrow keys to move cursor and select MONITOR on the MEAS SETUP page 3 Use Option key on the right of the LCD screen to select an available parameter Available parameter Rising edge When input signal of TRIG pin is a rising edge trigger measurement is performed Falling edge When input signal of TRIG pin is a falling edge trigger measureme...

Page 40: ...ion user will learn how to set up comparator The device can perform comparator function for resistance and voltage simultaneously or separately Steps 1 Press the Setup button to enter MEAS SETUP page 2 Press the COMP SETUP Option key on the right of the LCD screen ...

Page 41: ...e the buzzer PASS The buzzer tweets when the sorting result is passed FAIL The buzzer tweets when the sorting result is failed Set up comparator 4 Use arrow keys to move cursor and select R COMP or V COMP on the COMP SETUP page Available options OFF Disable the R COM VCOM funtion ON Enable the R COM VCOM funtion ...

Page 42: ...o compare the upper and lower limits of the setting range for voltage and resistance with the measurement reading so nominal value isn t required for calculation PER Measurement reading nominal value nominal value x 100 ABS Measurement reading nominal value Input normal value 6 Use arrow keys to select R NOM or V NOM on the COMP SETUP page when comparator mode is set to PER or ABS mode ...

Page 43: ...rresponding resistance and voltage unit Input upper and lower range 8 Use arrow keys to select R LOWER or V LOWER and R UPPER or V UPPER on the COMP SETUP page 9 Use key pad to input upper and lower limits values and option key on the right of the LCD screen to select corresponding resistance and voltage unit ...

Page 44: ...d in USB flash drive is larger than that saved in data buffer of the device this means of saving measurement data can be used to save measurement data of battery test in the production line of factory Steps 1 Insert a USB flash drive for using as data recoding 2 Press the Setup button to enter MEAS SETUP page 3 Press the USBDISK SETUP option key on the right of the LCD screen ...

Page 45: ...K SETUP page 5 Press CREATE FILE option key on the right of the LCD 6 A window INPUT FILE NAME popups Input file name you desired and then press Enter key to create a new file The new created file will be list under the title FILE NAME You can create as many files as you want ...

Page 46: ...les will have a red dot with a check mark in front of file name 8 Select the opened file and press CLOSE option key on the right of the LCD to close the file The red dot in front of file name will disappear and a message file closed displays on the lower left part of the screen 9 Press DELETE option key on the right of the LCD to delete selected file ...

Page 47: ...ight of the LCD screen to set interval time for recording measurement data Setup AUTO OPEN 12 Use arrow keys to select AUTO OPEN on the USBDISK SETUP page Available options ON Enable auto open function The measurement data will be saved to the original opened file when USB flash drive been inserted to the device again OFF Disable auto open function ...

Page 48: ...ll information on MEAS DESPLAY page How to enter MEAS DISPLAY page 49 Setting up measurement function 51 Setting up corresponding measurement range 52 Range for resistance 53 Range for voltage 53 Abnormal value description 53 Judgment result area 54 Setting up measurement speed 55 ...

Page 49: ...ps 1 Press the Measure button to enter MEAS DISPLAY page on the LCD screen 2 Press ENLARGE key below the LCD screen to enlarge resistance and voltage values on the screen Note There is another way to enter the MEAS DISPLAY page The steps are as follow ...

Page 50: ...GBM 3080 3300 User Manual 50 1 Press the Setup button to enter MEAS SETUP page 2 Press the MEAS DISPLAY option key on the right of the LCD screen The MEAS DISPLAY page will display on the screen ...

Page 51: ...e cursor and select FUNC item on the MEAS DISPLAY page 3 Use option key on the right of the LCD screen to select a parameter for this measurement item Parameter R V Measure and display both the resistance and voltage of battery under test R Measure and display the resistance of battery under test V Measure and display the voltage of battery under test ...

Page 52: ...AS DISPLAY page 3 Use option key on the right of the LCD screen to select a parameter for this measurement item Measurement range AUTO RANGE The device will automatically select the best range to test HOLD RANGE The device will always performe test with a user specified range NOM RANGE The device will automatically select the best range to test based on the nominal value INCR Increase the range nu...

Page 53: ...mΩ 3 3Ω 0 0000 3 1000 4 30Ω 0 000 31 000 5 300Ω 0 00 310 00 6 3kΩ 0 0 3200 0 Range for voltage The GBM 3000 series has three ranges for voltage with varying ranges for each range as follows Range no Range name Range 0 8V 0 00000V 8 08000V 1 80V 0 0000V 80 8000V 2 300V 0 000V 303 000V For GBM 3300 only Abnormal value description Display on the screen Description Unable to determine Measured value i...

Page 54: ...ould display on the LCD screen Display on the screen Description R V H SENSE or L SENSE isn t connected to battery H SOURCE or L SOURCE isn t connected to battery R V x xxxxxx H SOURCE or L SOURCE isn t connected to battery All test results are OK after comparison Some test results are HI or LO after comparison ...

Page 55: ...AY page on the LCD screen 2 Use arrow keys to move the cursor and select SPEED item on the MEAS DISPLAY page 3 Use option key on the right of the LCD screen to select a parameter for this measurement item Available test speed SLOW 4 times sec MED 11 times sec FAST 25 times sec EXFAST 60 times sec ...

Page 56: ...ion 57 Set up the data buffer 58 Start the continuous data logging function 60 Activate a single data logging 61 Stop the data logging 63 Saving data to USB flash drive 64 Statistics function 66 Set up statistics function 66 Set up the data buffer 67 Start the statistics function 68 Stop the statistics of data 69 Saving data to USB flash drive 70 Process Capability Index 70 Setting up statistics p...

Page 57: ... logging function is enabled The measured data can be instantly stored in the device s buffer through the data logging function These data can be sent to the computer through the communication interface or saved in CSV format directly to the USB flash drive Set up data logging function Steps 1 Press the Measure or Setup key on the front panel of the GBM 3300 or 2 Press SYSTEM key below the LCD scr...

Page 58: ...ata logging function is enabled as shown in the picture below Set up the data buffer The data buffer setting sets the maximum number of record counts that the internal buffers can store Settable range is 1 to 10000 Steps 1 Press the Measure or Setup key on the front panel of the GBM 3300 or Steps 2 Press SYSTEM key below the LCD screen to enter SYSTEM CONFIG setting page ...

Page 59: ...TEM CONFIG setting page The selected item will be highlighted 4 Enter a number from key pad then press Enter key or press MAX option key on the right of the LCD to set up the number of data for logging Available options MAX Set the number for data logging to maximum 10 000 sets ...

Page 60: ...n 2 Press the START option key on the right of the LCD screen to start continuous data logging function The data logging will keep running until the number of setting buffer is up 3 When data logging runs until the number of setting buffer you will see an exclamation mark and FULL display on the upper side of LCD screen as shown in the picture below ...

Page 61: ... Before start continuous data logging check if trigger mode set to INT Once data logging is enabled the measurement page will be locked and unable to switch to another page User must stop data logging faction first so as to switch to other page Activate a single data logging Steps 1 Set trigger mode to EXT mode ...

Page 62: ...igger button on the front panel to start a single data logging 4 You can see the number on LOG filed increase by one when pressing the trigger key once Note User must disable the data logging faction first before switching to other pages in the external trigger mode SCPI command TRIGGER or handler external trigger port can also be used to activate a single data logging ...

Page 63: ...ng An exclamation mark displays on the upper side of LCD screen to indicate that data logging function stops as shown in the picture below 2 Press the START option key on the right of the LCD screen again to restart the data logging function 3 Press CLEAR BUFFER option key on the right of the LCD screen to clear data in the buffer Note SCPI command LOG START OFF also can be used to stop data loggi...

Page 64: ...ive at any time after data logging is activated Step 1 When data logging is executing press SAVE TO USB option key on the right of the LCD screen at any time to save recorded data to USB flash drive Saved file format is in CSV 2 Open the saved file in USB flash drive with notepad or EXCEL program to edit ...

Page 65: ...n file with notepad Open file with Excel program Note Through the SCPI command the data stored in the buffer can be sent to the computer in whole or in a single file For detailed commands please refer to the Logger commands on page 160 ...

Page 66: ...ality control more easily Set up statistics function Steps 1 Press the Measure or Setup key on the front panel of the GBM 3300 or 2 Press SYSTEM key below the LCD screen to enter SYSTEM CONFIG setting page 3 Use arrow keys to select DATA LOGGER field as shown in the picture below 4 Press the STAT option key on the right of the LCD screen ...

Page 67: ...e after the statistics function is enabled as shown in the picture below Set up the data buffer The data buffer setting sets the maximum number of record counts that the internal buffers can store Settable range is 1 to 10000 The setting steps are the same as setting data buffer for data long on page 58 ...

Page 68: ...ess the START option key on the right of the LCD screen to start statistics function The statistics of data will keep running until the number of setting buffer is up 3 When statistics of data runs until the number of setting buffer you will see an exclamation mark and FULL display on the upper side of LCD screen as shown in the picture below ...

Page 69: ...P key option key on the right of the LCD screen at any time to stop stastistics logging function when statistics of data is processing An exclamation mark displays on the upper side of LCD screen to indicate that statistics function stops as shown in the picture below 2 Press the START option key on the right of the LCD screen again to restart the statistics logging function 3 Press CLEAR BUFFER o...

Page 70: ...teady state the product has 99 73 of the quality characteristic values scattered in the interval μ 3σ μ 3σ where μ is the overall mean of the product characteristic values and σ is the overall standard deviation of the product characteristic values Almost all product characteristic values fall within the 6σ range so the process capability is usually expressed as 6σ The smaller the value the better...

Page 71: ... taken into operation regardless of whether the comparator is enabled or not When sample standard deviation σn 1 0 Cp 99 99 CpK 99 99 When CpK 0 Cpk 0 The following SCPI query commands are used to obtain related information Number of statistics CALCulate STATistic RESistance NUMBer CALCulate STATistic VOLTage NUMBer For detailed please refer to page 153 and 156 The average of statistics CALCulate ...

Page 72: ...ndard deviation value CALCulate STATistic RESistance DEViation CALCulate STATistic VOLTage DEViation For detailed please refer to page 155 and 158 Process capability index CALCulate STATistic RESistance CP CALCulate STATistic VOLTage CP For detailed please refer to page 156 and 158 Setting up statistics parameters Steps 1 Press Measure button and MEAS DISPLAY page is appeared 2 Use arrow keys to s...

Page 73: ...tistics MIN The minimum value of statistics Population σ Standard deviation of maternal Sample s Standard deviation of samples Cp Process Capability Index Deviation Cpk Process Capability Index Offset Note The items R NO and V NO are effective statistics amount The items R CpK and V CpK are statistics parameters ...

Page 74: ...TEM CONFIG page are automatically saved in the system and loaded automatically at the next boot System configuration page 75 Configuring date and time 76 Configuring account number 77 Setting up the keypad tone 78 Configuring a mode for remote control 80 Setting up filter 81 Display error code 82 Restore to factory default setting 83 System info page 86 ...

Page 75: ...ation page you can set up the following items about system configuration Configuring date and time page 76 Configuring account number page 77 Setting up the keypad tone p78 Configuring a mode for remote control page 80 Setting up filter page 81 Displaying error code page 82 ...

Page 76: ...CD screen to enter SYSTEM CONFIG setting page 3 Use up and down arrow keys to select DATE TIME on this setting page The selected item will be highlighted 4 Press option key on the right of the LCD screen to change setting Available parameter Date YEAR INCR YEAR DECR MONTH DAY INCR DAY DECR Time HOUR INCR HOUR DECR MINUTE INCR MINUTE DECR SECOND INCR SECOND DECR ...

Page 77: ...ress the Measure or Setup key on the front panel of the GBM 3300 or 2 Press SYSTEM key below the LCD screen to enter SYSTEM CONFIG setting page 3 Use up and down arrow keys to select ACCOUNT on this setting page The selected item will be highlighted 4 Press option key on the right of the LCD screen to change setting Available parameter ACCOUNT ADMIN USER PASSWORD CHANGE PASSWORD DELETE PASSWORD ...

Page 78: ...es The parameter modified by USER will not be saved and restored to the original setting set by ADMIN at next boot Note When you use up and down arrow keys to select PASSWORD on this setting page The selected item will be highlighted If you select CHANGE PWD you can enter a password combined with numbers of 8 digits at maximum If you select DELETE PWD ADMIN will not be protected by password Settin...

Page 79: ... down arrow keys to select KEY BEEP on this setting page The selected item will be highlighted 4 Press option key on the right of the LCD screen to change setting Available parameter ON Turn on the keypad tone OFF Turn off the keypad tone ...

Page 80: ...wn arrow keys to select REMOTE on this setting page The selected item will be highlighted 4 Press option key on the right of the LCD screen to change setting Available parameter RS232 Select RS 232 port as remote control mode USB Select USB port as remote control mode Note Only one mode is supported Before selecting either a remote control mode please connect its corresponding cable to appropriate...

Page 81: ...setting serial transmission rate and the keyboard will be locked as well In order to be able to communicate correctly please confirm whether the setting serial transmission rate and stop bit are set correctly Otherwise the device won t be able to communicate with host computer correctly Setting up filter Steps 1 Press the Measure or Setup key on the front panel of the GBM 3300 or 2 Press SYSTEM ke...

Page 82: ... 50 or 60Hz according to AC power frequency 50Hz Suitable for AC power frequency 50Hz 60Hz Suitable for AC power frequency 60Hz Note Sets the power frequency which is close to either 50Hz or 60Hz The deviation from measuring will increase due to improper setup Display error code If the error code setting is set to on the meter will return error codes if the wrong command or an invalid command is r...

Page 83: ...his setting page The selected item will be highlighted 4 Press ON and then YES option key on the right of the LCD screen to change setting Available parameter ON Return when error occurs OFF Error code isn t returned when error occurs Restore to factory default setting After executing the factory default setting all settings of the device will be restored to factory default settings including all ...

Page 84: ...he selected item will be highlighted 4 Press ON and then YES option key on the right of the LCD screen to change setting Available parameter ON Return all parameters to factory default setting OFF Keep current settings and didn t do any change on parameters After restoring to factory default setting you can see SYSTEM CONFIG and MEAS SETUP page return to its original status For details about the G...

Page 85: ...SYSTEM CONFIGURATION 85 SYSTEM CONFIG MEAS SETUP ...

Page 86: ...follow the steps list below Steps 1 Press the Measure or Setup key on the front panel of the GBM 3300 or 2 Press SYSTEM key below the LCD screen to enter SYSTEM CONFIG setting page 3 Press SYSTEM INFO option key on the right of the LCD screen to enter SYSTEM INFORMATION page ...

Page 87: ...SYSTEM CONFIGURATION 87 Note There is not any option that user can configure on System Information page ...

Page 88: ...eads 90 Short circuit test 94 Handler Overview 97 Terminal and signals 97 Output terminal 97 Input terminal 98 Power source terminal 98 Connection 98 User internal power 99 Electrical parameters 99 Schematic diagrams 100 Connection method for input circuit 100 Connection method for output circuit 101 ...

Page 89: ...ds 1 by using the nSHORT signal of HANDLER 2 by using the communication command ADJust Since generated voltage signal will be very small several mV at maximum after the test current flows through the resistor in the condition of very small measuring resistance 3mΩ and 30mΩ ranges the location length and shape of the test leads may have influences on measuring In general the location where measurem...

Page 90: ...onnect H SOURCE and L SOURCE 3 Connect SENSE and SOURCE to complete connection of 3 points Offsetting of test leads GBM 01 TEST LEAD Kelvin 1 The SENSE terminal needs to be clipped on the same side to offset If offsetting is not performer on the same SENSE terminals it may cause measurement error ...

Page 91: ...ER FUNCTIONS 91 2 The SENSE terminals are clipped on the same side to complete connection of 3 points GBM 02 TEST LEAD Single 1 Refer to the connection method for offsetting to complete 3 points connection ...

Page 92: ...e distance between the two ends of the battery under test Then insert the SENSE pins into the holes and press down the probes to let the SOURCE touch the copper foil on the PCB board to complete the 3 point connection When performing offsetting it is necessary to keep the probe and the short circuit board in good contact condition to avoid shaking and affect the measurement results ...

Page 93: ...left and right of the center which has the same distance between the two ends of the battery under test Then insert the SENSE pins into the holes and press down the probes to let the SOURCE touch the copper foil on the PCB board to complete the 3 point connection When performing offsetting it is necessary to keep the probe and the short circuit board in good contact condition to avoid shaking and ...

Page 94: ...GBM 3080 3300 User Manual 94 Short circuit test Steps 1 Press the Measure button on the front panel 2 Press the SHORT TEST option key on the right of the LCD screen ...

Page 95: ... finally a message correction finished displays on the lower part of the LCD screen 5 If cursor on SHORT TEST is highlighted OFF Press the ON option key on the right of the LCD screen first and then follow the step above to perform short test Available parameters OFF Turn off the function of setting The setting value is not used when testing MEAS SHORT Perform short circuit reset Connect the test ...

Page 96: ...s to select DELAY on the SHORT TEST page Available parameters OFF Perform short test without any delay 3s Perform short test after 3 seconds of delay 5s Perform short test after 5 seconds of delay 10s Perform short test after 10 seconds of delay MEAS SHORT Perform short test ...

Page 97: ... input signals of TRIG activated by external trigger Through this interface the device can be easily controlled with the control components of user s system to complete automatic control functions Terminal and signals Terminal Output terminal PIN No Name Description 1 O_RLO 0 RLO 2 O_ROK 0 ROK 3 O_RHI 0 RHI 4 O_VLO 0 VLO 5 O_VOK 0 VOK 6 O_VHI 0 VHI 7 O_RNG 0 RNG 8 O_VNG 0 VNG ...

Page 98: ... 0 KEYLOCK Power source terminal PIN No Name Description 16 18 GND GND ends for external power supply 17 VCC Positive end for internal VCC power supply 5V 1A Connection Please connect the external power supply to the following pins simultaneously Pin 16 and 18 GND ends for external power supply Pin 17 Floating Note The device has built in fully isolated power supply so it is not necessary for exte...

Page 99: ... Power Requirements 3 3V 30VDC Output signal output with built in pull up Darlington pair collector resistor It is isolated with opt coupler and effective in low voltage level Maximum voltage 30VDC with built in 30V clamping circuit Input signal It is isolated with opt coupler and effective in low voltage level Maximum current 50mA Note To avoid damaging the interface the voltage of power supply v...

Page 100: ...GBM 3080 3300 User Manual 100 Schematic diagrams At Input terminal At output terminal Connection method for input circuit Connection with the switch ...

Page 101: ...HER FUNCTIONS 101 Connection by using relay to control Connection by using PLC negative common terminal Connection by using PLC positive common terminal Connection method for output circuit Control relay ...

Page 102: ...GBM 3080 3300 User Manual 102 Control light emitting diodes or opt couplers Negative logic output Two port output and form a logic or circuit ...

Page 103: ...OTHER FUNCTIONS 103 Output to PLC negative common terminal Output to PLC positive common terminal ...

Page 104: ... on page 108 Configure Interface 105 RS 232C Interface 105 Configure RS232 Interface 106 USB Interface 106 Configure USB Interface 107 Install USB Driver 108 Configure related settings for remote control mode 110 Set up the stop bits 110 Set up transmission speed 111 Set up protocol 112 Set up the style of sending result 113 Set up terminator 114 Set up hand shake function 115 ...

Page 105: ...wn as asynchronous serial communication standard which is used for data communication between computers and computers and peripherals RS is an abbreviation for Recommended Standard and 232 is the standard number This standard officially promulgated by the Electronic Industries Association EIA in 1969 It provides for the transmission of one bit of data via a data line each time In addition RS232 al...

Page 106: ...it Parity None Hardware flow control Off Data Bits 8 Stop bit 1 RS232 Pin Assignments Pin 2 RxD Pin 3 TxD Pin 5 GND Pin 1 4 6 9 No Connection 12 34 5 6789 PC Connection Use a Null Modem connection as shown in the diagram below GBM 3000 PC RxD Pin2 RxD Pin2 GND Pin5 GND Pin5 TxD Pin3 TxD Pin3 USB Interface On some newer computers the RS232 interface has been removed and requires use of a USB interf...

Page 107: ... remote control Before the GBM 3000 series can be used for remote control using the CDC USB class install the appropriate CDC USB driver included on the User Manual CD Configure USB Interface Background The Type B USB port on the rear panel is used for remote control This interface creates a virtual COM port when connected to a PC Note The USB interface requires the USB driver to be installed See ...

Page 108: ...ar panel USB B port on the GBM 3080 3300 Connect the other end to the Type A port on the PC Go to the Windows Device Manager For Windows 7 go to Start Menu Control Panel Hardware and Sound Device Manager The GBM 3080 3300 will appear as an unknown Virtual Com Port under Other Devices Right click Other Devices and select Update Driver Software Select Browse my computer for driver software and selec...

Page 109: ...y USB Drive To avoid electrical shock turn off the power when plugging and unplugging the DB9 cable If the driver installation is completed correctly the number of USB serial port will be displayed You need to remember this port number because you will use it when programming Both SCPI commands and Modbus commands can be operated through RS 232C or USB port ...

Page 110: ...low the LCD screen to enter SYSTEM CONFIG setting page 2 Use up and down arrow keys to select STOP BITS on this setting page The selected item will be highlighted 3 Press option key on the right of the LCD screen to change setting Available parameter 1 BIT In general stop bits is set to one bit 2 BITS Stop bits is set to two bit ...

Page 111: ...page The selected item will be highlighted 3 Press option key on the right of the LCD screen to change setting Available parameter 1200 Use this serial transfer rate if you use a communications converter with opt coupler isolation 9600 9600bps 38400 38400bps 57600 57600bps 115200 It is recommended that you use this high speed serial transmission speed to communicate with a host computer ...

Page 112: ... below the LCD screen to enter SYSTEM CONFIG setting page 2 Use up and down arrow keys to select PROTOCOL on this setting page The selected item will be highlighted 3 Press option key on the right of the LCD screen to change setting Available parameter SCPI SCPI protocol ...

Page 113: ... then returns the test result to the sorting machine without the need to receive a fetch command from either the sorting machine or the control PC Steps 1 Press SYSTEM key below the LCD screen to enter SYSTEM CONFIG setting page 2 Use up and down arrow keys to select RESULT on this setting page The selected item will be highlighted 3 Press option key on the right of the LCD screen to change settin...

Page 114: ... 1 Press SYSTEM key below the LCD screen to enter SYSTEM CONFIG setting page 2 Use up and down arrow keys to select TERMINATOR on this setting page The selected item will be highlighted 3 Press option key on the right of the LCD screen to change setting Available parameter LF 0x0A One byte of terminator for line feed CR 0x0D One byte of terminator for carriage return CR LF Two bytes of terminator ...

Page 115: ... to establish compilation of computer communication software Handshake agreement The command line parser of the device only accepts ASCII format and the response to command also returns in ASCII code The command string sent by the host must end with a terminator The command line parser of the device starts executing the command string only after receiving the terminator When the device is set to e...

Page 116: ... connection Communication format for high level language program error Please check if the serial port number communication format are correct and the serial transmission rate is the same as the device setting If the device is resolving the last command the host can t accept the response of the device Please try again later Steps 1 Press SYSTEM key below the LCD screen to enter SYSTEM CONFIG setti...

Page 117: ... If no special requirements please set the command to off ON Note After the instruction exchange is turned on all the commands which sent by the host to the instrument returns to the host computer as the same before returning the data After the command handshaking is turned off the commands sent by the host to the instrument will be processed immediately ...

Page 118: ...EW The Command overview chapter lists all programming commands in functional order as well as alphabetical order The command syntax section shows you the basic syntax rules you have to apply when using commands Command Syntax 119 Command List 123 ...

Page 119: ... a SCPI command represents each node in the command tree Each keyword node of a SCPI command is separated by a colon For example the diagram below shows an SCPI sub structure and a command example DCAC DC AC INPut MODE DC MODE INPut Command Types There are a number of different instrument commands and queries A command sends instructions or data to the unit and a query receives data or status info...

Page 120: ... can be written either in capitals or lower case just so long as the short or long forms are complete An incomplete command will not be recognized Below are examples of correctly written commands Long form INPut SYNChronize VOLTage COMMunicate HEADer ON Short form INP SYNC VOLT COMM HEAD ON Square Brackets Commands that contain square brackets indicate that the contents are optional The function o...

Page 121: ...ng to the lowest value This parameter can be used in place of any numerical parameter where indicated For queries it will return the lowest possible value allowed for the particular setting MAX Optional parameter For commands this will set the setting to the highest value This parameter can be used in place of any numerical parameter where indicated For queries it will return the highest possible ...

Page 122: ...GBM 3080 3300 User Manual 122 CR LF The most common EOL character is CR LF Message Separator EOL or semicolon Command Separator ...

Page 123: ...ce LiMiT MODE 132 RESistance LiMiT NOMinal 133 RESistance LiMiT SEQ 133 RESistance LiMiT ABS 134 RESistance LiMiT PER 134 VOLTage Commands VOLTage RANGe 136 VOLTage RANGe NO 136 VOLTage RANGe MODE 137 VOLTage LiMiT 137 VOLTage LiMiT STATe 138 VOLTage LiMiT MODE 138 VOLTage LiMiT NOMinal 139 VOLTage LiMiT SEQ 139 VOLTage LiMiT ABS 140 VOLTage LiMiT PER 140 AUTorange Command AUTorange 141 ADJust Com...

Page 124: ...Te 153 CALCulate STATistics RESistance NUMBer 153 CALCulate STATistics RESistance MEAN 154 CALCulate STATistics RESistance MAXimum 154 CALCulate STATistics RESistance MINimum 154 CALCulate STATistics RESistance LIMit 155 CALCulate STATistics RESistance DEViation 155 CALCulate STATistics RESistance CP 156 CALCulate STATistics VOLTage NUMBer 156 CALCulate STATistics VOLTage MEAN 156 CALCulate STATis...

Page 125: ...SYSTem DATAout 166 SYSTem BACKup 167 TRIGger Commands TRIGger SOURce 168 TRIGger DELay 168 TRIGger DELay STATe 169 TRG 169 FETCh READ Commands FETCh 170 FETch FULL 171 CORRection Command CORRection SHORt 172 FILE MMEM Commands FILE SAVE 173 FILE LOAD 173 FILE DELete 173 SPCI Commands IDN 175 ERRor 176 SAV 176 ...

Page 126: ... CONFIG SYST SYSTEM INFORMATION SINF Return parameter Page name abbreviation Meas enla mset bset cset cata syst sinf Example DISP PAGE MSET DISP PAGE mset DISPlay LINE Description Sets or returns a string of text at prompt field of the page The text can display up to 30 characters and the text stays on the screen for 10 seconds Syntax DISPlay LINE string Query Syntax DISPlay LINE Parameter string ...

Page 127: ...COMMAND OVERVIEW 127 Note NULL will be returned if the prompt field is empty ...

Page 128: ...ameter VOLTage or V Select voltage as measurement parameter Return parameter RV Measurement parameters are voltage and resistance RESISTANCE Measurement parameter is resistance VOLTAGE Measurement parameter is voltage Example FUNC RES FUNC RESISTANCE FUNCtion MONitor Description Sets or returns the monitor parameter Syntax FUNCtion MONitor OFF RABS RPER VABS VPER Query Syntax FUNCtion MONitor Para...

Page 129: ... OVERVIEW 129 RPER Monitor the resistance relative deviation R value VABS Monitor the voltage absolute deviation VΔ value VPER Monitor the voltage relative deviation V value Example FUNC MON RPER FUNC MON RPER ...

Page 130: ...ion Sets and returns the resistance range according to the resistance value Syntax RESistance RANGe 0 3100 Query Syntax RESistance RANGe Parameter 0 3100 Floating point with exponent represents the resistance value Return parameter 3 0000E 3 30 000E 3 300 00E 3 3 0000E 0 30 000E 0 300 00E 0 3 0000E 3 Example RES RANG 300 00E 3 RES RANG 300 00E 3 RESistance RANGe NO Description Sets and returns the...

Page 131: ... select the best range HOLD User specified range NOM Range on the nominal value Example RES RANG MODE AUTO RES RANG MODE AUTO Note If the range mode is set to NOM the device will set the range according to the mode of comparator When the comparator mode is SEQ the range will be set according to the upper limit of the comparator When the comparator mode is ABS and PER the range will be set accordin...

Page 132: ...Example RES LMT 10m 100m RES LMT 10 000E 3 100 000E 3 RESistance LiMiT STATe Description Set and returns the resistance comparator state Syntax RESistance LiMiT STATe ON 1 OFF 0 Query Syntax RESistance LiMiT STATe Parameter Return parameter ON Enable the resistance comparator OFF Disable the resistance comparator Example RES LMT STAT OFF RES LMT STAT OFF RESistance LiMiT MODE Description Sets and ...

Page 133: ...t of nominal value It s unit is Ω Example RES LMT NOM 12 345m RES LMT NOM 12 345E 3 Note If the current resistance range is set to NOM and the comparison mode for resistance is PER or ABS the resistance range will be shifted to the optimum range based on the nominal value However when the comparison mode for resistance is SEQ the range will not be shifted according to the nominal value range is se...

Page 134: ...esistance on the current absolute compassion mode Syntax RESistance LiMiT ABS lower upper 3200 3200 Query Syntax RESistance LiMiT ABS Parameter Return parameter Lower The lower limit of floating point upper The upper limit of floating point Example RES LMT ABS 1 23m 1 23m RES LMT ABS 1 2300E 3 1 2300E 3 Note RES LMT ABS command will switch the comparison mode for resistance to ABS mode RES LMT ABS...

Page 135: ...eter Lower The lower limit of floating point upper The upper limit of floating point Example RES LMT PER 10 10 RES LMT PER 10 000E 0 10 000E 0 Note RES LMT PER command will shift the comparison mode for resistance to PER mode RES LMT PER Command doesn t shift the comparison mode ...

Page 136: ...ltage range according to the voltage value Syntax VOLTage RANGe 0 300 Query Syntax VOLTage RANGe Parameter 0 300 Float point represents the voltage value Return parameter 8 00000E 0 80 0000E 0 300 000E 0 Example VOLT RANG 10 VOLT RANG 80 0000E 0 VOLTage RANGe NO Description Sets and returns the range number for voltage Syntax VOLTage RANGe NO Range no min max Query Syntax VOLTage RANGe NO Paramete...

Page 137: ...MODE AUTO Note If set to NOM mode the device will set the range according to the mode of comparator When the comparator mode is SEQ the range will be set according to the upper limit of the comparator When the comparator mode is ABS and PER the range will be set according to the nominal value VOLTage LiMiT Description Sets and returns the upper and lower limits of voltage of the current comparison...

Page 138: ...ce comparator OFF Disable the resistance comparator Example VOLT LMT STAT OFF VOLT LMT STAT OFF VOLTage LiMiT MODE Description Set comparison mode for voltage Syntax VOLTage LiMiT MODE SEQ PER ABS Query Syntax VOLTage LiMiT MODE Parameter Return parameter SEQ Comparison with current readout of upper and lower limits PER Comparison with percentage Relative deviation comparison ABS Comparison with a...

Page 139: ... ABS the voltage range will be shifted to the optimum range based on the nominal value However when the comparison mode for voltage is set to SEQ the range will not be shifted according to the nominal value range is selected according to the upper limit in SEQ mode VOLTage LiMiT SEQ Description Sets and returns the upper and lower limits for the voltage on the current readout compassion mode Synta...

Page 140: ...er The upper limit of floating point Example RES LMT SEQ 1 2 1 2 RES LMT SEQ 1 20000E 0 1 20000E 0 Note VOLTage LiMit ABS command will switch the comparison mode for voltage to ABS mode VOLTage LiMit ABS Command doesn t switch the comparison mode VOLTage LiMiT PER Description Sets and returns the percentage of the upper and lower limits for the resistance on the current percentage compassion mode ...

Page 141: ...ange mode simultaneously For set the range mode individually please refer to the RES RANG MODE and VOLT RANG MODE commands Syntax AUTorange ON 1 OFF 0 Query Syntax AUTorange Parameter Return parameter ON Enable the auto range function OFF Disable the auto range function Example AUT ON AUT ON Set Query ...

Page 142: ...he zero clear function Syntax ADJust CLEAr Example ADJ CLEA ADJust Description Enable the zero clear function Syntax ADJust Query Syntax ADJust Return parameter 0 Zero clear is successful 1 Zero clear is failed Example ADJ ADJ 1 Note Before performing zero clearing be sure to short the test clip Set Set Query ...

Page 143: ...r SLOW Sampling rate is slow MEDIUM Sampling rate is medium FAST Sampling rate is fast EXFAST Sampling rate is extremely fast Example SAMP RATE MED SAMP RATE MEDIUM SAMPle AVERage Description Sets or returns the average times Syntax SAMPle AVERage integer 0 256 Query Syntax SAMPle AVERage Parameter Return parameter 0 1 Disable the average function 2 256 Set average times Example SAMP AVER 5 SAMP A...

Page 144: ...s STATe 153 CALCulate STATistics RESistance NUMBer 153 CALCulate STATistics RESistance MEAN 154 CALCulate STATistics RESistance MAXimum 154 CALCulate STATistics RESistance MINimum 154 CALCulate STATistics RESistance LiMit 155 CALCulate STATistics RESistance DEViation 155 CALCulate STATistics RESistance CP 156 CALCulate STATistics VOLTage NUMBer 156 CALCulate STATistics VOLTage MEAN 156 CALCulate S...

Page 145: ...unction use SAMP AVER 2 256 command instead CALCulate AVERage Description Sets and returns count of average function Syntax CALCulate AVERage 0 256 Query Syntax CALCulate AVERage Parameter Return parameter 0 1 Disable the average function 2 256 Set average frequency Example CALCulate AVERage 10 CALCulate AVERage 10 CALCulate LIMit STATe Description Sets and returns the state of comparator for volt...

Page 146: ...cription Sets the comparator buzzer Syntax CALCulate LIMit BEEPer 0 OFF HL NG FAIL IN OK PASS Query Syntax CALCulate LIMit PEEPer Return parameter OFF Disable the comparator buzzer HL Buzzer sounds when testing is failed IN Buzzer sounds when testing is passed Example CALC LIM BEEP HL CALC LIM BEEP HL CALCulate LIMit RESistance MODE Description Sets and returns the comparator mode for resistance S...

Page 147: ...eturn parameter 0 99999 Positive integer If the parameter is more than 99999 the parameter will be set to 99999 automatically Example CALC LIM RES UPP 12345 CALC LIM RES UPP 12345 Note The number of decimal digits and unit are related to the current range no Please refer to the following table for their relationship Range no Number of decimal digits Unit Description 0 3mΩ 4 mΩ 12345 1 2345 mΩ 1 30...

Page 148: ...RES LOW 1000 Note The number of decimal digits and unit are related to the current range no Please refer to the following table for their relationship Range no Number of decimal digits Unit Description 0 3mΩ 4 mΩ 1000 0 1000 mΩ 1 30mΩ 3 mΩ 1000 1 000 mΩ 2 300mΩ 2 mΩ 1000 10 00 mΩ 3 3Ω 4 Ω 1000 0 1000 Ω 4 30Ω 3 Ω 1000 1 000 Ω 5 300Ω 2 Ω 1000 10 00 Ω 6 3kΩ 4 Ω 1000 0 1000 kΩ CALCulate LIMit RESistan...

Page 149: ... 5 300Ω 2 Ω 10000 100 00 Ω 6 3kΩ 4 Ω 10000 1 0000 Ω CALCulate LIMit RESistance PERCent Description Sets and returns limit in percentage for resistance comparator Syntax CALCulate LIMit RESistance PERCent float 0 0 100 0 Query Syntax CALCulate LIMit RESistance PERCent Parameter Return parameter 0 00 100 00 It is a floating point number and without positive and negative symbols Example CALC LIM RES ...

Page 150: ...or Syntax CALCulate LIMit VOLTage UPPer 0 999999 Query Syntax CALCulate LIMit VOLTage UPPer Parameter Return parameter 0 999999 Positive integer If the parameter is more than 999999 the parameter will be set to 999999 automatically Example CALC LIM VOLT UPP 123456 CALC LIM VOLT UPP 123456 Note The number of decimal digits and unit are related to the current range no Please refer to the following t...

Page 151: ...nit are related to the current range no Please refer to the following table for their relationship Range no Number of decimal digits Unit Description 0 8V 5 V 100000 1 00000V 1 80V 4 V 100000 10 0000V 2 300V 3 V 100000 100 000V CALCulate LIMit VOLTage REFerence Description Sets and returns nominal value for voltage comparator Syntax CALCulate LIMit VOLTage REFerence 0 999999 Query Syntax CALCulate...

Page 152: ...OLTage PERCent float 0 0 100 0 Query Syntax CALCulate LIMit VOLTage PERCent Parameter Return parameter 0 0 100 0 It is a floating point number without positive and negative symbols Example CALC LIM VOLT PERC 1 1 CALC LIM VOLT PERC 1 100 Note CALCulate LIMit ABS Description Sets absolute deviation comparison for voltage Syntax CALCulate LIMit ABS ON 1 OFF 0 Query Syntax CALCulate LIMit ABS Paramete...

Page 153: ...ease use command LOG START ON to enable data logging and statistic function when trigger mode is set to INT Please use trigger key to enable data logging and statistic function when trigger mode is set to EXT CALCulate STATistics RESistance NUMBer Description Queries the numbers of statistics for resistance Query Syntax CALCulate STATistics RESistance NUMBer Return parameter Total No Effective No ...

Page 154: ...of the statistics for resistance Query Syntax CALCulate STATistics RESistance MAXimum Return parameter floating point the N th data N means that the N th data is the maximum value from the measured data Example CALC STAT RES MAX 354 76E 0 2 Note CALCulate STATistics RESistance MINimum Description Queries the minimum of the statistics for resistance Query Syntax CALCulate STATistics RESistance MINi...

Page 155: ...n querying the file count of comparator make sure the comparator function is enabled otherwise 0 0 0 0 will be returned for data CALCulate STATistics RESistance DEViation Description Queries the standard deviation value of statistics for resistance Query Syntax CALCulate STATistics RESistance DEViation Return parameter Standard deviation of maternal σn Standard deviation of samples σn 1 Example CA...

Page 156: ... Description Queries the number of statistics for voltage Query Syntax CALCulate STATistics VOLTage NUMBer Return parameter Total No Effective No Both numbers are integers Example CALC STAT VOLT NUMB 10 10 Note Effective quantity doesn t include the number of overflow OF or error FAULT The value is regarded as valid as long as it can be displayed on the screen CALCulate STATistics VOLTage MEAN Des...

Page 157: ... VOLT MAX 3 70890E0 4 Note CALCulate STATistics VOLTage MINimum Description Queries the minimum of the statistics for voltage Query Syntax CALCulate STATistics VOLTage MINimum Return parameter floating point the N th data N means that the N th data is the minimum value from the measured data Example CALC STAT VOLT MIN 3 70566E0 5 CALCulate STATistics VOLTage LIMit Description Queries the result co...

Page 158: ... for voltage Query Syntax CALCulate STATistics VOLTage DEViation Return parameter Standard deviation of maternal σn Standard deviation of samples σn 1 Example CALC STAT VOLT DEV 0 0002 0 0002 Note Standard deviation of maternal Standard deviation of samples CALCulate STATistics VOLTage CP Description Queries process capability index of statistics for voltage Query Syntax CALCulate STATistics VOLTa...

Page 159: ...COMMAND OVERVIEW 159 Note Process capability index deviation Process capability index offset ...

Page 160: ...ger STATe LOG STAT Query Syntax LOGger STATe Parameter Return parameter LOG Enable the data logging function STAT Enable the statistics function Example LOG STAT LOG LOG LOG LOGger START Description Stop or start the process of data logging Syntax LOGger START ON 1 OFF 0 Query Syntax LOGger START Parameter Return parameter 0 Stop data logging 1 Start data logging Example LOG START ON LOG START ON ...

Page 161: ...r SIZE 1 10000 max Query Syntax LOGger SIZE Parameter Return parameter 1 10000 Integer If the number is less than 1 it will be set to 1 automatically Max Set the buffer to 10000 Example LOG SIZE 100 LOG SIZE 100 LOGger COUNt Description Queries the total number of recorded data in buffer Query Syntax LOGger COUNt Parameter Return parameter 0 10000 If return value is zero it means buffer is empty E...

Page 162: ... Integer Return Parameter Total count Index num RES VOLT If the specified index is greater than the total number of data or the specified index less than 1 return 0 Example LOG DATA 3 1 12 345E 0 8 7654E 0 2 12 345E 0 8 7654E 0 3 12 345E 0 8 7654E 0 ...

Page 163: ...s and return system time Syntax SYSTem TIME YEAR MONTH DAY HOUR MINUTE SECOND Return syntax SYSTem TIME Example SYST TIME 2016 12 30 11 18 31 SYST TIME 2016 12 30 11 18 31 SYSTem KEYLock Description Sets or returns the state of the key protection Syntax SYSTem KEYLock OFF 0 ON 1 Query Syntax SYSTem KEYLock Parameter Return Parameter 0 Turn the key protection function off 1 Turn the key protection ...

Page 164: ...instrument will return an error code each time it receives an instruction If command SYST CODE is disabled user can obtain error code through command ERR E00 No error E01 Bad command E02 Parameter error E03 Missing parameter E04 Buffer overruns E05 Syntax error E06 Invalid separator E07 Invalid multiplier E08 Numeric data error E09 Value too long E10 Invalid command E11 Unknown error SYSTem BEEPer...

Page 165: ...inous PULSe Query Syntax SYSTem CURRent Parameter Return parameter continuous Current is output continuously pulse Current is only output during measurement Example SYST CURR PULS SYST CURR pulse SYSTem CALibration Description Sets the self calibration once Syntax SYSTem CALibration Example SYST CAL Note A self calibration takes about 40ms If the command is sent out it will be delayed by at least ...

Page 166: ...es Example SYST CAL AUTO OFF SYST CAL AUTO OFF SYSTem RESult Description Sets or returns the means for sending data Automatic or by using FETCH instruction Syntax SYSTem RESult FETCH AUTO Query Syntax SYSTem RESult Parameter Return parameter FETCH The data can only be returned to the master through Fetch instruction The device passively sends the data AUTO The test results are automatically sent t...

Page 167: ...The test results are automatically sent to the master after each test is completed Example SYST DATA ON SYST DATA ON Note Both commands SYSTem RESult and SYSTem DATAout can set the means for sending data Either by automatic or by using FETCH command The only different are parameter and return parameter SYSTem BACKup Description Sets to save measurement parameter to current file Syntax SYSTem BACKu...

Page 168: ...eturn parameter IMMEDIATE Set trigger source as INT mode EXTERNAL Set trigger source as EXT mode Example TRIG SOUR EXT TRIG SOUR EXTERNAL TRIGger DELay Description Sets or returns the trigger delay timer Syntax TRIGger DELay 0 001 10 000 Query Syntax TRIGger DELay Parameter Return parameter 0 001 10 000 Unit is second Example TRIG DEL 0 001 TRIG DEL 0 001 Note If the trigger delay function is not ...

Page 169: ... 1 Query Syntax TRIGger DELay STATe Parameter Return parameter 0 Enable the trigger delay function 1 Disable the trigger delay function Example TRIG DEL STAT OFF TRIG DEL STAT OFF TRG Description A trigger is generated when the trigger source is set to EXT mode and data is returned after triggering Syntax TRG Example TRG Set Query Set Query ...

Page 170: ...ands are used to obtain test data Before using this command you need to set the Result option to FETCH on the SYSTEM CONFIG page FETCh 170 FETch FULL 171 FETCh Description Returns the main test data Query Syntax FETCh Parameter R V Return both the resistance and voltage value R Return the resistance value V Return the resistance value Example FETC 22 005E 0 3 69943E 0 Note If current LCD screen is...

Page 171: ...ond returned parameter is voltage value HI OK LO Result for resistance HI OK LO Result for voltage PASS FAIL WIRE OPEN Display total result Monitor type and value Display monitor type and value Example FETCh FULL 21 993e 0 3 70088e 0 OK HI FAIL RPER 2 18930e 04 Note If the current page is not on MEAS DISPLAY or ENLARGE DISPLAY page when using this command the LCD screen will be switched to MEAS DI...

Page 172: ...ets to perform a short circuit zero calibration Query Syntax CORRection SHORt Parameter Return parameter Short Short Clear Zero Start 0 Correction finished 1 Correction fail Example CORR SHOR short 0 Note Before sending the command be sure to short cut the test terminal Set Query ...

Page 173: ...file File No 0 9 Specified file Example FILE SAVE FILE SAVE 1 FILE LOAD Description To load instrument settings of current file or specified file to the system Syntax FILE L OAD None File No 0 9 Parameter None Current file File No 0 9 Specified file Example FILE LOAD FILE LOAD 1 FILE DELete Description To delete instrument settings of current file or specified file from the system Syntax FILE DEL ...

Page 174: ...GBM 3080 3300 User Manual 174 Parameter None Current file File No 0 9 Specified file Example FILE DEL FILE DEL 1 ...

Page 175: ...character data in the following format GBM 3300 REV B1 21 GES110T4A Good Will Instrument Co Ltd Model number GBM 3300 Firmware version V1 X X X Serial number XXXXXXXX Manufacturer GWINSTEK Example IDN GBM 3300 REV B1 21 GES110T4A Good Will Instrument Co Ltd Note When receiving IDN command the instrument buzzer will sound to prompt to receive the information and return the result This command is us...

Page 176: ...the most recent error information Please refer to page 164 for details about error code Query Syntax ERRor or ERRor Example ERR E00 No error SAV Description To save all modified settings to the device s internal memory Syntax SAV or SAV Example SAV Query Set ...

Page 177: ...APPENDIX 177 APPENDIX GBM 3300 Factory Default Settings 178 Specifications 180 General Specifications 180 AC Resistance 181 DC Voltage 181 Dimensions 183 Declaration of Conformity 184 ...

Page 178: ...lt Setting File No 0 File Media Internal File Recall File 0 File Auto Save 0 System Default Setting Baud 115200 Terminator CR LF Stop Bit 1 Hand Shake OFF Error Code OFF Send Mode Fetch Protocol SCPI Key Lock OFF Key Beep ON Data Logger LOG Log Size 10 000 Filter AUTO USB File Default Setting USB File OFF Short Test Default Setting Short ON Short Delay 0 Setup Default Setting FUNC R V SPEED SLOW A...

Page 179: ...APPENDIX 179 TRIGGER INT TRIG EDGE RISING EDGE BIN Setup Setting R COMP OFF V COMP OFF R COMP Mode SEQ V COMP Mode SEQ BEEP OFF NOMINAL 0 LOWER UPPER 0 ...

Page 180: ...n condensing Operating Environment Temperature Range 0 40 C Relative Humidity 70 RH non condensing Storage Conditions Temperature Range 10 70 C Relative Humidity 80 RH non condensing General Power Consumption AC 100V 240V 50 60Hz Max 10W Fuse 250V 1A slow melting Dimensions 264 mm W X 107 mm H X 309 mm D Weight Approximately 2 8 kg Display TFT LCD Type 3 5 TFT LCD color display Test speed Slow 4 t...

Page 181: ... 6 3kΩ 3200 0 100mΩ 10μA Range No Accuracy Temperature coefficient Slow Medium Fast Ex Fast 0 0 5 rdg 10 dgt 0 5 rdg 15 dgt 0 5 rdg 20 dgt 0 5 rdg 40 dgt 0 05 rdg 1dgt C 1 6 0 5 rdg 5 dgt 0 5 rdg 7 dgt 0 5 rdg 7 dgt 1 rdg 8 dgt 0 05 rdg 0 5 dgt C DC Voltage Range No Range Maximum Displayed Values Resolution 0 8V 8 08000 10μV 1 80V 80 8000 100μV 2 300V For GBM 3300 only 303 000 1mV Range No Accurac...

Page 182: ... can be used to reduce the impact on the measurement It is recommended to use GTL 308 test lead with GBM G1 ground lead to connect to the Frame Terminal on the back of the machine Effect of radiated radio frequency electromagnetic field 10V m Resistance 10 rdg 8000dgt Voltage 0 01 rdg 50dgt Effect of conducted radio frequency electromagnetic field 3V Resistance 0 5 rdg 1000dgt ...

Page 183: ...APPENDIX 183 Dimensions ...

Page 184: ... EN 61000 4 5 2014 Voltage Fluctuation EN 61000 3 3 2013 Conducted Susceptibility EN 61000 4 6 2014 Electrostatic Discharge EN 61000 4 2 2009 Power Frequency Magnetic Field EN 61000 4 8 2010 Radiated Immunity EN 61000 4 3 2006 A1 2008 A2 2010 Voltage Dips Interrupts EN 61000 4 11 2004 Low Voltage Equipment Directive 2014 35 EU Safety Requirements EN 61010 1 2010 EN 61010 2 030 2010 GOODWILL INSTRU...

Reviews: