background image

English 

38 


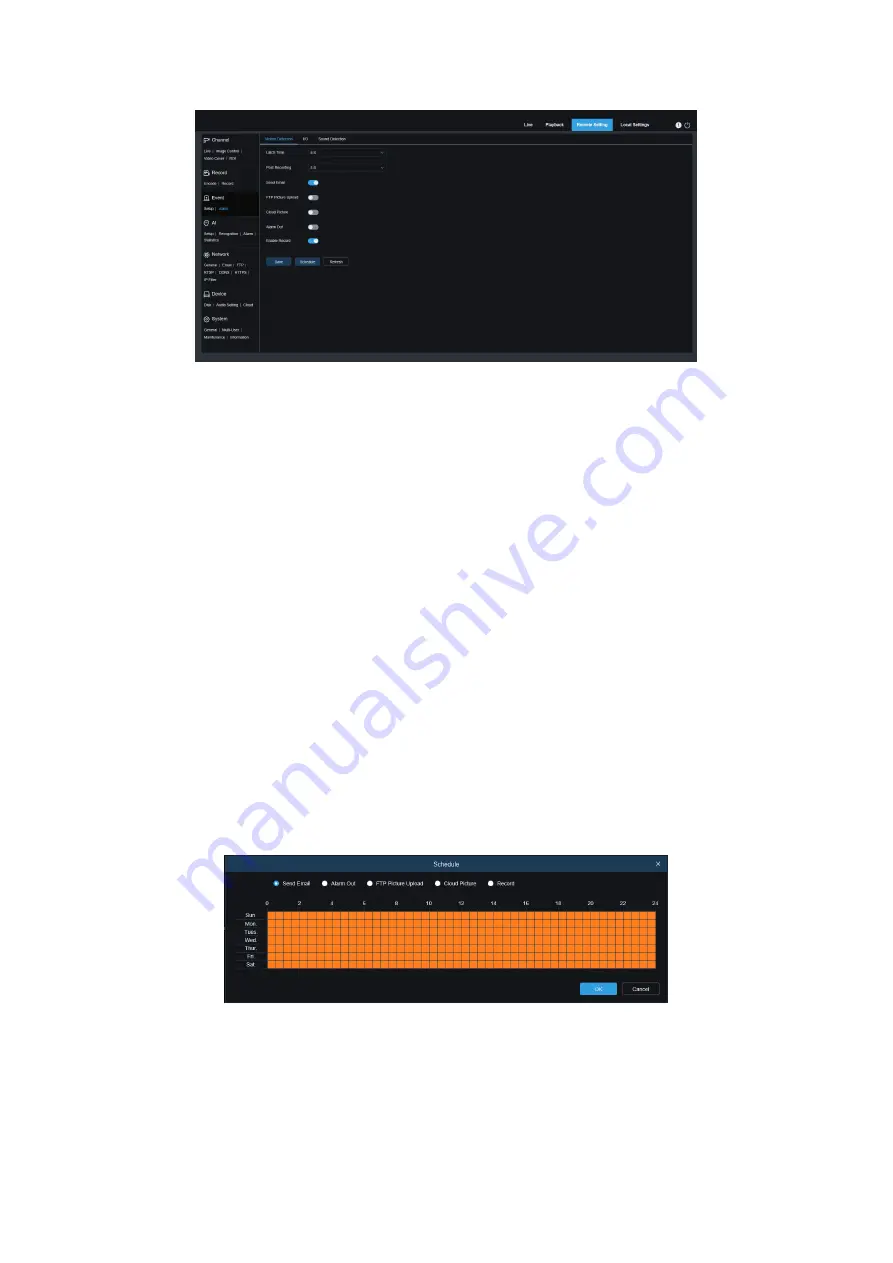
Figure 8.11 

Latch Time

Set the external alarm triggering time when motion is detected. 

Post Recording

Set the duration of the device's recording after the event occurs. There are 5s, 

10 s, 20s, and 30s optional. The default recording time is 5s. The max is 30s. 

Send Email

Set the camera to send email to your mailbox when it detects motion. 

FTP Picture Upload: 

Upload the alarm picture to the FTP server after the alarm is triggered. 

Cloud Picture: 

Upload the alarm picture to the cloud server after the alarm is triggered. 

Alarm Out

: Optional function. If your camera supports to connect an external alarm device, you 

can enable this function to activate the external alarm device. 

Enable Record

When checked, this type of recording will be enabled when an alarm is 

triggered. 

Schedule

Set the scheduled time of each alarm action. A series of alarm actions will be 

executed within the scheduled time. 


Figure 8.12 

8.6.2.2 I/O Alarm 

This is an optional function. This function can be enabled only if the camera supports I/O sensors 

and meanwhile is connected an external I/O alarm device.   

Summary of Contents for GU-CI Series

Page 1: ...English 1 ...

Page 2: ...tion 12 4 4 2 Key File 13 4 4 3 Super Password 13 4 5 Password Expired 14 5 Plug in Installation 14 6 Preview 16 6 1 Live 16 6 2 Recording Status 17 7 Playback 19 7 1 General Playback 19 7 2 Playback Searched by Face 20 7 3 Playback Searched by Human Vehicle 22 7 4 PID LCD 22 7 5 Repeat Customer Detection 23 7 6 Face Attendance 25 8 Remote Setting 29 8 1 Live 29 8 2 Image Control 30 8 3 Video Cove...

Page 3: ...gs 66 8 8 4 RTSP Settings 67 8 8 5 DDNS Settings 67 8 8 6 HTTPS Setting 68 8 8 7 IP Filter 69 8 9 Camera Management 69 8 9 1 Disk Management 69 8 9 2 Audio Setting 70 8 9 3 Cloud 70 8 10 System 71 8 10 1 General 72 8 10 1 1 Date and time 72 8 10 1 2 Daylight Saving Time DST 73 8 10 2 Multi user management 73 8 10 3 System Maintenance 76 8 10 4 System Information 80 9 Local Settings 81 ...

Page 4: ... product model Further information about the product like Data Sheets CE Documents etc can also be found on our Web page www grundig security com This User Guide is a manual for IP Cameras Please see in the table of Model Overview the applicable models Please read this User Guide carefully and retain it for future use Model Overview This User Guide is for the following products GU CI AC5617E GU CI...

Page 5: ...ital solution an integrated media processing platform for audio video acquisition compression and network transmission on a single board It is in compliance with H 264 H265 High Profile encoding standards Any remote user can have access to real time monitoring by entering the IP address or domain name of the IP camera in web browser This network camera solution is applicable to residential or busi...

Page 6: ...tem Windows 7 Windows 8 Windows 2008 32 64 bit Windows 2003 Windows XP Windows 2000 32 bit CPU Intel Core Duo II dual core processor or higher Memory 1G or more Video memory 256M or more Display 1024 768 or higher resolution IE IE 10 or higher version ...

Page 7: ...mera in one network segment The IP camera will communicate with PC within one minute after being powered on if the network operates normally Figure 2 1 direct connection 2 Connection to router switch This is more commonly used in connecting the IP camera to Internet where the camera and PC are connected to LAN ports of a router switch with gateway of the camera set to the IP address of the router ...

Page 8: ...ally Take the camera in factory mode as an example Step 1 Obtain the basic setting information of the current network Open Network on the PC Win10 Open Network and Internet Settings Network Sharing Center Ethernet Details to view the setting information of the current network Note If the current network supports DHCP to assign IP this step can be ignored Figure 3 1 Network settings Step 2 Run Devi...

Page 9: ...and the default password is admin Step 3 As shown in Figure 3 2 select the corresponding device enter the account and password edit the corresponding network information and click Modify to save the information Note If the current network supports DHCP to distribute network change Network Mode to DHCP to obtain IP ...

Page 10: ...nario the http access method will default to port 80 4 2 Initial login In the first time accessing the web of the camera the program will remind you to set a more complicated password as the default password of the device is too simple The interface as shown in Figure 4 2 will be popped up Click to check password requirements The password should be 8 15 characters including letters numbers or spec...

Page 11: ...e setting directly without checking and the password retrieval function will not be enabled Figure 4 3 Password retrieval Security Question Configuration to modify the main user s password by question verification After enabling you need to select 3 of the 15 frequently used questions and set the answer required to retrieve the password The maximum length of the answer is 64 characters Certificate...

Page 12: ... interface will be entered as shown in Figure 4 4 Enter the corresponding account password then click login you can access the camera s operating interface At the same time you can select the desired language when log in Figure 4 4 Login 4 4 Retrieve password When you forget the login information you can click Recover Password on the login interface to enter the password retrieval interface Accord...

Page 13: ...ace switch to the Certificate of authorization mode and the interface is converted as shown in Figure 4 6 Click Import to select the key file certificate txt After the Import is successful enter the new password to modify the main user s password Figure 4 6 Key file 4 4 3 Super Password The super password is a very insecure way to retrieve the password According to the Mac of the camera and the ti...

Page 14: ...me of current login is 90 days later than the system time of the last password modification the user will be reminded to change the password When user decides to change the password the interface jumps to Figure 4 8 According to the interface prompts user can set a new password by verification with old password Figure 4 8 Password 5 Plug in Installation Use IE browser to log in you need to install...

Page 15: ...e 5 1 Plug in Note Programs without plug ins are supported When using Safari 12 and above Chrome57 and above Firefox 52 and above Edge 41 and other browsers for web access the plug in installation steps can be ignored ...

Page 16: ...side interface Sub stream Bandwidth and requirements for the PC are moderate but the image will be worse than the main stream Mobile stream The bandwidth and requirements for the PC are the lowest but the image is also the worst Main menu switching bar Switch the function interface of the web The web terminal has 4 menus Live Playback Remote Setting and Local Settings Info Display the currently lo...

Page 17: ...ital Zoom Electronically zoom in on certain area of the display screen Audio turn on off adjust the sound in current preview Voice Intercom Talk to the camera Warning Light Manually turn on off the white light Siren Manually turn on off the white light Pixel Counter Select the area by frame to check the pixel size of the area in the code stream Bullet box information when some alarms are triggered...

Page 18: ...but IO alarm recording is not enabled The camera is in IO alarm and IO alarm recording is performing The camera is in PIR alarm but PIR alarm recording is not enabled The camera is in PIR alarm and PIR alarm recording is performing The camera is in smart alarm but the smart alarm recording is not performed Note Intelligent alarms include Face alarm Human Vehicle alarm etc The camera is in smart al...

Page 19: ...ode Switch the current search mode As shown in the figure above the default is General search and the search information is ordinary video files You can switch to AI search Search date Set the date to search for the video click search it will prompt the date of the video file Search Type Display the search type supported by the camera You can search and view part of the video according to your dem...

Page 20: ... the current preview image in a way that fills the display area Full Screen Display the current preview image in full screen you can double click the screen to turn on off the function and press Esc to exit the full screen when enabling the function Playback progress bar zoom in out the progress bar defaults to display the progress of 24 hours By this function you can more accurately jump to the c...

Page 21: ...ing to the settings of the face database With this setting you can search for pictures of the desired group Search Search face data according to settings Add Add pictures to the picture display area for the Compare function You can add local pictures and captured pictures Delete Delete the currently added picture Similarity Set the minimum similarity of the feature values matching faces when using...

Page 22: ...arch mode is AI Human Vehicle Detection Start time Set the start time of search End time Set the end time of search Detection Type Set the captures of human or car to be searched and you can also search both at the same time Search Search for human vehicle captures according to the search element settings Search Results Display Area Display the search results Double click the picture to enter the ...

Page 23: ...arch for human car captures according to the search element settings Search Results Display Area Display the search results Double click the picture to enter the playback for a short period of time before and after the detection Search results Flip You can flip the search results in the lower right corner 7 5 Repeat Customer Detection When using the face recognition function the camera not only ca...

Page 24: ...on is set only the captures with face attribute turned on are searched Alarm Group Identify repeat customers based on database grouping Note When the group limit is not set all pictures are searched and the Similarity takes effect Stranger information will be ignored when setting group restrictions Search Search for face capture information Search result display area Display the search results in ...

Page 25: ...ance results based on the captured records The interface is shown in below figure Figure 7 6 Search Mode Switch the search mode The current search mode is AI Face Attendance Attendance Type There are day week month customize and today After selecting a type the system will automatically change the start date and end date Select day it will automatically synchronize the end date and start date Sele...

Page 26: ...sed on database grouping Figure 7 7 When by Face is selected the interface will be replaced with the menu shown above Select images Click to select the face to be detected The window shown below will pop up Figure 7 8 Click Alarm Group to select a group and then click Search all faces in the group will be searched out Select the face you want to perform face attendance detection then click OK to a...

Page 27: ... the window Search Search face attendance information Search Result Display Area Display the search results in the form of a table on the upper right side As shown below Figure 7 10 Working Day Click to set the working day Duty Time Set attendance time Refresh After changing attendance parameters click to refresh the search results ...

Page 28: ...ce Search Result Secondary Display Area Click on a person and detailed time information will be displayed at the bottom right The due time that matches this person will be marked with a red bar Click the red bar to jump to the corresponding quick playback Click Detail icon to view detailed information Click the playback icon to enter the corresponding quick playback Figure 7 11 Click the arrow in ...

Page 29: ...optional Flicker Control Set the refresh rate of the image There are two options of 60Hz and 50Hz corresponding to N standard and P standard Show Name Set whether to display the channel name in the image Show Time Set whether to show the channel time in the image Channel Name Display Position Set by dragging the channel name on the image Time Display Position Set by dragging the channel time on th...

Page 30: ...n black white and color through the schedule setting To enable this function you need to set the start and end time of night vision IR CUT Delay Automatic mode and Image Mode switch between day and night the duration of IR CUT needs to be determined For example when switching the night vision the night vision switch will only be performed when the camera is in the dark for the set time IR LED Set ...

Page 31: ...ite Balance Use three primary colors of red green and blue to generate white after mixing which is an indicator of color adjustment There are 2 modes Automatic mode Use the default parameters of the firmware to adjust the white light Manual The user actively sets the red green and blue gains to synthesize white light Shutter Set the shutter exposure time there are 2 modes Automatic mode According ...

Page 32: ...g and recording Those areas can be hidden in the video through this function The interface is shown in the figure below Figure 8 3 Enable Switch to turn on the function Cover Area Set the area that needs to be covered on the monitoring screen When setting the covering block is red and the corresponding area of the screen is black when it is enabled 4 covering blocks can be set Delete Remove the se...

Page 33: ...e Non ROI Fps Set the frame rate outside the region 8 5 Record This menu allows you to configure the preview and recording parameters 8 5 1 Encode This menu allows you to configure the image quality of recorded video or network transmission Generally the main stream is the quality of the recorded video that will be saved in the HDD the sub stream is the preview video quality through remote access ...

Page 34: ...suitable For more complex scenes such as busy streets variable bit rate VBR is more suitable Bitrate Mode If you want to set the bitrate yourself please select the Custom mode If you want to select a preset bitrate select Preset Mode Bitrate The data transmission speed that IPC uses to record Video with higher bitrate will have better quality I Frame Interval Set the I frame interval only IPC can ...

Page 35: ...efore the alarm event occurs If your camera s main recording type is based on motion detection or I O alarm it is recommended to use this option Netbreak Recording when the network is disconnected 8 5 2 2 Recording Schedule This menu allows you to specify when the IPC will record video which can be set in the recording schedule Only during the selected time period will the recording be performed D...

Page 36: ...hing notifications via mobile APP Figure 8 8 Drag the left mouse button to delimit the detection area in the right window Only movement in the area will trigger an alarm Enable Enable or disable motion detection Sensitivity Set the sensitivity of motion detection There is more large value there is more sensitive 8 6 1 2 Sound Detection When the camera detects a change in the connected audio and me...

Page 37: ...he higher sound detection threshold Hard to trigger alarm Decline Turn on the sound drop detection when the sound suddenly increases and decreases in a short period of time trigger the sharp drop alarm Decline Sensitivity The decline sensitive can be set to 1 100 and the higher the value is the higher the sensitivity Easier to trigger alarm Schedule Set the time schedule of sound detection It is f...

Page 38: ...oud Picture Upload the alarm picture to the cloud server after the alarm is triggered Alarm Out Optional function If your camera supports to connect an external alarm device you can enable this function to activate the external alarm device Enable Record When checked this type of recording will be enabled when an alarm is triggered Schedule Set the scheduled time of each alarm action A series of a...

Page 39: ...s 30s Send Email Set the camera to send email to your mailbox when it detects I O FTP Picture Upload Upload the alarm picture to the FTP server after the alarm is triggered Cloud Picture Upload the alarm picture to the cloud server after the alarm is triggered Alarm Out Optional function If your camera supports to connect an external alarm device you can enable this function to activate the extern...

Page 40: ...d FTP Picture Upload Upload the alarm picture to the FTP server after the alarm is triggered Cloud Picture Upload the alarm picture to the cloud server after the alarm is triggered Alarm Out Optional function If your camera supports to connect an external alarm device you can enable this function to activate the external alarm device Enable Record When checked this type of recording will be enable...

Page 41: ... the face model algorithm and compare it with the face database to trigger alarm Figure 8 17 Enable Enable or disable FD Face Detection Dynamic Marking choose to show or don t show the track Face Enhance Turn on the face enhance function to enhance the effect of the face image captured by the moving target so as to make it clearer However enable this function will take up more resources of IPC mak...

Page 42: ... device when person enters the monitoring area in IPC and the second picture will be sent to NVR when a person or vehicle leaves the monitoring area Interval Mode Push pictures to the docking device You can set the maximum number of times to send and the interval for each picture to be sent Snap Number Number of push pictures for each locked target can be set as 1 2 3 and infinite times that is pu...

Page 43: ...image Frontal Default set the frontal view to load default Multi Default set the multi view to load default Note Trigger FD S will appear on the channel a pop up window will appear in the lower left corner of the page In addition PID LCD and PD VD FD are mutually exclusive and cannot be enabled at the same time 8 7 1 2 PD VD Pedestrian Vehicle Detection Through this function camera can recognize p...

Page 44: ...ite times Note this function is available in interval mode Snap Frequency n s pic n can set to 1 255 Select the best snapshot every N seconds and push it to the docking recorder Min Pixel The lowest pixel setting of human and vehicle When the recognized object is smaller than the pixel no alarm is generated accordingly It can be set to 64 1080 Note the figure recognition function recognizes the wh...

Page 45: ...D function Figure 8 19 Enable Enable or disable PID detection Sensitive Sensitive level range is 1 4 the default setting is 3 If the detected object sensitivity is higher the moving object can be detected easily Meanwhile the false detection rate is higher Suggest to use default level Dynamic Marking choose to show or don t show the track Detection Type The detection types include pedestrian and v...

Page 46: ...tion is triggered S will appear on the channel and a pop up window will appear in the lower left corner of the page as shown in picture 4 9 In addition PID LCD and PD VD FD are mutually exclusive and cannot be enabled at the same time 8 7 1 4 LCD Line Crossing Detection When detected target cross the preset line the alarm will be triggered through Line Crossing Detection LCD Figure 8 20 Enable Ena...

Page 47: ...ns can detect two directions moving LCD Line Crossing Detection click on the area draw a square area of four points and then set it as a perimeter intrusion detection rule You can draw four rule areas each rule has a corresponding digital ID Click the red small box next to the digital ID of the rule and you can drag or stretch the perimeter intrusion detection rule area Note when LCD Line Crossing...

Page 48: ...gacy means can detect above two 8 7 1 6 CC Cross Counting Camera can record the specific objects crossing line in monitoring area by Cross Counting CC function Set the crossing line there are two areas A and B on two sides of line When the rule is A B it means object crosses the line from area A to area B The count in increases by one When the object enters from area B and cross the line to area A...

Page 49: ... can detect B to A direction moving 8 7 1 7 HM Heat Map The Heat Map HM statistics function uses a logic similar to motion to judge whether there is a change in transmission in each area of the monitoring area and save and upload the change at 10 minutes intervals Through a large number of statistics user can view the change in each area in the scene This function only supports data logging not al...

Page 50: ... is set as 2 Dynamic Marking can choose to show or not show the track Min Pixel The lowest pixel setting of humans When the recognized object is smaller than the pixel no alarm is generated accordingly It can be set to 32 1080 Note the figure recognition function recognizes the whole picture as a 1080p picture Max Pixel The highest pixel setting for people When the recognized object is larger than...

Page 51: ...iting time is too long an alarm will be triggered by Queuing Detection QD function Figure 8 25 Enable Enable or disable QD Sensitive The sensitivity of Queue Length Detection can be set as 1 4 The larger the value is the more sensitive QD alarm is The default sensitivity of QD is set as 2 Dynamic Marking choose to show or don t show the track Min Pixel The lowest pixel setting of humans When the r...

Page 52: ... or stretch the region Rule Number Only one rule is allowed to be turned on The entire screen has been checked in the default area If you need to customize the area check the box in the upper left corner of the screen and drag the points placed at the four corners of the screen to re divide the detection area Rule Switch The switch of rule 8 7 2 FR Face Recognition The face recognition function fo...

Page 53: ...k Edit icon to set the data of the corresponding group The interface is as shown in the figure below Figure 8 27 Added Picture Display Area Display the face database pictures of the added group Info Show the information of selected picture Detail Information Right click Event to view the detailed information of the selected picture Move To Right click Event to move the selected picture to other gr...

Page 54: ... The third category is FA The camera automatically searches for data at a specific time and send an alarm push email 8 7 3 1 FD AD PD VD PID LCD SOD CC CD QD When the camera detects an alarm event it will directly trigger an alarm Figure 8 28 Alarm Type Special option for AD alarm The camera can alarm by identifying whether the captured object is wearing a mask or not There are 3 modes Close Disab...

Page 55: ...led by the schedule and the cloud storage server needs to be associated first Alarm Out Latch Time Set the switch to enable Enable Record Post Recording Set the switch to enable Deterrent White light associated switch When an alarm is triggered the camera will respond to the alarm according to the setting of Remote Setting Event Setup Deterrence Specifically it can be divided into white light resp...

Page 56: ...m Out FTP Picture Upload Cloud Picture in group alarm Latch Time The time that the IO alarm cable continues to alarm when the camera acquires the picture and matching is successful Note The camera needs to support the IO output function and the working time is controlled by the corresponding schedule Alarm Out Latch Time Set the switch to enable Save Picture Switch to save face snapshot to SD card...

Page 57: ...ndance FA function camera can retrieve different groups saved in SD card excluding stranger group matching the situation of human faces at a specified time Attendance record can be generated based on the captured records and can be sent to the associated mailbox Figure 8 30 Enable Switch to generate the attendance record automatically by FA Send Email Send the time of FA check in The firmware retr...

Page 58: ... when generating attendance records Note Stranger group does not support this function so the group 3 is grayed out by default 8 7 4 Statistics This is AI data statistical analysis function 8 7 4 1 Face Detection According to the search settings camera searches the face data stored in the SD card by face detection The interface of FD data statistics is shown in the following figure Figure 8 31 Tim...

Page 59: ...time ranges such as Day Week Month Quarter and Year Intelligent Search based on the type of mark when capturing the snapshot There are 6 types of snapshots PID Human PID Vehicle LCD Human LCD Vehicle Human Vehicle Search Search the data again according to the search settings Export Need to add the export file name and export the search data by Excel file Display Area Display the search results in ...

Page 60: ...ere are two types Cross In and Cross Out Export Need to add the export file name and export the search data by Excel file System time The reference time of the selected Report Type Mode Choose to display the data as a bar graph or a line graph Display Area Display the current search results in the form of graphs Search Search the data again according to the search settings 8 7 4 4 Heat Map Statist...

Page 61: ...ed area the darker the color The color shows blue to red corresponding to light to dark Select the time heat map type and click the search button and the statistical table is displayed in a column chart at the bottom as shown in Figure 8 34 2 Note The time heat map is a statistical of the number of targets in the current range for each frame of data processed Since the number has been accumulated ...

Page 62: ...ork IP Address IP address is the identification of IPC in the network It consists of four groups of numbers between 0 and 255 separated by periods For example 192 168 001 100 Subnet Mask It is a network parameter that defines the range of IP addresses that can be used in the network If the IP address is like the street where you live then the subnet mask is like a community The subnet address also...

Page 63: ...e directly to the network through a DSL modem Check the Enable PPPOE box and then enter the PPPoE username and password Click Apply to save and the system will restart to activate the PPPoE settings 8 8 1 3 SNMP Simple Network Management Protocol SNMP a standard application layer protocol is specifically designed to manage network nodes like servers workstations routers switches and HUBS etc in an...

Page 64: ... Community value of the SNMP server Write Community Set the Write Community value of the SNMP server Trap IP Address Set the Trap IP address of the SNMP server Trap Port Set the Trap port of the SNMP server 8 8 1 4 Port Configuration Figure 8 38 Web Port This is the port you use to log in to the IPC remotely for example using a web client If other application is already using port 80 please change...

Page 65: ...rt forwarding on the router If your router supports UPnP please enable this option In this case you do not need to manually configure port forwarding on the router If your router does not support UPnP please manually complete port forwarding on the router Multicast port Multicast port can be set P2P Switch P2P switch P2P will not take effect after it is turned off 8 8 2 Mail Settings This menu all...

Page 66: ...l be sent to your mailbox If you receive a test email it shows the configuration parameters are correct 8 8 3 FTP Server Settings Through this menu you can enable the FTP server to view pictures and videos uploaded from IPC to FTP Figure 8 40 FTP Enable Click to enable FTP function Server Enter the IP address or domain name of your FTP server Port Enter the FTP port Name Password Enter the usernam...

Page 67: ...you to view real time images through video player Figure 8 41 RTSP Enable Turn on off This protocol can be used only after it is on Anonymous Login Anonymous login After it is enabled the protocol can be used without authentication 8 8 5 DDNS Settings This menu allows you to set DDNS DDNS provides a static address to simplify the remote connection with IPC To use DDNS you first need to create an a...

Page 68: ...fter entering all parameters click Test DDNS to test the DDNS If the test result is Network unreachable or DNS error please check whether the network is normal or whether the DDNS information is correct 8 8 6 HTTPS Setting The camera can be connected via HTTPS protocol which can be set in this menu Figure 8 43 Certificate Type Authentication type There are two types default and custom Custom allow...

Page 69: ...Management 8 9 1 Disk Management This menu allows you to check and configure the internal TF card Formatting is only required for the first access or when replacing a new TF card Figure 8 45 Format Hard Disk Select the TF card to be formatted and then click Format Hard Disk To start formatting you need to enter your username and password and then click OK Overwrite When TF card is full use this op...

Page 70: ...enu can set the volume of the camera Figure 8 46 Enable Audio Turn on off audio Output Volume Set the volume of output audio Input Volume Set the volume of input audio Audio Code Type Set the audio decoding type G711A and G711U are supported 8 9 3 Cloud The camera can upload snapshots or videos to cloud services through Dropbox which is a free service that allows you to easily store and share pict...

Page 71: ... Cloud Storage Click to enable this function Cloud Type Choose cloud storage type including Dropbox and Google Drive Drive Name Enter the name of the folder created by your IPC in cloud storage Activate Cloud Click to activate this function After a while the web page will automatically jump to the associated link of Dropbox Enter the correct username and password to associate 8 10 System Is used t...

Page 72: ...ion via network Date Format Set the date format Time Zone Select the time zone related to your area or city Time Format Select the preferred time format System Time Click the box to change the date and time Synchronize computer time Synchronize the time to the computer time If NTP synchronization is selected the time cannot be set manually at this time Sever Address The automatic time calibration ...

Page 73: ...nd end time of DST Time Offset Select the time that DST increases in your time zone This is the difference between Coordinated Universal Time UTC and local time 8 10 2 Multi user management This menu allows you to configure user name password and user permissions The system supports the following user types ADMIN System Administrator The administrator can fully configure the system and can change ...

Page 74: ...or user s password click the Editing icon The password must be at least 8 characters and must be composed of numbers letters and symbols Enter the new password again to confirm Save the new password the system will ask you to enter the old password for authentication ...

Page 75: ...me 4 Click the area next to Password to enter the required password 5 Click the area next to Confirm to re enter the password 6 Click Save You need to enter the administrator password for authentication Figure 8 54 Set the user s permission and check the box corresponding to the function Click All to select all boxes Click Clear to clear all boxes ...

Page 76: ...ime from the on screen calendar 2 Click the area next to End Time and select the end date and time from the on screen calendar 3 Select the event type you want to search from the drop down list next to Log Type or select All to view the entire system logs for the selected time period Optional types are system log configuration log alarm log account log recording log storage log and network log 4 S...

Page 77: ... FD start FD end CC start CC end CD start CD end QD start QD end sound alarm start and sound alarm end account Login logout and switch users recording Search playback and backup storage Format hard disk hard disk is full and hard disk error network Offline online network error and network mode change 1 Click Search to search 2 Browse the system log from the selected time interval 7 Switch the page...

Page 78: ...re 8 57 1 Put the firmware file sw file on the computer hard disk 2 Click beside Path and select the firmware file in the computer Click Upgrade button to start The upgrade will last about 5 10 minutes please do not turn off the power of the camera or close IE during this period 8 10 3 4 Parameter management You can export the configured main menu parameters to the computer or import the exported ...

Page 79: ...ort File Name Click the box to enter the file name of the exported parameters Click Export to export parameters 8 10 3 5 Automatic Maintenance This menu allows the system to automatically reboot periodically It is recommended to keep this function enabled because it can maintain the operational stability of the camera Figure 8 59 Auto Reboot Click to enable Time The IPC can be set to reboot by day...

Page 80: ...English 80 8 10 4 System Information This menu allows you to view system information such as camera ID model name MAC address firmware version etc Figure 8 60 ...

Page 81: ...rding downloading and snapshot files as well as the format of recording and snapshot Note Programs without plug ins are supported If you use Safari 12 and above Chrome57 and above Firefox 52 and above Edge 41 and other browsers for web access this menu can be ignored Figure 9 1 ...

Page 82: ......

Reviews: