


46
Detailed description of programming
Reserving a new memory
If you have already read through to this point in the manual you will undoubtedly have already made your fi rst
attempt at programming the system. Even so, it is important to describe each menu here in detail, to ensu-
re that you have comprehensive instructions for each application you are likely to encounter. In this section we
start with setting up a “free” model memory prior to “programming” a new model:
Program description
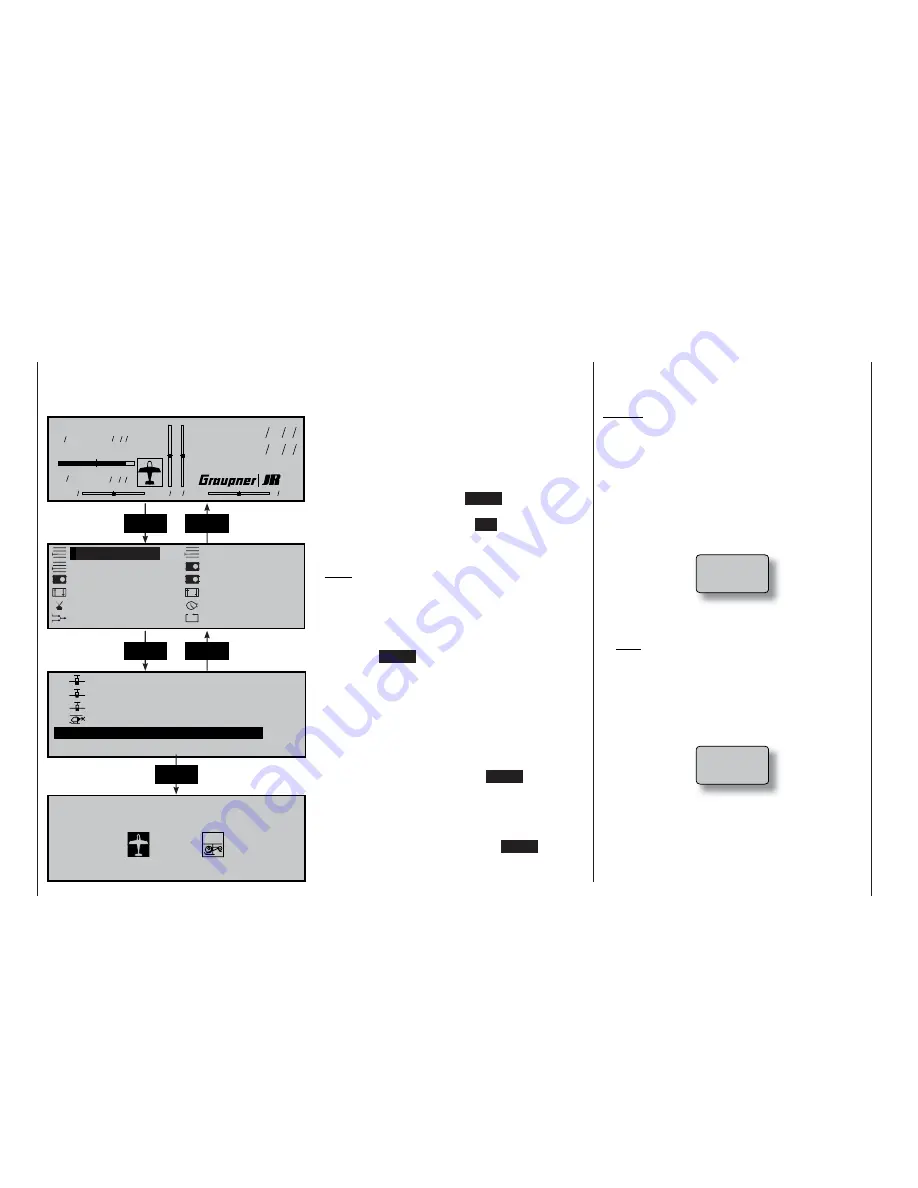
Basic transmitter display
The fi rst steps should be to select the menu language
and then select a transmission channel, as described
on pages 21 and 22. Adjust the screen contrast if ne-
cessary by pressing and turning the rotary control.
From the basic display press
ENTER
to shift to the
“Multi-function menu”. You can return to the basic
screen at any time by pressing
ESC
.
If necessary select the »
Model select
« menu from
the list using the rotary control.
Note:
If the expert mode has been set to “no” in the
»Basic settings« menu, you will only see a limited
selection of menus at this point. The »Fail-Safe«
menu only appears if the transmitter is set to
“PCM20” or “SPCM20” transmission mode.
Now press
ENTER
or the rotary control to shift to the
»
Model select
« menu.
The model memories marked „
free
“ are
not yet in use. Memories which are already occupied
appear with the model name at the appropriate point,
together with the type of modulation and the model
operating time. The model name is the one you have
entered in the
»Base setup model«
menu (page 50).
Use the rotary control to select one of the free mo-
del memories 1 to 30, then press
ENTER
or the rota-
ry control.
You are now invited to defi ne the basic model type,
i.e. either “fi xed-wing” or “helicopter”.
Use the rotary control to select the appropriate type,
then press the
rotary control
or the
ENTER
button
to confi rm your choice. The screen switches back to
the basic display: the model memory is now reserved.
Changing to another model type for this model me-
mory is now only possible if you fi rst erase the model
memory (»
Copy / Erase
« menu, page 47).
Caution:
•
All the transmitter’s functions are barred, and the
transmitter does not broadcast a signal to the ser-
vos, until you confi rm the model type you have se-
lected. If you switch off the transmitter before you
set the model type, the screen automatically re-
verts to the screen shown at the bottom when tur-
ned on again. You must always defi ne a model
type!
•
If the warning ...
… appears on the screen, move the throttle stick
back in the direction of idle.
Note:
The appearance of this warning also depends on
the settings you have made in the “Motor” line of
the »
Model type
« menu (see page 52). Select
“none” if the motor is not powered. The warning is
then disabled.
•
If the message ...
... appears on the screen, please read the section
on the »
Fail-safe
« menu on pages 112 / 114.
The following description of the menus follows the se-
quence of the multi-function menu list.
ENTER
ESC
Model name
#01 0:00h C73
H-J Sandbrunner
10.8V
0:00h
0 0 0 0
St watch
Flighttm
0 00
0 00
:
:
Model select
Copy / Erase
Suppress codes
Base setup model
Model type
Servo adjustment
Control adjust
Dual Rate / Expo
Switch display
Timers
Wing mixers
Basic settings
0 1
C U M U L U S 9 7 S P C M 2 0
1 : 2 5 h
0 2
L a s e r
P C M 2 0
2 : 4 5 h
0 3
D V 2 0 K A T A N A P P M 1 8
5 : 2 6 h
0 4
M E G A S T A R
S P C M 2 0
8 : 3 1 h
0 5
V V V
f r e e
V V V
0 6
V V V
f r e e
V V V
S e l e c t m o d e l t y p e ( f r e e m o d e l m e m o r y )
ENTER
ESC
ENTER
Thr
too
high!
Fail Safe
setup
Summary of Contents for MC-22S
Page 1: ...1 mc 22s GB mc 22s 3D Rotary Programming System Programming manual ...
Page 33: ...33 Digital trims ...
Page 55: ...55 Program description Base setup model ...
Page 77: ...77 Program description Flight phases ...
Page 89: ...89 Program description Mixers ...
Page 174: ...174 ...
Page 175: ...175 ...
Page 176: ...176 ...
Page 177: ...177 ...
Page 178: ...178 ...


