

1
GETTING STARTED
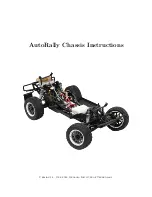
1 Getting Started
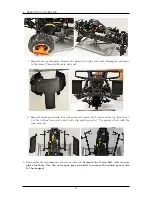
This is a step-by-step guide to construct a complete AutoRally chassis. Starting from a 1/5 scale
HPI Baja 5SC chassis, you will replace the gasoline engine with an electric conversion, upgrade
many of the stock parts, and install sensors and a few custom fabricated components. The result
is an off-road autonomous research‘ chassis capable of high-speed aggressive maneuvers.
The chassis is controlled with a standard RC transmitter or by a computer connected to the elec-
tronics box. Seamless remote switching between autonomous and manual control is done with a
switch on the transmitter. The last channel on the transmitter, controlled by another button, is a
remote run-stop. It controls a live-man relay on the chassis that sits between the throttle signal
and electronic speed controller (ESC).
Many of the steps refer to instruction booklets included with 3rd party components, the maintenance
manual for the 5SC, or other documents located in
. To avoid extra work, make sure to
follow only the portion of external instructions specified in this document.
These instructions assume some experience with, or willingness to learn: understanding manufacturer-
provided documentation, soldering, 3D printing, laser cutting, servo motors, various crimps and
housings, reading basic circuit diagrams, and Arduino programming.
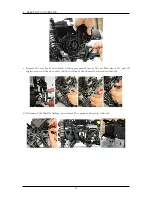
The quality of solder joints, crimp housing connections, heat shrink coverage, and
wire routing are especially important for the reliability of the chassis.
The most common
problems (and often most frustrating to debug) are loose wire housings, bad crimp connections,
and failing solder joints.
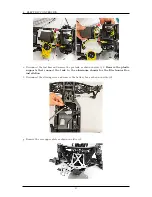
Wire routing is the final step in the chassis build.
Make sure to leave sufficient length when
cutting wires to allow proper routing on the chassis with slack for moving parts such
as steering and suspension.
While this chassis is the basis for an accessible research platform, it can cause seri-
ous injury and damage if operated in an unsafe manner. Only operate in an access-
controlled space where the operator can maintain line-of-sight visibility to the chassis
at all times.
This document is best viewed in color.
1.1 Total Time
Total estimated time to construct a complete chassis for one person is 41.75 hours, not including
the time to print 3D printed and laser cut components, which will vary significantly based on the
printer used. Each step includes an estimated completion time, but the actual time may be longer
if you have to learn new skills.
1.2 Parts List
A complete parts list for the AutoRally platform (chassis and compute box) can be found in the
1.3 Tools
Tools required for the assembly of the chassis: tool kit included with the HPI Baja 5SC, hex key
set, Phillips screwdriver set, utility knife, wire cutters, wire strippers, needle nose pliers, crimp tool
suitable for all crimps, soldering iron, 3rd hand, heat gun, hot glue gun, hand saw.
1
Summary of Contents for AutoRally
Page 1: ...AutoRally Chassis Instructions Version 1 4 June 2018 Georgia Institute of Technology...
Page 2: ......
Page 79: ...27 APPENDIX A PARTS Futaba FUTM1725 Charger for Futaba 4PV Glitch Capacitor GPS antenna 75...
Page 80: ...27 APPENDIX A PARTS GPS antenna cable GPS box fan Hallogic OH090U Hall Effect sensors 76...
Page 88: ...27 APPENDIX A PARTS 1 M3 4mm screw 27 7 3 GPS Box 8 M3 8mm screws 4 M3 hex nuts 84...
Page 89: ...27 APPENDIX A PARTS 2 M1 4 fan screws 2 M1 4 fan nuts 2 M3 25mm screws 85...
Page 92: ......