


GE MEDICAL SYSTEMS
LOGIQ 200 PRO Series PROPRIETARY MANUAL
2242594
DIAGNOSTICS
2--11
REV 0
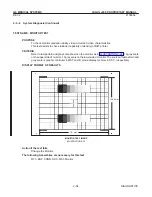
2--3--2 System Diagnosis (Continued)
Procedure 3
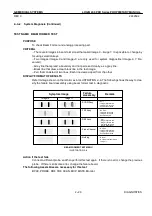
Follow these steps to enter each test in the System Diagnosis menu.
1.
Using the
Arrow
up/down keys, select test which should be performed. Refer to ILLUSTRATION 2--6.
2.
Press
Set
or
Return
keys.
Refer to each section to perform the each test for System Diagnosis.
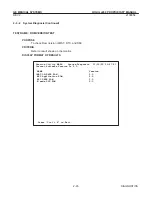
Procedure 4
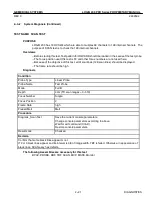
The result of test will appear on the status column in the System Diagnosis menu. Refer to the ILLUSTRATION 2--7.
The AUTO type tests have three status as belows.
Running
It shows that this test item is doing now.
Pass
It shows that this test item finished without failure.
Fail : ###
It shows that this test item finished with failure. The “###”shows failure code. Refer to
TABLE 2--1 as detailed failure code.
Checked
It shows that this test item had been checked.
Skipped
It shows that DRAM test had not been executed at booting.
No PIOP
It shows that the option PIOP unit is not installed.
In case of CINE test, It shows the failure message when the option unit is not installed.
The MANUAL type tests have one status as belows.
Service Utility MENU :
System Diagnosis
99/03/12 09:16:37
Current Software Version is 3.0
NAME
Time
Status
*System test
21 M
Passed
Scan Test
0 M
Checked
TBF Test
0 M
Checked
Linear/Convex Path
0 M
Checked
Sector Probe Path
0 M
Checked
BPHV test
1 M
Checked
MVP Hardware Test
1 M
Running
B mode Function
1 M
Passed
B mode Cine
8 M
M mode Function
2 M
MSTE test
4 M
Fail:###
Keyboard
0 M
Checked
PIOP
1 M
Monitor
0 M
Checked
Power Supply
1 M
Exit
Press ’ctrl’+’X’to
SERVICE DIAGNOSIS MENU--RESULT
ILLUSTRATION 2--7
Summary of Contents for LOGIQ 200
Page 4: ......
Page 8: ......
Page 10: ...05 23 00 MAC Page 2 of 2 ...
Page 28: ...05 23 00 MAC Page 2 of 2 ...
Page 87: ...LOGIQ α200 ...
Page 88: ...LOGIQ 200 PRO ...
Page 144: ......
Page 190: ......
Page 196: ......