JF-2418UV User Manual
134
8.
These numbers will indicate the offset (bias) value for each inkjet head
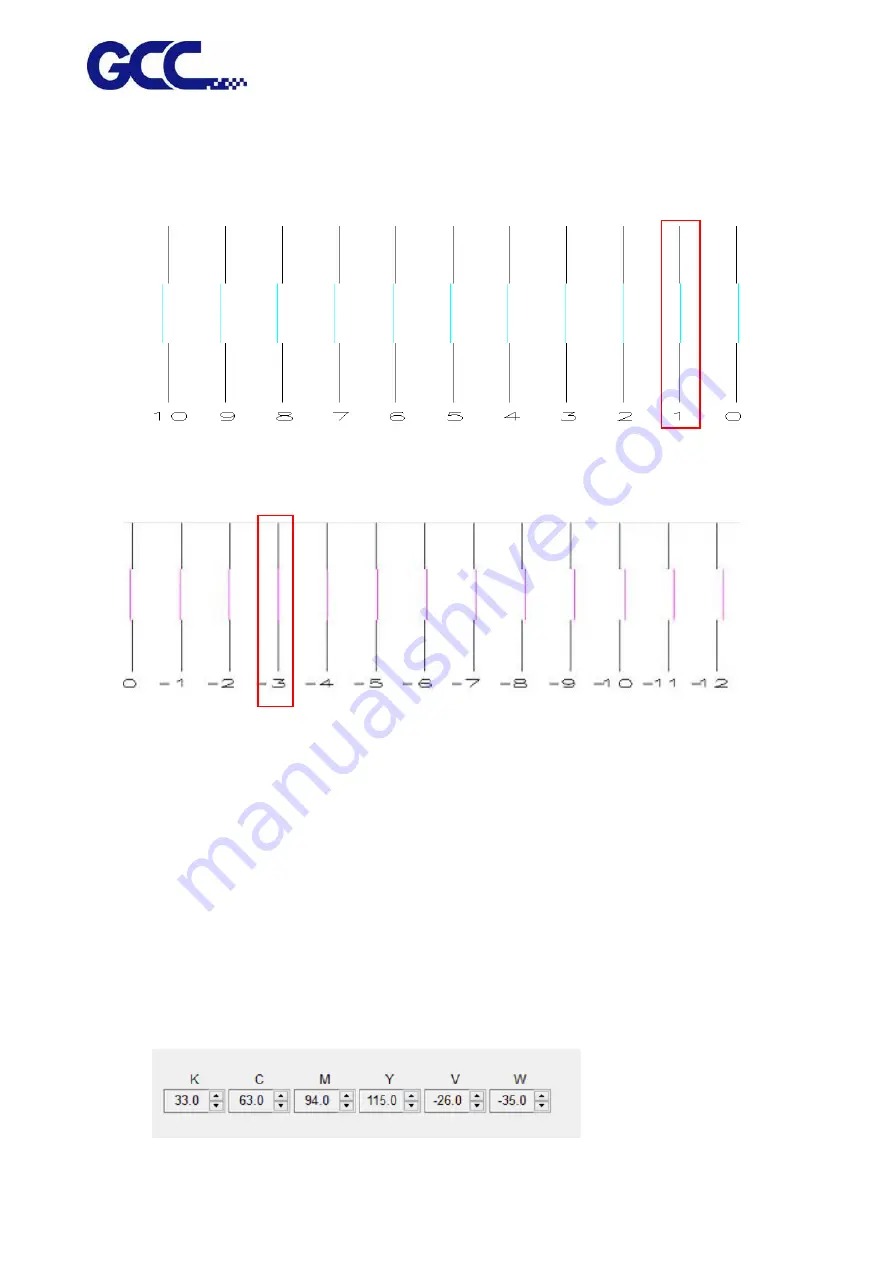
Example 1: Horizontal alignment calibration for the inkjet head of Cyan color.
Example 2: Horizontal alignment calibration for the inkjet head of Magenta color
Step 1. Enlarge the Cyan calibration test pattern chart to Example 1. Use a magnify lens to
observe that Cyan line and Black line are aligned at number “1” line. Keep a record on the
number where two lines are aligned.
Step 2.
Use a magnify lens to observe that Magenta line and the Black line are aligned at number
“-3” line (as Example 2), please keep a record on the number where two lines are aligned.
Step 3. Use the same method to observe and record each color line aligned with Black color line.
Step 4.
After record all the numbers, go to the control interface of “Unidirection Offset
「
K
、
C
、
M
、
Y
、
LC
、
LM
、
W
、
V
」
” for JF-2418UV VCLD software (as shown below) to conduct horizontal
fine tuning.
Summary of Contents for JF-2418UV
Page 1: ...JF 2418UV User Manual http www GCCworld com V 1 2022 Mar GCC GCC Club...
Page 3: ...JF 2418UV User Manual 2 Release Note Version Change V 1 2021 Nov Add JF 2418UV User Manual...
Page 24: ...JF 2418UV User Manual 23 Control panel flow...
Page 25: ...JF 2418UV User Manual 24 Operating work flow...
Page 27: ...JF 2418UV User Manual 26 Operating work flow...
Page 28: ...JF 2418UV User Manual 27 Control panel flow O N FRONT REAR O N O N OFF OFF...
Page 42: ...JF 2418UV User Manual 41 B Set the PH Gap Auto Adjustment to be OFF on the control panel...
Page 57: ...JF 2418UV User Manual 56 Step 4 The settings is completed and open FlexiPRINT GCC Edition...
Page 88: ...JF 2418UV User Manual 87 8 Select Advanced...
Page 169: ...JF 2418UV User Manual 168 Step 2 Enter the password caldera Step 3 Click Next...
Page 170: ...JF 2418UV User Manual 169...


