background image

Garmin G1000 Pilot’s Guide for the Socata TBM 850/900

190-00709-05  Rev. D

490

HAZARD AVOIDANCE

6.11  KTA 870 TRAFFIC

  NOTE:  

Refer to the Honeywell® KTA 870 Pilot’s Guide for a detailed discussion of the KTA 870 TAS.

TAS SYMBOLOGY

The Traffic Advisory System (TAS) is designed to help in detection and avoidance of other aircraft.  TAS uses 

an on-board interrogator-processor and the Mode S transponder for the air-to-air traffic data link.  Traffic is 
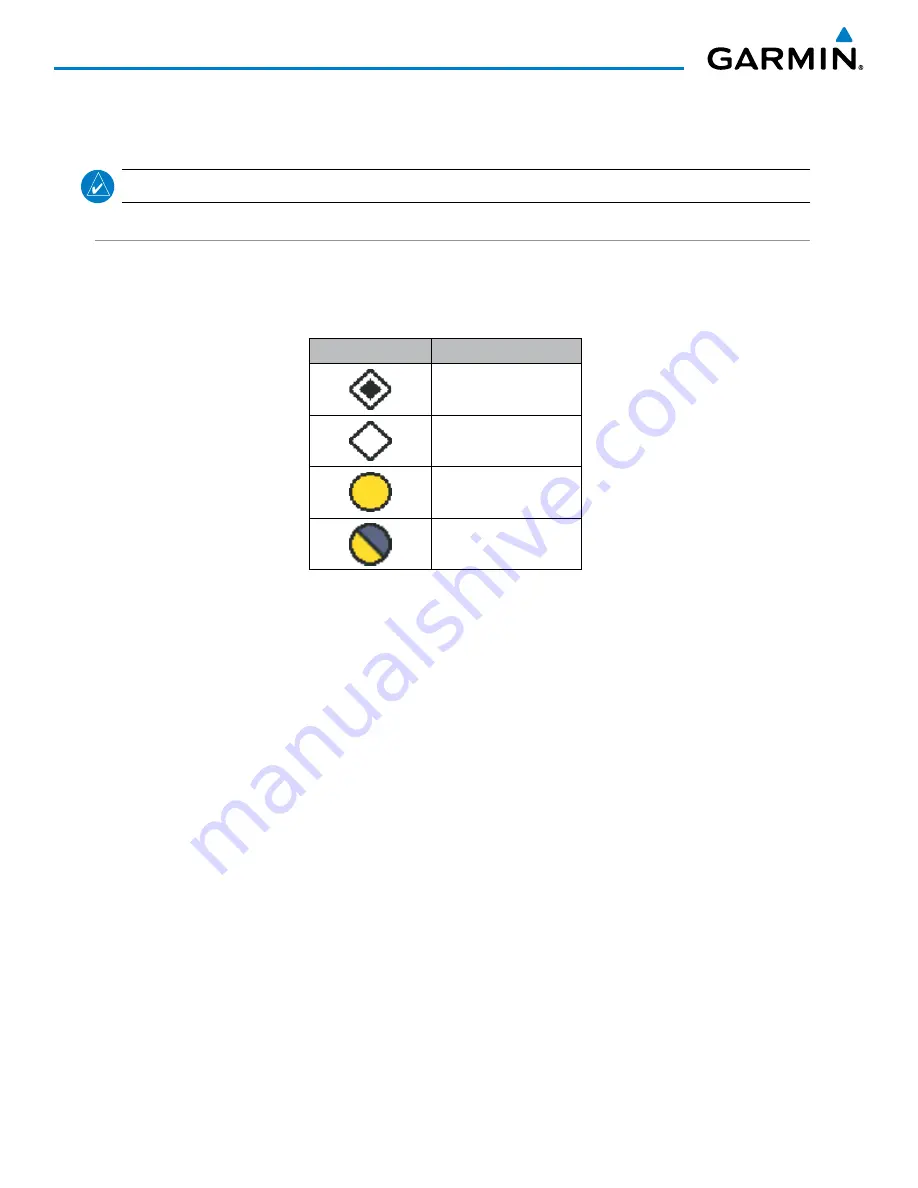
displayed using the symbols shown in Table 6-38.

TAS Symbol

Description

Non-Threat Traffic

Proximity Advisory (PA)

Traffic Advisory (TA)

Traffic Advisory Off Scale

Table 6-38  TAS Symbol Description

A Non-threat Advisory, shown as an open white diamond, indicates that an intruding aircraft is at greater than 

±1200 feet relative altitude or the distance is beyond 5 nm.

A Proximity Advisory indicates that the intruding aircraft is within ±1200 feet and is within 5 nm range, but 

is still not considered a threat.

A Traffic Advisory (TA) alerts the crew to a potentially hazardous intruding aircraft.  Closing rate, distance, 

and vertical separation meet TA criteria.  A Traffic Advisory that is beyond the selected display range is indicated 
by a half TA symbol at the edge of the screen at the relative bearing of the intruder.

Summary of Contents for Cessna Caravan G1000

Page 1: ...G1000 Integrated Flight Deck Pilot s Guide TBM 850 TBM 900 ...

Page 2: ......

Page 3: ...ovided by SiriusXM Satellite Radio Inc AC U KWIK is a registered trademark of Penton Business Media Inc AOPA Membership Publications Inc and its related organizations hereinafter collectively AOPA expressly disclaim all warranties with respect to the AOPA information included in this data express or implied including but not limited to the implied warranties of merchantability and fitness for a pa...

Page 4: ...Garmin G1000 Pilot s Guide for the Socata TBM 850 900 Blank Page ...

Page 5: ...NING Do not rely solely upon the display of traffic information for collision avoidance maneuvering The traffic display does not provide collision avoidance resolution advisories and does not under any circumstances or conditions relieve the pilot s responsibility to see and avoid other aircraft WARNING Do not rely solely upon the display of traffic information to accurately depict all of the traf...

Page 6: ...ew and understand all aspects of the Pilot s Guide documentation and the Socata TBM 850 900 Airplane Flight Manual Thoroughly practice basic operation prior to actual use During flight operations carefully compare indications from the system to all available navigation sources including the information from other NAVAIDs visual sightings charts etc For safety purposes always resolve any discrepanc...

Page 7: ...is device must accept any interference received including interference that may cause undesired operation NOTE The data contained in the terrain and obstacle databases comes from government agencies Garmin accurately processes and cross validates the data but cannot guarantee the accuracy and completeness of the data NOTE This product its packaging and its components contain chemicals known to the...

Page 8: ...d by the system It is the pilot s responsibility to operate in accordance with established AFM S and regulatory guidance or limitations as applicable to the pilot the aircraft and installed equipment NOTE The pilot operator must review and be familiar with Garmin s database exclusion list as discussed in SAIB CE 14 04 to determine what data may be incomplete The database exclusion list can be view...

Page 9: ...lans Added flight data logging Added other GDU 9 14 parameters Corrected discussion of setting Selected Altitude Added GDU 11 01 parameters Added GTS 820 Added AOPA Airport Directory Added dual navigation database capability Added database synchronization Updated System Configuration Diagram Added Flight ID discussion for GTS 820 Traffic Page Added NG HI CAS message Added Airspeed Airspeed and GTS...

Page 10: ... Connext Weather Changed XM to SiriusXM Changed Synthetic Vision System SVS to Synthetic Vision Technology SVT Added other GDU 14 01 parameters Clerical Added database use notes Changed vacuum low pressure CAS message description Changed oil pressure CAS message description Added import export of Pilot Profiles Added discussion regarding system behavior when automatically switching from GPS to LOC...

Page 11: ...ker Beacon Annunciations 82 Traffic Annunciation 82 Terrain Annunciations 83 Altitude Alerting 84 Low Altitude Annunciation 84 Minimum Descent Altitude Decision Height Alerting 85 Radar Altimeter 86 2 4 Abnormal Operations 88 Abnormal GPS Conditions 88 Heading Failure Modes 89 Unusual Attitudes 89 SECTION 3 ENGINE AND AIRFRAME SYSTEMS 3 1 Engine Indication System EIS 93 Engine Parameters 94 Cabin ...

Page 12: ...ry Mode 168 SECTION 5 FLIGHT MANAGEMENT 5 1 Introduction 169 Navigation Status Box 170 5 2 Using Map Displays 172 Map Orientation 172 Map Range 174 Map Panning 177 Measuring Bearing and Distance 182 Topography 183 Map Symbols 186 Airways 192 Track Vector 194 Wind Vector 195 Nav Range Ring 196 Fuel Range Ring 197 Field of View SVS 198 Selected Altitude Intercept Arc 199 5 3 Waypoints 200 Airports 2...

Page 13: ...g TAWS B Data 449 TAWS B Alerts 453 System Status 461 6 8 Profile View Terrain 463 Profile View Display 464 6 9 Traffic Information Service TIS 467 Displaying TRAFFIC Data 468 Traffic Map Page 470 TIS Alerts 472 System Status 473 6 10 GTS 820 Traffic 476 Theory of operation 476 TAS Alerts 480 System Test 481 Operation 482 6 11 KTA 870 Traffic 490 TAS Symbology 490 Operation 491 Altitude Display 49...

Page 14: ...ts Cycle Number and Expiration Date 603 8 5 Airport Directory 606 Airport Directory Database Cycle Number and Revision 607 8 6 SiriusXM Radio Entertainment 609 Activating SiriusXM Satellite Radio Services 609 Using SiriusXM Radio 610 8 7 Scheduler 614 8 8 Electronic Checklists 616 8 9 Flight Data Logging 620 8 10 Satellite Telephone and SMS Messaging 622 Registering the Iridium Satellite System 62...

Page 15: ...ttitude and Heading Reference System AHRS GMU 44 Magnetometer GMA 1347D Cabin Dual Audio System with Integrated Marker Beacon Receiver GTX 33 33D Mode S Transponder GDL 69A Data Link optional GWX 68 or GWX 70 Weather Radar optional GDR 66 VHF Data Link Transceiver optional GSR 56 Iridium Transceiver optional GCU 475 MFD Control Unit GMC 710 AFCS Control Unit GTS 820 Traffic Avoidance System option...

Page 16: ...D and with the on side GIA 63W Integrated Avionics Unit through a High Speed Data Bus HSDB connection GDU 1500 Features a 15 inch LCD with 1024 x 768 resolution and is configured as an MFD This unit is linked to both PFDs via HSDB connection GIA 63W Functions as the main communication hub linking all LRUs with the on side PFD Each GIA 63W contains a GPS SBAS receiver VHF COM NAV GS receivers a fli...

Page 17: ...engine and airframe sensors This unit communicates with both GIA 63Ws using an RS 485 digital interface GRS 77 Provides aircraft attitude and heading information via ARINC 429 to both the on side GDU 1040A and the on side GIA 63W The GRS 77 contains advanced sensors including accelerometers and rate sensors and interfaces with the on side GMU 44 to obtain magnetic field information with the GDC 74...

Page 18: ... indicated as XPDR1 The GTX 33 is indicated as XPDR2 Both transponders can be controlled from either PFD and only one transponder can be active at a time Each transponder communicates with the on side GIA 63W through an RS 232 digital interface GDL 69A A satellite radio receiver that provides real time weather information to the G1000 MFD and indirectly to the inset map of the PFD as well as digit...

Page 19: ...irectly linked to the MFD via HSDB connection GTS 820 The GTS 820 Traffic Advisory System TAS uses active interrogations of Mode S and Mode C transponders to provide Traffic Advisories to the pilot independent of the air traffic control system GCU 475 Provides the Flight Management System FMS controls for the MFD through an RS 232 digital interface GMC 710 Provides the controls for the Garmin AFCS...

Page 20: ... GTA 82 The GTA 82 Trim Adapter is a remote mounted device that is used to allow the AFCS to drive the yaw trim actuator GA 36 and GA 37 The GA 36 is a through mount GPS SBAS antenna The GA 37 is a through mount GPS SBAS antenna with SiriusXM Datalink GA 36 GA 37 GA 58 The GA 58 is directional antenna for the Traffic Avoidance System One top mounted directional antenna is required Optional bottom ...

Page 21: ...710 GMU 44 1 GEA 71 2 GEA 71 1 GDC 74B 1 OAT Probe GMA 1347D Cabin 2 GMA 1347D Cabin 1 GTX 33D GTX 33 GCU 475 GWX 68 or 70 GDL 69A GRS 77 2 GMU 44 2 GDC 74B 2 OAT Probe VHF COM VHF NAV LOC GPS WAAS G S AFCS Mode Logic Flight Director Servo Management VHF COM VHF NAV LOC GPS WAAS G S AFCS Mode Logic Flight Director Servo Management GTA 82 Trim Adapter GTS 820 GSR 56 GDR 66 Figure 1 1 Example G1000 ...

Page 22: ...trols GMC 710 are described in the CNS Audio Panel and AFCS sections respectively The G1000 system controls are located on the PFD and MFD bezels MFD Control Unit AFCS Control Unit and audio panel The controls for the PFD and MFD are discussed within the following pages of this section PFD CONTROLS Figure 1 2 PFD Controls 2 1 5 4 6 8 7 3 11 12 10 9 15 14 13 ...

Page 23: ... field as a percentage Press to turn the COM automatic squelch ON and OFF 9 Direct to Key Allows the user to enter a destination waypoint and establish a direct course to the selected destination the destination is either specified by the identifier chosen from the active route or taken from the map pointer position 10 FPL Key Displays the active Flight Plan Page for creating and editing the activ...

Page 24: ...d in the applicable window by turning the small and large knobs In this case the large knob moves the cursor on the page while the small knob selects individual characters for the highlighted cursor location 2 Direct to Key Allows the user to enter a destination waypoint and establish a direct course to the selected destination the destination is either specified by the identifier chosen from the ...

Page 25: ...tes or confirms a menu selection or data entry 12 CLR Key Erases information cancels entries or removes page menus Pressing and holding this key displays the Navigation Map Page automatically 13 SPC Key Adds a space character 14 BKSP Key Moves the cursor back one character space AFCS CONTROLS NOTE With the exception of the FD and SPD Keys if a key is selected its respective annunciator is illumina...

Page 26: ... Vertical Speed and Flight Level Change modes 12 VNV Key Selects deselects Vertical Navigation mode 13 ALT SEL Knob Sets the selected altitude in the Selected Altitude Box In addition to providing the standard G1000 altitude alerter function selected altitude provides an altitude setting for the Altitude Capture Hold mode of the AFCS 14 YD Key Engages disengages Yaw Damper 15 AP Key Engages diseng...

Page 27: ...y selected when this key is pressed allowing received audio from the the 1 Com receiver to be heard COM2 receiver audio can be added by pressing the COM2 Key 2 COM1 When selected audio from the 1 Com receiver can be heard 3 COM2 MIC Selects the 2 transmitter for transmitting COM2 is simultaneously selected when this key is pressed allowing received audio from the the 2 Com receiver to be heard COM...

Page 28: ...n or off the audio from the ADF receiver 16 NAV2 When selected audio from the 2 Nav receiver can be heard 17 AUX Not used on some aircraft 18 MAN SQ Pressing activates deactivates intercom manual squelch operation 19 PLAY Press once to play the last recorded audio Press during play to play the previously recorded memory block Each subsequent press of the PLAY Key begins playing the next previously...

Page 29: ...rd slots SD cards are used for navigation database and system software updates as well as expanded basemap terrain obstacle SafeTaxi FliteCharts ChartView and AOPA Airport Directory database storage Not all SD cards are compatible with the G1000 Use only SD cards supplied by Garmin or the aircraft manufacturer To install an SD card Insert the SD card in the SD card slot pushing the card in until t...

Page 30: ...omentarily illuminated on the audio panels the control units and the display bezels On the PFD the AHRS begins to initialize and displays AHRS ALIGN Keep Wings Level The AHRS should display valid attitude and heading fields typically within one 1 minute of power up The AHRS can align itself both while taxiing and during level flight When the MFD powers up Figure 1 8 the MFD Power up Page displays ...

Page 31: ...e G1000 system NORMAL OPERATION PFD In normal mode the PFD presents graphical flight instrumentation attitude heading airspeed altitude and vertical speed thereby replacing the traditional flight instrument cluster The PFD also offers control for COM and NAV frequency selection MFD In normal mode the right portion of the MFD displays a full color moving map with navigation information while the le...

Page 32: ...nel see Figure 1 11 and refer to the Audio Panel section for further details Pressing this button again deactivates reversionary mode Figure 1 11 DISPLAY BACKUP Button Pressing the DISPLAY BACKUP button activates deactivates reversionary mode for both the on side PFD and the MFD Each display can be configured to operate in reversionary mode as follows PFD1 By pressing the DISPLAY BACKUP button on ...

Page 33: ...y alerts The AHRS GRS 77 corrects for shifts and variations in the Earth s magnetic field by applying the Magnetic Field Variation Database The Magnetic Field Variation Database is derived from the International Geomagnetic Reference Field IGRF The IGRF is a mathematical model that describes the Earth s main magnetic field and its annual rate of change The database is updated approximately every 5...

Page 34: ...eamlessly transitions to using the other GPS receiver An alert message informs the pilot of the use of the backup GPS path If both GPS inputs fail the AHRS continues to operate in reversionary No GPS mode so long as the air data and magnetometer inputs are available and valid AIR DATA INPUT FAILURE A failure of the air data input has no effect on AHRS output while AHRS is operating in normal mode ...

Page 35: ...ays all possible flags and responsible LRUs Upon G1000 power up certain windows remain invalid as equipment begins to initialize All windows should be operational within one minute of power up If any window remains flagged the G1000 System should be serviced by a Garmin authorized repair facility Figure 1 14 G1000 System Failure Annunciations GDC 74B Air Data Computer GTX 33 D Transponder Or GIA 6...

Page 36: ...und and automatically switch back to white text on black background when selected If messages remain after acknowledgement the MSG Softkey is black on white The PFD softkeys provide control over flight management functions including GPS NAV terrain traffic and lightning optional Each softkey sublevel has a BACK Softkey which can be pressed to return to the previous level The MSG Softkey is visible...

Page 37: ...he softkeys for enabling or disabling Synthetic Vision features PATHWAY Displays rectangular boxes representing the horizontal and vertical flight path of the active flight plan SYN TERR Enables synthetic terrain depiction HRZN HDG Displays compass heading along the Zero Pitch line APTSIGNS Displays position markers for airports within approximately 15 nm of the current aircraft position Airport i...

Page 38: ...w allowing tuning of the ADF ADF Mode selection ADF volume control and selection of the DME XPDR Displays transponder mode selection softkeys XPDR1 Selects the 1 transponder as active XPDR2 Selects the 2 transponder as active STBY Selects standby mode transponder does not reply to any interrogations ON Selects Mode A transponder replies to interrogations ALT Selects Mode C altitude reporting mode ...

Page 39: ...6 Top Level PFD Softkeys Figure 1 17 INSET Softkeys TRFC 1 TRFC 2 Select the BACK Softkey to return to the top level softkeys STRMSCP WX LGND METAR optional or PRECIP optional or DL LTNG Figure 1 18 SENSOR Softkeys Press the BACK Softkey to return to the top level softkeys BACK MSG ADC2 ADC1 AHRS1 AHRS2 ...

Page 40: ...ftkeys Select the BACK Softkey to return to the top level softkeys ALTUNIT METERS IN HPA ADF DME BACK 360 HSI ARC HSI HSI FMT SYN VIS SYN TERR HRZN HDG PATHWAY APTSIGNS Figure 1 20 XPDR Softkeys Press the BACK Softkey to return to the top level softkeys Press the BACK Softkey to return to the previous level softkeys MSG MSG ...

Page 41: ...creen for the CPDLC system NEW Accesses New CPDLC message screen DELETE Delete selected CPDLC message DEL ALL Delete all CPDLC messages BACK Returns display to previous softkey level MAP Enables second level Navigation Map softkeys TRAFFIC Displays traffic information on Navigation Map PROFILE Displays removes Vertical Situation Display on Navigation Map Page TOPO Displays topographical data e g c...

Page 42: ...utter levels DCLTR No Declutter All map features visible DCLTR 1 Declutters land data DCLTR 2 Declutters land and SUA data DCLTR 3 Removes everything except the active flight plan SHW CHRT When available displays optional airport and terminal procedure charts CHKLIST When available displays optional checklists Figure 1 21 MFD Softkeys MAP DCLTR TRAFFIC TOPO BACK TERRAIN DCLTR 2 DCLTR 3 DCLTR 1 Sel...

Page 43: ... sensor annunciations are most often seen after system power up when one GPS receiver has acquired satellites before the other or one of the GPS receivers has not yet acquired an SBAS Satellite Based Augmentation System signal While the aircraft is on the ground the SBAS signal may be blocked by obstructions causing one GPS receiver to have difficulty acquiring a good signal Also while airborne tu...

Page 44: ...tellite is represented by an oval containing the Pseudo random noise PRN number i e satellite identification number Satellites whose signals are currently being used are represented by solid ovals Satellite signal information status The accuracy of the aircraft s GPS fix is calculated using Estimated Position Uncertainty EPU Dilution of Precision DOP and horizontal and vertical figures of merit HF...

Page 45: ...the intended approach Receiver Autonomous Integrity Monitoring RAIM is a GPS receiver function that performs a consistency check on all tracked satellites RAIM ensures that the available satellite geometry allows the receiver to calculate a position within a specified RAIM protection limit 2 0 nautical miles for oceanic and enroute 1 0 nm for terminal and 0 3 nm for non precision approaches During...

Page 46: ...If necessary select the RAIM Softkey 3 Press the FMS Knob The WAYPOINT field is highlighted 4 Press the MENU Key 5 With Set WPT to Present Position highlighted press the ENT Key 6 Press the ENT Key to accept the waypoint entry 7 Use the FMS Knob to enter an arrival time and press the ENT Key 8 Use the FMS Knob to enter an arrival date and press the ENT Key 9 With the cursor highlighting COMPUTE RA...

Page 47: ...tellite in view with the appropriate satellite PRN number 01 32 or 120 138 for WAAS below each bar The progress of satellite acquisition is shown in three stages as indicated by signal bar appearance No bar Receiver is looking for the indicated satellite Hollow bar Receiver has found the satellite and is collecting data Cyan bar Receiver has collected the necessary data and the satellite signal ca...

Page 48: ...here are no options for the window page selected The main controls used in association with all window page group operations are described in section 1 3 Softkey selection does not display menus or submenus To navigate the Page Menu Window 1 Press the MENU Key to display the Page Menu Window 2 Turn the FMS Knob to scroll through a list of available options a scroll bar appears to the right of the ...

Page 49: ... XM Procedure Loading the active title of the page changes while the page name in the list remains the same Figure 1 24 Page Title and Page Groups Page Group Active Page Title MFD Page Groups Pages in Current Group The main page groups are navigated using the FMS Knob specific pages within each group can vary depending on the configuration of optional equipment Selecting a page using the FMS Knob ...

Page 50: ...n Proximity Terrain SVS or TAWS B TAWS A Figure 1 26 Waypoint Pages Airport Information Screens Waypoint Pages WPT Airport Information screens Airport Information INFO 1 Softkey Airport Directory INFO 2 Softkey Departure Information DP Softkey Arrival Information STAR Softkey Approach Information APR Softkey Weather Information WX Softkey Intersection Information NDB Information VOR Information Us...

Page 51: ...stem Status Video SiriusXM Satellite Screens The Flight Plan Pages may also be accessed using the FPL Key on the MFD Maintenance data is continuously recorded by the Central Maintenance Computer CMC At the discretion of the Aircraft Manufacturer this data may be displayed on an OEM DIAGNOSTICS Page accessible from within the AUX Page Group Flight Plan Pages FPL Active Flight Plan Wide View Narrow ...

Page 52: ...rmation also select GEN Softkey Figure 1 29 System Pages The System Pages may also be accessed by selecting the SYSTEM Softkey when viewing the other page groups Main pages within this group are shown by selecting the applicable softkey or turning the small FMS Knob Figure 1 30 Nearest Pages Nearest Pages NRST Nearest Airports Nearest Intersections Nearest NDB Nearest VOR Nearest User Waypoints Ne...

Page 53: ...ll through the Procedure pages note the single page icon in the lower right corner Figure 1 31 Procedure Pages Procedure Pages PROC Departure Loading Arrival Loading Approach Loading For some of these pages Airport Information screens SiriusXM Satellite screens Procedure Pages the title of the page may change while the page icon remains the same The CPDLC pages are accessed by selecting the CPDLC ...

Page 54: ...ments Section Airspace Alerts see Flight Management Section Arrival Alerts Audio Alerts Flight Director Page Navigation MFD Data Bar Fields Navigation Status Box see Flight Management Section GPS CDI scaling for GPS navigation source see Flight Instruments Section COM Configuration see Audio Panel and CNS Section Nearest Airports display criteria see Flight Management Section Synchronization of Ba...

Page 55: ...ox 3 Turn the FMS Knobs to enter the time offset and press the ENT Key Display Units The Display Units Box on the System Setup Page allows configuration of the measurement units used for the following displayed data Nav angle magnetic true Affects the BRG field in the PFD Navigation Status Box Affects the BRG DTK TKE TRK and XTK fields in the MFD Navigation Status Box When set to AUTO magnetic var...

Page 56: ...s The Airspace Alerts Box allows the pilot to turn the controlled special use airspace message alerts on or off This does not affect the alerts listed on the Nearest Airspaces Page or the airspace boundaries depicted on the MFD Navigation Map Page It simply turns on off the warning provided when the aircraft is approaching or near an airspace Alerts for the following airspaces can be turned on off...

Page 57: ...o select the AUX System Setup Page 2 Press the FMS Knob momentarily to activate the flashing cursor 3 Turn the large FMS Knob to select the ON OFF field in the Arrival Alert Box 4 Turn the small FMS Knob clockwise to turn the airspace alert ON or counterclockwise to turn the alert OFF 5 Press the FMS Knob to deactivate the cursor Changing the arrival alert trigger distance 1 Use the FMS Knob to se...

Page 58: ...ver Destination FOD Fuel On Board FOB Endurance END Enroute ENR International Standard Atmosphere ISA Landing Time LDG GPS CDI The GPS CDI Box on the System Setup Page allows the pilot to define the range for the on screen course deviation indicator CDI The range values represent full range deflection for the CDI to either side The default setting is AUTO At this setting leaving the departure airp...

Page 59: ...s the ENT Key Nearest Airports The Nearest Airports Box on the System Setup Page defines the minimum runway length and surface type used when determining the nine nearest airports to display on the MFD Nearest Airports Page A minimum runway length and or surface type can be entered to prevent airports with small runways or runways that are not of appropriate surface from being displayed Default se...

Page 60: ...e From here pilot profiles may be created selected renamed or deleted Figure 1 34 Pilot Profiles System Setup Page Creating a profile 1 Use the FMS Knob to select the AUX System Setup Page 2 Press the FMS Knob momentarily to activate the flashing cursor 3 Turn the large FMS Knob to highlight CREATE in the Pilot Profile Box 4 Press the ENT Key A Create Profile window is displayed 5 Use the FMS Knob...

Page 61: ... Use the FMS Knob to select the AUX System Setup Page 2 Press the FMS Knob momentarily to activate the flashing cursor 3 Turn the large FMS Knob to highlight RENAME in the Pilot Profile Box 4 Press the ENT Key 5 In the Rename Profile window turn the FMS Knob to select the profile to rename 6 Press the ENT Key 7 Use the FMS Knob to enter a new profile name up to 16 characters long and press the ENT...

Page 62: ...ield then use the large and small FMS Knobs to enter the name and press the ENT Key Imported profile names cannot begin with a blank space or be named DEFAULT GARMIN DEFAULTS or DEFAULT SETTINGS 6 With IMPORT highlighted press the ENT Key 7 If the imported profile name is the same as an existing profile on the system the system displays an Overwrite existing file OK or CANCEL prompt Press the ENT ...

Page 63: ...arge FMS Knob to highlight the SELECT FILE field then enter the new name with the large and small FMS Knobs then press the ENT Key Then press the ENT Key with EXPORT highlighted 6 If the profile name to be exported is the same as an existing profile file name on the SD card the system displays an Overwrite existing file OK or CANCEL prompt Press the ENT Key to replace the profile on the SD card wi...

Page 64: ...ttheapplicablelist LRUINFOorAIRFRAME window through which the FMS Knob can be used to scroll information within the selected window Selecting the MFD1 DB Softkey label background changes to grey indicting the softkey is selected places the cursor in the DATABASE window Use the FMS Knob to scroll through database information for the MFD Selecting the softkey again will change the softkey label to P...

Page 65: ...rom PFD1 or PFD2 In reversionary mode it can also be adjusted from the MFD NOTE No other window can be displayed on the PFD while the PFD Setup Menu Window is displayed Backlighting may also be adjusted manually for all of the displays and the associated bezels The audio panel key backlighting is directly tied to the on side PFD key backlighting setting To adjust display backlighting manually 1 Pr...

Page 66: ...en arrowhead to display PFD1 KEY 3 Turn the large FMS Knob to highlight AUTO and turn the small FMS Knob to display the selection box 4 Turn the FMS Knob to select MANUAL then press the ENT Key The intensity value becomes highlighted 5 Turn the small FMS Knob to select the desired backlighting then press the ENT Key 6 Turn the large FMS Knob to highlight MFD DSPL or PFD2 DSPL and turn the small FM...

Page 67: ... weather information are also presented on the PFDs and are explained in other sections of this Pilot s Guide The following flight instruments and supplemental flight data are displayed on the PFDs Airspeed Indicator showing Indicated airspeed Airspeed awareness ranges Vspeed reference flags True airspeed TBM 850 only Mach number TBM 900 only Attitude Indicator with slip skid indication Altimeter ...

Page 68: ...tion Indicator HSI 8 Outside Air Temperature OAT 9 Softkeys 10 System Time 11 Transponder Data Box 12 Selected Heading Bug 13 Turn Rate Indicator 14 Barometric Altimeter Setting 15 Vertical Speed Indicator VSI 16 Selected Altitude Bug 17 Altimeter 18 Selected Altitude 19 COM Frequency Box 20 Navigation Status Box 21 AFCS Status Box 22 Slip Skid Indicator 23 Attitude Indicator Figure 2 1 Primary Fl...

Page 69: ...ata 5 Inset Map 6 DME Information Window 7 Bearing Information Windows 8 Flight Plan Window 9 Minimum Descent Altitude Decision Height 10 Selected Course 11 Radar Altimeter 12 Current Vertical Speed 13 Glidepath Indicator 14 Terrain Annunciation 15 AFCS Status Annunciation 2 7 3 1 4 5 8 12 6 10 13 15 9 Figure 2 2 Primary Flight Display Additional Information 14 11 ...

Page 70: ...only Speed Ranges Airspeed Trend Vector Vspeed References Figure 2 3 Airspeed Indicator Mach Number TBM 900 only Figure 2 4 Overspeed Indications Mach Number during Overspeed TBM 900 only A color coded white green and red white barber pole speed range strip is located on the moving tape The colors denote flaps operating range normal operating range and maximum operating speed VMO A red range is al...

Page 71: ...peed in 1 kt increments When a speed has been changed from a default value an asterisk appears next to the speed 4 Press the ENT Key or turn the large FMS Knob to highlight the ON OFF field 5 Turn the small FMS Knob clockwise to ON or counterclockwise to OFF 6 To remove the window press the CLR Key or the TMR REF Softkey Figure 2 5 Timer References Window Figure 2 6 Timer References Menu Turning a...

Page 72: ...meric labels are shown for every 10 up to 80 Minor pitch marks are shown for intervening 5 increments up to 25 below and 45 above the horizon line Between 20 below to 20 above the horizon line minor pitch marks occur every 2 5 The inverted white triangle indicates zero on the roll scale Major tick marks at 30 and 60 and minor tick marks at 10 20 and 45 are shown to the left and right of the zero A...

Page 73: ...Altitude exceeds the range shown on the tape the bug appears at the upper or lower edge of the tape See the AFCS Section for more information about Selected Altitude Setting the Selected Altitude Turn the ALT SEL Knob to set the Selected Altitude in 100 ft increments increments reduce to 10 feet for approach up to the aircraft s service ceiling When meters are displayed Selected Altitude is adjust...

Page 74: ...the Altimeter in inches of mercury in Hg or hectopascals hPa Adjusting the altimeter barometric setting creates discontinuities in VNV vertical deviation moving the descent path For large adjustments it may take several minutes for the aircraft to re establish on the descent path If the change is made while nearing a waypoint with a VNV Target Altitude the aircraft may not re establish on the desc...

Page 75: ...ettings differ between PFDs by more than 0 02 in Hg the readouts turn yellow Figure 2 11 The settings can be synchronized from the AUX System Setup Page on the MFD Once the settings are synchronized BARO SYNCHRONIZATION turned on they remain synchronized for the entire flight Synchronizing the altimeter barometric pressure settings 1 Select the AUX System Setup Page using the FMS Knob 2 Press the ...

Page 76: ...altitude The flashing stops when the barometric pressure setting is changed Setting the Baro Transition Alert 1 Use the FMS Knob to select the AUX System Setup Page on the MFD 2 Press the FMS Knob to activate the cursor 3 Turn the large FMS Knob to highlight Altitude in the Baro Transition Alert box 4 Turn the small FMS Knob to turn the alert OFF or ON and press the ENT Key 5 Turn the small FMS Kn...

Page 77: ...n becomes invalid See the Flight Management and AFCS sections for details on VNV features and refer to Section 2 2 Supplemental Flight Data for more information about VNV indications on the PFD The Glideslope Indicator Figure 2 14 appears to the left of the Altimeter whenever an ILS frequency is tuned in the active NAV field and the aircraft heading and selected course are within 107 A green diamo...

Page 78: ...y format 1 Press the PFD Softkey 2 Press the HSI FRMT Softkey 3 Press the 360 HSI or ARC HSI Softkey The 360 HSI contains a Course Deviation Indicator CDI with a Course Pointer To From Indicator and a sliding deviation bar and scale The course pointer is a single line arrow GPS VOR1 and LOC1 or a double line arrow VOR2 and LOC2 which points in the direction of the set course The To From arrow rota...

Page 79: ...er being adjusted The cyan bug on the compass rose corresponds to the Selected Heading While the HSI is displayed as an arc if the Selected Heading Bug is adjusted off the shown portion of the compass rose the digital reading displayed Adjusting the Selected Heading Turn the HDG Knob to set the Selected Heading Press the HDG Knob to synchronize the bug to the current heading The Selected Course is...

Page 80: ...e the navigation angle setting to True at the appropriate time Figure 2 19 Heading and Course Indications True Changing the navigation angle setting 1 Use the FMS Knob to select the AUX System Setup Page on the MFD 2 Press the FMS Knob to activate the cursor 3 Turn the large FMS Knob to highlight Nav Angle in the Display Units box 4 Turn the small FMS Knob to highlight the desired setting and pres...

Page 81: ...Rate Arrow Shown for Turn Rate 4 deg sec Figure 2 21 Turn Rate Indicator and Trend Vector BEARING POINTERS AND INFORMATION WINDOWS NOTE When the Arc HSI is displayed the Bearing Information windows and pointers are disabled Two bearing pointers and associated information can be displayed on the HSI for the NAV GPS and ADF sources The bearing pointers are cyan and are single line BRG1 or double lin...

Page 82: ...ving the tuned VOR station or if GPS is the bearing source and an active waypoint is not selected When the Arc HSI is displayed the Bearing Information windows and pointers are disabled Selecting bearing display and changing sources 1 Press the PFD Softkey 2 Press a BRG Softkey to display the desired bearing pointer and information window with a NAV source 3 Press the BRG Softkey again to change t...

Page 83: ... Figure 2 23 Course Deviation Indicator Flight Phase Scale Crosstrack Error Navigation Source CDI 360 HSI Navigation Source Flight Phase CDI Scale CDI Arc HSI The CDI can display two sources of navigation GPS or NAV VOR LOC The color indicates the current navigation source magenta for GPS or green for VOR and LOC The full scale limits for the CDI are defined by a GPS derived distance when navigati...

Page 84: ...hen all of the following occur A localizer or ILS approach has been loaded into the active flight plan The final approach fix FAF is the active leg the FAF is less than 15 nm away and the aircraft is moving toward the FAF A valid localizer frequency has been tuned The GPS CDI deviation is less than 1 2 times full scale deflection GPS steering guidance is still provided after the CDI automatically ...

Page 85: ...ss synchronized Once the CDIs are synchronized CDI Synchronization turned on they remain synchronized until the setting is changed When turning on the G1000 for use the system remembers the last CDI synchronization setting Synchronizing the CDIs 1 Select the AUX System Setup Page using the FMS Knob 2 Press the FMS Knob to activate the cursor Time Format is highlighted 3 Turn the large FMS Knob to ...

Page 86: ...ymbol The current GPS CDI scale setting is displayed as System CDI on the AUX System Setup Page and the full scale deflection setting may also be changed 2 0 nm 1 0 nm 0 3 nm or Auto from this page If the selected scaling is smaller than the automatic setting for enroute and terminal phases the CDI is scaled accordingly and the selected setting is displayed rather than the flight phase annunciatio...

Page 87: ... 3 nm Missed Approach 1 0 nm Approach 1 0 nm Terminal 1 0 nm Terminal 0 3 nm Departure CDI Full scale Deflection Refer to accompanying approach CDI scaling figures Once a departure procedure is activated the CDI is scaled for departure 0 3 nm The system switches from departure to terminal CDI scaling 1 0 nm under the following conditions The next leg in the departure procedure is not aligned with ...

Page 88: ...rther see Figures 2 29 and 2 30 This transition normally occurs within 2 0 nm of the final approach fix FAF The CDI switches to approach scaling automatically once the approach procedure is activated or if Vectors To Final VTF are selected If the active waypoint is the FAF the ground track and the bearing to the FAF must be within 45 of the final approach segment course If the active waypoint is p...

Page 89: ...ns exist the color changes to yellow Table 2 1 Automatic GPS CDI Scaling OBS MODE NOTE VNV is inhibited while automatic waypoint sequencing has been suspended Enabling Omni bearing Selector OBS Mode suspends the automatic sequencing of waypoints in a GPS flight plan GPS must be the selected navigation source but retains the current active to waypoint as the navigation reference even after passing ...

Page 90: ...the waypoint Press the CRS Knob to synchronize the Selected Course with the bearing to the next waypoint 3 Press the OBS Softkey again to return to automatic waypoint sequencing As the aircraft crosses the missed approach point MAP automatic approach waypoint sequencing is suspended SUSP appears on the HSI at the lower right of the aircraft symbol The OBS Softkey label changes to indicate the susp...

Page 91: ...ay In addition to the flight instruments the PFD also displays various supplemental information including temperatures wind data and Vertical Navigation VNV indications TEMPERATURE DISPLAYS The Outside Air Temperature OAT is displayed in degrees Celsius C by default in the lower left of the PFD under normal display conditions or below the true airspeed in reversionary mode Figure 2 34 Outside Air ...

Page 92: ...sing the FMS Knob 2 Press the FMS Knob to activate the cursor 3 Turn the large FMS Knob to highlight the TEMP field in the Display Units box 4 Turn the small FMS Knob to highlight either CELSIUS or FAHRENHEIT and press the ENT Key to confirm the selection 5 To cancel the selection press the FMS Knob or the CLR Key Figure 2 35 Temperature Selection Setting AUX System Setup Page ...

Page 93: ...DATA Wind data can be displayed in three different ways Figure 2 36 Wind Data No Data Option 2 Option 1 Option 3 Displaying wind data 1 Press the PFD Softkey 2 Press the WIND Softkey to display wind data to the left of the HSI 3 Press one of the OPTN softkeys to change how wind data is displayed OPTN 1 Wind direction arrows with numeric headwind tailwind and crosswind components OPTN 2 Wind direct...

Page 94: ...light VNV Target Altitude GPS is Selected Navigation Source Top of Descent Message Figure 2 37 Vertical Navigation Indications PFD Criteria VNV Indication Removed Required Vertical Speed RVSI Vertical Deviation VDI VNV Target Altitude Aircraft 1 min before the next TOD due to flight plan change X X X VNV cancelled CNCL VNV Softkey selected on MFD X X X Distance to active waypoint cannot be compute...

Page 95: ... begin flashing again Pressing the MSG Softkey while the System Messages Window is open closes the window unless the MSG Softkey is flashing Critical values generated by redundant sensors are monitored by comparators If differences in the sensors exceed a specified amount the Comparator Window appears in the upper right corner of the PFD and the discrepancy is annunciated in the Comparator Window ...

Page 96: ...ally on the Inset Map PFD the Navigation Map Page MFD and various other MFD page maps Refer to the Hazard Avoidance Section and Appendix F for more details about Traffic alerts When a Traffic Advisory TA is detected the following automatically occurs The PFD Inset Map is enabled displaying traffic A flashing black on yellow TRAFFIC annunciation appears to the top left of the Attitude Indicator for...

Page 97: ...AIN ANNUNCIATIONS Terrain Awareness and Warning System TAWS or Terrain SVS annunciations appear on the PFD to the upper left of the altimeter Refer to the Hazard Avoidance Section and Appendix A for information on terrain alerts and annunciations Figure 2 41 Traffic and Example Terrain Annunciations ...

Page 98: ...he aircraft flies outside the deviation band 200 feet of the Selected Altitude the Selected Altitude Box changes to yellow text on a black background flashes for five seconds and an aural tone is generated Figure 2 42 Altitude Alerting Visual Annunciations Within 1000 feet Within 200 feet Deviation of 200 feet LOW ALTITUDE ANNUNCIATION NOTE The LowAltitudeAnnunciation requires SBAS Terrain alerts ...

Page 99: ... turn yellow and the aural alert Minimums Minimums is generated When the radar altimeter is selected as the altitude source for the Minimum Descent Altitude alerting function the color of the current radar height changes to yellow Figure 2 44 Barometric MDA DH Alerting Visual Annunciations Altitude Reached Within 100 feet MDA DH Setting MDA DH Bug Within 2500 feet Alerting is inhibited while the a...

Page 100: ...ore sensitive as the height above ground decreases Table 2 3 Figure 2 46 Current Radar Height Radar Altimeter Radar Height Range Shown to Nearest 0 to 200 feet 5 feet 200 to 1500 feet 10 feet 1500 to 2500 feet 50 feet Table 2 3 Radar Altimeter Sensitivity When the radar altimeter is selected as the altitude source for the minimum descent altitude alerting function Figure 2 47 the color of the rada...

Page 101: ...y above the Radar Altimeter box Figure 2 51 Figure 2 49 Altimeter Displaying the Ground Line RAD ALT Ground Line Radar Altimeter Minimums Box Radar Altimeter Figure 2 50 Radar Altimeter Invalid Data Testing the Radar Altimeter KRA 405B only 1 Turn the FMS Knob to select the AUX System Status Page on the MFD 2 Select the RA TEST Softkey Or 1 Press the MENU Key 2 Turn the FMS Knob to highlight Enabl...

Page 102: ...isplayed for five seconds DR Upper right of aircraft symbol DeadReckoning SystemisusingprojectedpositionratherthanGPSposition to compute navigation data and sequence active flight plan waypoints Table 2 4 Abnormal GPS Conditions Annunciated on HSI Figure 2 52 Example of HSI Annunciations Dead Reckoning DR Mode causes the following items on the PFD to be shown in yellow when GPS is the selected nav...

Page 103: ...d track are unavailable the HSI displays a yellow HDG annunciation with a red X over the heading readout box The system also removes directional numbers and letters from the HSI Figure 2 53 Heading Failure Displays on the HSI HSI Track Mode Heading Unavailable Track Available Heading and Track Unavailable NOTE When heading information is unavailable the system removes the bearing pointers from the...

Page 104: ...e PFD and corresponding softkeys are disabled when the aircraft experiences unusual attitudes Traffic Annunciations AFCS Annunciations Flight director Command Bars Inset Map Outside air temperature OAT DME Information Window Wind data Selected Heading readout Selected Course readout Transponder Status Box System Time PFD Setup Menu Windows displayed in the lower right corner of the PFD Timer Refer...

Page 105: ...ntrol information on the left side of the Multi Function Display MFD Synoptics pages are provided for monitoring the status of the doors de icing systems electrical and fuel The Crew Alerting System CAS displays advisories cautions and warnings to communicate conditions statuses and system failures CAS messages are grouped by level of importance and color coded based on urgency and appear on the l...

Page 106: ... Display PFD symbology together with engine and CAS information refer to the System Overview for more information about Reversionary Mode In Reversionary Mode engine pressurization fuel electrical and trim data is presented in an abbreviated format on the left of the display CAS messages appear in a window on the right of the display Synoptics are not available while in Reversionary Mode EIS Displ...

Page 107: ... Speed 4 Interturbine Temperature 5 Oil Pressure 6 Oil Temperature 7 CAS Display 8 Cabin Pressure Altitude and Change Rate 9 Differential Pressure 10 Selected Cabin Altitude TBM 850 or LFE TBM 900 11 Oxygen Pressure 12 Fuel Quantity 13 Fuel Flow 14 Battery and Generator Currents 15 Battery and Essential Bus Voltages 16 Elevator Aileron and Rudder Trim and Flap Position Figure 3 3 EIS Display Norma...

Page 108: ...gits may flash red even if the parameter is still within in the cautionary range refer to each display description for details If the sensor data for a parameter becomes invalid or unavailable a red X is displayed across the indicator and or readout ENGINE PARAMETERS The EIS displays torque propeller speed generator speed and interturbine temperature using arc gauges TORQUE GAUGE The Torque Gauge ...

Page 109: ... Generator speed is indicated as a percentage of maximum safe operating speed rpm from 0 to 120 If generator speed exceeds 104 a warning condition occurs Figure 3 9 Generator Speed Gauge ITT GAUGE The Interturbine Temperature ITT Gauge ranges differ for engine off start and running conditions Values between 200 and 1200 degrees Celsius C are shown at engine start values change to 200 to 900 C when...

Page 110: ...e right EICAS column Only readouts for cabin altitude and pressure differential are displayed in Reversionary Mode Cabin altitude ALT FT is shown on a color coded scale labeled in 5 000 ft increments with a readout in feet below Cabin altitude change rate RATE FPM is displayed on a scale in terms of 2 000 fpm increments with a readout in fpm below Cabin pressure differential DIFF PSI in pounds per...

Page 111: ...LFE on the Cabin Pressure Display Landing Field Elevation Destination Airport Identifier Figure 3 14 Manual LFE on the Cabin Pressure Display Landing Field Elevation Setting the displayed landing field elevation to the value for the destination airport 1 Select the SYSTEM Softkey 2 Select the FMS LFE Softkey to set the LFE to the value for the destination airport in the current flight plan Manuall...

Page 112: ...wn along a slider scale Readouts for fuel quantity and fuel flow are shown in Reversionary Mode Fuel Flow Fuel Pressure If Installed TBM 850 Only Figure 3 15 Fuel Display Tank Fuel Quantities ELECTRICAL INFORMATION Currents for the battery pointers labeled B and generator pointer labeled G for primary generator and S for standby generator and voltages for the battery and essential bus pointer labe...

Page 113: ... along slide bar scales next to the CAS messages in normal display mode Flap deflection is normally displayed beneath the trim indications using a rotating pointer Flap positions for takeoff landing and up positions are labeled In Reversionary Mode only elevator trim is indicated and flap position UP T O LDG is provided as a digital readout Figure 3 17 Trim and Flap Indications ...

Page 114: ...y is selected the Synoptics pages can be accessed using softkeys or the small FMS Knob To return to the previously displayed page when a Synoptics Page has been displayed select the SYSTEM Softkey or CLR Key or turn the large FMS Knob SYSTEM SYSTEM CPDLC MAP ELEC CHKLIST FUEL GEN Figure 3 18 TBM 850 Synoptic Pages Softkeys SYSTEM SYSTEM CPDLC MAP ELEC CHKLIST FUEL GEN MAN LFE FMS LFE Figure 3 19 T...

Page 115: ...190 00709 05 Rev D Garmin G1000 Pilot s Guide for the Socata TBM 850 900 101 ENGINE AIRFRAME SYSTEMS Map Synoptic Page Figure 3 20 MFD Layout TBM 850 Example EICAS ...

Page 116: ... status The generators ground power supply GPU batteries and buses are shown in green to denote normal operation Color of the units change depending on the condition Figure 3 21 Electrical Synoptics Page 1 Standby Generator 2 Main Generator 3 Ground Power Unit Door 4 Battery 5 Amperage 6 Battery Bus 7 Essential Bus 8 Battery Bus Voltage 9 Essential Bus Voltage 10 DC Buses 1 through 4 11 Main Bus 3...

Page 117: ... is open and selected the GPU status is shown in green when the door is open but not selected the status is shown in gray with the switch closed A CAS message GPU DOOR is generated if the GPU door is open Selected Not Selected GPU Door Open GPU Door Closed Figure 3 23 GPU Door Status Battery connection status to the main bus is indicated in green direction of current flow is indicated with an arro...

Page 118: ...gure 3 25 Battery and Essential Bus Low Voltage Figure 3 26 DC Bus Status Bus Not Energized The Emergency Buses switch has two positions UP open and DN ground If the switch is in the UP position the essential bus is connected to the battery bus If the switch is in the DN position the essential bus is connected to the main bus Figure 3 27 Essential Bus Connections Essential Bus Connected to the Bat...

Page 119: ...fuel quantity drops below the threshold level Figure 3 28 Fuel Synoptics Page 1 Left Fuel Tank 2 Left Fuel Line 3 Fuel Pressure if installed 4 Engine Driven Boost Pump 5 Auxiliary Boost Pump 6 Fuel Selector 7 Right Fuel Tank 8 Right Fuel Line 9 Fuel Flow Data 5 4 8 7 1 2 3 6 9 Fuel Pressure Display if installed FUEL PRESSURE IF INSTALLED Fuel Pressure is displayed using a gauge If fuel pressure is...

Page 120: ...ector Status If the auxiliary fuel boost pump is on the symbol is displayed in green The mode automatic AUTO or manual MAN is displayed next to the pump symbol If the boost pump is off the symbol is shown in cyan automatic mode or red manual mode Fuel Boost Pump On Fuel Boost Pump Off Auto Fuel Boost Pump Off Manual Table 3 2 Auxiliary Boost Pump Status Fuel used and remaining are based on the fue...

Page 121: ...ield Cyan indicates heat has been selected windshield Green indicates heat is on Yellow indicates heat has failed stall sensor propeller and pitot tube Invalid sensor information is indicated with a red X Figure 3 31 General Synoptics Page 1 Rear Cargo Door Open 2 Cabin Door Open 3 Pilot Door Open 4 Pitot Probe 1 5 Forward Cargo Door Open 6 Propeller Heaters 7 Right Windshield Heat On 8 Pitot Prob...

Page 122: ...ystem CAS Display is located in the lower left corner of the EICAS Display on the MFD under normal display conditions Up to 14 messages can be displayed when more than 14 messages accumulate the CAS softkey becomes available When CAS messages are present while in Reversionary Mode the CAS Window appears on the display along with the flight instruments and EIS The window size increases to fit up to...

Page 123: ...nd flashing CAUTION softkey annunciation The softkey annunciation flashes and the corresponding aural alert sounds until acknowledged by depressing the softkey Figure 3 34 Softkey Annunciations MSG Softkey Labels A CAS message does not appear more than once at a given time Warning and caution CAS messages flash when they are generated and continue to flash until acknowledged Advisory CAS messages ...

Page 124: ...ering system failure FIRE Engine compartment fire temperature over 200 C if installed FLAPS ASYM Dissymmetry between left and right hand flaps FUEL OFF Fuel tank selectors set to Off FUEL PRESS Fuel pressure below 10 psi GEAR UNSAFE Gears are in an unsafe configuration ITT Engine start ITT over 1000 C 870 C 5 s or 840 C 20 s Engine running ITT over 840 C OIL PRESS Oil pressure below 60 psi OXYGEN ...

Page 125: ...GPU receptacle door not closed IGNITION Ignition exciter running INERT SEP FAIL Inertial separator failure INERT SEP ON Inertial separator extended LOW LVL FAIL L R Low fuel level sensor failure for specified tank LOW VOLTAGE Battery voltage below 26 V MAIN GEN Starter generator unconnected MAX DIFF MODE MAX DIFF PRESS MODE activated NG HI Generator speed is more than 103 OIL PRESS Oil pressure is...

Page 126: ...Garmin G1000 Pilot s Guide for the Socata TBM 850 900 190 00709 05 Rev D 112 ENGINE AIRFRAME SYSTEMS Blank Page ...

Page 127: ...S Transponders are controlled with softkeys and the FMS Knob located on the Primary Flight Display PFD The Transponder Data Box is located to the left of the System Time Box The data box displays the active four digit code mode and a reply status Figure 4 1 The Controller Pilot Data Link Communications System CPDLC provides data link communication between the aircraft and an Air Traffic Control fa...

Page 128: ...Garmin G1000 Pilot s Guide for the Socata TBM 850 900 114 AUDIO PANEL AND CNS PFD CONTROLS AND FREQUENCY DISPLAY Figure 4 1 PFD Controls COM NAV Frequency Tuning Boxes and ADF DME Tuning Window 12 2 1 6 8 7 3 4 5 9 10 11 ...

Page 129: ... cyan box and Frequency Transfer Arrow between COM1 and COM2 7 COM Frequency Transfer Key Transfers the standby and active COM frequencies Press and hold this key for two seconds to tune the emergency frequency 121 500 MHz automatically into the active frequency field 8 COM VOL SQ Knob Controls COM audio volume level Press to turn the COM automatic squelch on and off Volume level is shown in the C...

Page 130: ...e is simultaneously selected when this key is pressed allowing received audio from the 1 COM receiver to be heard COM2 receive can be added by pressing the COM2 Key 2 COM1 When selected audio from the 1 COM receiver can be heard 3 COM2 MIC Selects the 2 transmitter for transmitting COM2 receive is simultaneously selected when this key is pressed allowing received audio from the 2 COM receiver to b...

Page 131: ...ptional ADF receiver audio on or off 16 NAV2 When selected audio from the 2 NAV receiver can be heard 17 AUX Not used in the TBM 850 900 18 MAN SQ Enables manual squelch for the intercom When the intercom is active press the ICS Knob to illuminate SQ Turn the ICS Knob to adjust squelch 19 PLAY Press once to play the last recorded COM audio Press again to stop playing Press twice within 0 5 second ...

Page 132: ...ight The COM transceiver is selected for transmitting by pressing the COM MIC Keys on the Audio Panel During reception of audio from the COM radio selected for transmission audio from the other COM radio is muted An active COM frequency displayed in green indicates that the COM transceiver is selected on the Audio Panel COM1 MIC or COM2 MIC Key Both active COM frequencies appearing in white indica...

Page 133: ...selected on both Audio Panels the pilot has transmit priority on COM1 the copilot has transmit priority on COM2 COM TRANSCEIVER MANUAL TUNING The COM frequency controls and frequency boxes are on the right side of each PFD Manually tuning a COM frequency 1 Turn the COM Knob to tune the desired frequency in the COM Tuning Box large knob for MHz small knob for kHz 2 Press the Frequency Transfer Key ...

Page 134: ... Boxes Press the COM Knob to Switch the Tuning Box From One COM Radio to the Other QUICK TUNING AND ACTIVATING 121 500 MHZ Pressing and holding the COM Frequency Transfer Key for two seconds automatically loads the emergency COM frequency 121 500 MHz in the active field of the COM radio selected for tuning the one with the transfer arrow In the example shown pressing the Audio Panel COM2 MIC Key a...

Page 135: ...ncy is entered it becomes a standby frequency Pressing the Frequency Transfer Key places this frequency into the COM Active Frequency Field Auto tuning a COM frequency for a nearby airport from the PFD 1 Press the NRST Softkey on the PFD to open the Nearest Airports Window A list of 25 nearest airport identifiers and COM frequencies is displayed 2 Turn the FMS Knob to scroll through the list and h...

Page 136: ...ency can be auto tuned activate the cursor by pressing the FMS Knob on the MFD control unit or selecting the appropriate softkey 2 Turn the FMS Knob to place the cursor on the desired COM frequency Figure 4 11 3 Press the ENT Key to load the COM frequency into the standby field of the selected COM radio 4 Press the Frequency Transfer Key on either PFD to transfer the frequency to the COM Active Fr...

Page 137: ...to scroll through the menu options 3 Press the ENT Key to place the cursor on the desired selection 4 Scroll through the frequency selections with the FMS Knob 5 Press the ENT Key to load the COM frequency into the standby field of the selected COM radio 6 Press the Frequency Transfer Key to transfer the frequency to the COM Active Frequency Field Figure 4 10 Nearest Pages Menus Nearest Airspaces ...

Page 138: ...ing the FMS Knob and scrolling through the list The frequency is transferred to the COM Standby Field with the ENT Key Press ENT Key to load frequency into PFD1 COM Standby Field Cursor then advances to the next frequency Select INFO x Softkey for AIRPORT RUNWAYS and FREQUENCIES Windows Selected Airport Identifier and Information Runway Information Figure 4 11 WPT Airport Information Page ...

Page 139: ...ies can also be auto tuned from the NRST Nearest Airspaces NRST Nearest Frequencies and NRST Nearest Airports Pages on the MFD in a similar manner using the appropriate softkeys or MENU Key the FMS Knob and the ENT Key Figure 4 12 NRST Nearest Airspaces NRST Nearest Airports and NRST Nearest Frequencies Pages ...

Page 140: ... selection of the decimal digits COM channel spacing is set on the System Setup Page of the AUX Page Group Figure 4 13 COM Channel Spacing 25 kHz Channel Spacing 8 33 kHz Channel Spacing Changing COM frequency channel spacing 1 Select the AUX System Setup Page 2 Press the FMS Knob to activate the flashing cursor 3 Turn the large FMS Knob to highlight the Channel Spacing Field in the COM Configurat...

Page 141: ...Q Knob again enables Automatic Squelch When Automatic Squelch is disabled a white SQ appears next to the COM frequency Figure 4 15 Overriding Automatic Squelch Squelch Indication Press the COM VOL SQ Knob to turn off Automatic Squelch Press again to restore Automatic Squelch VOLUME COM radio volume level can be adjusted from 0 to 100 using the VOL SQ Knob Turning the knob clockwise increases volum...

Page 142: ...raft is nearing the coverage boundary of the CDA Current Data Authority or current facility the system will be assigned a NDA Next Data Authority or next facility The NDA is the ATC end system that is waiting to take control of the aircraft Upon crossing the boundary between the two ATC end systems a transfer instruction will be sent to the system making the NDA the new CDA In the event that the C...

Page 143: ...LC Disconnected The system has disconnected from a CPDLC connection If the network logon is still valid the system will accept another CPDLC session from an ATC facility Figure 4 17 CPDLC Messages Current ATC Facility Next ATC Facility ATC Facility Message Status Icon Message Status Text Connection Status CPDLC MESSAGE STATUS ICONS The CPDLC Messages Page contains a combination of status icons and...

Page 144: ...ot opened Unopened message that closed the message thread Closed message opened Opened message that closed the message thread Table 4 2 Uplink CPDLC Status Icons CONNECTING TO THE CPDLC SYSTEM A flight plan must be filed prior to logging on to the CPDLC system The information entered in the CPDLC Log On display must match the filed flight plan After entering flight plan information in the required...

Page 145: ...igure 4 18 CPDLC Log On Softkey LOGON Softkey 3 Turn the large FMS Knob to place the selection cursor over the Facility field Figure 4 19 CPDLC Log On Display Facility Field Flight ID Field Destination Airport Field Filed Departure Airport Field Filed Departure Time Field Send Button 4 Turn the small FMS Knob to select the desired ATC facility to which the CPDLC connection will be established ...

Page 146: ...used in the filed flight plan and press the ENT Key 11 The Filed Departure Airport field is populated with the airport identifier corresponding to the current aircraft location If the flight plan was filed using a different airport identifier turn the large FMS Knob to place the selection cursor over the Filed Departure Airport field enter the departure airport and press the ENT Key 12 Optional Tu...

Page 147: ...quired information and sending the request To create messages 1 From the MFD select the CPDLC Softkey 2 Select the NEW Softkey The CPDLC Thread Window appears Figure 4 20 CPDLC New Softkey NEW Softkey 3 With the Response Request field highlighted turn the small FMS Knob to select the desired request from the list and press the ENT Key For discussion purposes Request level is selected Figure 4 21 C...

Page 148: ...een multiple units of measure FT or FL highlight the first numeric position and turn the small FMS Knob counterclockwise Figure 4 22 CPDLC Request Parameters 5 Press the ENT Key to complete the entry 6 Optional Highlight the Reason field and enter the desired reason from the list 7 Press the ENT Key to complete the entry 8 Highlight the SEND Button and press the ENT Key ...

Page 149: ...owledgement The following PFD alert as well as an aural alert informs the flight crew of a received CPDLC message Figure 4 23 CPDLC PFD Alert CPDLC Alert To respond to a message 1 From the MFD select the CPDLC Softkey 2 Turn the large FMS Knob to place the selection cursor over the desired message and press the ENT Key 3 Turn the small FMS Knob to select the desired Response Request from the list ...

Page 150: ...n cursor over the desired message to view and press the ENT Key Figure 4 24 CPDLC Response VIEWING CPDLC MESSAGE DIALOGS The status of a string of messages or dialog may be checked and past message dialogs viewed When the G1000 system power is cycled the list of message dialogs is deleted To view message dialogs 1 From the MFD select the CPDLC Softkey 2 Turn the large FMS Knob to place the selecti...

Page 151: ...alogs DELETE Softkey Delete All DEL ALL Softkey To delete a single message dialog 1 From the MFD select the CPDLC Softkey 2 Turn the large FMS Knob to place the selection cursor over the desired message to delete 3 Select the DELETE Softkey A confirmation window appears 4 Highlight OK and press the ENT Key To delete all closed message dialogs 1 From the MFD select the CPDLC Softkey 2 Select the DE...

Page 152: ... to enable or disable the VDL VHF Data Link connection To enable disable data mode on the GDR 66 1 From the MFD select the CPDLC Softkey 2 Press the Menu Key to display the page menu 3 Turn the small FMS Knob to highlight Disable Data Mode or Enable Data Mode and press the ENT Key CPDLC SYSTEM FAILURE A red X over the Status Window on the CPDLC Messages Page indicates that the system is unavailabl...

Page 153: ...g Box and the Frequency Transfer Arrow are placed in the active NAV Frequency Field and the active NAV frequency color changes to green The three navigation modes that can be cycled through are VOR1 or LOC1 If NAV1 is selected a green single line arrow not shown labeled either VOR1 or LOC1 is displayed on the HSI and the active NAV1 frequency is displayed in green VOR2 or LOC2 If NAV2 is selected ...

Page 154: ... The NAV frequency controls and frequency boxes are on the left side of the PFDs Manually tuning a NAV frequency 1 Turn the NAV Knob to tune the desired frequency in the NAV Tuning Box 2 Press the Frequency Transfer Key to transfer the frequency to the NAV Active Frequency Field 3 Adjust the volume level with the NAV VOL ID Knob 4 Press the NAV VOL ID Knob to turn the Morse code identifier audio o...

Page 155: ... NAV1 or NAV2 Key on the Audio Panel Pressing the VOL ID Knob turns off the Morse code audio only in the radio with the NAV Tuning Box To turn off both NAV IDs transfer the NAV Tuning Box between NAV1 and NAV2 by pressing the small NAV Knob and pressing the VOL ID Knob again to turn the Morse code off in the other radio Figure 4 32 NAV Radio ID Indication The Morse Code Identifier for the GHM VOR ...

Page 156: ...om pages in the NRST or WPT page group by highlighting the frequency and pressing the ENT Key Auto tuning a NAV frequency from the WPT and NRST Pages 1 From any page that the NAV frequency can be auto tuned activate the cursor by pressing the FMS Knob on the MFD control unit or selecting the appropriate softkey 2 Turn the FMS Knob to place the cursor on the desired NAV identifier or NAV frequency ...

Page 157: ...menu options 3 Press the ENT Key to place the cursor in the desired window 4 Scroll through the frequency selections with the FMS Knob 5 Press the ENT Key to load the NAV frequency into the standby field of the selected NAV radio 6 Press the Frequency Transfer Key to transfer the frequency to the NAV Active Frequency Field Figure 4 35 Nearest Pages Menus Nearest Airspaces Menu Nearest Airports Men...

Page 158: ...is used to scroll through the list The cursor is placed on the frequency with the FREQ Softkey and loaded into the NAV Tuning Box with the ENT Key Select the FREQ Softkey to Place the Cursor on the VOR Frequency Figure 4 36 Loading the NAV Frequency from the NRST Nearest VOR Page Press the ENT Key to Load the Frequency into the NAV Standby Field Select the VOR Softkey to Place the Cursor on the VO...

Page 159: ...e auto tuned from the NRST Nearest Airports WPT Airport Information WPT VOR Information and NRST Nearest Frequencies Pages on the MFD in a similar manner using the appropriate softkeys or MENU Key the FMS Knob and the ENT Key Figure 4 37 NRST Nearest Frequencies WPT VOR Information WPT Airport Information and NRST Nearest Airports Pages ...

Page 160: ...on on both PFD1 and PFD2 When loading or activating a VOR or ILS LOC approach the approach frequency is automatically transferred to a NAV frequency field as follows If the current CDI navigation source is GPS the approach frequency is transferred to the NAV1 or NAV2 active frequency fields The frequency that was previously in the NAV1 or NAV2 active frequency fields are transferred to standby If ...

Page 161: ...On Muted and Deselected Pressing the MKR MUTE Key selects and deselects marker beacon audio The key annunciator indicates when marker beacon audio is selected During marker beacon audio reception pressing the MKR MUTE Key mutes the audio but does not affect the marker annunciations Figure 4 38 The marker tone is silenced then waits for the next marker tone The MKR MUTE Key Annunciator is illuminat...

Page 162: ...s tuned by pairing with a VHF NAV frequency DME frequency pairing is automatic and only the VHF NAV frequency is shown The following ADF DME information is displayed in the ADF DME Tuning Window Active and standby ADF frequencies ADF receiver mode ADF receiver volume DME tuning mode DME transceiver pairing When the ADF DME Tuning Window is displayed the selection cursor is placed over the standby ...

Page 163: ...s the ENT Key to complete data entry for the standby frequency Figure 4 41 Entering ADF Standby Frequencies Press the ENT Key to Complete ADF Frequency Entry Turn the Small FMS Knob to Enter Data in the Standby ADF Frequency Field Turn the Large FMS Knob to Move the Cursor to the Next Character Pressing the CLR Key before completing frequency entry cancels the frequency change and reverts back to ...

Page 164: ...equency Oscillator The ADF bearing pointer parks on the HSI at 90 degrees while an audible tone is provided when a signal is received This mode also allows identification of the interrupted carrier beacon stations and confirms signal reception Selecting an ADF receiver mode 1 Turn the large FMS Knob to place the selection cursor over the ADF mode field 2 Turn the small FMS Knob to select the desir...

Page 165: ...1 Pairs the DME frequency from the selected NAV1 frequency NAV2 Pairs the DME frequency from the selected NAV2 frequency HOLD When in the HOLD position the DME frequency remains paired with the last selected NAV frequency Selecting DME transceiver pairing 1 Press the ADF DME Softkey to display the ADF DME Tuning Window 2 Turn the small FMS Knob to select the DME tuning mode 3 Press the ENT Key to ...

Page 166: ...ce identifier capability Flight ID Flight Identification reporting The Mode S Transponder reports aircraft identification as either the aircraft registration or a unique Flight ID Altitude reporting Airborne status determination Transponder capability reporting Mode S Enhanced Surveillance EHS requirements Acquisition squitter Acquisition squitter or short squitter is the transponder 24 bit identi...

Page 167: ... either PFD Code entry must be completed with either the softkeys or the FMS Knob but not a combination of both Pressing the IDENT Softkey while in Mode or Code Selection initiates the ident function and reverts to the top level softkeys After 45 seconds of transponder control inactivity the system reverts back to the top level softkeys Figure 4 46 Transponder Softkeys PFD Pressing the BACK Softke...

Page 168: ...Softkeys A green GND indication and transponder code appear in the mode field of the Transponder Data Box In Ground Mode the transponder does not allow Mode A and Mode C replies but it does permit acquisition squitter and replies to discretely addressed Mode S interrogations When Standby Mode has been selected on the ground the transponder can be returned to Ground Mode by pressing the GND Softkey...

Page 169: ...Altitude Mode is automatically selected when the aircraft becomes airborne Altitude Mode may also be selected manually by pressing the ALT Softkey If Altitude Mode is selected a green ALT indication and transponder code appear in the mode field of the Transponder Data Box and all transponder replies requesting altitude information are provided with pressure altitude information Figure 4 50 Altitud...

Page 170: ...he transponder code becomes active Entering a Code Figure 4 52 Entering a Code Entering a transponder code with the PFD FMS Knob 1 Press the XPDR and the CODE Softkeys as in the previous procedure to enable code entry 2 Turn the small FMS Knob on the PFD to enter the first two code digits 3 Turn the large FMS Knob to move the cursor to the next code field 4 Enter the last two code digits with the ...

Page 171: ... configuration Figure 4 54 VFR Code VFR Code IDENT FUNCTION NOTE In Standby Mode the IDENT Softkey is inoperative Pressing the IDENT Softkey sends a distinct identity indication to Air Traffic Control ATC The indication distinguishes the identing transponder from all the others on the air traffic controller s screen The IDENT Softkey appears on all levels of transponder softkeys When the IDENT Sof...

Page 172: ...ID entry Entering a Flight ID 1 Press the TMR REF Softkey to display the Timer References Window 2 Press the FMS Knob to activate the selection cursor if not already activated 3 Turn the large FMS Knob to scroll down to the Flight ID 4 Turn the small FMS Knob to enter the desired Flight ID 5 Press the ENT Key to complete Flight ID entry If an error is made during Flight ID entry pressing the CLR K...

Page 173: ...s the right headset channel output to ground While this does not damage the Audio Panel a person listening on a monaural headset hears only the left channel in both ears If a monaural headset is used at one of the passenger positions any other passenger using a stereo headset hears audio in the left ear only SPEAKER Each Audio Panel controls a separate cabin speaker Pressing the SPKR Key selects a...

Page 174: ...g Pressing the MAN SQ Key enables manual squelch control indicated by the MAN SQ annunciator When the MAN SQ Annunciator is extinguished Automatic Squelch is on the ICS Knob controls only the volume pressing the ICS Knob has no effect on the VOL SQ selection When the MAN SQ Annunciator is illuminated Manual Squelch the ICS Knob controls either volume or squelch selected by pressing the ICS Knob an...

Page 175: ...r headphones When PA is selected on the Audio Panel the annunciator flashes about once per second while pressing the PTT the COM MIC annunciator is no longer lit and the active COM frequency for that Audio Panel changes to white indicating that there is no COM selected Figure 4 59 PA Key Selected for Cabin Announcements PA Key is Selected on the Audio Panel SIMULTANEOUS COM OPERATION Both the pilo...

Page 176: ...PLAY Key controls the play function The PLAY annunciator flashes to indicate when play is in progress The PLAY annunciator turns off after playback is finished Pressing the PLAY Key once plays the latest recorded memory block and then returns to normal operation Pressing the PLAY Key again during play of a memory block stops play If a COM input signal is detected during play of a recorded memory b...

Page 177: ...vel The time required for MUSIC 1 volume to return to normal is between one half and four seconds MUSIC 1 Muting Enable Disable Pressing and holding the MUSIC Key for three seconds switches MUSIC 1 muting on and off When switching either one or two beeps are heard one beep indicates that music muting is enabled two beeps indicate music muting is disabled MUSIC 1 muting is independent for each Audi...

Page 178: ... of one another but the radio volumes are not NOTE When the MAN SQ Key is pressed the ICS squelch can be set manually by the pilot and copilot If manual squelch is set to full open SQ annunciated and the knobs turned counterclockwise background noise is heard in the ICS system as well as during COM transmissions After powering up the G1000 System the following steps aid in maximizing the use of th...

Page 179: ...ng the Audio Panels during preflight 1 Verify that the INTR COM Key is selected 2 Verify manual squelch is set to minimum 3 Turn the MSTR Knob Master Volume Control on both Audio Panels clockwise two full turns This sets the headset audio level to max volume least amount of attenuation 4 Adjust radio volume levels COM NAV etc to a suitable level 5 Adjust the ICS volume Knob on each Audio Panel to ...

Page 180: ...nsmitting after 35 seconds of continuous operation An alert appears on the PFD to advise the crew of a stuck microphone The COM1 MIC or COM2 MIC Key Annunciator on the Audio Panel flashes as long as the PTT Key remains stuck Figure 4 63 Stuck Microphone Alert COM TUNING FAILURE In case of a COM system tuning failure the emergency frequency 121 500 MHz is automatically tuned in the radio in which t...

Page 181: ...cy is not shown The COM1 emergency frequency is available to both the copilot and pilot Figure 4 65 Frequency Section of PFD2 Display after PFD1 Failure Emergency Channel Loaded Automatically If PFD2 fails COM2 and NAV2 display a red X on the remaining PFD display NAV2 is unavailable COM2 tunes 121 500 MHz but the frequency is not shown The COM2 emergency frequency is available to both the copilot...

Page 182: ... the speakers If there is a failure of one Audio Panel that side only has access to their respective on side fail safe COM If there is a failure of one Audio Panel the remaining one does not have access to the others side s COM and NAV For example if the pilot side Audio Panel fails the copilot side Audio Panel has access to all the radios except for COM1 and NAV1 REVERSIONARY MODE The red DISPLAY...

Page 183: ...ftkey removes the Inset Map The Navigation Map displays aviation data e g airports VORs airways airspaces geographic data e g cities lakes highways borders topographic data map shading indicating elevation and hazard data e g traffic terrain weather The amount of displayed data can be reduced by selecting the DCLTR Softkey The Navigation Map can be oriented four different ways North Up NORTH UP Tr...

Page 184: ... Box Navigation Mode Figure 5 2 GPS Navigation Information on the MFD Navigation Page Active Flight Plan Leg Navigation Map Aviation Data Geographic Data Topographic Data Hazard Data Navigation Status Box Aircraft Icon at Present Position Navigation Page Title Map Range Map Orientation Flight Plan Leg NAVIGATION STATUS BOX The Navigation Status Box located at the top of the PFD contains two fields...

Page 185: ...ated Time of Arrival ETA Estimated Time Enroute ETE Fuel on Board FOB Fuel over Destination FOD Ground Speed GS ISA Relative Temperature ISA ETA at Final Destination LDG Minimum Safe Altitude MSA True Air Speed TAS Track Angle Error TKE Track TRK Vertical Speed Required VSR Crosstrack Error XTK MFD Navigation Status Box The navigation information displayed in the four data fields can be selected o...

Page 186: ...Track vector Topography scale Topography data Obstacle data MAP ORIENTATION Maps are shown in one of four different orientation options allowing flexibility in determining aircraft position relative to other items on the map north up or for determining where map items are relative to where the aircraft is going track up desired track up or heading up The map orientation is shown in the upper right...

Page 187: ...nly be changed on the Navigation Map Page Any other displays that show navigation data reflect the orientation selected for the Navigation Map Page Changing the Navigation Map orientation 1 With the Navigation Map Page displayed press the MENU Key The cursor flashes on the Map Setup option Figure 5 4 Navigation Map Page Menu Window Map Setup Selection 2 Press the ENT Key to display the Map Setup W...

Page 188: ...TO NORTH UP field 6 Select On or Off using the small FMS Knob 7 Press the ENT Key to accept the selected option The flashing cursor highlights the range field 8 Use the small FMS Knob to select the desired range 9 Press the ENT Key to accept the selected option 10 Press the FMS Knob to return to the Navigation Map Page MAP RANGE There are 28 different map ranges available from 500 feet to 2000 nm ...

Page 189: ...g the minimum and maximum look forward times set on the Map Setup Window for the Map Group These settings determine the minimum and maximum distance to display based upon the aircraft s ground speed Waypoints that are long distances apart cause the map range to increase to a point where many details on the map are decluttered If this is not acceptable lower the maximum look ahead time to a value t...

Page 190: ...e MENU Key with the Navigation Map Page displayed The cursor flashes on the Map Setup option 2 Press the ENT Key The Map Setup Menu is displayed 3 Select the Map group 4 Press the ENT Key 5 Highlight the AUTO ZOOM field 6 Select Off MFD Only PFD Only or ALL On 7 Press the ENT Key to accept the selected option The flashing cursor highlights the MAX LOOK FWD field Times are from zero to 999 minutes ...

Page 191: ...lected by pressing the Joystick the Map Pointer flashes on the map display A window also appears at the top of the map display showing the latitude longitude position of the pointer the bearing and distance to the pointer from the aircraft s present position and the elevation of the land at the position of the pointer Figure 5 8 Navigation Map Map Pointer Activated Map Pointer Map Pointer Informat...

Page 192: ...aced on an object the name of the object is highlighted even if the name was not originally displayed on the map When any map feature or object is selected on the map display pertinent information is displayed Figure 5 9 Navigation Map Map Pointer on Point of Interest Map Pointer on POI Information about Point of Interest ...

Page 193: ...ation includes the name and class of airspace the ceiling in feet above Mean Sea Level MSL and the floor in feet MSL Figure 5 10 Navigation Map Map Pointer on Airspace Map Pointer on Airspace Information about Airspace Panning the map 1 Press the Joystick to display the Map Pointer 2 Move the Joystick to move the Map Pointer around the map 3 Press the Joystick to remove the Map Pointer and recente...

Page 194: ...e the Map Pointer on a waypoint 2 Press the ENT Key to display the Waypoint Information Page for the selected waypoint 3 Select the GO BACK Softkey the CLR Key or the ENT Key to exit the Waypoint Information Page and return to the Navigation Map showing the selected waypoint Figure 5 11 Navigation Map Information Window NAVAID NAVAID Information GO BACK Softkey ...

Page 195: ...on an open area within the boundaries of an airspace 2 Press the ENT Key to display an options menu 3 Review Airspaces should already be highlighted if not select it Press the ENT Key to display the Airspace Information Page for the selected airspace 4 Press the CLR or ENT Key to exit the Airspace Information Page Figure 5 12 Navigation Map Information Window Airspace Airspace Information ...

Page 196: ... navigation map Measuring bearing and distance between any two points 1 Press the MENU Key with the Navigation Map Page displayed 2 Highlight the Measure Bearing Distance field 3 Press the ENT Key A Measure Pointer is displayed on the map at the aircraft s present position 4 Move the Joystick to place the reference pointer at the desired location The bearing and distance are displayed at the top o...

Page 197: ...ying removing topographic data on all pages displaying navigation maps 1 Select the MAP Softkey the INSET Softkey for the PFD Inset Map 2 Select the TOPO Softkey 3 Select the TOPO Softkey again to remove topographic data from the Navigation Map When topographic data is removed from the page all navigation data is presented on a black background Displaying removing topographic data TOPO DATA using ...

Page 198: ...ting of 100 nm removes the item at ranges above 100 nm on MFD navigation maps while the PFD Inset Map removes the same item at 50 nm Selecting a topographical data range TOPO DATA 1 Press the MENU Key with the Navigation Map Page displayed The cursor flashes on the Map Setup option 2 Press the ENT Key The Map Setup Menu is displayed 3 Select the Map group 4 Press the ENT Key 5 Highlight the TOPO D...

Page 199: ...Aircraft Altitude MSL Ground Elevation at Map Pointer Location only visible when Map Pointer is displayed Range of Displayed Elevations Displaying removing the topographic scale TOPO SCALE 1 Press the MENU Key with the Navigation Map Page displayed The cursor flashes on the Map Setup option 2 Press the ENT Key The Map Setup Menu is displayed 3 Select the Map group and press the ENT Key 4 Highlight...

Page 200: ...wing items are configured on the land menu Land Symbols Text label size can be None Small Medium Med or Large Lrg Symbol Default Range nm Maximum Range nm Latitude Longitude LAT LON Off 2000 Highways and Roads Interstate Highway FREEWAY 300 800 International Highway FREEWAY 300 800 US Highway NATIONAL HWY 30 80 State Highway LOCAL HWY 15 30 Local Road LOCAL ROAD N A 8 15 Railroads RAILROAD 15 30 L...

Page 201: ...VAIDs 2000 2000 Large Airports LARGE APT 200 500 Medium Airports MEDIUM APT 150 300 Small Airports SMALL APT 50 100 Taxiways SAFETAXI See Additional Features 3 20 Runway Extension RWY EXTENSION N A Off 100 Intersection INT WAYPOINT 15 30 Non directional Beacon NDB WAYPOINT 15 30 VOR VOR WAYPOINT 150 300 Class B Airspace TMA CLASS B TMA 200 500 Class C Airspace TCA CLASS C TCA 200 500 Class D Airsp...

Page 202: ...t On or Off 5 Press the FMS Knob to return to the Navigation Map Page Figure 5 18 Navigation Map Setup Menu LAND DATA Setup LAND DATA On Off The label size TEXT sets the size at which labels appear on the display none small medium and large The range RNG sets the maximum range at which items appear on the display Selecting a Land or Aviation group item text size and range 1 Press the MENU Key with...

Page 203: ...isplay Range Text Label Size None Small Med or Lrg Figure 5 20 Navigation Map Setup Menu AVIATION GROUP Setup Maximum Display Range Text Label Size None Small Med or Lrg NOTE Since the PFD Inset Map is much smaller than the MFD navigation maps items are removed on the PFD Inset Map two range levels smaller than the range selected in the Map Setup pages e g a setting of 100 nm removes the item at r...

Page 204: ...clutter Level Navigation Map Page Menu DCLTR Softkey Decluttering the map Select the DCLTR Softkey with the Navigation Map Page displayed The current declutter level is shown With each softkey selection another level of map information is removed Or 1 Press the MENU Key with the Navigation Map Page displayed 2 Select Declutter The current declutter level is shown 3 Press the ENT Key Decluttering t...

Page 205: ...ghtning X Graphical METARs X Airports X Safe Taxi X Runway Labels X TFRs X Restricted X MOA Military X User Waypoints X X Latitude Longitude Grid X X NAVAIDs does not declutter if used to define airway X X Intersections does not declutter if used to define airway X X Class B Airspaces TMA X X Class C Airspaces TCA X X Class D Airspaces X X Other Airspaces ADIZ X X Obstacles X X Cities X X X Roads ...

Page 206: ...irways since they run primarily between VORs High Altitude Airways or Jet Routes primarily serve airliners jets turboprops and turbocharged piston aircraft operating above 18 000 feet MSL Jet Routes start at 18 000 feet MSL and extend upward to 45 000 feet MSL altitudes above 18 000 feet are called flight levels and are described as FL450 for 45 000 feet MSL Jet Routes are designated with a J befo...

Page 207: ...s the ENT Key The Map Setup Menu is displayed 3 Turn the small FMS Knob to select the Airways group and press the ENT Key 4 Turn the large FMS Knob to highlight the AIRWAYS field 5 Turn the FMS Knob to select Off All LO Only or HI Only and press the ENT Key 6 Press the FMS Knob to return to the Navigation Map Page Figure 5 23 Navigation Map Setup Menu AIRWAYS Setup Low Altitude Airway Range High A...

Page 208: ...min 10 min 20 min and determines the length of the track vector The track vector shows up to 90 degrees of a turn for the 30 and 60 second time settings It is always a straight line for the 2 min 5 min 10 min and 20 min settings Figure 5 24 Navigation Map Track Vector Track Vector Displaying removing the track vector 1 Press the MENU Key with the Navigation Map Page displayed The cursor flashes on...

Page 209: ...ind vector information is displayed as a white arrow pointing in the direction in which the wind is moving for wind speeds greater than or equal to 1 kt Figure 5 26 Navigation Map Wind Vector Wind Direction Wind Speed NOTE The wind vector is not displayed until the aircraft is moving It is not displayed on the Waypoint Information pages Displaying removing the wind vector 1 Press the MENU Key with...

Page 210: ...he Nav Range Ring is not displayed on the Waypoint Information pages Nearest pages or Direct to Window map Displaying removing the Nav Range Ring 1 Press the MENU Key with the Navigation Map Page displayed The cursor flashes on the Map Setup option 2 Press the ENT Key The Map Setup Menu is displayed 3 Select the Map group 4 Press the ENT Key 5 Highlight the NAV RANGE RING field 6 Select On or Off ...

Page 211: ...el Total Endurance Range Displaying removing the fuel range ring and selecting a fuel range time 1 Press the MENU Key with the Navigation Map Page displayed The cursor flashes on the Map Setup option 2 Press the ENT Key The Map Setup Menu is displayed 3 Select the Map group 4 Press the ENT Key 5 Highlight the FUEL RNG RSV field 6 Select On or Off 7 Highlight the fuel reserve time field This time s...

Page 212: ... symbol on the map This is only available if SVS is installed on the aircraft Figure 5 29 Navigation Map Field of View Lateral Field of View Boundaries Displaying removing the field of view 1 Press the MENU Key with the Navigation Map Page displayed The cursor flashes on the Map Setup option 2 Press the ENT Key The Map Setup Menu is displayed 3 Select the Map group 4 Press the ENT Key 5 Highlight ...

Page 213: ...n the aircraft is actuallly climbing or descending Figure 5 30 Navigation Map Range to Altitude Arc Range to Altitude Arc Displaying removing the selected altitude intercept arc 1 Press the MENU Key with the Navigation Map Page displayed The cursor flashes on the Map Setup option 2 Press the ENT Key The Map Setup Menu is displayed 3 Select the Map group 4 Press the ENT Key 5 Highlight the SEL ALT ...

Page 214: ...w section for detailed instructions on entering data in the G1000 As a waypoint identifier facility name or location is entered the G1000 s Spell N Find feature scrolls through the database displaying those waypoints matching the characters which have been entered to that point A direct to navigation leg to the selected waypoint can be initiated by pressing the Direct to Key on any of the waypoint...

Page 215: ...ment procedures that may be involved in the flight plan See the Audio Panel and CNS Section for more information on loading frequencies auto tuning After engine startup the Airport Information Page defaults to the airport where the aircraft is located After a flight plan has been loaded it defaults to the destination airport On a flight plan with multiple airports it defaults to the airport which ...

Page 216: ...Elev Fuel Available Time Zone UTC Offset COM NAV Freq Info Identification Frequency Availability Additional Information Softkeys The following descriptions and abbreviations are used on the Airport Information Page Usage type Public Military Private or Heliport Runway surface type Hard Turf Sealed Gravel Dirt Soft Unknown or Water Runway lighting type No Lights Part Time Full Time Unknown or PCL F...

Page 217: ...tructions Surface Phones Phone Fax Numbers Weather Service Type Frequency Phone Number Obstructions General Airport Obstructions Hours Facility Hours Light Hours Tower Hours Beacon Hours Flight Service Station FSS FSS Name Phone Numbers Special Operations at Airport Location Sectional Magnetic Variation Instrument Approaches Published Approach Frequency Services Available Category Specific Service...

Page 218: ...s Box uses the descriptions and abbreviations listed in the following table Communication Frequencies Navigation Frequencies Approach Arrival ASOS ATIS AWOS Center Class B Class C Clearance Control CTA Departure Gate Ground Helicopter Multicom Other Pre Taxi Radar Ramp Terminal TMA Tower TRSA Unicom ILS LOC May include Additional Information Table 5 5 Airport Frequency Abbreviations A departure ar...

Page 219: ... Region Airport Information Lat Long Airport Information ID Type City Facility The Nearest Airports Page on the MFD is first in the group of NRST pages because of its potential use in the event of an in flight emergency In addition to displaying a map of the currently selected airport and surrounding area the page displays nearest airport information in five boxes labeled NEAREST AIRPORTS INFORMAT...

Page 220: ...r on BACK or press the CLR Key The cursor is now on the next airport in the nearest airports list Repeatedly pressing the ENT Key moves through the airport list alternating between the Nearest Airports Window and the Airport Information Window 4 Press the CLR Key or the NRST Softkey to close the PFD Nearest Airports Window Viewing information for a nearest airport on the MFD 1 Turn the large FMS K...

Page 221: ... displayed Default settings are 0 feet or meters for runway length and HARD SOFT for runway surface type Selecting nearest airport surface matching criteria 1 Use the FMS Knob to select the System Setup Page 2 Press the FMS Knob momentarily to activate the flashing cursor 3 Turn the large FMS Knob to highlight the runway surface field in the Nearest Airports Box 4 Turn the small FMS Knob to select...

Page 222: ...s labeled INTERSECTION INFORMATION and NEAREST VOR Figure 5 39 Intersection Information Page Selected Intersection Navigation Map Showing Selected Intersection Intersection Identifier Nearest VOR Info Identifier Type symbol Radial to VOR Distance to VOR Intersection Info Region Lat Long Selecting an intersection 1 With the Intersection Information Page displayed enter an identifier in the Intersec...

Page 223: ...d intersection is indicated by a white arrow Up to seventeen intersections are visible at a time If there are more than can be shown the list can be scrolled If there are no items for display text indicating that fact is displayed NOTE The list only includes waypoints that are within 200 nm Figure 5 40 Nearest Intersections Page Nearest Intersection Navigation Map Showing Nearest Intersection Inte...

Page 224: ...port NDB Information Type Region Lat Long NDB Frequency NOTE Locator Outer Marker LOM Locator Middle Marker LMM a low power low or medium frequency radio beacon installed in conjunction with the instrument landing system When LOM is used the locator is at the Outer Marker when LMM is used the locator is at the Middle Marker Selecting an NDB 1 With the NDB Information Page displayed enter an identi...

Page 225: ...tifier indicates the selected NDB Up to sixteen NDBs are visible at a time If there are more than can be shown each list can be scrolled The list only includes waypoints that are within 200nm If there are no NDBs in the list text indicating that there are no nearest NDBs is displayed If there are no nearest NDBs in the list the information and frequency fields are dashed Figure 5 42 Nearest NDB Pa...

Page 226: ...led VOR INFORMATION FREQUENCY and NEAREST AIRPORT Figure 5 43 VOR Information Page Selected VOR Navigation Map Showing Selected VOR VOR Identifier Type Facility Name Nearest City Nearest Airport Info Identifier Type symbol Bearing Distance to Airport VOR Information Class Magnetic Variation Region Lat Long VOR Frequency The VOR classes used in the VOR information box are LOW ALTITUDE HIGH ALTITUDE...

Page 227: ...rrounding area the Nearest VOR Page displays information for up to 25 nearest VOR stations in three boxes labeled NEAREST VOR INFORMATION and FREQUENCY The list only includes waypoints that are within 200 nm A white arrow before the VOR identifier indicates the selected VOR Up to sixteen VORs are visible at a time If there are more than can be shown each list can be scrolled If there are no VORs i...

Page 228: ...ser Waypoint Information Page Selected User Waypoint Navigation Map Showing Selected User Waypoint User Waypoint Info Identifier Temporary Normal Waypoint Type User Waypoint List Identifier Comment Reference Wpt Info Identifier Rad Dist or Identifiers Radials or Region Lat Long Softkeys User Wpt Comment User Wpts Used Displayed if User Wpt was created on map page Selecting a User Waypoint 1 With t...

Page 229: ... User Waypoint 2 Enter a user waypoint name up to six characters 3 Press the ENT Key The current aircraft position is the default location of the new waypoint 4 If desired define the type and location of the waypoint in one of the following ways a Select RAD RAD using the small FMS Knob press the ENT Key and enter the two reference waypoint identifiers and radials into the REFERENCE WAYPOINTS wind...

Page 230: ...ing ways a Select RAD RAD using the small FMS Knob press the ENT Key and enter the two reference waypoint identifiers and radials into the REFERENCE WAYPOINTS window using the FMS Knobs Or b Select RAD DIS using the small FMS Knob press the ENT Key and enter the reference waypoint identifier the radial and the distance into the REFERENCE WAYPOINTS window using the FMS Knobs Or c Select LAT LON usi...

Page 231: ...Key and enter the two reference waypoint identifiers and radials into the REFERENCE WAYPOINTS window using the FMS Knobs Or b Select RAD DIS using the small FMS Knob press the ENT Key and enter the reference waypoint identifier the radial and the distance into the REFERENCE WAYPOINTS window using the FMS Knobs Or c Select LAT LON using the small FMS Knob press the ENT Key and enter the latitude an...

Page 232: ...enerated comment for a user waypoint incorporates the reference waypoint identifier bearing and distance If a system generated comment has been edited a new comment can be generated Resetting the comment field to the system generated comment 1 Enter a waypoint name or select the waypoint in the User Waypoint List then press the ENT Key 2 Press the MENU Key 3 Select Auto Comment 4 Press the ENT Key...

Page 233: ...lashing cursor Or 1 Highlight a User Waypoint in the User Waypoint List or enter a waypoint in the User Waypoint field 2 Press the MENU Key 3 Select Delete User Waypoint 4 Press the ENT Key twice to confirm the selection 5 Press the FMS Knob to remove the flashing cursor NOTE The option to Delete All User Waypoints is not available while the aircraft is in flight Deleting all user waypoints 1 High...

Page 234: ...an display the following types of airspaces Class B TMA Class C TCA Class D Restricted MOA Military Other Airspace Air Defense Interdiction Zone ADIZ and Temporary Flight Restriction TFR Figure 5 48 Airspaces MOA Military Class D Airspace Class B Airspace Restricted Area Class C Airspace Alert Area ADIZ Warning Area TFR ...

Page 235: ...irspace an alert message is not generated but if the aircraft is less than 500 feet above below an airspace and projected to enter it the pilot is notified with an alert message The default setting for the altitude buffer is 200 feet Changing the altitude buffer distance setting 1 Use the FMS Knob to select the AUX System Setup Page 2 Press the FMS Knob momentarily to activate the flashing cursor ...

Page 236: ...rspace Alerts DFLTS Softkey Airspace Alerts Box Airspace Altitude Buffer Alert On Off Default Settings Shown Map ranges for the airspace boundaries are selected from the Aviation Group in the Map Setup Menu See Table 5 2 for the default and maximum ranges for each type of airspace and the symbol used to define the airspace area ...

Page 237: ...nly if Ahead or Ahead 2nm Airspace Vertical Limits Ceiling Floor Airspace Agency Info Airspace Type Controlling Agency Softkeys Airspace 1 Associated Frequencies Type Availability Info Frequency Airspace 2 Airspace 3 Airspace alerts and associated frequencies are shown in scrollable lists on the Nearest Airspaces Page The ALERTS and FREQ softkeys place the cursor in the respective list The FREQ So...

Page 238: ... ARSPC Inside airspace The aircraft is inside the special use airspace ARSPC AHEAD Airspace ahead less than 10 minutes Special use airspace is ahead of aircraft The aircraft penetrates the airspace within 10 minutes ARSPC NEAR Airspace near and ahead Special use airspace is near and ahead of the aircraft position ARSPC NEAR Airspace near less than 2 nm Special use airspace is within 2 nm of the ai...

Page 239: ...th a new direct to or flight plan or cancelled A vertical navigation VNV direct to creates a descent path and provides guidance to stay on the path from the current altitude to a selected altitude at the direct to waypoint Vertical navigation is based on barometric altitudes not on GPS altitude and is used for cruise and descent phases of flight The Direct to Window allows selection and activation...

Page 240: ...e or city field and turn the small FMS Knob to begin entering a facility name or city If duplicate entries exist for the entered facility or city name additional entries can be viewed by turning the small FMS Knob during the selection process 3 Press the ENT Key The Activate field is highlighted 4 Press the ENT Key to activate the direct to Any waypoint contained in the active flight plan can be s...

Page 241: ...he small FMS Knob clockwise to display the NRST RECENT USER or AIRWAY waypoints 4 Turn the large FMS Knob clockwise to select the desired waypoint 5 Press the ENT Key The cursor is now displayed on ACTIVATE 6 Press the ENT Key again to activate the direct to The Direct to Window can be displayed from any page and allows selection and activation of direct to navigation If the direct to is initiated...

Page 242: ...ck to display the pointer 2 Move the Joystick to place the pointer at the desired destination location 3 If the pointer is placed on an existing airport NAVAID or user waypoint the waypoint name is highlighted 4 Press the Direct to Key to display the Direct to Window with the selected point entered as the direct to destination 5 Press the ENT Key The cursor is now displayed on ACTIVATE 6 Press the...

Page 243: ...provides guidance to stay on the path from the aircraft s current altitude to the altitude of the direct to waypoint The altitude is reached at the waypoint or at the specified distance along the flight path if an offset distance has been entered All VNV altitudes prior to the direct to destination are removed from the active flight plan upon successful activation of the direct to All VNV altitude...

Page 244: ...EMENT Removing a VNV altitude constraint 1 Press the Direct to Key to display the Direct to Window 2 Press the MENU Key 3 With Clear Vertical Constraints highlighted press the ENT Key Figure 5 55 Direct to Window Clearing Vertical Constraints Page Menu Clear Vertical Navigation Constraints ...

Page 245: ... off and overwritten when another flight plan is activated When storing flight plans with an approach departure or arrival the G1000 uses the waypoint information from the current database to define the waypoints If the database is changed or updated the G1000 automatically updates the information if the procedure has not been modified If an approach departure or arrival procedure is no longer ava...

Page 246: ...being used Loading the new airway sequence would exceed the capacity of the flight plan FLIGHT PLAN CREATION There are three methods to create or modify a flight plan Active Flight Plan Page on the MFD create modify the active flight plan Active Flight Plan Window on the PFD create modify the active flight plan Flight Plan Catalog Page on the MFD create modify a stored flight plan Figure 5 56 Acti...

Page 247: ...FD Active Flight Plan Leg Active Flight Plan Waypoint List Waypoint ID Desired Track to Waypoint Distance to Waypoint Airway Identifier Figure 5 58 Flight Plan Catalog Page Flight Plan List Comment Selected FPL Info Departure Waypoint Destination Waypoint Total Flight Plan Distance Enroute Safe Altitude Catalog Contents Used Empty Softkeys Selected Flight Plan Map ...

Page 248: ...ress the ENT Key The active flight plan is modified as each waypoint is entered 5 Repeat step numbers 3 and 4 to enter each additional flight plan waypoint 6 When all waypoints have been entered press the FMS Knob to remove the cursor Creating a stored flight plan 1 Press the FPL Key 2 Turn the small FMS Knob clockwise to display the Flight Plan Catalog Page 3 Select the NEW Softkey or press the M...

Page 249: ...ht Plan and press the ENT Key If an empty slot is selected a list of the available flight plans on the SD card will be displayed Or If an existing flight plan is selected an Overwrite existing flight plan OK or CANCEL prompt is displayed Press the ENT Key to choose to overwrite the selected flight plan and see the list of available flight plans on the SD card If overwriting the existing flight pla...

Page 250: ... Active Flight Plan Page on the MFD 3 Turn the small FMS Knob to select the Flight Plan Catalog Page 4 Press the FMS Knob to activate the cursor 5 Turn the large FMS Knob to highlight the flight plan to be exported 6 Press the EXPORT Softkey or press the MENU Key select Export Flight Plan 7 If desired change the name for the exported file by turning the large FMS Knob to the left to highlight the ...

Page 251: ... are limited to 99 waypoints including waypoints within airways and procedures If the number of waypoints in the flight plan exceeds 99 the message Flight plan is full Remove unnecessary waypoints appears and the new waypoint s are not added to the flight plan Figure 5 61 Stored Flight Plan Page Stored Flight Plan Selected Memory Slot Comment Procedure Identifier Waypoint Identifier Airway Identif...

Page 252: ...ation Window turning it counter clockwise displays the Waypoint Information Window with a waypoint selection submenu allowing selection of active flight plan nearest recent user or airway waypoints 6 Enter the identifier facility or city name of the waypoint or select a waypoint from the submenu of waypoints and press the ENT Key The new waypoint now exists in the flight plan NOTE If the identifie...

Page 253: ... desired user waypoint 2 Select the LD WPT Softkey or press the MENU Key select Load Waypoint and press the ENT Key The user waypoint is created with a name of USRxxx using the next available in sequence and is added to the end of the active flight plan ADDING AIRWAYS TO A FLIGHT PLAN Airways can be added to the active flight plan or any stored flight plan Choose a flight plan add the desired airw...

Page 254: ...ed The LD AIRWY Softkey or the Load Airway menu item is available only when a valid airway entry waypoint has been chosen the waypoint ahead of the cursor position 5 Turn the FMS Knob to select the desired airway from the list and press the ENT Key Low altitude airways are shown first in the list followed by all altitude airways and then high altitude airways 6 Turn the FMS Knob to select the desi...

Page 255: ...L Airway UR975 in North Africa has more complicated directional restrictions within the list of airway waypoints AMANO VAKOR LIBRO NELDA DIRKA GZO KOSET and SARKI Starting from AMANO the airway can be flown only to LIBRO Starting from SARKI the airway can be flown only to LIBRO Between NELDA and GZO the airway can be flown in either direction In the US airways that are one way for specified hours ...

Page 256: ...dures from the navigation database into a flight plan The procedures are designed to facilitate routing of traffic leaving an airport departure arriving at an airport arrival and landing at an airport approach See the procedures section for more details Figure 5 67 Stored Flight Plan Page Flight Plan Name Flight Plan Waypoint List Softkeys Load Departure Load Arrival Load Approach Activate Flight ...

Page 257: ...nt Sequence Preview of Selected Departure Loading a departure procedure into a stored flight plan 1 Select a stored flight plan from the Flight Plan Catalog Page 2 Select the EDIT Softkey or press the MENU Key select Edit Flight Plan and press the ENT Key The Stored Flight Plan Page is displayed 3 Select the LD DP Softkey or press the MENU Key select Load Departure and press the ENT Key The Depart...

Page 258: ... Airport Selected Departure Departure Transition Points Available Selected Runway Selected Departure End Point Preview of Selected Departure Selected Transition Figure 5 70 Stored Flight Plan Page Departure Inserted Inserted Departure Header Departure Identifier departure airport departure runway departure transition departure end point e g KMKC ALL WLDCT2 SLN ...

Page 259: ...Sequence Preview of Selected Arrival Selected Runway Loading an arrival procedure into a stored flight plan 1 Select a stored flight plan from the Flight Plan Catalog Page 2 Select the EDIT Softkey or press the MENU Key select Edit Flight Plan and press the ENT Key The Stored Flight Plan Page is displayed 3 Select the LD STAR Softkey or press the MENU Key select Load Arrival and press the ENT Key ...

Page 260: ...g the Transition Destination Airport Selected Arrival Transitions Available with DBRY1 Arrival Waypoint Sequence Preview of Selected Arrival Selected Transition Figure 5 73 Stored Flight Plan Page Arrival Inserted Inserted Arrival Header Arrival Identifier arrival airport arrival transition arrival arrival runway e g KCOS TBE DBRY1 ALL ...

Page 261: ...t plan 1 Select a stored flight plan from the Flight Plan Catalog Page 2 Press the EDIT Softkey or press the MENU Key select Edit Flight Plan and press the ENT Key The Stored Flight Plan Page is displayed 3 Press the LD APR Softkey or press the MENU Key select Load Approach and press the ENT Key The Approach Loading Page is displayed 4 Select the airport and approach a Use the FMS Knob to select a...

Page 262: ...ch procedure Figure 5 75 Approach Loading Page Selecting the Transition Destination Airport Selected Approach Transitions Available with Selected Approach Approach Waypoint Sequence Preview of Selected Approach Load Approach Selected Transition Figure 5 76 Stored Flight Plan Page Approach Inserted Inserted Approach Header Approach Identifier approach airport runway and approach type e g KCOS RNAV ...

Page 263: ...t plan 4 The Flight Plan Information is displayed showing departure destination total distance and enroute safe altitude information for the selected Flight Plan 5 Select the EDIT Softkey to open the Stored Flight Plan Page and view the waypoints in the flight plan 6 Press the FMS Knob to exit the Stored Flight Plan Page Figure 5 77 Stored Flight Plan Information Preview of Selected Flight Plan St...

Page 264: ...MS Knob to display the Flight Plan Catalog Page 2 Press the FMS Knob to activate the cursor and turn the FMS Knob to highlight the desired flight plan 3 Select the INVERT Softkey or press the MENU Key highlight Invert Activate FPL and press the ENT Key The Invert and activate stored flight plan window is displayed 4 With OK highlighted press the ENT Key To cancel the request press the CLR Key or h...

Page 265: ... Key and turn the small FMS Knob to display the Flight Plan Catalog Page 2 Press the MENU Key 3 Highlight Delete All and press the ENT Key A Delete all flight plans confirmation window is displayed 4 With OK highlighted press the ENT Key to delete all flight plans To cancel the request press the CLR Key or highlight CANCEL and press the ENT Key FLIGHT PLAN EDITING The active flight plan or any sto...

Page 266: ...the cursor not required on the PFD and turn the large FMS Knob to highlight the white header of the airway to be deleted 3 Press the CLR Key The Remove airway name window is displayed 4 With OK highlighted press the ENT Key To cancel the request press the CLR Key or highlight CANCEL and press the ENT Key 5 Press the FMS Knob to remove the flashing cursor Deleting an entire procedure from the activ...

Page 267: ...MS Knob to highlight the flight plan to be edited 4 Select the EDIT Softkey or press the MENU Key select Edit Flight Plan and press the ENT Key The Stored Flight Plan Page is displayed 5 Turn the large FMS Knob to highlight the white header of the airway to be deleted 6 Press the CLR Key The Remove airway name window is displayed 7 With OK highlighted press the ENT Key To cancel the request press ...

Page 268: ...PL Key to display the Active Flight Plan Page 2 Press the FMS Knob to activate the cursor and turn the large FMS Knob to highlight the comment field 3 Use the FMS Knobs to edit the comment 4 Press the ENT Key to accept the changes 5 Press the FMS Knob to remove the flashing cursor Changing a stored flight plan comment 1 Press the FPL Key to display the Active Flight Plan Page 2 Turn the small FMS ...

Page 269: ...set is not allowed at or after the final approach fix of an approach An along track offset distance cannot be modified once entered If the along track offset distance must be changed the existing along track offset waypoint must be deleted and a new one created with the new offset distance Figure 5 78 Along Track Offset Along Track Offset Waypoint and Distance Along Track Offset Waypoint and Dista...

Page 270: ...ult of the course change NOTE Vertical navigation is unavailable while the Parallel Track feature is active Figure 5 79 Active Flight Plan Window Selecting Parallel Track Active Flight Plan prior to Parallel Track Selecting Parallel Track Activating parallel track 1 Press the FPL Key to display the Active Flight Plan Page MFD or the Active Flight Plan Window PFD 2 Press the MENU Key highlight Para...

Page 271: ... Track Original Track If the parallel track proposed by the offset direction and distance is not allowed by the system the activation prompt is displayed but disabled Parallel Track cannot be activated if a course is set using direct to or if the active leg is the first leg of the departure procedure Attempting to activate parallel track with these conditions results in the message Parallel Track ...

Page 272: ...he active leg is not a track between two fixes TF or a course to a fix DF leg the status indicates that the system is unable to activate the parallel track because parallel track is not available for the active leg type Figure 5 83 Cancelling Parallel Track Cancel Prompt Active Status Offset Direction Distance Subdued Unavailable Cancelling parallel track 1 Press the FPL Key to display the Active ...

Page 273: ...activate the cursor not required on the PFD and turn the large FMS Knob to highlight the destination waypoint for the desired leg 3 Select the ACT LEG Softkey MFD only or press the MENU Key highlight Activate Leg and press the ENT Key A confirmation window is displayed with ACTIVATE highlighted 4 Press the ENT Key to activate the flight plan leg To cancel press the CLR Key or highlight CANCEL and ...

Page 274: ...t Active Flight Plan confirmation window is displayed 3 Select OK 4 Press the ENT Key to invert and activate the active flight plan To cancel press the CLR Key or highlight CANCEL and press the ENT Key Inverting and activating a stored flight plan 1 Press the FPL Key and turn the small FMS Knob to display the Flight Plan Catalog Page 2 Press the FMS Knob to activate the cursor and turn the FMS Kno...

Page 275: ...to display the Active Flight Plan Page 2 Select the VIEW Softkey to display the CUM and LEG LEG Softkeys 3 Select the CUM Softkey to view cumulative waypoint distance or select the LEG LEG Softkey to view leg to leg waypoint distance 4 Select the BACK Softkey to return to the top level active flight plan softkeys Figure 5 86 Active Flight Plan Leg to Leg vs Cumulative Distance WIDE Softkey NARROW ...

Page 276: ... computed values such as DIS or ETE shown for the exit waypoint reflect the total of all the legs on the airway that have been hidden in the collapsed display The DTK value is inhibited because it is not usable in this context The Active Flight Plan Page always keeps the following three waypoints visible From waypoint To waypoint and Next waypoint To prevent one or more of these waypoints from bei...

Page 277: ...elected reference waypoint and creates a user waypoint at this location The name for the new user waypoint is derived from the identifier of the reference waypoint USER DEFINED HOLDING PATTERNS A holding pattern can be defined at any active flight plan waypoint at the aircraft present position or at a direct to waypoint Creating a user defined hold at an active flight plan waypoint 1 Press the FPL...

Page 278: ...gure 5 89 Creating a User Defined Holding Pattern at an Active Flight Plan Waypoint Location of Hold Expect Further Clearance Time Leg Length Mode Button TIME or DIST Map of Hold Location Course Direction INBOUND or OUTBOUND Leg Length Time in nm or Distance in minutes Hold Entry Course Turn Direction RIGHT or LEFT Load Hold in Active Flight Plan ...

Page 279: ... FMS Knob to select INBOUND or OUTBOUND course direction and press the ENT Key 4 Use the small FMS Knob to select TIME or DIST length mode and press the ENT Key 5 Use the FMS Knobs to edit the length and press the ENT Key 6 Use the small FMS Knob to select RIGHT or LEFT turn direction and press the ENT Key 7 Use the FMS Knobs to edit the Expect Further Clearance Time EFC TIME and press the ENT Key...

Page 280: ...he cursor on the Cancel Direct To NAV selection 3 Press the ENT Key The holding pattern is removed Hold At Present Position Menu Selection Figure 5 90 Creating a User Defined Holding Pattern at the Aircraft Present Position Location of Hold Expect Further Clearance Time Leg Length Mode Button TIME or DIST Map of Hold Location Course Direction INBOUND or OUTBOUND Leg Length Time in nm or Distance i...

Page 281: ...tion Figure 5 91 Creating a User Defined Holding Pattern at a Direct To Waypoint Location of Hold Expect Further Clearance Time Course Direction INBOUND or OUTBOUND Leg Length Time in nm or Distance in minutes Turn Direction RIGHT or LEFT Load Hold and Activate Direct To Map of Hold Location Hold Entry Course Leg Length Mode Button TIME or DIST ...

Page 282: ... desired path is defined by a line joining two waypoints with specified altitudes or as a vertical angle from a specified waypoint altitude The vertical waypoints are integrated into the active flight plan Both manual and autopilot coupled guidance are supported Figure 5 92 Enabling Disabling Vertical Navigation Current Vertical Navigation Profile Disabled fields dashed ENBL VNV Softkey CNCL VNV S...

Page 283: ...navigation direct to to any waypoint in the active flight plan with an altitude constraint designated for vertical guidance Selecting the VNV Direct to Softkey on the Active Flight Plan Page allows the flight plan to be flown while vertical guidance based on the altitude constraint at the VNV direct to waypoint is provided The altitude change begins immediately and is spread along the flight plan ...

Page 284: ... box Modifying the VS TGT and FPA 1 Press the FPL Key to display the Active Flight Plan Page on the MFD 2 Select the VNV PROF Softkey or press the MENU Key highlight Select VNV Profile Window and press the ENT Key The cursor is now located in the CURRENT VNV PROFILE box 3 Turn the FMS Knobs as needed to edit the values 4 Press the FMS Knob to remove the flashing cursor ALTITUDE CONSTRAINTS The G10...

Page 285: ...d as white text up to but not including the FAF The FAF is always a reference only altitude and cannot be designated unless the selected approach does not provide vertical guidance In this case the FAF altitude can be designated Altitudes that have been designated for use in vertical guidance can be un designated using the CLR Key The altitude is now displayed only as a reference It is not used to...

Page 286: ...de constraint if the selected waypoint is an airport an additional choice is displayed Turn the small FMS Knob to choose MSL or AGL and press the ENT Key to accept the altitude Altitude constraints can be modified or deleted after having been added to the flight plan In the event an altitude constraint is deleted and the navigation database contains an altitude restriction for the lateral waypoint...

Page 287: ...n window is displayed 4 Select REVERT and press the ENT Key The altitude is changed to the navigation database value 5 Press the FMS Knob to remove the flashing cursor Modifying a system calculated altitude constraint 1 Press the FPL Key to display the Active Flight Plan Page on the MFD 2 Press the FMS Knob and turn to highlight the desired waypoint altitude constraint 3 Press the CLR Key An Edit ...

Page 288: ... flight plan but keeps the procedure available on the Active Flight Plan Page for quick activation when needed Activating also adds the procedure to the end of the flight plan but immediately begins to provide guidance to the first waypoint in the approach DEPARTURES A Departure Procedure DP is loaded at the departure airport in the flight plan Only one departure can be loaded at a time in a fligh...

Page 289: ...50 900 275 FLIGHT MANAGEMENT Figure 5 95 Departure Selection Departure Airport Departure Preview Available Procedure Actions Departure Choices Loaded Procedures Procedure Loading Page Selection Softkeys Figure 5 96 Departure Loading Loaded Departure Selected Departure ...

Page 290: ...tions Press the ENT Key to select the transition The cursor moves to the Sequence box The departure is previewed on the map 7 Select the INFO x Softkey to return to the Airport Information Page REMOVING A DEPARTURE FROM THE ACTIVE FLIGHT PLAN When plans change while flying IFR departures can be easily removed from the Active Flight Plan Removing a departure procedure from the active flight plan 1 ...

Page 291: ... AN ARRIVAL INTO THE ACTIVE FLIGHT PLAN Loading an arrival into the active flight plan using the PROC Key 1 Press the PROC Key The Procedures Window is displayed 2 Highlight SELECT ARRIVAL 3 Press the ENT Key The Arrival Loading Page is displayed 4 Use the FMS Knob to select an airport and press the ENT Key 5 Select an arrival from the list and press the ENT Key 6 Select a transition if required a...

Page 292: ...he available arrivals Press the ENT Key to select the arrival The cursor moves to the Transition box The arrival is previewed on the map 5 Turn the small FMS Knob to view the available transitions Press the ENT Key to select the transition The cursor moves to the Runway box The arrival is previewed on the map 6 Turn the small FMS Knob to view the available runways Press the ENT Key to select the r...

Page 293: ...Whenever an approach is selected the choice to either load or activate is given Loading adds the approach to the end of the flight plan without immediately using it for navigation guidance This allows continued navigation via the intermediate waypoints in the original flight plan but keeps the procedure available on the Active Flight Plan Page for quick activation when needed Activating also adds ...

Page 294: ...PROC Key The Procedures Window is displayed 2 Highlight SELECT APPROACH and press the ENT Key The Approach Loading Page is displayed 3 Select the airport and approach a Use the FMS Knob to select an airport and press the ENT Key b Select an approach from the list and press the ENT Key Or a If necessary push the FMS Knob to exit the approach list and use the large FMS Knob to move the cursor to the...

Page 295: ...isplayed GPS provides guidance to the approach but the HSI must to be switched to a NAV receiver to fly the final course of the approach Figure 5 99 Approach Selection Destination Airport Approach Preview Available Procedure Actions Approach Choices Loaded Procedures Figure 5 100 Approach Loading Loaded Approach Selected Approach LOAD or ACTIVATE Annunciation Procedure Loading Page Selection Softk...

Page 296: ... moves to the temperature field Use the small FMS Knob to select the temperature Press the ENT Key The cursor moves to the Sequence box The approach is previewed on the map Or a When minimums are selected off the cursor moves to the Sequence box The approach is previewed on the map 7 Press the INFO 1 or the INFO 2 Softkey to return to the Airport Information Page Loading an approach into the activ...

Page 297: ...indow 2 Highlight ACTIVATE VECTOR TO FINAL and press the ENT Key Loading and activating an approach using the MENU Key 1 From the Approach Loading Page press the MENU Key The page menu is displayed with Load Activate Approach highlighted 2 Press the ENT Key When GPS is not approved for the selected final approach course the message NOT APPROVED FOR GPS is displayed GPS provides guidance to the app...

Page 298: ... compensated altitude 1 From the Active Flight Plan Page press the MENU Key The Page Menu is displayed 2 Turn the FMS Knob to highlight Temperature Compensation 3 Press the ENT Key The TEMPERATURE COMPENSATION Window is displayed 4 Use the small FMS Knob to select the temperature at the airport The compensated altitude is computed as the temperature is selected NOTE The temperature at the destinat...

Page 299: ...de ACTIVATE COMPENSATION Highlighted Figure 5 102 Activating Cancelling Temperature Compensation CANCEL COMPENSATION Highlighted Compensated Altitudes Figure 5 103 Temperature Compensation in the Active Flight Plan Uncompensated Altitudes Cancelling temperature compensated altitude 1 From the Active Flight Plan Page press the MENU Key The Page Menu is displayed 2 Turn the FMS Knob to highlight Tem...

Page 300: ... altitude is provided by Jeppesen and may be below equal to or above the published minimums for this approach In this case if the aircraft altitude is below the specified altitude 6 368 feet after crossing the MAP a direct to is established to provide a course on runway heading until an altitude of 6 368 feet is reached After reaching 6 368 feet a direct to is established to the published MAHP in ...

Page 301: ... Total Air Temperature Softkeys Automatic Manual Page Mode Flight Plan Waypoint Mode Preview of Selected Flight Plan Flight Plan Leg Trip Planning Page Mode Automatic Manual Selected Flight Plan Segment FPL Number Cumulative Legs CUM or REM or Leg Number NN Waypoints Defining Selected Flight Plan Flight Plan Leg Fuel Statistics Efficiency Total Endurance Remaining Fuel Remaining Endurance Fuel Req...

Page 302: ...of the active flight plan has already been flown Desired Track DTK DTK is shown as nnn and is the desired track between the selected waypoints It is dashed unless only a single leg is selected Distance DIS The distance is shown in tenths of units up to 99 9 and in whole units up to 9999 Estimated time enroute ETE ETE is shown as hours minutes until less than an hour then it is shown as minutes sec...

Page 303: ...ed time enroute to the end of the selected leg Fuel required for trip FUEL REQ This value is calculated by multiplying the time to go by the fuel flow Total range at entered fuel flow TOTAL RANGE This value is calculated by multiplying the time of fuel endurance by the ground speed OTHER STATISTICS These statistics are calculated based on the system sensor inputs or the manual trip planning inputs...

Page 304: ...tkey or press the MENU Key highlight Waypoints Mode and press the ENT Key The cursor is positioned in the waypoint field directly below the FPL field 2 Turn the FMS knobs to select the desired waypoint or select from the Page Menu SetWPT to Present Position if that is what is desired and press the ENT Key The cursor moves to the second waypoint field 3 Turn the FMS knobs to select the desired wayp...

Page 305: ...ght Calculation Est Landing Weight Calculation Estimated Landing Fuel Calculation Fuel Reserve Entry Excess Fuel Calculation Empty Weight Softkey selects Basic Empty Weight Entering basic empty weight 1 Select the EMPTY WT Softkey or press the MENU Key highlight Set Basic Empty Weight and press the ENT Key to select the BASIC EMPTY WEIGHT field 2 Turn the small FMS Knob to enter the basic empty we...

Page 306: ...of passengers is calculated by multiplying the number of passengers by the average passenger weight Entering the cargo weight 1 Press the FMS Knob to activate the cursor and highlight the CARGO field 2 Turn the small FMS Knob to enter the cargo weight 3 Press the ENT Key to confirm the entry 4 Press the FMS Knob to remove the flashing cursor The ZERO FUEL WEIGHT is calculated by adding the basic e...

Page 307: ...not been entered the following fields display invalid values consisting of six dashes Estimated landing weight Estimated landing fuel weight Excess fuel weight WEIGHT CAUTION AND WARNING CONDITIONS If the zero fuel weight is greater than the maximum allowable zero fuel weight then the zero fuel weight is displayed in amber If the aircraft weight is greater than the maximum allowable takeoff weight...

Page 308: ...also indicates whether RAIM is available at a specified date and time RAIM computations predict satellite coverage within 15 min of the specified arrival date and time Because of the tighter protection limit on approaches there may be times when RAIM is not available RAIM prediction must be initiated manually if there is concern over SBAS coverage at the destination or some other reason that compr...

Page 309: ...ss the ENT Key 6 Turn the FMS Knobs to enter an arrival date and press the ENT Key 7 Press the ENT Key with COMPUTE RAIM highlighted to begin the computation Predicting RAIM availability at the aircraft present position 1 Select the AUX GPS Status Page 2 Press the FMS Knob The RAIM Prediction WAYPOINT field is highlighted 3 Press the MENU Key highlight Set WPT to Present Position and press the ENT...

Page 310: ...System SBAS provides increased navigation accuracy when available SBAS can be enabled or disabled manually on the GPS Status Page Figure 5 110 SBAS Display Active SBAS Softkey displays SBAS Selection SBAS SELECTION Box EGNOS Enable Disable MSAS Enable Disable WAAS Enable Disable RAIM Softkey displays RAIM PREDICTION SBAS Status ...

Page 311: ...AS softkey 3 Press the FMS Knob and turn the large FMS Knob to highlight EGNOS MSAS or WAAS 4 Press the ENT Key to disable SBAS Press the ENT Key again to enable SBAS Figure 5 111 SBAS Display Disabled SBAS Softkey displays SBAS Selection SBAS SELECTION Box EGNOS Enable Disable MSAS Enable Disable WAAS Enable Disable RAIM Softkey displays RAIM PREDICTION SBAS Status ...

Page 312: ...om KMKC to KCOS filed using the TIFTO2 departure various Victor Airways and the DBRY1 arrival with the transition at TBE The flight plan includes an enroute altitude of 12 000 feet an LPV WAAS approach selected for runway 35R and a missed approach executed at the Missed Approach Point MAP A few enroute changes are demonstrated 1 Prior to departure the TIFTO2 departure the airways and the DBRY1 arr...

Page 313: ...299 FLIGHT MANAGEMENT 3 ATC now assigns routing to joinV4 A heading of 290º is assigned to interceptV4 The aircraft turns to heading 290 as seen in Figure 5 113 Figure 5 113 Assigned Heading of 290º 4 Enter V4 into the flight plan a Press the FMS Knob to activate the cursor ...

Page 314: ...sired flight plan insertion point SLN as shown in Figure 5 114 When the V4 entry point TOP is inserted it is placed immediately above the highlighted waypoint SLN Figure 5 114 Begin Adding V4 to the Flight Plan c Turn the small FMS Knob to display the Waypoint Information Window Enter the desired entry point for V4 Topeka VOR TOP as shown in Figure 5 115 Figure 5 115 Entering V4 Entry Point ...

Page 315: ...e Flight Plan e With SLN still highlighted as in Figure 5 116 turn the small FMS Knob clockwise The Waypoint Information Page is displayed and the LD AIRWY Softkey is now available f Select the LD AIRWY Softkey to display the list of available airways for TOP as seen in Figure 5 117 Figure 5 117 List of Available Airways for TOP g Turn either FMS Knob to highlight V4 in the list as seen in Figure ...

Page 316: ...displayed as in Figure 5 118 Figure 5 118 List of Available Exits for V4 i If necessary turn either FMS Knob to select the desired exit In this case Salina VOR SLN is selected as in Figure 5 118 j Press the ENT Key The selected airway and exit are displayed and the prompt LOAD highlighted as in Figure 5 119 Figure 5 119 Ready to Load V4 k Press the ENT Key ...

Page 317: ... the Flight Plan 5 Making V4 the active leg of the flight plan a Press the FMS Knob to activate the cursor b Turn the large FMS Knob to highlight ULNAZ The TO waypoint of the leg is selected in order to activate the leg c Select the ACT LEG Softkey The confirmation window is now displayed as in Figure 5 121 Note the TOP to ULNAZ leg is actually part of V4 Figure 5 121 Comfirm Active Leg ...

Page 318: ...n leg Note the phase of flight remained inTerminal TERM mode up to this point because a departure leg was active Since a leg after the departure is now active the current CDI flight phase is ENR Enroute and CDI scaling has changed to 2 0 nm Figure 5 122 V4 Now Active Leg 6 The aircraft continues on heading 290º When crosstrack distance is less than 2 0 nm the XTK disappears from the HSI and the CD...

Page 319: ... 7 As the CDI approaches center the aircraft turns onto the active leg as seen in Figure 5 123 Figure 5 123 Turn on to Active Leg 8 At SLN Victor Airway 244 V244 is intercepted Turn prompts are displayed in the PFD Navigation Status Box as seen in Figure 5 124 Figure 5 124 Turn to Intercept V244 ...

Page 320: ...Garmin G1000 Pilot s Guide for the Socata TBM 850 900 190 00709 05 Rev D 306 FLIGHT MANAGEMENT 9 As seen in Figure 5 125 V244 is now the active flight plan leg Figure 5 125 V244 Now Active Leg ...

Page 321: ...e 11 ATC grants clearance to proceed direct to the OPSHN intersection to begin the arrival procedure ATC advises to expect an altitude of 10 000 feet at OPSHN a Press the FMS Knob to activate the cursor b Turn the large FMS Knob to select OPSHN in the flight plan list c Press the Direct to Key The Direct to Window is now displayed as shown in Figure 5 127 Figure 5 127 Direct To OPSHN ...

Page 322: ... 000 feet is entered as requested by ATC f Press the ENT Key The cursor is now displayed in the VNV offset field as shown in Figure 5 129 Figure 5 129 Enter VNV Offset Distance g Enter the offset or distance from the waypoint at which to reach the pressed altitude In this case three miles prior to OPSHN is entered In other words the G1000 gives vertical guidance so the aircraft arrives at an altit...

Page 323: ...PSHN Note the Direct to waypoint is within the loaded arrival procedure therefore phase of flight scaling for the CDI changes to Terminal Mode and is annunciated by displaying TERM on the HSI NOTE If the loaded arrival procedure has waypoints with altitude constraints retrieved from the database to be used as is the altitude must be manually accepted by placing the cursor over the desired altitude...

Page 324: ... should be highlighted as shown in Figure 5 131 Figure 5 131 Procedures Window c Press the ENT Key A list of available approaches for the destination airport is displayed as in Figure 5 132 Figure 5 132 List of Available Approaches d Turn either FMS Knob to select the LPV approach for 35R as shown in Figure 5 132 ...

Page 325: ...e 5 133 Figure 5 133 List of Available Transitions f Turn either FMS Knob to select the desired transition In this case the Initial Approach Fix IAF at HABUK is used g Press the ENT Key h Barometric Minimums To set MINIMUMS turn the small FMS Knob to select BARO and press the ENT Key Turn the small FMS Knob to select the altitude and press the ENT Key Or To skip setting minimums press the ENT Key ...

Page 326: ...a TBM 850 900 190 00709 05 Rev D 312 FLIGHT MANAGEMENT Figure 5 134 Barometric Minimums Set i With LOAD highlighted again press the ENT Key The selected approach is added to the flight plan as seen in Figure 5 135 Figure 5 135 Loaded Approach ...

Page 327: ...to be used in computing vertical guidance a Press the FMS Knob to activate the cursor b Turn the large FMS Knob to place the cursor in the altitude field associated with the IAF at HABUK as in Figure 5 136 Figure 5 136 Designate HABUK Altitude Constraint c Press the ENT Key Note the altitude is now displayed as cyan text indicating that the value is now used in computing vertical guidance The G100...

Page 328: ...aypoints back to where the previous altitude value was entered for OPSHN Altitude constraint values associated with the Final Approach Fix FAF and waypoints beyond the FAF cannot be designated for vertical guidance These altitude values are always displayed as white text Vertical guidance from the FAF and on to the MissedApproach Point MAP is given using theWAAS GPS altitude source therefore the d...

Page 329: ...speed field VS TGT as shown in Figure 5 139 b At this point the descent vertical speed can be selected or the FPA can be selected Turn the large FMS Knob to select the desired selection field then turn the small FMS Knob to enter the desired value Note the information now displayed in the CURRENTVNV PROFILE box Also note the offset waypoint orange box and gray circle are now displayed on the map T...

Page 330: ...on Indicator VDI and the Required Vertical Speed Indicator RVSI are now displayed on the PFD as shown in Figure 5 141 When the aircraft is within one minute of the TOD it is annunciated as shown in Figure 5 141 and an aural alert Vertical track will be heard Figure 5 140 Approaching Top of Descent TOD Figure 5 141 VDI RVSI When Approaching Top of Descent TOD Required Vertical Speed Indicator RVSI ...

Page 331: ...Figure 5 142 Figure 5 142 VDI RVSI Showing Established Descent Align Actual Vertical Speed with Required Vertical Speed Keep Vertical Deviation Indicator Centered 17 When the aircraft is one minute from the bottom of descent BOD it is annunciated as shown in Figure 5 143 Upon reaching the offset waypoint for OPSHN the aircraft is at 10 000 feet Figure 5 143 Approaching Bottom of Descent BOD at OPS...

Page 332: ...oaching OPSHN The upcoming turn and next heading are annunciated at the top left of the PFD as seen in Figure 5 144 Initiate the turn and maneuver the aircraft on a track through the turn radius to intercept the magenta line for the OPSHN to FSHER leg and center the CDI Figure 5 144 Turn to intercept OPSHN to FSHER Leg ...

Page 333: ...re is now active Figure 5 145 Tracking the OPSHN to FSHER Leg 20 The flight continues through the arrival procedure to PYNON see Figure 5 146 At a point 31 nm from the destination airport the phase of flight scaling for the CDI changes to Terminal Mode and is annunciated by displaying TERM on the HSI A descent to HABUK is in the next leg Note the TOD point on the map Annunciations for the upcoming...

Page 334: ...Garmin G1000 Pilot s Guide for the Socata TBM 850 900 190 00709 05 Rev D 320 FLIGHT MANAGEMENT Figure 5 146 Approaching PYNON ...

Page 335: ...ogressed through the final waypoint of the arrival and the flight plan has automatically sequenced to the IAF as the active leg activating the approach procedure see Figure 5 147 Figure 5 147 Approach is Now Active Note To manually activate the approach procedure perform the following steps a Press the PROC Key b Turn the large FMS Knob to highlight ACTIVATE APPROACH as shown in Figure 5 148 c Pre...

Page 336: ...09 05 Rev D 322 FLIGHT MANAGEMENT 22 The IAF is the next waypoint At the TOD establish a descent vertical speed as previously discussed in Step 16 The aircraft altitude is 9 000 feet upon reaching HABUK Figure 5 149 Descending Turn to the Initial Approach Fix IAF ...

Page 337: ...dingly and is used much like a localizer when flying an ILS approach The RVSI is no longer displayed and the VDI changes to the Glidepath Indicator as shown in Figure 5 150 when the final approach course becomes active Figure 5 150 Descending to the FAF The descent continues through the FAF CEGIX using the Glidepath Indicator as one would use a glideslope indicator to obtain an altitude AT 7 800 f...

Page 338: ...proach In this case if the aircraft altitude is below the specified altitude 6 368 feet after crossing the MAP a direct to is established to provide a course on runway heading until an altitude of 6 368 feet is reached After reaching 6 368 feet a direct to is established to the published MAHP in this case MOGAL If the aircraft altitude is above the specified altitude after crossing the MAP a direc...

Page 339: ...cing is suspended past the MAP Press the SUSP Softkey on the PFD to resume automatic waypoint sequencing through the missed approach procedure A direct to is initiated to MOGAL which is the Missed Approach Hold Point MAHP as seen in Figure 5 152 The aircraft is climbing to 10 000 feet The CDI flight phase now changes from LPV to MAPR as seen on the HSI Figure 5 152 Missed Approach Active ...

Page 340: ...continues climbing to AT or ABOVE 10 000 feet at MOGAL A holding pattern is established at the MAHP MOGAL as shown in Figure 5 153 Figure 5 153 Establishing the Holding Pattern 27 The aircraft maintains 10 000 feet while following the magenta line through the hold as in Figure 5 154 Figure 5 154 Hold Established ...

Page 341: ...not be used for navigation DR Mode is inherently less accurate than the standard GPS SBAS Mode due to the lack of satellite measurements needed to determine a position Changes in wind speed and or wind direction compound the relative inaccuracy of DR Mode Because of this degraded accuracy other navigation equipment must be relied upon for position awareness until GPS derived position data is resto...

Page 342: ...igation Lost Message Dead Reckoning Annunciation Subdued Aircraft Symbol Nav Data Bar All data except Active Leg TAS and DTK are in yellow Dead Reckoning Annunciation Wind Data Wind Data Bearing Pointer Distance Current Track Indicator Deviation Bar NOTE The Inset Map is removed from the PFD any time aircraft pitch is greater than 30 or less than 20 or when a 65 bank angle is reached ...

Page 343: ...fic This section is divided into the following groups Weather GDL 69 69A SiriusXM Weather Optional GSR 56 Garmin Connext Weather Optional GWX Airborne Color Weather Radar Optional L 3 STORMSCOPE WX 500 Lightning Detection System Terrain Avoidance Terrain Proximity Terrain SVS Included with SVT Option Terrain Awareness and Warning System Class B TAWS B Optional Traffic TIS Traffic Information Servi...

Page 344: ...rvice packages visit www siriusxm com ACTIVATING SERVICES Before SiriusXM Weather can be used the service must be activated by providing SiriusXM s customer service the coded IDs unique to the installed GDL 69 69A The SiriusXM Weather service has a coded Data Radio ID The Data Radio ID must be provided to activate the weather service This ID is in the following locations The AUX XM Information Pag...

Page 345: ...rmation Page Data Radio ID for SiriusXM Weather Service Weather Products Available Products Indicated in Green Select INFO Softkey to Display XM Information Page Audio Radio ID for SiriusXM Satellite Radio Select LOCK Softkey to Lock Subscription Information USING SIRIUSXM WEATHER PRODUCTS The principal map page for viewing SiriusXM Weather data is the Weather Data Link XM Page in the Map Page Gro...

Page 346: ...iriusXM or Garmin Connext 1 If necessary turn the large FMS Knob to select the Map Page Group 2 If necessary turn the small FMS Knob to select the Weather Data Link XM or CNXT Page 3 Press the MENU Key Figure 6 3 4 If necessary turn the large FMS Knob to highlight Display XMWeather or Display ConnextWeather and press the ENT Key Weather Data Link Page title and softkeys change to correspond to sel...

Page 347: ...rvice If more than half of the expiration time has elapsed the color of the product age changes to yellow If data for a weather product is not available the system displays N A next to the weather product symbol instead of the product age Table 6 1 shows the weather product symbols the expiration times and the broadcast rates The broadcast rate represents the interval at which the SiriusXM Weather...

Page 348: ...t image 60 12 Terminal Aerodrome Reports TAFs no product image 60 12 Table 6 1 Weather Product Symbols and Data Timing This table shows which SiriusXM Weather products can be displayed indicated with a symbol on specific maps SiriusXM Weather Product PFD Inset Map Navigation Map Page Weather Data Link XM Page Weather Information Page AUX Trip Planning Page System Page Group Nearest Page Group Flig...

Page 349: ...ge TFRs TAFs Winds Aloft data on Navigation Map Page displayed inside Profile View when enabled Table 6 2 Weather Product Display Maps SiriusXM Weather WEATHER SOFTKEYS ON THE WEATHER DATA LINK XM PAGE Softkeys control the display of weather information on most MFD pages and the PFD Inset Map The figure shows the weather product softkeys for the Weather Data Link XM Page When a weather product is ...

Page 350: ...000 30000 24000 BACK LEGEND 21000 18000 PREV OFF NEXT 30000 33000 27000 BACK LEGEND 24000 36000 21000 PREV OFF NEXT 45000 BACK LEGEND 42000 39000 PREV OFF NEXT SYSTEM CPDLC Displaying SiriusXM Weather products on the PFD Inset Map 1 On the PFD press the INSET Softkey 2 If the PFD Inset Map is showing the traffic map press the TFRC 2 Softkey to display the navigation map 3 Press the desired weather...

Page 351: ...and press the ENT Key Figure 6 5 5 Turn the large FMS Knob or press the ENT Key to scroll through product selections 6 Turn the small FMS Knob to scroll through options for each product ON OFF range settings etc 7 Press the ENT Key to select an option 8 Press the FMS Knob or CLR Key to return to the Weather Data Link XM Page with the changed settings Figure 6 5 Weather Data Link XM Page Setup Menu...

Page 352: ... Pilot Weather Report PIREPs Pilot Weather Report PIREPs Temporary Flight Restriction TFR Temporary Flight Restriction TFR Table 6 3 Corresponding SiriusXM Weather and Garmin Connext Weather Products Maps other than the Weather Data Link XM Page use settings based on those selected for the Navigation Map Page Setting up and customizing weather data for the Navigation Map Page 1 Select the Navigati...

Page 353: ...y 3 To remove the weather product information box press the WX LGND Softkey again or deselect all active XM weather products on the PFD Inset Map Each active weather product has an associated legend which can be displayed on the Weather Data Link XM Page Viewing legends for displayed weather products on the Weather Data Link XM Page 1 Select the Weather Data Link XM Page with the FMS Knob 2 Select...

Page 354: ...SIGMETs AIRMETs METARs County Warnings TFRs The map panning feature is enabled by pressing the RANGE Knob The map range is adjusted by turning the RANGE Knob If the map range is adjusted while panning is enabled the map is re centered on the Map Pointer Figure 6 9 Panning on the Weather Data Link XM Page Additional Information on Weather Feature Selected with Map Pointer Flash Flood Warning Select...

Page 355: ...es Periodically the weather data provider compiles the available individual site images from the network to form a composite image and assigns a single time to indicate when it created the image This image becomes the NEXRAD weather product Individual images gathered from each NEXRAD site differ in age and are always older than the displayed NEXRAD weather product age The data provider then sends ...

Page 356: ...he individual radar sweeps The display of the information is color coded to indicate the weather severity level All weather product legends can be viewed on the Weather Data Link XM Page For the NEXRAD legend select the LEGEND Softkey when NEXRAD is selected for display No Radar Coverage Figure 6 11 NEXRAD Data with Legend The display of radar coverage is always active when either NEXRAD or Echo T...

Page 357: ...e of Z increases as the returned signal strength increases NEXRAD Limitations NEXRAD radar images may have certain limitations NEXRADbasereflectivitydoesnotprovidesufficientinformationtodeterminecloudlayersorprecipitation characteristics For example it is not possible to distinguish between wet snow wet hail and rain NEXRAD base reflectivity is sampled at the minimum antenna elevation angle An ind...

Page 358: ... points directly at the sun Interference from buildings or mountains which may cause shadows Metallic dust from military aircraft which can cause alterations in radar scans NEXRAD Limitations Canada Radar coverage extends to 55ºN Any precipitation displayed between 52ºN and 55ºN is displayed as mixed precipitation regardless of actual precipitation type Precipitation Above 52ºN Appears Mixed No Co...

Page 359: ...altitude airborne weather radar was able to detect precipitation particularly at longer ranges from the airborne weather radar antenna See section 6 3 for more information on airborne weather radar The Echo Tops weather product like all data link weather products does not provide real time information Figure 6 14 Echo Tops Weather Product Displaying Echo Tops information 1 Select the Weather Data ...

Page 360: ...Cloud Tops and Echo Tops cannot be displayed at the same time Cloud Tops data Figure 6 16 depicts cloud top altitudes as determined from satellite imagery Figure 6 16 Cloud Tops Data Displaying Cloud Tops information 1 Select the Weather Data Link XM Page with the FMS Knob 2 Select the CLD TOP Softkey To display the Cloud Tops legend select the LEGEND Softkey when Cloud Tops is selected for displa...

Page 361: ...Lightning weather product Figure 6 18 shows the approximate location of cloud to ground lightning strikes A strike icon represents a strike that has occurred within a two kilometer region The exact location of the lightning strike is not displayed Lightning Strikes Figure 6 18 Lightning Data SiriusXM Lightning information is available on the following maps PFD Inset Map Navigation Map Page Weather...

Page 362: ...display Figure 6 19 Lightning Legend CELL MOVEMENT The Cell Movement weather product Figure 6 20 shows the location and movement of storm cells as identified by the ground based system Cells are represented by yellow squares with direction of movement indicated with short orange arrows Figure 6 20 Cell Movement Data Storm Cells On most applicable maps Cell Movement data is selected for display alo...

Page 363: ...zing weather data for the Navigation Map Page To display the Cell Movement legend on the Weather Data Link XM Page select the LEGEND Softkey when Cell Movement is selected for display Figure 6 21 Cell Movement Legend SIGMETS AND AIRMETS SIGMETs SIGnificant METeorological Information and AIRMETs AIRmen s METeorological Information are broadcast for potentially hazardous weather A Convective SIGMET ...

Page 364: ...for METARs is given in hectopascals hPa except in the United States where it is reported in inches of mercury in Hg Temperatures are reported in Celsius NOTE METAR information is only displayed within the installed navigation database service area METARs METeorological Aerodrome Reports typically contain information about the temperature dewpoint wind precipitation cloud cover cloud heights visibi...

Page 365: ...ecoded version TAF information is displayed only in its original text form when it is available Displaying METAR and TAF text 1 On the Weather Data Link XM Page select the METAR Softkey 2 Select the RANGE Knob and pan to the desired airport 3 Press the ENT Key The Weather Information Page is shown with METAR and TAF text 4 Use the FMS Knob or the ENT Key to scroll through the METAR and TAF text ME...

Page 366: ...lan with an associated METAR Displaying raw METAR text on the Active Flight Plan Page 1 Select the Active Flight Plan Page on the MFD 2 Press the FMS Knob to activate the cursor 3 Turn the large FMS Knob to highlight a waypoint with an associated METAR The METAR text will appear in the SELECTED WAYPOINT WEATHER Window below 4 When finished press the FMS Knob to remove the cursor or press the FPL K...

Page 367: ...nformation Figure 6 27 is available for current and forecast weather conditions Forecasts are available for intervals of 12 24 36 and 48 hours Figure 6 27 Surface Analysis Data 12 Hour Displaying Surface Analysis and City Forecast information 1 Select the Weather Data Link XM Page with the FMS Knob 2 Select the MORE WX Softkey 3 Select the SFC Softkey 4 Select the forecast time CURRENT 12 HR 24 HR...

Page 368: ...50 900 190 00709 05 Rev D 354 HAZARD AVOIDANCE To display the Surface Analysis and City Forecast legend select the LEGEND Softkey when Surface Analysis and City Forecast are selected for display Figure 6 28 Surface Analysis and City Forecast Legend ...

Page 369: ...ude the data for that altitude has not been received or is out of date and has been removed from the display New data appears at the next update Figure 6 29 Freeze Level Data Displaying Freezing Level information 1 Select the Weather Data Link XM Page with the FMS Knob 2 Select the MORE WX Softkey 3 Select the FRZ LVL Softkey To display the Freezing Level legend Figure 6 30 select the LEGEND Softk...

Page 370: ...he FMS Knob 2 Select the MORE WX Softkey 3 Select the WIND Softkey 4 Select the desired altitude level SFC surface up to 42 000 feet Select the NEXT or PREV Softkey to cycle through the altitude softkeys The WIND Softkey label changes to reflect the altitude selected Figure 6 31 Winds Aloft at 24 000 Feet Figure 6 32 Winds Aloft Data with Legend Headwind and tailwind components aloft are available...

Page 371: ...e Profile View Path Enabled Arrows pointing to the left indicate headwind components tailwind component arrows point to the right as shown in Table 6 4 Headwind Symbol Tailwind Symbol Headwind Tailwind Component None None Less than 5 knots 5 knots 10 knots 50 knots Table 6 4 Profile View Headwind Tailwind Component Symbols Showing Hiding Profile View containing winds aloft data 1 Select the Naviga...

Page 372: ... Select the Navigation Map Page 2 Press the MENU Key 3 With Map Setup highlighted press the ENT Key Figure 6 34 4 Turn the small FMS Knob to select the Profile Group and press the ENT Key Figure 6 35 5 Turn the large FMS Knob to select Profile Winds Figure 6 36 6 Turn the small FMS Knob to select On or Off 7 Press the FMS Knob or CLR Key to return to the Navigation Map Page with the changed settin...

Page 373: ...nclude information on severe thunderstorms tornadoes and flood conditions Figure 6 38 County Warnings Severe Thunderstorm Warning Selected Displaying County Warning information 1 Select the Weather Data Link XM Page with the FMS Knob 2 Select the MORE WX Softkey 3 Select the COUNTY Softkey To display the County Warnings legend Figure 6 39 select the LEGEND Softkey when County Warnings are selected...

Page 374: ... a two digit date followed the estimated time of arrival in the form of DD HH MM Figure 6 40 Cyclone Weather Product on the Weather Data Link XM Page Cyclone Displaying cyclone hurricane track information 1 Select the Weather Data Link XM Page with the FMS Knob 2 Select the MORE WX Softkey 3 Select the CYCLONE Softkey To display the Cyclone legend Figure 6 41 select the LEGEND Softkey when Cyclone...

Page 375: ...latively large super cooled water droplets indicative of freezing drizzle and freezing rain aloft SLD threat areas are depicted as magenta dots over the CIP colors Displaying Icing data 1 Select the Weather Data Link XM Page 2 Select the MORE WX Softkey 3 Select the ICNG Softkey 4 Select the desired altitude level 1 000 feet up to 30 000 feet Select the NEXT or PREV Softkey to cycle through the al...

Page 376: ... supplement AIRMETs and SIGMETs Displaying Turbulence data 1 Select the Weather Data Link XM Page 2 Select the MORE WX Softkey 3 Select the TURB Softkey 4 Select the desired altitude level 21 000 feet up to 45 000 feet Select the NEXT or PREV Softkey to cycle through the altitude softkeys The TURB Softkey label changes to reflect the altitude selected Figure 6 44 Turbulence Data at 27 000 Feet Mod...

Page 377: ...Figure 6 46 AIREPs and PIREPs on the Weather Data Link XM Page Instructions for Viewing PIREP and AIREP Text Selected PIREP AIREP Urgent PIREP Displaying PIREP and AIREP text 1 Select the Weather Data Link XM Page 2 Select the MORE WX Softkey 3 Select the AIREPS or PIREPS Softkey 4 Press the RANGE Knob and pan to the desired weather report A gray circle will appear around the weather report when i...

Page 378: ...rary Flight Restrictions TFRs to designate areas where flight is restricted TFRs are issued to restrict flight for a variety of reasons including national security law enforcement fire suppression efforts natural disasters airshows and large sporting events TFRs may be issued at any time and TFR data displayed on the G1000 is only intended to supplement official TFR information obtained from Fligh...

Page 379: ... summary information above the map 3 Press the ENT Key The system displays a pop up menu 4 If necessary turn the FMS Knob to select Review Airspaces and press the ENT Key The system displays the TFR Information window 5 Press the FMS Knob or the CLR Key to remove the TFR Information window Figure 6 50 Full Text for Selected TFR The setup menus for the Navigation Map Page control the map range sett...

Page 380: ...ighlighted press the ENT Key Figure 6 51 4 Turn the small FMS Knob to select the Aviation Group and press the ENT Key Figure 6 52 5 Turn the large FMS Knob to scroll to the TFR product range setting Figure 6 53 6 Turn the small FMS Knob to scroll through options Off range settings 7 Press the ENT Key to select an option 8 Press the FMS Knob or CLR Key to return to the Navigation Map Page with the ...

Page 381: ...vated Perform a quick check of the circuit breakers to ensure that power is applied to the Data Link Receiver For troubleshooting purposes check the LRU Information Box on the AUX System Status Page for Data Link Receiver GDL 69 69A status serial number and software version number If a failure has been detected in the GDL 69 69A the status is marked with a red X Selecting the System Status Page 1 ...

Page 382: ...eceiver NO SIGNAL Weather Data Link XM Page center of page Loss of signal signal strength too low for receiver WEATHER DATA LINK FAILED Weather Data Link XM Page center of page No communication from Data Link Receiver within last 5 minutes ACTIVATION REQUIRED Weather Data Link XM Page center of page SiriusXM subscription is not activated DETECTING ACTIVATION Weather Data Link XM Page center of pag...

Page 383: ...de shows all Garmin Connext weather products regardless of product availability in a specific area or subscription package The optional GSR 56 Iridium satellite transceiver provides Garmin Connext Weather reception capabilities to the system Graphical weather information and its associated text are displayed on the Multi Function Display MFD and the Primary Flight Display PFD Inset Map The system ...

Page 384: ...rmin Connext Weather 1 With the aircraft outside and having a clear view of the sky turn the large FMS Knob on the MFD to select the MAP page group 2 Turn the small FMS Knob to select the MAP WEATHER DATA LINK CNXT or XM Page If XM is displayed in the page title it will be necessary to change the data link source to CNXT before continuing Refer to Viewing the Weather Data Link CNXT Page procedure ...

Page 385: ...TBM 850 900 371 HAZARD AVOIDANCE Figure 6 56 Select Register With Connext 4 Turn the large FMS Knob to select Register With Connext in the menu list 5 Press the ENT Key The Connext Registration Window appears as shown in Figure 6 57 Figure 6 57 Enter Access Code ...

Page 386: ...urce such as SiriusXM Weather has also been installed The displayed weather products and softkeys correspond to the selected weather data link source No weather information is displayed until the first Connext Data Request is made Viewing the Weather Data Link CNXT Page 1 Turn the large FMS Knob to select the Map Page Group 2 Turn the small FMS Knob to select the Weather Data Link CNXT or XM Page ...

Page 387: ...ct age display does not indicate the age of the information contained within the weather product which can be significantly older than the displayed weather product age Weather products are updated continuously or refreshed at specific intervals defined in the Refresh Rate column in Table 6 6 If for any reason a product is not refreshed within the Expiration Time intervals see Table 6 6 the system...

Page 388: ...port METARs 90 Continuous Winds Aloft WIND 60 Continuous Pilot Weather Report PIREPs 90 Continuous Temporary Flight Restrictions TFRs no product image 60 Continuous Terminal Aerodrome Reports TAFs no product image 60 Continuous The composite precipitation image is updated every 3 minutes but individual radar sites may take between 3 and 10 minutes to provide new data Canadian radar precipitation d...

Page 389: ...ages Precipitation PRECIP Infrared Satellite IR SAT Datalink Lightning LTNG SIGMETs AIRMETs SIG AIR METARs Winds Aloft WIND PIREPs Radar Coverage TFRs TAFs Winds Aloft data on Navigation Map Page displayed inside Profile View when enabled Table 6 7 Garmin Connext Weather Product Display Maps Softkeys control the display of weather information on most MFD pages and the PFD Inset Map Figure 6 59 sho...

Page 390: ...h weather products data are decluttered from the display If a map range larger than the weather product map range setting is selected the weather product data is removed from the map The menus also provide a means in addition to the softkeys for enabling disabling display of weather products Setting up and customizing the Weather Data Link CNXT Page 1 Select the Weather Data Link CNXT Page 2 Press...

Page 391: ... for selection and press ENT Key The G1000 supports dual installation of both the GSR 56 for Garmin Connext Weather and the GDL69 69A for SiriusXM Weather Only one set of data link weather products Garmin Connext or SiriusXM can be displayed at a time Switching between Garmin Connext and SiriusXM weather data link sources 1 Turn the large FMS Knob on the MFD to select the MAP page group 2 Turn the...

Page 392: ...WIND Winds Aloft WIND Pilot Weather Report PIREPs Pilot Weather Report PIREPs Table 6 8 Corresponding SiriusXM Weather and Garmin Connext Weather Product Settings Maps besides the Weather Data Link CNXT Page use settings based on those selected for the Navigation Map Page Setting up and customizing weather data for the Navigation Map Page 1 Select the Navigation Map Page 2 Press the MENU Key 3 Wit...

Page 393: ...e displayed weather products Or a Press the MENU Key b Select Weather Legend and press the ENT Key 3 Turn the FMS Knob to scroll through the legends if more are available than fit in the window 4 To remove the Legend Window select the LEGEND Softkey the ENT or the CLR Key or press the FMS Knob When a Garmin Connext weather product is enabled for display on the PFD Inset Map the weather product inf...

Page 394: ...requested weather coverage area s choose automatic weather update intervals if desired and the ability to send or cancel weather data requests The status of the Garmin Connext data request process is also displayed Before a Garmin Connext data request can occur a valid request coverage area must be defined from which all currently available Garmin Connext weather products will be retrieved At a mi...

Page 395: ...tion about entering and activating flight plans FPL Requests data along an active flight plan if one exists Turn the small FMS Knob to select the desired flight plan look ahead distance option or choose REMAINING FPL to request the remainder of the flight plan then press the ENT Key WAYPOINT Requests data based on a waypoint which may be off route Turn the large and small FMS Knobs to enter a wayp...

Page 396: ...Garmin G1000 Pilot s Guide for the Socata TBM 850 900 190 00709 05 Rev D 382 HAZARD AVOIDANCE Figure 6 66 Weather Data Link CNXT Page Menu Figure 6 67 Connext Data Request Menu ...

Page 397: ...d while the data request is processing by pressing the FMS Knob the data request will continue to process in the background Connext Data Requests typically take between 1 to 3 minutes to complete depending on the size of the selected weather coverage area and Iridium signal connection quality The system retrieves all available Garmin Connext Weather products within the selected coverage area durin...

Page 398: ...Requests were enabled prior to the system entering Reversionary Mode the automatic weather data requests will continue in Reversionary Mode however the Connext Data Request menu and its associated options will not be available Enabling disabling automatic Connext Data Requests 1 Select the Weather Data Link CNXT Page 2 Press the MENU Key 3 With Connext Data Request highlighted press the ENT Key 4 ...

Page 399: ...Product on the Weather Data Link CNXT Page Precip Weather Product Selected for Display Boundary of Connext Data Request appears when Precipitation weather product is enabled No radar coverage Precipitation data can be displayed on the following maps PFD Inset Map Navigation Map Page Weather Data Link CNXT Page Airport Information Page Trip Planning Page Nearest Pages Flight Plan Pages Displaying P...

Page 400: ...put certain types of weather reflect radar better than others The intensity of a radar reflection is not necessarily an indication of the weather hazard level For instance wet hail returns a strong radar reflection while dry hail does not Both wet and dry hail can be extremely hazardous The different radar echo intensities are measured in decibels dB relative to reflectivity Z Weather radars measu...

Page 401: ...ck represents 4 km2 The following may cause abnormalities in displayed radar images Ground clutter Strobes and spurious radar data Sun strobes when the radar antenna points directly at the sun Interference from buildings or mountains which may cause shadows Metallic dust from military aircraft which can cause alterations in radar scans ...

Page 402: ... Brighter cloud top colors indicate cooler temperatures occurring at higher altitudes Figure 6 72 METAR Flags on the Weather Data Link Page Displaying Cloud Tops information 1 Select the Weather Data Link CNXT Page 2 Press the IR SAT Softkey To display the Infrared Satellite legend Figure 6 73 select the LEGEND Softkey when Infrared Satellite data is selected for display Figure 6 73 Infrared Satel...

Page 403: ... be enabled for display at a time on a navigation map Figure 6 74 Data Link Lightning Areas of Lightning Strikes Datalink Lightning data displayed on the following maps PFD Inset Map Navigation Map Page Weather Data Link CNXT Page Trip Planning Page Nearest Pages Flight Plan Pages Displaying Datalink Lightning information 1 Press the MAP Softkey for the PFD Inset Map select the INSET Softkey This ...

Page 404: ...gnificant weather conditions are not widespread The entire SIGMET or AIRMET is displayed as long as any portion of it is issued within the coverage area of the Connext Data Request Figure 6 76 SIGMET AIRMET Data SIGMET Displaying SIGMETs and AIRMETs 1 Select the Weather Data Link CNXT Page 2 Press the SIG AIR Softkey 3 To view the text of the SIGMET orAIRMET press the RANGE Knob and move the Map P...

Page 405: ...essure at an airport or observation station They can also contain information on precipitation amounts lightning and other critical data METARs reflect hourly observations non routine updates include the code SPECI in the report METARs are shown as colored flags at airports that provide them Figure 6 79 METAR Flags on the Weather Data Link CNXT Page Instructions for Viewing METAR and TAF Text Sele...

Page 406: ...h the METAR and TAF text METAR text must be completely scrolled through before scrolling through the TAF text 5 Press the FMS Knob or the CLR Key to return to the Weather Data Link CNXT Page Or 1 Select the Weather Information Page a Turn the large FMS Knob to select the Waypoint Page Group b Select the WX Softkey to select the Weather Information Page 2 Press the FMS Knob to display the cursor 3 ...

Page 407: ...window below 4 When finished press the FMS Knob to remove the cursor or press the FPL Key to exit the Active Flight Plan Page To display the METAR legend on the Weather Data Link CNXT Page Figure 6 81 select the LEGEND Softkey when METARs are selected for display The METAR flag color is determined by the information in the METAR text A gray METAR flag is displayed when the METAR text does not cont...

Page 408: ...s Aloft legend Figure 6 83 select the LEGEND Softkey when Winds Aloft is selected for display Figure 6 83 Winds Aloft Data with Legend Headwind and tailwind components aloft are available inside the Profile View on the Navigation Map Page Figure 6 84 The displayed components are relative to current aircraft altitude and track but not to aircraft speed ...

Page 409: ...e Profile View Path Enabled Arrows pointing to the left indicate headwind components tailwind component arrows point to the right as shown in Table 6 9 Headwind Symbol Tailwind Symbol Headwind Tailwind Component None None Less than 5 knots 5 knots 10 knots 50 knots Table 6 9 Profile View Headwind Tailwind Component Symbols Showing Hiding Profile View containing winds aloft data 1 Select the Naviga...

Page 410: ...gation Map Page Enabling disabling winds aloft data display in Profile View 1 Select the Navigation Map Page 2 Press the MENU Key 3 With Map Setup highlighted press the ENT Key Figure 6 85 4 Turn the small FMS Knob to select the Profile Group and press the ENT Key Figure 6 86 5 Turn the large FMS Knob to select Profile Winds Figure 6 87 6 Turn the small FMS Knob to select On or Off 7 Press the FMS...

Page 411: ...e Weather Data Link CNXT Page Instructions for Viewing PIREP Text PIREP Selected Urgent PIREP Displaying PIREP text 1 Select the Weather Data Link CNXT Page 2 Press the MORE WX Softkey 3 Press the PIREPS Softkey 4 Press the RANGE Knob and pan to the desired weather report A gray circle will appear around the weather report when it is selected 5 Press the ENT Key The PIREP tex is first displayed in...

Page 412: ...min com fly garmin gfds weather for Garmin Connext product coverage information In the United States the FAA issues Temporary Flight Restrictions TFRs to designate areas where flight is restricted TFRs are issued to restrict flight for a variety of reasons including national security law enforcement fire suppression efforts natural disasters airshows and large sporting events TFRs may be issued at...

Page 413: ...Page or Navigation Map Page 2 Press the RANGE Knob and pan the map pointer over a TFR to highlight it The system displays TFR summary information above the map 3 Press the ENT Key The system displays a pop up menu 4 If necessary turn the FMS Knob to select Review Airspaces and press the ENT Key The system displays the TFR Information window 5 Press the FMS Knob or the CLR Key to remove the TFR Inf...

Page 414: ...R data for maps on which TFR data can be displayed 1 Select the Navigation Map Page 2 Press the MENU Key 3 With Map Setup highlighted press the ENT Key Figure 6 93 4 Turn the small FMS Knob to select the Aviation Group and press the ENT Key Figure 6 94 5 Turn the large FMS Knob to scroll to the TFR product range setting Figure 6 95 6 Turn the small FMS Knob to scroll through options Off range sett...

Page 415: ...d re send the data request Connext Comm Error 8 A server error has occurred or invalid data received Connext Login Invalid There is a problem with the Garmin Connext registration Contact Garmin at 1 866 739 5687 in the United States or 913 397 8200 wait for the operator and request exentension 1135 for assistance Connext Server Temporarily Inop The Garmin Connext weather data server is temporarily...

Page 416: ...ay see Table 6 7 for a list of weather products and their associated map availability If manual weather data requests were enabled prior to entering Reversionary Mode no new Garmin Connext weather data can be retrieved while operating in Reversionary Mode If automatic weather data requests were enabled prior to Reversionary Mode operation the system will continue the automatic data requests in Rev...

Page 417: ...eas where radar return signals are weakened or attenuated by intense precipitation or large areas of lesser precipitation and may not fully reflect the weather behind a storm Weather Alert that looks ahead for intense cell activity in the 80 320 nm range even if these ranges are not being monitored PRINCIPLES OF PULSED AIRBORNE WEATHER RADAR The term RADAR is an acronym for RAdio Detecting And Ran...

Page 418: ...ar is only capable of seeing what is inside the boundaries of the beam The figure below depicts a radar beam s characteristics The figure illustrates vertical dimensions of the radar beam although the same holds true for the horizontal dimensions In other words the beam is as wide as it is tall Note that it is possible to miss areas of precipitation on the radar display because of the antenna tilt...

Page 419: ...end much further A cell containing heavy precipitation may block another cell located behind the first preventing it from being displayed on the radar Never fly into these shadowed areas and never assume that all of the heavy precipitation is being displayed unless another cell or a ground target can be seen beyond the heavy cell The WATCH feature of the weather radar system can help in identifyin...

Page 420: ...good reflectors and normally do not provide good returns The energy is reflected in a forward scatter angle with inadequate energy being returned They can appear as dark areas on the display However rough or choppy water is a better reflector and provides stronger returns from the downwind sides of the waves Mountains also provide strong return signals to the antenna but also block the areas behin...

Page 421: ...es a minimum safe distance from the antenna for personnel near operating weather radar The minimum safe distance is based on the FCC s exposure limit at 9 3 to 9 5 GHz for general population uncontrolled environments which is 1 mW cm2 See Advisory Circular 20 68B for more information on safe distance determination MAXIMUM PERMISSIBLE EXPOSURE LEVEL MPEL The zone in which the radiation level exceed...

Page 422: ...imately it is desired to have the antenna tilted so that the bottom of the radar beam is four degrees below parallel with the ground The following example explains one way of achieving this With the aircraft flying level adjust the antenna tilt so ground returns are displayed at a distance that equals the aircraft s current altitude AGL divided by 1 000 For example if the aircraft is at 14 000 fee...

Page 423: ...d range to 60 miles may be more helpful Closely monitor anything that enters the display Also after setting up the antenna tilt angle as described previously ground returns can be monitored for possible threats The relationship between antenna tilt angle altitude and distance is one degree of tilt equals 100 feet of altitude for every one nautical mile Vertical Change of Radar Beam feet Change in ...

Page 424: ... 6 102 The colors shown on the scale correspond to the colors shown in Table 6 11 NOTE The system does not display magenta for precipitation in GWX 70 installations although magenta appears on the scale in Weather mode Figure 6 102 Precipitation Intensity Scale on the Weather Radar Page Thunderstorms Updrafts and downdrafts in thunderstorms carry water through the cloud The more severe the drafts ...

Page 425: ...owing wide areas of green are generally precipitation without severe turbulence Irregularities in the target return may also indicate turbulence appearing as hooks fingers or scalloped edges These irregularities may be present in green areas with no yellow red or magenta areas and should be treated as highly dangerous areas Avoid these areas as if they are red or magenta Figure 6 103 Cell Irregula...

Page 426: ... are not limited to these characteristics Confirmed radar observations of tornadoes most often have not shown shapes different from those of a normal thunderstorm display Hail Hail results from updrafts carrying water high enough to freeze Therefore the higher the top of a thunderstorm the greater the probability that it contains hail Vertically scanning the target return can give the radar top of...

Page 427: ... when it is safe to do so When transmitting while the aircraft is on the ground no personnel or objects should be within 9 16 feet of the antenna CAUTION In Standby mode the antenna is parked at the center line It is always a good idea to put the radar in Standby mode before taxiing the aircraft to prevent the antenna from bouncing on the bottom stop and possibly causing damage to the radar assemb...

Page 428: ...ar enters the Standby Mode a Select the WEATHER Softkey A confirmation window is displayed Figure 6 107 Confirming Activating Radar b Turn the small FMS Knob to highlight YES and press the ENT Key to continue radar activation OR If the aircraft is airborne select the WEATHER Softkey A one minute warm up period is initiated countdown is displayed on the screen After the warm up is complete the rada...

Page 429: ...ress the ENT Key 2 Press the ENT Key 3 Turn the small FMS Knob to place the Bearing Line on the desired storm cell or other area to be vertically scanned Figure 6 108 Bearing Line on Horizontal Scan Scan Line Bearing Line 4 Select the VERTICAL Softkey A vertical scan of the selected area is now displayed Figure 6 109 5 The small FMS Knob may be used to move the scanned bearing line a few degrees r...

Page 430: ...reezing level of the storm The best way to find this point is to use the Vertical Scan feature The antenna tilt angle can be centered on the strongest return area in the vertical scan to get a more accurate view of the coverage and intensity of the target in the horizontal scan Adjusting antenna tilt on the Horizontal Scan display 1 Press the FMS Knob to activate the cursor in the TILT field 2 Tur...

Page 431: ...ield and display the Tilt Line If theTilt Line is not displayed press the MENU Key and turn the large FMS Knob to select ShowTilt Line Press the ENT Key 2 Turn the small FMS Knob to adjust the antenna tilt angle The selected tilt angle is implemented when Horizontal Scan is again selected The RANGE Knob can also be used to adjust tilt Figure 6 110 Adjusting Tilt on Vertical Scan Display Scan Line ...

Page 432: ...ty of precipitation 1 Select the GAIN Softkey to activate the cursor in the GAIN field 2 Turn the small FMS Knob to adjust the gain for the desirable level The gain setting is visible in the GAIN field as a movable horizontal bar in a flashing box The line pointer is a reference depicting the calibrated position 3 Press the FMS Knob to remove the cursor 4 Select the GAIN Softkey again to recalibra...

Page 433: ... the ENT Key Figure 6 112 Selecting Sector Scan Position 3 Turn the small FMS Knob to place the Bearing Line in the desired position The location of the Bearing Line becomes the center point of the Sector Scan 4 Turn the large FMS Knob to place the cursor in the SECTOR SCAN field 5 Turn the small FMS Knob to select FULL 60 40 or 20 scan 6 If desired readjust the Bearing Line as discussed previousl...

Page 434: ...Sector Scan Antenna Stabilization 1 To activate or deactivate the antenna stabilization select the MODE Softkey 2 Select the STAB ON Softkey to activate antenna stabilization or select the STAB OFF Softkey to deactivate The current stabilization condition is shown in the upper right of the weather radar display ...

Page 435: ...attenuates the radar energy All these factors have an effect on the return intensity The more energy that dissipates the lesser the displayed intensity of the return Accuracy of the displayed intensity of returns located in the shaded areas are suspect Make maneuvering decisions with this information in mind Proper antenna tilt management should still be employed to determine the extent of attenua...

Page 436: ...ximate azimuth of the detected returns If a Weather Alert is detected within 10 of the aircraft heading an alert is displayed on the PFD in the Messages Window If the antenna tilt is adjusted too low a weather alert can be generated by ground returns To avoid unwanted weather alerts deselect the WX ALRT Softkey Figure 6 115 Weather Alert Indications Weather Alerts To activate or deactivate Weather...

Page 437: ...nd targets can be recognized more easily As previously discussed the type and orientation of the target in relation to the aircraft affects the intensity displayed When the weather radar system is in either the Weather or Ground Map mode the system automatically switches to Standby mode upon landing Ground Map Mode Color Intensity Black 0 dB Cyan 0 dB to 9 dB Yellow 9 dB to 18 dB Magenta 18 dB to ...

Page 438: ...n mode If the radar is operating in vertical scan mode while the overlay is enabled the system indicates N A in the information box to indicate the airborne weather radar overlay is not available until the horizontal scan mode is selected on the Weather Radar Page NOTE When viewing airborne weather radar information overlay on the Navigation Map Page selecting a Heading Up navigation map orientati...

Page 439: ... radar bearing is adjustable in one degree increments on the Navigation Map Page by pushing the Range Knob left or right when the overlay is enabled A left or right arrow next to the bearing readout indicates the direction of the selected bearing The cyan radar bearing line is only viewable on the Weather Radar Page While the bearing line is not shown on the Navigation Map Page adjusting the beari...

Page 440: ...map besides the Stormscope Page select the MAP Softkey or the INSET Softkey for the PFD Inset Map then select the STRMSCP Softkey These pages can also display cell or strike data using the yellow lightning strike symbology shown in Table 6 13 Lightning Age Symbol Strike is less than 6 seconds old Strike is between 6 and 60 seconds old Strike is between 1 and 2 minutes old Strike is between 2 and 3...

Page 441: ...r off STRMSCP MODE Selects the CELL or STRIKE mode of lightning activity Cell mode identifies clusters or cells of electrical activity Strike mode indicates the approximate location of lightning strikes STRMSCP SMBL Selects the range at which Stormscope data displays Stormscope data is removed when a map range greater than the STRMSCP SMBL value is selected Figure 6 118 Page Menu Figure 6 119 Map ...

Page 442: ...Setup selected press the ENT Key 3 Select the Weather group 4 Press the ENT Key The cursor flashes on STRMSCP LTNG 5 Turn the large FMS Knob to select STRMSCP MODE 6 Turn the small FMS Knob to change between CELL and STRIKE options When an item is selected press the ENT Key 7 Press the FMS knob to return to the Navigation Map Page Stormscope Icon 50 nm Map Range Figure 6 120 Navigation Map Page wi...

Page 443: ...mscope data is 400 nm diameter total 200 nm in front and 200 nm behind the 500 nm range in North Up orientation shows all the data At a map range of less than 25 nm Stormscope lightning data is not displayed but can still be present The maximum zoom range can also be set on the Navigation Map Note that Stormscope data above the selected maximum zoom range is decluttered Selecting a Stormscope rang...

Page 444: ...g data can be displayed at the ranges of 25 nm 50 nm 100 nm and 200 nm Adjusting the Stormscope Map Range 1 Turn the large FMS Knob to select the Map Page Group 2 Turn the small FMS Knob to select the Stormscope Page 3 To change the map range turn the RANGE Knob clockwise to zoom out or counter clockwise to zoom in Figure 6 122 Stormscope Page ...

Page 445: ...o the Stormscope Page Or 1 Select the Stormscope Page 2 Press the MENU Key 3 Turn the small FMS Knob to choose between CELL and STRIKE options 4 When an item is selected press the ENT Key If heading input is lost strikes and or cells must be cleared manually after the execution of each turn Figure 6 123 This is to ensure that the strike and or cell positions are depicted accurately in relation to ...

Page 446: ...Softkey The 360 and ARC softkeys are displayed 3 Select the 360 Softkey to display a 360 viewing area or select the ARC Softkey to display a 120 viewing area 4 Select the BACK Softkey to return to the Stormscope Page Or 1 Select the Stormscope Page 2 Press the MENU Key 3 Turn the small FMS Knob to choose between View Arc and View 360 options 4 When an item is selected press the ENT Key ...

Page 447: ...uctions relative to the aircraft position and altitude with reference to a database that may contain inaccuracies Terrain and obstructions are shown only if they are in the database Terrain and obstacle information should be used as an aid to situational awareness They should never be used to navigate or maneuver around terrain Note that all obstructions may not be available in the terrain and obs...

Page 448: ...L 1000 AGL 1000 AGL 1000 AGL Red obstacle is above or within 100 ft below the aircraft altitude Yellow obstacle is between 100 ft and 1000 ft below the aircraft altitude Table 6 14 Terrain Proximity Terrain Obstacle Colors and Symbology Terrain and obstacle information can be displayed on the following pages PFD Inset Map Navigation Map Page Terrain Proximity Page Trip Planning Page Flight Plan Pa...

Page 449: ...y Customizing terrain and obstacle display on the Navigation Map Page 1 Select the Navigation Map Page 2 Press the MENU Key 3 With Map Setup highlighted press the ENT Key Figure 6 125 4 Turn the small FMS Knob to select the Map Group and press the ENT Key Figure 6 126 5 Turn the large FMS Knob or press the ENT Key to scroll through product selections Figure 6 127 TERRAIN DATA Turns the display of ...

Page 450: ...t Altitude TERRAIN PROXIMITY PAGE The Map Terrain Proximity Page is the principal page for showing terrain and obstacle data in relation to the aircraft s current altitude without clutter from the basemap Aviation data airports VORs and other NAVAIDs can be displayed for reference Aircraft orientation on this map is always heading up unless there is no valid heading Two views are available relativ...

Page 451: ...ow Terrain Between 100 and 1000 Below the Aircraft Altitude Red Terrain Above or Within 100 Below the Aircraft Altitude Black Terrain More than 1000 Below the Aircraft Altitude Terrain Legend Map Range Rings Map Orientation Current Aircraft GPS derived GSL Altitude Figure 6 130 Terrain Proximity Page ARC View Yellow Terrain Between 100 and 1000 Below the Aircraft Altitude Red Terrain Above or With...

Page 452: ...ated algorithms to assess aircraft distance from terrain and obstacles Terrain SVS does not provide the following Premature Descent Alerting PDA Excessive Descent Rate EDR Negative Climb Rate NCR Descent to 500 Feet Callout DFC Terrain SVS requires the following components to operate properly Valid 3 D GPS position Valid terrain obstacle database Terrain SVS displays altitudes of terrain and obstr...

Page 453: ... to depict terrain and obstacles with heights greater than 200 feet above ground level AGL Alerts are given relative to aircraft altitude Colors are adjusted automatically as the aircraft altitude changes The colors and symbols shown in the figure and table below are used to represent terrain obstacles and potential impact points Figure 6 131 Terrain Altitude Color Correlation for Terrain SVS Unli...

Page 454: ...fects the PFD Inset Map Terrain data can be selected for display independently of obstacle data however obstacles for which warnings and cautions are issued are shown when terrain is selected for display and the map range is within the setting limit Maps other than the Terrain SVS Page use settings based on those selected for the Navigation Map Page The maximum display ranges for obstacles on each...

Page 455: ...matically zooms in to the closest potential point of impact on the Terrain SVS Page Aircraft orientation on this map is always heading up unless there is no valid heading Two views are available relative to the position of the aircraft the 360 default display and the radar like ARC 120 display Map range is adjustable with the RANGE Knob from 1 to 200 nm as indicated by the map range rings or arcs ...

Page 456: ...raft Altitude Red Terrain Above or Within 100 Below the Aircraft Altitude Black Terrain More than 1000 Below the Aircraft Altitude Terrain Legend Map Range Rings Map Orientation Current Aircraft GPS derived GSL Altitude Annunciation Window Figure 6 136 Terrain SVS Page ARC View Yellow Terrain Between 100 and 1000 Below the Aircraft Altitude Red Terrain Above or Within 100 Below the Aircraft Altitu...

Page 457: ...ly issued Table 6 17 shows Terrain SVS alert types with corresponding annunciations and voice alerts When an alert is issued annunciations appear on the PFD and MFD The Terrain SVS Alert Annunciation is shown to the upper left of the Altimeter on the PFD and below the Terrain Legend on the MFD If the Terrain SVS Page is not displayed at the time a pop up alert appears on the MFD To acknowledge the...

Page 458: ...he MFD Alert Annunciation Potential Impact Points TERRAIN SVS INHIBIT Terrain SVS visual annunciations and voice alerts can be manually inhibited Use caution when inhibiting Terrain SVS as the system should be enabled when appropriate When Terrain SVS is inhibited the system status annunciation TER INH is shown on the PFD and on the terrain annunciation window on the MFD when terrain display is en...

Page 459: ...Final Approach Fix is the active waypoint The aircraft is at least 164 feet below the prescribed altitude at the Final Approach Fix See the Flight Instruments Section for more details about the LOW ALT annunciation Alert Type PFD MFD Alert Annunciation MFD Pop Up Alert except Terrain SVS Page Voice Alert Reduced RequiredTerrain Clearance Warning RTC Warning Terrain Terrain ImminentTerrain ImpactWa...

Page 460: ...alculated to come within minimum clearance altitudes in Figure 6 140 Required Clearance 0 100 200 300 400 500 600 700 800 0 5 10 15 20 25 30 Distance From Runway NM Required Terrain Clearance FT Level FT Descending FT Figure 6 140 FLTA Alert Minimum Terrain and Obstacle Clearance Values Distance From Runway NM Required Clearance FT FLTA alerts are automatically inhibited when the aircraft is less ...

Page 461: ...n the database coverage area the voice alert Terrain System Available is generated Alert Cause PFD MFD System Status Annunciation Terrain SVS Page Center Banner Annunciation Voice Alert MFD Terrain or Obstacle database unavailable or invalid Terrain SVS operating with PFD Terrain or Obstacle databases None TERRAIN DATABASE FAILURE None Terrain or Obstacle database unavailable or invalid invalid so...

Page 462: ... of the content per TSO C151b However the displayed information should never be understood as being all inclusive and data may be inaccurate TAWS B uses information provided from the GPS receiver to provide a horizontal position and altitude GPS altitude is derived from satellite measurements GPS altitude is then converted to the height above geodetic sea level GSL which is the height above mean s...

Page 463: ...e adjusted automatically as the aircraft altitude changes The colors and symbols in the figure and tables below are used to represent terrain obstacles and potential impact points Figure 6 141 Terrain Altitude Color Correlation for TAWS Unlighted Obstacle Lighted Obstacle Obstacle Location 1000 AGL 1000 AGL 1000 AGL 1000 AGL Red obstacle is above or within 100 ft below the aircraft altitude Yellow...

Page 464: ...hile the range setting also affects the PFD Inset Map Terrain data can be selected for display independently of obstacle data however obstacles for which warnings and cautions are issued are shown when terrain is selected for display and the map range is within the setting limit Maps besides the TAWS B Page use settings based on those selected for the Navigation Map Page The maximum display ranges...

Page 465: ...om the basemap Aviation data airports VORs and other NAVAIDs can be displayed for reference If an obstacle and the projected flight path of the aircraft intersect the display automatically zooms in to the closest potential point of impact on the TAWS B Page Aircraft orientation on this map is always heading up unless there is no valid heading Two views are available relative to the position of the...

Page 466: ...n the TAWS B Page 1 Press the MENU Key 2 Select Show Aviation Data or Hide Aviation Data dependent on current state and press the ENT Key Figure 6 146 TAWS B Page 360º View Yellow Terrain Between 100 and 1000 Below the Aircraft Altitude Red Terrain Above or Within 100 Below the Aircraft Altitude Black Terrain More than 1000 Below the Aircraft Altitude Terrain Legend Map Range Rings Map Orientation...

Page 467: ...hin TAWS B software algorithms TAWS B alerts typically employ a CAUTION or a WARNING alert severity level or both When an alert is issued visual annunciations are displayed and voice alerts are simultaneously issued Table 6 22 shows TAWS B alert types with corresponding annunciations and voice alerts When an alert is issued annunciations appear on the PFD and MFD The TAWS B Alert Annunciation is s...

Page 468: ...for the Socata TBM 850 900 190 00709 05 Rev D 454 HAZARD AVOIDANCE Figure 6 148 TAWS B TERRAIN Alert Annunciation on the MFD Alert Annunciation Potential Impact Points Figure 6 149 Alert Annunciation on the PFD Alert Annunciation ...

Page 469: ...190 00709 05 Rev D Garmin G1000 Pilot s Guide for the Socata TBM 850 900 455 HAZARD AVOIDANCE Figure 6 150 Alert Pop up on the MFD Potential Impact Points ...

Page 470: ...Required Terrain Clearance Caution RTC or Caution Terrain Caution Terrain or Terrain Ahead Terrain Ahead Imminent Terrain Impact Caution ITI or Caution Terrain Caution Terrain or Terrain Ahead Terrain Ahead Reduced Required Obstacle Clearance Caution ROC or Caution Obstacle Caution Obstacle or Obstacle Ahead Obstacle Ahead Imminent Obstacle Impact Caution IOI or Caution Obstacle Caution Obstacle o...

Page 471: ...xcessive Descent Rate Alert Criteria FORWARD LOOKING TERRAIN AVOIDANCE Reduced Required Terrain Clearance RTC and Reduced Required Obstacle Clearance ROC alerts are issued when the aircraft flight path is above terrain yet is projected to come within the minimum clearance values in Figure 6 152 When an RTC alert is issued a potential impact point is displayed on the TAWS B Page Imminent Terrain Im...

Page 472: ...e the destination runway elevation while within 0 5 nm of the approach runway or the aircraft is between runway ends PREMATURE DESCENT ALERTING A Premature Descent Alert PDA is issued when the system detects that the aircraft is significantly below the normal approach path to a runway Figure 6 153 PDA alerting begins when the aircraft is below 700 feet AGL within 15 nm of the destination airport a...

Page 473: ...ft is at least 164 feet below the prescribed altitude at the Final Approach Fix See the Flight Instruments Section for more details about the LOW ALT annunciation FIVE HUNDRED VOICE ALERT The purpose of the Five hundred voice alert is to provide an advisory alert of when the aircraft descends to within 500 feet above the terrain or runway threshold When the aircraft is within five nautical miles o...

Page 474: ...arameters based on Altitude Loss and Sink Rate respectively as defined by TSO C151b Figure 6 155 Negative Climb Rate NCR Altitude Loss 0 100 200 300 400 500 600 700 800 900 1000 0 20 40 60 80 100 120 140 Altitude Loss Feet Height Above Terrain Feet DON T SINK or TOO LOW TERRAIN Figure 6 156 Negative Climb Rate NCR Sink Rate 0 100 200 300 400 500 600 700 800 900 1000 0 500 1000 1500 2000 2500 3000 ...

Page 475: ...s Manually testing the TAWS B System 1 Select the TAWS B Page 2 Press the MENU Key 3 Select Test TAWS System and press the ENT Key to confirm the selection Figure 6 157 TAWS B Page Menu TAWS B continually monitors several system critical items such as database validity hardware status and GPS status If the terrain obstacle database is not available the voice alert TAWS System Failure occurs with t...

Page 476: ...acle database unavailable or invalid on all displays invalid software configuration TAWS audio fault TAWS FAIL TAWS System Failure No GPS position NO GPS POSITION TAWS Not Available TAWS Available when GPS position returns Excessively degraded GPS signal None TAWS Not Available TAWS Available when sufficient GPS signal is received Out of database coverage area None TAWS Not Available TAWS Availabl...

Page 477: ...and 1000 ft below the aircraft altitude Black terrain is more than 1000 ft below the aircraft altitude Figure 6 158 Terrain Altitude Color Correlation for Profile View Terrain Unlighted Obstacle Lighted Obstacle Obstacle Location 1000 AGL 1000 AGL 1000 AGL 1000 AGL Red obstacle is above or within 100 ft below the aircraft altitude Yellow obstacle is between 100 ft and 1000 ft below the aircraft al...

Page 478: ...a as shown in the Terrain Legend or obstacles from the Navigation Map these items are also removed from the Profile View only an outline of the terrain will be displayed in black in the Profile View window Refer to the Terrain Proximity Terrain SVS or TAWS B discussions for more information about displaying terrain or obstacles on the Navigation Map Page Terrain Legend Profile View Length is One H...

Page 479: ...configured for metric units The Profile Path rectangle may be configured on or off and the Navigation Map range at which the Profile Path is removed from map display can be changed Customizing the Profile Path display on the Navigation Map Page 1 Select the Navigation Map Page 2 Press the MENU Key 3 With Map Setup highlighted press the ENT Key Figure 6 160 4 Turn the small FMS Knob to select the P...

Page 480: ...ot s Guide for the Socata TBM 850 900 190 00709 05 Rev D 466 HAZARD AVOIDANCE Figure 6 161 Navigation Map Page Setup Menu Figure 6 160 Navigation Map Page Menu Figure 6 162 Navigation Map Page Setup Menu Profile Group ...

Page 481: ...iption Non Threat Traffic Traffic Advisory TA Traffic Advisory Off Scale Table 6 27 TIS Traffic Symbols A Traffic Advisory TA indicates that the current track of the intruder could result in a collision When traffic meets the advisory criteria for the TA a solid yellow circle symbol is generated A TA which is detected but is outside the range of the map is indicated with a message in the lower lef...

Page 482: ...t Plan Page Traffic information can also be displayed on the PFD when the Synthetic Vision System SVS option is installed and enabled See the Additional Features Section for details Displaying traffic information maps other than the Traffic Map Page 1 Select the MAP Softkey 2 Select the TRAFFIC Softkey to display traffic data When traffic is selected on maps other than the Traffic Map Page an icon...

Page 483: ...ections Figure 6 166 TRAFFIC Turns the display of traffic data on or off TRAFFIC MODE Selects the traffic mode for display select from All Traffic Displays all traffic TA ONLY Displays Traffic Alerts only TRAFFIC SMBL Selects the maximum range at which traffic symbols are shown TRAFFIC LBL Selects the maximum range at which traffic labels are shown with the option to turn off 6 Turn the small FMS ...

Page 484: ...ut clutter from the basemap Aircraft orientation on this map is always heading up unless there is no valid heading Map range is adjustable with the RANGE Knob from 2 to 12 nm as indicated by the map range rings The traffic mode is annunciated in the upper left corner of the Traffic Map Page When the aircraft is on the ground TIS automatically enters Standby Mode Once the aircraft is airborne TIS s...

Page 485: ... Non Bearing Traffic System Unable to Determine Bearing Distance is 4 0 nm 500 Above Descending Non Threat Traffic Altitude Not Reported Traffic Advisory Off Scale 400 Below Level Traffic Status Banners Traffic Mode Annunciation TIS Not Available Voice Alert Status Range Marking Ring Select to Mute TIS Not Available Voice Alert Traffic Advisory 500 Below Climbing ...

Page 486: ...itially decreases and then subsequently increases another voice alert is generated Figure 6 168 Traffic Annunciation PFD Inset Map Displays When TA is Detected A TIS Not Available TNA voice alert is generated when the TIS service becomes unavailable or is out of range TIS may be unavailable in the radar coverage area due to the following Radar site TIS Mode S sensor is not operational or is out of...

Page 487: ... TIS passes the test TIS enters Standby Mode on the ground or Operating Mode in the air If TIS fails the power up test an annunciation is shown in the center of the Traffic Map Page Traffic Map Page Annunciation Description NO DATA Data is not being received from the transponder DATA FAILED Data is being received from the transponder but a failure is detected in the data stream FAILED The transpon...

Page 488: ...de and traffic information is displayed The mode can be changed manually using softkeys or the page menu Mode Traffic Mode Annunciation Traffic Map Page Traffic Display Enabled Icon Other Maps TIS Operating OPERATING TIS Standby STANDBY also shown in white in center of page TIS Failed FAIL See Table 6 30 for additional failure annunciations Table 6 29 TIS Modes Switching between TIS modes 1 Select...

Page 489: ...ing AGE MM SS Appears if traffic data is not refreshed within 6 seconds If after another 6 seconds data is not received traffic is removed from the display The quality of displayed traffic information is reduced as the age increases TRFC COAST The displayed data is not current 6 to 12 seconds since last message The quality of displayed traffic information is reduced when this message is displayed ...

Page 490: ...t with the highest threat potential can be displayed simultaneously No TAS surveillance is provided for aircraft without operating transponders THEORY OF OPERATION When the GTS 820 is in Operating Mode the unit interrogates the transponders of intruding aircraft while monitoring transponder replies The GTS 820 uses this information to derive the distance relative bearing and if reported the altitu...

Page 491: ...S B directional information Points in the direction of the aircraft track Non threat traffic with ADS B directional information Points in the direction of the intruder aircraft track Traffic with ADS B directional information but positional accuracy is degraded Points in the direction of the aircraft track Table 6 32 TAS Traffic with ADS B Symbology A Traffic Advisory TA displayed as a yellow circ...

Page 492: ... 6 170 Intruder Altitude and Vertical Trend Arrow If the intruding aircraft is providing ADS B track information this is displayed as a vector line extending beyond the traffic symbol in the direction of the track Vector Line indicates intruder aircraft track Figure 6 171 Intruder Traffic with ADS B Directional Information and Track Flight IDs may also be displayed with traffic symbols see the Fli...

Page 493: ...ting Conditions A Yes Intruder closing rate provides less than 20 seconds of vertical and horizontal separation Or Intruder closing rate provides less than 20 seconds of horizontal separation and vertical separation is within 600 feet Or Intruder range is within 0 2 nm and vertical separation is within 600 feet A No Intruder closing rate provides less than 15 seconds of separation B Yes Intruder c...

Page 494: ...e top right of the airspeed on the PFD flashes for five seconds and remains displayed until no TAs are detected in the area Figure 6 172 The PFD Inset Map is automatically displayed with TA traffic If the bearing of TA traffic cannot be determined a yellow text banner will be displayed in the center of the Traffic Map Page and in the lower left of the PFD inset map instead of a TA symbol The text ...

Page 495: ...rd otherwise the system announces TAS System Test Failed When the system test is complete the GTS 820 enters Standby Mode Testing the traffic system 1 Turn the large FMS Knob to select the Map Page Group 2 Turn the small FMS Knob to select the Traffic Map Page 3 Turn the Range knob to set the range to 2 6 nm to make sure full test pattern is shown during test 4 Select the TEST Softkey Or 1 Press t...

Page 496: ...to standby mode On the Traffic Page select the STANDBY Softkey Or 1 Press the MENU Key and turn the small FMS knob to select Standby Mode 2 Press the ENT Key Switching from standby mode to operating mode On the Traffic Page select the OPERATE Softkey Or 1 Press the MENU Key and turn the small FMS knob to select Operate Mode 2 Press the ENT Key The GTS 820 switches from Standby Mode to Operating Mo...

Page 497: ... Climbing Non Threat Traffic Altitude Not Reported Non Threat Traffic 2500 Above Descending Displaying traffic on the Traffic Map Page 1 Turn the large FMS Knob to select the Map Page Group 2 Turn the small FMS Knob to select the Traffic Map Page 3 Select the OPERATE Softkey to begin displaying traffic OPERATING is displayed in the Traffic mode field 4 Select the STANDBY Softkey to place the syste...

Page 498: ...0 feet below the aircraft Typically used during enroute phase of flight BELOW Displays non threat and proximity traffic from 2700 feet above the aircraft to 9000 feet below the aircraft Typically used during descent phase of flight UNREST unrestricted All traffic is displayed from 9900 feet above and 9900 feet below the aircraft 3 To return to the Traffic Page select the BACK Softkey Or 1 Press th...

Page 499: ...age with Flight IDs Enabled Flight ID Enabling Disabling Flight ID Display On the Traffic Map Page select the FLT ID Softkey Or 1 Press the MENU Key 2 Turn the small FMS Knob to choose Show Flight IDs or Hide Flight IDs choice dependent on current state Figure 6 176 3 Press the ENT Key Figure 6 176 Traffic Map Page Menu ...

Page 500: ...Map Page Traffic Map Page Trip Planning Page Nearest Pages Active Flight Plan Page System Pages Traffic information can also be displayed on the PFD when the Synthetic Vision Technology SVT option is installed and enabled See the Additional Features Section for details Displaying traffic information MFD maps other than the Traffic Map Page 1 Select the MAP Softkey 2 Select the TRAFFIC Softkey Traf...

Page 501: ...Key Figure 6 179 5 Turn the large FMS Knob or press the ENT Key to scroll through the selections Figure 6 180 TRAFFIC Turns the display of traffic data on or off TRAFFIC MODE Selects the traffic mode for display select from All Traffic Displays all traffic TA PA Displays Traffic Advisories and Proximity Advisories TA ONLY Displays Traffic Advisories only TRAFFIC SMBL Selects the maximum range at w...

Page 502: ...the map Maps besides the Traffic Map Page use settings based on those selected for the Navigation Map Page Traffic information can also be displayed on the PFD Inset Map by pressing the INSET Softkey A traffic map will appear in heading up orientation Traffic information can also be overlaid with navigation topographic and optional weather data Displaying traffic information PFD Inset Map 1 Select...

Page 503: ...TAS unit but the unit is self reporting a failure FAILED Incorrect data format received from the TAS unit Table 6 36 TAS Failure Annunciations The annunciations to indicate the status of traffic information appear in a banner at the lower left corner of maps on which traffic can be displayed Traffic Status Banner Annunciation Description TA OFF SCALE A Traffic Advisory is outside the selected disp...

Page 504: ...raffic Proximity Advisory PA Traffic Advisory TA Traffic Advisory Off Scale Table 6 38 TAS Symbol Description A Non threat Advisory shown as an open white diamond indicates that an intruding aircraft is at greater than 1200 feet relative altitude or the distance is beyond 5 nm A Proximity Advisory indicates that the intruding aircraft is within 1200 feet and is within 5 nm range but is still not c...

Page 505: ...urn the small FMS knob to select Standby Mode 2 Press the ENT Key to place the KTA 870 in the Standby mode System Self Test 1 Set the range to 2 6 nm to allow for display of full traffic test pattern 2 Select the TEST Softkey 3 Self test takes approximately eight seconds to complete When completed successfully traffic symbols are displayed and a voice alert TAS System Test Okay is heard In the eve...

Page 506: ...is no valid heading Map range is adjustable with the RANGE Knob from 2 to 40 nm as indicated by the map range rings The traffic mode and altitude display mode are annunciated in the upper left corner DISPLAYING TRAFFIC DATA Traffic information can be displayed on the following maps when the KTA 870 unit is operating PFD Inset Map Navigation Map Page Traffic Map Page Trip Planning Page Nearest Page...

Page 507: ...AFFIC Softkey to display traffic data on the inset map TRFC 1 3 Select the softkey again to display the traffic only inset TRFC 2 4 Select the softkey again to remove traffic data The Navigation Map Page Setup Menu also controls the display of traffic The setup menu controls the map range settings Traffic data symbols and labels can be decluttered from the display If a map range larger than the ma...

Page 508: ...e BACK Softkey Or 1 Press the MENU Key 2 Turn the small FMS Knob to select one of the following BELOW NORMAL ABOVE UNREST unrestricted 3 Press the ENT Key TRAFFIC MAP PAGE DISPLAY RANGE The display range on the Traffic Map Page can be changed at any time Map range is adjustable with the RANGE Knob from 2 to 40 nm as indicated by the map range rings Changing the display range on the Traffic Page 1 ...

Page 509: ... or off TRAFFIC MODE Selects the traffic mode for display select from All Traffic Displays all traffic TA PA Displays Traffic Alerts and Proximity Advisories TA ONLY Displays Traffic Alerts only TRAFFIC SMBL Selects the maximum range at which traffic symbols are shown TRAFFIC LBL Selects the maximum range at which traffic labels are shown with the option to turn off 6 Turn the small FMS Knob to sc...

Page 510: ...ining displayed until no TAs are detected in the area The PFD Inset Map is automatically displayed with TA traffic A single Traffic voice alert is generated when the number of TAs increases Figure 6 186 Traffic Annunciation PFD Inset Map Displays When TA is Detected SYSTEM STATUS The traffic mode is annunciated in the upper left corner of the Traffic Map Page Mode Traffic Mode Annunciation Traffic...

Page 511: ...mation appear in a banner at the lower left corner of maps on which traffic can be displayed Traffic Status Banner Annunciation Description TA OFF SCALE A Traffic Advisory is outside the selected display range Annunciation is removed when traffic comes within the selected display range TA X X XX System cannot determine bearing of Traffic Advisory Annunciation indicates distance in nm altitude sepa...

Page 512: ...Garmin G1000 Pilot s Guide for the Socata TBM 850 900 190 00709 05 Rev D 498 HAZARD AVOIDANCE Blank Page ...

Page 513: ...0 has two flight directors each operating within an IAU and referred to as pilot side and copilot side Commands for the selected flight director are displayed on both PFDs The flight directors provide Command Bars showing pitch roll guidance Vertical lateral mode selection and processing Autopilot communication Autopilot AP Autopilot operation occurs within the pitch roll and pitch trim servos and...

Page 514: ... annunciated Autopilot Engagement with Flight Director On If the flight director is on the autopilot will smoothly pitch and roll the airplane to capture the FD command bars The prior flight directore modes remain unchanged Autopilot Disengagement The most common way to disconnect the autopilot is to press and release the AP DISC Switch which is located on each control wheel An autopilot disconnec...

Page 515: ...se while in VOR LOC or OBS Mode in 1 increments on the Horizontal Situation Indicator HSI of the corresponding PFD Press to re center the Course Deviation Indicator CDI and return course pointer directly TO the bearing of the active waypoint station 10 SPD Key Toggles Airspeed Reference between IAS and Mach for Flight Level Change Mode 11 NOSE UP DN Wheel Adjusts the reference in Pitch Hold Vertic...

Page 516: ...gation source is VOR LOC and a valid frequency has been tuned The GA Switch is located on the throttle MEPT Switch Manual Electric Pitch Trim Used to command manual electric pitch trim An MEPT Switch is located on each control wheel The TBM 850 uses a two piece switch split into left and right sides On the left is the ARM Switch and on the right is the UP DN Switch The UP DN Switch when operated s...

Page 517: ...isabled when the autopilot is engaged Control Pressed Modes Selected Lateral Vertical FD Key Roll Hold default ROL Pitch Hold default PIT AP Key Roll Hold default ROL Pitch Hold default PIT CWS Button Roll Hold default ROL Pitch Hold default PIT GA Switch Takeoff on ground Go Around in air TO GA Takeoff on ground Go Around in air TO GA ALT Key Roll Hold default ROL Altitude Hold ALT VS Key Roll Ho...

Page 518: ...damper statuses are shown in the center of the AFCS Status Box Lateral flight director modes are displayed on the left and vertical on the right Armed modes are displayed in white and active in green GPS is Selected Navigation Source Command Bars Vertical Speed Reference Selected Altitude Figure 7 2 PFD AFCS Display AFCS Status Box Flight Director Indicator Arrow Active Active Yaw Damper Status La...

Page 519: ...ashing yellow mode annunciation and annunciator light indicate loss of sensor ADC or navigation data VOR LOC GPS VNV SBAS required to compute commands When such a loss occurs the system automatically begins to roll the wings level enters Roll Hold Mode or maintain the pitch angle enters Pitch Hold Mode depending on the affected axis The flashing annunciation stops when the affected mode key is pre...

Page 520: ...he yellow Aircraft Symbol The single cue Command Bars Figure 7 5 move together vertically to indicate pitch commands and bank left or right to indicate roll commands Figure 7 5 Single cue Command Bars Aircraft Symbol Command Bars If the attitude information being sent to the flight director becomes invalid or unavailable the Command Bars are removed from the display The flight director Command Bar...

Page 521: ...vertical speed may be used to climb descend to the Selected Altitude VS Key VS nnnn fpm 4000 to 3000 fpm 100 fpm Flight Level Change IAS Hold Maintains the current aircraft airspeed in IAS or Mach while the aircraft is climbing descending to the Selected Altitude FLC Key FLC nnn kt 80 to 265 kts 1 kt Flight Level Change Mach Hold FLC M nnn M 0 20 to 0 69 M 0 01 Vertical Path Tracking Captures and ...

Page 522: ...s activated In Pitch Hold Mode the flight director maintains a constant pitch attitude the pitch reference The pitch reference is set to the aircraft pitch attitude at the moment of mode selection If the aircraft pitch attitude exceeds the flight director pitch command limitations the flight director commands a pitch angle equal to the nose up down limit When operating in Pitch Hold Mode the pitch...

Page 523: ...TS annunciation flashing for up to 10 seconds and the appearance of the white ALT annunciation The Selected Altitude is shown as the Altitude Reference beside the ALTS annunciation At 50 feet from the Selected Altitude the flight director automatically transitions from Selected Altitude Capture to Altitude Hold Mode and holds the Selected Altitude shown as the Altitude Reference As Altitude Hold M...

Page 524: ...n Selected Altitude Capture Mode see Figure 7 7 Selected Altitude Capture Mode automatically transitions to Altitude Hold Mode when the altitude error is less than 50 feet In this case the Selected Altitude becomes the flight director s Altitude Reference NOTE Turning the ALT SEL Knob while in Altitude Hold Mode changes the Selected Altitude but not the flight director s Altitude Reference and doe...

Page 525: ...Speed Reference is also displayed above the Vertical Speed Indicator A Vertical Speed Reference Bug corresponding to the Vertical Speed Reference is shown on the indicator The Vertical Speed Reference shown both in the AFCS Status Box and above the Vertical Speed Indicator may be changed by Using the NOSE UP DN Wheel Pressing the CWS Button hand flying the aircraft to attain a new Vertical Speed R...

Page 526: ... indicated by a green FLC annunciation beside the Airspeed Reference in the AFCS Status Box The Airspeed Reference is also displayed directly above the Airspeed Indicator along with a bug corresponding to the Airspeed Reference along the tape Engine power must be adjusted to allow the autopilot to fly the aircraft at a pitch attitude corresponding to the desired flight profile climb or descent whi...

Page 527: ...ference in this case the CWS Button must be pressed again after the Selected Altitude is reached Airspeed Reference units can be manually toggled between IAS and Mach units using the SPD Key When the FLC Airspeed Reference is displayed in Mach the Airspeed Reference Bug is displayed on the Airspeed Indicator at the IAS corresponding to the selected Mach target speed and the current Mach number is ...

Page 528: ...nd Bars provide vertical profile guidance based on specified altitudes entered manually or loaded from the database at waypoints in the active flight plan or vertical direct to The appropriate VNV flight control modes are sequenced by the flight director to follow the path defined by the vertical profile Upon reaching the last waypoint in the VNV flight plan the flight director transitions to Alti...

Page 529: ...on starts to flash Flashing continues until acknowledged or the descent path is intercepted If the descent is not confirmed by the time of interception Vertical Path Tracking Mode remains armed and the descent is not captured In conjunction with the TOD top of descent within 1 minute annunciation in the PFD Navigation Status Box and the Vertical track voice message VNV indications VNV Target Altit...

Page 530: ... Tracking Active VNV Target Altitude Vertical Deviation Indicator VDI Required Vertical Speed Indication RVSI If the altimeter barometric setting is adjusted while Vertical Path Tracking is active the flight director increases decreases the descent rate by up to 500 fpm to re establish the aircraft on the descent path without commanding a climb Adjusting the altimeter barometric setting creates di...

Page 531: ... to allow profile re capture Figure 7 15 Flight Level Change VNV Non Path Descent To prevent immediate profile re capture the following must be satisfied At least 10 seconds have passed since the non path transition was initiated Vertical deviation from the profile has exceeded 250 feet but is now less than 200 feet Pressing the VNV Key twice re arms Vertical Path Tracking for immediate profile re...

Page 532: ...ransition Altitude Reference In This Case Equal To VNV Altitude Target Figure 7 16 VNV Altitude Capture NOTE Pressing the CWS Button while in VNV Target Altitude Capture Mode does not cancel the mode Changing the current VNV Target Altitude while VNV Target Altitude Capture Mode is active causes the flight director to revert to Pitch Hold Mode Vertical Path Tracking and the appropriate altitude ca...

Page 533: ...pilot coupled the aircraft will not level off at the MDA even if the MDA is set in the altitude preselect Upon reaching the glidepath the flight director transitions to Glidepath Mode and begins to capture and track the glidepath Figure 7 17 Glidepath Mode Armed Once the following conditions have been met the glidepath can be captured The active waypoint is at or after the final approach fix FAF V...

Page 534: ...tion source use the CDI Softkey to cycle through navigation sources if necessary 3 Press the APR Key Or 1 Ensure that GPS is the selected navigation source use the CDI Softkey to cycle through navigation sources if necessary 2 Ensure a LOC ILS approach is loaded into the active flight plan 3 Ensure the corresponding LOC frequency is tuned 4 Press the APR Key Figure 7 19 Glideslope Mode Armed Once ...

Page 535: ...mode can be selected only while on the ground by pushing the GA Switch The flight director Command Bars assume a wings level pitch up attitude Autopilot engagement while Takeoff Mode is active is inhibited while the aircraft is on the ground Pressing the GA Switch while in the air activates the flight director in a wings level pitch up attitude allowing the execution of a missed approach or a go a...

Page 536: ...rack Navigation LOC Capture Track No Glideslope LOC 25 Capture 10 Track Backcourse Capture Track Captures and tracks a localizer signal for backcourse approaches BC Key BC 25 Capture 10 Track Approach GPS Captures and tracks the selected navigation source GPS VOR LOC APR Key GPS 25 Approach VOR Capture Track VAPP 25 Capture 10 Track Approach LOC Capture Track Glideslope Mode automatically armed LO...

Page 537: ...its bank to 30 Table 7 4 Roll Hold Mode Responses Figure 7 23 Roll Hold Mode Annunciation The roll reference can be changed by pressing the CWS Button establishing the desired bank angle then releasing the CWS Button LOW BANK MODE When in Low Bank Mode the flight director limits the maximum commanded roll angle to 15 Low bank arc limits are displayed in green along the Roll Scale Low Bank Mode can...

Page 538: ...ug is turned more than 180 from the present heading e g a 270 turn to the right However Selected Heading changes of more than 330 at a time result in turn reversals Figure 7 25 Heading Select Mode Command Bars Track Selected Heading Pitch Hold Mode Active Heading Select Mode Active Selected Heading Selected Heading Bug NAVIGATION MODES GPS VOR LOC NOTE The selected navigation receiver must have a ...

Page 539: ...llowing occur the flight director reverts to Roll Hold Mode wings rolled level Different VOR tuned while in VOR Navigation Mode VOR Navigation Mode reverts to armed Navigation source manually switched with the CDI Softkey During a LOC ILS approach the FAF is crossed while in GPS Navigation Mode after the automatic navigation source switch from GPS to LOC If the navigation source is VOR or localize...

Page 540: ...left of the active lateral mode If the CDI is less than one dot the LOC is automatically captured when the APR Key is pressed VOR Approach Mode VAPP provides greater sensitivity for signal tracking than VOR Navigation Mode Selecting VOR Approach Mode 1 Ensure a valid VOR frequency is tuned 2 Ensure that VOR is the selected navigation source use the CDI Softkey to cycle through navigation sources i...

Page 541: ...proach is loaded into the active flight plan 3 Ensure the corresponding LOC frequency is tuned 4 Press the APR Key If the following occurs the flight director reverts to Roll Hold Mode wings rolled level Approach Mode is active and a Vectors To Final is activated Approach Mode is active and Navigation source is manually switched During a LOC ILS approach GPS Navigation Mode is active and the FAF i...

Page 542: ... the aircraft does not reset any reference data while in Backcourse Mode The autopilot guides the aircraft back to the Selected Course when the CWS Button is released INTERCEPTING AND FLYING A DME ARC The AFCS will intercept and track a DME arc that is part of the active flight plan provided that GPS Navigation Mode is engaged GPS is the active navigation source on the CDI and the DME arc segment ...

Page 543: ...itch axis uses pitch rate to stabilize the aircraft pitch attitude during flight director maneuvers Flight director pitch commands are rate and attitude limited combined with pitch damper control and sent to the pitch servo motor The pitch servo measures the output effort torque and provides this signal to the pitch trim servo The pitch trim servo commands the motor to reduce the average pitch ser...

Page 544: ...y of the autopilot and the yaw damper annunciator light is illuminated Autopilot and yaw damper status are displayed in the center of the AFCS Status Box Engagement is indicated by green AP and YD annunciations respectively CONTROL WHEEL STEERING During autopilot operation the aircraft may be hand flown without disengaging the autopilot Pressing and holding the CWS Button disengages the pitch and ...

Page 545: ... 5 seconds upon disengagement Figure 7 33 Yaw Damper Disengagement Automatic autopilot disengagement is indicated by a flashing red and white AP annunciation and by the autopilot disconnect aural alert which continue until acknowledged by pushing the AP DISC or MEPT ARM Switch Automatic autopilot disengagement occurs due to System failure Invalid sensor data Roll Trim input Stall warning Inability...

Page 546: ...rway V4 is intercepted following ATC vectors Airway V4 is flown to Salina VOR SLN using VOR navigation then airway V244 is flown using a GPS flight plan The ILS approach for runway 35L and LPV WAAS approach for runway 35R are shown and a missed approach is executed Figure 7 35 Flight Plan Overview 0 3 6 9 1 2 1 5 18 2 1 2 4 27 3 0 33 0 3 6 9 1 2 15 18 2 1 24 27 3 0 33 Salina VOR SLN KMKC Lamar VOR...

Page 547: ...to set the Selected Heading complying with ATC vectors to intercept Airway V4 Press the HDG Key to activate Heading Select Mode while the autopilot is engaged in the climb The autopilot follows the Selected Heading Bug on the HSI and turns the aircraft to the desired heading 4 As the aircraft nears the Selected Altitude the flight director transitions to Selected Altitude Capture Mode indicated by...

Page 548: ...et the navigation source to VOR c Use the CRS1 or CRS2 Knob to set the Selected Course to the desired value 255 Note that at this point the flight director is still in Heading Select Mode and the autopilot continues to fly the Selected Heading 290 d Press the NAV Key This arms VOR Navigation Mode and the white VOR annunciation appears to the left of the active lateral mode 2 As the aircraft nears ...

Page 549: ... Transition from VOR to GPS Navigation Mode a Press the CDI Softkey until GPS is the selected navigation source b Press the NAV Key to activate GPS Navigation Mode The autopilot guides the aircraft along the active flight plan leg 2 Following the flight plan the autopilot continues to steer the aircraft under GPS guidance Note that in GPS Navigation Mode course changes defined by the flight plan a...

Page 550: ... Flight Level Change Mode is used in the example Flight Level Change descent 1 Select Flight Level Change Mode a Using the ALT SEL Knob set the Selected Altitude to 10 000 feet b Press the FLC Key to activate Flight Level Change Mode The annunciation FLC appears next to the Airspeed Reference which defaults to the current aircraft airspeed Selected Altitude Capture Mode is armed automatically c If...

Page 551: ...H annunciation begins flashing do one of the following Press the VNV Key Turn the ALT SEL Knob to adjust the Selected Altitude If the descent is not confirmed by the time of interception Vertical Path Tracking Mode remains armed and the descent is not captured 2 When the top of descent TOD is reached the flight director transitions to Vertical Path Tracking Mode and begins the descent to the VNV T...

Page 552: ... maintains the Airspeed Reference 3 As the aircraft nears the Selected Altitude the flight director transitions to Selected Altitude Capture Mode indicated by the green ALTS annunciation flashing for up to 10 seconds The green ALT annunciation flashes for up to 10 seconds upon reaching 50 feet from the SelectedAltitude the autopilot transitions to Altitude Hold Mode and levels the aircraft After l...

Page 553: ...t the Runway 35L ILS approach for KCOS and select VECTORS for the transition Load and activate the approach into the flight plan b Use the HDG Knob to set the Selected Heading after getting vectors from ATC c Press the HDG Key The autopilot turns the aircraft to the desired heading d Use Heading Select Mode to comply with ATC vectors as requested 2 Arm LOC Approach and Glideslope modes a Ensure th...

Page 554: ...ILS Approach to KCOS H D G M o d e LOC APR GS Mode PETEY 1 2 3 GPS NAV Mode KCOS PYNON Flying a RNAV GPS approach with vertical guidance 1 Arm flight director modes for a RNAV GPS approach with vertical guidance a Make sure the navigation source is set to GPS use CDI Softkey to change navigation source b Select the Runway 35R LPV approach for KCOS Load and activate the approach into the flight pla...

Page 555: ...e The flight director now provides guidance to the missed approach point 4 There are two options available at this point as the autopilot flies the approach Push the AP DISC Switch at the decision height and land the aircraft Use the GA Switch to execute a missed approach 4 GPS APR GP Mode FALUR 1 2 3 GPS NAV Mode KCOS HABUK PYNON CEGIX Figure 7 43 LPV Approach to KCOS ...

Page 556: ...P annunciation flashing yellow for 5 seconds and the autopilot disconnect aural alert Flashes 5 sec 2 Start the climb to the prescribed altitude in the published Missed Approach Procedure in this case 10 000 ft a Press the AP Key to re engage the autopilot b Press the NAV Key to have the autopilot fly to the hold 3 Use the ALT SEL Knob to set a Selected Altitude to hold To hold the current airspee...

Page 557: ...190 00709 05 Rev D Garmin G1000 Pilot s Guide for the Socata TBM 850 900 543 AUTOMATIC FLIGHT CONTROL SYSTEM Figure 7 44 Go Around Missed Approach 3 4 1 2 KCOS MOGAL GA Mode GPS NAV Mode ...

Page 558: ...icated direction Elevator Mistrim Up Pitch Trim Failure or stuck MEPT Switch If AP engaged take control of the aircraft and disengage AP If AP disengaged move MEPT switches separately to unstick Yaw Trim Failure or stuck MEYT Switch If AP engaged take control of the aircraft and disengage AP If AP disengaged move MEYT switch to unstick Yaw Damper Failure YD control failure Roll Failure Roll axis c...

Page 559: ...il overspeed protection becomes active Overspeed protection is provided in situations where the flight director cannot acquire and maintain the mode reference for the selected vertical mode without exceeding the certified maximum autopilot airspeed When an autopilot overspeed condition occurs the Airspeed Reference appears in a box above the Airspeed Indicator flashing a yellow MAXSPD annunciation...

Page 560: ... s to electrically isolate the servo and solenoid components 5 Release the AP DISC Switch OVERPOWERING AUTOPILOT SERVOS In the context of this discussion overpowering refers to any pressure or force applied to the pitch controls when the autopilot is engaged A small amount of pressure or force on the pitch controls can cause the autopilot automatic trim to run to an out of trim condition Therefore...

Page 561: ...ess to essential information Either ChartView or FliteCharts may be configured in the system but not both The AOPA or AC U KWIK Airport Directory offers detailed information for a selected airport such as available services hours of operation and lodging options The optional SiriusXM Radio entertainment audio feature of the GDL 69A Data Link Receiver handles more than 170 channels of music news an...

Page 562: ...ing temporary loss of the GPS signal will cause SVT to be disabled until the required data is restored The SVT terrain display shows land contours colors are consistent with those of the topographical map display large water features towers and other obstacles over 200 AGL that are included in the obstacle database Cultural features on the ground such as roads highways railroad tracks cities and s...

Page 563: ...HWAY SYN TERR HRZN HDG and APTSIGNS The BACK Softkey returns to the previous level of softkeys Synthetic Terrain must be active before any other SVT feature may be activated HRZN HDG APTSIGNS and PATHWAY Softkeys are only available when the SYN TERR Softkey is activated gray with black characters After activating the SYN TERR Softkey the HRZN HDG APTSIGNS and PATHWAY softkeys may be activated in a...

Page 564: ...T display will cycle on or off with the SYN TERR Softkey Enabling and disabling Pathways 1 Press the PFD Softkey 2 Press the SYN VIS Softkey 3 Press the PATHWAY Softkey The Pathway feature will cycle on or off with the PATHWAY Softkey Enabling and disabling Horizon Headings 1 Press the PFD Softkey 2 Press the SYN VIS Softkey 3 Press the HRZN HDG Softkey The horizon heading display will cycle on or...

Page 565: ...n on the VDI whichever is less The altitude at which the pathway boxes are displayed is determined by the selected altitude during climb cruise and when the active leg is the final approach course prior to intercepting the glidepath glideslope During a descent except while on the approach glidepath glideslope the pathway boxes are displayed at the selected altitude or the VNAV altitude programmed ...

Page 566: ...active flight plan leg pathways are displayed as a series of boxes with pointers at each corner that point in the direction of the active waypoint Pathways are not displayed for the first leg of the flight plan if that segment is a Heading to Altitude leg The first segment displaying pathways is the first active GPS leg or active leg with a GPS overlay If this leg of the flight plan route is outsi...

Page 567: ...ublished lateral and vertical descent path or at the selected altitude whichever is lower During an ILS approach the initial approach segment is displayed in magenta at the segment altitudes if GPS is selected as the navigation source on the CDI When switching to localizer inbound with LOC selected as the navigation source on the CDI pathways are displayed in green along the localizer and glide sl...

Page 568: ... using other than GPS pathways are not displayed for that segment In this case the pathways displayed for the next leg may be outside the field of view and will be visible when the aircraft has turned in the direction of that leg Pathways are displayed along each segment including the path required to track course reversals that are part of a procedure such as holding patterns Pathways boxes will ...

Page 569: ... altitudes and direction when navigating a flight plan When on course and altitude the FPM is aligned inside the pathway boxes as shown Figure 8 7 The FPM may also be used to identify a possible conflict with the aircraft flight path and distant terrain or obstacles Displayed terrain or obstacles in the aircraft s flight path extending above the FPM could indicate a potential conflict even before ...

Page 570: ...her away Traffic within 250 feet laterally of the aircraft will not be displayed on the SVT display Traffic symbols and coloring are consistent with that used for traffic displayed in the Inset map or MFD traffic page If the traffic altitude is unknown the traffic will not be displayed on the SVT display For more details refer to the traffic system discussion in the Hazard Avoidance section AIRPOR...

Page 571: ... runway thresholds are depicted at their respective elevations as defined in the database In some situations where threshold elevations differ significantly crossing runways may appear to be layered As runways are displayed those within 45 degrees of the aircraft heading are displayed in white Other runways will be gray in color When an approach for a specific runway is active that runway will app...

Page 572: ...ed and yellow X symbols on the Inset Map and MFD map displays For more detailed information regarding Terrain SVT and TAWS refer to the Hazard Avoidance Section In some instances a terrain or obstacle alert may be issued with no conflict shading displayed on the synthetic terrain In these cases the conflict is outside the SVT field of view to the left or right of the aircraft TERRAIN Annunciation ...

Page 573: ...e height above terrain and distance from the aircraft Unlike the Inset map and MFD moving map display obstacles on the synthetic terrain display do not change colors to warn of potential conflict with the aircraft s flight path until the obstacle is associated with an actual FLTA alert Obstacles greater than 1000 feet below the aircraft altitude are not shown Obstacles are shown behind the airspee...

Page 574: ...of view 1 While viewing the Navigation Map Page press the MENU Key to display the PAGE MENU 2 Turn the large FMS Knob to highlight Map Setup and press the ENT Key Figure 8 12 Option Menus Navigation Map Page OPTIONS Menu Map Setup Menu Map Group Field of View Option Field of View 3 Turn the FMS Knob to select the Map Group and press the ENT Key 4 Turn the large FMS Knob to scroll through the Map G...

Page 575: ...Rev D 561 ADDITIONAL FEATURES The following figure compares the PFD forward looking depiction with the MFD plan view and FIELD OF VIEW turned on Figure 8 13 PFD and MFD Field of View Comparison Lines Depict PFD Field of View SVT View on the PFD Field of View on the MFD ...

Page 576: ...ilots of areas on an airport surface where positional awareness confusion or runway incursions happen most often Hot Spots are defined with a magenta circle or outline around the region of possible confusion Any map page that displays the navigation view can also show the SafeTaxi airport layout within the maximum configured range The following is a list of pages where the SafeTaxi feature can be ...

Page 577: ...TR 3 each time the softkey is selected for easy recognition of decluttering level Selecting the DCLTR Softkey removes the taxiway markings and airport feature labels Selecting the DCLTR 1 Softkey removes VOR station ID the VOR symbol and intersection names if within the airport plan view Selecting the DCLTR 2 Softkey removes the airport runway layout unless the airport in view is part of an active...

Page 578: ...NU Map Setup Option 3 Turn the FMS Knob to select the Aviation Group and press the ENT Key 4 Turn the large FMS Knob to scroll through the Aviation Group options to SAFETAXI 5 Turn the small FMS Knob to display the range of distances 6 Turn either FMS Knob to select the desired distance for maximum SafeTaxi display range 7 Press the ENT Key to complete the selection 8 Press the FMS Knob to return ...

Page 579: ...ether the databases are current out of date or not available Figure 8 17 Power up Page SafeTaxi Database SafeTaxi Database Power up Page Display Definition Normal operation SafeTaxi database is valid and within current cycle SafeTaxi database has expired Database card contains no SafeTaxi data Table 8 1 SafeTaxi Annunciation Definitions The SafeTaxi Region Version Cycle Effective date and Expires ...

Page 580: ... database cycle Figure 8 18 AUX System Status Page SafeTaxi Current Information SafeTaxi Data SafeTaxi information appears in blue and yellow text The EFFECTIVE date appears in blue when data is current and in yellow when the current date is before the effective date The EXPIRES date appears in blue when data is current and in yellow when expired Figures 8 18 and 8 19 NOT AVAILABLE appears in blue...

Page 581: ... the SafeTaxi database Figure 8 19 illustrates possible SafeTaxi database conditions that may appear on the AUX System Status Page The EFFECTIVE date is the beginning date for this database cycle If the present date is before the effective date the EFFECTIVE date appears in yellow and the EXPIRES date appears in blue The EXPIRES date is the revision date for the next database cycle NOT AVAILABLE i...

Page 582: ... display Figure 8 20 shows examples of off scale areas indicated by the grey shading Note the grey shading is for illustrative purposes only and will not appear on the published chart or MFD display These off scale areas appear on the chart to convey supplemental information However the depicted geographical position of this information as it relates to the chart planview is not the actual geograp...

Page 583: ...tion Page Selecting the GO BACK Softkey reverts to the top level softkeys and previous page Selecting the CHRT OPT Softkey advances to the next level of softkeys ALL HEADER PLAN PROFILE MINIMUMS FIT WDTH FULL SCN and BACK While viewing the CHRT OPT Softkeys after 45 seconds of softkey inactivity the system reverts to the chart selection softkeys Figure 8 21 ChartView SHW CHRT Chart Selection and C...

Page 584: ...rmation Page OPTIONS Menu Figure 8 22 Option Menus On the Waypoint Airport Information Page OPTIONS Menu select the desired chart and press the ENT Key to display the chart When no terminal procedure chart is available the banner CHART NOT AVAILABLE appears on the screen The CHART NOT AVAILABLE banner does not refer to the FliteCharts subscription but rather the availability of a particular airpor...

Page 585: ...nformation pages are unavailable the Approach Chart for the airport is shown Selecting a chart 1 While viewing the Navigation Map Page Flight Plan Page or Nearest Airports Page select the SHW CHRT Softkey The airport diagram or approach chart is displayed on the Airport Information Page 2 Press the FMS Knob to activate the cursor 3 Turn the large FMS Knob to select either theAirport Identifier Box...

Page 586: ...f the chart The aircraft symbol is not displayed when the Aircraft Not Shown Icon appears Figure 8 29 If the Chart Scale Box displays a banner NOT TO SCALE the aircraft symbol is not shown The Aircraft Not Shown Icon may appear at certain times even if the chart is displayed to scale Selecting the CHRT Softkey switches between the ChartView diagram and the associated map in the WPT page group In t...

Page 587: ... is from the INFO Box above the chart for certain airports This information source is not related to the INFO 1 or INFO 2 Softkey When the INFO Box is selected using the FMS Knob the G1000 softkeys are blank The Charlotte NC airport has five additional charts offering information the Airport Diagram Take off Minimums Class B Airspace Airline Parking Gate Coordinates and Airline Parking Gate Locati...

Page 588: ...Class B Chart is selected Pressing the ENT Key displays the Charlotte Class B Airspace Chart Figure 8 28 Figure 8 28 Airport Information Page Class B Chart Selected from INFO View Selecting the DP Softkey displays the Departure Procedure Chart if available Chart Not To Scale Aircraft Not Shown Icon Figure 8 29 Departure Information Page ...

Page 589: ...key displays the Standard Terminal Arrival Chart if available Figure 8 30 Arrival Information Page Aircraft Not Shown Icon Change Range and Scroll Through the Chart With the Joystick Chart Not To Scale Selecting the APR Softkey displays the approach chart for the airport if available Figure 8 31 Approach Information Page ...

Page 590: ...function is disabled NOTE Only NOTAMs applicable to specific information conveyed on the displayed Jeppesen chart are available when the NOTAM Softkey is selected There may be other NOTAMs available pertaining to the flight that may not be displayed Contact Jeppesen for more information regarding Jeppesen database published NOTAMs Recent NOTAMS applicable to the current ChartView cycle are include...

Page 591: ...e NOTAM Softkey Appears for Selected Airports Figure 8 34 Airport Information Page Local NOTAMs Local NOTAM on This Airport NOTAM Softkey Selected Selecting the NOTAM Softkey again removes the NOTAMS information Selecting the GO BACK Softkey reverts to the previous page Navigation Map Page Nearest Pages or Flight Plan Page ...

Page 592: ... ADDITIONAL FEATURES CHART OPTIONS Selecting the CHRT OPT Softkey displays the next level of softkeys the chart options level Figure 8 21 Selecting the ALL Softkey shows the entire approach chart on the screen Complete Chart Shown Figure 8 35 Approach Information Page ALL View ...

Page 593: ... HEADER Softkey shows the header view approach chart briefing strip on the screen Approach Chart Briefing Strip Figure 8 36 Approach Information Page Header View Selecting the PLAN Softkey shows the approach chart two dimensional plan view Figure 8 37 Approach Information Page Plan View Approach Chart Plan View ...

Page 594: ...scent profile strip Approach Chart Descent Profile Strip Figure 8 38 Approach Information Page Profile View Full Screen Width Selecting the MINIMUMS Softkey displays the minimum descent altitude visibility strip at the bottom of the approach chart Minimum Descent Altitude Visibility Strip Figure 8 39 Approach Information Page Minimums View Full Screen Width ...

Page 595: ...ONAL FEATURES If the chart scale has been adjusted to view a small area of the chart selecting the FIT WIDTH Softkey changes the chart size to fit the available screen width Select FIT WDTH Softkey to Show Full Chart Width Figure 8 40 Airport Information Page FIT WDTH Softkey Selected ...

Page 596: ...he large FMS Knob to highlight the AIRPORT INFO RUNWAYS or FREQUENCIES Box INFO Box shown 4 Turn the small FMS Knob to select the INFO Box choices If multiple choices are available scroll to the desired choice with the large FMS Knob and press the ENT Key to complete the selection 5 Press the FMS Knob again to deactivate the cursor Figure 8 41 Airport Information Page Full Screen and Info Window S...

Page 597: ...While viewing a terminal chart press the MENU Key to display the Page Menu OPTIONS 2 Turn the large FMS Knob to highlight the Chart Setup Menu Option and press the ENT Key 3 Turn the large FMS Knob to move between the FULL SCREEN and COLOR SCHEME Options 4 Turn the small FMS Knob to choose between the On and Off Full Screen Options Figure 8 42 Page Menus Full Screen On Off Selection Chart Setup Op...

Page 598: ... press the ENT Key Figure 8 43 Waypoint Information Page OPTIONS Menu 3 Turn the large FMS Knob to move to the COLOR SCHEME Option Figure 8 44 4 Turn the small FMS Knob to choose between Day Auto and Night Options 5 If Auto Mode is selected turn the large FMS Knob to select the percentage field Use the small FMS Knob to change the percentage value The percentage value is the day night crossover po...

Page 599: ...Garmin G1000 Pilot s Guide for the Socata TBM 850 900 190 00709 05 Rev D 585 ADDITIONAL FEATURES Figure 8 44 Arrival Information Page Day View Figure 8 45 Arrival Information Page Night View ...

Page 600: ...armin authorized service center for configuration System is configured for ChartView but no chart database is installed Contact Jeppesen for a ChartView database Normal operation ChartView database is valid and within current cycle ChartView database is within 1 week after expiration date A new cycle is available for update ChartView database is beyond 1 week after expiration date but still within...

Page 601: ...el indicates the function is disabled Select the MFD1 DB Softkey to place the cursor in the DATABASE window Scroll through the listed information by turning the FMS Knob or pressing the ENT Key until the ChartView database information is shown The ChartView database cycle number shown in the figure 1304 is deciphered as follows 13 Indicates the year 2013 04 Indicates the fourth issue of the ChartV...

Page 602: ...n date for the next database cycle The DISABLES date in yellow is the date that this database cycle is no longer viewable CYCLE NOT AVAILABLE in blue indicates no ChartView data is available on the database card or no database card is inserted Figure 8 48 AUX System Status Page ChartView Database Status ChartView Database is Disabled ChartView has Expired but is not Disabled ChartView Database is ...

Page 603: ...les of off scale areas indicated by the grey shading Note these areas are not shaded on the published chart These off scale areas appear on the chart to convey supplemental information However the depicted geographical position of this information as it relates to the chart planview is not the actual geographic position Therefore when the aircraft symbol appears within one of these areas the aircr...

Page 604: ...n Page Selecting the GO BACK Softkey reverts to the top level softkeys and previous page Selecting the CHRT OPT Softkey displays the available terminal chart and advances to the next level of softkeys ALL FIT WDTH FULL SCN and BACK While viewing the CHRT OPT Softkeys after 45 seconds of softkey inactivity the system reverts to the chart selection softkeys NOTAMs are not available with FliteCharts ...

Page 605: ...rmation Page OPTIONS Menu Figure 8 51 Option Menus On the Waypoint Airport Information Page OPTIONS Menu select the desired chart and press the ENT Key to display the chart When no terminal procedure chart is available the banner CHART NOT AVAILABLE appears on the screen The CHART NOT AVAILABLE banner does not refer to the FliteCharts subscription but rather the availability of a particular airpor...

Page 606: ... pages are unavailable the Approach Chart for the airport is shown Selecting a chart 1 While viewing the Navigation Map Page Flight Plan Page or Nearest Airports Page select the SHW CHRT Softkey The airport diagram or approach chart is displayed on the Airport Information Page 2 Press the FMS Knob to activate the cursor 3 Turn the large FMS Knob to select either theAirport Identifier Box or theApp...

Page 607: ...symbol is not shown on FliteCharts The Chart Scale Box displays a banner NOT TO SCALE and the Aircraft Not Shown Icon is displayed in the lower right corner of the screen Selecting the CHRT Softkey switches between the FliteCharts diagram and the associated map in the WPT page group In the example shown the CHRT Softkey switches between the Gainesville FL KGNV Airport Diagram and the navigation ma...

Page 608: ...ditional airport information is from the INFO Box above the chart Figure 8 55 or to the right of the chart Figure 8 56 for certain airports This information source is not related to the INFO 1 or INFO 2 Softkey When the INFO Box is selected using the FMS Knob the G1000 softkeys are blank The DeKalb Peachtree Airport has three additional charts offering information the Airport Diagram Alternate Min...

Page 609: ...n in Figure 8 56 ALTERNATE MINIMUMS is selected Pressing the ENT Key displays the IFR Alternate Minimums Chart Figure 8 57 Figure 8 57 Airport Information Page ALTERNATE MINIMUMS Selected from INFO View Selecting the DP Softkey displays the Departure Procedure Chart if available Figure 8 58 Departure Information Page ...

Page 610: ...v D 596 ADDITIONAL FEATURES Selecting the STAR Softkey displays the Standard Terminal Arrival Chart if available Figure 8 59 Arrival Information Page Selecting the APR Softkey displays the approach chart for the airport if available Figure 8 60 Approach Information Page ...

Page 611: ...ormation windows AIRPORT INFO 2 Press the FMS Knob to activate the cursor 3 Turn the large FMS Knob to highlight the INFO Box 4 Turn the small FMS Knob to select the INFO Box choices When the INFO Box is selected the G1000 softkeys are blank If multiple choices are available scroll to the desired choice with the large FMS Knob and press the ENT Key to complete the selection 5 Press the FMS Knob ag...

Page 612: ...8 ADDITIONAL FEATURES CHART OPTIONS Selecting the CHRT OPT Softkey displays the next level of softkeys the chart options level Figure 8 50 Selecting the ALL Softkey shows the entire chart on the screen Complete Chart Shown Figure 8 62 Airport Information Page ALL View Selected ...

Page 613: ...ATURES Selecting the FIT WIDTH Softkey fits the width of the chart in the display viewing area In the example shown the chart at close range is replaced with the full width chart Figure 8 63 Approach Information Page FIT WDTH Softkey Selected Select FIT WDTH Softkey to Show Full Chart Width ...

Page 614: ...fo Window Selecting the BACK Softkey or waiting for 45 seconds reverts to the chart selection softkeys The full screen view can also be selected by using the page menu option Selecting full screen On or Off 1 While viewing a terminal chart press the MENU Key to display the Page Menu OPTIONS 2 Turn the large FMS Knob to highlight the Chart Setup Menu Option and press the ENT Key 3 Turn the large FM...

Page 615: ...viewing a terminal chart press the MENU Key to display the Page Menu OPTIONS 2 Turn the large FMS Knob to highlight the Chart Setup Menu Option and press the ENT Key Figure 8 66 Waypoint Information Page OPTIONS Menu 3 Turn the large FMS Knob to move to the COLOR SCHEME Option Figure 8 67 4 Turn the small FMS Knob to choose between Day Auto and Night Options 5 If Auto Mode is selected turn the lar...

Page 616: ...ay must be changed in order for the new setting to become active This may be accomplished by selecting another page or changing the display range 6 Press the FMS Knob when finished to remove the Chart Setup Menu Figure 8 67 Approach Information Page Day View Figure 8 68 Approach Information Page Night View ...

Page 617: ...e displays and the definition of each Figure 8 69 Power up Page FliteCharts Database FliteCharts Database Power up Page Display Definition Blank Line system is not configured for FliteCharts Contact a Garmin authorized service center for configuration System is configured for FliteCharts but no chart database is installed Refer to Updating Garmin Databases in Appendix B for the FliteCharts databas...

Page 618: ...nd is no longer available for viewing This date is shown as the DISABLES date After the disable date the SHW CHRT Softkey label appears subdued and is unavailable until a revised issue of FliteCharts is installed NOTE A subdued softkey label indicates the function is disabled Select the MFD1 DB Softkey to place the cursor in the DATABASE window Scroll through the listed information by turning the ...

Page 619: ...ere The EXPIRES date in yellow is the revision date for the next database cycle The DISABLES date in yellow is the date that this database cycle is no longer viewable REGION and CYCLE NOT AVAILABLE in blue indicate that FliteCharts database is not available on the database card or no database card is inserted Figure 8 71 AUX System Status Page FliteCharts Datbase Status FliteCharts Expired but is ...

Page 620: ...is displayed as shown in Figure 8 72 Both Airport Directories are available for downloading at flygarmin com However copy only one of the databases to the Supplemental Data Card The system cannot recognize both databases simultaneously Selecting the Airport Directory Page 1 Turn the large FMS Knob to select the WPT page group 2 Turn the small FMS Knob to select theAIRPORT INFORMATION Page Initiall...

Page 621: ...tory is always available for use after the expiration date When turning on the system the Power up Page indicates whether the databases are current out of date or not available Figure 8 73 Power up Page Airport Directory Database Airport Directory Database Power up Page Display Definition Normal operation Airport Directory database is valid and within current cycle Airport Directory database has e...

Page 622: ... Indicates the second issue of the Airport Directory database for the year The Airport Directory EFFECTIVE date 15 APR 13 is the beginning date for the current database cycle The Airport Directory EXPIRES date 14 JUL 13 is the revision date for the next database cycle Figure 8 74 AUX System Status Page Airport Directory Current Information Airport Directory Data Airport Directory information appea...

Page 623: ...subscription It is not required to activate both the entertainment and weather service subscriptions with the GDL 69A Either or both services can be activated SiriusXM Satellite Radio uses one or both of the coded IDs to send an activation signal that when received by the GDL 69A allows it to play entertainment programming These IDs are located On the label on the back of the Data Link Receiver On...

Page 624: ...er product boxes are blank on the XM Information Page and a yellow Activation Required message is displayed in the center of the Weather Data Link Page Map Page Group The Service Class refers to the groupings of weather products available for subscription USING SIRIUSXM RADIO The XM Radio Page provides information and control of the audio entertainment features of the SiriusXM Satellite Radio Sele...

Page 625: ...tly by channel number Selecting a channel from the channel list 1 While on the XM Radio Page select the CHNL Softkey 2 SelecttheCH SoftkeytogoupthroughthelistintheChannelBox ormovedownthelistwiththeCH Softkey Or 1 Press the FMS Knob to highlight the channel list and turn the large FMS Knob to scroll through the channels 2 Press the ENT Key to activate the selected channel Selecting a channel direc...

Page 626: ...e desired category with the small FMS Knob and press the ENT Key Selecting All Categories places all channels in the list Figure 8 77 Categories List PRESETS Up to 15 channels from any category can be assigned a preset number The preset channels are selected by selecting the PRESETS and MORE Softkeys Then the preset channel can be selected directly and added to the channel list for the Presets cat...

Page 627: ...oftkeys VOLUME Radio volume is shown as a percentage Volume level is controlled by selecting the VOL Softkey which brings up the MUTE Softkey and the volume increase and decrease softkeys Adjusting the volume 1 With the XM Radio Page displayed select the VOL Softkey 2 Select the VOL Softkey to reduce volume or select the VOL Softkey to increase volume Once the VOL Softkey is selected the volume ca...

Page 628: ... 80 Scheduler Utility Page Entering a scheduler message 1 Select the AUX Utility Page 2 Press the FMS Knob momentarily to activate the flashing cursor 3 Turn the large FMS Knob to highlight the first empty scheduler message naming field 4 Use the FMS Knob to enter the message text to be displayed in the Messages Window and press the ENT Key 5 Press the ENT Key again or use the large FMS Knob to mo...

Page 629: ...Press the FMS Knob momentarily to activate the flashing cursor 3 Turn the large FMS Knob to highlight the name field of the scheduler message to be deleted 4 Press the CLR Key to clear the message text If the CLR Key is pressed again the message is restored 5 Press the ENT Key while the message line is cleared to clear the message time Scheduler messages appear in the Messages Window on the PFD Wh...

Page 630: ... modified and updated by the aircraft manufacturer NOTE Checklists cannot be edited from within the system The optional Checklist functions are displayed on two levels of softkeys that are available from any MFD page Figure 8 82 Checklist Softkeys CHKLIST DCLTR MAP The DONE Softkey label changes to UNDO when the checklist item is already checked EXIT DONE EMERGCY SHW CHRT Optional SYSTEM CPDLC SYS...

Page 631: ...hecklist File is Not Available The AUX System Status page also shows checklist validity and availability The valid CHECKLIST data gives the aircraft type and version number If the database is not valid the CHECKLIST line shows INVALID If the database is not installed the CHECKLIST line shows NOT AVAILABLE indicating that the database is not available on the database card or no database card is ins...

Page 632: ...ess the ENT Key or DONE Softkey to select the highlighted checklist item item turns green and a checkmark is placed in the box next to the item The next item is automatically highlighted for selection Press the CLR Key to remove a check mark from an item 8 Once the last item in a checklist is selected Go to the next checklist is highlighted Press the ENT Key to advance to the next checklist displa...

Page 633: ...de for the Socata TBM 850 900 190 00709 05 Rev D 619 ADDITIONAL FEATURES Immediately accessing emergency procedures 1 From any page select the CHKLIST Softkey 2 Select the EMERGCY Softkey Figure 8 86 Sample Emergency Checklist ...

Page 634: ...eters the G1000 system is capable of logging for the TBM850 900 aircraft Local Date YYYY MM DD Local Time HH MM SS Active Waypoint Distance nm Active Waypoint Bearing degrees mag UTC Offset HH MM Mag Variation degrees Active Waypoint Identifier Voltage 1 volts Voltage 2 volts Amps 1 amps Amps 2 amps AFCS On 0 false 1 true Latitude degrees AFCS Roll Mode e g HDG LOC GPS VOR ROL Longitude degrees Ri...

Page 635: ...will appear in the format shown in Figure 8 87 This file can be imported into most computer spreadsheet applications log_130210_104506_KIXD csv Local Date YYMMDD Local 24hr Time HHMMSS Nearest Airport A blank will be inserted if no airport is found Figure 8 87 Log File Format Data logging status can be monitored on the AUX UTILITY Page ...

Page 636: ...the AUX TELEPHONE and AUX TEXT MESSAGING Pages For operation using the cabin handset consult the instructions provided with the handset REGISTERING THE IRIDIUM SATELLITE SYSTEM A subscriber account must be established prior to using the Iridium Satellite System Before setting up an Iridium account obtain the serial number of the Iridium Transceiver GSR1 and the System ID by selecting the AUX SYSTE...

Page 637: ...E IRIDIUM TELEPHONE SYSTEM The Iridium Satellite Telephone System may be turned on or off by using the page menu To enable the Iridium telephone system 1 With the AUX TELEPHONE Page displayed select the MENU Key on the MFD to display the Page Menu 2 Turn either FMS Knob to place the cursor on Enable Iridium Transmission 3 Press the ENT Key To disable the Iridium telephone system 1 With the AUX TEL...

Page 638: ...n Phone is disabled Phone is reserved for data transmission Calling other phone or incoming call from other phone Other phone is on hold Phones are connected Table 8 5 Telephone Symbols INCOMING CALLS NOTE Outside callers should dial 00 8816 or 8817 aircraft phone number when calling the aircraft Iridium Telephone System When a phone call is received while viewing MFD pages other than the AUX TELE...

Page 639: ...n Answer Incoming Call 4 Press the ENT Key Selecting the IGNORE Softkey will extinguish the pop up window and leave the current call unanswered Selecting the IGNRE ALL Softkey will extinguish the pop up window for the current and all future incoming calls and leave the current call unanswered Selecting the TEL Softkey will display the AUX TELEPHONE Page allowing additional call information to be v...

Page 640: ...U Key to display the Page Menu c Turn either FMS Knob to place the cursor on Dial a Phone Call d Press the ENT Key Figure 8 92 Enter Phone Number 3 Selecting the number softkeys on the MFD enter country code area code phone number when calling a non satellite telephone system Enter Satellite Country Code shown in the following table phone number when placing a call to another satellite telephone s...

Page 641: ...900 190 00709 05 Rev D 627 ADDITIONAL FEATURES 4 Press the ENT Key OK is highlighted as in Figure 8 93 Figure 8 93 Make the Call 5 Press the ENT Key The system will begin calling the number as in Figure 8 94 Figure 8 94 System is Making the Connection ...

Page 642: ...ay be sent to an email address or text message capable cellular telephone Message length is limited to 160 characters including the email address Senders should address text messages to the aircraft by entering aircraft Iridium phone number msg iridium com The text messaging user interface is mainly through the AUX TEXT MESSAGING Page Viewing the Text Messaging Page 1 Turn the large FMS Knob on th...

Page 643: ... Messaging Page Message Symbol Description Received text message that has not been opened Received text message that has been opened Saved text message draft not sent System is sending text message Text message has been sent System failed to send text message Predefined text message Table 8 6 Text Message Symbols ...

Page 644: ... Received New Text Message Pop up New Text Message Symbol on MFD Page Select the VIEW Softkey to view the message Figure 8 98 Selecting the IGNORE Softkey will extinguish the pop up window and leave the text message unopened Selecting the IGNR ALL Softkey will extinguish the pop window and ignore all future incoming text messages Selecting the SMS Softkey will display the AUX TEXT MESSAGING Page F...

Page 645: ... on Disable New Message Popups or Enable New Message Popups 3 Press the ENT Key The pop up alert will not be displayed when an incoming text message is received Figure 8 99 Disabling New Text Message Pop Ups REPLY TO A TEXT MESSAGE After reading a text message a reply may be sent Replying to a text message While viewing the text message select the REPLY Softkey Or 1 Press the MENU Key to display t...

Page 646: ...e TO field Enter country code area code phone number when sending to a text capable telephone An email address may also be entered Entry can be accomplished through the alphanumeric keys on the MFD Controller or combination of the FMS Knob on the controller and softkeys on the MFD The FMS Knob is used to enter letters and numbers or numbers can be entered from the MFD by selecting the NUMBERS Soft...

Page 647: ... Select the CANCEL Softkey to delete the message PREDEFINED TEXT MESSAGES Time and effort can be saved in typing text messages that are used repeatedly by saving these messages as a predefined message Creating a predefined text message 1 While viewing the AUX TEXT MESSAGING Page press the MENU Key to display the Page Menu Figure 8 101 Creating Editing Predefined Messages 2 Turn either FMS Knob to ...

Page 648: ...d softkeys on the MFD The FMS Knob is used to enter letters and numbers or numbers can be entered from the MFD by selecting the NUMBERS Softkey Select the CAP LOCK Softkey to create upper and lower case alpha characters Special characters can be accessed by selecting the SYMBOLS Softkey 6 Press the ENT Key The cursor is now displayed in the MESSAGE field 7 Enter the desired message using any combi...

Page 649: ...ation of the FMS Knob on the controller and softkeys on the MFD The FMS Knob is used to enter letters and numbers or numbers can be entered from the MFD by selecting the NUMBERS Softkey Select the CAP LOCK Softkey to create upper and lower case alpha characters Special characters can be accessed by selecting the SYMBOLS Softkey 3 Press the ENT Key The cursor is now displayed in the MESSAGE field F...

Page 650: ... in the Inbox as Read or Unread messages The Outbox contains Sent and Unsent text messages Saved messages that are meant to be sent later are stored as Drafts Each text message box may be viewed separately or together in any combination Show Inbox messages While viewing the AUX TEXT MESSAGING Page select the ARRANGE Softkey then select the INBOX Softkey Figure 8 105 Or 1 Press the MENU Key to disp...

Page 651: ...The viewed messages may be listed according to the date time the message was sent or received the type of message read unread sent unsent etc or by message address Viewing messages sorted by message date time While viewing the AUX TEXT MESSAGING Page select the ARRANGE Softkey then select the TIME Softkey Figure 8 105 Or 1 Press the MENU Key to display the Page Menu 2 Turn either FMS Knob to place...

Page 652: ... of a text message 1 While viewing the AUX TEXT MESSAGING Page select the desired message box 2 Press the FMS Knob to activate the cursor 3 Turn either FMS Knob to select the desired message 4 Select the VIEW Softkey Or Press the ENT Key Or a Press the MENU Key to display the Page Menu b Turn either FMS Knob to place the cursor on View Selected Message c Press the ENT Key Message content is displa...

Page 653: ...T Key The message symbol now indicates the message has been opened Marking all messages as read 1 While viewing the Inbox on the AUX TEXT MESSAGING Page press the MENU Key to display the Page Menu 2 Turn either FMS Knob to place the cursor on Mark All New Messages As Read 3 Press the ENT Key A confirmation window is displayed 4 With cursor highlighting YES press the ENT Key The message symbols now...

Page 654: ...t This information may be used by aircraft maintenance personnel in determining specific maintenance requirements The Maintenance Logs feature is accessible by entering a password No pilot action is required Viewing the Maintenance Logs Page 1 Turn the large FMS Knob on the MFD to select the AUX page group 2 Turn the small FMS Knob to select MAINTENANCE LOG as seen in Figure 8 107 The AUX MAINTENA...

Page 655: ...ob to select VIDEO and display the AUX VIDEO Page The video display softkeys shown below appear on the AUX VIDEO Page Figure 8 108 Video Display Softkeys Pressing the BACK Softkey returns to the Previous Level Softkeys SAT MAP SYSTEM SETUP VID ZM VID ZM HIDE MAP CNTRST BRIGHT SAT RESET BACK CNTRST BRIGHT INPUT MAP ACTV VID ACTV CPDLC Control of the AUX VIDEO Page can also be accessed through the P...

Page 656: ... Adjusting the video settings 1 With the AUX VIDEO Page displayed press the SETUP Softkey 2 Press the BRIGHT or BRIGHT to adjust display brightness in five percent increments from 0 to 100 3 Press the CNTRST or CNTRST to adjust display contrast in five percent increments from 0 to 100 4 Press the SAT or SAT to adjust display saturation in five percent increments from 0 to 100 5 If desired return t...

Page 657: ...s the map and displays video on the full screen The softkey label changes to grey with black characters Pressing the HIDE MAP Softkey again restores the map view and the small video image The softkey label returns to white characters on a black background Figure 8 110 AUX Video Split Screen Video Display Map View Figure 8 111 Full Screen Video Display ...

Page 658: ... the Split Screen mode pressing the MAP ACTV or VID ACTV Softkey determines which display the Joystick adjusts Pressing the softkey to display MAP ACTV allows the Joystick to control the range setting of the map display Pressing the softkey to display VID ACTV allows the Joystick to control the zoom setting of the video display When zooming in on the video display a Zoom Window will appear in the ...

Page 659: ... blue over brown attitude display SVT becomes disabled without the following data resources Attitude data Heading data GPS position data 9 Arc second Terrain data Obstacle data TAWS function is not available in test mode or failed The position of the aircraft exceeds the range of the terrain database REVERSIONARY MODE SVT can be displayed on the Multifunction Display MFD in Reversionary Mode If it...

Page 660: ...e condition The display shows either a brown or blue colored bar at the top or bottom of the screen to represent earth or sky This is intended to prevent losing sight of the horizon during extreme pitch attitudes Figure 8 114 Unusual Attitude Display The blue colored bar is also displayed when terrain gradient is great enough to completely fill the display Blue Band Figure 8 115 Blue Sky Bar with ...

Page 661: ...reakers to ensure that power is applied to the Data Link Receiver Ensure that nothing is plugged into the MUSIC 1 or MUSIC 2 jacks because that would prevent XM radio from being heard For troubleshooting purposes check the LRU Information Box on the AUX System Status Page for Data Link Receiver GDL 69 69A status serial number and software version number If a failure has been detected in the GDL 69...

Page 662: ...e MFD Loss of signal signal strength too low for receiver LOADING XM Radio Page MFD Acquiring channel audio or information OFF AIR XM Radio Page MFD Channel not in service XM Radio Page MFD Missing channel information WEATHER DATA LINK FAILED Weather Datalink Page MFD No communication from Data Link Receiver within last 5 minutes ACTIVATION REQUIRED XM Information Page MFD SiriusXM subscription is...

Page 663: ...ingle chime every 5 seconds and flashing CAUTION softkey annunciation The softkey annunciation flashes and the corresponding aural alert sounds until acknowledged by depressing the softkey A CAS message does not appear more than once at a given time Warning and caution CAS messages flash when they are generated and continue to flash until acknowledged Advisory CAS messages flash for 5 seconds or u...

Page 664: ...ering system failure FIRE Engine compartment fire temperature over 200 C if installed FLAPS ASYM Dissymmetry between left and right hand flaps FUEL OFF Fuel tank selectors set to Off FUEL PRESS Fuel pressure below 10 psi GEAR UNSAFE Gears are in an unsafe configuration ITT Engine start ITT over 1000 C 870 C 5 s or 840 C 20 s Engine running ITT over 840 C OIL PRESS Oil pressure below 60 psi OXYGEN ...

Page 665: ...R GPU receptacle door not closed IGNITION Ignition exciter running INERT SEP FAIL Inertial separator failure INERT SEP ON Inertial separator extended LOW LVL FAIL L R Low fuel level sensor failure for specified tank LOW VOLTAGE Battery voltage below 26 V MAIN GEN Starter generator unconnected MAX DIFF MODE MAX DIFF PRESS MODE activated NG HI Generator speed is more than 103 OIL PRESS Oil pressure ...

Page 666: ...Comparator Window Text Condition ALT MISCOMP Difference in altitude sensors is 200 ft IAS MISCOMP If both airspeed sensors detect 35 knots this is inhibited If either airspeed sensor detects 35 knots and the difference in sensors is 10 knots If either airspeed sensor detects 80 knots and the difference in sensors is 7 knots HDG MISCOMP Difference in heading sensors is 6 degrees PIT MISCOMP Differe...

Page 667: ...or Window Text Condition BOTH ON ADC1 Both PFDs are displaying data from the number oneAir Data Computer BOTH ON ADC2 Both PFDs are displaying data from the number twoAir Data Computer BOTH ON AHRS1 Both PFDs are displaying data from the number oneAttitude Heading Reference System BOTH ON AHRS2 Both PFDs are displaying data from the number twoAttitude Heading Reference System BOTH ON GPS1 Both PFD...

Page 668: ...ies are displayed in the Messages Window and convey messages to the flight crew regarding problems with the G1000 or certain aircraft systems Typically a large red X appears in a window when a related LRU fails or detects invalid data The following section describes various system annunciations Refer to the POH for additional information regarding pilot responses to these annunciations NOTE Upon p...

Page 669: ...nciations GDC 74B Air Data Computer GTX 33 D Transponder Or GIA 63W Integrated Avionics Units GDC 74B Air Data Computer GEA 71 Engine Airframe Unit Or GIA 63W Integrated Avionics Unit GIA 63W Integrated Avionics Units GRS 77 AHRS Or GMU 44 Magnetometer GIA 63W Integrated Avionics Units GIA 63W Integrated Avionics Units ...

Page 670: ...ormation from the AHRS Indicates a configuration module failure Display system is not receiving airspeed input from air data computer Display system is not receiving valid heading input from AHRS Display system is not receiving altitude input from the air data computer Display system is not receiving vertical speed input from the air data computer Display system is not receiving valid transponder ...

Page 671: ...isting operational priorities must be considered when responding to a message Always use sound pilot judgment The Pilot s Operating Handbook POH takes precedence over any conflicting guidance found in this section MFD PFD MESSAGE ADVISORIES Message Comments DATA LOST Pilot stored data was lost Recheck settings The pilot profile data was lost System reverts to default pilot profile and settings The...

Page 672: ...ing Reducing power usage PFD1 KEYSTK PFD1 key name Key is stuck A key is stuck on the PFD and or MFD bezel Attempt to free the stuck key by pressing it several times The G1000 system should be serviced if the problem persists PFD2 KEYSTK PFD2 key name Key is stuck MFD1 KEYSTK MFD key name Key is stuck CNFG MODULE PFD1 configuration module is inoperative The PFD1 configuration module backup memory ...

Page 673: ...cle database error exists The MFD and or PFD detected a failure in the obstacle database Ensure that the data card is properly inserted Replace data card If problem persists The G1000 system should be serviced PFD1 DB ERR PFD1 obstacle database error exists PFD2 DB ERR PFD2 obstacle database error exists MFD1 DB ERR MFD1 obstacle database missing The obstacle database is present on another LRU but...

Page 674: ... DB MISMATCH Standby Navigation database mismatch The PFDs and MFD have different standby navigation database versions or regions installed Check the AUX SYSTEM STATUS Page to determine versions or regions Also check the AUX SYSTEM STATUS Page for a database synchronization function not completed After synchronization is complete power must be turned off then on DB MISMATCH Terrain database mismat...

Page 675: ...be available and the audio panel may still be usable The G1000 system should be serviced when possible GMA2 SERVICE GMA2 needs service Return unit for repair GIA 63W MESSAGE ADVISORIES Message Comments GIA1 CONFIG GIA1 config error Config service req d The GIA1 and or GIA2 configuration settings do not match backup configuration memory The G1000 system should be serviced GIA2 CONFIG GIA2 config er...

Page 676: ...mismatch communication halted The NAV1 and or NAV2 has incorrect software installed The system should be serviced MANIFEST NAV2 software mismatch communication halted COM1 TEMP COM1 over temp Reducing transmitter power The system has detected an over temperature condition in COM1 and or COM2 The transmitter is operating at reduced power If the problem persists the G1000 system should be serviced C...

Page 677: ...r A failure has been detected in the GPS1 and or GPS2 receiver The receiver may still be available The G1000 system should be serviced GPS2 SERVICE GPS2 needs service Return unit for repair NAV1 SERVICE NAV1 needs service Return unit for repair A failure has been detected in the NAV1 and or NAV2 receiver The receiver may still be available The G1000 system should be serviced NAV2 SERVICE NAV2 need...

Page 678: ...be serviced MANIFEST GTX2 software mismatch communication halted The transponder has incorrect software installed The G1000 system should be serviced XPDR1 SRVC XPDR1 needs service Return unit for repair The 1 transponder should be serviced when possible XPDR2 SRVC XPDR2 needs service Return unit for repair The 2 transponder should be serviced when possible XPDR1 FAIL XPDR1 is inoperative There is...

Page 679: ...ate Update magnetic field model when practical AHRS2 SRVC AHRS2 Magnetic field model needs update The 2 AHRS earth magnetic field model is out of date Update magnetic field model when practical GEO LIMITS AHRS1 too far North South no magnetic compass The aircraft is outside geographical limits for approved AHRS operation Heading is flagged as invalid GEO LIMITS AHRS2 too far North South no magneti...

Page 680: ...en lost CPDLC CPDLC facility logon failed Logon failed Check pertinent entries for accuracy CPDLC CPDLC data link available Logon is still required The data link is ready for use but logon to the facility has not yet taken place GDRTEMP GDR over temp Reducing transmitter power The system has detected an over temperature condition in the GDR The transmitter operates at reduced power If the problem ...

Page 681: ...tion The G1000 system should be serviced GWX FAIL GWX is inoperative The GDU is not receiving status packet from the GWX 70 or the GWX 70 is reporting a fault The GWX 70 radar system should be serviced GWX SERVICE GWX needs service Return unit for repair A failure has been detected in the GWX 70 The GWX 70 may still be usable WX ALERT Possible severe weather ahead The GWX 70 indicates severe weath...

Page 682: ...ments GMC CONFIG GMC Config error Config service req d Error in the configuration of the GMC 710 GMC FAIL GMC is inoperative A failure has been detected in the GMC 710 The GMC 710 is unavailable MANIFEST GMC software mismatch Communication halted The GMC 710 has incorrect software installed The G1000 system should be serviced GMC KEYSTK GMC key name Key is stuck A key is stuck on the GMC 710 bezel...

Page 683: ...C Inside airspace The aircraft is inside the special use airspace ARSPC AHEAD Airspace ahead less than 10 minutes Special use airspace is ahead of aircraft The aircraft will penetrate the airspace within 10 minutes ARSPC NEAR Airspace near and ahead Special use airspace is near and ahead of the aircraft position ARSPC NEAR Airspace near less than 2 nm Special use airspace is within 2 nm of the air...

Page 684: ...l magnetic heading by more than 2 SVT SVT DISABLED Out of available terrain region Synthetic Vision is disabled because the aircraft is not within the boundaries of the installed terrain database SVT SVT DISABLED Terrain DB resolution too low Synthetic Vision is disabled because a terrain database of sufficient resolution 9 arc second or better is not currently installed SCHEDULER message Message ...

Page 685: ...iding sustained force in the indicated direction Aircraft rudder retrim after substantial pitch and power changes required Rudder Mistrim Left Aileron Mistrim Right Roll servo providing sustained force in the indicated direction Aileron Mistrim Left Elevator Mistrim Down Pitch servo providing sustained force in the indicated direction May indicate a failure of the pitch trim servo or trim system E...

Page 686: ...rvo power up and preflight system tests as this may cause the preflight system test to fail or never to start if servos fail their power up tests Power must be cycled to the servos to remedy the situation TERRAIN SVT ALERTS Alert Type PFD MFD TERRAIN SVT Page Annunciation MFD Pop Up Alert Aural Message Reduced RequiredTerrain ClearanceWarning RTC Warning Terrain Terrain ImminentTerrain ImpactWarni...

Page 687: ...le database unavailable or invalid Terrain SVT operating with PFD Terrain or Obstacle databases None TERRAIN DATABASE FAILURE None Terrain System Test Fail TERRAIN FAIL Terrain System Failure Terrain or Obstacle database unavailable or invalid invalid software configuration system audio fault TERRAIN FAIL Terrain System Failure No GPS position NO GPS POSITION Terrain System Not Available Excessive...

Page 688: ...l Up Pull Up or ObstacleAhead Pull Up ObstacleAhead Pull Up Imminent Obstacle ImpactWarning IOI or ObstacleAhead Pull Up ObstacleAhead Pull Up or Obstacle Obstacle Pull Up Pull Up Reduced RequiredTerrain Clearance Caution RTC or Caution Terrain Caution Terrain or TerrainAhead TerrainAhead ImminentTerrain Impact Caution ITI or TerrainAhead TerrainAhead or Caution Terrain Caution Terrain Reduced Req...

Page 689: ...he aircraft is one minute from Top of Descent Issued only when vertical navigation is enabled Airspeed Airspeed Played when the indicated airspeed is below a given threshold for a given aircraft configuration Note this alert may be heard under normal conditions during the landing flare Incoming Call Satellite telephone is receiving a call ATC Message New Data Link message received from ATC Traffic...

Page 690: ...r more of these waypoints did not import successfully Too many points Flight plan truncated The flight plan on the SD card contains more waypoints than the system can support The flight plan was imported with as many waypoints as possible Some waypoints not loaded Waypoints locked The flight plan on the SD card contains one or more waypoints that the system cannot find in the navigation database T...

Page 691: ...mation These discrepancies could come in the form of an incorrect procedure incorrectly identified terrain obstacles and fixes or any other displayed item used for navigation or communication in the air or on the ground Go to FlyGarmin com and select Aviation Data Error Report NAVIGATION DATABASES The navigation database is updated on a 28 day cycle The ChartView database is updated on a 14 day cy...

Page 692: ...ve the SD card when finished 8 Apply power to the system and press the ENT Key to acknowledge the startup screen 9 Turn the large FMS Knob to select theAUX Page group on the MFD 10 Turn the small FMS Knob to select the System Status Page 11 Press the Display Database Selection Softkey to show active navigation database information for each display MFD1 DB PFD1 DB PFD2 DB Verify the correct active ...

Page 693: ... database is current and the active database is out of date the display will upload the standby database into the active internal database location Uploading the standby database to the active location takes approximately 45 55 seconds The pilot is alerted that the update is complete by a system alert message NAV DB UPDATED Loading a standby navigation database 1 With the system OFF insert the SD ...

Page 694: ...owledge the startup screen 10 Turn the large FMS Knob to select the AUX Page group on the MFD 11 Turn the small FMS Knob to select the System Status Page 12 The new database is copied to the SD card in the bottom card slot of each PFD Progress can be monitored in the SYNC STATUS field When copying is finished Complete is displayed 13 Turn system power OFF 14 Remove the SD card from the top card sl...

Page 695: ... features such as rivers lakes and towns It is updated only periodically with no set schedule There is no expiration date The terrain database contains the terrain mapping data The airport terrain database contains increased resolution terrain data around airports These databases are updated periodically and have no expiration date The obstacle database contains data for obstacles such as towers t...

Page 696: ...ory AOPA and Terrain This feature applies only to databases that are stored on the SD card that resides in the bottom slot of each display This feature does not apply to the navigation database which is stored internally in each display or to the charts databases FliteCharts and ChartView which are only required to be present on the MFD The typical procedure would be to download new databases to t...

Page 697: ...is displayed the problem must be corrected before the synchronization can be completed A power cycle is required to restart synchronization when Card Full or Err is shown Figure B 9 Synchronization Error Message Database Synchronization Error Message Error Message Description Canceled Database synchronization has been canceled by removing the bottom SD card in display being updated Card Full SD ca...

Page 698: ... Verifying message may be seen If this message is present wait for the system to finish loading before proceeding to step 5 Figure B 10 Database Information on the Power up Screen 5 Acknowledge the Power up Page agreement by pressing the ENT Key or the right most softkey 6 Turn the large FMS Knob to select the AUX Page group on the MFD 7 Turn the small FMS Knob to select the System Status Page 8 M...

Page 699: ...example GRS1 is the first AHRS to indicate an update is available In actuality this is dependent on which AHRS is the first to report status to the system GRS2 may be displayed before GRS1 The order is not important only that both AHRS be updated Figure B 12 GRS1 Magnetic Field Variation Database Update Prompt Loading the magnetic field variation database update 1 With OK highlighted as seen in Fi...

Page 700: ...M 850 900 190 00709 05 Rev D 686 APPENDIX B 3 With OK highlighted press the ENT Key on the MFD A progress monitor is displayed as shown in Figure B 15 When the upload is complete the system is ready for use Figure B 15 Uploading Database to GRS2 ...

Page 701: ...e Bearing The compass direction from the present position to a destination waypoint BFO beat frequency oscillator BKSP backspace BRG bearing C center runway ºC degrees Celsius CA Course to Altitude CALC calculator Calibrated Airspeed Indicated airspeed corrected for installation and instrument errors CD Course to DME distance CDA Current Data Authority CDI Course Deviation Indicator CDU Control Di...

Page 702: ...board ENG engine ENGD engaged ENR enroute Enroute Safe Altitude The recommended minimum altitude within ten miles left or right of the desired course on an active flight plan or direct to ENT enter EPE Estimated Position Error EPU Estimated Position Uncertainty ERR error ESA Enroute Safe Altitude Estimated Position Error A measure of horizontal GPS position error derived by satellite geometry cond...

Page 703: ...based upon indications from a magnetic compass or a properly set directional gyro HF Hold Terminating at Fix HFOM Horizontal Figure of Merit Hg mercury HI high HI SENS High Sensitivity HM Hold with Manual Termination Horizontal Figure of Merit A measure of the uncertainty in the aircraft s horizontal position hPa hectopascal HPL Horizontal Protection Level hr hour HSDB High Speed Data Bus HSI Hori...

Page 704: ...ne MEPT manual electric pitch trim MFD Multi Function Display MGRS Military Grid Reference System MHz megahertz MIC microphone MIN minimum Minimum Safe Altitude Uses Grid MORAs to determine a safe altitude within ten miles of the aircraft present position MKR marker beacon MOA Military Operations Area MOV movement mpm meters per minute MSA Minimum Safe Altitude MSAS Multi functional Satellite Augm...

Page 705: ...SRVC SVC service STAL stall STAR Standard Terminal Arrival Route STATS statistics STBY standby STD standard STRMSCP Stormscope SUA Special Use Airspace SUSP suspend SVT Synthetic Vision Technology SW software SYS system T true TA Traffic Advisory TACAN Tactical Air Navigation System TAF Terminal Aerodrome Forecast TAS True Airspeed TAS Traffic Advisory System true airspeed TAT Total Air Temperatur...

Page 706: ... Very High Frequency VI Heading Vector to Intercept VLOC VOR Localizer Receiver VM Heading Vector to Manual Termination VMC Visual Meteorological Conditions VNAV VNV vertical navigation VOL volume VOR VHF Omni directional Range VORTAC very high frequency omnidirectional range station and tactical air navigation VPL Vertical Protection Level VPROF VNV profile vertical profile VPTH VNV path vertical...

Page 707: ...an and parts of northern Australia How does SBAS affect approach operations LNAV VNAV LP and LPV RNAV approaches use the accuracy of SBAS to include vertical glide path guidance capability The additional accuracy and vertical guidance capability allows improved instrument approaches to an expanded number of airports throughout the U S The implementation of RNAV LP and LPV approaches further improv...

Page 708: ...ortion of the flight plan remains active unless the instrument procedure is activated This may be done either when the procedure is loaded or at a later time Flight plans can also be stored with an approach a departure or an arrival Note that the active flight plan is erased when the system is turned off Also the active flight plan is overwritten when another flight plan is activated When storing ...

Page 709: ...ed i e no OBS or SUSP annunciation For automatic sequencing to occur the aircraft must also cross the bisector of the turn being navigated The bisector is a line passing through the waypoint common to two flight plan legs at an equal angle from each leg How can a waypoint be skipped in an approach a departure or an arrival The G1000 allows the pilot to manually select any approach departure or arr...

Page 710: ... procedures must be followed as indicated on the approach plate To execute the missed approach procedure prior to the MAP not recommended select the Active Flight Plan Page and use the ACT LEG Softkey to activate the missed approach portion of the procedure After a missed approach how can the same approach be re selected How can a new approach be activated NOTE Do not attempt to reactivate the cur...

Page 711: ...rectional radio beacon VOR VOR DME VOR ILS VORTAC TACAN LINE SYMBOLS Item Symbol ICAO Control Area Class B Airspace Mode C Tower Area Warning Area Alert Area Caution Area Danger Area Prohibited Area Restricted Area Training Area Unknown Area Class C Terminal Radar Service Area Mode C Area Military Operations Area MOA State or Province Border International Border Road Railroad Latitude Longitude MA...

Page 712: ...bled User Waypoint Vertical Navigation Along Track Waypoint Parallel Track Waypoint Unanchored Flight Path Waypoint Top of Descent TOD Bottom of Descent BOD Navigating using Dead Reckoning STORMSCOPE LIGHTNING STRIKES Item Symbol Lightning Strike 0 6 sec ago Lightning Strike 6 20 sec ago Lightning Strike 20 60 sec ago Lightning Strike 60 120 sec ago TRAFFIC Item Symbol Non threat Traffic hollow di...

Page 713: ...t 100 ft Threshold Terrain Above Aircraft Altitude Terrain Color Terrain Location Red WARNING Terrain above or within 100 ft below the aircraft altitude Yellow CAUTION Terrain between 100 ft and 1000 ft below the aircraft altitude Black Terrain more than 1000 ft below the aircraft altitude Terrain SVT TAWS Color Chart Terrain SVT TAWS Potential Impact Points Unlighted Obstacle Lighted Obstacle Obs...

Page 714: ...bled XM Lightning display enabled Cell Movement display enabled SIGMETs AIRMETs display enabled METARs display enabled City Forecast display enabled Surface Analysis display enabled Freezing Levels display enabled Winds Aloft display enabled County Warnings display enabled Cyclone Warnings display enabled Icing Potential CIP and SLD ICNG Pilot Weather Report PIREPs Air Report AIREPs Turbulence TUR...

Page 715: ... System 21 Annunciator lights 159 ANT BFO 150 Antenna stabilization 420 Antenna tilt 417 AOPA 606 AOPA Airport Directory 681 Approach 694 Activating 283 ILS 539 Loading 247 280 282 Missed 542 Removing 283 WAAS 540 Approach channel 247 280 Approach Mode 526 539 Approach Mode AFCS 540 APR softkey 282 290 Arc HSI 65 Arrival procedure 231 245 277 278 279 307 309 319 Attitude 1 Attitude Heading Referen...

Page 716: ...FD 44 Database 16 Databases 677 Database Synchronization 677 682 683 Data link 1 Data Link Receiver 648 Datalink receiver troubleshooting 647 Data logging 621 Data Logging 620 Date and time 41 Day Night views 584 601 Day view 585 602 DB Mismatch 677 Dead reckoning 88 Decision height DH 55 Declutter 28 Declutter display 90 Delete Flight Plans 251 Deleting an entire airway 252 253 Deleting an entire...

Page 717: ...1 GEA 71 1 Generator Current 93 98 Speed 93 95 Geodetic sea level 433 438 448 GFDS Data Request 380 GIA 63 1 Glidepath 323 Glidepath indicator 63 Glidepath Mode 518 526 Glidepath Mode GP 540 Glideslope 323 Glideslope indicator 63 Glideslope Mode 520 539 Global Positioning System GPS Navigation 225 328 Receiver information 29 31 GMA 1347 1 16 51 GMU 44 1 Go Around Mode 521 542 543 GPS Window 683 Gr...

Page 718: ...0 NAV2 audio 140 NAV frequency window 54 Navigation database 270 271 Navigation Map 228 Navigation Mode 524 525 534 535 Navigation mode selection 139 Navigation source 69 71 Navigation status box 54 Nav radio selection 139 Nearest Airports 45 220 223 282 VOR 220 221 nearest airport 204 205 206 Nearest Airport 204 205 206 207 Minimum Runway Length 207 Surface Matching 207 Nearest airports frequency...

Page 719: ...ude Capture Mode 508 509 510 511 514 Selected Altitude Intercept Arc 199 Selected course 55 65 Selected heading 55 65 Selected Heading 501 524 Selecting a COM radio 118 Sensor 652 653 Sequencing automatic 695 SIGMET 349 390 Simultaneous COM operation 161 SiriusXM Radio 330 Receiver troubleshooting 367 SiriusXM radio 609 610 SiriusXM radio active channel 611 SiriusXM radio channel list 611 SiriusXM...

Page 720: ...nsponder data box 113 Transponder ground mode 154 Transponder mode field 113 154 155 Transponder standby mode 154 Transponder status box 54 Trend vector Turn Rate 67 Trim 93 99 Trip Planning 287 288 289 Trip Statistics 288 289 True airspeed 56 True Airspeed 289 Turn anticipation 695 Turn rate indicator 54 67 TX indicator 119 U Unable to display chart 570 591 Updating Garmin databases 567 User Defi...

Page 721: ...her real time 4 Wind 172 195 Wind data 55 79 Winds Aloft 393 WIND Softkey 393 X XM radio entertainment 163 XM Satellite Weather AIRMETs 390 Airrep 363 Cell Movement 348 City Forecast 353 Cloud Tops 346 County Warning 359 Cyclone Hurricane 360 Echo Tops 345 Freezing Level 355 Icing CIP SLD 361 Lightning 347 NEXRAD 341 Limitations 343 Pirep 363 PIREPs 363 SIGMETs 390 Surface Analysis 353 Turbulence ...

Page 722: ...Garmin G1000 Pilot s Guide for the Socata TBM 850 900 190 00709 05 Rev D I 8 INDEX Blank Page ...

Page 723: ......

Page 724: ...urner Road SE Salem OR 97302 U S A p 503 391 3411 f 503 364 2138 Garmin Europe Ltd Liberty House Hounsdown Business Park Southampton Hampshire SO40 9LR U K p 44 0 23 8052 4000 f 44 0 23 8052 4004 Aviation Support 44 0 87 0850 1243 Garmin Corporation No 68 Jangshu 2nd Road Shijr Taipei County Taiwan p 886 02 2642 9199 f 886 02 2642 9099 ...

Reviews: