background image

201

PRIMERGY TX120 User’s Guide

8

Con

figurin

g Hardwa

re

 a

nd utili

ties

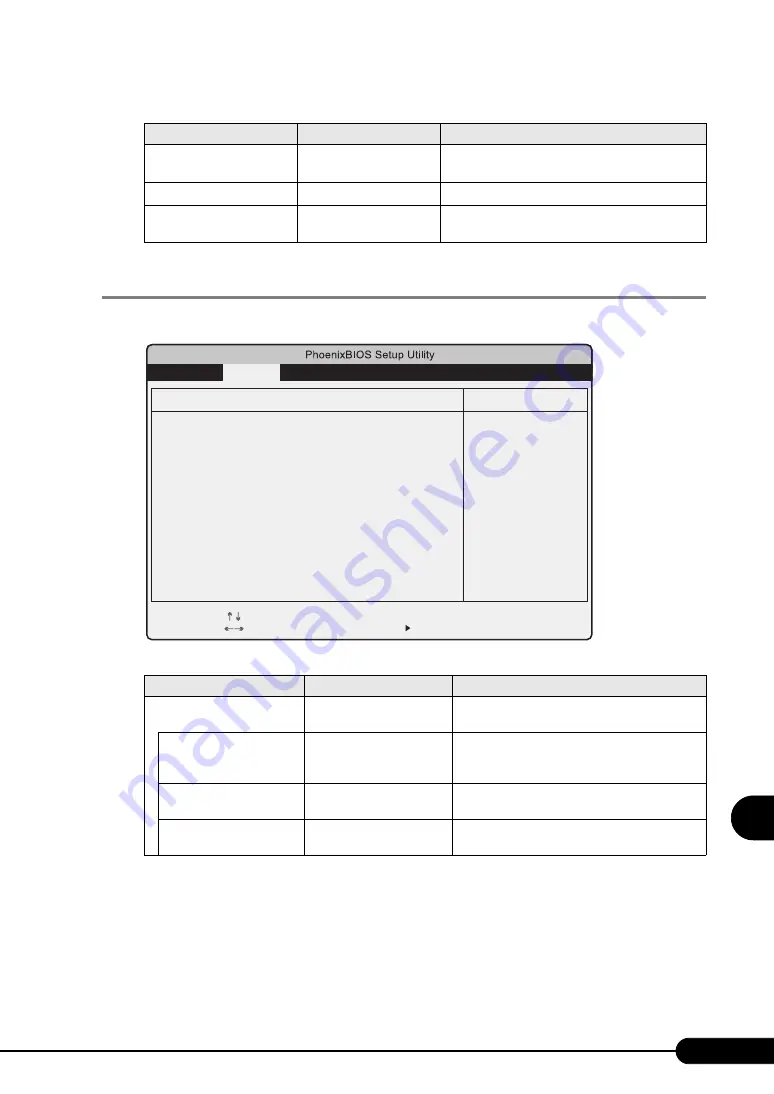
8.2.9 Power On/Off Submenu

Use this submenu to configure power On/Off settings. 

Discard Timer Mode

1024 clocks 
(Unchangeable)

Configures the delayed transfer of PCI bus burst 
transfer.

SMART Device Monitoring

Enabled (Unchangeable)

Sets whether or not to monitor SMART device.

High Precision Event Timer

• Disabled (Initial value)
• Enabled

Sets whether or not to use the high precision timer 
of the chipset. 

table: Items on the Power On/Off Submenu

Item 

Setting

Description

Power On Source

BIOS Controlled 
(Unchangeable)

Configures the power-on setting. 

Remote

• Disabled (Initial value)
• Enabled

Sets whether or not the power is turned on when 
the modem (connected to the serial port) receives 
a ring signal. 

LAN

• Disabled
• Enabled (Initial value)

Sets whether or not to enable the power to be 
turned on via LAN. 

Wake Up Timer

Disabled (Unchangeable)

Sets whether or not the power is turned on at a 
certain time or after a certain time has passed. 

table: Items on the Advanced System Configuration Submenu

Item 

Setting

Description

Item Specific Help

Change Values

-/+

F10

Select Item
Select Menu

Select     Sub-Menu

Enter

F1
Esc

Help
Exit

F9

Setup Defaults
Save and Exit

Advanced

Security

Server

Exit

Main

Power On/Off

Power on Source:
   Remote: 
   LAN:
   Wake up Timer:
      Wake up Time:
      Wake up Mode:

Power Off Source
   Power Button: 

Power Failure Recovery:

[Bios Controlled]
[Disabled]
[Enabled]
[Disabled]

[00:00:00]
[Dally]

[Enabled]

[Previous State]

Summary of Contents for Primergy TX120

Page 1: ...xplains how to install the OS without using ServerStart Chapter 5 Operations after OS Installation This chapter explains the operations to be performed after OS installation Be sure to perform those operations before operating the server Chapter 6 High Reliability Tools For stable PRIMERGY server operations we recommend that high reliability tools be installed This chapter explains the installatio...

Page 2: ...d application software perform backup and other necessary operations Note that data protection is not guaranteed when repairs are performed It is the customer s responsibility to maintain backup copies in advance In case of data loss Fujitsu assumes no liability for data maintenance or restoration and damages that occur as a result of the data loss for any reason except for items covered under war...

Page 3: ... Descriptions In this manual both CD ROM and DVD RAM drives are described as CD ROM drives Unless otherwise noted a CD ROM drive can also mean a DVD RAM drive Ignoring this symbol could be potentially lethal Ignoring this symbol may lead to physical injury and or damage the server or internal options A triangle mark emphasizes the urgency of the WARNING and CAUTION Details are described next to th...

Page 4: ...tup exe Screen Shots and Figures Screen shots and figures are used as visual aids throughout this manual Windows screens and file names may vary depending on the OS software or configuration of the server used Figures in this manual may not show cables that are actually connected for convenience of explanation Consecutive Operations Consecutive operations are described by connecting them with arro...

Page 5: ...bels Warning and caution labels are found on the server Do not remove or stain these labels table Abbreviations of Product Names Product name Expressions and abbreviations PRIMERGY TX120 This server or the server Microsoft Windows Server 2003 R2 Standard Edition Windows Server 2003 R2 Windows Server 2003 Windows Microsoft Windows Server 2003 Standard Edition Windows Server 2003 Standard Edition Mi...

Page 6: ...6 ...

Page 7: ...nstallation 2 1 Preparation on the Server 38 2 1 1 Installing Internal Options 38 2 1 2 Hardware Settings 39 2 2 Selecting the Installation Method 41 2 3 Precautions on Installation 42 2 3 1 Installation Partition Size 42 2 3 2 Notes on Configuring RAID 42 2 3 3 Notes on a Multiple LAN Adapter Configuration 43 2 3 4 Cautions for Using ServerStart 43 2 3 5 Expansion Cards Supported by ServerStart 4...

Page 8: ...of the PXE Server When the PXE Server is Used 86 3 4 4 Preparation of Remote Resources 93 3 4 5 Starting Remote Installation Using a PXE Server 93 3 4 6 Starting Remote Installation Using a Remote Resource Server 97 3 5 Installation on Multiple the Second and Subsequent Servers 101 3 5 1 Preparation for Installation 101 3 5 2 Installation in Guided Mode 102 3 5 3 Installation in Preparation Mode 1...

Page 9: ...n Function from CD ROM Drives 140 5 5 2 Drive Letter Assignment in Expert Mode 140 5 5 3 Notes on Advanced Uninterruptible Power Supply UPS 141 5 5 4 Turning the Power On via a LAN 141 5 5 5 Other Notes on Operation 142 5 6 LAN Driver Advanced Setup BACS 143 5 6 1 BACS Installation 143 5 6 2 VLAN Setup Procedure 145 5 6 3 Cautions for Onboard LAN Driver Ver9 25 0 0 147 5 7 LAN Driver Advanced Setu...

Page 10: ...and Notes 174 7 5 3 How to Install the Internal Hard Disk Unit 175 7 5 4 Replacing the Failed Internal Hard Disk Unit in the array configuration only 177 7 6 Installing Internal Bay Options 178 7 6 1 Where to Install Internal Bay Options 179 7 6 2 Installable Internal Bay Options and Notes 179 7 6 3 How to Install an Internal DAT72 Unit 179 7 6 4 How to Install a DVD RAM Unit 184 Chapter 8 Configu...

Page 11: ...6 Restoring the System 237 9 7 Reinstalling the OS 239 9 7 1 Checking before OS Reinstallation 239 9 7 2 Reinstallation Using ServerStart 239 9 8 Maintenance Service 240 9 8 1 Contacting Maintenance Support 240 Appendix A Server Specifications 242 B Specifications for Internal Options 243 B 1 Memory 243 B 2 Internal Hard Disk Units 244 B 3 Power Cord Selection 244 C Remote Control Function 247 C 1...

Page 12: ...12 ...

Page 13: ...his server as well as an overview of the software provided with this server In addition the workflow from placing the server to starting the operation is also described 1 1 TX120 14 1 2 Supplied Software 16 1 3 Component Names and Functions 23 1 4 Standard Operations 29 1 5 Workflow 36 ...

Page 14: ...em z Hardware and Software Designed for Data Security A lock on the drive cover and the password setting in the BIOS Setup Utility protect hardware and data assets in the server against theft ensuring data security z Proactive Fan Function When a fan fails or the ambient temperature rises the system fan speed is increased automatically to avoid increase in temperature in the server ensuring stable...

Page 15: ...5 inch storage bays The hard disk size can be increased up to 146 8 GB z Three PCI Slots The server has three PCI slots Functions can be added by using expansion cards z Internal Option Bay The DAT72 unit can be installed in the internal option bay to accommodate for an increasing amount of data Space saving z Compact Size The size of this server is 99 x 399 x 340 mm that can be set up in small sp...

Page 16: ...erverStart Auto setup Not using ServerStart Using ServerStart Setup It is necessary to input successively for installation resulting in more mistakes and longer time Example Operations such as setting IP address creating users and registering computer name are required Auto installation of recommended drivers SCSI LAN etc enables high reliable installation High reliability tools can be installed a...

Page 17: ...pport to install Linux The OS which the server does not support cannot be installed z Configuration File SerStartBatch ini A configuration file stores the server setup information configured in ServerStart To create a configuration file use the ServerStart floppy disk supplied with this server Store only one file on each floppy disk Do not set the ServerStart floppy disk to the write protected sta...

Page 18: ... While the wizard is running do not click the icon to move to the previous or next window or to upper tree level To move to a different window click the Previous Up or Next button at the bottom of the wizard window Brings you to the next page Brings you up one tier Brings you to the main screen Ends ServerStart Changes the size of icons Brings you to the previous page Resets the status function Se...

Page 19: ...utomatically recognized expansion cards are installed with the server This prevents possible mistakes in driver installation such as installation of an older version or drivers which were not supplied with this server Automatic RAID Configuration When an array controller card is used specify the RAID type and the number of hard disk units before starting installation A storage system can be config...

Page 20: ...uble For the consideration of ServerView s security refer to ServerView User s Guide z Early Detection of a Disk Problem RAID Management Tool RAID Management Tool is software that performs array configurations disk initialization and storage system monitoring When an event occurs it leaves an event log in the event viewer s application logs At the same time a pop up window indicates a hard disk fa...

Page 21: ...MERGY by specifying them in Application Wizard when the OS is installed is initiated with ServerStart The following high reliability tools are installed A Installed in any case N Installed if selected Not selected by default S Installed if selected Selected by default Linux does not support batch installation with ServerStart ServerView must be configured after installation even when the high reli...

Page 22: ...r IIS Install Microsoft Internet Information Server IIS supplied with Windows separately ServerView is installed with the setting to use IIS installed on the system When IIS is not found in the system ServerView Web Server is installed even if ServerView for IIS is selected ServerView for apache is selected by default for guided mode To install ServerView for IIS select RAID Management Tool Server...

Page 23: ...aseboard 1 3 1 Server Front View a Drive cover key We recommend you lock it to prevent unauthorized access to the inside of the server b Option bay Contains an internal bay option c Internal hard disk drive bay Contains an internal hard disk unit a b c d e f m l k j i g h n o p q Drive cover Use a drive cover key to unlock the drive cover and open it ...

Page 24: ... the hard disk access LED is blinking Data in the hard disk may be damaged l System identification LED button When pressing system identification LED button the system identification LED is lit blue so that the locations of devices being maintained can be determined m System identification LED This LED is used for maintenance When pressing the system identification LED button the LED is lit blue s...

Page 25: ... Power LED This LED is lit green when the server is turned on Power LED is lit when the server is in standby mode when the AC power is on and the DC power is off but this does not indicate an error Even if the server is turned off this LED is lit green during waiting for ASR q USB connector Connects peripheral equipment conforming to the USB standard 2 0 or 1 1 1 3 2 Server Rear View a Inlet Conne...

Page 26: ...nt Controller Jpg 252 h LAN 10 100 1000BASE T port An Unshielded Twisted Pair UTP cable is plugged in For 1000Mbps connection a category 5 enhanced or a category 6 cable is required For 10Mbps 100Mbps connection a category 5 or higher cable is required The meaning of the LED is shown in the table below i USB connector Connects peripheral equipment conforming to the USB standard 2 0 or 1 1 table Me...

Page 27: ...a 2 5 inch storage bay Contains an internal hard disk unit b Optional bay Contains an internal bay option c Power supply unit d Expansion Card Slot Contains extension cards that enhance the server functions e Memory slot Contains memory f CPU a b c f d e Front Rear ...

Page 28: ...IDE connector An IDE cable for the internal CD ROM drive unit or the internal DVD RAM drive unit is plugged in d USB connector e 24pins ATX power connector f Floppy disk connector A floppy disk drive cable is plugged in This connector is not used for this server g SAS connector A SAS cable for the internal hard disk is plugged in h JP1 i JP2 j JP3 k PCI Slots Contains an expansion card l 4pins ATX...

Page 29: ...perations This section explains such standard operations as turning the server on off and inserting ejecting CD ROMs 1 4 1 Opening the Drive Cover 1 Turn the drive cover key counterclockwise to unlock the cover 2 Tilt the drive cover downward Drive cover key ...

Page 30: ... the hard disk in the server and cause data loss Turn the server on when the temperature is in its operating environment range 10 35 C For details about the operating environment refer to Start Guide and Safety Precautions When operating the device outside of this operating environment the server may operate improperly damage data etc Furthermore Fujitsu cannot be held responsible for any related ...

Page 31: ... details refer to 3 4 Serious Error Handling ASR in ServerView User s Guide If you press the F12 key right after the POST memory amount check the Boot Menu is displayed where you can change the boot disk How to Start the BIOS Setup Utility Jpg 191 1 4 3 Turning Off the Server 1 Open the drive cover J 1 4 1 Opening the Drive Cover pg 29 In the event of smoke or sparks immediately unplug the electri...

Page 32: ...d hard disk are off when the OS is shut down 4 Press the power switch on the front of the server The server s power LED is lit amber 5 Turn off the display and peripheral devices The time to turn the server off can be set with the ASR setting on the Power On Off tab using ServerView For details refer to 3 4 Serious Error Handling ASR in ServerView User s Guide Be sure to wait for 10 seconds or mor...

Page 33: ... apply ink or pencil to both sides of the CD ROM Do not touch or scratch the data side of the CD ROM Do not bend the CD ROM or place heavy objects on it When cleaning the CD ROM use a slightly wet cloth to wipe it from the center to the edge and then wipe it with a dry cloth Do not expose the disk to any fluids Do not store the disk in extremely hot or cold conditions Do not store the disk in humi...

Page 34: ...34 Chapter 1 Overview Inserting the CD ROM 1 Make sure the server is turned on and press the CD ROM eject button The CD ROM tray comes out a little CD ROM eject button ...

Page 35: ...til it clicks If the disc is not set properly it may not be played or ejected 3 Press the CD ROM eject button The tray is inserted into the server and CD ROM is set When CD ROM is set the CD ROM access LED is lit To do next operation confirm that the LED is off Ejecting the CD ROM To eject the CD ROM confirm that the CD ROM access LED is off and then press the CD ROM eject button CD ROM tray ...

Page 36: ...t ServerStart is used to perform installation Checking precautions on installation Before installing the OS check the precautions on installation by referring to 2 3 Precautions on Installation Procedures before operation Before operating the server refer to Chapter 5 Operations after OS Installation High reliability tools installation Start operations Installing internal options Refer to Chapter ...

Page 37: ...on the server and cautions necessary before OS installation Please read this chapter before starting installation 2 1 Preparation on the Server 38 2 2 Selecting the Installation Method 41 2 3 Precautions on Installation 42 2 4 Preparation for Using ServerStart on a Client Computer 46 ...

Page 38: ...Installation Internal hard disk units where the OS is not installed If an internal option device that must be installed after the OS installation has been already installed remove the device install the OS and then reinstall the device Installing Optional External Devices When installing external hard disk drives and or USB devices turn off their power or unplug their connection cables from the se...

Page 39: ...t connect to the Internet until the setup completes If the OS is installed or applications are automatically installed without connecting the LAN cable to the LAN card an error may be recorded in the event viewer after setup completes 2 1 2 Hardware Settings Before starting installation set necessary hardware such as the BIOS Setup Utility BIOS Setup Utility The BIOS Setup Utility must be set in t...

Page 40: ...tion submenu window appears 7 Change the Boot Sequence settings as shown below 8 Exit the BIOS Setup Utility and turn off the server 2 Check the MAC address Start up the server from the network The MAC address is displayed as shown below The MAC address is required for remote installation Write it down You can turn the power on from a client via a LAN by utilizing the Wakeup On LAN WOL function Re...

Page 41: ...ol ServerStart Jpg 16 Installation While Maintaining the Established RAID Environment In guided mode or preparation mode select Logical Drive View at Raid and Disk Configuration Wizard in the Configuration for Disks and RAID Controllers window and install the OS Installation Using ServerStart While Maintaining the Existing Partitions In expert mode of ServerStart start up Disk Manager format the i...

Page 42: ...hen the same partition is specified as the OS and BOOT partitions When different partitions are specified as the OS and BOOT partitions The OS cannot be installed in a partition larger than 2TB 2 3 2 Notes on Configuring RAID RAID can be configured with hard disk units connected to the SAS controller on the baseboard Check the following notes before configuring the RAID z Hardware Configuration On...

Page 43: ...multiple LAN adapters network adapters on the system However there are the following limitations z Adapter Numbers To configure multiple LAN cards select the adapter numbers in order of Adapter 1 and Adapter 2 and enter settings for each adapter Note that the order of adapter numbers is not necessarily the same as the order of slots for the installed LAN adapters This means that the setting for Ad...

Page 44: ... license for use of Windows PE contained in the ServerStart CD ROM Windows PE for starting up ServerStart can be only used for installing Windows Server 2003 R2 Windows Server 2003 R2 x64 Windows Server 2003 or Windows Server 2003 x64 provided under a separate legal license Onboard LAN Display When installing the OS using ServerStart the onboard LAN display on the OS is as shown in the table below...

Page 45: ...er must be initialized For more details refer to the manual in the Array Controller Document Tool CD Free Space Required for Installation The partition where the OS is installed must have enough free space for obtaining memory dump For more details refer to 5 1 Memory Dump Paging File Setting Jpg 124 Cautions on Restarting In the course of installation a message appears to indicate that the setup ...

Page 46: ... Server or Windows Server 2003 is installed Perform the procedure in 2 4 1 Installing ServerStart Jpg 46 to install ServerStart 2 4 1 Installing ServerStart If a different version of ServerStart has been installed uninstall it The FloppyBuilder function or installation wizard may not operate properly on a different version For details on how to uninstall ServerStart refer to 2 4 2 Uninstalling Ser...

Page 47: ...ServerStart Launcher window does not appear execute SeStSetup exe in the CD ROM 2 Check an only Classic and click OK The Setup window appears 3 Click Next The License Agreement window appears 4 Select I accept the license agreement and click Next The User Information window appears 5 Enter the user information of the software and click Next The Destination Folder window appears ...

Page 48: ...ystem restarts insert the Server Start CD ROM and start installation again If the This program does not respond message appears during restart operation click Exit to continue the restart operation When the installation is completed the completion window appears 8 Click Exit ServerStart has been installed to the client computer 2 4 2 Uninstalling ServerStart Perform the following procedure to unin...

Page 49: ...th ServerStart creating the ServerStart floppy disk is not required since the disk is already ServerStart floppy disk 1 Start up ServerStart If ServerStart has already been started it is not necessary to start it up again If it has not start it up according to the following procedures 1 Click Start Programs Fujitsu Siemens ServerStart ServerStart Start from CD ServerStart starts up and the Welcome...

Page 50: ...skette A message prompts you to insert the floppy disk 4 Insert the floppy disk and click OK Set the floppy disk in the write enabled state Creation of a ServerStart floppy disk starts When the creation is completed the message Floppy disk has been created appears 5 Click OK ...

Page 51: ...verStart This chapter explains how to install the OS in the server using ServerStart 3 1 Guided Mode 52 3 2 Preparation Mode 69 3 3 Expert Mode 76 3 4 Remote Installation 83 3 5 Installation on Multiple the Second and Subsequent Servers 101 ...

Page 52: ... the ServerStart Disc 1 CD ROM immediately ServerStart starts up and a message prompts you to insert the ServerStart floppy disk 2 Insert the ServerStart floppy disk supplied with the server Make sure that Removable media and A are selected and click Create Set the ServerStart floppy disk in the write enabled state To install the OS other than Windows Server 2003 x64 on the server which has no flo...

Page 53: ...Start The network setting window for remote installation appears 3 Click OK The Initialization of ServerStart core running window appears and the ServerStart initialization process starts Depending on the hardware configuration this process may take a few minutes ...

Page 54: ...ect your keyboard language from the drop down list and click OK The subsequent start procedure may take several minutes The Welcome to ServerStart window appears 7 Click Click here to prepare and or initiate an operating system installation The Select the operating system to be installed window appears Click Special Hints on Operating System Installation and read the contents Important information...

Page 55: ... for the selected OS starts up Start up the wizards to set items in the following procedures Exiting the wizard returns the display to the guided mode window Make sure to open the menu of each wizard and confirm the settings 㪦㫇㪼㫅㪆㪺㫉㪼㪸㫋㪼㩷㪺㫆㫅㪽㫀㪾㫌㫉㪸㫋㫀㫆㫅㩷㪽㫀㫃㪼 㪦㪪㩷㫀㫅㫊㫋㪸㫃㫃㪸㫋㫀㫆㫅㩷㫎㫀㫑㪸㫉㪻 㪘㫇㫇㫃㫀㪺㪸㫋㫀㫆㫅㩷㫎㫀㫑㪸㫉㪻 㪚㫃㫆㫊㪼㪆㫊㪸㫍㪼㩷㪺㫆㫅㪽㫀㪾㫌㫉㪸㫋㫀㫆㫅㩷㪽㫀㫃㪼 㪪㫋㪸㫉㫋㫀㫅㪾㩷㪦㪪㩷㫀㫅㫊㫋㪸㫃㫃㪸㫋㫀㫆㫅 㪩㪘㪠㪛㩷㪸㫅㪻㩷㪛㫀㫊㫂㩷㫎㫀㫑㪸㫉㪻 䋨㪺㫆㫅㫅㪼㪺㫋㪼㪻㩷㪻㫀㫊㫂㫊㩷㪸㫉㪼㩷㪻㫀㫊㫇㫃...

Page 56: ...t here to create a complete configuration file The Open ServerStart Configuration File window appears Once a configuration file is opened another file cannot be opened until you click Close and save Configuration File 2 Select the configuration file and click Create The RAID and Disk Wizard starts up automatically J 3 1 3 RAID and Disk Wizard pg 57 ...

Page 57: ... controllers already installed are displayed 2 Select the method of RAID configuration To install the OS while maintaining the established RAID environment Select Logical Drive View and add partitions as necessary For more details refer to Installation While Maintaining the Established RAID Environment Jpg 58 To configure RAID Select Mass Storage Controller View and add controllers as necessary Fo...

Page 58: ...matic setting is specified in Partition size the size of created partitions will be 4090MB The following limits apply to the volume label length A volume label longer than the limit may be used However it can cause installation failure Enter a volume label within the limit FAT Up to 11 characters NTFS Up to 32 characters Configuring RAID When a RAID configured disk is used Hard disk units that hav...

Page 59: ...rs window Click Details to check the settings of the controller Add partitions as necessary Add a partition 1 Click Add Partition A partition is added Add required partitions 2 Click Details and modify the settings as necessary The partition configuration is displayed As the default values are configured confirm the settings and modify them as necessary ...

Page 60: ...talled The following describes operations on Windows Server 2003 R2 To install another OS interpret Windows Server 2003 R2 as your OS 1 Click Operating System Wizard Specify operating system parameters The Windows Installation window appears 2 Enter the password in Password for Administrator account and Please repeat Password and click Next If the password differs between Password for Administrato...

Page 61: ...ng the CD ROM applied Service Pack 1 on Windows Server 2003 select the OS including SP1 menu from the Operating System Type list The Installation Directory and Time Zone window appears 4 Set items and click Next The User Name window appears 5 Set items and click Next The Display Settings window appears ...

Page 62: ...62 Chapter 3 OS Installation Using ServerStart 6 Set items and click Next The Network Protocol window appears ...

Page 63: ...63 PRIMERGY TX120 User s Guide 3 OS Installation Using ServerStart 7 Set items and click Next The Software Components window appears ...

Page 64: ...ts are always copied to the hard disk To install the components click Properties and check the components to be installed 8 Set items and click next The Services window appears SNMP Service is always installed Click Properties to change the settings if needed 9 Set items and click leave wizard The OS installation wizard closes ...

Page 65: ...ck Set all applications to be installed on the Selected applications list The following applications are always installed in guided mode Although the selection can be released in expert mode it may take a long time to restore the system when errors are occurs without the management tools Be sure to install these tools Broadcom Advanced Control Suite RAID Management Tool Fujitsu ServerView for apac...

Page 66: ...n specify any name for the configuration file However OS installation is possible only when it is saved as SerStartBatch ini When installing the OS make sure to save it as Ser StartBatch ini on the ServerStart floppy disk 3 1 7 Starting OS Installation Install the OS to the server During installation do not use the mouse or keyboard unless it is necessary for installation operations Otherwise inst...

Page 67: ... x64 1 Insert the OS CD ROM Installation CD ROM The License Agreement window appears 2 Click I agree After files are copied a message prompts you to eject the CD ROM and floppy disk For Windows Server 2003 R2 Windows Server 2003 R2 x64 1 Insert the OS CD ROM Installation CD ROM Disc 1 The License Agreement window appears 2 Click I agree After files are copied a message prompts you to insert the Di...

Page 68: ...ck OK The system restarts 9 When the system restarts log on to the server using the Administrator account for the local computer The server setup and OS installation have been completed Refer to Chapter 5 Operations after OS Installation Jpg 123 and perform necessary procedures before starting server operations ...

Page 69: ...ls on how to uninstall ServerStart refer to 2 4 2 Uninstalling ServerStart Jpg 48 Prepare the ServerStart floppy disk When using a formatted commercial release disk create the ServerStart floppy disk in advance referring to 2 4 3 Creating the ServerStart Floppy Disk Jpg 49 3 2 1 Starting Up the Preparation Mode Start up the preparation mode 1 Start up ServerStart If ServerStart has already been st...

Page 70: ...s the important information such as restrictions of the disk configurations 3 Click Creation of ServerStart Configuration file for the installation of a Microsoft Windows Operating System The Microsoft Windows Operating System Installation window appears 4 Select Create a configuration file for the installation of OS The Preparing the Installation of MS Windows Server 2003 window appears ...

Page 71: ...g a wizard returns the display to the preparation mode window Make sure to open the menu of each wizard and confirm the settings 3 2 3 Closing Saving the Configuration File When settings in all wizards are completed save the configuration file 1 Click Close and save Configuration File The Save ServerStart Configuration File window appears 㪦㫇㪼㫅㪆㪺㫉㪼㪸㫋㪼㩷㪺㫆㫅㪽㫀㪾㫌㫉㪸㫋㫀㫆㫅㩷㪽㫀㫃㪼 㪦㪪㩷㫀㫅㫊㫋㪸㫃㫃㪸㫋㫀㫆㫅㩷㫎㫀㫑㪸㫉㪻 㪘㫇㫇㫃㫀...

Page 72: ... Set items when performing remote installation 4 Click Set The configuration file is saved You can specify any name for the configuration file However OS installation is possible only when it is saved as SerStartBatch ini When installing the OS make sure to save it as SerStartBatch ini on the ServerStart floppy disk ...

Page 73: ... CD ROM immediately A message prompts you to insert the ServerStart floppy disk 2 Insert the ServerStart floppy disk containing the created configuration file and click OK Set the ServerStart floppy disk in the write enabled state If it is write protected installation will fail The Initializing ServerStart window appears and the ServerStart initialization process starts Depending on the hardware c...

Page 74: ...loppy disk For Windows Server 2003 R2 Windows Server 2003 R2 x64 1 Insert the OS CD ROM Installation CD ROM Disc 1 The License Agreement window appears 2 Click I agree After files are copied a message prompts you to insert the Disc 2 3 Insert the OS CD ROM Installation CD ROM Disc 2 After files are copied a message prompts you to eject the CD ROM and floppy disk 6 Eject the CD ROM and floppy disk ...

Page 75: ... Guide 3 OS Installation Using ServerStart The server setup and OS installation have been completed Refer to Chapter 5 Operations after OS Installation Jpg 123 and perform necessary procedures before starting server operations ...

Page 76: ...nstallation appears 2 Click OK The Initialization of ServerStart core running window appears and the ServerStart initialization process starts Depending on the hardware configuration this process may take a few minutes The Welcome to ServerStart window appears For Windows Server 2003 x64 Windows Server 2003 R2 x64 1 Insert the ServerStart floppy disk supplied with the server Make sure that Removab...

Page 77: ...ant information such as limitations on disk configuration is described 5 Click MS Windows Operating Systems The Microsoft Windows Operating System Installation window appears 6 Select the OS to install The OS installation window appears 7 Click Install MS Windows Server 2003 interactively expertise required The expert mode starts Start up the configuration tools to set items in the following proce...

Page 78: ...nstallation partition Select the OS installation partition and click the Partition menu Format The Format Partition window appears Be sure to specify the active partition on drive C Partitions equal to or larger than 4096MB cannot be FAT formatted 3 Set items and click Format The partition is formatted 4 When the formatting is completed click the File menu Exit Disk Manager closes and the display ...

Page 79: ...he configuration file 2 Click No The Windows Server 2003 Installation window appears 3 Enter the password in Password for Administrator account and Please repeat Password and click Next If the password differs between Password for Administrator account and Please repeat Password an error dialog window appears Enter the password correctly The Computer Identification window appears 4 Set items and c...

Page 80: ... Specify installation of supplied applications such as high reliability tools For details on the application wizard refer to 3 1 5 Application Wizard Jpg 65 3 3 5 Starting OS Installation Install the OS to the server Notes on the Installation When the installation partition is not empty a confirmation message appears If it does not matter click OK to continue the installation procedure If an incor...

Page 81: ...Array Controller Document Tool CD insert the CD ROM and click OK 2 If a message prompts you to insert the Document Tool CD insert the PRIMERGY Document Tool CD and click OK 3 If a message prompts you to insert the Service Pack CD ROM insert the CD ROM and click OK 4 For Windows Server 2003 x64 a message prompts you to insert the ServerStart Disc 2 and restart the system Insert the ServerStart Disc...

Page 82: ...M and floppy disk 5 Eject the CD ROM and floppy disk and click OK Then the system is restarted The system continues the installation operation after restart OS GUI setup LAN utility installation Service Pack installation and Active Directory installation are performed automatically 6 When a confirmation message to restart appears click Restart The system restarts and installs high reliability tool...

Page 83: ...server that can start up a target server through network startup PXE is called a PXE server Installation Method Remote installation uses a PXE or a remote resource server z Remote Installation Using a PXE Server In remote installation using a PXE server the network startup PXE function of the PXE server starts up the target server and performs installation in preparation mode This method is used w...

Page 84: ...ironment is required Remote Resource PXE Server Requirements Notes on the PXE server Check that no other PXE server exists on the same LAN Servers installed with software with the PXE function such as the Microsoft RIS function cannot be used as a PXE server Checking Server Free Space Decide a server to use as a remote resource server PXE server and check it for enough free space for storing resou...

Page 85: ...mote resource server PXE server has enough free space free space greater than the space required for the resources When the amount of free space is insufficient you must use more remote resource servers table Free Space Required for Resources Resource Required free space ServerStart Disc 1 approx 650MB ServerStart Disc 2 approx 450MB Windows Server 2003 644MB Windows Server 2003 Service Pack 1 389...

Page 86: ...e network If the DHCP service function is not installed perform the following procedures to install the DHCP service The following procedures are examples for Windows Server 2003 1 Click Start Control Panel Add or Remove Applications 2 Click Add or Remove Windows Components Click the Dynamic Host Configuration Protocol DHCP service from Network Services The DHCP service is installed 3 Create and c...

Page 87: ...SeStSetup exe in the CD ROM 2 Check Classic Remote Installation PXE Server and Data packages for Remote Installation and click OK For Classic Remote Installation and Data packages for Remote Installation check the items of the corresponding OS The setup window appears 3 Click Next The Destination Folder window appears 4 Select the installation folder and click Next To change the installation folde...

Page 88: ...k and click OK The Ready to Install the Application window appears 7 Click Install Installation starts When the installation is completed the InstallShield Wizard Completed window appears 8 Click finish The setup window appears 9 Click Next The License Agreement window appears 10 Select I accept the license agreement and click Next The User Information window appears 11 Enter the user information ...

Page 89: ... displays the Create New User window Configure each item to create a new user 13 Enter a user name and a password and click Next The Ready to Install the Application window appears 14 Click Install Installation starts When the installation is completed the InstallShield Wizard Completed window appears 15 Click finish The setup window appears 16 Click Next The License Agreement window appears 17 Se...

Page 90: ...tallation eject the CD ROM and restart the system according to the message When the system restarts insert the ServerStart CD ROM and start installation again If the This program does not respond message appears during restart operation click Exit to continue the restart operation When the installation is completed the completion window appears 21 Click Exit In case of Windows Server 2003 x64 inst...

Page 91: ...ices and Applications On the Services list check that PXE Services and TFTP Service have been installed and started z Checking the DHCP Service Perform the following check only when the PXE server performs the DHCP service 1 On the PXE server click Start Programs Administrative Tools DHCP to start up the DHCP administrative tool 2 Click Server Options and check that the 060 ClassID server option i...

Page 92: ...t account to obtain the image via network startup PXE 1 Click Start Programs Accessories Windows Explorer and move to the TFTP path the default is C Program Files Fujitsu Siemens DeploymentService tftp 2 Right click the TFTP folder and click Properties 3 Click the Security tab add the Guest account and set the Read and execute List Folder Contents and Read access permissions The preparation of the...

Page 93: ...rs 2 Create a shared folder for storing resources Create a shared folder for each CD prepared in Step 1 E g E W2K3Sv for Windows Server 2003 3 Extract the resources Using Windows Explorer copy the CD ROM for the resource to the shared folder 3 4 5 Starting Remote Installation Using a PXE Server Perform remote installation using a PXE server in the following procedures Checking the Network Startup ...

Page 94: ...n Mode Jpg 69 and 3 2 2 Configuring Settings in Wizards Jpg 71 When creating a configuration file on the PXE server start installation Specify the shared name prepared instead of the local CD ROM as installation information Starting Installation 1 On the PXE server start up ServerStart If ServerStart has already been started you do not have to restart it If it is not started click Start Programs F...

Page 95: ... already been created go to Step 6 5 Set items in wizards to create a configuration file Refer to 3 2 2 Configuring Settings in Wizards Jpg 71 Set items in wizards and save the configuration file Exiting a wizard returns to the preparation mode window 6 Click Click here to initiate the Remote Installation Process The Remote Installation Target Server window appears ...

Page 96: ...of target system 2 Select the PRIMERGY model type 3 Specify the Configuration File containing the installation settings 8 Click Start Installation Installation starts All disk contents on the target server are deleted The ServerStart Boot Manager window appears Check that the status is Waiting for client ...

Page 97: ...Operations after OS Installation Jpg 123 and perform necessary procedures before starting server operations 3 4 6 Starting Remote Installation Using a Remote Resource Server In remote installation using a remote resource server installation is performed using shared resources on the remote resource server Perform 3 4 4 Preparation of Remote Resources Jpg 93 before starting installation Configuring...

Page 98: ...ith the server is used 1 Insert the ServerStart floppy disk supplied with the server Make sure that Removable media and A are selected and click Create The network startup setting window for remote installation appears 2 Click OK The Initialization of ServerStart core running window appears and the ServerStart initialization process starts Depending on the hardware configuration this process may t...

Page 99: ...onfiguration file For settings in wizards refer to 3 1 Guided Mode Jpg 52 or 3 3 Expert Mode Jpg 76 Set items in wizards and save the configuration file When using the remote floppy specify the path to the shared folder for the remote floppy as the configuration file saving location Specify the shared name of the prepared shared folder instead of the local CD ROM as instal lation source informatio...

Page 100: ...ocess starts Depending on the hardware configuration this process may take a few minutes When the process is completed the ServerStart Unattended Mode window appears 4 Click Start Installation starts At steps where the CD ROM for resources such as the OS to be installed is necessary the resource is automatically acquired from the resource server via the network 5 Eject the CD ROM and floppy disk a...

Page 101: ...3 5 1 Preparation for Installation Required Software The following software is required for installation on the second and subsequent servers Be sure to have these items close at hand CD ROM for the OS to be installed ServerStart CD ROM ServerStart floppy disk A ServerStart floppy disk containing the configuration file used for installation on the first server B ServerStart floppy disks supplied w...

Page 102: ...s may take a few minutes When the process is completed the Create a ServerStart Floppy Disk window appears 4 Click or insert a Server Start Floppy Disk to Start Server Start The Welcome to ServerStart window appears 5 Click Click here to prepare and or initiate an operation system installation The Select the operating system to be installed window appears 6 Click MS Windows Operating Systems The M...

Page 103: ...low these installation procedures Performing the procedure in 3 2 1 Starting Up the Preparation Mode Jpg 69 deletes the contents of the ServerStart floppy disk making the disk unavailable for installation on multiple servers 1 Start up ServerStart If ServerStart has already been started you do not have to restart it If it is not started perform the following startup procedures 1 Insert the ServerS...

Page 104: ...n the OS installation wizard For other items change the settings as necessary You do not need to start up wizards where no set tings will be changed If the settings for the first server are not reflected to wizards perform the procedures from copying the floppy disk over again table Settings to be Changed for Installation on Subsequent Servers Window name Setting item name Remarks User Information...

Page 105: ... Chapter 4 Manual OS Installation This chapter explains how to install the OS without using ServerStart 4 1 Creating Driver Disks 106 4 2 Starting Manual Installation 111 4 3 Installing the LAN Driver 117 ...

Page 106: ...Prepare for it in advance For Windows Server 2003 x64 1 Created by the ServerStart FloppyBuilder function table Drivers Required for Installing Windows Server 2003 x64 Expansion card onboard controller Driver Chipset Driver provided with the Server Start CD ROM Graphic controller Driver provided with the Server Start CD ROM Onboard SAS controller Integrated Mirroring SAS Driver Windows 2003 for x6...

Page 107: ... it and install the proper version For details on how to uninstall ServerStart refer to 2 4 2 Uninstalling ServerStart Jpg 48 Starting ServerStart If ServerStart has already been started you do not have to restart it If it is not started perform the following startup procedures table Drivers Required for Installing Windows Server 2003 Expansion card onboard controller Driver Chipset Driver provide...

Page 108: ...ediately ServerStart starts up and a message prompts you to insert the ServerStart floppy disk 2 Insert the attached ServerStart floppy disk into the server s floppy disk drive Then make sure Removable media and A are selected and click Create A network setup window for remote installation appears If a configuration file already exists in the ServerStart floppy disk and OK is clicked without click...

Page 109: ...t initialization process starts Depending on the hardware configuration this process may take a few minutes When the process is completed the Create a ServerStart Floppy Disk window appears 4 Click or Insert a ServerStart Floppy Disk to Start ServerStart The Welcome to ServerStart window appears 5 Eject the ServerStart floppy disk ...

Page 110: ... Windows Server 2003 x64 The FloppyBuilder Driver Disk window appears 3 Click the type of the driver you want to create 4 Click the driver disk you want to create Follow the message and insert a floppy disk 5 Perform the procedures following the messages on the window The floppy disk will be formatted automatically and file copying will start The driver disk is automatically created When a message...

Page 111: ...ned on the server and configure RAID If RAID is not required to be configured proceed to step 3 Turn on the server to display the following message and press the Ctrl C key to start up the RAID BIOS Utility Configure the array system using the RAID BIOS Utility For more details refer to Integrated Mirroring SAS User s Guide in the Array Controller Document Tool CD Turn off the server after configu...

Page 112: ...ows appears select Yes to continue the installation procedure 7 Install the ChipSet driver 1 Insert the ServerStart Disc 1 CD ROM into the drive of the server When the ServerStart window appears exit ServerStart 2 Execute the following command on the CD ROM CD ROM drive DRIVERS ChipSet Intel Intel3000 infinst_autol exe The installation wizard starts up 3 Click Next Follow the instructions in the w...

Page 113: ...nstallation 4 When the installation is completed eject the ServerStart CD ROM from the CD ROM drive and click Finish to restart the system 10 Installing high reliability tools To ensure stable server operation refer to Chapter 6 High Reliability Tools Jpg 153 and install high reliability tools Please install the RAID Management Tool when you configure RAID The installation of Windows Server 2003 x...

Page 114: ...the F6 key This message will be displayed for a short time after the setup window blue screen appears Press the F6 key immediately after the window turns blue 5 Install the Drivers for the array controller manually 1 When the following message appears press the S key 2 When the Please insert the disk labeled Manufacturer supplied hardware support disk into Drive A message appears press the Enter k...

Page 115: ...ed message appears eject the ServerStart CD ROM from the CD ROM drive and click Finish to restart the system 8 Install the LAN driver Install the LAN driver using the driver disk created from the ServerStart CD ROM For more details refer to 4 3 Installing the LAN Driver Jpg 117 9 Install the Display driver 1 Insert the ServerStart Disc 1 CD ROM into the drive of the server When the ServerStart win...

Page 116: ...lity tools Please install the RAID Management Tool when you configure RAID The installation of Windows Server 2003 has completed z Before Starting Operation After OS installation refer to Chapter 5 Operations after OS Installation Jpg 123 and perform the necessary procedures 4 2 3 Installing Linux For the use of Linux refer to the Fujitsu PRIMERGY website http primergy fujitsu com ...

Page 117: ...dvance 1 Click Start Administrative Tools Computer Management 2 Click Device Manager On the Device Manager list check if a recognized network adapter is present Window example When a recognized network adapter is present Network adapters appears z When a recognized network adapter is present For Windows Server 2003 x64 Perform Updating the LAN Cards Jpg 119 on the LAN device name under Network ada...

Page 118: ... Clicking Finish displays the Help and Support Center window Click X to close the window After installation the mark is displayed at the LAN device name in Device Manager Device names are displayed properly when all LAN drivers are installed and the system is restarted 4 3 1 Installing the LAN Driver Windows Server 2003 x64 LAN cards except PG 2861 are recognized as the network adapters when the O...

Page 119: ... not this time and click Next 7 Select Install the software automatically Recommended and click Next The driver will be installed 8 Click Finish 9 Click Close to close the properties window Installing the LAN Driver Perform the following procedures on each Ethernet controller under Other devices in Device Manager 1 Insert the driver disk created from the ServerStart CD ROM into the server 2 Double...

Page 120: ...er was recognized during the OS installation Updating LAN Drivers Perform the following procedures on all LAN device names under Network adapters in Device Manager 1 Click Start Administrative Tools Computer Manager 2 Click Device Manager 3 Double click a LAN device name under Network adapters 4 Insert the driver disk created from the ServerStart CD ROM into the server it is according to the insta...

Page 121: ...ndow The Welcome to the Hardware Update Wizard window appears 4 Select Install the software automatically Recommended and click Next The driver will be installed 5 Click Finish 6 Click Close to close the properties window 7 Remove the driver disk and restart the system After LAN driver installation names of the LAN devices are displayed as follows 4 3 3 Latest Drivers For the latest drivers refer ...

Page 122: ...122 Chapter 4 Manual OS Installation ...

Page 123: ...hese operations before operating the server 5 1 Memory Dump Paging File Setting 124 5 2 Creating a Disk for System Recovery 129 5 3 Storing the System Configuration Information 131 5 4 Creating Maintenance Tools 135 5 5 Notes before Operating the Server 140 5 6 LAN Driver Advanced Setup BACS 143 5 7 LAN Driver Advanced Setup Intel PROSet 148 ...

Page 124: ...les and memory dump files The obtainable dump types and required hard disk capacity are as follows z Complete Memory Full Dump recommended When the system unexpectedly stops contents of the whole system memory are recorded The file is stored in the directory displayed in the Dump file box Paging file Installed physical memory 11MB Recommended Installed physical memory x 1 5 Memory dump file Same a...

Page 125: ...KB or 128KB Memory Dump File Setting Set up the memory dump file according to the following procedures 1 Log on to the server with administrator privileges 2 Check free space of the drive where the memory dump file is to be stored Check the required amount of free space according to Checking Hard Disk Free Space Jpg 124 If the drive has no free space refer to Cannot Collect the Memory Dump Jpg 225...

Page 126: ...r complete memory dump if Overwrite any existing file is checked debugging information is overwritten to the specified file every time 6 Click OK to close the Startup and Recovery window 7 Click OK to close the System Properties window 8 Restart the system The setting is enabled after the system is restarted Paging File Setting Set up the paging file according to the following procedures 1 Log on ...

Page 127: ...anced tab 6 Click Change in the Virtual memory section The Virtual Memory window appears 7 Specify the drive where the paging file is to be created In Drive select the drive where the system is installed The selected drive is displayed in Drive in Paging file size for selected drive ...

Page 128: ... in Maximum size Specify a value larger than the Initial size 10 Save the settings Click Set in the Paging file size for selected drive section The settings are saved and the value specified is displayed in Paging File Size of Drive 11 Click OK to close the Virtual Memory window 12 Click OK to close the Performance Options window 13 Click OK to close the System Properties window 14 Restart the sys...

Page 129: ... unit USB BIOS does not recognize the FDD unit USB as performing the Automated System Recovery ASR Make sure to connect the FDD unit USB and set the floppy disk before starting the server For details refer to E External Floppy Disk Drive USB Notes on Usage Jpg 257 1 Click Start All Programs Accessories System Tool Backup The Backup or Recovery Wizard window appears 2 Click Next The Backup or Recov...

Page 130: ...the message and put a label on it Label Example Windows Automated System Recovery Disk Backup bkf Created at 12 00 04 01 2003 9 Click OK to exit Backup Utility 10 Click Close to close the Backup Progress window An automated system recovery set has been created Store the automated system recovery set just created in a secure location ...

Page 131: ...nit USB BIOS does not recognize the FDD unit USB Make sure to connect the FDD unit USB and set the floppy disk before starting the server For details refer to E External Floppy Disk Drive USB Notes on Usage Jpg 257 Cautions Server Management Tools disk is exclusively for this server Do not use it on other systems Otherwise the systems may be damaged Only the information that is configured with the...

Page 132: ...BIOS Remote Management Controller information For details of ServerView refer to ServerView User s Guide 1 Turn on the server and insert the Server Management Tools disk into the floppy disk drive The window for selecting a keyboard appears 2 Select a keyboard Select 1 for Japanese keyboard or select 2 for English keyboard Japanese keyboard is selected by default 3 When the DOS prompt window appea...

Page 133: ...operation For details of ServerView refer to ServerView User s Guide 1 Turn on the server and insert the Server Management Tools disk into the floppy disk drive The window for selecting a keyboard appears 2 Select a keyboard Select 1 for Japanese keyboard or select 2 for English keyboard Japanese keyboard is selected by default 3 When the DOS prompt window appears confirm that the BIOS stored info...

Page 134: ...esuming operation For details of ServerView refer to ServerView User s Guide 1 Turn on the server and insert the Server Management Tools disk into the floppy disk drive The window for selecting a keyboard appears 2 Select a keyboard Select 1 for Japanese keyboard or select 2 for English keyboard Japanese keyboard is selected by default 3 When the DOS prompt window appears confirm that the Remote M...

Page 135: ...sed under environments such as the ServerStart system started on a client computer recommended the system started on the server using the ServerStart CD ROM When creating the tools on a client computer it is necessary to install ServerStart on the client computer beforehand Install it according to 2 4 Preparation for Using ServerStart on a Client Computer Jpg 46 If ServerStart of a different versi...

Page 136: ... z For Creation on the Server 1 Turn on the server and insert the ServerStart Disc 1 CD ROM immediately after that ServerStart starts up and a message prompts you to insert the ServerStart floppy disk 2 Insert the attached ServerStart floppy disk into the server s floppy disk drive Then make sure Removable media and A are selected and click Create A network setup window for remote installation app...

Page 137: ...rStart initialization process starts Depending on the hardware configuration this process may take a few minutes When the process is completed the Create a ServerStart Floppy Disk window appears 4 Click or Insert a ServerStart Floppy Disk to Start ServerStart The Welcome to ServerStart window appears 5 Eject the ServerStart floppy disk ...

Page 138: ...Builder window appears 2 Click Hardware Configuration Tools 3 Click the tool you want to create Insert the prepared floppy disk by following the message 4 Perform the subsequent operations according to the messages on the window The floppy disk will be formatted automatically and file copying will start The respective tools will be created automatically When a message appears indicating that the d...

Page 139: ...vance 1 Start up ServerStart and Click FloppyBuilder For details on procedures for starting up ServerStart refer to Starting ServerStart Jpg 136 2 Click DOS Diskette Insert the prepared floppy disk by following the message 3 Perform the subsequent operations according to the messages on the window The floppy disk will be formatted automatically and file copying will start The DOS diskette will be ...

Page 140: ...ROM drives after server installation 1 Make the registry editable and change the value of AutoRun of the following registry key HKEY_LOCAL_MACHINE System CurrentControlSet Services CDRom Set the value of Autorun to 1 to enable auto run and set the value to 0 to disable auto run 2 Restart the system The setting is enabled after the system is restarted 5 5 2 Drive Letter Assignment in Expert Mode In...

Page 141: ...shutdown which may result in destruction of data For more details refer to the manuals for UPS and UPS management software Power Supply Control by UPS Change the BIOS Settings to turn on the server automatically at power recovery or during scheduled operation using the UPS management software PowerChute Network Shutdown PowerChute Business Edition 1 Start the BIOS Setup Utility J 8 2 1 Starting an...

Page 142: ...Advanced menu and press the Enter key The Power On Off submenu window appears 3 Set Power On Source LAN to Enabled 4 Save changes and exit the BIOS Setup Utility To start up the server via a LAN refer to z Performing Remote Installation Jpg 39 5 5 5 Other Notes on Operation Unnecessary Files After OS installation is completed folders named Runonce and Runonce 2 may be left in the drive where the O...

Page 143: ...rd LAN Use of Intel PROSet Use Intel PROSet Jpg 148 to perform the following advanced setups of a LAN card Use the Teaming function between LAN cards or between a LAN card and the onboard LAN Setup a VLAN using a LAN card Perform the other advanced setups of a LAN card 5 6 1 BACS Installation If Broadcom Control Suite 2 is not displayed in the Control Panel install BACS according to the following ...

Page 144: ... OS Installation 2 Click Next License agreement window appears 3 Click I accept the terms in the license agreement and click Next Custom Set up window appears 4 Click Next Proceed the installation by following the window instruction ...

Page 145: ...AL Broadcom MgmtApps setup exe The installer starts up 2 Proceed the installation by following the window instructions When the window below appears during the installation procedure check BASP and click Next 5 6 2 VLAN Setup Procedure 1 Click Start Control Panel Broadcom Control Suite 2 to start up BACS 2 Right click a LAN adapter or the Team name of a teamed up adapter and click Create a VLAN or...

Page 146: ...he Add VLAN window appears The VLAN ID should be identical with the switch setting The VLAN Name does not need to be identical with the switch setting You cannot use a VLAN ID or VLAN Name that has already been used Enter another set value 5 When the setting for the team is completed click OK 6 Click Apply to apply the settings After the network is temporarily disconnected a window is displayed Cl...

Page 147: ...t start with the following log may be stored in the system log file of the event viewer at system start up Since such event logs will be stored even if the Teaming function and VLAN function are operated normally ignore them Source Blfm ID 8 Type Error Description Could not bind to adapter DEVICE adapter name adapter name varies depending on the OS or hardware configuration ...

Page 148: ... onboard LAN Perform the other advanced setups of the onboard LAN 5 7 1 Intel PROSet Installation If the tabs such as Link Teaming and VLANs are not displayed in the property of LAN adapters which can be selected from the Device Manager install Intel PROSet according to the following installation procedures 1 Execute the following file contained in the ServerStart Disc 1 CD ROM For Windows Server ...

Page 149: ...l up Connections When deleting a virtual adapter make sure to use Intel PROSet When the Teaming function is being used you can only use the following protocols For AFT SFT Static link type IP NetBEUI IPX NCP IPX NetBIOS For ALB type IP IPX NCP When the Teaming function is being used you cannot use the hardware assist function of IPSEC Do not use this function even if the function is installed in a...

Page 150: ...ute will not be switched in the team but the communication with the Team may become an error Teaming Configuration Procedure 1 Start up Intel PROSet Click Start Administrative Tools Computer Management 2 Click Device Manager and double click a LAN adapter to incorporate in a Team 3 Click the Teaming tab select Team with other adapters and click New Team 4 Enter a team name and click Next 5 Check t...

Page 151: ...ys use Intel R PROSet Do not disable or delete a VLAN from the Device Manager or Network and Dial up Connections VLAN Configuration Procedure 1 Start up Intel PROSet Click Start Administrative Tools Computer Management 2 Click Network Adapter under the Device Manager and double click a LAN adapter to setup a VLAN 3 Double click the VLANs tab and click New 4 Specify VLAN ID and VLAN Name Then click...

Page 152: ...152 Chapter 5 Operations after OS Installation ...

Page 153: ...er operations we recommend that high reliability tools be installed This chapter explains the installation and necessary settings of high reliability tools 6 1 RAID Management Tool 154 6 2 Server Monitoring Tool ServerView 155 6 3 Solving Problems Early DSNAP 158 ...

Page 154: ...To install RAID Management Tool individually using the standard installer follow the procedures below Before installing RAID Management Tool check that TCP IP is installed and works properly 1 Log on to the server with administrator privileges Exit all programs before starting installation Installation will fail if Event Viewer or Computer Management is run 2 Insert the Array Controller Document T...

Page 155: ...Monitoring ServerView notifies of the RAID errors In an environment where ServerView is not applied the administrator is not notified of the RAID errors Leaving the RAID error unattended may lead to a system stop with multiple dead drives z Memory Monitoring ServerView monitors the memory In an environment where ServerView is not applied a memory single bit error cannot be detected during operatio...

Page 156: ... Tools System stops due to power supply failures cannot be prevented 6 2 1 Installing ServerView z When Installed Using ServerStart If the OS is installed using ServerStart ServerView will be installed at once with the OS and other high reliability tools z When Installed Manually Linux ServerView cannot be installed using ServerStart To install ServerView manually into a Linux system refer to Inst...

Page 157: ...rView installation referring to 2 4 Checking after Installation in ServerView User s Guide Boot Monitoring Setting We recommend enabling the Boot Monitoring function after ServerView is installed For setting procedures and explanation on the function refer to Restart Settings Tab of 3 4 Serious Error Handling ASR in ServerView User s Guide ...

Page 158: ...into the server s hard disk CD ROM drive PROGRAMS Japanese DSNAPx64 DSNAPx64 EXE z For Windows Server 2003 When installing DSNAP separately copy the following file stored in the ServerStart Disc 1 CD ROM into the server s hard disk CD ROM drive PROGRAMS Japanese DSNAP DSNAP EXE 6 3 2 How to Use z For Windows Server 2003 x64 Refer to the following file stored in the ServerStart Disc 1 CD ROM Use a ...

Page 159: ...and remove the various hardware options 7 1 Before Installing Hardware Options 160 7 2 Removing and Attaching the Side Cover 162 7 3 Installing Memory Modules 164 7 4 Installing Expansion Cards 169 7 5 Installing Internal Hard Disk Units 173 7 6 Installing Internal Bay Options 178 ...

Page 160: ...d or removed Failure to do so can damage the device The types of optional devices listed in this manual are liable to be updated without any notice Please be forewarned When installing optional products such as internal external options and USB equipments be sure to use the products in a system configuration diagram for stable PRIMERGY server operations Fujitsu does not warrant that the server rel...

Page 161: ...devices Doing so may cause a device failure fire or electric shock Devices inside the server remain hot after shutdown Wait for approximately 10 minutes after shutdown before installing or removing internal options The circuit boards and soldered parts of internal options are exposed They can be damaged by static electricity Before handling them first touch a metal part of the server to discharge ...

Page 162: ... Cover 1 Turn off the server and connected devices and unplug all power cables from the outlet 2 Remove the foot stands and lay the server with the rubber feet down Before removing or attaching the side cover turn off the server all peripheral devices and any other connected devices Also unplug all power cables from the outlet Failure to do so can cause electric shock 1 4 3 Turning Off the Server ...

Page 163: ...ides of the server and then lift up the cover to remove it Installing the Side Cover To attach the side cover simply reverse the removal procedures Before turning on the server make sure that all covers are in place Check to make sure no tools or unnecessary components are left inside the server before attaching the side cover back into place ...

Page 164: ...When installing or removing memory make sure to remove the screws at the specified locations only There is a risk of injury if screws other than those at the specified locations are removed This could also damage the server Touch only the specified part of the printed circuit board Failure to do so could cause injury or damage the server Memory modules are made of delicate components that are extr...

Page 165: ...e Memory Modules and Notes Installable Memory Modules The following memory module types can be used in this server Order of Memory Module Installation Install memory modules in ascending order of capacity which are memory slot 1A 1B 2A and 2B table List of Installable Memory Modules Model Remarks Memory Module 512MB PG RM51BE 512MB 512MB DIMM x 1 Memory Module 1GB PG RM1BE 1GB 1GB DIMM x 1 Memory ...

Page 166: ...tatic electricity 4 Remove a reinforcing bar It may be difficult to install the memory modules depending on the location of the memory slots because of the peripheral devices In this case remove a unit bay For removing it refer to 7 6 3 How to Install an Internal DAT72 Unit Jpg 179 5 To replace the memory module open outward the retention clips on both sides of the slot Make sure not to open the c...

Page 167: ...and insert the module perpendicularly to the slot When the module is correctly inserted the retention clips on both sides will close Then check that they secure the memory module If the retention clips are not securely closed push them with your fingers to close 7 Attach the reinforcing bar 8 Attach the cover An improperly engaged memory module could cause a fire Do not insert the memory module on...

Page 168: ...rver Replacing the Defective Memory 1 Check the slot whose memory is defective from the system event log J 9 3 System Event Log pg 228 2 Replace the defective memory with a new one according to 7 3 3 How to Install Memory Modules Jpg 166 3 Start the BIOS Setup Utility J 8 2 1 Starting and Exiting the BIOS Setup Utility pg 191 4 Select the Memory Status submenu from the Server menu and check that r...

Page 169: ...cards Failure to do so can cause burns injury When installing or removing expansion cards make sure to remove the screws at the specified locations only There is a risk of injury if screws other than those at the specified locations are removed This could also damage the server Touch only the specified part of the printed circuit board Failure to do so could cause injury and also damage the server...

Page 170: ...talled in this server PCI slots where the expansion cards are installed are different depending on the cards Installable Expansion Cards and Installation Location table Installation Order of the Expansion Cards and Slots to Use Expansion cards Model name PCI slots Installation number Installation order PCI PCI E x4 PCI E x1 SCSI card PG 1301L 1 1 1 1 LAN card PG 1892L 1 1 2 LAN card PG 1882L 1 1 3...

Page 171: ... off the server and connected devices and unplug all power cables from the outlet 2 Remove the side cover J 7 2 Removing and Attaching the Side Cover pg 162 3 Touch a metal part of the server to discharge static electricity 4 Push the tabs on the slot fixing cover 1 to open to the rear side 2 and remove the slot cover 3 Be sure to keep the removed slot cover for later use If operating the server w...

Page 172: ...ling Hardware Options 5 Install the expansion card 6 Fix the expansion card with the slot fixing cover 7 Attach the cover Removing the Expansion Card To remove the expansion card perform the same procedures of installation ...

Page 173: ...from the outlet However when the array system is configured the defect hard disk unit can be replacing without turning off the server Install our genuine internal hard disk units only Failure to do so may cause a device failure fire or electric shock When installing or removing hardware options make sure to remove the screws on the specified points only There is a chance of injury if screws other ...

Page 174: ... be installed in this server The internal hard disk unit should be installed in descending order of the capacity Note that the hard disks with same capacity same model should be installed in the bay 1 and bay2 when configuring the array system table Installable Internal Hard Disk Units Product name Model number Overview HDD SAS 10k 36GB hot plug 2 5inch PG HDD61A 36 GB 10 000 rpm SAS 2 5 inch hot ...

Page 175: ...in the disk Make sure to keep a backup of important data Even if the hard disk is of the same type there could be a slight difference in storage capacity We recommend backing up data on the basis of files or sectors rather than hard disks Slot Number The slot numbers which are displayed on the software such as RAID Management tool correspond to the hard disk bay numbers as follows Replacing the Fa...

Page 176: ...nternal Hard Disk Unit To remove an internal hard disk unit open the cover with the tab pressed and pull the internal hard disk unit out towards you When pulling out the internal hard disk unit put your hand on it and hold it with both hands 5 Install the internal hard disk unit into the server Insert the internal hard disk unit into the bay with the cover opened 1 close the cover and lock the tab...

Page 177: ...metal part of the server to discharge static electricity 3 Open the cover while pressing the tab on the failed hard disk unit pull out the unit by only 1 to 3 cm and disconnect it from the SAS connector Do not pull out the hard disk unit fully from the server 4 Wait more than one minute until the hard disk stops rotating and pull out the failed hard disk unit 5 Remove faulty hard disk 6 Insert a n...

Page 178: ...al bay options turn off the server all peripheral devices and any other connected devices Also unplug all power cables from the outlet Failure to do so can cause electric shock Install our genuine internal bay options only Failure to do so may cause a device failure fire or electric shock When installing or removing internal bay options make sure to remove the screws on the specified points only T...

Page 179: ...ons can be installed in this server 7 6 3 How to Install an Internal DAT72 Unit 1 Turn off the server and connected devices and unplug all power cables from the outlet 2 Remove the cover J 7 2 Removing and Attaching the Side Cover pg 162 table Installable Internal Bay Options Product name Model Location DVD RAM ATAPI PG DVA102D Internal CD ROM drive bay Tape Drv DAT72 36GB internal PG DT5042 Optio...

Page 180: ... Remove the reinforcing bar 4 Remove the internal hard disk drive bay internal CD ROM drive bay 1 Remove all cables connected to the internal hard disk drive bay internal CD ROM drive bay SAS cable Power cable Power cable IDE cable SAS LED cable ...

Page 181: ...ve bay internal CD ROM drive bay to the front side and lift it up 5 Remove the cover of the optional bay Insert your fingers into two holes of the cover and pull the cover towards you to remove it Be sure to keep the removed dummy units for later use 6 Install the rails supplied with the internal DAT72 unit PUSH The cover of the optional bay ...

Page 182: ...und with clips on the server Open the clips 2 Connect a USB cable and a power cable to the rear side of the internal DAT unit 3 Connect the other side of the USB cable to the USB connector on the baseboard For the location of the USB connector on the baseboard refer to 1 3 4 Baseboard Jpg 28 Clip USB cable the rear side of the DAT72 unit USB connector Power connector Power cable ...

Page 183: ...and slide it to be fixed 10 Connect the cables which are removed in step 4 to the internal hard disk unit internal CD ROM drive unit Be sure to connect cables to the same connector 11 Attach the reinforcing bar 12 Remove the optional bay panel from the cover of the server Take off the tab inside of the panel to remove it 13 Attach the cover Internal hard disk drive bay internal CD ROM drive bay 䌛t...

Page 184: ...ll a DVD RAM Unit Before installing a DVD RAM unit remove the preinstalled CD ROM unit Perform the following procedures to install a DVD RAM unit 1 Turn off the server and connected devices and unplug all power cables from the outlet 2 Remove the reinforcing bar ...

Page 185: ...D ROM drive bay 1 Remove all cables connected to the internal hard disk drive bay internal CD ROM drive bay 2 Push the PUSH part on the side of the server slide the internal hard disk drive bay internal CD ROM drive bay to the front side and lift it up SAS cable Power cable Power cable IDE cable SAS LED cable PUSH ...

Page 186: ... ROM unit is pushed out Pull it out slowly 5 Pull off the projections of the CD frame from the removed CD ROM unit and remove the CD ROM drive 6 Attach the removed CD frame to the DVD RAM unit Put the projections of the CD frame to the holes on the side of the DVD RAM drive PUSH Internal CD ROM unit Projections Projections the side face of DVD Holes ...

Page 187: ... bottom face of the internal hard disk unit bay internal CD ROM drive bay to the holes of the optional bay and slide it to be fixed 9 Connect the cables which are removed in step 3 to the internal hard disk drive bay internal CD ROM drive bay DVD RAM unit Be sure to connect cables to the same connector 10 Attach the reinforcing bar 11 Attach the cover Internal hard disk drive bay internal CD ROM d...

Page 188: ...188 Chapter 7 Installing Hardware Options ...

Page 189: ...ter 8 Configuring Hardware and Utilities This chapter explains how to make the environment settings necessary to operate the server and how to use each utility 8 1 Jumper Settings 190 8 2 BIOS Setup Utility 191 ...

Page 190: ...r as follows Functions and settings of each jumper are as follows table Jumper Settings Jumper Number Function Setting Description JP1 BIOS recovery 1 2 standard Activates with the normal BIOS information 2 3 Activates with the saved BIOS information JP2 BIOS password recovery 1 2 Disables the BIOS password 2 3 standard Enables the BIOS password JP3 Clear CMOS 1 2 standard Retains the information ...

Page 191: ...etup F12 BOOT Menu is displayed on the screen The Main menu window appears when the POST completes When the Main menu window does not appear When the Main menu window does not appear because the F2 is pressed at wrong timing press the Ctrl Alt Delete keys at the same time to restart the system then start the BIOS Setup Utility Item Specific Help Change Values Enter F10 Select Item Select Menu Sele...

Page 192: ...the Esc key to close it Esc Ends a submenu and returns to the previous menu Or displays the Exit menu Scrolls through the menu option list Switches between menus Changes the value of an item Enter Selects an item In items in which is displayed the sub menu appears F9 Sets each item to its default value F10 Saves the value of each item and exits the BIOS Setup Utility Boot Menu 1 CD ROM Drive 2 Dis...

Page 193: ... the Configuration has not been saved Save before exiting message is displayed 3 Use the keys to move the cursor to Yes or No and press the Enter key If you selected Save Changes Exit from the Exit menu Select Yes to exit After saving changes to settings the BIOS Setup Utility closes and the server restarts Select No not to exit The display returns to the BIOS Setup Utility window If you selected ...

Page 194: ...ample September 20 2005 is set as 09 20 2005 Diskette A 1 4M Unchangeable Sets the type of Floppy Disk Drive A recording density and drive size Standard IDE Sets the type and operating mode for connected IDE devices Press the Enter key to display the 8 2 3 Standard IDE Submenu Jpg 195 window Boot Options Sets system startup options Press the Enter key to display the 8 2 4 Boot Options Submenu Jpg ...

Page 195: ...ion PIO Mode PIO 4 Displays the current PIO Programmed I O transfer mode The fastest PIO transfer mode among connected IDE devices is automatically set DMA Mode UDMA 2 Displays the current DMA Direct Memory Access data transfer mode The fastest DMA transfer mode among connected IDE devices is automatically set Firmware Displays the version of the firmware Item Specific Help Standard IDE Select Sub...

Page 196: ...to display the logo screen instead of POST information Boot Menu Enabled Unchangeable Sets whether or not to display the boot drive selection window after POST By selecting the boot drive from the Boot Menu window startup can be done from the selected boot drive regardless of the Boot Sequence setting NumLock Auto Unchangeable The state of the NumLock during activation MultiBoot for HDs Enabled Un...

Page 197: ...lay the 8 2 7 PCI Configuration Submenu Jpg 199 window Advanced System Configuration Configures additional settings Press the Enter key to display the 8 2 8 Advanced System Configuration Submenu Jpg 200 window Power On Off Configures power On Off settings Press the Enter key to display the 8 2 9 Power On Off Submenu Jpg 201 window IPMI Configures server management settings Press the Enter key to d...

Page 198: ...o enable the USB controller 2 0 standard USB BIOS Supported Devices Auto Unchangeable Sets whether the USB device can be used on the OS that does not support USB USB Boot Delay Os Unchangeable Sets the delay time by the second for initializing USB mass storage device during the POST Diskette Controller Disabled Initial value Enabled Configures the floppy disk controller Mouse Controller Auto Detec...

Page 199: ...ting Description PCI SLOTS Configuration Configures the PCI slots Press the Enter key to display the PCI SLOTS Configuration submenu window PCI 32 Slot 1 Configuration Option ROM SCAN Enabled Disabled Initial value Sets whether or not to initialize the extended ROM in each PCI slot PCI E x8 Slot 2 Configuration Option ROM SCAN Enabled Disabled Initial value PCI E x1 Slot 3 Configuration Option ROM...

Page 200: ...nced Unchangeable NX Memory Protection Disabled Initial value Enabled Sets whether to enable or disable execute disable bit function of processor Virtualization Technology Disabled Initial value Enabled Sets whether to enable or disable Virtualization Technology Hardware Prefetch Enabled Unchangeable Configures the CPU internal setting Adjacent Sector Prefetch Enabled Unchangeable CPU Timeout Coun...

Page 201: ...Initial value Enabled Sets whether or not the power is turned on when the modem connected to the serial port receives a ring signal LAN Disabled Enabled Initial value Sets whether or not to enable the power to be turned on via LAN Wake Up Timer Disabled Unchangeable Sets whether or not the power is turned on at a certain time or after a certain time has passed table Items on the Advanced System Co...

Page 202: ...ercentage Clear System Event Log Disabled Unchangeable Sets whether or not to clear the event log Event Log Full Mode Overwrite Unchangeable Sets whether or not to overwrite the event log when space available for it becomes full Note Changing this setting deletes the existing event log Before making changes refer to 9 3 1 How to Use Server Management Tools Jpg 228 for saving the event log iRMC Tim...

Page 203: ...rming the remote operation using RemoteControlService Press the Enter key to display the LAN Settings Submenu Jpg 203 window table Items on the LAN Settings Submenu Item Setting Description DHCP Disabled Initial value Enabled Sets whether or not to obtain LAN IP address of the Remote Management Controller port from the DHCP server Local IP address 192 168 120 101 Initial value Enter an IP address ...

Page 204: ...ed Keyboard can be locked while initializing expansion card When the expansion card that can execute the setup during system start up is installed the setting of the expansion card can be protected by locking the keyboard You can set this item only when Setup Password is specified Set System Password Sets a system password Setting a system password makes it necessary to enter the password in order...

Page 205: ...t this item only when System Password Mode is set to System System Load Standard Initial value Diskette CDROM Lock Sets whether to enable or disable system startup from a floppy disk or CD ROM Setup Prompt Disabled Enabled Initial value Sets whether or not to display a setup message F2 BIOS Setup F12 BOOT Menu on the POST window during system startup Virus Warning Disabled Unchangeable Sets whethe...

Page 206: ...erStart CD ROM or DOS diskette is inside be sure to disable the OS Boot Monitoring function If the system is started with this function enabled the server may automatically turn off or restart improperly When setting this function refer to ServerView User s Guide to fully learn about its specifications in order to use it properly with the correct settings Action Continue Reset Initial value Power ...

Page 207: ...estarting with ASR R Next Boot uses Boot option Unchangeable Sets the boot device for restarting Device Instance 0 Unchangeable Sets the device ID of LAN Boot Device diagnosis Temperature Monitoring Disabled Unchangeable Sets whether or not the server can be turned on when the temperature is not in its operating environment range 10 35 C CPU Status Press the Enter key to display the CPU Status Sub...

Page 208: ...on When set to Enabled the following parameters appear Set each of them If set to Disabled the items are not displayed Baud Rate 1200 2400 4800 9600 Initial value 19 2K 38 4K 57 6K 115 2K Sets baud rate of the console redirection Protocol VT100 VT100 8bit PC ANSI 7bit PC ANSI VT100 Initial value Sets the console type for console redirection Flow Control None XON XOFF CTS RTS Initial value Sets flo...

Page 209: ...hanges Exit Exits the BIOS Setup Utility without saving current settings Previously saved settings remain valid Get Default Values Returns to the server s default values for all items Load Previous Values Sets all items to the values before the last changes by reading from CMOS Current setting values are discarded Item Specific Help Change Values F9 Advanced Security Server Exit Main Save Changes ...

Page 210: ...210 Chapter 8 Configuring Hardware and Utilities ...

Page 211: ...t become necessary after starting to use this server as well as daily care and maintenance 9 1 Daily Maintenance 212 9 2 Troubleshooting 215 9 3 System Event Log 228 9 4 Security 231 9 5 Backup 234 9 6 Restoring the System 237 9 7 Reinstalling the OS 239 9 8 Maintenance Service 240 ...

Page 212: ... trouble is detected the administrator is notified in real time which enables early detection This allows the server administrator to remove a system error early and avoid trouble For an overview and installation of ServerView and other high reliability tools refer to 1 2 2 High Reliability Tools JPg 20 and Chapter 6 High Reliability Tools JPg 153 9 1 2 Cleaning Clean the server regularly Cleaning...

Page 213: ... connector before adding a memory module or an expansion card Internal hard disk units 5 inch internal devices Remove dust deposits from units and devices Tape devices are particularly susceptible to dust and may cause failures Install them in a clean environment Be careful when removing components such as CPU memory modules or hard disk units Be sure to install parts and cables in the original po...

Page 214: ...of the mouse Wipe the inside of the mouse the roller and the bottom cover with a damp cloth 4 Insert the ball and apply the cover After the ball and inside of the mouse are dry insert the ball and apply the cover Optional Devices For details about cleaning optional devices refer to PRIMERGY ServerBooks supplied with the server and Supplement supplied with options Roller ...

Page 215: ...ftware refer to the Fujitsu PRIMERGY website http primergy fujitsu com 9 2 1 Hardware Troubleshooting This section explains hardware related troubleshooting If it does not operate properly or if a failure is suspected check the following For optional devices refer to PRIMERGY ServerBooks supplied with the server and Supplement supplied with options Server z The server does not power on or the powe...

Page 216: ...es not display any characters or the mouse cursor does not move Check to see whether the keyboard and mouse are connected properly If they are not connected turn the server off and then connect the cables to the server For the connection location refer to Start Guide z The screen shakes If a device that produces a strong magnetic field such as a television or speaker is near the display place them...

Page 217: ...ffset h A memory error has occurred Turn the server off and check that the memory modules are installed properly If the message appears even after the server is turned on again check the error log and replace the memory modules If the message still appears the baseboard must be replaced Contact an office listed in the Contact Information of Start Guide Shadow RAM Failed at offset h Extended RAM Fa...

Page 218: ... message still appears the CPU or baseboard must be replaced Contact an office listed in the Contact Information of Start Guide CPU mismatch detected The CPU frequency has changed If the correct CPU is installed and this message is displayed update the BIOS using the BIOS Update Utility supplied with the CPU If the message still appears after the update select Yes for the Reset Configuration Data ...

Page 219: ...e last startup Check the error log and replace the memory module If the message still appears the baseboard must be replaced Contact an office listed in the Contact Information of Start Guide No usable system memory Memory error No memory modules available to the system are detected Check the error log and replace the memory module If the message still appears the baseboard must be replaced Contac...

Page 220: ...ormation of Start Guide Allocation error static node An onboard device or an expansion card cannot be used Disconnect the device card and replace the card If the message still appears the baseboard must be replaced Contact an office listed in the Contact Information of Start Guide Baseboard Management Controller has detected an Error BMC error The error log needs to be checked and the relevant par...

Page 221: ... baseboard must be replaced Contact an office listed in the Contact Information of Start Guide Controller access degraded or unavailable ControllerAccessDegradedOrUnavailable Asserted table List of Server Management Tools Error Messages Message Description Write protect error writing drive A Abort Retry Fail The inserted floppy disk is write protected Disable the write protect and then press the R...

Page 222: ...al SCSI devices and perform installation again Connect the optional devices after the installation completes z Operating System not found appears when the system restarts after file copy from the CD ROM The following are possible causes Please check The Active flag is specified ERROR Fail to write 1st CMOS data into system nn The following are possible causes Check the floppy disk status again The...

Page 223: ... exe is used does not operate properly To use the tftp client function tftp exe install tftp exe from the OS CD ROM according to the following procedures 1 Insert the OS CD ROM into the CD ROM drive The OS CD ROM must be either Windows Server 2003 CD that has applied SP1 Windows Server 2003 x64 CD or Windows Server 2003 R2 Disc 1 CD 2 Move to the i386 folder of CD ROM drive 3 Start the command pro...

Page 224: ...k is displayed at the LAN device name in Device Manager Device names are displayed properly when all LAN drivers are installed and the system is restarted For details on LAN driver installation refer to 4 3 2 Installing the LAN Driver Windows Server 2003 JPg 120 LAN Operation Fails or Error Message Appears during LAN Driver Installation A conflict may have occurred between system resources includi...

Page 225: ...table List of Event Log Errors That Can Occur after Installation ID Description Cause and corrective action 62 This computer is a domain PDC at the root of forest Use the net command net time setsntp server name to configure it for synchronization from an external time source Cause An NTP was selected as a component Corrective action ServerStart cannot configure the NTP server due to the absence o...

Page 226: ...r disk created at the installation to restore the system For restoration procedures refer to 9 6 Restoring the System JPg 237 Failed in Remote Installation If remote installation fails check the following z Checking Services Check that the DHCP PXE Service and TFTP Service are running For checking procedures refer to 3 4 Remote Installation JPg 83 z Setting TFTP To access TFTP Service add a Guest ...

Page 227: ...ed to display the time This may cause a difference in time between the OS and the hardware clock When you want to see the accurate time on the OS it is recommended to use the NTP service to periodically correct the time displayed on the OS z Changing the Time Settings for the OS and Hardware Clock In a Linux environment the time displayed on the OS the software clock value on the OS is written to ...

Page 228: ...Contact Information of Start Guide z Notes The Server Management Tools disk supplied with this server is for use with this server only Do not use those tools on other systems If it is used the system can be damaged Make sure to perform this operation only when the server is started with the Server Management Tools disk Do not run Server Management Tools on the server started from the hard disk or ...

Page 229: ...2 US Keyboard Your selection General Information Temperature Information Fan Information Voltage Information Powersupply Information System Event Log SEL FRU Information ID Proms User Management LAN Configuration FSC System Specific Functions FUJITSU SIEMENS COMPUTERS IPMI Tool Vx xx Select ENTER Start ESC Exit 004 MMM DD YYYY HH MM SS XXXXXXXXXXXXXXXXXXXXXXXXXXXXXXXXXXXXXXXX 003 MMM DD YYYY HH MM...

Page 230: ... System Event Log Saving the Log 1 Start Server Management Tools to display the SYSTEM EVENT LOG window 2 Press the F2 key 3 Enter the name of the file to save the log to and press the Enter key The log is saved to the floppy disk under the specified file name Deleting the Log 1 Start Server Management Tools to display the SYSTEM EVENT LOG window 2 Press the F3 key 3 Press the Enter key This delet...

Page 231: ...Locking the drive cover Lock the drive cover to protect the hardware hard disk units and 5 inch internal options in the server from theft or tampering Turn the key clockwise to lock the cover Do not lose the drive cover key If the key is lost contact an office listed in the Contact Information of Start Guide For instructions on opening the drive cover refer to 1 4 1 Opening the Drive Cover JPg 29 ...

Page 232: ...up this server Unless the set password is entered the BIOS setup cannot be accessed and the OS cannot be booted Setting a Password The password is set in the BIOS Setup Utility For details on the BIOS Setup Utility refer to 8 2 11 Security Menu JPg 204 1 Start the BIOS Setup Utility J 8 2 1 Starting and Exiting the BIOS Setup Utility Pg 191 2 Select the Security menu and select the type of passwor...

Page 233: ...revent confidential or important data from leaking out the data on the hard disk must be wiped before disposal or transfer However wiping the hard disk is not an easy task Simply initializing formatting the hard disk or deleting the files may give the pretense that the data no longer exists but in reality the data is simply no longer accessible to the OS and it is still accessible to malicious ind...

Page 234: ...ently lost To prepare for unexpected problems be sure to perform periodic backups of the system 9 5 2 Backup Devices Software and Their Operations Backup operations differ depending on network operating systems applications and system operations Contact an office listed in the Contact Information of Start Guide and make backups using the following items Backup device Backup software Standard backu...

Page 235: ...er To manage the lifespan write the use start date on the media z Rotating Media When using a single media cartridge repeatedly backup data can be temporarily lost in the event the backup fails Also if the hard disk fails during backup the backup data cannot be recovered Perform backup operations using multiple mediums on a rotating basis z Avoid Leaving Media in Devices Because the magnetic recor...

Page 236: ...nction may cause the media to eject from an internal device of the server and hit the chassis door If this is the case open the door when ejecting or do not eject the media z Media Label Types and Positions When writing information such as the name on media use the label that came with the media The area in which a label can be posted on the media of each device varies Failing to post labels in th...

Page 237: ...d array controller for an array controller card For details about required driver disk and how to create a drive disk refer to 4 1 Creating Driver Disks JPg 106 1 Turn on the server and insert the Windows Server 2003 CD ROM immediately Check there are no floppy disks in the floppy disk drive 2 When the active area is specified on the hard disk the following message appears Press any key while this...

Page 238: ...e system When prompted to change the floppy disk follow the instructions and change it If a message appears indicating that the driver has not passed Windows Logo testing to verify its compatibility with Windows select Yes to continue the installation procedure When prompted to insert media set the backup media created beforehand and follow the messages to continue Notes on Automated System Recove...

Page 239: ...ration in a different location Some drivers and software are not installed together with the OS Install them after OS installation Other Notes Other notes are the same as those that apply for first time installation Please check in advance 9 7 2 Reinstallation Using ServerStart When the previous installation was performed in guide or preparation mode the ServerStart floppy disk used in that instal...

Page 240: ...enance support check the following Fill in the Configuration Sheet and Accident Sheet of Configuration Sheets z Item Model name and product ID of the server They are described on the label on the server For the label location refer to Start Guide Hardware configuration Types and locations of internal options Configuration information BIOS Setup Utility SCSI Setup Utility settings OS LAN WAN system...

Page 241: ...ions for the server and for its internal options A Server Specifications 242 B Specifications for Internal Options 243 C Remote Control Function 247 D Remote Management Controller 252 E External Floppy Disk Drive USB Notes on Usage 257 F Recycling 258 ...

Page 242: ... Express by one short 1 Floppy disk drive No Use the floppy disk drive of USB connection Hard disk drive bay 2 bays 2 5 inch I F SAS Maximum 146 8GB 73 4GB 2 Optional drive Standard CD ROM Drive unit Optional Internal DAT 72 unit USB Onboard controller SAS LSI Logic 1064E IME LAN Broadcom BCM5754 1 GbE VGA iRMC 1 7MB Video RAM External I O port Monitor 1 Analogue RGB DSUB 15PIN Keyboard 1 PS 2 min...

Page 243: ...ge contains the following items before use Should it happen that items are missing contact an office listed in the Contact Information of Start Guide B 1 Memory Package Memory modules 1 Specifications table Memory Specifications Item Function and Specifications Product Name Memory Module 512MB Memory Module 1GB Memory Module 2GB Models PG RM51BE PG RM1BE PG RM2BE Capacity 512MB 1GB 2GB Clock frequ...

Page 244: ...untry of destination It must be used to prevent electric shock Use the following guidelines if it is necessary to replace the original cord set The female receptacle of the cord set must meet CEE 22 requirements see Figure table Internal Hard Disk Unit Specifications Item Function and Specification Models PG HDD61A PG HDD71A Interface SAS Serial Attached SCSI Storage media 2 5 inch hard disk Memor...

Page 245: ...ave the appropriate safety approvals for the country in which the equipment will be installed and should be marked HAR For the United Kingdom Should the plug on the flexible cord not be of the type for your socket outlets do not use an adapter but remove the plug from the cord and discard Carefully prepare the end of the supply cord and fit a suitable plug The wires in this mains lead are colored ...

Page 246: ...e wire which is colored Green and Yellow must be connected to the terminal in the plug which is marked with the letter E or by the earth symbol or colored Green or Green and Yellow The wire which is colored Blue must be connected to the terminal which is marked with the letter N or colored Black The wire which is colored Brown must be connected to the terminal which is marked with the letter L or ...

Page 247: ...the remote control function perform the following procedure Configuring the BIOS Connecting the Server to a PC Configuring terminal software communication settings on the PC Configuring the BIOS To use the function of the server management port perform the following setting using the BIOS Setup Utility 1 Turn on the server Press the F2 key during POST to start up the BIOS Setup Utility 2 Select th...

Page 248: ...rminal Software PC Perform settings for the remote control function using terminal software on the PC z Port Configuration Configure the port on the PC as follows table Port Settings Item Contents Bits per second 9600 Data bits 8 Parity None Stop bits 1 Flow control None Server Rear PC Rear Serial port Serial port RS 232C cross cable ...

Page 249: ...al software The remote control window appears Power state is displayed next to Power Status table Meaning of Power Status Display Description On The server is powered on Off The server is powered off Welcome to PRIMERGY Remote Manager Firmware Revision x xxA x xx SDRR ID 0203 TX120 Firmware built xxx xx xxxx xx xx xx System Type PRIMERGY TX120 System ID xxxxxxxx System Name TX120 2 xxx xxx xxx xxx...

Page 250: ...he remote control main menu appears Please enter pass phrase Welcome to PRIMERGY Remote Manager Firmware Revision x xxA x xx SDRR ID 0203 TX120 Firmware built xxx xx xxxx xx xx xx System Type PRIMERGY TX120 System ID xxxxxxxx System Name TX120 2 xxx xxx xxx xxx System OS xxxxxxxx System Status OK Power Status On Main Menu 1 System Information 2 Power Management 3 Enclosure Information 4 Service Pr...

Page 251: ... Turns the server off and back on again When Windows is operating the server restarts after the OS is shut down Power On 4 Turns the server on Graceful Power Off Shutdown 5 Shuts down the OS and turns the server off When Windows is operating the server is turned off after the OS is shut down Graceful Reset 6 Shuts down the OS and resets the server When Window is operating the server is reset after...

Page 252: ...1 is necessary For details of Remote Management Ctrl Upgrade kit PG RMCU1 refer to D 4 Remote Management Ctrl Upgrade kit PG RMCU1 Jpg 255 Features of the Remote Management Controller The Remote Management Controller and LAN are provided on the baseboard This makes possible to control power supply and reset of the server without depending on the state of the server The console redirection function...

Page 253: ...ss the F2 key during POST to start up the BIOS Setup Utility 2 Select the Advanced menu IPMI the LAN Settings submenu and set the each item For setting items refer to LAN Settings Submenu Jpg 203 3 From the Exit menu select Saving Changes Exit to exit the BIOS Setup Utility Save the setting information of set parameters using the Server Management Tools For details refer to 5 3 Storing the System ...

Page 254: ...ver hang therefore it is effective when the server cannot be monitored by ServerView table Functions of the Remote Management Controller Item Description System Information Displays the system information iRMC Information Displays Remote Management Controller information and configures the license key Power On Off This is used to turn the server power ON OFF or restart Sensors Displays the status ...

Page 255: ...n of the multiple servers environment is shown in the figure below z Remote Storage Function This is a function to recognize the external memory device connected by using the console redirection function as a remote device of the server The configuration of the remote storage function is shown in the figure below table Specifications of Remote Management Controller Upgrade Item Specifications Prod...

Page 256: ...he manual supplied with PG RMCU1 After Advanced Video Redirection startup set the keyboard setting again according to the compatible remote device For details of the setting method refer to 7 4 10 Console Redirection Mouse and Keyboard Settings of ServerView User s Guide D 5 Notes on Security In the information on the Remote Management Controller personal information such as names of administrator...

Page 257: ...System Recovery When performing system recovery using Windows backup data with the following software also when installing Windows manually system recovery installation might not be performed properly This is caused by the device driver being unreadable due to recognition failure of the floppy disk media replacement BrightStor ARCserve Backup Disaster Recovery Option Windows Server 2003 Automatic ...

Page 258: ...tting or deleting files may not avoid the risk that the data is restored and used for wrongful purposes If confidential or private information is saved in order to make it impossible to be restored it is recommended to use third party data wiping tools Disposing of Used up Batteries Used up batteries must be disposed of as industrial waste and therefore require special processing Let a licensed in...

Page 259: ...bmenu 198 Power On Off Submenu 201 Security Menu 204 Server Menu 206 Standard IDE submenu 195 Starting 191 Boot monitoring setting 157 C Changing Passwords 233 Cleaning 212 Cleaning the keyboard 213 Cleaning the server 212 Cleaning the server interior 213 Component Names 23 Configuration file Close save 66 71 Open create 56 Configuring a network 19 Creating a Hardware Configuration Tool 136 Creati...

Page 260: ... Setting 125 Memory Dump Setting 124 Memory modules 164 Memory monitoring 155 Multiple LAN adapter configuration Adapter numbers 43 Note 43 O Operating the Server Precautions 140 OS installation Installation method 41 Precautions 42 Preparation 37 OS installation wizard Expert mode 79 Guided mode 60 P Paging File Setting 124 126 Password settings 232 POST 217 Error Messages 217 Power supply monito...

Page 261: ...allation 46 Supported expansion cards 44 Uninstallation 48 ServerView 20 155 Installation 156 SNMP service 227 Solving problems 158 System diagnosis support tools 20 System Event logs 228 System Recovery Disk 129 T Temperature monitoring 155 Troubleshooting 215 Turning off the server 31 Turning on the server 30 Turning the Power On via a LAN 141 U Uninstallation ServerStart 48 UPS 141 V Voltage mo...

Page 262: ...262 ...

Page 263: ...r damages to third party copyrights or other rights arising from the use of any information in this manual No part of this manual may be reproduced in any without the prior written permission of Fujitsu PRIMERGY TX120 User s Guide B7FH 4801 01EN 00 Issued on Issued by February 2007 FUJITSU LIMITED ...

Reviews: