62
"
#
!
!
!
Planer-Thicknesser
A 941 / AD 941 / AD 951
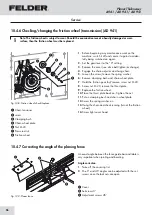
11.6.2 Reversing/changing System Tersa automatic cutterblock planer knives
Fig. 11-5: Changing the Tersa reversible knives
Fig. 11-6: Assembling position
Note:
Reverse or replace the planer knives once the planing results are no longer satisfactory.
Only use original FELDER planer knives:
See: Tools and Accessories catalogue
Note:
The planer knives are only properly clamped once a sample workpiece has been planed.
Warning! Risk of injury! The planer knives are razor sharp.
Handle the planer knives with the utmost care. especially when turning the cutterblock by hand.
Attention! Risk of material damage!
Execute the following instructions exactly!
Attention! Risk of material damage!
Do not clean with compressed air! Ensure that the planer knife is positioned correctly!
1.
Switch the machine off and ensure that it cannot be
switched on again.
2.
Pivot the exhaust hood up
3.
Using the available brass pin, strike the knife base
downwards.
4.
Pull the planer knife sideways out of the cutterblock.
5.
Clean resin residues thoroughly from the planer
knife, knife base and cutterblock. Use resin remover
art. no. 10.0.022 (0,5 l spray bottle) or 10.0.023
(3,0 l).
6.
Reverse the planer knife (if only one cutting edge ‘
is worn)
7.
Push the planer knife (reversed or new) again into
the cutterblock and center.
8.
Repeat steps 3 to 7 for the other planer knives.
9.
Prepare the machine for operation and start
cutterblock.
10.
Plane sample workpiece. The planer knives are
clamped automatically by the centrifugal force
!
Brass pin
"
Knife base
#
Planer knife
Faults
Summary of Contents for AD 941
Page 13: ...13 Planer Thicknesser A 941 AD 941 AD 951 Safety...
Page 67: ...67 Planer Thicknesser A 941 AD 941 AD 951 Faults...
Page 69: ...69 Planer Thicknesser A 941 AD 941 AD 951 Annex...
Page 70: ......
Page 71: ......

