54
#
"
!
%
%
$
$
&
&
$
$
AD 951
A 941 / AD 941
!
Planer-Thicknesser
A 941 / AD 941 / AD 951
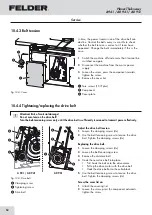
In time, the power transmission of the drive belt can
decline. Control the belts every six months to check
whether the belt tension is correct or if tears have
appeared. Change the belts immediately if this is the
case.
1.
Switch the machine off and ensure that it cannot be
switched on again.
2.
Disconnect the machine from the mains power
supply
3.
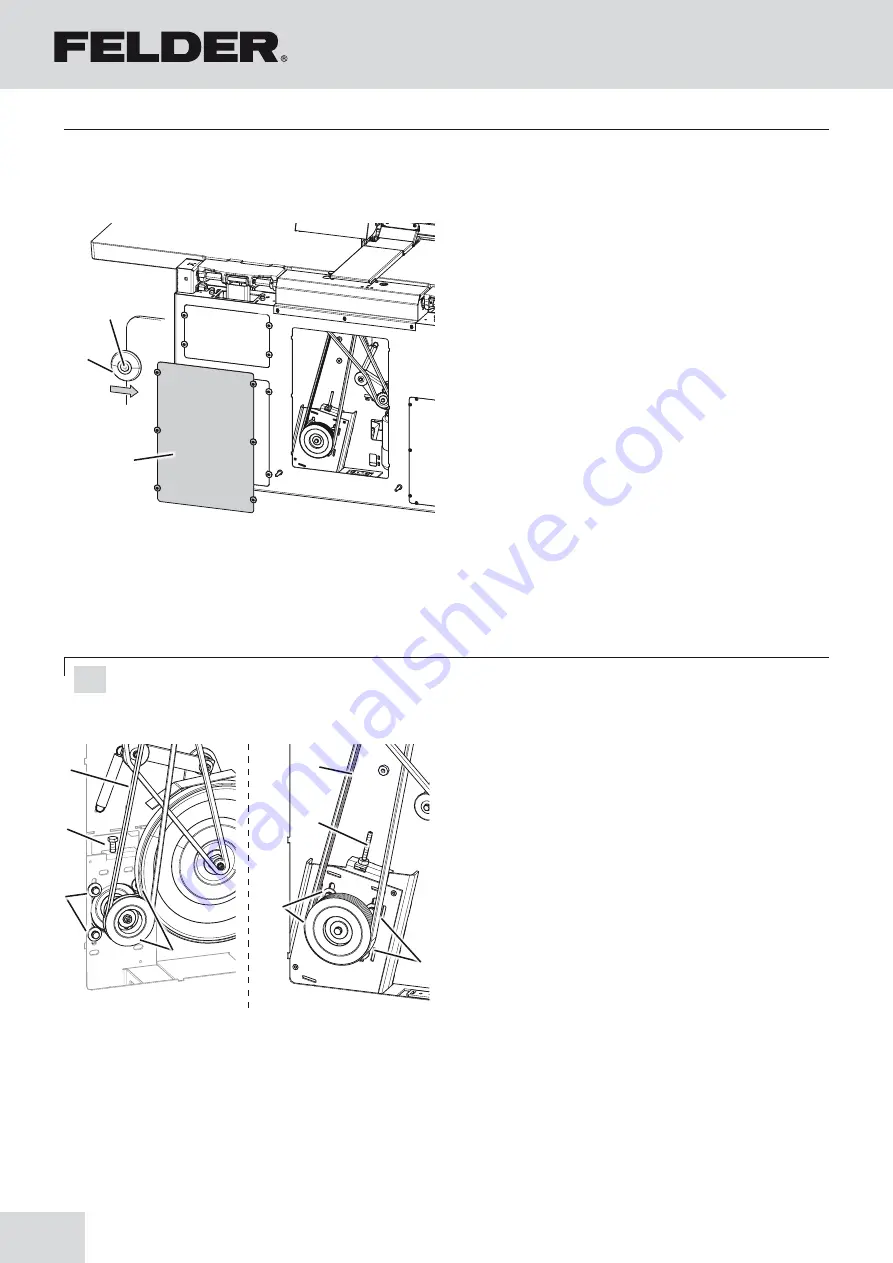
Loosen the screw, press the component inwards,
tighten the screw.
4.
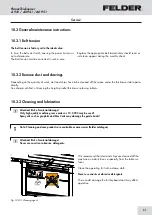
Remove the cover lid.
!
Torx screws (15 IP plus)
"
Component
#
Cover plate
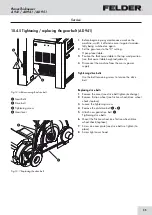
Adjust the drive belt tension.
1.
Loosen the clamping screws (4x)
2.
Use the belt tensioning screw to tension the drive
belt. Tighten the clamping screws (4x).
Replacing the drive belt:
1.
Loosen the clamping screws (4x)
2.
Loosen the belt-tensioning screw.
3.
Remove the old drive belt
4.
Hook the new drive belt into place:
• First hook the belt onto the drive motor.
• Pull up the drive motor with the drive belt.
• Hook the drive belt onto the cutterblock.
5.
Use the belt tensioning screw to tension the drive
belt. Tighten the clamping screws (4x).
Screw the cover lid on:
1.
Attach the covering lid.
2.
Loosen the screw, press the component outwards,
tighten the screw.
$
Clamping screw
%
Tightening screw
&
Drive belt
10.4.3 Belt tension
Fig. 10-4: Cover
Attention! Risk of material damage!
Do not over-tension the drive belt!
Turn the belt-tensioning screw only until the drive belt is sufficiently tensioned to transmit power effectively.
Fig. 10-5: Drive belt
10.4.4 Tightening/replacing the drive belt
Service
Summary of Contents for AD 941
Page 13: ...13 Planer Thicknesser A 941 AD 941 AD 951 Safety...
Page 67: ...67 Planer Thicknesser A 941 AD 941 AD 951 Faults...
Page 69: ...69 Planer Thicknesser A 941 AD 941 AD 951 Annex...
Page 70: ......
Page 71: ......


