background image

Chapter 3 - page 1

MCO-TCO work mode

3.   OPERATING WITH OPERATIONS OR CYCLES

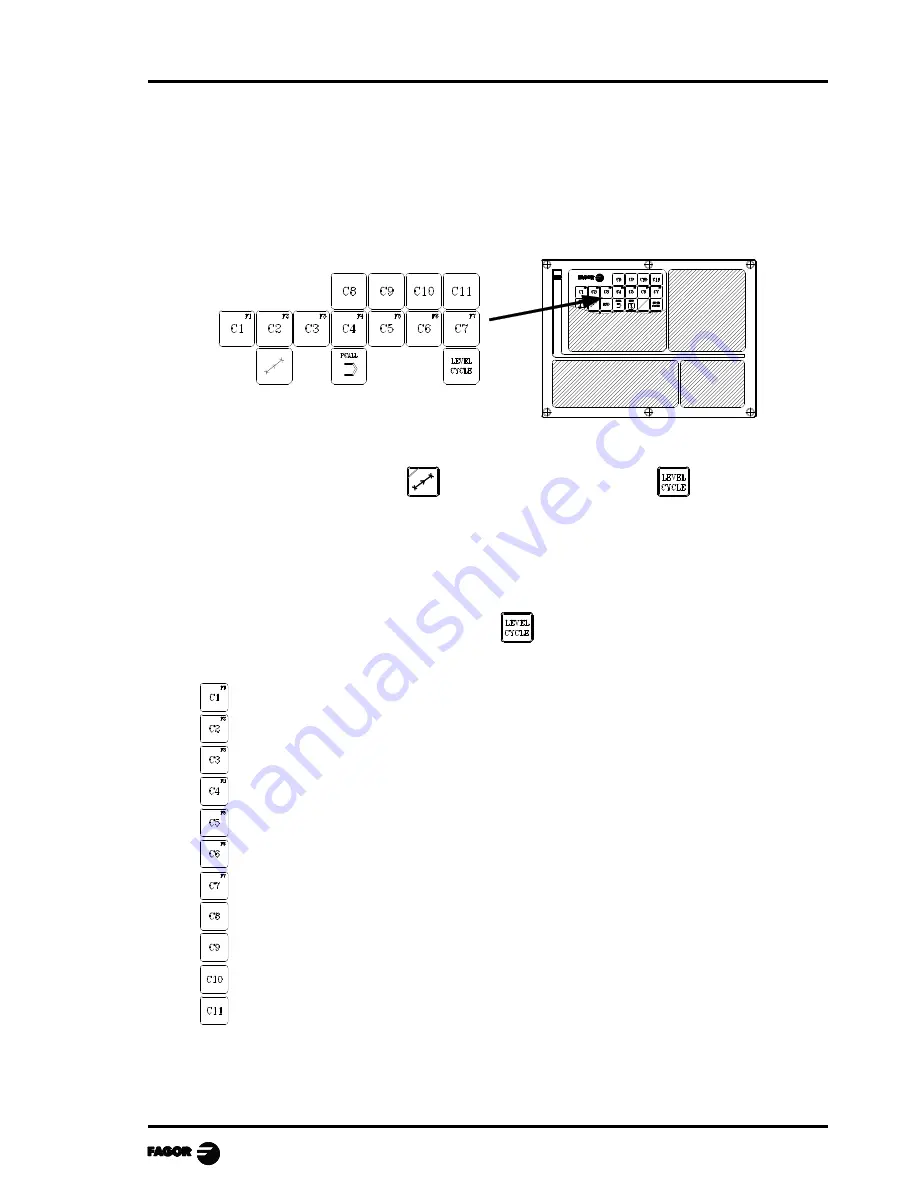
The following keys should be used to select the machining Operations or Cycles:

The standard version offers 2 positioning cycles.

To access these cycles, press   

  and to change the cycle, press  

The manufacturer may define up to 200 different cycles which will be grouped in 20 groups.

Use keys [C1] through [C11] to access the first 11 groups.
The access to the rest of the groups must be set in the PLC program by the manufacturer as
described later on. To do this, external devices or free keys (blank keys or keys [O1] through
[O14]) may be used.

To change levels, within each group, press  

The OEM cycles accessed with each key are:

Cycles

1

21

41

61

81

101

121

141

161

181

Cycles

2

22

42

62

82

102

122

142

162

182

Cycles

3

23

43

63

83

103

123

143

163

183

Cycles

4

24

44

64

84

104

124

144

164

184

Cycles

5

25

45

65

85

105

125

145

165

185

Cycles

6

26

46

66

86

106

126

146

166

186

Cycles

7

27

47

67

87

107

127

147

167

187

Cycles

8

28

48

68

88

108

128

148

168

188

Cycles

9

29

49

69

89

109

129

149

169

189

Cycles

10

30

50

70

90

110

130

150

170

190

Cycles

11

31

51

71

91

111

131

151

171

191

Summary of Contents for 8040 TCO CNC

Page 1: ...Operating Manual MCO TCO options Ref 0204 ing...

Page 2: ...he information described in this manual may be subject to variations due to technical modifications FAGOR AUTOMATION S Coop Ltda reserves the right to modify the contents of the manual without prior n...

Page 3: ...he axes 8 2 4 1 Jogging to a programmed position 8 2 4 2 Incremental jog 8 2 4 3 Continuous jog 9 2 4 4 Jogging with an Electronic Handwheel 10 2 4 4 1 Standard handwheel mode 11 2 4 4 2 Path handwhee...

Page 4: ...ored programs 2 4 2 See content of a program 3 4 2 1 Seeing one of the cycles in detail 3 4 3 Edit a new part program 4 4 3 1 Storage of an ISO block or a cycle 4 4 4 Erasing a part program 5 4 5 Copy...

Page 5: ...en customizing in the Installation manual design machining operations and canned cycles see chapter on working with operations or cycles create screens for diagnosis setup to show the status of the CN...

Page 6: ...s the R character JOG keyboard To jog the axes of the machine Govern the spindle Modify axes feedrate and spindle speed Start and stop program execution Specific keys of the CO model To Select and def...

Page 7: ...cting different states in particular cycles or screens Select different levels in each cycle The blank keys are free and may be customized by the manufacturer by inserting printed strips through slots...

Page 8: ...ressed and 0 when it is not The register bit for each key is the following keys O1 through O14 have an indicator lamp The status of each key lamp must be controlled by the machine manufacturer with a...

Page 9: ...dpends on the model TCO model MCO model La forma de operar con ambos modelos es muy parecida Si algunas de las prestaciones descritas en este cap tulo no es com n para ambos modelos se indicar clarame...

Page 10: ...installation manual The one supplied by Fagor can display the following data The coordinates of the axes The symbol indicates that the axis is working in diameters When defining the text 33 of progra...

Page 11: ...stallation manual The one supplied by Fagor shows everything about the spindle The theoretical turning speed selected S value when working in rpm and the CSS value when working in TCO mode at constant...

Page 12: ...a but during execution it shows the lines of the program being executed 5 The axes have the following fields COMMAND States the coordinate programmed that is the position that the axis must reach ACTU...

Page 13: ...the following format hours minutes seconds hundredths of second Whenever the execution of a program is started even though this is repetitive this variable assumes value 0 TIMER States the reading of...

Page 14: ...ected by machine parameter To modify these values the T mode has to be accessed modifying the relevant machine parameter 2 2 2 COORDINATE PRESET The axes must be preset one at a time with the followin...

Page 15: ...REFPSUB Warning The CNC saves the part zero or zero offset that is active at the time If no home searching subroutine is defined the CNC will display the relevant error message Home search on a singl...

Page 16: ...cted Position Position 2 4 2 INCREMENTAL JOG Place the left hand switch in one of the positions Incremental movement must be done axis to axis To do this press the JOG key for the direction of the axi...

Page 17: ...le the relevant JOG key is pressed The axis will start moving when the JOG key is pressed and will not stop until said JOG key or another JOG key is pressed again and in this case the movement is tran...

Page 18: ...nch 10 1 000 mm or 0 1000 inch 100 10 000 mm or 1 0000 inch Warning Whenoperatingwithindividualhandwheelsanddependingonhowfastthehandwheel isturnedandontheselectedhandwheelswitchposition theCNCmightbe...

Page 19: ...ebuttonagain theCNCselectsthenextaxisandsooninarotaryfashion Todeselecttheaxis holdthebuttonpressedformorethan2seconds 2 Jogtheaxis Oncetheaxishasbeenselected itwillmoveasthehandwheelisbeingturnedandi...

Page 20: ...d and when choosing a circular jog lower drawing the arc center coordinates must be indicated in radius To define these variables press the F and then one of these keys Example The O2 key is used to a...

Page 21: ...l and the feedrate control is carried out with the second handwheel CY1 R101 0 Resets the register containing the previous handwheel reading END PRG DFU I71 CPL M1000 Every time the button is pressed...

Page 22: ...splay this window when text 47 of program 999997 is not defined To select another tool press tool number The CNC will manage the tool change and will update the graphics Press to cancel the selection...

Page 23: ...tes X Z and in small characters the coordinates for the axes referring to home text 33 of program 999997 Since the tool change point can be modified by the operator at any time the subroutine associat...

Page 24: ...in the value and press When the machine uses a live tool the following considerations must be born in mind Set one of the general machine parameters P0 through P9 to 13 The location code shape of the...

Page 25: ...B29R561 CNCRD LIVRPM R117 M1 CNCWR R117 GUP100 M1 CNCEX1 M45 SP100 M1 If in CO mode CUSTOM 1 a live tool is selected M2 and the O3 key live tool clockwise is pressed DFU B29R561 the PLC reads in R117...

Page 26: ...ustomized entirely The one supplied by Fagor can display the following information depending on the model CSS RPM The data appearing in that window depend on the selected work mode RPM Spindle in rpm...

Page 27: ...his percentage press 5 Maximum spindle speed in rpm To select any other speed press twice The CNC will frame the present value Enter the new value and press The CNC assumes said value and will not let...

Page 28: ...es this value and if the spindle is started it will update the actual speed of the spindle in rpm 3 State of the spindle turning clockwise turning counterclockwise or stopped To modify the status of t...

Page 29: ...g cases may arise a The spindle is started The CNC moves the axes to the F programmed As the X axis is moved the CNC makes the spindle speed rpm match to maintain the constant surface speed selected I...

Page 30: ...en is displayed where it is possible to edit up to 6 program blocks in ISO or in high level language Example ISO G95 G96 S120 M3 G0 Z100 G1 X30 F0 1 Once the desired block or blocks have been edited p...

Page 31: ...am by the manufacturer as described later on To do this external devices or free keys blank keys or keys O1 through O14 may be used To change levels within each group press The OEM cycles accessed wit...

Page 32: ...ted with it screen 004 the configuration file P999004 and the routine 9004 When pressing the CNC shows all the screens define by the manufacturer OEM with the WGDRAW application software Screens 001 t...

Page 33: ...t is recommended to define all the OEM routines in a program with a high number in order to prevent the operator from modifying them If so wished program P999999 may be used since it is free The follo...

Page 34: ...creens P999995 The program containing the help texts for the cycles P999994 This section describes the procedure to create OEM cycle 001 and how the user must define its data In other words How to cre...

Page 35: ...ted with in this case 1 It must ALWAYS be defined DEBUG It is optional It indicates the first line from which program 999500 logs the errors occurred when debugging the configuration file The debuggin...

Page 36: ...igns the value of O11 O12 O13 O14 W6 PLCO11 It assigns the value of O11 O12 O41 O42 If a W data has associated with it a parameter variable or resource it behaves as follows It assumes the value of it...

Page 37: ...TOREFRESH W11 FLWEX MODALCYCLE It indicates that the cycle is modal see programming manual The call to the routine will be of the MCALL 9001 A10 B12 C5 type If after executing the cycle several moveme...

Page 38: ...otkey 88 and the X axis position associated with it In other words Pressing the X key selects the W1 field and pressing X again selects this field W3 If while this field is selected RECALL is pressed...

Page 39: ...he data shown by each parameter depends on the associated data type If it is a numeric data coordinates feedrates etc The assigned value If it is the number of a profile The assigned value The call to...

Page 40: ...n in P103 M3 M4 M5 IF P11 LT 4 P104 8 ELSE P104 9 Coolant depending on type of material Coolant ON M8 and coolant OFF M9 If steel aluminum brass or iron coolant ON and if plastic or wood coolant OFF P...

Page 41: ...og several lines indicating the errors detected The error log file P999500 contains all the errors detected from when the CNC was turned on When turning the CNC off this error log program P999500 is d...

Page 42: ...180 200 The following example shows how 2 cycle groups may be selected The blank key below the key selects and de selects the group 12 32 52 An external push button connected to input I27 selects and...

Page 43: ...ses it is possible to assign to this field the value of an internal variable coordinate tool number etc In those cases press and Numeric data to select a profile 3 digit unsigned integer value in Wgdr...

Page 44: ...on Execution and Simulation 3 7 BACKGROUND CYCLE EDITING It is possible to edit an operation or cycle while a part program is executing background editing The new operation just edited may be stored a...

Page 45: ...e to be defined The way the positioning is to be done The type of feedrate fast or at the F stated Level 2 The coordinates of the target point have to be defined The way the positioning is to be done...

Page 46: ...ake on the value displayed in the top right hand window Press The auxiliary functions M which will be executed before and after positioning Auxiliary function M is the name given to the functions dete...

Page 47: ...e direction required by means of the JOG keys The CNC starts the spindle and assumes said turning direction as spindle turning data for the cycle 3 8 3 DEFINITION OF MACHINING CONDITIONS Axis feedrate...

Page 48: ...ining process This chapter explains how to operate with these part programs and has the following sections and subsections for this purpose List of programs stored See the content of a program See one...

Page 49: ...ocks that make up that part After selecting the program list the CNC will let you Create a new part program See the content of a part program Erase a part program Copy a part program in another Modify...

Page 50: ...mns and to change the column After selecting an operation the CNC allows Seeing the operation in detail Erasing the operation Moving the operation to another position Modifying the operation 4 2 1 SEE...

Page 51: ...he required order 4 3 1 STORAGE OF AN ISO BLOCK OR A CYCLE An ISO block or a cycle may be added at the end of the program after the last operation or inserted between 2 existing operations To store an...

Page 52: ...he list of part programs stored Use the pointer to select in the left hand column the part program to be copied Press At the bottom the CNC will display a message requesting the number to be assigned...

Page 53: ...ion of the erasing operation If you press the CNC will erase the operation selected and update the right hand column If you press the operation is not erased and the erasing operation is left 4 6 2 MO...

Page 54: ...ation Modify all the data required To store the modified operation again Press to access the list of part programs stored The CNC displays the pointer over the same operation To select another positio...

Page 55: ...ration to be executed or simulated This simulation or execution can be done from beginning to end or alternatively press for it to be executed or simulated step by step The CNC enables execution or si...

Page 56: ...and Edition Mode Execution mode Editing Mode Simulation The operation or cycle can be simulated in both operating modes To do this press The CNC will display the graphics screen Execution An operatio...

Page 57: ...ect the program in the left column and the first operation to be executed or simulated in the right column Press to simulate the part program and to execute it Warning Whenever a section of the part p...

Page 58: ...ress the CNC displays the special screen for the CO mode After selection the operation or part can be executed as many times as necessary To do this after execution once more press During execution of...

Page 59: ...to make the tool change the standard screen for the CO mode must be selected Press The CNC will highlight the tool number Key in the number of the tool to be selected and press for the CNC to select...

Page 60: ...g the axes or the unmachined part The zone displayed cannot be modified during execution or simulation of the piece In this case stop execution or simulation by pressing Zoom This function allows the...

Page 61: ...cutter the part the axes and the clamps At the top right hand side of the screen use keys to select the type of path and the keys to select the color to be applied For the CNC to assume said values pr...

Reviews: