


10
11
25.03.2019
25.03.2019
EN
EN
A.
Clamping sleeve
B.
Fastening nut
C.
Soldering tip
D. Heater
E.
Heater fastener
F.
Rubber cap
G.
Soldering iron handle
H.
Cable strain relief
I.
Power cord
3.
By pressing the [4] key once, you can increase the
temperature by 1°C. Holding the [4] key down
increases the temperature continuously.
NOTE: The temperature can be decreased in the
same way using the [3] key.
4.
After heating the [C] tip of the [9] soldering iron,
coat the tip with solder. This will protect the tip and
extend its life.
5.
When the set temperature is reached, the marker on
the [1] display will flash.
NOTE: Unused soldering iron [9] should always be
left on the [10] rack.
NOTE: Before inspecting or repairing electric cables,
etc., make sure that they are not live.
3.3.2. PARAMETER SETTINGS MENU
1.
Press and hold down the [2] key. The message [---]
will appear on the display.
2. Enter the password [010] to proceed to the
parameter setting menu.
NOTE: Entering an incorrect password will exit the
settings menu.
3.
After entering the menu, [F-0] will appear on the
display. The user can choose settings according to
the scheme F-0> F-1> F-2> F-3> F-4> F-0 with the
[3] and [4] keys.
4.
Password settings [F-1]
•
Confirm the selection with the [2] key when a flashing
[F-1] message appears on the screen.
•
Use the [3] and [4] keys to select the parameter
value. The selected value, e.g. 100, will be the new
password protecting the station.
NOTE: selecting the [000] value means that the
station will not be password protected.
•
Press the [2] key to leave the password setting mode.
5.
Temperature correction settings [F-2]
•
Confirm the selection with the [2] key when a flashing
message [F-2] appears on the screen.
•
Use the [3] and [4] keys to select the parameter value.
It is possible to select a temperature correction in the
range (-99°C ÷ + 99°C).
•
Press the [2] key to exit the temperature correction
setting mode.
6.
Hibernate mode settings [F-3]
•
Confirm the selection with the [2] key when a flashing
message [F-3] appears on the screen.
•
Use the [3] and [4] keys to select the parameter
value.
a) Selecting [000] means inactive hibernation mode.
b) Selecting [100] means that the device will reduce
the soldering tip temperature to 150°C after 20
minutes of inactivity.
•
Press the [2] key to exit the hibernation mode.
7.
Temperature scale setting [F-4]
•
Confirm the selection with the [2] key when a flashing
message [F-4] appears on the screen.
•
Use the [3] and [4] keys to choose between the
Celsius and Fahrenheit scale. The current option will
appear on the right side of the display.
•
Press the [2] key to exit the temperature scale setting
mode.
3.3.3. CAUSES OF A DRY SOLDERING TIP
During the soldering process, the material surface is being
wetted which is one of the conditions for a durable solder.
There are factors that have a negative impact on the
wetting process and thus on the quality of the resulting
weld:
1.
Temperature display
2.
Settings button
3.
Temperature decrease button
4.
Temperature increase button
5.
Soldering iron cord
6.
Power on / off switch
7.
Front panel fastening screw
8.
Power cord (not visible in the S-LS-50 drawing)
9.
Soldering iron
10. Soldering iron rack with wire cleaner
11. Grounding socket (S-LS-50 model only)
12. Fuse holder (S-LS-50 model only)
13. Power cord socket (S-LS-50 model only)
14. Soldering iron cord socket (S-LS-50 model only)
3.1.2. SOLDERING IRON CONSTRUCTION
A B
C
D
E
F
G H
I
1.
Temperature of the soldering tip > 410°C (770°F).
2.
No protective layer on the soldering tip which was
left idle
3.
No flux in solder.
4.
Wiping the tip with a contaminated sponge or cloth,
contamination with sulphur compounds.
5.
Contact with bioplastics.
6.
Pollutants in solder.
3.3.4. OPERATING RECOMMENDATIONS FOR
SOLDERING TIPS
1.
Attention: Before taking any action, turn off the
device, disconnect it from the mains supply and
allow it to cool down.
2.
It is recommended to clean the solder tip every day
during high work intensity.
3. Before leaving the soldering tip inactive, it is
recommended to coat it with a protective layer of
solder.
4.
Before using the device, clean the tip with a cleaner.
5.
The use of high temperature when operating the
device shortens the tip's life.
6.
Rubbing or pressing the tip against the work surface
can reduce its life or damage it.
7.
During work, do not apply solder to the tip, as this
may damage the tip.
8.
Do not clean the tip with abrasive materials.
9.
Do not use fluxes containing corrosive substances.
10. Removal of oxides from the soldering tip:
•
Gently remove the sludge from the soldering tip
using abrasive cloth (grit 600 - 800) or isopropyl
alcohol.
•
Coat the surface with rosin core tinol.
•
Cover the surfaces to be soldered with rosin core
tinol and melt.
11. To properly clean the inside of the clamping sleeve,
loosen the fastening nut and remove the sleeve and
the tip. Any dirt inside the sleeve should be removed
with compressed air.
NOTE:
Be careful that the dust is not blown into your
eyes.
3.3.5. USING NEW SOLDERING TIPS
1.
Set the minimum temperature, turn the station on.
2. When the temperature reaches 250°C, cover the
surface of the tip with tinol which contains rosin.
3.
Wait for 3 minutes with the temperature at 250°C.
Do not use the device during this time.
4.
Set the working temperature. After reaching it, the
station is ready for use.
NOTE: In order for the device to work properly and
the tip to be heated optimally, ensure that the tip
and the fastening sleeve are cleaned each time after
work.
3.2. PREPARING FOR USE
APPLIANCE LOCATION
The temperature of environment must not be higher
than 40°C and the relative humidity should be less than
85%. Ensure good ventilation in the room in which the
device is being used. There should be at least 10 cm
distance between each side of the device and the wall
or other objects. The device should always be used when
positioned on an even, stable, clean, fireproof and dry
surface, and be out of the reach of children and persons
with limited mental and sensory functions. Position the
device such that you always have access to the power
plug. The power cord connected to the appliance must
be properly grounded and correspond to the technical
details on the product label.
ASSEMBLING THE DEVICE
1. ATTENTION: Before carrying out any soldering
work, make sure that the power source is
compatible with the device.
2.
Carefully unpack all components and check them
for damage and / or missing items.
3.
Make sure that the device is not connected to
a power source.
4.
Place the device on an even and stable surface.
5.
Connect the soldering iron cord plug [9] to the
soldering iron socket [14] (S-LS-50).
6.
Connect the cord plug [8] to the cord socket [13]
(S-LS-50).
7.
Connect the other plug of the cord to the power
source.
8.
Start the device with the power switch [6].
3.3. DEVICE USE
3.3.1 BASIC OPERATION
1.
Start the device with the power switch [6].
2.
Press the [4] key and set the temperature to 250°C
(482 ° F). The value will appear on the display [1].
3.4. CLEANING AND MAINTENANCE
a)
Unplug the mains plug and allow the device to cool
completely before each cleaning, adjustment or
replacement of accessories, or if the device is not
being used. Failure to follow these instructions may
result in damage to the device.
b)
Use only non-corrosive cleaners to clean the surface.
c)
After cleaning the device, all parts should be dried
completely before using it again.
d)
Store the unit in a dry, cool place, free from moisture
and direct exposure to sunlight.
e)
Do not spray the device with a water jet or submerge
it in water..
f)
Do not allow water to get inside the device through
vents in the housing of the device.
g)
Clean the vents with a brush and compressed air.
h)
The device must be regularly inspected to check its
technical efficiency and spot any damage.
i)
Use a soft, damp cloth for cleaning.
j)
Do not use sharp and/or metal objects for cleaning
(e.g. a wire brush or a metal spatula) because they
may damage the surface material of the appliance.
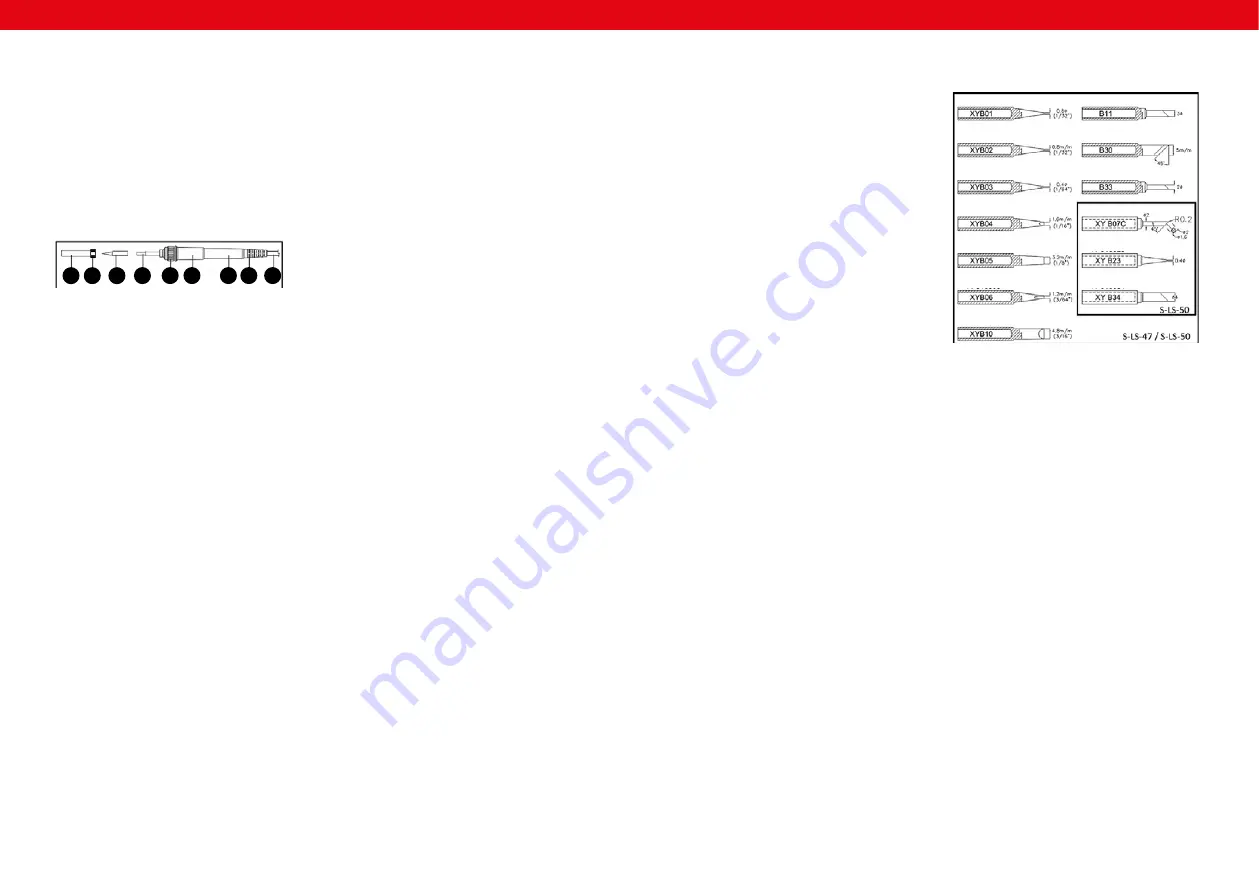
3.3.6. DIAGRAMS OF REPLACEABLE TIPS
The following types of tips can be used with the devices
shown.


