158
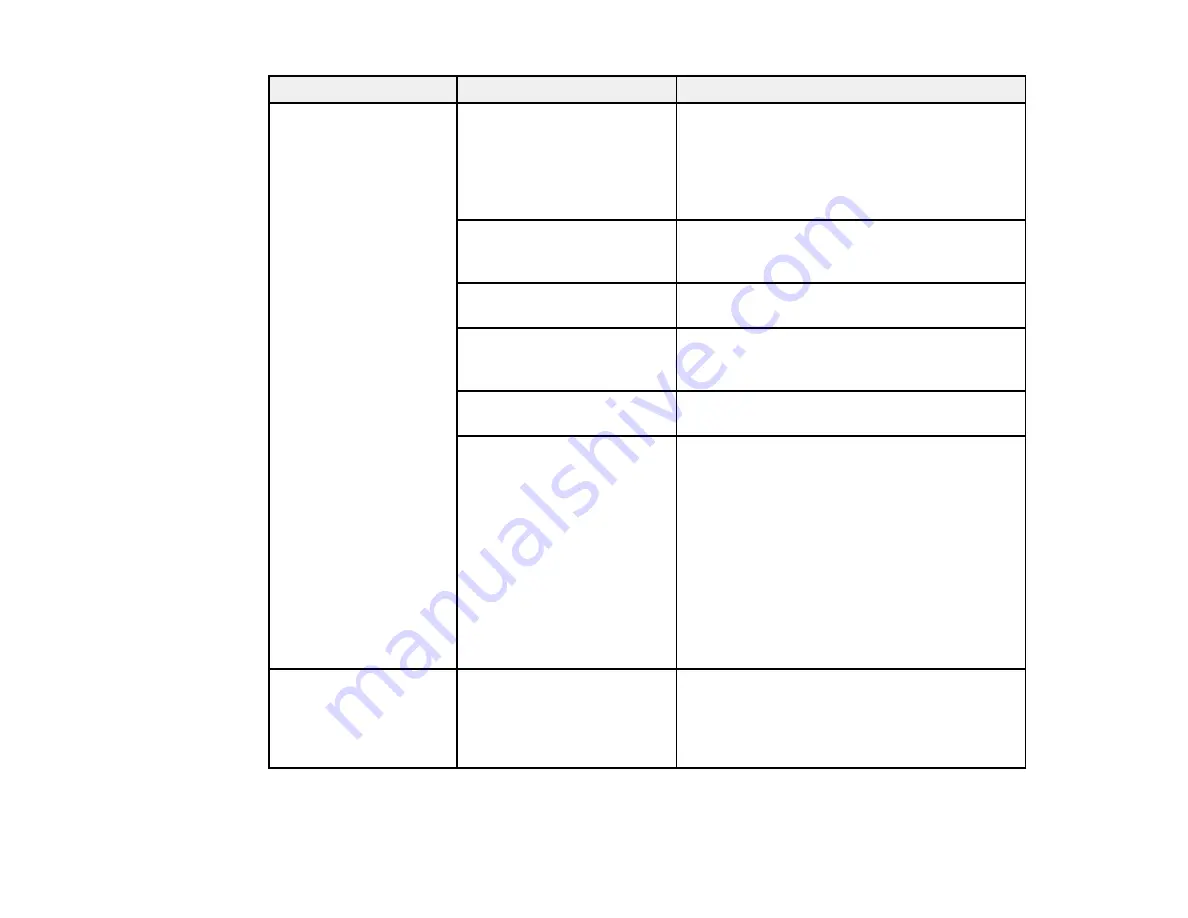
Setting
Options
Description
Preferences
Power On Cleaning
Select
On
to have the printer perform cleaning
after power is turned on and before starting
printing for the first time. Cleaning is also
performed peridiocally after that. Cleaning
may take up to 20 minutes. (Available only for
White Ink Mode.)
Date & Time
Select to set the printer's built-in clock, used
when printing the job log and printer status
sheets
Language
Select to set the language used on the printer
control panel screen
Unit: Length
Select to set the unit of length used on the
control panel screen (
m
for meters or
ft/in
for
feet/inches) and when printing patterns
Alert Sound Setting
Select
On
to enable the buzzer to sound when
an error occurs
Sleep Mode
Select
Off
to turn off sleep mode or choose the
amount of time before the printer enters sleep
mode (from 5 to 180 minutes)
The printer automatically enters sleep mode
when it displays no errors, is receiving no print
jobs, and is performing no control panel or
other commands. In sleep mode, the LCD
screen, internal motors, and other parts turn
off to consume less power. To wake the printer
from sleep mode, press a button on the control
panel and resume operation within 30
seconds.
Reset All Settings
Yes
No
Select
Yes
to return all control panel settings
to their default values, except for
Date & Time
,
Language
, and
Maintenance Mode
; also
does not change the current printer mode
(White Ink Mode or Color Ink Mode)
Parent topic:
Summary of Contents for SureColor F2100 Series
Page 1: ...Epson SureColor F2100 Series User s Guide ...
Page 2: ......
Page 8: ......
Page 36: ...36 Sleeve platen 1 0 47 inch 12 mm margins 2 Platen frame 3 Printable area ...
Page 44: ...44 2 Peel off the edges of the grip pad 3 Flip the platen over and hold it down with one hand ...
Page 55: ...55 If you are installing a sleeve platen install it as shown Then go to step 2 ...
Page 58: ...58 1 Insert the ends of each hook into the holes in the front of the printer as shown ...
Page 108: ...108 5 Open the printer cover ...
Page 136: ...136 8 Grasp the tab on the air filter and lift it up to remove it ...
Page 143: ...143 Note Do not apply force to the gears shown below when cleaning A malfunction may occur ...
Page 147: ...147 Parent topic Maintenance ...


