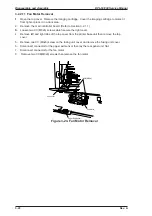
3.2.2.3 Interlock Switch Removal
1.
Open the top cover. Remove the imaging cartridge. Cover the imaging cartridge to protect it
from light or place it in a dark area.
2.
Remove the main controller board. (Refer to Section 3.2.1.1.)
3.
3.
Remove one CC (M3
×
6) screw from the control panel and lift the panel forward.
4.
Remove two CC (M3x8) screws and take the right cover away.
5.
Remove two CC (M3x8) screws on the paper guide case.
6.
Remove four CC (M3x6) screws on the top and two CC (M3x6) screws at the right of the shield
cover and take it away.
7.
Remove two CP(S)(P) (M3x16) screws.
8.
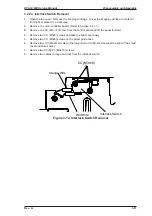
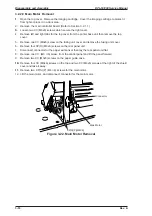
Remove two cables (orange and red) from the interlock switch.
CC (M3x16)
Orange Wire
Red Wire
Interlock Switch
Figure 3-12. Interlock Switch Removal
EPL-N1200 Service Manual
Disassembly and Assembly
Rev. A
3-11
Summary of Contents for EPL-N1200
Page 1: ...EPSON TERMINAL PRINTER EPL N1200 SERVICE MANUAL EPSON 4006838 ...
Page 8: ...REVISION SHEET I Revision I Issue Date Revision Page Rev A December 9 1996 1st issue vii ...
Page 111: ...Chapter 4 Adjustment No adjustment is required in this product ...
Page 127: ...6 ii Rev A ...
Page 133: ...Figure A 2 Engine Section Cable Connection Appendix A EPL N1200 Service Manual A 2 Rev A ...

