


Maintenance 8. Replacing the Timing Belts (U
1
Belt)
156
E2C Rev.6
8.4 Replacing the U
1
Belt
A brake is mounted on the motor of Joint #4 to prevent the shaft from moving down and
rotating due to the weight of the end effector while the power to the Controller is OFF or
while the motor is in OFF status (MOTOR OFF).
Note that the brake will not work during the replacement procedure.
Move the shaft down to its lower limit before starting the replacement procedure by
following the instructions below:
Removal
(1) Remove the arm top cover.
For details on the removal method, refer to
Maintenance: 3.1 Arm Top Cover
.
(2) Cut off the wire tie binding the duct plate,
motor, and cables together.
(3) Remove the duct plate.
Duct plate
3-M5
×
1
5
(4) Loosen the bolts securing the Joint #4
motor unit.
If there is a wire tie securing cables to the
Joint #4 motor, cut off it.
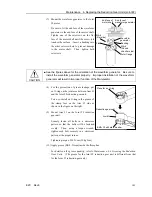
(5) Remove the Joint #4 counter shaft unit.
To do so, unscrew the bolts securing the
Joint #4 counter shaft unit.
Move the Joint #4 motor unit to the shaft
side and remove the Joint #4 counter shaft
unit from the U1 and U2 belts.
4-M4
×
1
2
+Washer,
Spring washer
Joint #4
motor unit
2-M4
×
1
2+Washer, Spring washer
M5
×
8 double-sems screw
Joint #4 counter
shaft unit
(6) Remove the U1 belt from the U1 pulley.
U2 belt
Joint #4 motor unit
U
1
belt
)
NOTE
Summary of Contents for E2C Series
Page 1: ...SCARA ROBOT E2C series MANIPULATOR MANUAL Rev 6 EM069R1409F ...
Page 2: ...MANIPULATOR MANUAL E2C series Rev 6 ...
Page 8: ...vi E2C Rev 6 ...
Page 14: ......
Page 82: ......
Page 92: ...Maintenance 2 General Maintenance 80 E2C Rev 6 ...
Page 118: ...Maintenance 4 Replacing the Cable Unit 106 E2C Rev 6 ...
Page 194: ...Maintenance 11 Replacing the Signal Relay Board 182 E2C Rev 6 ...