background image

Pearl-2 User Guide                                     

Configure HTTPS

The default HTTP port 80 redirects traffic to the default HTTPS port 443 when HTTPS is enabled. If the default 
ports used by Pearl-2 are not available on your network, you can change them using the Admin panel, see 

Change the HTTP/HTTPS port values

Custom applications that use the Pearl-2 HTTP API should continue to work if you configure Pearl-
2 for HTTPS. 

A default, self-signed certificate from Epiphan Video comes preloaded on Pearl-2. You can upload and delete 
your own certificate and private key. However, you cannot delete the default self-signed certificate that 
comes preloaded onPearl-2. 

If you upload your own self-signed certificate and private key, ensure they're PEM encoded. Certificates can 
either include the private key or be separate files.

If you attempt to access the web-based Admin panel using a web browser and the required security certificate 
isn't found in the list of certificates loaded on Pearl-2, a warning message appears stating that the device isn't 
trusted. You can choose whether to proceed and connect to Pearl-2's web-based Admin panel without the 
security certificate authentication or cancel the connection. 

If the Epiphan Video self-signed certificate is selected, your web browser  may warn of an 
untrusted certificate when you try to access Pearl's web-based Admin panel. You can dismiss the 
warning and continue to  the Admin panel for your device.

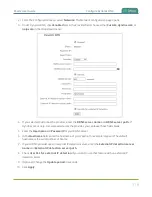
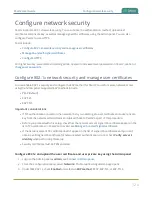
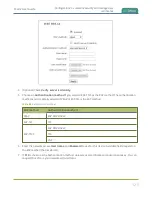
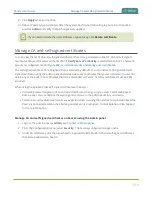
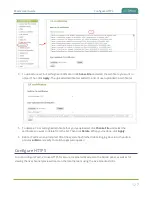
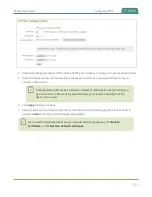
Configure HTTPS and upload a self-signed certificate using the Admin panel

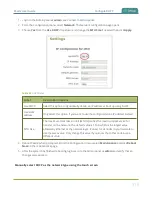
 1.  Login to the Admin panel as 

admin

, see 

Connect to Admin panel

.

 2.  From the Configuration menu, select 

Security

. The Security configuration page opens.

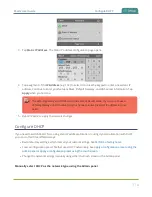
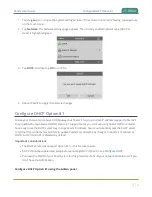
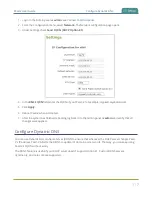
 3.  Under HTTPS configuration, check 

Secure connection (HTTPS)

.

128

Summary of Contents for Pearl-2

Page 1: ...Epiphan Pearl 2 Pearl 2 Rackmount Pearl 2 Rackmount Twin User Guide Release 4 14 1 April 15 2021 UG115 24 and 2021 Epiphan Systems Inc ...

Page 2: ...BE ACCURATE AT TIME OF WRITING BUT ARE PRESENTED WITHOUT WARRANTY OF ANY KIND EXPRESS OR IMPLIED USERS MUST TAKE FULL RESPONSIBILITY FOR THEIR APPLICATION OF ANY PRODUCTS LIMITATION OF LIABILITY UNDER NO CIRCUMSTANCES SHALL EPIPHAN BE LIABLE FOR ANY INCIDENTAL SPECIAL CONSEQUENTIAL EXEMPLARY OR OTHER INDIRECT DAMAGES THAT RESULT FROM THE USE OF OR THE INABILITY TO USE THIS PRODUCT OR THE INFORMATI...

Page 3: ...ate of purchase Technical support Epiphan s products are backed by our professional support team You can reach our team several ways l Email support epiphan com l Live chat from our support site https www epiphan com support l Phone toll free at 1 877 599 6581 or call 1 613 599 6581 Gather as much information about your problem as you can before you contact us so we can help you better including l...

Page 4: ...feature using the Admin panel Locking CMS start screen Configure Pearl 2 s touch screen to show the Content Management System CMS events screen at start up Add a PIN to restrict user access to the start screen Locking the start screen is useful when operating Pearl 2 in public spaces classrooms and unmanned kiosks Pre configured stream URLs for Kaltura webcasts When you create a Kaltura webcasting...

Page 5: ...ud using the touch screen We listened to your concerns about people inadvertently unpairing Pearl 2 from Epiphan Cloud and so we removed the unpair option from the touch screen You can still unpair the device using the Admin panel or directly in Epiphan Cloud ...

Page 6: ...d remote access 38 The touch screen 39 About the touch screen 39 The Channel view 41 Record a channel using the touch screen 43 Stream a channel using the touch screen 44 Switching mixing using the touch screen 45 Single Touch streaming and recording control 47 About Single Touch streaming and recording 47 Customize the Single Touch control display 49 Specify channels and recorders for Single Touc...

Page 7: ...Access Epiphan Live from the Admin panel 82 Stream record and monitor using the Dashboard interface 83 Switching mixing using Epiphan Live 91 Your recordings 95 Cloud based device management 97 About device management with Epiphan Cloud 97 Enable or disable Epiphan Cloud access 98 Pair and unpair from Epiphan Cloud 100 Remote login to the Admin panel and Epiphan Live 103 PART 1 Setup 106 Rackmount...

Page 8: ... video output source using the touch screen 149 Preview the video output port 150 Disable the video output port 151 Disable or enable audio and output port volume 152 Display and reposition the audio VU meter 154 Rename a video output port 155 Mirror the video output port display 156 Connect an external keyboard 157 Connect a USB status light 159 Feature add ons 160 4K feature add on 163 Configura...

Page 9: ... Admin panel 208 View device information using the touch screen 208 View network status 210 View 802 1x network connection status 210 View channel status and stream information 211 View the video output port status 213 View AFU and file transfer progress 214 View scheduled CMS events and history 217 PART 2 Capture 219 What is a channel 220 Channel layout examples 221 About automatic channels Auto ...

Page 10: ...xt overlay 277 Custom system variables for text overlays 280 Crop a video source 281 Configure chroma keying 284 Performance considerations 285 What is upstream chroma keying 285 What is downstream chroma keying 286 Set up chroma key for a green screen video source 287 Add chroma key titler effects using Microsoft Powerpoint slides 293 Add external titler software effects to Pearl 2 298 Video and ...

Page 11: ...am 353 View the live broadcast URL using a web browser 355 View the streaming URL using a media player 357 Streaming to servers CDNs and other devices 360 Set up an RTMP or RTMPS push stream 360 Set up an SRT stream using rendezvous mode 362 Set up an SRT stream using caller and listener modes 365 Adjust latency and view the SRT stream status 369 Set AES encryption and a passphrase for SRT 372 Set...

Page 12: ...8 Duplicate a recorder 419 Delete a recorder 419 Manage recorded files 421 View list of recorded files 421 Download recorded files manually 422 Join recorded files together 423 Extract tracks from a recording 424 Rename recorded files 426 Delete recorded files 427 FTP and automatic file transfers 429 About Automatic File Upload AFU 429 Set channels and recorders to include in AFU 431 Enable AFU sc...

Page 13: ...stered resource 471 Kaltura recording and webcasting setup 474 About Kaltura recording and webcasting 474 Select channels for Kaltura VOD events 477 Select a channel and URLs for Kaltura webcasting events 478 Set Kaltura ad hoc event parameters 479 Change the events schedule refresh interval 481 Use RTMPS for a Kaltura webcasting event 482 Panopto registration 483 Enable CMS and register with Pano...

Page 14: ...tory reset 519 Firmware upgrade 520 Support 526 Register your device 530 Storage capacity and maintenance 532 Adjust the fan speed 534 PART 7 Troubleshooting 535 Diagnostic tools 535 Connectivity status results 537 Run diagnostic tests using the Admin panel 538 Run diagnostic tests using the touchscreen 540 Troubleshooting Quick Reference 542 Remove black bars matte from the video 548 Use a specif...

Page 15: ...tegrated with Kaltura and Panopto Content Management Systems CMSs and is easily setup using the Admin panel The Integration section of this guide details how to register and set up Pearl 2 as a remote recording and streaming device for Kaltura and Panopto For information about using Pearl 2 s RS 232 API HTTP API and HTTPS API with third party applications refer to the Pearl System API Guide About ...

Page 16: ...o recorder all in one Pearl 2 comes in three models Pearl 2 Pearl 2 Rackmount Pearl 2 Rackmount Twin A small silent portable system that comes with a hard shell carry case A 2U rackmount system with all the same functionality as the portable Pearl 2 but designed for installation and operation in a rack A high density 2U rack mount variation that contains two complete and independent Pearl 2 system...

Page 17: ...n smart devices connected to the same private network as Pearl 2 Download recordings using your web browser or set Pearl 2 to automatically upload recorded files directly to a network server using FTP RSYNC CIFS WebDav and more Pearl 2 is also fully integrated with Kaltura and Panopto Content Management Systems CMSs and can be registered as a video remote recorder resource for seamless lecture cap...

Page 18: ...w for details about the availability of add ons for your system as well as instructions to purchase and install add ons Where you see this symbol 4K in the guide that means the feature or function applies only if you have activated the 4K feature add on 4 ...

Page 19: ...nagement Systems CMSs to create unscheduled ad hoc recordings and webcasts USB 3 0 port For connection of external hard drives flash drives USB keyboards and supported USB status light indicators Can be used to connect a USB mouse or keyboard when the local console feature is enabled A web camera or USB microphone cannot be connected to this port only to the ports on the rear panel 3 5 mm audio ja...

Page 20: ...ow for any signal up to full HD and the second two inputs allow for any input resolution up to 4K4K 12G SDI in Connects SDI signals to Pearl 2 including 3G SDI 6G SDI 12G SDI 4K SDI HD SDI SD SDI RCA audio in The RCA ports are consumer line level left right stereo pair and are calibrated for 10 dBV signals RS 232 port For connection to a control computer terminal HDMI output ports HDMI output for ...

Page 21: ... SRT NDI and NDI HX Tx Rx networked video inputs See Configure network settings for setup instructions Power jack Plug the supplied 120 240 V AC power cable in here 1 Requires 4K feature add on The SDI ports on the back of Pearl 2 can be delicate Be careful to avoid sharp impacts or pressure such as balancing the system on its back with the SDI ports against a hard surface Rough treatment of the S...

Page 22: ...l descriptions Label Name Description Touch screen front panel display Used for confidence monitoring and simple configuration obtaining system information and starting stopping recordings and streams User can also authenticate with one of the integrated Content Management Systems CMSs to create unscheduled ad hoc recordings and webcasts USB 3 0 port For connection of external hard drives flash dr...

Page 23: ...local console feature is enabled A web camera or USB microphone cannot be connected to this port only to the ports on the rear panel 3 5 mm audio jack For audio confidence monitoring Plays the audio for the currently visible channel Power button and LED Press once to power on Double press to initiate a graceful system shutdown 9 ...

Page 24: ...here Always use the provided power supply HDMI in Connect HDMI and DVI signals 4K HDMI in Connect up to 4K1 HDMI signals SDI in Connect SDI signals XLR audio in The four XLR ports can function as two professional line level left right stereo pairs XLR A pair and XLR B pair or as four mono inputs see AV inputs The XLR ports are professional line level inputs and are calibrated for 4 0 dBu signals R...

Page 25: ...rd when the local console feature is enabled RJ 45 Ethernet Auto sensing gigabit Ethernet 10 100 1000 Base T network port with support for RTSP SRT NDI and NDI HX Tx Rx networked video inputs See Configure network settings for setup instructions 1 Requires 4K feature add on The SDI ports on the back of Pearl 2 can be delicate Be careful to avoid sharp impacts or pressure such as balancing the syst...

Page 26: ...s Cable storage is located under the custom foam tray that holds Pearl 2 in the case Inside the box with your Pearl 2 system you ll find the power cable and the following items Pearl 2 Rackmount Twin comes with two sets of cables 1 One SDI cable 3 feet 1 meter in length 2 One HDMI cable 3 feet 1 meter in length 3 One HDMI to DVI adapter 4 One Ethernet cable 5 One region specific power supply cable...

Page 27: ...ge Name Description SDI cable Connect SDI sources to the SDI ports 12G SDI capable HDMI cable Connect HDMI or DVI using adapter sources to the HDMI ports DVI female to HDMI male adapter Connect DVI sources to the HDMI port RJ 45 Ethernet cable Connect Pearl 2 to your network 13 ...

Page 28: ... two plug and play channels Auto A and Auto B Auto channels are used for this quick start They have automatic video sensing which detects the video signal you connect to the video input ports on Pearl 2 The first video source you connect while Pearl 2 is powered on is automatically assigned to the Auto channel either Auto A or Auto B depending in which labeled port you connect the video source For...

Page 29: ...e A row appears in the Auto A channel and the video source connected to the B row appears in the Auto B channel 7 Use the touch screen on Pearl 2 for confidence monitoring To display the single Channel view simply tap on one of the channels that you see in the Grid view From the Channel view you can do things like stop and start recording for the 8 Optional Plug headphones into the 3 5 mm stereo a...

Page 30: ...r Pearl 2 preview cgi channel 2 For example http 192 1 10 100 preview cgi channel 2 1 Optional Open a new tab in your browser and enter the URL to login to the Admin panel http IP Address for Pearl 2 admin For example http 192 1 10 100 admin The default user name admin has no password set by default If a password has been set consult with your system administrator for the login credentials see Wha...

Page 31: ...om the Grid view tap the channel you want to record The Channel view appears 2 Tap the red dot to start recording The record timer starts and continues for as long as the system is recording Tap the red dot again to stop recording If the control icons aren t visible tap the screen once To control recording using the Admin panel 1 From the Channels menu in the Admin panel click Recording for your c...

Page 32: ...t configuration l What is streaming l Selecting an audio source l Video output ports l FTP and automatic file transfers For higher security we recommend setting admin operator and viewer level passwords on Pearl 2 see Set or change user passwords When you re done setting up Pearl 2 make sure you back up the system configuration using the procedure described in Create a configuration preset Registe...

Page 33: ...ra and slides then easily switch between layouts with either a tap on the touch screen using Epiphan Live on a mobile device or from the Admin panel Your program stream with switched layouts could look like this To create a program channel with custom layouts using the custom layout editor that you can switch see What is a channel For instructions on how to live switch see l Switching mixing using...

Page 34: ...phones icon on the touch screen to adjust the volume Each tap increases the volume by 25 to a maximum volume of 100 Tapping the headphones icon when the volume is at 100 mutes the volume You can also long press the headphones icon to mute and unmute the volume Volume is muted 25 volume 50 volume 75 volume 100 volume At 75 volume what you hear corresponds to the nominal audio level in the VU meter ...

Page 35: ... two bars The top bar is the left audio channel and the bottom bar is the right audio channel VU meter mono VU meter stereo Table 6 Audio VU meter levels Color Decibel range Red 0 to 9 dBFS Yellow 9 to 18 dBFS Green 18 dBFS and lower The VU meter appears in several different places so you can visually check audio levels l Touch screen On the individual channel view and the grid view If the audio m...

Page 36: ...air RCA consumer line level input 10 dBV l Two USB video audio ports The four XLR audio inputs are configured as two stereo pairs by default XLR A left right and XLR B left right see Configure audio ports for stereo or mono The XLR B audio ports and the RCA audio ports are linked You can configure Pearl 2 to use both or just one of the audio sources using the Admin panel see Assign audio sources t...

Page 37: ...XLR line level inputs 1To avoid unwanted signal noise on the RCA ports we recommend adding no more than 12dB of gain to the RCA port or when XLR B RCA is used To choose a different audio device for the channel 1 Using a web browser on the admin computer go to the IP address of your Pearl 2 and log in see Connect to Admin panel 2 From the Channels menu select your channel i e Auto A or Auto B and c...

Page 38: ...just audio gain and delay Connecting microphones to the XLR line level inputs The XLR analog audio input ports on Pearl 2 are professional line level inputs rated at 4 0 dBu up to 12 3 V RMS 24 dBu You can t connect microphones directly to the XLR ports because the microphone signal is too low If you want to connect microphones to the line level XLR ports on Pearl 2 you must use an external preamp...

Page 39: ...supports the following AV inputs However Pearl 2 does support common signal converters and input adapters Pearl 2 Rackmount Twin has two complete sets of these inputs Table 8 Inputs for Pearl 2 Input port Qty Details SDI1 2 Linear PCM audio video input Supports up to 12G SDI signals HDMI 2 Linear PMC audio video input non HDCP protected DVI I using an adapter is single link 4K HDMI2 2 Linear PMC a...

Page 40: ...s 4K feature add on 3 A mix of video over Ethernet sources are supported Just ensure that total system loading is within acceptable levels see Optimum CPU performance 4 In the Admin panel Analog audio B includes audio signals from the XLR B audio pair and the RCA audio pair by default You can disable one or the other using the Admin panel see Assign audio sources to an input If you are using DVI2P...

Page 41: ... Standard resolutions PAL PAL wide NTSC NTSC wide Input resolution range 640 480 to 4096 2160 Frame rate Up to 60 fps7 Video input color spaces HDMI RGB 4 4 4 YCRCB 4 2 2 YCRCB 4 4 4 SDI RGB 4 4 4 YCRCB 4 2 2 Deinterlacing Yes Maximum cable length for SDI 300 ft Maximum cable length for USB 3 0 6 ft Audio Inputs Analog audio inputs 4 XLR pro line level 4 0 dBu up to 12 3 VRMS 24 dBu balanced unbal...

Page 42: ... 1 RJ 45 female Audio gain control 0 dB to 30 dB Audio mute Yes Configurable audio delay 300 ms to 300 ms Video processing Video output color space 4 2 0 8 bits per color Video codec H 264 AVC ITU H 264 ISO IEC 14496 10 4 2 0 8 bit color l Encoding profile High Main Baseline l Profile levels 3 0 3 1 3 2 4 0 4 1 5 1 Motion JPEG NDI NDI HX Bitrate 1 to 50 Mbps selectable Bitrate control Constant Har...

Page 43: ...gnal types 2 HDMI port 1 HDMI 2 0 port 2 HDMI 1 4a 3 H 264 AVC digital video over Ethernet 2 NDI unicast 6 RTSP 6 SRT push 6 HLS push 6 MPEG DASH push Connectors 2 HDMI 1 RJ 45 female Streaming protocols MPEG TS and FLV RTSP over TCP UDP SRT push over UDP HLS push over HTTP HTTPS MPEG DASH push over over HTTP HTTPS Multi Publish to Streaming Server CDN SRT RTSP RTMP RTMPS HLS pull Native Apple HTT...

Page 44: ... H 264 AVC ITU H 264 ISO IEC 14496 10 4 2 0 8 bit color l Encoding profile High Main Baseline l Profile levels 3 0 3 1 3 2 4 0 4 1 Motion JPEG NDI Network traffic shaping multicast streams 4 Mbps to 95 Mbps configurable Audio output Analog audio output 1 3 5 mm stereo headphone jack front panel Digital audio outputs RTSP SRT and NDI audio over Ethernet HLS and MPEG DASH over HTTP HTTPS HDMI audio ...

Page 45: ...ecord formats AVI MOV MP4 and MPEG TS Upload image formats JPEG PNG Internal hard drive 512 GB SSD10 File transfer protocols FTP SFTP SCP AWS S3 client and WebDAV client RSync Network file share protocols CIFS SMB File system for USB storage FAT16 FAT32 XFS EXT2 EXT3 EXT4 NTFS External USB ports 1 USB 3 0 front panel 2 USB 3 0 UAV UAC rear panel Bitrate Up to 50 Mbps 31 ...

Page 46: ...P HTTP HTTPS NTP PTP FTP SFTP SCP AWS S3 Network discovery Announce UPnP SAP Network security 802 1x EAP methods PEAP EAP TLS EAP TTLS Administration and control Admin panel Local web UI for full administration On screen display and mobile UI for confidence monitoring administration and control Local Admin panel access using a USB mouse keyboard and monitor connected directly to Pearl 2 with built...

Page 47: ...ve access as well as local network access to the live channel broadcast Remote access Remote login11 to cloud versions of the Admin panel and Epiphan Live API Yes HTTP HTTPS or RS 232 Crestron driver Yes See https applicationmarket crestron com epiphan Integrations Content Management Systems Kaltura Panopto Cloud access and management Epiphan Cloud 33 ...

Page 48: ...earl 2 Rackmount Twin 19 3 10 485 mm 89 mm 276 mm dimensions include mounting tabs Weight Pearl 2 8 38 lbs 3 8 kg Pearl 2 Rackmount 12 1 lbs 5 5 kg Pearl 2 Rackmount Twin 14 6 lbs 6 6 kg Regulatory compliance FCC compliance Part 15 CE compliance Directive 2014 30 EU Electromagnetic Compatibility Directive 2014 35 EU Low Voltage Directive Directive 2011 65 EU RoHS Time Synchronization NTP TIME RFC ...

Page 49: ... and Pearl 2 Rackmount Twin are powerful live video production systems however there s a limit to the number of concurrent tasks the onboard CPU can perform efficiently The number of concurrent tasks depends on many factors like how many channels you have how many layouts you have per channel how often you switch layouts is the system resizing scaling video sources what frame rate and bitrate is u...

Page 50: ...the CPU usage from the touch screen tap the gear icon and select System Status If the system load is higher than recommended you can l Disable the video output port if unused l Remove unused channels or layouts l Reduce the number of channels created 36 ...

Page 51: ...h German Icelandic Italian Norwegian Portuguese Spanish and Swedish l Central Eastern European languages Bosnian Croatian Czech Hungarian Polish Romanian Slovak and Russian Important considerations l Use only alphanumeric and diacritic characters in metadata descriptions The whole metadata string is refused if any special currency or mathematical symbol appears in the description You must remove t...

Page 52: ...r interface that s primarily used to perform system set up and administrative tasks for your Pearl 2 You can access the Admin Panel using an internet browser on a computer or tablet that s connected to the same local Ethernet network as your Pearl 2 or locally using a USB mouse keyboard and monitor connected directly to Pearl 2 See About the Admin panel l Epiphan Live A web based user interface th...

Page 53: ...screen About the touch screen Pearl 2 s convenient touch screen has many uses including confidence monitoring basic configuration and diagnostics one touch streaming and recording control easy start stop of scheduled events and authentication with a Content Management System CMS to create unscheduled ad hoc recordings and webcasts The touch screen is capacitive Use your finger or a specially desig...

Page 54: ...the grid icon to return to the grid view Tap the gear icon at any time to go to system settings Grid icon A No Channels screen appears if there are no channels configured on your Pearl 2 and the automatic channels Auto A and Auto B have been deleted Tap anywhere on this screen to go to the system settings screen By default the touch screen and all features except viewing the CMS Events screen are ...

Page 55: ...een When setting some features a pop up virtual keyboard appears To enable using an external keyboard that you connect to one of Pearl 2 s USB ports instead see Connect an external keyboard The Channel view Each channel you configure on Pearl 2 can be monitored and controlled using the touch screen After you power on Pearl 2 and the grid view opens you can select a channel and open the channel vie...

Page 56: ...r several seconds Tap the touch screen and the icons reappear 8 Audio VU meter uses quasi peak ballistics with samples averaged every 10 ms The maximum average audio level in each 100 ms period is displayed using colored bars l RED 0 to 9 dBFS l Yellow 9 to 18 dBFS l Green 18 dBFS and lower 9 Audio monitoring volume control icon Tap to change volume level See Monitoring audio for more information ...

Page 57: ...ecord icon doesn t appear in the top right corner of the screen recording is disabled See Disable or enable recording streaming and switching from the touch screen to enable recording Start and stop recording a channel using the touch screen 1 From the grid view select the channel you want to record The channel view opens If necessary tap the screen once to display the controls 2 Tap the red Recor...

Page 58: ... streaming is disabled See Disable or enable recording streaming and switching from the touch screen to enable streaming Start and stop streaming a channel using the touch screen 1 From the grid view select the channel you want to record The channel view opens If necessary tap the screen once to display the controls 2 Tap the gray Stream icon at the top left of the screen to start streaming The St...

Page 59: ...annel display in the carousel Simply tap a layout to load it in to the standby panel and you re ready to start live switching Performing live switching using one interface like the touch screen does not dynamically update the visuals in the other interfaces e g the Admin panel and Epiphan Live The other interfaces must be manually refreshed to accurately reflect the current live switching layout i...

Page 60: ...in to the Preview panel 4 Tap Apply or double tap inside the Preview panel to switch that layout to the Live panel The layout that was in the Live panel moves to the Preview panel so that it s ready for the next time you switch 5 To load a different layout into the Preview panel tap another layout in the carousel 46 ...

Page 61: ...nd recorders for Single Touch recording l Specify channels for Single Touch streaming l Customize the Single Touch control display About Single Touch streaming and recording The Single Touch feature lets you control the recording and streaming of multiple channels and recorders with one touch of a button on the touch screen Simply specify which channels and recorders to include for Single Touch co...

Page 62: ...the total number of channels that are configured for one touch recording the second number 3 The number of channels that are actively streaming the first number over the total number of channels that are configured for one touch streaming the second number When you press the start button to activate Single Touch recording and streaming a blue Stop button appears the Recording values update to show...

Page 63: ...aming configuration page using the Admin panel and identify which channel isn t streaming Then correct any streaming configuration errors See Specify channels for Single Touch streaming and Specify channels and recorders for Single Touch recording for more information about configuring channels and recorders for Single Touch control Customize the Single Touch control display You can use the Admin ...

Page 64: ...pears in the top right of the start screen You must enter the PIN to unlock the Single Touch control start screen and access the other screens using the touch screen When you return to the Single Touch control start screen Pearl 2 automatically locks itself and you must re enter the 4 digit PIN to unlock the touch screen Configure how the Single Touch control screen displays on the touch screen us...

Page 65: ...l channels and recorders using the Admin panel To learn how to configure your channels for recording see Record To learn how to configure recorders see Recorders Enable or disable Single Touch control for a channel 1 Login to the Admin panel as admin see Connect to Admin panel 2 From the Channels menu select the channel you want and click Recording The Recording page opens 3 Select change and then...

Page 66: ...dmin see Connect to Admin panel 2 To enable or disable Single touch control for a recorder 3 From the Recorders menu select the recorder you want The Recorder Setup page opens 4 Select change and then check Single touch control on the options page to enable the recorder for Single Touch control Uncheck Single touch control if you don t want to include that recorder for 52 ...

Page 67: ...streaming by default You can enable and disable one touch streaming control for individual channels using the Admin panel To learn how to configure your channels for streaming see Stream Specify channels for Single Touch streaming using the Admin panel 1 Login to the Admin panel as admin see Connect to Admin panel 2 From the Channels menu select a channel and click Streaming The Streaming page ope...

Page 68: ... for Single Touch control Uncheck Single touch control if you don t want to include this channel s stream for Single Touch control Then click Apply CMS event controls using the touch screen Pearl 2 starts recording scheduled events automatically however you can use the touch screen to start and stop scheduled events sooner The touch screen can also be used to authenticate with your Content 54 ...

Page 69: ...Panopto recording and webcasting Table 12 Events screens using Pearl 2 for scheduled Kaltura and Panopto events Events screens Description The Calendar icon appears on the touch screen of Pearl 2 when CMS is setup using the Admin panel Tap the calendar icon to display the Events screen For example From the Channel view the calendar icon appears along the bottom of the screen This Events screen dis...

Page 70: ...p Start event To create an ad hoc recording or webcast tap Create event and authenticate using your CMS credentials Note Scheduled events override ad hoc events Pearl 2 stops the ad hoc event and starts the scheduled event when it s time for the scheduled event to start This Events screen displays when a scheduled event is set to start in five minutes or less To start the scheduled event early tap...

Page 71: ...s screen Tap in a field and enter your credentials then tap Sign in Kaltura login screen When Pearl 2 is registered with Kaltura this authentication screen appears when you tap Create event from the Events screen Tap in the Event owner field and enter your Kaltura user ID or a valid Kaltura email address as your login credentials then tap Next This screen displays after a successful authentication...

Page 72: ... Swipe to scroll down to add Kaltura categories and tags Tap Start when you re ready to start the ad hoc event This Events screen displays after you have started the ad hoc event To stop the ad hoc event tap Stop event Note To log out after stopping an ad hoc event tap Create event from the Events screen and re enter your User ID to return to this logout screen Configure the touch screen The touch...

Page 73: ...itive even when the display is disabled Disable or enable the touch screen display using the Admin panel 1 Login to the Admin panel as admin see Connect to Admin panel 2 From the Configuration menu click Touch Screen The touch screen configuration page opens 3 Uncheck Enable display to disable the touch screen display Check Enable display if you want the touch screen display enabled 4 Click Apply ...

Page 74: ...o the Admin panel as admin see Connect to Admin panel 2 From the Configuration menu click Touch Screen The touch screen configuration page opens 3 Uncheck Show preview to disable channel previews from displaying on the touch screen Check Show preview if you want to enable channel previews on the touch screen 4 Click Apply Disable or enable the system status screen The system status screen displays...

Page 75: ...system status if you want to enable the system status screen to open on the touch screen 4 Click Apply Disable or enable configuration using the touch screen You can apply configuration presets and configure network settings using the touch screen on Pearl 2 by default You can disable this ability using the Admin panel If configuration is blocked and system status is permitted touch screen users s...

Page 76: ...l using the touch screen on Pearl 2 is enabled by default You can disable this function using the Admin panel to stop users from switching layouts and from starting or stopping live streams and recordings Channel preview must be enabled for the touch screen for recording streaming and live switching control to work See Hide or show channel previews on the touch screen Disable or enable recording s...

Page 77: ...fter it times out and shuts off simply tap anywhere on the screen If the start screen is not set to locked mode and a screen timeout occurs tapping the touch screen returns you to the last screen you were on before the timeout occurred If you set a 4 digit PIN when the start screen is in locked mode a lock appears in the top right of the start screen after a timeout You must enter the PIN to unloc...

Page 78: ...o protect the touch screen of Pearl 2 from unauthorized access By default the PIN is not set If a PIN is configured users are prompted to enter the PIN code whenever l You power on or restart Pearl 2 l Pearl 2 recovers from timeout mode see Set the touch screen timeout If no 4 digit PIN is set when the start screen is in locked mode simply tap the touch screen to access the configured start screen...

Page 79: ...ccess other screens using the touch screen When you return to the Single Touch control or CMS start screen Pearl 2 automatically locks itself and you must re enter the 4 digit PIN to unlock the touch screen Set a touch screen PIN security code using the Admin panel 1 Login to the Admin panel as admin see Connect to Admin panel 2 From the Configuration menu select Touch Screen The touch screen conf...

Page 80: ...ess to the Admin panel l Connect using a DNS based service discovery l Connect using persistent static IP address l Switching mixing using the Admin panel For information about remote access to the cloud version of the Admin panel see Remote login to the Admin panel and Epiphan Live For information about integrating Pearl 2 with Content Management Systems CMSs like Panopto and related administrato...

Page 81: ...enu The channels that are available for the current configuration of your Pearl 2 are listed Select a channel to access the drop down list of options that are available to configure channel encoding add video and audio sources create layouts perform confidence monitoring record the channel and more 67 ...

Page 82: ... events and completed ah hoc and scheduled events 6 Configuration menu A list of all the available configuration options 7 Internal storage and system information menu System details are displayed in this area such as the total amount of internal storage how much space is currently used and how much free space is available 8 Main panel The main panel is where the selected menu information displays...

Page 83: ...d login to the Admin panel 1 Get the IP address of Pearl 2 Do one of the following a From a single channel view or grid view tap the system settings gears icon then tap System Status or b If your system doesn t have any channels showing tap the touch screen anywhere to go to the system settings screen then tap System Status 2 When you have the IP address of Pearl 2 enter the following into the add...

Page 84: ...u can also connect an external USB keyboard When you enable local console you must also enable the External keyboard option Use the Admin panel or the touch screen on Pearl 2 to enable local console and the external USB keyboard Once enabled simply connect your USB mouse USB keyboard and an HDMI monitor to the HDMI OUT port that has local console enabled You cannot use the HDMI pass through port f...

Page 85: ...pdate files Use the web based Admin panel from your administration computer for full access to all Admin panel functions Enable local console and the external keyboard option using the Admin panel 1 Login to the Admin panel as admin see Enable local console access to the Admin panel 2 From the Configuration menu select External keyboard The External keyboard configuration page opens 3 Select Local...

Page 86: ...eps to configure the external keyboard for local console an error message appears Click the link to fix it 8 Optional Check Disable authentication if you don t want users to have to use their credentials to login before using the local console to access the Admin panel on Pearl 2 9 Under Settings select Local console in the Source drop down menu 10 Click Apply Enable local console using the touch ...

Page 87: ...directly from Pearl 2 Connect using a DNS based service discovery Pearl 2 uses DNS based messages to advertise details about itself including its host name With a compatible utility installed on your computer you can access the system simply by typing its serial number and the suffix local into the address bar of your browser The following table lists the compatible systems and Bonjour Print Servi...

Page 88: ...scovery 1 Find the system s serial number that s printed on a label attached to the device TIP The serial number also appears on the System information screen from the touch screen of Pearl 2 Tap the system information gear icon to display the System information screen If needed tap the screen once to display the control icons 2 Enter the following string into the address bar of your web browser o...

Page 89: ...dure to connect directly to the system for configuration A workstation computer with access rights to modify your network settings is required Pearl 2 static IP address defaults are l IP Address 192 168 255 250 l Netmask 255 255 255 252 l Username admin l Password your admin password by default there is no password assigned Access the Admin panel using the persistent static IP address 1 Establish ...

Page 90: ...ion see Configure network settings 8 Restore the previously saved network configurations on the workstation Switching mixing using the Admin panel Switching live video inputs or video mixing is fast and easy using the Admin panel For best results you may wish to be in a location where you can see the live action and have a solid understanding idea of what is in each of your layouts Good layout nam...

Page 91: ...g mixing using the Admin panel 4 To switch to a different layout as the active live layout click the gray circle beside the layout you want to make go live The circle turns red to indicate that it s now the active live layout 77 ...

Page 92: ...Epiphan Live l Your recordings For information about remote access to the cloud version of Epiphan Live see Remote login to the Admin panel and Epiphan Live About Epiphan Live The Epiphan Live interface lets you easily operate your Pearl 2 using a computer or mobile device such as a tablet You can l Control streaming and recording of channels and recorders l Do live switching between sources and l...

Page 93: ...le Chrome iPhone or iPad l Google Chrome l Safari Most instructions assume that a touch screen device is used however you can tap or click depending on your device Text scaling using Google Chrome for Android is not supported The Dashboard interface The Dashboard interface is the first page you see when you open Epiphan Live You ll find helpful tools for confidence monitoring as well as streaming ...

Page 94: ...d header icons l Warning This icon displays only if there are any configuration errors in your channels sources streams or recordings Clicking the icon displays more detail about the errors l Save Save the current Dashboard layout Tap Save to preserve the current layout Logged in operators and administrators will see the 80 ...

Page 95: ...oard panels per set to 4 5 Video inputs Displays a list of your video inputs configured in the Admin panel and includes basic status information for each input 6 Channels Displays a list of your channels configured in the Admin panel and includes streaming and recording control buttons for each channel as well as individual control buttons for each stream when you set up multiple streams in a chan...

Page 96: ... you update the security certificate Use a different web browser such as Firefox or update the version of your web browser then add the security certificate for the website to the exceptions list Access Epiphan Live from the Admin panel You need the IP address of your Pearl 2 to log in to the Admin panel for this procedure see Connect to Admin panel 1 Log in to the Admin panel using your credentia...

Page 97: ...ut source using Epiphan Live l Control streaming and recording using Epiphan Live Configure Dashboard panels You can customize each Dashboard panel to display a specific channel input source or video output for live confidence monitoring Panels can also be set up to display system information l CPU load l Quantity of streaming connections l The current streaming bandwidth bitrate l Automatic file ...

Page 98: ...bs at the same time Configure Dashboard panels 1 Log in to Epiphan Live see Access Epiphan Live using a web browser or mobile device 2 Tap the drop down menu that appears below the panel and select the channel source or output to display The label says None if the panel is not yet configured When a channel is selected streaming and recording control buttons appear below the panel You can control s...

Page 99: ...nd audio inputs The video inputs section of the Dashboard lists all inputs configured on your Pearl 2 and displays the video resolution l A green dot means that the video source is connected and a signal is received l A yellow dot means that a signal is not being receiving from the source l A triangular warning icon means there is a source configuration issue that needs attention Tap the name of a...

Page 100: ...dio level The audio VU meter uses quasi peak ballistics with samples averaged every 10 ms The maximum average in each 100 ms period is displayed as a series of colored bars The following table describes the levels at which the meter changes from green to yellow and red Table 17 Audio VU meter levels Color Decibel range Red 0 to 9 dBFS Yellow 9 to 18 dBFS Green 18 dBFS and lower Show or hide video ...

Page 101: ...oard lists the output ports along with the resolution and frame rate You can select a channel or a video source to display on the video output port using Epiphan Live You can also enable or disable audio for the output port To configure the video output port using the Admin panel see Set up the video output port using the Admin panel l Green text means your output is connected and transmitting to ...

Page 102: ...n t include the audio VU meter You can change these defaults in the Admin panel See Video output ports to learn more about advanced level video output configuration using the Admin panel Select a video source for the output port and enable or disable audio 1 Tap Video outputs to display the video output configuration menu 2 Tap the text field beside the output port and select a channel or source f...

Page 103: ...nd recording for channels using the buttons in the Channels section When a channel is not currently streaming or recording the buttons are gray and their respective timers are set to 00 00 00 If streaming isn t configured for a channel the streaming button displays as Not set See Streaming a channel direct to viewers to learn how to configure streaming for a channel using the Admin panel l The lef...

Page 104: ...he streaming button turns blue when the channel is streaming and the timer s clock increments l The recording button turns red when the channel is recording and the timer s clock increments Streaming and recording control buttons also appear below the Dashboard monitoring panels when they re configure to display a channel You can use those control buttons to start and stop streaming or recording f...

Page 105: ...i track recorders using the Admin panel To start recording simply tap the recording control button for that multi track recorder The button turns red when the multi track recorder is recording and the timer s counter increments Tap the button a second time to stop recording Switching mixing using Epiphan Live The Live Switcher view in Epiphan Live is a simple interface that lets you live switch be...

Page 106: ...lays links to the Dashboard view and the Admin panel when clicked 3 Preview panel Displays a preview of a selected layout which is outlined with a green border When you click the Switch button this preview layout becomes the live layout See Switching while live streaming and recording using Epiphan Live for more information 4 Live view panel Displays the active live layout that is currently being ...

Page 107: ... live streaming and recording using Epiphan Live The Switcher interface lets you easily live switch between custom layouts with the simple press of a button Switch layouts while live streaming and recording 1 Log in to Epiphan Live The Dashboard view opens by default See Access Epiphan Live using a web browser or mobile device 2 Tap the Menu icon in the upper right corner of the Dashboard screen a...

Page 108: ...hannel are displayed in a carousel along the bottom of the screen The layout that is live is displayed in the Live panel on the right side of the interface see About the Switcher interface 4 In the carousel tap the layout that you want to switch to next That layout is loaded into the Preview panel 94 ...

Page 109: ...el to the Live panel The layout that was in the Live panel moves to the Preview panel so that it s ready for the next time you switch 6 To load a different layout into the Preview panel tap another layout in the carousel Your recordings All recordings made using Epiphan Live are saved to the Your recordings panel 95 ...

Page 110: ...file selects it so that it can be managed through the other tools on the page You may also download or delete an individual file by using the action items at the end of the file line Tap the file name to rename the file 4 Page indicators The page number indicates which page of results you are currently viewing and how many pages of results are there The buttons allow you to move between pages one ...

Page 111: ...ement with Epiphan Cloud Epiphan Cloud is your remote management and control center for all your Pearl 2 devices All you need is a free Epiphan Cloud account After you pair Pearl 2 with your Epiphan Cloud account you can access Pearl 2 from anywhere there s an Internet connection You can even invite others to join your team for easy remote access Using Epiphan Cloud you can l Preview video sources...

Page 112: ... manage and control all your Pearl 2 devices Access is enabled on Pearl 2 by default All you need to do is pair Pearl 2 to your free Epiphan Cloud account for access to your device over the Internet You can disable Epiphan Cloud access on Pearl 2 from the touch screen or using the Admin panel and enable it again later Access is enabled by default Important considerations l Unpair Pearl 2 from Epip...

Page 113: ...ttings screen If the control icons aren t showing tap anywhere on the touch screen 3 Tap the arrow icon in the lower right corner of the screen to go to the second Settings page 4 Tap Epiphan Cloud The Epiphan Cloud settings page shows the status as enabled and displays a pairing code by default 5 Uncheck Enable Epiphan Cloud to disable the feature or leave it checked to allow Pearl 2 to access Ep...

Page 114: ... or disable Epiphan Cloud access You can unpair from Epiphan Cloud using the Admin panel or directly within Epiphan Cloud Each time you unpair Pearl 2 the device ID pairing code changes value When you pair Pearl 2 again a new instance of the Pearl 2 with a different device ID is created in Epiphan Cloud If you unpair from Epiphan Cloud using the Admin panel Pearl 2 s status in Epiphan Cloud only c...

Page 115: ...status page opens The pairing code device ID for Pearl 2 is shown as well as a link to pair the device 3 Select Click to pair The Epiphan Cloud login page opens in a new tab https go epiphan cloud 4 Login to your existing Epiphan Cloud account or sign up for a free account 5 After you ve logged in to Epiphan Cloud your Pearl 2 automatically pairs to your default Epiphan Cloud team and the Device D...

Page 116: ...r Pearl 2 using the Admin panel select Unpair on the Epiphan Cloud status page Get the pairing code for Pearl 2 using the touch screen 1 Tap the gear icon to open the System settings screen If the control icons aren t showing tap anywhere on the touch screen 2 Tap the arrow icon in the lower right corner of the screen to go to the second Settings screen 102 ...

Page 117: ...ersion of the Admin panel and Epiphan Live You just need to pair Pearl 2 to an Epiphan Cloud account that has one of the Pro plans With an Epiphan Cloud Pro plan full administrative access to your Pearl 2 for setup and rescue troubleshooting is fast and convenient And anyone on your team can remotely control live switching and recording using the cloud version of Epiphan Live The cloud version of ...

Page 118: ...left navigation pane click Devices to open the All Devices page 3 Click the device name in the list to open the details page for that device From the All Devices page you can also click the three dots at the far right in the device s row and select Remote login 4 From the Device Details page click Remote login in the header bar A new tab with the cloud Admin panel login opens in your browser 5 Ent...

Page 119: ...Pearl 2 User Guide Remote login to the Admin panel and Epiphan Live See The Admin panel and Epiphan Live for instructions to use the interface or to access the local web version 105 ...

Page 120: ...ude l Rackmount installation l Configure network settings l Configure network security l Configure date and time l Configure device info name description and location l Audio input ports l Video output ports l Feature add ons l Connect an external keyboard l Connect a USB status light l Configuration presets l User administration l Status and monitoring For information about integrating Pearl 2 wi...

Page 121: ...tly into a 19 inch rack For the smaller portable Pearl 2 model you can purchase our optional rackmount shelf for installation in a rack Instructions for the rackmount shelf are included with the shelf To install Pearl 2 Rackmount or Pearl 2 Rackmount Twin in a 19 inch rack 1 Ensure you have the correct bolts needed for your rack not included Pearl 2 s rackmount holes are sized to work with both th...

Page 122: ... Pearl 2 The following table lists the default incoming and outgoing network ports that Pearl 2 uses Do not block traffic over these ports If you want Pearl 2 to operate properly make sure that your firewall is configured to open these ports Blocking a port will cause the service that uses that port to fail It is possible to use the Admin panel to change the default ports that are used for some se...

Page 123: ...tion requests Random in range 32768 61000 UDP If the client video player chooses RTSP UDP it will negotiate 4 random UDP ports two for audio and two for video The port range is dependent on the OS of the client video player and can change with updates to that OS 1900 UDP UPnP server for UPnP discovery if enabled See Stream using UPnP Random in range 50000 to 65000 TCP UPnP media server if enabled ...

Page 124: ...e Network configuration page using the Admin panel l From the Settings menu using the touch screen on Pearl 2 Table 20 Network Information Item Description Options MAC Address A media access control address MAC address is a unique identifier for the network interface The value is read only and cannot be changed You may need to share this value with your system administrator Current IP Address Refl...

Page 125: ...e control icons aren t showing tap anywhere on the touch screen 2 Tap System Status to see the System Status page 3 Tap Back to return to the System Settings screen or the Home icon to return to the channel view If the system settings control icon won t appear when you tap the touch screen it may be disabled See Configure the touch screen to enable system information 111 ...

Page 126: ...guration presets Only IPv4 addresses are supported Pearl 2 does not support IPv6 Configure a static IP address using the Admin panel 1 Login to the Admin panel as admin see Connect to Admin panel 2 From the Configuration menu select Network The Network configuration page opens 3 Choose No from the Use DHCP drop down and enter your networking information in to the required fields Click Apply when y...

Page 127: ...blank unless you are using DHCP MTU Size The maximum transmission unit MTU specifies the maximum packet size for transfer on the network The default value is 1500 which is the largest value allowed by Ethernet at the network layer It s best for all nodes in your network to use the same value Only change the MTU value if you know that other nodes use a different value The default gateway and DNS Se...

Page 128: ...he static IP address in those fields 5 Reboot Pearl 2 to apply the network changes Configure DHCP If you need to switch Pearl 2 from using static IP address allocation to using dynamic allocation with DHCP you can do this three different ways l Restore factory settings which clear all your custom settings See Perform a factory reset l Load a configuration preset file that uses DHCP networking See ...

Page 129: ...red static IP address instead MTU Size The maximum transmission unit MTU specifies the maximum packet size for transfer on the network The default value is 1500 which is the largest value allowed by Ethernet at the network layer It s best for all nodes in your network to use the same value Only change this value if you know that other nodes use a different value 4 Reboot Pearl 2 when prompted From...

Page 130: ...y Qualified Domain Name FQDN Option 81 support means you can keep using Pearl s FQDN no matter how many times the DHCP server may change Pearl s IP address Pearl 2 automatically asks the DHCP server to tell the Domain Name Server DNS to update Pearl 2 s record with any changes to Pearl 2 s IP address or FQDN DHCP Option 81 is disabled by default Important considerations l The DHCP server must supp...

Page 131: ... Reboot Pearl 2 when prompted 7 After the system has finished rebooting log back in to the Admin panel as admin and verify that all changes were applied Configure Dynamic DNS You can use Dynamic Domain Name Server DDNS to ensure that whenever the DHCP server changes Pearl 2 s IP address Pearl 2 informs the DDNS to update it s domain name records That way you can keep using Pearl 2 s FQDN without w...

Page 132: ...0 to 864000 seconds i e up to a maximum period of 10 days The default is 600 seconds Username Enter your user name for the DDNS provider Password Enter your password for the DDNS provider Hostname Enter the hostname to use for this Pearl 2 in the DDNS server records Pearl 2 s serial number is the default hostname External IP detection server name If your DDNS provider uses an external IP detection...

Page 133: ...re selected as the provider you can leave those fields blank 5 Enter the Username and Password for your DDNS server 6 In the Hostname field enter the hostname of your Pearl 2 for example mypearl The default hostname is the serial number of Pearl 2 7 If your DDNS provider uses an external IP detection server enter the External IP detection server name and External IP detection server path 8 Check U...

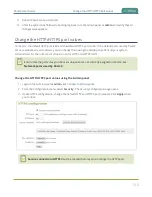
Page 134: ...Admin panel Consult your system administrator for the correct port values to use for HTTP and HTTPS traffic Ensure that the port value you choose is unique and is not currently assigned on Pearl 2 see Network ports used by Pearl 2 Change the HTTP HTTPS port values using the Admin panel 1 Login to the Admin panel as admin see Connect to Admin panel 2 From the Configuration menu select Security The ...

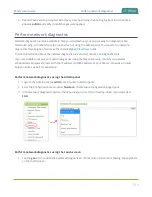
Page 135: ...ls and test results see Diagnostic tools If you are unable to resolve your networking issues using the diagnostic tools contact your network administrator and provide them with the IP address and MAC address of your Pearl 2 otherwise contact Epiphan Video support for assistance Perform network diagnostics using the Admin panel 1 Login to the Admin panel as admin see Connect to Admin panel 2 From t...

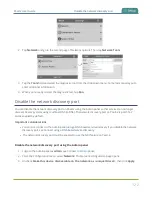
Page 136: ...rl 2 systems using multicast DNS mDNS The network discovery port on Pearl 2 is port 5557 and is enabled by default Important considerations l You cannot connect to the Admin panel using a DNS based service discovery if you disable the network discovery port see Connect using a DNS based service discovery l The network discovery port must be enabled to use the NDI feature on Pearl 2 Disable the net...

Page 137: ...Pearl 2 User Guide Disable the network discovery port 123 ...

Page 138: ...mportant considerations l If TLS authentication is used on the network then you need to get a user certificate and a user private key from the network administrator and upload those to Pearl 2 as part of this procedure l Before you proceed with this setup check that the network server s signed CA certificate appears in the list of CA certificates on Pearl 2 and is valid see Manage CA and self sign...

Page 139: ...ed if PEAP or EAP TLS is the EAP method Table 24 Authentication methods EAP method Authentication method PEAP EAP MSCHAPv2 EAP TLS TLS EAP TTLS EAP MSCHAPv2 TLS PAP 6 Enter the network access User name and Password to use for this device Available fields depend on the EAP method that is selected 7 If TLS is chosen as the Authentication method upload a user certificate and a user private key You ca...

Page 140: ...s well as delete any certificates that you ve uploaded You cannot delete any of the built in CA certificates that came preloaded on Pearl 2 Security certificates must be PEM encoded When using the Epiphan Video self signed certificate with Pearl 2 l Your web browser may warn of an untrusted certificate when you try to access Pearl s web based Admin panel You can dismiss the warning and continue to...

Page 141: ...ploaded click Choose File and select the certificate you want to delete from the list Then click Delete When you re done click Apply 6 Reboot Pearl 2 when prompted After the system has finished rebooting log back in to the Admin panel as admin and verify that all changes were applied Configure HTTPS You can configure Pearl 2 to use HTTPS for secure local network access to the Admin panel as well a...

Page 142: ...e the private key or be separate files If you attempt to access the web based Admin panel using a web browser and the required security certificate isn t found in the list of certificates loaded on Pearl 2 a warning message appears stating that the device isn t trusted You can choose whether to proceed and connect to Pearl 2 s web based Admin panel without the security certificate authentication o...

Page 143: ...n t included in the list of certificates on Pearl 2 when you try and connect to Pearl 2 using a web browser you ll receive a warning that the device isn t trusted 6 Click Apply when you re done 7 Reboot Pearl 2 when prompted After the system has finished rebooting log back in to the Admin panel as admin and verify that all changes were applied If you need to delete the certificate you uploaded and...

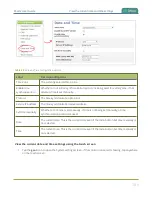
Page 144: ...ime and zone View the current date and time settings There are two ways to view the current date and time settings of Pearl 2 l From the Date and Time page using the Admin panel l From the Settings menu using the touch screen on Pearl 2 To manually set the date time and time zone using the Admin panel see Manually set the date time and zone To set up a local Network Time Protocol NTP server or cha...

Page 145: ...ress The time synchronization server address Set time manually Whether or not time is set manually If time is not being set manually a time synchronization protocol is used Date The current date This is the current date even if the radio button Set time manually is not selected Time The current time This is the current time even if the radio button Set time manually is not selected View the curren...

Page 146: ...a different time server using the Admin panel Contact your system administrator for the time synchronization server settings you should use The following table lists the time server types that Pearl 2 supports Table 26 Supported time server types Label Description Options NTP Network Time Protocol NTP servers are used to synchronize system time Many NTP servers are available on the Internet Or you...

Page 147: ...ation page opens 3 For local NTP servers check Enable local NTP server Otherwise skip this step 4 Select Enable time synchronization and choose the time synchronization protocol from the Protocols drop down a If NTP is selected enter the IP address or server name for the NTP server in the Server IP Address field b If PTP v1 is selected choose a multicast address for the PTP v1 server from the PTP ...

Page 148: ...n panel as admin see Connect to Admin panel 2 From the Configuration menu click Date and Time The Date and Time configuration page opens 3 Enter the current date in the Date field using the format yyyy mm dd and enter the current time in the Time field using the format hh mm ss 4 Select a time zone from the Time Zone field 5 Click Apply 134 ...

Page 149: ... a folder upon file upload the device name you set for Pearl 2 is used for the folder name instead of Pearl s serial number For Kaltura and Panopto the device name you set here for Pearl 2 appears as the registered name for this device Configure the device name description and location using the Admin panel 1 Login to the Admin panel as admin see Connect to Admin panel 2 From the Configuration men...

Page 150: ... and location b Enter a description using alphanumeric characters including hyphens up to a maximum of 50 characters c Enter a location using alphanumeric characters including hyphens up to a maximum of 50 characters alphanumerical characters and hyphens 136 ...

Page 151: ...o sources to an input l Adjust audio gain and delay l Mute audio For details about the audio inputs see AV inputs Configure audio ports for stereo or mono The four XLR professional line level inputs are configured as two stereo pairs by default XLR A left and right stereo pair and XLR B left and right stereo pair Using the Admin panel you can configure these ports to function as a stereo pair left...

Page 152: ...ser interfaces The audio sources that share resources are l XLR B left and right ports l RCA left and right ports Both the XLR B left right and RCA left right audio sources appear under the label Analog B Audio You can assign one or both audio sources to Analog B Audio Choosing one audio source for the shared input disables the other audio source This means that when you select Analog B Audio as t...

Page 153: ...lay Pearl 2 does not introduce audio delay and has near zero latency when capturing However other external factors can cause audio to become de synchronized such as the length of audio cables or the configuration of your equipment The audio delay feature helps you adjust audio coming from external sources so that your video and audio sources are synchronized when captured streamed and recorded You...

Page 154: ...audio signal This table offers some guidelines for adjusting the gain at the audio input port of Pearl 2 for common types of audio input devices You should add the suggested gain to the audio input to get an average signal to register at a nominal level in the VU meter i e where the green bars change to yellow The actual amount of gain needed depends on the strength of the original audio signal Ta...

Page 155: ...gative value adjusts the audio to start earlier 5 Click Apply Mute audio You can mute any audio input port using the Admin panel For analog audio ports that are configured as mono inputs you can mute each port separately Some audio input ports share internal audio processing resources in Pearl 2 Muting an audio input that shares internal resources mutes all the associated audio sources The followi...

Page 156: ... RCA right ports are not muted In mono mode Analog B audio Right muted Both the XLR B right and RCA right ports are muted The XLR B left and RCA left ports are not muted Mute an audio source using the admin panel 1 Login to the Admin panel as admin see Connect to Admin panel 2 From the Inputs menu select an audio source The audio configuration page for the audio source opens 3 Check Mute to mute t...

Page 157: ...Pearl 2 User Guide Mute audio 143 ...

Page 158: ...e using the touch screen l Preview the video output port l Disable the video output port l Disable or enable audio and output port volume l Display and reposition the audio VU meter l Rename a video output port l Mirror the video output port display To select the video source displayed on the video output port using Epiphan Live see Monitor and setup the output port source and audio About video ou...

Page 159: ...p video source the average delay on the video output port is approximately 100 ms For a 1080p channel the average delay on the video output port is approximately 300 ms The actual amount can vary depending on the setup l If an SDI or HDMI video input source that is selected to display at the HDMI output port also appears in a custom layout for a channel then the channel s encoding settings are use...

Page 160: ...is tall The ratio of its width to height is 16 to 9 which has an aspect ratio that is 16 9 By default you can choose from the following output resolutions for your video output ports but you can also change settings to allow a variety of other resolutions through Aspect ratio legend Aspect Ratio Common Use 4 3 Standard TV NTSC PAL display and non widescreen computer displays 16 9 Widescreen HD TV ...

Page 161: ...HDMI output Changing the channel s frame rate will change the frame rate used at the output port for that video input If the video source appears in multiple layouts in different channels the one with the highest frame rate set in the encoding settings is used l Default auto channels have the related HDMI or SDI port selected by default As soon as you connect your video source to the port it appea...

Page 162: ...This is the default value Each display has a preferred resolution and when you choose this setting the video output port will use the display s default resolution 640 360 640 480 960 540 1024 768 1280 720 1280 960 1360 768 1400 1050 1920 1080 1920 1200 2560 1440 3840 21604K 4096 21604K Choose a specific resolution for the output port For an explanation of the different choices see Set up the video...

Page 163: ...or an input source do the following a Select an Audio source from the drop down list b Optional Adjust the volume Enter a value from 0 to 100 percent in the Audio volume field c Optional Choose whether or not to display the audio meter from the Audio meter drop down d If displaying the audio meter select horizontal or vertical from the Audio meter orientation drop down menu to change the orientati...

Page 164: ...put port 4 From the Output port s screen select the source you want displayed on the video output port and tap Apply Preview the video output port You can preview the video signal that is shared over your video output port by looking at the preview window at the bottom of the video output configuration page in the Admin panel The preview is updated every few seconds and always maintains the same a...

Page 165: ... select the video output source using Epiphan Live for more information Disable the video output port You can use the Admin panel to disable a video output port so that even if a display is connected nothing is shown To disable video output ports using the Epiphan Live see Monitor and select the video output source using Epiphan Live Disable the video output port using the Admin panel 1 Login to t...

Page 166: ... as the source for your video output port you can select an audio source and adjust the volume Audio is taken from the video input source you ve selected for the video output port by default Disable audio for a channel on the video output port and adjust the volume using the Admin panel 1 Login to the Admin panel as admin see Connect to Admin panel 2 From the Output ports menu click the output por...

Page 167: ...down menu to change the orientation of the displayed audio meter 4 For input sources do the following a Select an Audio source from the drop down list b Optional Adjust the volume Enter a value from 0 to 100 percent in the Audio volume field c Optional Choose whether or not to display the audio meter from the Audio meter drop down d If displaying the audio meter select horizontal or vertical from ...

Page 168: ...ther or not to display the audio VU meter using the Admin panel You can also determine the position and orientation of the audio meter Audio pass through adjusting the volume and displaying an audio meter are only supported when a channel is the selected video source Configure the audio meter for the video output port using the Admin panel 1 Login to the Admin panel as admin see Connect to Admin p...

Page 169: ...o select an orientation horizontal or vertical in the Audio meter orientation field 5 Click Apply Rename a video output port Using the Admin panel or Epiphan Live you can easily change the video output port default name from HDMI 1 and HDMI 2 to something more suitable For example Projector Output or Confidence Monitor Change a video output port name using the Admin panel 1 Login to the Admin pane...

Page 170: ...o mirror the original video source on the output port so that it appears reversed on the connected display If there s an on screen image that includes text such as a custom no signal image the text will appear reversed Mirror the video source at the video output port using the Admin panel 1 Login to the Admin panel as admin see Connect to Admin panel 2 From the Output ports menu click the output p...

Page 171: ...rd on Pearl 2 s touch screen you can connect a USB keyboard to Pearl 2 and use that Simply enable the external keyboard feature using the Admin panel and connect your keyboard directly to any available USB port on Pearl 2 You can change the keyboard layout to any of the supported languages When multiple languages are selected you can use Ctrl Shift or Ctrl Alt to toggle between languages l America...

Page 172: ...nel 1 Login to the Admin panel as admin see Connect an external keyboard 2 From the Configuration menu select External keyboard The External keyboard configuration page opens 3 In the Keyboard application drop down menu select Touch screen 4 Optional Check a different keyboard language layout or multiple language layouts The default layout is American English 5 Optional Choose the keyboard key com...

Page 173: ...yLight models UC Alpha and UC Omega l Delcom Products USB HID single color and multi color signal indicators The status light is activated as soon as it is connected to a USB port on Pearl 2 and flashes once Table 30 Status light indicator Light Description Solid off Pearl 2 is not currently recording or streaming Solid on Recording or streaming is in progress Flashing Rapid flashing approximately...

Page 174: ...d the 4K feature add on Add ons overview Pearl 2 add ons are listed in the Admin panel when you click Firmware upgrade from the Configuration menu A 4K feature add on shows the name and description for each feature add on that is available for purchase and installation Add ons must be purchased installed and activated before their features can be used If you have already purchased an add on either...

Page 175: ...to the epiphan com website and purchase that specific feature Install purchased add ons The 4K feature add on is required to enable that feature on Pearl 2 Your purchased add on can be installed and activated on only one Pearl 2 system Pearl 2 Rackmount Twin requires a separate 4K add on for each Pearl 2 system To install purchased add ons Click Install purchased add ons from the Firmware Upgrade ...

Page 176: ...th a Purchase button next to it has already been purchased click Install purchased add ons If no add ons are ready to be activated and installed a message appears After you ve activated your feature add ons and the system reboots the Purchase button beside those features is replaced by an Activated indicator Current list of add ons As of firmware 4 0 1 the 4K feature add on is the only add on avai...

Page 177: ...n the 4K add on was included automatically in some systems If you purchased the full version of Pearl 2 or an early copy with firmware 4 0 0 the 4K add on was included with your purchase and is automatically activated so in those cases no action is required About 4K on Pearl 2 Pearl 2 supports resolutions from low res SD to 4K which means that you can use Pearl 2 to capture both DCI 4K and 4K UHD ...

Page 178: ...Pearl 2 User Guide 4K feature add on 164 ...

Page 179: ...lete a configuration preset About configuration presets Configuration presets are groups of settings that get applied to the system leaving other important settings intact They make it easy to manage multiple Pearl 2 systems in shared spaces like a studio and ensures a consistent setup each time you go to use your Pearl 2 Configuration presets let you quickly apply settings so you can reconfigure ...

Page 180: ...s groups included in the preset All other settings are unaffected Read the Configuration preset considerations section carefully to understand caveats around using configuration presets Example of presets in action You could upload custom background images to Pearl 2 in advance of a conference and create custom channel configuration presets for several different keynote speakers each with a differ...

Page 181: ...eset only affects channels and their configuration Session 1 preset Session 1 presenter data and background image plus the conference IP address Session 2 preset Session 2 presenter data and background image plus the conference IP address After applying a configuration preset recorded files from the previous session remain present on the system If AFU is configured the recorded files continue to u...

Page 182: ...ation is not private l Media and recorded files can be deleted affecting more than just the currently applied configuration preset Users can erase uploaded media or recordings that belong to other users Media files that you ve uploaded to Pearl 2 logos background images etc are included in the configuration preset and must be present on the system when creating a preset that includes the Channels ...

Page 183: ...a channel is streaming or a channel or recorder is recording at the time you create a configuration preset the channel will immediately start recording or streaming whenever you apply that preset to the channel Similarly if a configuration preset is created when a channel or recorder is not recording or streaming applying that preset later won t cause the channel and recorder to start recording or...

Page 184: ...3 is no longer present its corresponding files can be accessed by entering the following into the address bar http 192 168 0 183 admin channel3 archive If you now create a new channel with index 3 or load a preset that contains a channel with index 3 you ll find it starts with five recorded files in the Recordings section These are the same recorded files that existed at the start of this example ...

Page 185: ...urce name and take over for the resource instance that is still registered in Kaltura see Reassign a registered resource If you apply a configuration preset to set up a replacement Pearl 2 with the settings from a Pearl 2 that is currently registered with Kaltura the replacement Pearl 2 assumes the identity of the registered resource However you risk having two active Pearl 2 resources with the sa...

Page 186: ...ings for sources Applying configuration presets with this group automatically applies the included EDIDs This process can take a while Channels All channel configuration data and current recording state all layouts images used in layouts streaming state all recording configuration data and current recording state individual and global UPnP settings AFU Automatic file upload type parameters and sch...

Page 187: ...ory reset is more invasive This table describes the differences Table 32 Factory default configuration preset vs a factory reset Item Factory default configuration preset Factory reset function Deletes all created channels ü ü Deletes all recorded files in channels ü Deletes all created recorders ü ü Deletes all recorded files in recorders ü Resets network configuration ü ü Resets touch screen con...

Page 188: ...nstance in Kaltura CMS You can reregister your Pearl 2 using the same resource name and take over for the resource instance that is still registered in Kaltura see Reassign a registered resource Create a configuration preset You can create as many configuration presets as you need however there s a limit to the amount of space available for configuration presets A maximum of 256 MB is available fo...

Page 189: ...eset but there isn t enough space an error message is displayed You ll need to delete some presets before proceeding Create a configuration preset using the Admin panel 1 Login to the Admin panel as admin see Connect to Admin panel 2 From the Configuration menu click Maintenance The maintenance page opens 3 Under Create a configuration preset enter a name for your configuration preset in the Name ...

Page 190: ...reboot is required If you apply a preset that has the EDID configuration group the system may appear unresponsive for a short time while it applies these EDIDs to the video grabbers You can verify which configuration groups are included in a preset by looking at the list to the right of the configuration preset name The term all means all groups are included Otherwise groups are listed individuall...

Page 191: ...escribed in this procedure If you apply a preset that has the EDID configuration group the system may appear unresponsive for a short time while it applies these EDIDs to the video grabbers Apply a configuration preset using the touch screen 1 Tap the gear icon to open the System settings screen If the control icons aren t showing tap anywhere on the touch screen 2 Tap Configuration Presets A list...

Page 192: ...ation preset If the configuration preset includes the network or system configuration groups a reboot is required Alternatively you can apply a configuration preset from the Settings when you select Network and go to the second page of Network options Then tap Network Presets to display the list of saved configuration presets Only configuration presets that contain the network configuration group ...

Page 193: ...erations Configuration presets are not cross compatible between different Pearl models You cannot download upload configuration presets using the local console on Pearl 2 Use the web based Admin panel instead Download or export a configuration preset using the Admin panel 1 Login to the Admin panel as admin see Connect to Admin panel 2 From the Configuration menu Click Maintenance The maintenance ...

Page 194: ...u click Maintenance The maintenance page opens 3 In the Import configuration preset section click Choose file and browse to select the file you want to upload with the extension preset then click OK 4 Click Import 5 If your system already has a configuration preset with the same name as the one you re loading a warning is shown Click OK to overwrite the existing preset or Cancel to cancel the uplo...

Page 195: ... a configuration preset To update a configuration preset and add or remove different configuration groups using the Admin panel you simply creating a new configuration preset with the same name so that it overwrites the existing one Update a configuration preset using the Admin panel 1 Login to the Admin panel as admin see Connect to Admin panel 2 From the Configuration menu click Maintenance The ...

Page 196: ... the existing configuration preset with the new one Delete a configuration preset You can delete all configuration presets at once by doing a factory reset or you can delete individual configuration presets from the Maintenance page You cannot delete the Factory default configuration preset Delete a configuration preset using the Admin panel 1 Login to the Admin panel as admin see Connect to Admin...

Page 197: ...ide Delete a configuration preset 2 From the Configuration menu select Maintenance The maintenance page opens 3 Click Delete beside the configuration preset that you want to delete and then click OK when prompted 183 ...

Page 198: ...ypes and privileges There are three Pearl 2 user levels l Administrator l Operator l Viewer No password is assigned to these user levels by default and you cannot change the default user names or disable these user levels When you log in to Pearl 2 you must log in as one of these three user levels Private profiles with individually set passwords are not used You can set an access password for each...

Page 199: ...eb based Admin panel local console and Pearl 2 remote login access The default user name used to log in to Pearl 2 is operator Operators can to do the following l Configure inputs l Control recordings start and stop l Rename download and delete recordings l Switch layouts while live streaming l Perform network diagnostics If an operator does not have the privileges to apply a particular configurat...

Page 200: ... viewer access to channel streams User privileges The following table outlines the default privileges for each user level For administrator level privileges that can be assign to operators see Assign administrator privileges to operators Table 33 User privileges in the Admin panel Action or Menu Option viewer operator admin View channel output ü ü ü Channel Operations View channel configuration ü ...

Page 201: ...ü ü Network security Configure static IP address ü Configure DHCP including Option 81 and DDNS ü Change HTTP HTTPS port values ü Configure 802 1x ü Configure HTTPS ü CMS Operations Start stop scheduled events touch screen ü ü ü Create ad hoc events touch screen ü ü ü Enable CMS and register ü Disable CMS or deregister ü Configure CMS settings and default event parameters ü Start stop scheduled eve...

Page 202: ...nfigure network address ü Configure date and time preferences ü Set or change user passwords ü Configure the touch screen ü Configure serial port flow control ü Upload and delete media ü Enable remote support ü Backup device configuration ü Restore device configuration ü Restore factory configuration ü Reboot device Admin panel ü Shutdown device Admin panel ü Perform a manual disk check ü View dis...

Page 203: ... the Security menu in the Admin panel The following table lists the available options and their associated privileges Table 34 Options with additional operator privileges Option Operator admin functions Channel configuration Add remove and rename a channel Configure channel encoder settings Create and configure a custom layout for a channel Configure remove rename and publish a stream for a channe...

Page 204: ... configuration presets System configuration Configure the video output settings Enable CMS and register Disable CMS or deregister Configure CMS settings and default event parameters Configure Automatic File Upload AFU Select external USB drive behavior Configure Pearl 2 as an FTP server Configure UPnP sharing Configure the date and time preferences Configure the touch screen Configure the serial p...

Page 205: ...configuration presets that don t include the System group are allowed 2 Allow operators to apply configuration presets that include the System group as well as apply the factory default configuration preset Assign administrative privileges to operators using the Admin panel 1 Login to the Admin panel as admin see Connect to Admin panel 2 From the Configuration menu select Security The Security con...

Page 206: ...eric characters within the ASCII range Restricted characters include leading and trailing spaces single quotes double quotes and backslash Contact your system administrator for your organization s specific password requirements In addition to setting global passwords for viewers you can also set access passwords and IP restrictions on a per channel basis from the channel s Streaming page see Restr...

Page 207: ...case sensitive 6 Select the user s password confirmation field and confirm the new password 7 Click Apply TIP You can set multiple account passwords before clicking Apply If you were logged in as the user whose password you just changed you are logged out and must log back in with the new password If you added or changed the viewer s password all viewer s stream will pause until they log in with t...

Page 208: ... If you have lost the password for the operator or viewer account you can log in to the Admin panel and reset the password using the procedure described in Set or change user passwords If you have lost the admin password and you have remote support enabled on the system contact Epiphan Support to request a remote password reset If remote support is disabled you must return the system to Epiphan fo...

Page 209: ...s See Configure LDAP user authentication These instructions assume you have a pre configured LDAP server The server must support anonymous binding or have a special bind account with search access privileges Note that Active Directory does not support anonymous binding LDAP referrals restrictions and failovers are not supported Configure LDAP authentication using the Admin panel 1 Login to the Adm...

Page 210: ...queMember attribute for the specified group to be granted Administrator access If left blank LDAP is not supported for Administrators but can still be used for Operators and Viewers 10 In the Operators group DN field specify the distinguished name of the group users must be part of to be logged in as the operator Users must have the member or unqueMember attribute for the specified group to be gra...

Page 211: ...for the system and can also override these settings on a per channel basis Both global and per channel configuration procedures are described The following table describes what happens when an IP address is added to the allowed and denied IP address lists Item Description Allow IP s Users connecting from addresses in this list are permitted to view broadcasts from the system provided their IP addr...

Page 212: ...d for the viewer only and does not affect the Admin panel or the mobile configuration interface Restrict viewer access to watch streams for all channels by their IP address 1 Login to the Admin panel as admin see Connect to Admin panel 2 From the Configuration menu select Security The Security configuration page opens 3 Enter the allowed IP addresses or address ranges in the Allow IP s field and e...

Page 213: ... 51 and 192 165 1 75 respectively can connect to the broadcast construct the following allow list Allow 192 168 1 50 192 168 1 51 192 168 1 75 Allow list with a range of IP addresses Sometimes you ll want a range of computer IP addresses to connect to your system This may happen when you have one range of IP addresses assigned to desktop computers i e in the range 192 168 1 1 to 192 168 1 100 and ...

Page 214: ...puters 192 168 1 200 192 168 1 250 to access the broadcast with the exception of the public boardroom computer 192 168 1 211 Use both allow and deny lists to create the rule as follows Allow 192 168 1 200 192 168 1 250 192 168 1 50 192 168 1 51 192 168 1 75 Deny 192 168 1 211 Both lists can have multiple ranges and multiple distinct IP addresses provided they are separated by commas The following ...

Page 215: ...he exception of the CEO s desktop laptop and tablet computers Additionally boardroom computers should not be permitted with the exception of the cafeteria computer IP address 192 168 1 222 The deny list is an exception list for the allow list So to craft the rule described above we need to allow all the computers in the local subnet then deny specific sub ranges including two groups of boardroom c...

Page 216: ...output port status l View AFU and file transfer progress l View scheduled CMS events and history Monitoring audio and VU sensitivity You can connect headphones to the 3 5 mm audio jack on the front panel of Pearl 2 To monitor audio for a specific channel just select the channel using the touch screen The audio you hear depends on which layout is currently live because different layouts can have di...

Page 217: ...ew opens by default when you turn on Pearl 2 If necessary tap the touch screen once to turn it on and tap again to display the controls Table 39 Grid view indicators Item Description Streaming and recording indicators Streaming left and recording right indicators appear in the top right corner for each channel no dots Streaming is disabled and recording is stopped Streaming is stopped and recordin...

Page 218: ...h samples averaged every 10 ms The maximum average audio level in each 100 ms period is displayed using colored bars l RED 0 to 9 dBFS l Yellow 9 to 18 dBFS l Green 18 dBFS and lower You can do more monitoring for a specific channel when you select a channel from the grid view Just tap the channel you want to monitor from the grid view and the channel view opens Table 40 Individual channel view in...

Page 219: ... VU meter for the channel uses quasi peak ballistics with samples averaged every 10 ms The maximum average audio level in each 100 ms period is displayed using colored bars l RED 0 to 9 dBFS l Yellow 9 to 18 dBFS l Green 18 dBFS and lower To monitor a different channel tap the right or left arrows on the channel view to see the next or previous channel If the touch screen controls aren t showing t...

Page 220: ...l number l Video grabber number l Firmware version Network Information l IP Address l MAC Address Device Status l System date l System time l Uptime l CPU load and Temperature Celsius Storage Information when available l Disk space available l Pictogram of available disk space Open the System Status screen 206 ...

Page 221: ...tus to see the System Status page 3 Tap CPU load to toggle between the operating temperature Celsius and CPU load 4 Tap Back to return to the System Settings screen or the Home icon to return to the channel view If the system settings control icon won t appear when you tap the touch screen it may be disabled See Configure the touch screen to enable system information 207 ...

Page 222: ... settings for a channel View system information using the Admin panel 1 Login to the Admin panel as admin see Connect to Admin panel 2 From the Configuration menu click Info The system information page opens The Bitrate Actual bitrate values show the total of the video bitrate plus audio bitrate View device information using the touch screen View Pearl 2 s device name location and description from...

Page 223: ...owing tap anywhere on the touch screen 2 Tap System Status to see the System Status page 3 Tap below Device to show the device information Tap a second time to show the serial number grabber and firmware values again 4 Tap Back to return to the System Settings screen or the Home icon to return to the channel view 209 ...

Page 224: ...ss l Hostname l 802 1x status l Rated Ethernet link speed Mbps l Sending and receiving speed Mbps View the network status using the Admin panel 1 Login to the Admin panel as admin see Connect to Admin panel 2 From the Configuration menu click Network The Network configuration page opens View 802 1x network connection status You can see the 802 1x network connection status when you run the Connecti...

Page 225: ...ion You can see information about the status of a channel on Pearl 2 from the channel s status page using the Admin panel including l The status and uptime of encoder services l Stream information and URLs l Channel preview l Active network connections More encoder information can be found on the Info page from the Configuration menu see View system information using the Admin panel View the statu...

Page 226: ...uide View channel status and stream information Active unicast and multicast stream information displays under Connections NDI connections aren t currently displayed on the channel s status page under Connections 212 ...

Page 227: ...port configuration page opens Table 41 Possible video output status messages Message Description Disabled This video output port is disabled in the configuration Display is not connected There is no display connected to the video output port or the connected display is not powered on or not functioning Source is currently unavailable The video output port is configured to display a channel that no...

Page 228: ... files are in the queue the total size of the queue the AFU type and status are shown In this example AFU is scheduled to occur at specified time intervals so the start of the next scheduled file transfer is shown If the Pearl 2 is configured to allow copying recordings to a connected USB drive instead of AFU the USB drive status displays If AFU is not enabled the screen displays AFU File upload i...

Page 229: ...nage USB file transfer queue View file transfer status using the Admin panel 1 Login to the Admin panel as admin see Connect to Admin panel 2 From the Configuration menu click Automatic File Upload If there are files to be uploaded they appear in the queue View file transfer status using the touch screen 215 ...

Page 230: ...touch screen tap the screen once to activate the control buttons If the system settings button is still not visible it is disabled in the system s touch screen configuration See Configure the touch screen to enable system information 2 Tap the arrow icon in the lower right corner of the screen to go to the second Settings page 3 Tap File transfers to display the AFU Status page 216 ...

Page 231: ...ory Using the Admin panel select the Events menu to see up to 90 days of upcoming scheduled events and up to 90 days of ongoing and completed events for this Pearl 2 resource Click the page arrows at the bottom of each list to navigate through multiple pages The Events page updates to show new events every hour Click Refresh schedule at any time to manually update the Events page The Events page o...

Page 232: ...ing server see Configure date and time From the touch screen on Pearl 2 you can tap the Scheduled events icon at any time to display the Events screen The icon only appears when Kaltura or Panopto CMS is enabled on Pearl 2 The Events screen displays automatically on the touch screen of Pearl 2 about five minutes before a scheduled event starts For events with more channels than can be previewed at...

Page 233: ... covers how to create channels and add custom layouts so that you can capture stream and record exactly what you want how you want Whether that s a simple channel with a single video and audio source or channels that have multiple video and audio sources and custom layouts like picture in picture Topics include l What is a channel l Channel layout examples l About automatic channels Auto A and Aut...

Page 234: ...h images company information corporate colors and time stamps just to name a few possibilities You can even apply chroma key effects to either one or to all your input video sources at the same time When you use the custom layout editor to create multiple layouts in a channel you can live switch between the different layouts while recording streaming and displaying the channel on a confidence moni...

Page 235: ... a new file is started If you delete all the layouts in a channel until there is only one layout left and that layout has only one video source assigned then the channel name changes back to the name of the video source For example Channel 1 changes to HDMI A To avoid channel name changes we recommend that you rename the channel to a custom name Changing the channel name to a custom name ensures t...

Page 236: ...you want it to appear on screen One source with a text overlay in the bottom right corner To get this look Using the custom layout editor add one video source to the layout select keep aspect ratio and stretch to fill the entire layout area Then add a text overlay to the layout and drag it where you want it to appear on screen One video source a slideshow presentation in this case with a green bac...

Page 237: ... to fill the entire layout area Then add your two video sources to the layout adjusting their size and position as needed Lastly add the logo to the layout and move it in to position For the second video source use the Crop tool to crop the second source to a square aspect ratio Examples including a 4x3 video source Layout example Description One 4x3 video source at the full size of the channel To...

Page 238: ...e to add the video sources then use the Crop tool to crop the second source to a square aspect ratio About automatic channels Auto A and Auto B To get you started as quickly as possible Pearl 2 comes pre configured with two automatic channels called Auto A and Auto B Simply plug a source into one of the A inputs and a second source into one of the B inputs Pearl 2 automatically configures the chan...

Page 239: ...pears automatically in the auto channel s custom layout Changing the auto channel s frame rate or deleting the auto channel will change the frame rate used at the output port for that video input Deleting the auto channel forces the video output port to use the original frame rate of the video input source l If you delete the auto channel it will re appear upon factory reset or when loading the de...

Page 240: ...dio If the HDMI video signal is lost or you manually select the SDI audio source using the custom layout editor Auto A will switch to SDI video with SDI audio If all the connected sources lose signal at the same time i e for example is SDI loses video signal and no other video signal is found no change is made and the auto channel continues to use the current source In this case a no signal image ...

Page 241: ... of using the default setting The default setting automatically sets the channel frame size to match the frame size of the video source Changing the frame size to a fixed value ensures that you don t experience any stream interruptions if the frame size of the video source changes like when switching between different layouts that contain a single video source with different frame sizes Channel en...

Page 242: ...as admin see Connect to Admin panel 3 From the Channels menu click Auto A or Auto B The channel s status page opens 4 Configure the automatic channel as you would any other channel To change the video source for the automatic channel just select a different video source using the custom layout editor see Add video sources or a channel as a source The channel name automatically changes to the name ...

Page 243: ...ditor page This happens because the channel s encoding page has Use current signal resolution as frame size selected by default If you want to change the aspect ratio for your channel see Configure encoding Each additional channel and layout consumes additional CPU processing capacity of Pearl 2 see Optimum CPU performance When you create a channel it s convenient to add your video and audio sourc...

Page 244: ...Pearl 2 User Guide Create a channel 3 Click Add new item and select Video Source 4 From the Source settings select a video source in the Source drop down 230 ...

Page 245: ...ick and drag the red and white handles on the corners of the source to re size it in the layout editor area For a single source channel it should fill the entire layout area Alternatively you could enter a value in the percentage boxes that are along the side and bottom of the layout editor area to resize the video source 6 Select an audio source from the list of audio sources 231 ...

Page 246: ...o sources or a channel as a source You can add one or multiple video sources to any of the layouts for your channel using the custom layout editor You can even add the output from another channel as a video input source When you add a channel as a video source in another channel whatever is displaying live in that channel also displays in the other channel This is useful when you need to stream th...

Page 247: ...nt layouts happen to have different video sources with different resolutions see Configure encoding Add a video source or a channel as a source using the Admin panel 1 Login to the Admin panel as admin see Connect to Admin panel 2 From the Channels menu select the channel and click Layouts The custom layout editor opens 3 In the Layouts list that appears at the top of the page click a layout s row...

Page 248: ...appear to have no signal if the RTSP source is not currently sending content 7 Click and drag the red and white handles on the corners of the source to re size it in the layout editor area Alternatively enter a value in the fields along the side and bottom of the layout editing area to resize the selected item For a channel with only a single video source it should fill the entire layout area For ...

Page 249: ...lower down the list 8 Select an audio source from the list of audio sources If a channel is selected as the video source the corresponding audio for that channel is selected automatically by default 9 Click Save A note about item positioning and sizing There are multiple ways to position and size images text overlays and video sources in the layout area 1 Using the mouse 2 Using the keyboard 3 Usi...

Page 250: ...than percent you can type a pixel value in any of the positioning value squares followed by the characters px e g 56px You can mix and match pixels and percents changing only the boxes you want to use pixel values At any time you can switch back to percents by typing a percent See Resize and position items using percents or pixels for more information Add an audio source to a layout You can add mu...

Page 251: ...s at audio sources to avoid clipping see Adjust audio gain and delay l If audio encoding is not configured for a channel no audio signal is processed or sent with the video content when recording streaming or confidence monitoring see Configure audio encoding l If an audio source is added to a layout and then the audio device is disconnected from the input port on Pearl 2 some residual noise may b...

Page 252: ...dio input source see Adjust audio gain and delay Duplicate a channel You can duplicate any channel you ve created All settings in the channel you duplicate are recreated Duplicate a channel using the Admin panel 1 Login to the Admin panel as admin see Connect to Admin panel 2 From the Admin panel scroll to the Channels menu option 3 From the Channels menu click Status The Status page opens 238 ...

Page 253: ...fault name delete the channel name and leave the name field blank When you save Pearl 2 will automatically repopulate the name field with the default name Channels are created with the same name as their video source by default When a second layout or a second video source is added to the channel the channel name changes to Channel X where X is the index number for the channel To stop a channel na...

Page 254: ...ers We recommend using underscores to separate words rather than using spaces 5 Press Enter using your keyboard to save the new name Delete a channel You can delete a channel using the Admin panel Deleting a channel removes all recorded files that are associated with that channel You cannot recover recordings for a channel after the channel is deleted We recommend that you stop recording or stream...

Page 255: ...click Cancel Preview a channel You can open a live preview of a channel in your web browser to see any configuration changes you make to the channel as you make them Web browsers that support HTML5 and Flash are supported There are several ways to preview a channel l Preview a channel from the Info page l Preview a channel from the Status page l Preview all channels at the same time You can also p...

Page 256: ...igured for Pearl 2 the live broadcast URL will start with https instead of http The Info page has preview links for all the channels that are configured on Pearl 2 Preview a channel from the Info page using the Admin panel 1 Login to the Admin panel as admin see Connect to Admin panel 2 From the Configuration menu select Info The information window opens Then click View to open a preview window of...

Page 257: ...annels at the same time using the Admin panel The resulting web page can be very large You can use your keyboard s zoom keys or the zoom buttons for your web browser to adjust the screen view Plus many browsers support short cuts like Ctrl control minus to zoom out and Ctrl control plus to zoom in 1 Open a new tab in your web browser on the Admin computer 2 Go to the following URL to open the prev...

Page 258: ...d depends largely on the media player For example VLC stores the metadata in a media information file while other media players scroll the text horizontally from right to left across the bottom of the media player window Use only alphanumeric and diacritic characters in metadata descriptions The whole metadata string is refused if any special currency or mathematical symbol appears in the descript...

Page 259: ...tion H 264 H 264 is the default video codec configured for the channels on Pearl 2 This codec provides high quality video while using low bandwidth and is the preferred codec to use with the system Motion JPEG Motion JPEG is suitable for live streaming and video however you can experience low quality images while using high bandwidth Motion JPEG does not support audio Table 43 Supported audio code...

Page 260: ...io When selecting this encoding you must use a web browser that supports HTML5 or a media player to preview your channel PCM Pulse Code Modulation PCM is a standard for digital audio in computer and other devices such as digital telephone systems Setting the level to match the audio source s level provides the best sound quality and avoids audio resampling Most digital signals HDMI or SDI sources ...

Page 261: ...dec selec ted MP4 and MP4 Fragmented AVI MOV MPEG TS H 264 No audio codec ü ü ü ü H 264 PCM ü ü ü H 264 MP3 ü ü ü ü H 264 AAC ü ü ü ü MJPEG No audio codec ü ü ü ü Configure video encoding You can configure the video encoding settings for a channel using the Admin panel Video encoding settings include l Video codec The video codec determines the type of compression and decompression and also affect...

Page 262: ...ations l For optimum system performance the frame size of the channel should be set to match the frame size of your video input source to avoid scaling see Optimum CPU performance l If you have unchecked all the manual resizing and positioning boxes in the custom layout editor and you downscale the video source using the frame size setting on the Encoding tab for example select 1280 720 frame size...

Page 263: ...This codec is suitable for streaming and recording video however you get lower quality images and it requires a large amount of bandwidth Motion JPEG does not support audio Key frame interval The key frame interval feature specifies how often a key frame a frame that contains all the pixels is sent when streaming the video This setting also impacts how quickly a video moves through the frames when...

Page 264: ...r streaming and video recordings are larger If you re using H 264 then you can set the bitrate to improve the image quality For example an HD Blu ray video is typically in the range of 20 Mbps whereas a standard definition DVD is usually 6 Mbps If you re unsure what bitrate value to use start at 5000 kbps slightly less than a typical DVD and test to see how this looks for your viewers Configure vi...

Page 265: ...line Choose this option when streaming to an application that requires robustness and cannot tolerate data loss for example video conferencing Main Choose this option for standard definition broadcasts High This is the default Choose this option when video is viewed for broadcast and disk storage applications particularly for high definition television application such as Blu ray disk storage form...

Page 266: ...s set as the default audio codec for the channel You can choose a different audio codec for a channel using the Admin panel The following table lists the supported audio codecs and bitrates Table 47 Supported Audio codecs and bitrates Value Description AAC The AAC default audio codec is comparable to MP3 and may produce better sound quality with a similar bitrate Supported values are 16 22 44 and ...

Page 267: ...computer and other devices such as digital telephone systems Most digital signals HDMI or SDI sources use 48 kHz audio Matching the encoded level with the source level provides the best sound quality by avoiding audio resampling Flash FLV doesn t support 48 kHz PCM audio When selecting this value you ll need to use a media player to preview your channel Change the audio codec for a channel using t...

Page 268: ...i encoding and channel as a source Pearl 2 lets you easily do multi encoding so you can record and stream the same content at different encoding settings This is useful when you want to l Record a video at a high bitrate and frame size and live stream the same content at lower encoding settings l Record the channel while also sending two or more streams of that channel using different encoding set...

Page 269: ... channel 1 4 Create Channel 2 for your recording with just one layout and add Channel 1 as the video source Stretch it to fill the full screen 5 For Channel 2 s audio source choose Channel 1 if not already selected by default 6 Set encoding and streaming settings for channel 2 Using this process you can again use the same video you re recording on Channel 2 and stream it at a different bitrate and...

Page 270: ...tems using percents or pixels l Open the custom layout editor for a channel l Configure a custom layout for a channel l Rename a layout l Delete move or duplicate a layout l Set the background color l Add an image to a layout l Upload or remove an image using the Media page l Add a text overlay l Custom system variables for text overlays l Crop a video source l Configure chroma keying About the cu...

Page 271: ...e as well as crop images and video The main layout area has the same frame size and aspect ratio as the encoding setting of the channel As you add items to the layout they appear in the layout editing area The currently selected item is presented in full color Unselected items appear transparent To change the settings for an item click an item in the item list that appears below the layout editing...

Page 272: ...ing the manual positioning values with percents 4 Using the manual positioning values with pixels To use the mouse Click and drag to move the item Click and drag the round red and white handles to resize an image or video source for text overlays just use the padding settings Using this method you can make quick changes that are in increments of approximately 5 of the width or height of your layou...

Page 273: ... to your layouts The bottom section of the custom layout editor is where you select the audio source for the currently selected layout It s also where you ll find the Save button If a layout doesn t have an audio source selected there will be silence when that layout is selected during live switching recording and confidence monitoring If an Auto channel is selected as a video source then Auto A o...

Page 274: ...be converted to pixels by simply overwriting the percent value in a given adjustment box and replacing it with a pixel value When entering percent values ensure the suffix is added to your value i e 20 When entering pixel values ensure the suffix px is added to your value i e 200px A layout item s total pixel dimensions are a reflection of your channel s frame size as configured in your encoding s...

Page 275: ...ed 20 or 200px to the right 3 If using percents this value is the item s percentage of total width on the layout s horizontal axis I e the item takes up 60 of the layout s width represented by a thin red bar above the percent box If using pixels this value is the item s width in pixels with a maximum pixel width i e frame size identified in your channel s encoding settings Configure encoding 4 The...

Page 276: ...gs Configure encoding 7 The percentage of blank space or number of pixels from the top downward on the layout s vertical axis I e the item is displaced 10 or 200px from the top down Resize layout items The easiest way to resize a layout item is to use the center adjustment boxes annotated as 3 and 6 in the image above on each of the horizontal and vertical axes to set your item s width and height ...

Page 277: ...rcents are used by default in the layout editor even if pixels are used in adjacent boxes Combined with the 50 960px width of the image these two 25 480px values total 100 1920px of the layout s horizontal axis If you instead decide to enable the left and right percent boxes and change their values to 30 each instead of the current 25 then the image s width shrinks from 50 960px to 40 750px to acc...

Page 278: ... to shift your layout item For example using percents to move a layout item with a 60 width as far to the right of the layout area as possible you would need to enter 40 into the left percent box to push the item to the right The layout item originally takes up 60 of the layout width so this added 40 shift pushes the item as far to the right as possible I e 100 of the horizontal axis The right adj...

Page 279: ... the top down or enter 27 into the bottom percent box to specify a 27 margin from the bottom up added to the item s 70 height this leaves a 3 margin above your layout item You can manipulate elements to get the custom look that you want using percents pixels your keyboard or any combination Here s an example of using pixels and percents to created a custom layout with two video sources and a backg...

Page 280: ...From the Channels menu select the channel and click Layouts The custom layout editor opens 3 From the Layouts list select the layout you want to edit The layout editor updates to display the selected layout and the row for the selected layout is highlighted in green If this is a new or an unformatted layout the layout area is empty and a black background matte appears 266 ...

Page 281: ... up scale and downscale your video sources add multiple audio sources and text overlays to mention just a few For examples of how to get different channel layouts see Channel layout examples Important considerations If you re live switching your channel we recommend that you set the frame size to a fixed size instead of using the default automatic detection of source frame size Setting the frame s...

Page 282: ...ns 3 Select a layout from the layout list or click Add Layout to create a new layout If this is a new channel or layout the layout area is empty and you see a black background matte See Add video sources or a channel as a source 4 Click and drag the red and white handles on the corners of the video source to re size it in the layout editor area 268 ...

Page 283: ...switching consider using shortened names for layouts Long names get truncated on the touch screen You can include certain international characters in layout names Pearl 2 supports common character sets for Western and Central European languages Nordic languages and Russian For a complete list see International character support Rename a layout using the Admin panel s custom layout editor 1 Login t...

Page 284: ...hannel name automatically changes to a generic name Channel X where X is the channel index number For example HDMI A changes to Channel 1 Changing the channel name affects system operation l If the channel is streaming the stream is stopped and restarted l If the channel s recorder is recording then recording is stopped and a new file is started If you delete all the layouts in a channel until the...

Page 285: ...de of the row for the layout you want to delete The system prompts you to make sure you want to delete the layout 4 Click OK When using the switcher on Epiphan Live refresh your browser if you still see a layout that was deleted The deleted layout should disappear Duplicate a layout using the Admin panel s custom layout editor If you re planning to use live switching we strongly recommend you rena...

Page 286: ... From the Channels menu select the channel and click Layouts The custom layout editor opens 3 Click the drop down arrow next to the existing by default black background color field The color picker opens 4 Pick a new color or type in an RGB value in the field the color is updated in the layout area 5 Click anywhere off the color picker to close the picker 6 Click Save Add an image to a layout You ...

Page 287: ...e you upload Any image without the proper file extension appears in the layout editor but doesn t display in the actual video output For instance a PNG image with the file extension bmp or an invalid file extension such as png2 are examples of improper file extensions If your uploaded image does not appear in the list ensure it doesn t exceed the maximum image size of 4096 2160 No warning or error...

Page 288: ...Your picture appears in the Picture settings preview and is added to the layout area 6 In the layout area use the mouse the keyboard or the manual position value fields to position and resize your image For background images click and drag to fill the full layout area For more details see About the custom layout editor 274 ...

Page 289: ... new item and change their order Items that are higher up the list appear over top items that are lower down the list 8 Click Save Upload or remove an image using the Media page You can customize a channel by adding pictures as backgrounds overlays or transparent overlays Image files formats supported include PNG and JPEG The maximum supported image size is 4096 2160 No warning or error message is...

Page 290: ...nclude special characters slashes or spaces l Uploading an image of the same name overwrites the existing image l Any image without the proper file extension appears in the layout editor but doesn t display in the actual video output For instance a PNG image with the file extension bmp or an invalid file extension such as png2 are examples of improper file extensions Upload or remove an image usin...

Page 291: ... and time in to layouts in your channel You can add text to any layout using the custom layout editor The following tables lists shortcut codes that you can enter and the resulting content that appears on screen Table 49 Overlay text shortcut codes Item Shortcut code Example date format yyyy mm dd F 2019 01 26 date format mm dd yy D 01 26 19 year G 2019 month 01 m 01 month Jan b Jan month January ...

Page 292: ...acters in text overlays Pearl 2 supports common character sets for Western and Central European languages Nordic languages and Russian For a complete list see International character support Add a text overlay using the custom layout editor 1 Login to the Admin panel as admin see Connect to Admin panel 2 From the Channels menu select the channel and click Layouts The custom layout editor opens 3 C...

Page 293: ... text overlay Include Overlay text shortcut codes as needed Press Tab or click outside the text field to refresh the preview in the custom layout editor For example if you enter A B d G Live streaming channel Auto A The resulting text is displayed 5 Select the Font Font size and Text color You can also change the default Line spacing in percentages For a mono spaced font use Droid Sans Mono Limita...

Page 294: ...t that changes throughout the course of your live stream or recorded program For example using the HTTP API you can create a system variable for the current GPS co ordinates then use a script to update the GPS co ordinates in your custom variable as the physical location in your stream changes Here s an example custom variable called gpsvar1 that has a value of N103 68201 W765 29712 To insert the ...

Page 295: ...ore information about sizing and positioning elements in the custom layout editor area see About the custom layout editor Crop a video source You can crop a video source to change the size and shape of your video as it appears on screen using the custom layout editor Cropping a source gives you a lot of advantages and can help to conserve the overall amount of processing CPU usage for your Pearl 2...

Page 296: ...size aspect ratio and position of the crop with minimal restrictions l The red box with click and drag circular handles in the corners shows the cropped area that appears in the final layout Only the content inside the box shows in the layout In Free form mode you can click and drag the red handles to change the size and ratio of the box and you can click and drag the box itself to change its posi...

Page 297: ...rom the available list This creates a box with that exact resolution Click and drag the box to move it into position The size cannot be changed except by selecting a different size or by selecting Free form or Aspect Ratio l Selecting an aspect ratio allows you to create a crop box of almost any size in a particular ratio After selecting a ratio you can manipulate the crop area s size and position...

Page 298: ...shows someone standing in front of a green screen Using chroma key in Pearl 2 an image of an office space replaces the green background White grey and black are not recommended colors for chroma keying Those are treated as the same color with a different luminance value The result in Pearl 2 is that the chroma keying affect gets applied to all shades ranging from white to black You configure chrom...

Page 299: ... that has chroma keying enabled For more information about performance monitoring see What is Pearl 2 Observe the following l For Pearl 2 the maximum resolution is 1920 1080 at 30 fps for chroma keying l Avoid scaling a video source that has chroma key enabled l Where possible crop the video source that has the chroma key enabled to minimize the area that Pearl 2 must process for the chroma key ef...

Page 300: ...rs in the custom layout with chroma key enabled has the chroma key effect applied to it If you want to apply the chroma key effect to a video source that appears in several different custom layouts you must enable the chroma key effect in each custom layout where that particular video source appears What is downstream chroma keying Downstream chroma keying applies the chroma key effect to all vide...

Page 301: ... screen To get a downstream key effect using Pearl 2 you can enable the same chroma key effect on all your custom layouts This way the same chroma key effect gets applied to everything you stream or record Set up chroma key for a green screen video source A common use of chroma keying is to use a green screen and then replace the green background with another video or still image 287 ...

Page 302: ...n effects computer This example shows two camera sources connected to Pearl 2 The green screen appears in the video source connected to HDMI A and the office background is from HDMI B Configure chroma keying for green screen using the Admin panel 1 Login to the Admin panel as admin see Connect to Admin panel 2 Follow the steps in Configure a custom layout for a channel to create a custom channel 3...

Page 303: ... Keep aspect ratio when scaling checkbox from the Source settings box 6 Click Add new Item again and add the video source that has the green screen image 7 Click the Crop button and crop your green screen video source in the pop up crop editing window For detailed steps see Crop a video source Click OK when your done to return to the custom layout editor Cropping the green screen video source help...

Page 304: ...arl 2 User Guide Set up chroma key for a green screen video source 9 With the green screen video source selected check Enable Chroma keying in the custom layout editor The chroma keying options appear 290 ...

Page 305: ...video image shows through all the colored areas on the chroma key video layer that match the color you select as the chroma key 11 Adjust the chroma color selection and blend the edges to remove unwanted chroma effects or residual color a Enter a number in the Key threshold field to adjust the color selection A value of 0 equals the original color you selected A higher value widens the range of th...

Page 306: ...he keyboard to move the item up down left or right in the layout Changes are in increments of approximately 5 of the height or width of the layout area Press the Ctrl key while using the arrow keys to make more refined movements To change the size of an image or video source press the Shift key while using the arrow keys for text overlays just use the padding settings Press both Ctrl and Shift for...

Page 307: ...e as using a dedicated titling software on an effects computer with Pearl 2 This example shows an HDMI camera connected to the HDMI A port on Pearl 2 and an effects computer that has a Powerpoint presentation loaded on it connected to the HDMI B port To the computer Pearl 2 is treated just like an external display You can connect the effects computer with the Powerpoint file to any supported port ...

Page 308: ...ing in the background For detailed steps see Add video sources or a channel as a source 5 In the layout editing area click and drag to position the video See the note after this procedure for positioning techniques For best results select the Keep aspect ratio when scaling checkbox from the Source settings box 6 Click Add new Item again and add the video source from your effects computer 7 Click t...

Page 309: ...point slides Cropping the Powerpoint computer video source helps optimize the performance of Pearl 2 8 In the layout area position the Powerpoint video source over top the other video source To optimize performance avoid scaling the Powerpoint video source if you can 295 ...

Page 310: ...User Guide Add chroma key titler effects using Microsoft Powerpoint slides 9 With the Powerpoint video source selected check Enable Chroma keying in the custom layout editor The chroma keying options appear 296 ...

Page 311: ...s the chroma key 11 Adjust the chroma color selection and blend the edges to remove unwanted chroma effects or residual color a Enter a number in the Key threshold field to adjust the color selection A value of 0 equals the original color you selected A higher value widens the range of the selected chroma color A lower number narrows the range of the selected chroma color b Enter a number in the E...

Page 312: ...oximately 5 of the height or width of the layout area Press the Ctrl key while using the arrow keys to make more refined movements To change the size of an image or video source press the Shift key while using the arrow keys for text overlays just use the padding settings Press both Ctrl and Shift for fine grained size control Using percents Specify a whole number followed by a percent sign e g 4 ...

Page 313: ...xternal display You can connect the effects computer with the titling software to any supported port that is available on Pearl 2 Apply chroma key effect to an effects computer video source using the Admin panel 1 Login to the Admin panel as admin see Connect to Admin panel 2 Follow the steps in Configure a custom layout for a channel to create a custom channel 3 From the custom layout editor clic...

Page 314: ... to position the video See the note after this procedure for positioning techniques For best results select the Keep aspect ratio when scaling checkbox from the Source settings box 6 Click Add new Item again and add the video source from your effects computer 7 Click the Crop button and crop your effects video source in the pop up crop editing window For detailed steps see Crop a video source Clic...

Page 315: ...o Pearl 2 Cropping the effects computer video source helps optimize the performance of Pearl 2 8 In the layout area position the effects video source over top the other video source To optimize performance avoid scaling the effects video source if you can 301 ...

Page 316: ...Pearl 2 User Guide Add external titler software effects to Pearl 2 9 With the effects video source selected check Enable Chroma keying in the custom layout editor The chroma keying options appear 302 ...

Page 317: ...roma key 11 Adjust the chroma color selection and blend the edges to remove unwanted chroma effects or residual color a Enter a number in the Key threshold field to adjust the color selection A value of 0 equals the original color you selected A higher value widens the range of the selected chroma color A lower number narrows the range of the selected chroma color b Enter a number in the Edge blen...

Page 318: ...ove the item up down left or right in the layout Changes are in increments of approximately 5 of the height or width of the layout area Press the Ctrl key while using the arrow keys to make more refined movements To change the size of an image or video source press the Shift key while using the arrow keys for text overlays just use the padding settings Press both Ctrl and Shift for fine grained si...

Page 319: ...ice Video sources are also displayed on the Epiphan Live control interface See Monitor video and audio input sources using Epiphan Live for more information Topics include l About connecting video and audio sources l Tested RTSP based IP cameras l Supported web cameras l Connect an RTSP source l Connect an SRT stream as an input l Connect an NDI source l Connect an AV io video grabber l Preview a ...

Page 320: ... network using the Admin panel Application of amplified speaker signals to the audio line inputs exceeds the recommended ratings and may permanently damage the device The Admin panel automatically discovers all video and audio sources that you connect to the input ports on Pearl 2 and lists them in the Inputs menu of the Admin panel Sources coming from the Ethernet network such as NDI SRT and RTSP...

Page 321: ...can change that to display the default No Signal image for Pearl 2 or create your own custom no signal image See Add a custom No Signal image Audio mixers and other line level devices can be connected to the XLR and RCA audio input ports on Pearl 2 Embedded audio from sources connected to the HDMI SDI and USB video ports is also supported For specifications and guidance when connecting an audio so...

Page 322: ...of text that needs to be included in the source URL to connect your IP camera to Pearl 2 see Connect an RTSP source to learn how to connect an RTSP source like an IP camera using the Admin panel For example to connect a Sony SRG300SE camera with an IP address of 192 168 0 160 your source URL needs to be entered as rtsp 192 168 0 160 video1 Or if using a Q See QCN8029Z camera your source URL needs ...

Page 323: ...s USB microphones The following list of web cameras have been tested for compatibility with Pearl 2 If your web camera doesn t appear in the list that just means your model hasn t been tested It s likely that it will work without any issues Table 52 List of tested Web cameras l Logitech HD Pro Webcam C920 Max video mode 1920x1080 30 l Logitech C925e Max video mode 1920x1080 30 l Microsoft LifeCam ...

Page 324: ...for improved performance enabled by default Important considerations l If an RTSP source is connected but unused in any channel Pearl 2 decodes only key frames to preserve CPU resources l To synchronize timestamps between your RTSP source and your Pearl 2 the same time synchronization server should be used for both devices We recommend that you configure an NTP server on your Pearl 2 and use Pearl...

Page 325: ...and then click Add RTSP input The RTSP input page opens 3 Enter the Input URL Username and Password for your RTSP source and select either UDP or TCP as the Preferred transport If you re using another Pearl 2 as an RTSP source see Share a live broadcast stream HTTP HTTPS or RTSP 311 ...

Page 326: ...ure a custom No signal image see Add a custom No Signal image 7 Click Apply to save your settings and connect your RTSP source After your RTSP source is connected you can view basic video and audio signal information and packet loss statistics for the source under the Status header at the top of the page Any warnings or errors associated with your RTSP stream are also displayed on this page 312 ...

Page 327: ... SRT is a low latency protocol used to stream over the Internet to SRT destinations decoders such as CDNs and other SRT decoders such as a Pearl 2 You can configure Pearl 2 as an SRT destination decoder and ingest SRT streams as video inputs that you can add to custom layouts for switching recording and streaming Up to six of the video inputs configured for Pearl 2 can come from SRT sources or one...

Page 328: ...you must know which mode the SRT source uses and configure the SRT input on Pearl 2 to use the corresponding mode For example if the SRT source is in caller mode then the input must be in listener mode For an example SRT stream using caller listener modes see Set up an SRT stream using caller and listener modes l If AES encryption and a passphrase is required Consult your IT administrator for this...

Page 329: ...arl 2 device sending an SRT stream ii Optional In the Source port field enter the port number for this device to use for SRT traffic b If Listener mode is selected enter the Port number for this device to use for SRT traffic See Network ports used by Pearl 2 to determine available ports c If Rendezvous mode is selected enter the URL of the SRT source encoder using the format srt encoder ip address...

Page 330: ...mmend using the default latency value for an initial test stream After you perform a test stream you can determine the Quality of Service QoS and calculate the latency requirements To set the SRT stream latency see Adjust latency and view the SRT stream status Connect an NDI source NDI lets you to transmit and receive low latency video over Gigabit Ethernet networks Pearl 2 accepts multicast and u...

Page 331: ... work properly network ports 49152 to 65535 need to be open for two way traffic Contact your network administrator for assistance l The network discovery port 5557 on Pearl 2 must be enabled default see Disable the network discovery port l Pearl 2 supports up to six 1920 1080 30 fps inputs simultaneously Up to three of those 1080 30 inputs can be from NDI sources l Pearl 2 supports up to four 4K4K...

Page 332: ...t network or subnet than Pearl 2 or the network has mDNS disabled enter the IP address of the remote NDI resource in the Extra source IP addresses field then click Discover Use a comma to separate multiple IP addresses Select Add beside an NDI resource to select it d If you want to add an NDI input to Pearl 2 without selecting an NDI resource click Add NDI input The new NDI input is added and a bl...

Page 333: ...for you You can also discover specific NDI resources installed on different networks subnets and on networks that have mDNS disabled when you know the IP address of the NDI resource see Connect an NDI source NDI devices that use versions earlier than NDI version 2 0 do not support remote resource discovery across subnets If you created an NDI input on Pearl 2 without assigning an NDI resource to i...

Page 334: ...r Settings do one of the following and then click Apply a Enter the NDI name and group if applicable b Enter the IP address of the NDI source in Extra source IP addresses Connect an AV io video grabber You can connect an Epiphan AV io frame grabber to a USB input port just the same as you would connect a web camera Pearl 2 treats the video source from the frame grabber just like any other video so...

Page 335: ...m l AV io 4K https www epiphan com userguides avio 4k Content Home AVio4K htm Preview a video source using the Admin Panel You can preview the images captured from your video sources in the Admin panel You can also preview your sources using the Epiphan Live control interface see Monitor video and audio input sources using Epiphan Live Preview an input source using the Admin panel 1 Login to the A...

Page 336: ...the input port name to match the data it s capturing so that it s clear what the channel is capturing Alternately you can change the channel s name see Rename a channel You can include certain international characters for video and audio input port names Pearl 2 supports common character sets for Western and Central European languages Nordic languages and Russian The name should not include specia...

Page 337: ... We recommend using underscores to separate words rather than using spaces 5 Press Enter using your keyboard to save the new name Configure a video input source Captured video sources don t usually need configuration but you can change some of the video settings using the Admin panel including l HDMI and DVI video settings l SDI video settings l USB video and web camera settings For details to con...

Page 338: ... Admin panel 1 Login to the Admin panel as admin see Connect to Admin panel 2 Ensure a source is connected to the input port see About connecting video and audio sources 3 From the Inputs menu click the source name The configuration page for the source opens HDMI and DVI video settings The following options are available for HDMI and DVI video input sources connected to the HDMI port 324 ...

Page 339: ...ou to choose a custom no signal image for the channel The drop down list gives you the option to choose the default image or any image you have uploaded through the Add a custom No Signal image Timeout The timeout represents the number of seconds after losing the signal that the no signal is displayed You may change this number to adjust how soon you wish the no signal image to appear after the si...

Page 340: ...meout represents the number of seconds after losing the signal that the no signal is displayed You may change this number to adjust how soon you wish the no signal image to appear after the signal disappears USB video and web camera settings The following options are all potentially available for video input sources connected to the USB port However some settings apply only to certain types or bra...

Page 341: ...ion and fps at which the video source is captured The drop down list of available resolutions and frame rates changes depending on the attributes of the connected device Brightness The brightness of the video can be adjusted by entering a numerical value from 0 to 100 Estimate values and view the result in the preview area until desired result 327 ...

Page 342: ... a numerical value from 0 to 100 Estimate values and view the result in the preview area until desired result is achieved Powerline frequency The powerline frequency of the video can be adjusted by selecting the desired output from a drop down list of frequencies available to your source Image This menu allows you to choose a custom no signal image for the channel The drop down list gives you the ...

Page 343: ... on Pearl 2 you must upload it see Upload or remove an image using the Media page Set the no signal image for an input port using the Admin panel 1 Login to the Admin panel as admin see Connect to Admin panel 2 From the Inputs menu click the source name The configuration page for the source opens 3 In the No signal image section select an image from the Image drop down list 4 In the Timeout field ...

Page 344: ...unicast multicast SRT HLS MPEG DASH RTMP SAP UPnP and more Topics include l What is streaming l Viewing a channel s live broadcast stream l Directly sharing channel stream URLs with viewers l Suggested stream settings l Streaming a channel direct to viewers l Streaming to servers CDNs and other devices l Streaming to a media player or smart TV For instructions on how to use Pearl 2 s touch screen ...

Page 345: ...cal TCP based network or streaming to a CDN over the Internet how much bandwidth do you have available and is live streaming security a concern Pearl 2 can stream to a CDN or media server using any of the following streaming protocols l SRT push l HLS push l MPEG DASH push l RTMP RTMPS push l RTSP A channel can support multiple streams That means you can stream a channel to multiple destinations u...

Page 346: ...CMS like Kaltura or Panopto See CMS recording and webcasting control To start stop scheduled streams and authenticate with a CMS to create unscheduled ad hoc events using the touch screen see CMS event controls using the touch screen Streaming to a CDN multicasting and streaming to multiple des tinations A Content Delivery Network CDN relies on geo diverse CDN servers to receive and disperse web c...

Page 347: ...lable and saves you from having to purchase and maintain your own servers to host and deliver video content Using one or more CDNs to stream live content allows you to reach a large geographically diverse audience and because CDNs perform format conversion the stream is platform independent Streaming protocols supported include SRT push HLS push MPEG DASH push RTMP RTMPS For more information about...

Page 348: ...ing to a CDN You can also test how your content is streamed by sending your content to Epiphan s CDN For a list of Epiphan s preferred CDN providers see https www epiphan com partners cdn partners Streaming to multiple destinations There are a few different ways to stream to multiple destinations using Pearl 2 One option is to configure a channel on Pearl 2 as your switched program channel then us...

Page 349: ...sily view a channel s live broadcast stream You can provide people separate URLs for streams coming from each channel or one URL that includes all the streams for the channel All you need to do is provide them the channel s stream URL and log in credentials if you ve set one for viewers see Set or change user passwords Choose the right type of URL for the type of device the person will use to watc...

Page 350: ...ming to CDNs and other SRT enabled decoders across unreliable Internet connections using User Datagram Protocol UDP transport and additional error checking Low latency SRT is particularly good for real time two way communications between a remote guest and a local on site host You can configure Pearl 2 as an SRT source encoder and stream video using SRT You can also configure Pearl 2 as an SRT dec...

Page 351: ...to simplify the process Rendezvous Caller and Listener l Rendezvous mode is the easiest to setup and usually doesn t need any intervention from your IT administrator for the SRT stream from the source to traverse the firewall to the destination The SRT source and destination devices must use the same SRT port value see Set up an SRT stream using rendezvous mode l Caller and Listener modes work tog...

Page 352: ...ee Set AES encryption and a passphrase for SRT Secure streaming Secure streaming is a great option for confidential content such as corporate meetings or internal employee training There are several ways to secure your live stream with Pearl 2 l Stream to a CDN or media server over the Internet using Secure Reliable Transport SRT l Stream to a CDN or media server over the Internet using Real Time ...

Page 353: ...ble image degradation The following table provides suggested settings to maximize your video quality while minimizing system resource usage when streaming video content from your Pearl 2 Table 53 Suggested stream settings for video Option Setting Codec H 264 Video encoding preset Hardware accelerated Video encoding profile High Key frame interval 2 sec1 Limit frame rate 301 Bitrate 4 Mbps for HD 6...

Page 354: ... Limit frame rate 30 Bitrate 4 Mbps for HD 6 Mbps for Full HD 12 Mbps for 4K UHD4K Audio format AAC 44 KHz We recommend the following frame rates per stream l 60 fps at 1920 1080 capturing and streaming 2 sources simultaneously l 30 fps at 1920 1080 capturing and streaming 6 sources simultaneously l 30 fps at 4K UHD2 capturing and streaming one source 340 ...

Page 355: ...ng methods for only a small number of viewers because each viewer uses the full stream bandwidth and consumes resources on Pearl 2 For more information about using an HTTP stream see Share a live broadcast stream HTTP HTTPS or RTSP RTSP Viewers can copy and paste the URL of the RTSP stream into a media player and watch the stream on the local network For more information about using RTSP streaming...

Page 356: ...red for Pearl 2 the live broadcast URL will start with https instead of http If Pearl 2 is behind a firewall and you want to share a stream with remote viewers you need to set up port forwarding on your network Consult with your network administrator Table 56 URL options Access Method URL Format serial discovery http serial local preview cgi channel channel number https serial local preview cgi ch...

Page 357: ...P address instead of by Serial number Bonjour Print Services to see URLs with the IP address see Connect to Admin panel Enable HLS pull Stream a live broadcast of a channel directly to viewers on the same local network as Pearl 2 using HTTP over port 80 This gives viewers with iOS devices convenient access to the channel s live broadcast If HTTPS is configured for Pearl 2 the traffic from port 80 ...

Page 358: ...the Segment duration and Playlist size 5 Optional Check Bypass stream access control for HLS video data to allow the viewer software to read the HLS stream s video data without having to provide a viewer password or LDAP authentication as configured on Pearl 2 A viewer password or LDAP authentication that is configured on Pearl 2 is still needed to access the HLS stream s playlist Try enabling thi...

Page 359: ...ss If LDAP is configured for viewer authentication the viewer must pass global autentication using LDAP credentials or the viewer global password if there is one and must meet the local channel settings come from an allowed IP address See Configure LDAP user authentication for more information on LDAP configuration Restrict viewers for a channel using the Admin panel 1 Login to the Admin panel as ...

Page 360: ...nel by selecting Use these settings and leaving all the fields blank 6 Optional Enter the allow and deny IP addresses for viewers of this channel See Restrict viewers by IP address for details about allow and deny lists 7 Click Apply Restrict viewers by IP address Pearl 2 permits you to restrict which computers can access broadcasts by building a list of allowed and denied IP addresses You can do ...

Page 361: ...ss you need to know the IP addresses or range of addresses for your viewers By default all IP addresses are allowed to connect to the broadcast If a user attempts to connect to the stream from a disallowed IP address access is denied If there s an attempt to connect using a web browser the message IP address rejected is displayed Table 57 IP Based Restriction Options If you re not familiar with cr...

Page 362: ... deny list is to use the list of known IP addresses to craft a list of allowed IP addresses All other addresses are denied access to the broadcast For example if your system is accessible on your local area network LAN and you want to make sure only the CEO s specific desktop laptop and tablet computers with IP Addresses 192 168 1 50 192 168 1 51 and 192 165 1 75 respectively can connect to the br...

Page 363: ... the list as follows Allow 192 168 1 200 192 168 1 250 192 168 1 50 192 168 1 51 192 168 1 75 Your list can have multiple ranges and multiple distinct IP addresses provided they are separated by commas Allow list with a range of IP addresses distinct IP addresses and an exception Building on the previous examples consider a situation where you want the CEO s computers 192 168 1 50 192 168 1 51 192...

Page 364: ...ider a situation where you want every computer on the network to access the broadcast with the exception of the CEO s desktop laptop and tablet computers Additionally boardroom computers should not be permitted with the exception of the cafeteria computer IP address 192 168 1 222 The deny list is an exception list for the allow list So to craft the rule described above we need to allow all the com...

Page 365: ...e HTTP and RTSP streaming ports for streaming to viewers on the local network 1 Login to the Admin panel as admin see Connect to Admin panel 2 From the Channels menu select the channel and click Streaming The Streaming page opens 3 Set the HTTP Streaming port to specify the port used to stream the HTTP broadcast This value along with the URL is used by viewers to access the FLV and MPEG TS streams...

Page 366: ...can share with viewers You can disable the channel s streaming URLs from the Streaming configuration page using the Admin panel When you create a channel the channel s streaming URLs are enabled by default Disabling channel streaming for viewers using their web browser or media player does not disable live streaming to a CDN Disabling streams for viewers does disable all viewer formats including H...

Page 367: ...l the system automatically generates and displays a list of available live broadcast streams You can share the channel s stream URLs with people on the same local network as Pearl 2 so they can watch a live broadcast of the channel All you need to do is provide them the channel s stream URL and log in credentials if you ve set one for viewers see Set or change user passwords To stream video outsid...

Page 368: ...o codecs configured for the channel affect which live broadcast formats are listed Just copy the live broadcast URL and share that with viewers so they can watch the channel stream using a web browser see View the live broadcast URL using a web browser Or choose one of the other channel stream URLs if your viewers prefer to watch using a media player see View the streaming URL using a media player...

Page 369: ...ad View the live broadcast URL using a web browser You can share a channel s live broadcast URL with viewers so they can watch your live stream using their favorite web browser Your viewers must be on the same network as Pearl 2 to watch a live broadcast using the channel s live broadcast URL If the channel you re streaming is configured with 48 kHz audio some web browsers may not work In this cas...

Page 370: ...ng with the URL of the stream To set a viewer password see Set or change user passwords If HTTPS is enabled on Pearl 2 replace http with https in the URL of the stream Share the live broadcast URL with viewers 1 Login to the Admin panel as admin or operator see Connect to Admin panel 2 From the Channels menu select the channel and click Status You can copy the Live broadcast URL and share that wit...

Page 371: ...ayer You can share a channel s streaming URL with viewers so they can watch your live stream using their favorite media player like VLC Your viewers must be on the same network as Pearl 2 to watch a channel stream using a stream URL The different stream types available for channels include RTSP MPEG TS and Flash streams see Viewing a channel s live broadcast stream The URL contains either the IP a...

Page 372: ...2 From the Channels menu select the channel and click Status You can copy the Live broadcast URL and share that with your viewers View the channel s stream URL using a VLC 1 Launch a media player 2 Click the Media tab and select Open Network Stream from the drop down menu 3 Enter the stream URL In this example the serial number method is shown rtsp 49E7B8E4 local 554 stream sdp 358 ...

Page 373: ...Pearl 2 User Guide View the streaming URL using a media player 4 Press Play to watch the stream in the media player window 359 ...

Page 374: ...s to configure multicast streaming see Multicast streaming Streaming a channel to CDNs and multicast streaming is available only when the H 264 codec is configured as the channel encoding see Configure video encoding Set up an RTMP or RTMPS push stream Real Time Messaging Protocol RTMP is this the most common way to stream to a CDN including to Facebook Live and YouTube Use Real Time Messaging Pro...

Page 375: ...stopped using Single Touch streaming and recording control This is enabled by default 6 Enter the URL of the ingestion point provided by the CDN or media server l For RTMP push enter rtmp followed by the rest of the URL for example rtmp server ip address port etc l For RTMPS enter rtmps followed by the rest of the URL for example rtmps server ip address port etc 7 Enter the Stream name which also ...

Page 376: ...nreliable Internet connections via UDP The easiest way to establish a link between the SRT source and destination devices is to use rendezvous mode In rendezvous mode both the SRT source and destination device are ready to establish the SRT connection as soon as an SRT stream starts Typically no intervention is needed from your IT administrator to traverse a firewall in rendezvous mode However you...

Page 377: ... All traffic received at Firewall B that s addressed to 168 112 1 1 on port 20000 passes through the firewall directly to Destination B 203 0 113 10 because of the port number What s needed for this setup l The public IP address of Source A e g 198 51 100 20 and the public IP address of Destination B e g 168 0 113 10 l The SRT streaming port that Source A is configured to use e g port 20000 363 ...

Page 378: ...dedicated for the exchange of SRT control and recovery packets between the source and destination Ensure that the total SRT stream bitrate i e the bandwidth required for the stream plus the recovery bandwidth overhead is less than the network bandwidth you have available Set up Pearl 2 as a streaming source in rendezvous mode using the Admin panel 1 Login to the Admin panel as admin see Connect to...

Page 379: ... QoS and calculate the latency requirements To set the SRT stream latency see Adjust latency and view the SRT stream status 10 Optional In the Recovery bandwidth overhead field adjust the value of the bandwidth that s dedicate for SRT control and recovery packets The default value is 25 11 Optional Rename the stream Click the current name and enter a different name then press Enter Refresh your br...

Page 380: ... or listener is arbitrary If the destination device is set as the listener and is ingesting multiple SRT sources then all your SRT source devices must be set as callers In the following example a Pearl 2 is setup as SRT Source A 192 168 1 10 and another Pearl 2 is setup as SRT Destination B 203 0 113 10 Source A is streaming through a firewall NAT to Destination B which ingests the SRT stream as a...

Page 381: ... SRT stream e g port 2000 The port must allow 2 way traffic and route the traffic to the internal IP address and SRT port of Destination B In this example traffic received at the firewall s public IP address 168 112 1 1 on SRT port 2000 is routed to 203 0 113 10 3000 When you re configuring an SRT stream on Pearl 2 you can also adjust the recovery bandwidth overhead using the Admin panel This sett...

Page 382: ...Pearl 2 ii Optional In the Source port field enter the port number that this Pearl 2 should use for SRT traffic b If Listener is selected enter the Port number that this Pearl 2 should use for SRT traffic See Network ports used by Pearl 2 to determine available ports 6 Optional In the Stream ID field enter a unique name for this stream 7 Optional Check Encryption and choose the AES key length if t...

Page 383: ... remote source you must add the SRT stream as a input see Connect an SRT stream as an input Adjust latency and view the SRT stream status Secure Reliable Transport SRT achieves high quality low latency streaming across unreliable Internet connections via UDP packets If packets are lost in transit to the SRT destination a request to retransmit the lost packets is sent back to Pearl 2 Using the Admi...

Page 384: ...d the stream quality will suffer Latency can be configured at the source and at the destination SRT uses the highest of the two latency values The formula to calculate latency is SRT Latency RTT Multiplier RTT where the recommended range of the RTT Multiplier is a value from 3 to 20 The following table provides guidelines for what values to use when calculating latency An RTT multiplier value less...

Page 385: ... 3 16 506 ms or 50 ms of latency rounded up Adjust latency and recovery bandwidth overhead for an SRT stream using the Admin panel 1 Login to the Admin panel as admin see Connect to Admin panel 2 View the SRT statistics for the active stream Do one of the following a To open the SRT statistics from the Channels menu select the channel with the SRT stream to configure and click Streaming The Stream...

Page 386: ...ou can configure your Secure Reliable Transport SRT streams to use 128 bits 192 bits or 256 bits AES encryption using the Admin panel You can also assign the SRT stream an alphanumeric passphrase if required The encryption and passphrase settings on the SRT encoder sending the stream must match the settings on the SRT decoder receiving the stream The encryption key length is negotiated between the...

Page 387: ...RT stream name to reveal the stream settings In this example the name of the SRT stream is Stream 1 4 Check Encryption and choose the Key length 5 In the Passphrase field enter the passphrase using alphanumeric characters if required 6 Click Apply Set up AES encryption and a passphrase for an SRT input using the Admin panel 1 Login to the Admin panel as admin see Connect to Admin panel 2 From the ...

Page 388: ...sphrase using alphanumeric characters if required Special characters are not supported 5 Click Apply Set up an HLS push stream HTTP Live Streaming HLS is an adaptive HTTP based streaming protocol that sends video and audio content over the network in small media segments that get reassembled at the streaming destination Media 374 ...

Page 389: ...d advanced features like a master manifest which is an address applied to each individual media playlist in the stream You can also assign the HLS stream a user name and password If security and authentication credentials are required to stream to the ingestion server consult the ingestion server provider Important considerations l Only a single resolution and bitrate stream is supported l Set H 2...

Page 390: ...estion server provider 7 In the Method field select POST or PUT This selection must match the requirements of the ingestion server 8 In the Segment duration field enter the length of the media segment in seconds The default duration is six seconds Fractions and periods are not supported 9 In the Playlist size field enter the number of ts segment files in each segment The default playlist size is s...

Page 391: ...le to no IT involvement As an open standard MPEG DASH is designed to be codec and resolution agnostic Pearl 2 can send a single resolution and bitrate MPEG DASH stream as an HTTP POST or HTTP PUT to HLS ingestion servers and CDNs such as Akamai and YouTube The default is HTTP POST Your channels on Pearl 2 must be configured for H 264 and AAC audio codec to stream using MPEG DASH Pearl 2 supports M...

Page 392: ...e name of the initialization file that Pearl 2 sends to the ingestion server Check with the ingestion server provider for what value to use Media segment template Use this field to specify the name of the media segment file that Pearl 2 sends to the ingestion server Check with the ingestion server provider for what value to use DASH MPD upload period Set the duration as an integer in seconds The a...

Page 393: ... New stream and choose DASH push The new stream is created using the default name Stream 1 To see the settings click the stream name 4 In the URL field enter the URL of the destination server that is ingesting the stream For example http p ep721023 i akamaientrypoin net 722223 hlsQualification my_video m3u8 5 Optional Enter a Username and Password if required for this stream Get this from the inge...

Page 394: ...olution and codec e In the Media segment template field enter the naming format used for the names of media segments For example chunk Number 05d ts f Enter the DASH MPD upload period as an integer in seconds The default is 60 seconds 10 Click Apply 11 When you re ready to start streaming this channel click Start For details on how to start and stop streaming using the touch screen see Stream a ch...

Page 395: ...l Uncheck Single touch control if you don t want this stream to be started and stopped using Single Touch streaming and recording control checked by default 7 Enter the following parameters l The URL of the ingestion point provided by the CDN or media server l Select the Transport type as either UDP or TCP Consult your CDN provider to find out which transport protocols the CDN supports l The CDN U...

Page 396: ...he CDN using an XML profile Some CDNs provide an XML file for easy configuration setup Pearl 2 supports using XML profiles to set a stream Set up a stream using an XML profile from the CDN 1 Login to the Admin panel as admin see Connect to Admin panel 2 From the Channels menu select the channel and click Streaming The Streaming configuration page opens 3 Click New stream and select Use profile XML...

Page 397: ...ming and recording using Epiphan Live for instructions to use Epiphan Live Start and stop streaming to a CDN After your stream to a CDN is configured on the channel you can start and stop streaming using the Admin panel the touch screen or Epiphan Live For details to start and stop streaming using Epiphan Live see Control streaming and recording using Epiphan Live To learn how to use Single Touch ...

Page 398: ...nel and click Streaming The Streaming configuration page opens To set up a stream using the Admin panel click New stream and follow the instructions for how to Streaming to a CDN multicasting and streaming to multiple destinations 3 Click Start at the top right corner to start that stream or click Start all at the top of the page to start streaming all streams that are configured for the channel 3...

Page 399: ...creen You can tell if your channel is streaming from the touch screen on Pearl 2 when you look at the channel view or the Grid view The following shows an example Grid view l A blue dot in the top right corner means the channel is currently streaming l A yellow dot with an exclamation mark means a problem with streaming occurred that requires attention For details to start and stop streaming using...

Page 400: ...gns smart TVs and other digital media players over a local network using UPnP see Stream using UPnP MPEG TS streams using RTP UDP push When you configure an MPEG TS stream using RTP UDP push you have the option to enable SAP and multicast over a local network at the same time Before configuring your channel for MPEG TS streaming ensure the following codecs are configured l Video H 264 l Audio MP3 ...

Page 401: ...eck SAP announcement to enable advertising your stream over a local network When this is enabled and a multicast IP address is configured your stream is displayed in the playlist of the local media player b Enter a multicast IP address in the SAP announcement IP field If your media player is configured to receive multicast streams from an IP address that is different from the default address 224 2...

Page 402: ... for example rtp ip port or in the case of the sample configuration in the figure shown above rtp 226 10 24 32 7000 To view the stream when SAP announce has been set and the stream is advertised on a media player set top box or Smart TV refer to Viewing with Session Announcement Protocol SAP MPEG TS streams using UDP push When you configure an MPEG TS stream using UDP push you have the option to e...

Page 403: ...k SAP announcement to enable advertising your stream over a local network When this is enabled and a multicast IP address is configured your stream is displayed in the playlist of the local media player b Enter a multicast IP address in the SAP announcement IP field If your media player is configured to receive multicast streams from an IP address that is different from the default address 224 2 1...

Page 404: ...32 7000 To view the stream when SAP announce has been set and the stream is advertised from a media player set top box or Smart TV refer to Viewing with Session Announcement Protocol SAP If you re streaming to 10 100 Mbps set top boxes over Gigabit Ethernet and you notice frames are dropping you can limit the bandwidth of the stream see Set up traffic shaping Multicast streaming using RTP UDP You ...

Page 405: ...io and video ports must be 2 6 Click Apply An SDP file is generated 7 From the channel s Status page click the SDP file to download it Provide the SDP file name and location if prompted 8 Share the file with your viewers and when you re ready to start streaming select Start Set up traffic shaping If you re multicasting to set top boxes that have 10 100 Mbps interfaces on the same Gigabit Ethernet ...

Page 406: ...he bandwidth limit bitrate is 14 Mbps Important considerations l Traffic shaping works for the local switch Switches connected to the local switch don t respect the policy l If the channel encoding bitrate is set to a value that s less than 4 Mbps and traffic shaping is enabled the minimum bandwidth limit does not drop below than 4 Mbps l If the channel encoding bitrate value is greater than 95 Mb...

Page 407: ... to 95 000 kbps 7 Click Apply Viewing with Session Announcement Protocol SAP When SAP Announce is configured for a stream that uses UDP streaming the stream is advertised over the local network Local viewers can view the stream using a software or hardware media player Viewers are presented with a list of available channels similar to a television menu Viewers need only click on a stream and the v...

Page 408: ...terity receivers listen for SAP announcements on a specific multicast address 239 255 255 255 If your audience is using Exterity to view your stream you must change the SAP announcement IP address to 239 255 255 255 3 Launch a media player and play the streams a Using VLC click View and select Playlist The right hand panel indicates the playlist is empty b From the side menu click Network streams ...

Page 409: ...st SDP file session description file directly see Viewing with Session Announcement Protocol SAP To stream video outside of your LAN use a CDN or configure port forwarding on your router Refer to your Network Administrator Network configuration is beyond the scope of this guide Stream using UPnP Using the Universal Plug and Play UPnP networking protocol Pearl 2 can be discovered and can stream to ...

Page 410: ...ce level including setting a share name l Enable UPnP for the channel and recorder Streams and MPEG TS recorded files must use the supported codecs H 264 with MP3 or AAC audio Having a viewer password could prevent the ability to use UPnP Enable UPnP for the device using the Admin panel 1 Login to the Admin panel as admin see Connect to Admin panel 3 From the Configuration menu click UPnP The UPnP...

Page 411: ...nable UPnP for a channel using the Admin panel After you enable UPnP for the device to allow live stream and recorded file sharing you need to enable sharing for each channel you want to share 1 For a channel you are live streaming do the following a From the Channels menu select the channel and click Streaming The Streaming configuration page opens b Check Share via UPnP and click Apply You can n...

Page 412: ... it click here The UPnP service will start when you click Apply 2 For a channel you are recording do the following a From the Channels menu select the channel and click Recording The channel s recording page opens b Under Recorder Setup select change The recording setup options opens c Check Share via UPnP and click Apply You can now browse for your server from your digital media player 398 ...

Page 413: ...the Recorders menu select the recorder to open the recorder s configuration page 2 Select change beside the listed recording options The recording setup options open 3 Check Share via UPnP and click Apply You can now browse for your server from your digital media player If you have not already enabled UPnP for the device the message UPnP live video sharing is not enabled with this device to fix it...

Page 414: ...the following a From the Channels menu select the channel and click Recording The channel s recording page opens b Under Recorder Setup select change The recording setup options opens c Uncheck Share via UPnP and click Apply Disable UPnP globally for the device using the Admin panel 1 Login to the Admin panel as admin see Connect to Admin panel 3 From the Configuration menu click UPnP The UPnP con...

Page 415: ...ed recordings if a viewer password is set If needed see Remove user passwords to clear the viewer password When browsing via UPnP your Pearl 2 is displayed by the server name you set or it s product serial number For example when browsing from a Windows computer you will see a list of media devices that includes Pearl 2 Live streams When you open the device from Windows Media Player you ll see a l...

Page 416: ...n configure the UPnP server name that appears for your Pearl 2 By default if you leave the server name field blank when enabling UPnP the device s serial number is used as the server name Change the UPnP server name using the Admin panel 1 Login to the Admin panel as admin see Connect to Admin panel 3 From the Configuration menu click UPnP The UPnP configuration page opens 4 In the Server name fie...

Page 417: ...two way traffic Contact your network administrator for assistance The unicast NDI stream can be ingested by other NDI devices on the network You can start and stop the NDI output stream using either the Admin panel the touch screen or Epiphan Live see Start and stop streaming to a CDN Important considerations l Pearl 2 can unicast up to two 1920 1080 30 fps NDI output streams at the same time Howe...

Page 418: ...n the network For example PLTTSG999901 name where name is the unique alphanumeric name you assign the stream and PLT is the three digit prefix that identifies this as a Pearl 2 system Pearl 2 shows up as an NDI resource to other NDI resources on the network as soon as you start an NDI stream All NDI devices on the same network as Pearl 2 can access the unicast stream Important considerations l Pea...

Page 419: ... Rename the stream Click the current name and enter a different name then press Enter 9 Click Apply 10 To start streaming click Start or click Start all to simultaneously start this stream and any other streams you have configured for this channel 11 Click Delete this stream at any time to delete the stream For details on how to start and stop streaming using the touch screen see Stream a channel ...

Page 420: ...tic and manual mechanisms available to download the files Topics include l About recording l Record a channel l Record using Single Touch control l Configure recording settings file size and type l Restart recording to a new file l Recorders l Manage recorded files l FTP and automatic file transfers l Local FTP server For instructions on how to use Pearl 2 s touch screen to start stop scheduled re...

Page 421: ...channel that is recording is an auto channel a new recording is started if the video input source automatically switches from one video source to another due to signal loss You can set the maximum recording time or file size limit using the Admin panel The default recording limits are set to 30 minutes or 500 MB whichever comes first When the time or file size limit is reached the current recordin...

Page 422: ...Linux l MPlayer l VLC 2 2 2 HTML 5 Browsers Windows l Google Chrome 37 works with MOV and MP4 files using H 264 codec Not all media players and editors support all recording formats such as the more modern MP4 fragmented format To playback MOV files created by Pearl 2 we recommend using a newer media player Record a channel Using the Admin panel you can start and stop recording a channel as well a...

Page 423: ... recording using the Admin panel 1 Login to the Admin panel as admin or operator see Connect to Admin panel 2 From the Channels menu select the channel and click Recording The channel recording menu opens 3 Select Start to start recording the channel and select Stop when you re done If the Start button is not active there are no active sources for the channel or recorder Check your inputs to ensur...

Page 424: ...e Touch control 1 Login to the Admin panel as admin or operator see Connect to Admin panel 2 Configure your channels and recorders for One Touch control see Specify channels and recorders for Single Touch recording 3 Tap the Single Touch control icon along the bottom of the touch screen to display the Single Touch control screen If the Single Touch control icon is not visible on the touch screen t...

Page 425: ...file size that is far larger than you saw in your tests Important considerations l You cannot change the recording settings file size and type for channels used with Kaltura events l The file recording type for a channel you are controlling and recording using Epiphan Cloud must be set to MP4 and the maximum file size supported is 500 MB The following table describes the recordings configuration s...

Page 426: ...ell the difference between MP4 files and MP4 Fragmented files from the file name because both use the mp4 extension l MPEG TS Choose for UPnP playback Does not support PCM audio encoding l MOV A progressive version of MOV Generally used for playback on Mac OS This type of MOV has the best compatibility with video players and editors Filename prefix Specifies how the recordings are named Recording ...

Page 427: ... Channels menu b For a recorder select a recorder from the Recorders menu 3 Under Recorder Setup select change The recorder settings open 4 Change the default recording file settings l Time limit Select a value from 5 minutes to unlimited l Size limit Select a value from 50 MB to 64 GB l File type AVI MPEG TS MOV MP4 or MP4 Fragmented 5 Optional Enter a prefix for the recordings All new recorded f...

Page 428: ...You can manually force a recording that s in progress to save to a file and continue recording in a new file from that point forward without any loss of content This is useful if you need to download a recording since you cannot download recordings that are in progress Restart recording to a new file using the Admin panel 1 Login to the Admin panel as admin see Connect to Admin panel 2 Open the Re...

Page 429: ...ing and webcasting Topics include l Add a recorder l Select channels to record l Rename a recorder l Duplicate a recorder l Delete a recorder To change recording settings such as the file size limit type or to add a custom prefix to the file name see Configure recording settings file size and type You only need to create recorders for multi track recordings For single channel recordings see Record...

Page 430: ...n Pearl 2 in the single multi track file by default If you create new channels they are automatically added to the recorder You can choose which channels the recorder includes in the multi track file using the Admin panel Select the channels recorded by a recorder using the Admin panel 1 Login to the Admin panel as admin see Connect to Admin panel 2 From the Recorders menu select a recorder The re...

Page 431: ...recorders using the One Touch control feature see Record using Single Touch control and using Epiphan Live see Record a channel using the touch screen The recorder number turns red to indicate it is recording If the system runs out of storage space the oldest recorded file is deleted to make room for the new recording You can have multiple recorders and multiple channels recording all at the same ...

Page 432: ...cording and click Stop to end recording You can navigate away from the page without affecting the recording Rename a recorder Rename a recorder using the Admin panel 1 Login to the Admin panel as admin see Connect to Admin panel 2 From the Recorders menu select a recorder The recorder configuration page opens 3 Click the recorder name and type the new name for the recorder 4 Press Enter to save th...

Page 433: ...page opens 3 Click Duplicate this recorder The duplicate recorder is created and assigned the next recorder number in your list of recorders Delete a recorder When you no longer need a recorder you can delete it Deleting a recorder deletes all the recorded files for the recorder Be sure you have a copy of any important recorded files before proceeding Delete a recorder using the Admin panel 1 Logi...

Page 434: ...Pearl 2 User Guide Delete a recorder 3 Click Delete this recorder and click OK when prompted 420 ...

Page 435: ...s l Delete recorded files For information about automatic file transfers or setting up Pearl 2 as a local FTP server so you can manually or automatically connect to the system and download recordings see FTP and automatic file transfers View list of recorded files Recordings for Pearl 2 are stored for each channel and each recorder separately You can view all the recordings for a channel or record...

Page 436: ...oaded until it has finished recording 4 If there are no recordings a message indicates there are no recorded files for this channel or recorder Download recorded files manually You can manually download recordings using the Admin panel Files you download are saved to your connected admin computer This feature is not available using the local console on Pearl 2 Download recordings to your admin com...

Page 437: ...iple files select the check box next to the recordings to download and then click Download Selected The files are download as a zip file containing the selected recordings What s next To free up space for new recordings consider deleting recordings off of Pearl 2 see Delete recorded files Join recorded files together After recording files on Pearl 2 you can join two or more files together This is ...

Page 438: ... looks like this ffmpeg i C Users JoesComputer downloads Program_A_May11_16 24 56 avi i C Users JoesComputer downloads Program_A_May11_12 26 14 avi c copy C Users JoesComputer Desktop Concatenated_File avi 5 After completing the process you will be able to access your new file in the location you specified The file moves straight from the first video into the second without a pause You can this pr...

Page 439: ...y select tracks using the Admin panel 1 Login to the Admin panel as admin or operator see Connect to Admin panel 2 From the Recorders menu select a recorder The recorder page appears 3 Click the multi track icon beside the recording A list of tracks appears 4 Select the tracks you want to extract Tip To deselect all tracks click the check box for the top track then hold SHIFT and click the check b...

Page 440: ...lso change the default name that Pearl 2 assigns to recordings see Configure recording settings file size and type for information about setting file name prefixes Rename a recording using the Admin panel 1 Login to the Admin panel as admin see Connect to Admin panel 2 Open the Recording page Do one of the following a To view files recorded for a channel select a channel from the Channels menu and...

Page 441: ...time select multiple files for the channel or recorder and delete those or you can delete all recordings for the channel or recorder Deleted recordings cannot be recovered Delete recordings using the Admin panel 1 Login to the Admin panel as admin or operator see Connect to Admin panel 2 Open the Recording page Do one of the following a To view files recorded for a channel select a channel from th...

Page 442: ...n prompted b To delete multiple recordings check the check box beside the recordings you want to delete then click Delete Selected Click OK when prompted c To delete all recordings for the channel or recorder click Delete All and click OK when prompted The list may not update immediately You can refresh the list by reloading the Recording page for channels or the recorder settings page for recorde...

Page 443: ...AFU queue l Enable AFU schedule and set options l Configure AFU to FTP server parameters l Configure AFU to RSync server parameters l Configure AFU to CIFS server parameters l Configure AFU to SCP client parameters l Configure AFU to SFTP server parameters l Configure AFU to AWS S3 parameters l Configure AFU to WebDav server parameters l AFU or copy to USB l Local FTP server To view and manage the...

Page 444: ...le transfers from the same channel or recorder l Automatic File Upload AFU is not available while Content Management System CMS is enabled Pearl 2 l Files are automatically uploaded only once New recordings created during later sessions do not overwrite files that were previously uploaded A new file is uploaded l If the connection is lost during the transfer the transfer automatically restarts whe...

Page 445: ...ble Automatic File Upload AFU for the channel before you can include channel recordings in the upload schedule If AFU is not enabled for the channel the following message appears in the Automatic File Upload configuration page Set a channel or recorder to include in the AFU schedule using the Admin panel 1 Login to the Admin panel as admin see Connect to Admin panel 2 Open the Recording page Do on...

Page 446: ... selected you can enable AFU and schedule when and where you want the recorded files to upload To select channels and recorders to include in AFU see Set channels and recorders to include in AFU By default recorded video files are uploaded as soon as recording stops However you can schedule file uploads to only occur during a specific period of time every 24 hours Recordings that end within the co...

Page 447: ...d to the root folder of the destination file system Remove after upload Delete files from local storage on Pearl 2 when the upload completes Mark file as downloaded Change the color of the file in the recording list to show the files are downloaded This only applies if the files are not deleted after upload is complete Create a subfolder for each channel Save the downloaded files into a folder usi...

Page 448: ...Optional Enter a remote path If no path is specified the files are copied to the root folder of the destination file system 5 Optional Check any optional parameter to select it For example you can check Mark file as downloaded and Create a subfolder for each channel 6 To schedule AFU check File upload schedule and select a start time and an end time in the Start upload and Stop upload fields to de...

Page 449: ...SFTP server parameters l Configure AFU to AWS S3 parameters l Configure AFU to WebDav server parameters l AFU or copy to USB Configure AFU to FTP server parameters You can automatically upload recordings to an FTP server when you select FTP as the AFU protocol transfer type using the Admin panel The following table describes the parameters to configure for AFU to an FTP server Table 65 FTP Automat...

Page 450: ...upload to an FTP server using the Admin panel 1 From the Automatic File Upload configuration page select FTP Client as the protocol transfer type 2 Specify the target Server address If your system is configured with DHCP or has a valid DNS configuration see Configure DHCP you can use the server s fully qualified domain name instead of the IP address 3 Specify the Server Port used for the target FT...

Page 451: ...port The port used by the target SFTP server Standard port is 22 Login Username for the SFTP server Password Password for the SFTP user Use temp file Causes files to be named with part extension on the server during active upload When the upload completes the file is renamed to the appropriate extension mov mp4 or avi Prerequisites l Channels and recorders are already added for AFU see Set channel...

Page 452: ...ord in the Password field The characters are masked with dots Alternatively you can choose to use a private key instead of a password for authentication 6 Select Use temp file to name files with a temporary filename extension part on the server until upload is complete For secure file transfer you can upload an SSH identity for your Pearl 2 This key must be trusted by the destination server Detail...

Page 453: ...against the secure server 8 Click Apply Configure AFU to RSync server parameters You can automatically upload recordings to an RSync server when you select RSync as the AFU protocol transfer type using the Admin panel The following table describes the parameters to configure for AFU to an RSync server Table 67 RSync Automatic File Upload Configuration Parameters Name Description Server address The...

Page 454: ...d configuration page select RSync Client as the protocol transfer type 2 Specify the target Server address If your system is configured with DHCP or has a valid DNS configuration see Configure DHCP you can use the server s fully qualified domain name instead of the IP address 3 Specify the Server module This is the name of the shared folder on the server If needed request this value from your netw...

Page 455: ...CIFS server Server share The name of the shared folder on the CIFS server Domain The CIFS server s Windows domain or Work Group name Needed if the server is part of Active Directory or a Domain Controller Login Username for the CIFS server Password Password for the CIFS user Use temp file Causes files to be named with part extension on the server during active upload When the upload completes the ...

Page 456: ...rk administrator 5 If the system is in a different domain than the server or if it is part of Active Directory enter the Domain name of the CIFS server 6 Specify a username for the CIFS Server in the Login field The user must have write permissions for the share folder 7 Specify the password for the user in the Password field the value is masked by dots 8 Select Use temp file to name files with a ...

Page 457: ...nable AFU schedule and set options Configure AFU upload to an SCP client using the Admin panel 1 From the Automatic File Upload configuration page select SCP Client as the protocol transfer type 2 Specify the target Server address If your system is configured with DHCP or has a valid DNS configuration see Configure DHCP you can use the server s fully qualified domain name instead of the IP address...

Page 458: ...e and navigate to select the private key file from your hard drive then click Open b Click Upload to upload the file The system accepts RSA keys for SSH 1 DSA ECDSA EC25519 and RSA for SSH 2 Keys must be in OpenSSH format c Optional Use the Test your key field to test your uploaded key against the secure server 7 Click Apply Configure AFU to AWS S3 parameters You can automatically upload recording...

Page 459: ...ccount and is a required parameter i e bHaprXUenFEMI K6MANVG cPxDfiBYEXAMPLEKEY Session Token The temporary security token provided by the AWS Security Token Service STS that allows access to your AWS account for authorized users Prerequisites l You must have read and write privileges for your AWS account before you can setup AFU to upload to an AWS S3 location You also need the AWS Access Key ID ...

Page 460: ...the parameters to configure AFU to a WebDav server Table 71 WebDav Automatic Upload Configuration Options Name Description Options Server address The IP address or fully qualified domain name of the FTP server Server port The port used by the target WebDav server Standard port is 21 Login Username for the WebDav server Password Password for the WebDav user Enable HTTPS Select if you need to use a ...

Page 461: ...in field 5 Enter the FTP account password in the Password field The characters are masked with dots 6 Select Enable HTTPS if you need a secure HTTPS link to the WebDav server 7 Select Use temp file to name files with a temporary filename extension part on the server until upload is complete 8 Click Apply AFU or copy to USB Pearl 2 has USB 3 0 ports that you can use to copy recordings from internal...

Page 462: ...rage device To view AFU and monitor file transfer progress see View AFU and file transfer progress AFU to a USB storage device You can transfer recordings to a USB storage device automatically when you select an external USB device as the AFU protocol transfer type using the Admin panel USB ports are available on both the back and the front panels of Pearl 2 Prerequisites l A properly formatted US...

Page 463: ...h channel to have recordings organized by channel 3 Click Apply Do a one time copy move all recordings to USB storage device When one time move copy of files is configured Pearl 2 automatically starts copying files as soon as you connect a USB storage device to the USB port Newest recordings are copied first Files continue copying over until one of the following events occur l all files are copied...

Page 464: ...king this box makes the transfer a move instead of a copy mark file as downloaded If checked the files that are downloaded are marked with a downloaded icon when viewing file lists This has no effect if remove after copying is checked ignore already downloaded files If checked files that were previously downloaded or marked as downloaded are not included in subsequent downloads If your USB drive h...

Page 465: ... the activity light on the USB storage device stops flashing If your USB device doesn t have activity indicators a Check the Recording list for each channel and the Recorded Files list for each recorder to verify if there are files that have yet to be copied b Safely eject USB storage device when you are satisfied all files have been copied or if you notice the USB storage device is out of space s...

Page 466: ...ial number if that option is also selected Files are copied to their respective folders File already exists Choose the action to take if a file with the same name already exists in the copy location l replace default l skip l rename Manually copy recorded files to a USB device using the Admin panel 1 Login to the Admin panel as admin see Connect to Admin panel 2 From the Configuration menu select ...

Page 467: ...rl 2 In this example the first file is currently recording and cannot be downloaded 6 Follow the steps to Safely eject USB storage device when you re done View file transfer status and cancel file copy to a USB device During a file transfer to an External USB drive you can monitor the file transfer progress and cancel the file transfer using the Admin panel You can only cancel the transfer of a fi...

Page 468: ... is highlighted in green is currently being transferred View available USB storage space When you insert a USB storage device into a USB port and select an External USB Drive action other than ignored i e manual copy automatic copy etc the total and free space are calculated and displayed in the Admin panel When you insert your USB storage device into an available USB port an External storage usag...

Page 469: ...ly eject the USB storage device using the Admin panel 1 Login to the Admin panel as admin see Connect to Admin panel 2 At the bottom of the menus panel click eject and click OK when prompted It s now safe to disconnect the USB storage device from Pearl 2 Manage USB file transfer queue You can view USB file transfer information delete files in the USB file transfer queue and cancel USB file uploads...

Page 470: ...configuration page opens If there are files to be uploaded they appear in the queue 3 To remove a file from the USB transfer queue click X beside the file you want to remove 4 To cancel the current USB file transfer that s in progress and remove all files that are currently waiting in the USB transfer queue click Cancel Add recordings to an AFU queue You can add previously recorded files to an AFU...

Page 471: ...rdings before they are uploaded see Manage USB file transfer queue View the AFU log A log is kept of automatic file uploads You can view the AFU log using the Admin panel If you want to view the AFU status see View AFU and file transfer progress View the AFU log using the Admin panel 1 Login to the Admin panel as admin see Connect to Admin panel 2 From the Configuration menu select Automatic File ...

Page 472: ...ded files waiting to be uploaded You can view the AFU queue and remove files from the queue using the Admin panel Automatic File Transfer must be configured for the AFU queue to display For other options to view AFU and file transfer progress see View AFU and file transfer progress Emptying the AFU queue does not cancel an AFU transfer View the AFU queue and remove files from the queue using the A...

Page 473: ...on menu click Automatic File Upload If there are files to be uploaded they appear in the queue 3 To remove a file from the AFU queue click X beside the file you want to remove 4 To remove all files that are currently waiting in the AFU queue click Empty Queue 459 ...

Page 474: ...ure the local FTP server You can setup the local FTP server on Pearl 2 using the Admin panel The following table describes the configuration parameters to setup Pearl 2 s local FTP server Table 75 FTP Server Configuration Parameters Name Description Enable FTP access The check box controls whether or not the system acts as an FTP server By default this is disabled FTP user name Select one of the s...

Page 475: ...FTP DELETE command and click Apply to allow users to delete files Any currently logged in ftp users must log out and back in again to have access to the command b Uncheck Enable FTP DELETE command and click Apply to disable file deletion by FTP Any currently logged in users will continue to have access to the delete command until they log out and log in again Using the local FTP server Once you ha...

Page 476: ...is 192 168 1 210 the username is admin there is no password and the Windows command line ftp utility is used Connect to the FTP server 1 Open a command window on Windows alternatively open a terminal window on Linux Mac or open your FTP utility of choice 2 Establish an ftp connection using the command ftp 192 168 1 210 3 Provide the username admin provide the username of your FTP user 4 Provide th...

Page 477: ...led in the FTP configuration page delete the file after downloading it by issuing the delete command or using your tool s delete mechanism If the delete command is not enabled attempting to delete a file will result in an Unknown Command error 463 ...

Page 478: ...anage Pearl 2 with Kaltura and Panopto as well as how to record and stream Topics include l Kaltura registration l Panopto registration l Kaltura recording and webcasting setup l Panopto recording and webcasting setup l CMS recording and webcasting control For information about using the Pearl 2 RS 232 and HTTP HTTPS APIs see the Pearl System API Guide ...

Page 479: ... CMS and register with Kaltura When CMS is enabled use the Admin panel to register Pearl 2 as an encoder resource for Kaltura After Pearl 2 is registered you can assign it a unique name that appears in the list of resources when creating an event in Kaltura s MediaSpace The default name includes the serial number of Pearl 2 to ensure the name is unique If more than two other resources are already ...

Page 480: ...ACCESS KMC_READ_ONLY BASE_USER_SESSION_PERMISSION WIDGET_SESSION_ PERMISSION CONTENT_INGEST_BASE CONTENT_INGEST_UPLOAD CONTENT_MANAGE_ BASE cuePoint MANAGE CONTENT_MANAGE_SCHEDULE CAPTURE_DEVICE_ PERMISSION CONTENT_INGEST_REFERENCE_MODIFY LIVE_STREAM_ADD Important considerations for user session application tokens l Pearl 2 uploads all events scheduled and ad hoc to the user account ID associated ...

Page 481: ...er ID and administrator secret l Your application token ID and token value Enable Pearl 2 as a resource and register with Kaltura using the Admin panel 1 Login to the Admin panel as admin see Connect to Admin panel 2 From the Configuration menu click CMS The Content management system configuration menu opens 3 From the Choose CMS drop down select Kaltura and then click Apply 4 In the Authorization...

Page 482: ...elect Pearl 2 as a resource using Kaltura MediaSpace However the events schedule won t synchronize on Pearl 2 and any events that are scheduled to start while CMS is disable do not start on Pearl 2 If CMS is re enabled on Pearl 2 before the event is scheduled to end that event will start automatically after the events schedule is refreshed on Pearl 2 see View scheduled CMS events and history Exist...

Page 483: ...lect a new resource for those events l Ensure the deregistered Pearl 2 entry in the list of encoder devices on Kaltura disappears before registering again if using the same device name l Do not disable CMS while an event is in progress Disable Pearl 2 as a resource or deregister from Kaltura using the Admin panel 1 Login to the Admin panel as admin see Connect to Admin panel 2 From the Configurati...

Page 484: ...esource name as another resource When a resource with the same name is already registered in Kaltura a warning message appears when you try to apply the new resource name to Pearl 2 l If there s only one other registered resource with that name you re prompted to choose whether or not to take over the events for that other resource If you do take them over Kaltura transfers all scheduled events fr...

Page 485: ...ked whether or not you want to take over from the other resource l If there s only one other registered resource with that name you re prompted to choose whether or not to take over the events for that other resource If you do take them over Kaltura transfers all scheduled events from that other device l If more than two other resources are already registered with the same resource name in Kaltura...

Page 486: ... of having duplicate resources If you ve performed a factory reset that resulted in an orphaned Kaltura resource registration you can perform this procedure to reregister your Pearl 2 using the same resource name to take over the resource instance that is still registered in Kaltura Before you begin you should already have l A Kaltura instance created l Access to the Kaltura Management Console KMC...

Page 487: ...en click Apply 4 Enter your Partner ID and Administrator secret that you got from Kaltura 5 Change the Resource name to the resource name of the Pearl 2 you are replacing and click Register device 6 When you re prompted to take over the events from the existing resource with that same name click Yes 473 ...

Page 488: ...ly assign Pearl 2 as a resource when setting up an event using MediaSpace Scheduled events start and end automatically No manual intervention is required After the event ends the recording automatically uploads Back up recordings for each channel are also saved locally on Pearl 2 If the network connection or the CMS goes down during an event Pearl 2 continues to record locally and uploads the reco...

Page 489: ...ordings and webcasts l Set the channel used for scheduled and ad hoc webcasts l Set ad hoc event parameters l Change how often Pearl 2 polls Kaltura for an updated list of Events Pearl 2 administrators and operators can use the Admin panel to l Create ad hoc events see Create ad hoc events using the Admin panel l View the Events page to see all upcoming scheduled sessions and completed sessions se...

Page 490: ...n the Events page in the Admin panel l If the time and zone settings of Pearl 2 are out of synchronization with Kaltura s scheduling server an error appears on the Events page and you re prompted to reconfigure the time settings on Pearl 2 see Configure date and time l We recommend that you configure the channel that is selected as the main entry as well as the other channels in a multi view sched...

Page 491: ...d create two channels on Pearl 2 one for the main camera and another one for the presentation laptop Set up your channels before performing this task To learn how to create a channel see Create a channel The main entry is the default view that people see when they are watching as well as the main view i e the large screen for PiP The main view VOD metadata and edits like trimning the VOD can be do...

Page 492: ...y and backup URLs supplied by Kaltura Auto is the default setting Ensure that you have selected the channel on Pearl 2 that you want to use for your scheduled webcasting event well in advanced of the event start time The first channel on Pearl 2 is selected by default When it s time for the scheduled webcasting event to start Pearl 2 automatically sends an RTMP or RTMPS stream to the primary URL a...

Page 493: ...rop down list Select Auto to use the backup URL from Kaltura If Auto is the only available option then no additional streams are configured for the channel 6 Click Apply at the bottom of the page Set Kaltura ad hoc event parameters The same channels that you select for scheduled VOD events using the Admin panel are the channels that are recorded for ad hoc events see Select channels for Kaltura VO...

Page 494: ... needs to enter wilson to authenticate Description The description of the uploaded media that appears in Kaltura Tags Assign tags to the uploaded media for use by Kaltura Categories Assign Kaltura categories to the uploaded media Duration Assign a default duration for ad hoc events This value can be changed when an ad hoc event is created Automatic logout Automatically logs out the ad hoc event cr...

Page 495: ...s listed on the Events page The default interval is once every 3600 seconds 1 hour Requesting updated information too frequently can impact performance We recommend setting an interval of no less than 120 seconds once every 2 minutes The longest interval supported is 604800 seconds once a week Change how often Pearl 2 polls Kaltura for the latest event information 1 Login to the Admin panel as adm...

Page 496: ...ed the backup stream see Select a channel and URLs for Kaltura webcasting events You can configure Pearl 2 to send an RTMPS stream instead using the Admin panel Configure Pearl 2 to send an RTMPS stream using the Admin panel 1 Login to the Admin panel as admin see Connect to Admin panel 2 From the Configuration menu click CMS The Content management system configuration menu opens 3 Under Live stre...

Page 497: ...default name is assigned that includes the serial number of Pearl 2 This name appears in the list of remote recorders in Panopto You can change the remote recorder name using the Admin panel Before you begin you need l Your Panopto service URL for example https myorg hosted panopto com l A Panopto generated registration key for the remote recorder l The Epiphan API key from Panopto is required for...

Page 498: ...e Device name field before you register Pearl 2 Changes after Pearl 2 is registered do not appear in Panopto Enable Pearl 2 as a remote recorder and register with Panopto using the Admin panel 1 Login to the Admin panel as admin see Connect to Admin panel 2 From the Configuration menu click CMS The Content management system configuration page opens 3 From the Choose CMS drop down select Panopto an...

Page 499: ... Enable CMS and register with Panopto Changing Panopto s device name for Pearl 2 does not change the name that is assigned to Pearl 2 in the Device info fields see Configure device info name description and location 485 ...

Page 500: ...y start when the connection is re established A new webcasting event should be created Revoking the registration key and deleting Pearl 2 as a remote recorder is performed in Panopto see Panopto s documentation for instructions If you delete Pearl 2 in Panopto all scheduled and recurring events that were associated with Pearl 2 are permanently deleted Content Management Systems CMSs can change cha...

Page 501: ...sable CMS and disconnect from Panopto 2 From the Configuration menu click CMS The Content management system configuration menu opens 3 To disconnect Pearl 2 select none from the Choose CMS drop down and then click Apply 487 ...

Page 502: ...ple source ad hoc recordings and webcasts Each Pearl 2 channel is treated as a separate video source that Panopto users can select when scheduling an event in Panopto Scheduled events start and end automatically No manual intervention is required After the event ends recorded files automatically upload to the event owner s folder in Panopto Back up recordings for each channel are also saved locall...

Page 503: ...for a channel see Recover channel backup recordings l Start and stop scheduled events before the scheduled time see Start stop scheduled CMS events using the Admin panel To use the touchscreen on Pearl 2 to start stop and create events see CMS event controls using the touch screen Default Panopto encoding settings are applied automatically to the channel when Panopto is enabled which override the ...

Page 504: ...nds both sets of files are uploaded to Panopto l If Pearl 2 was unavailable on the network or powered down and misses a scheduled event the status of that event appears as Skipped on the Events page in the Admin panel l Do not use the Single Touch recording control AFU or configure recording file size type and other channel recording settings when CMS is enabled on Pearl 2 l For ad hoc events Pear...

Page 505: ...Panopto for ad hoc event authentication to work l One API client URL redirect is for Pearl 2 l The other API client URL redirect is for the web based Admin UI An API client ID and both URL redirects are required to enable ad hoc authentication on Pearl 2 Before you begin you need l Admin access to Panopto l A Pearl 2 remote recorder that s registered with Panopto Important considerations l Record ...

Page 506: ...en click Create a new API Client The Create API Client page opens b From the Create API Client page enter a unique name for the Pearl 2 API client in the Client Name field If a client already exists in Panopto with that name choose a different name c In the Client Type field select JavaScript Web Application d In the Redirect URL field enter http pearl sso and then click Create API Client 492 ...

Page 507: ...r Settings page under API Clients click Edit beside the Pearl API Client that you just created b In the Allowed Redirect URLs field enter http device_ip admin events where device_ip is the IP address of Pearl 2 If Pearl 2 is configured for https enter https instead of http c In the URL Type field select Redirect URL d Click Add URL The Admin panel URL redirect appears in the Allowed URL list 5 Log...

Page 508: ...ent ID that was generated for ad hoc event authentication see Setup Panopto authentication for ad hoc events l Duration Assign a default duration for ad hoc events This value can be changed when an ad hoc event is created l Automatic logout Automatically logs out the ad hoc event creator when the ad hoc event ends if the touch screen was used to create the ad hoc event Pearl 2 must be connected to...

Page 509: ...w disk space alerts that Pearl 2 sends to Panopto using the Admin panel and enable it again at any time Disable low disk space Panopto alerts using the Admin panel 1 Login to the Admin panel as admin see Connect to Admin panel 2 From the Configuration menu click CMS The Content management system configuration page opens 3 Under Settings uncheck Low disk space alert and click Apply to disable sendi...

Page 510: ...Pearl 2 User Guide Disable low disk space Panopto alerts 4 To enable this feature again simply check Low disk space alert and click Apply 496 ...

Page 511: ...s of each channel are easily recovered using the Admin panel Do not schedule recordings that are longer than the capacity of Pearl 2 to store the recording on it s local drive Topics include l Setup a CMS start screen l Start stop scheduled CMS events using the Admin panel l Stop start scheduled CMS events using the touch screen l Create ad hoc events using the Admin panel l Create ad hoc events u...

Page 512: ... screen If no 4 digit PIN set when the start screen is in locked mode you can access the CMS Events start screen right away to start stop events and create an as hoc event However you cannot access any other screens using the touch screen If you set a 4 digit PIN when the start screen is in locked mode a lock appears in the top right of the start screen You must enter the PIN to unlock the CMS Eve...

Page 513: ...mpleted event s recording when network connectivity resumes However Panopto does not recognize that the event has ended The event remains in the In Progress state in Panopto and you must wait until the original event s scheduled end time before creating a new event using that Pearl 2 l For multiple source Panopto events that are manually stopped or have ended if you use the Admin panel to delete a...

Page 514: ...n the Admin panel you can click Refresh schedule at any time to manually update the events listed on the Events page After the event ends it may take a while for content to show up in Kaltura s media lists depending on how busy the Kaltura CMS system is at the time Stop start scheduled CMS events using the touch screen You can use Pearl 2 s touch screen to manually start scheduled events up to thi...

Page 515: ...ing the touch screen Important information l Pearl 2 must already be registered with your CMS to appear listed as a remote recorder resource in Kaltura or Panopto Contact your CMS administrator responsible for setting up hardware encoders for your organization if Pearl 2 isn t listed as a resource or the calendar icon does not appear on the touch screen l For Kaltura each channel on Pearl 2 corres...

Page 516: ...e your Pearl 2 administrator if you need to add or remove channels on Pearl 2 For information about Pearl 2 administration and control using the Admin panel see Integration For Panopto VOD events if you manually stop a scheduled VOD event before the scheduled end time when Pearl 2 doesn t have network connectivity Pearl 2 uploads the completed event s recording when network connectivity resumes Ho...

Page 517: ...019 07 04 13 22 Description Enter a description of the event Tags Add Kaltura search tags separated by commas For example tag1 tag2 tag3 Category Add a Kaltura category Duration Select the event duration in minutes from the drop down list or enter a value using your keyboard Select a value from 5 to 240 minutes or enter a value using your keyboard Event type Choose either VOD Video on Demand Live ...

Page 518: ...er For ad hoc events Pearl 2 ignores a user s presets that are set in Panopto As a result ad hoc recordings automatically upload to the user s default folder as originally assigned by Panopto Duration Select the event duration in minutes from the drop down list or enter a value using your keyboard Select a value from 5 to 240 minutes or enter a value using your keyboard Event type Choose either VO...

Page 519: ...nt is not active your CMS has blocked your account If login to the CMS is denied the account you entered may not exist or may not have access rights to create an ad hoc event using Pearl 2 Contact your CMS administrator for CMS related login and account issues 4 Click Start event now when you re ready to start recording or Live streaming Or click Cancel When you re done creating ad hoc events it s...

Page 520: ...get the login error that your account is not active your CMS has blocked your account If login to the CMS is denied the account you entered may not exist or may not have access rights to create an ad hoc event using Pearl 2 Contact your CMS administrator for CMS related login and account issues Once you re logged in you can choose to either log out and return to the Events screen or continue Tap N...

Page 521: ... on Pearl 2 l For Kaltura you can use your Kaltura user ID or a valid Kaltura email address to authenticate and create ad hoc events from the touch screen on Pearl 2 l You cannot start an ad hoc event if it s within five minutes of a scheduled event s start time The Create event button does not display l Scheduled events have priority over ad hoc events If an ad hoc event is still in progress when...

Page 522: ...ty of back up recordings Logout of an ad hoc session After you ve logged into your CMS from the touch screen on Pearl 2 and started an unscheduled ad hoc event you re automatically logged out after the ad hoc event ends If your Pearl 2 administrator has not enabled the automatic logout feature then your login session stays active for one hour after the event ends For Panopto ad hoc events that you...

Page 523: ...n as your Content Management System CMS event ends Pearl 2 uploads the associated recordings to the CMS server if a network connection to the CMS server is available Using the Admin panel you can schedule Pearl 2 to upload recordings only during a specific time period Recordings made outside the upload time period are queued and only upload when the time to start uploading is reached This feature ...

Page 524: ...el If an upload schedule is set the webcast recording uploads during the scheduled upload time period see Schedule when CMS event recordings upload Enable or disable uploading the local webcast recording using the Admin panel 1 Login to the Admin panel as admin see Connect to Admin panel 2 From the Configuration menu click CMS The Content management system configuration page opens 3 Under Settings...

Page 525: ...If for some reason the recordings are not available in the CMS administrators can manually download backup recordings for a channel on Pearl 2 Pearl 2 saves a local backup of recordings automatically in a round robin fashion When the record drive is full new recordings overwrite the oldest ones Pearl 2 administrators and operators can use the Admin panel to 511 ...

Page 526: ...n panel 1 Login to the Admin panel as admin or operator see Connect to Admin panel 2 From the Events menu click the arrow icon beside the event to see which channels were included for that event 3 From the Channels menu click Recording The Recordings page for that channel opens with a list of recorded files 4 Click the name of the recording to download the file or select multiple files and click D...

Page 527: ...ne of the following l To delete a single recording click the X icon to the right of a recording and click OK when prompted l To delete multiple recordings check the check box beside the recordings you want to delete and click OK when prompted l To delete all recordings for the selected channel click Delete Selected and click OK when prompted 513 ...

Page 528: ...arl 2 User Guide Recover channel backup recordings The list may not update immediately You can refresh the list by reloading the Recording page for channels or the recorder settings page for recorders 514 ...

Page 529: ... the latest firmware updates and maintenance features Topics include l Power down and system restart l Backup your Pearl 2 setup l Perform a factory reset l Firmware upgrade l Support l Register your device l Storage capacity and maintenance l Adjust the fan speed ...

Page 530: ...enance The maintenance page opens 3 Under the Maintenance section select Reboot Now and click OK when prompted Power off the device using the Admin panel You can use the Admin panel to power off Pearl 2 The power button on Pearl 2 is a toggle switch If you power off the device using the Admin panel the power switch remains in the on state To power back on you must double press the power button 1 L...

Page 531: ...arl 2 using the power button The power button for Pearl 2 is found on the front To power off Pearl 2 manually double press two successive fast presses and releases the power button to initiate a safe power down If the system is unresponsive press and hold the power button for 4 seconds to force an immediate power down 517 ...

Page 532: ...presets are the perfect way to backup your Pearl 2 setup so that you can reapply it later without worrying if someone changes your settings or does a factory reset You can create a configuration preset from the Configuration menu when you select Maintenance see Configuration presets 518 ...

Page 533: ...configuration presets all locally saved media files and recordings from Pearl 2 Consider applying a factory default configuration preset if you want to preserve your uploaded media files configuration presets and channel recordings see Configuration presets Perform a factory reset using the Admin panel 1 Login to the Admin panel as admin see Connect to Admin panel 2 From the Configuration menu sel...

Page 534: ...ance server option is checked on the Maintenance page of the Admin panel You can also manually check for updates If your Pearl 2 has internet access Don t miss out on any feature enhancement Register your Pearl 2 device and be eligible to download firmware updates see Register your device When Enable connection to maintenance server is checked the built in firmware update mechanism checks for upda...

Page 535: ...he upgrade a disk rebuild may be required causing the restart process to take more time Please be patient and wait for the system to finish rebooting Do not interrupt power to the system during a firmware upgrade Before you begin Schedule a time to when you can update the firmware without negatively impacting viewers or automatic file upload and recording schedules It s good practice to make a bac...

Page 536: ...rade 5 When the firmware update is complete a message lets you know that Pearl 2 is going to reboot Wait for the system to restart 6 After the system reinitializes go to the settings for your web browser and clear your web browser s cache 7 Connect to the Admin panel and login as admin see Connect to Admin panel 8 From the Configuration menu select Firmware Upgrade The firmware upgrade page opens ...

Page 537: ...vice The BIOS Upgrade section appears on the Firmware Update page only when your Pearl 2 system requires a BIOS update Perform a BIOS update using the Admin panel 1 Login to the Admin panel as admin see Connect to Admin panel 2 Optional Save a copy of the current system configuration See Configuration presets 3 From the Configuration menu select Firmware Upgrade The firmware upgrade page opens 4 S...

Page 538: ...e BIOS update is complete a message lets you know that Pearl 2 is going to reboot Wait for the system to restart 6 After the system reinitializes go to the settings for your web browser and clear your web browser s cache 7 Connect to the Admin panel and login as admin see Connect to Admin panel 8 From the Configuration menu select Info and confirm that the date of the BIOS has updated 524 ...

Page 539: ...rl 2 User Guide Firmware upgrade You can also confirm that the latest BIOS is installed on Pearl 2 when the section called BIOS Upgrade no longer appears on the Firmware Upgrade page in the Admin panel 525 ...

Page 540: ...ng a remote session For more information about service plans see www epiphan com supportplan To contact Epiphan support l Email support epiphan com l Online chat www epiphan com support Monday to Friday between 9am and 5pm Eastern l Call 1 877 599 6581 613 599 6581 From time to time Epiphan support may ask you for logs from your system Follow the instructions to download the log files and allinfo ...

Page 541: ... to remotely access Pearl 2 to help you troubleshoot issues and reset lost admin passwords Your network must allow access to the Epiphan maintenance server which has the domain name epiphany epiphan com Pearl 2 must be able to resolve this domain name to connect to the Epiphan maintenance server for remote support Remote support uses ports 22 and 30 Ensure that these ports are opened to allow remo...

Page 542: ...intenance page opens 3 Check Enable remote support to enable incoming connections from Epiphan Systems 4 Check Enable connection to maintenance server to enable outgoing links to the Epiphan maintenance server epiphany epiphan com 5 Click Apply 6 Test that Pearl 2 can access the maintenance server a From the Configuration menu select Network b In Network Diagnostics enter epiphany epiphan com and ...

Page 543: ...port off for your Pearl 2 using the Admin panel Disabling remote support removes the ability for Epiphan to reset a lost admin password on your Pearl 2 If you forget the admin password and remote support feature is off you will need to return the system to Epiphan for reprogramming Disable remote support for your Pearl 2 using the Admin panel 1 Login to the Admin panel as admin see Connect to Admi...

Page 544: ...Pearl 2 handy when you register The serial number appears on a sticker attached to the bottom of the device You can also see the serial number from the System Status screen using the touch screen on Pearl 2 The banner to register your device appears on the Firmware update page in the Admin panel If your system is registered or there are no firmware updates are available you will not see a banner o...

Page 545: ...Pearl 2 User Guide Register your device 531 ...

Page 546: ...orded files and FTP and automatic file transfers Disk space can also be checked using Epiphan Live see Configure Dashboard panels Check internal storage space using the Admin panel 1 Login to the Admin panel as admin or operator see Connect to Admin panel 2 View the Internal Storage section at the bottom of the menu panel The bar will be mostly green if there is lots of space left or mostly red if...

Page 547: ...rding Start a manual disk check using the Admin panel 1 Login to the Admin panel as admin see Connect to Admin panel 2 From the Configuration menu select Disk Check The Disk maintenance page opens 3 Select Check Now to start the process A new page showing the progress of the disk check opens Do not interrupt power to the system during the disk check 4 When the disk check is complete the main page ...

Page 548: ...erate Pearl 2 at the reduced fan speed for long periods when device temperature is elevated Lowering the fan speed could reduce the reliability of the equipment Adjust the fan speed using the Admin panel 1 Login to the Admin panel as admin see Connect to Admin panel 2 From the Configuration menu click Maintenance The maintenance page opens 3 Under Fan speed setting select either Maximum speed or R...

Page 549: ...mbing effect on images It s good practice to backup your configuration settings so that you can revert back to a good configuration if the changes you made are not desirable see Configuration presets Diagnostic tools Diagnostic tools are available to help you troubleshoot your Pearl 2 setup and network connection You can run them from the touch screen on Pearl 2 or using the Admin panel Available ...

Page 550: ...n diagnostic tests using the Admin panel Using the touch screen the diagnostic tools are accessed when you tap Settings Network and select Connectivity Status More diagnostic tools are found on the second page under Network Tools To learn how see Run diagnostic tests using the touchscreen The following table describes what the colored icons in the results indicate Table 79 Diagnostic test result i...

Page 551: ... include disabled authenticated in progress and failed DNS Check if Pearl 2 can resolve host names with their associated IP address using the DNS server that is configured for Pearl 2 For information about setting a DNS server IP address for Pearl 2 see Configure a static IP address Captive portal Check for connectivity issues caused by a Captive portal An okay result can indicate several conditio...

Page 552: ...earl 2 Knowing the public IP address is useful when configuring SRT on Pearl 2 especially if Pearl 2 is behind a NAT on the network An empty result means the IP address was not reported When you run Connectivity status diagnostics using the Admin panel additional networking information about Pearl 2 is displayed l MAC address l IP address l Network mask l Default gateway l DNS servers l mDNS Run d...

Page 553: ...urself try to ping the IP address of your Pearl 2 or do a traceroute to a server such as 8 8 8 8 If you are unable to resolve your networking issues contact your network administrator and provide them the IP address and MAC address of your Pearl 2 or contact Epiphan support For more information about diagnostic tools and test results see Diagnostic tools Run diagnostics using the Admin panel 1 Log...

Page 554: ... if Pearl 2 can reach a specified destination server on the network Not all networks support ping l Trace route Trace the route that packet traffic takes to get from Pearl 2 to a specified destination server on the network Not all networks support traceroute l Bandwidth test Display the available upload and download bandwidth speed in Mbps up to a maximum bandwidth of 1000 Mbps l Domain name resol...

Page 555: ...ls 5 Do one of the following a If Ping is selected enter the destination server IP address or domain name in the empty field b If Trace route is selected enter the destination server IP address or domain name to routetrace in the empty field c If Bandwidth test is selected the measured upload and download bandwidth displays after you click Start d If Domain name resolution is selected enter the IP...

Page 556: ...Epiphan Live see Monitor video and audio input sources using Epiphan Live No sound is coming from an audio source Verify that you are using the correct audio input by following the steps in Configure encoding OR Check the touchscreen interface for audio monitoring or use the 3 5 mm headphone jack on the front panel of Pearl 2 to verify audio see About the touch screen OR Check the audio meter from...

Page 557: ...code parameter for the connected NDI source see Connect an NDI source My NDI source won t connect The NDI source may not send a timecode Set the Ignore timecode parameter for the connected NDI source see Connect an NDI source My NDI source isn t detected Pearl 2 supports NDI version 4 1 Some products with earlier NDI versions may not be compatible Check with the manufacturer and upgrade to NDI 4 1...

Page 558: ...ion Up scaling and down scaling can affect picture quality 2 Increase the Bitrate value and or decrease the Limit frame rate value in the Encoding menu See Configure encoding Frames per second are lower than expected The following tips can help improve frames per second fps 1 Increase the Limit frame rate value and or decrease the Bitrate value in the Encoding menu See Configure encoding 2 Reduce ...

Page 559: ...t and you notice frames are dropping you can limit the bandwidth of the stream using traffic shaping to adapt for lower bandwidth set top boxes and prevent frame drops see Set up traffic shaping Recording won t start If recording will not start check the Disk Status Information to see if the system is out of storage space See Check internal storage space and Manage recorded files AFU to my CIFS se...

Page 560: ...layer to playback the recording I can t hear the audio in VLC or the video won t play VLC version 3 0 3 won t play audio for MP4 fragmented files In VLC s Input Codecs settings page you can try increasing the file caching parameter VLC version 3 0 6 windows won t play MP4 fragmented video files This is a VLC issue Ubuntu not recognizing attached monitor Legacy Ubuntu systems have poor support for ...

Page 561: ...ay receive the following error message Unable to register device System name MyPearl already exists To avoid this ensure the deregistered Pearl 2 entry in the list of encoder devices disappears before registering again using the same device name My login attempt to create an ad hoc event from Pearl 2 was denied Kaltura or Panopto has denied you access to create unscheduled ad hoc recordings and we...

Page 562: ...pect ratio of the video source at the input see Match output frame size with aspect ratio of input signal 2 Stretch the image to fit the output frame size aspect ratio see Stretch the image The color of the bars matte is defined by the Background color that is selected using the custom layout editor for the channel see Custom layout configuration For example l Input signal resolution is 720 480 a ...

Page 563: ...u can change the output frame size on channels to match the aspect ratio of the video source to avoid this problem Change the output frame size of a channel to match the aspect ratio of the video source using the Admin panel 1 Connect to the Admin panel and login as admin see Connect to Admin panel 2 To determine the input port name of the video source that s used in the channel select the channel...

Page 564: ... resolution as frame size to see the frame size listed in the Frame size fields then uncheck that check box and manually enter the value in the Frame size fields 7 Click Apply Stretch the image You can remove the matte black bars by stretching the image to fit your output frame size using the custom layout editor 1 Login to the Admin panel as admin see Connect to Admin panel 2 From the Channels me...

Page 565: ...y the video input ports on Pearl 2 correctly emulate a monitor for the connected video source However there are times when you may need to upload a custom EDID like when your source uses a custom set of display properties When you upload a custom EDID to an input port on Pearl 2 you can force the port to supply a specific resolution color depth etc to the connected video source Upload a new EDID I...

Page 566: ...ge for that source scroll to the EDID upload section and click Choose FIle 4 Browse to the location where the custom EDID file was saved and select it then click open 5 Select upload When the upload is complete the page updates to reflect success or failure Restore factory default EDID When you no longer want a custom EDID assigned to an input port you can restore the input port to use the factory...

Page 567: ...ting the image is stretched to match the output frame size To prevent the image from looking stretched you can use the custom layout editor to preserve the video source s aspect ratio Unstretching the image causes a matte black bars to appear on the sides or top and bottom of the output To remove these see Remove black bars matte from the video Unstretch the output video to preserve the video sour...

Page 568: ...is happens when a fast motion video is interlaced Since each frame is captured from a different point in time the action captured in one frame is carried over to the next frame The result is a blurred image and horizontal lines running across the video Convert an interlaced source signal to a non interlaced signal using the Admin panel 1 Login to the Admin panel as admin see Connect to Admin panel...

Page 569: ...tor support for select models of Kuando BusyLight and Delcom Product s USB HID status indicators l Email address lookup for Kaltura ad hoc events Release 4 12 l Secure Reliable Transport SRT streaming protocol support l HTTP Live Streaming HLS streaming protocol support l MPEG DASH streaming protocol support l Additional HLS pull options to configure the segment size and playlist duration l Mutlip...

Page 570: ...vent details and configurable event schedule refresh interval l Panopto support for ad hoc event authentication from Pearl 2 s touch screen using credentials for external identity providers l Panopto ad hoc event folder selection from the Pearl 2 s touch screen l Automatic user logout when an ad hoc event ends l International character support in channel names layout names video and audio input na...

Page 571: ...d NDI HX support l Hardware acceleration l Live switching improvement l Audio inputs as playback audio sources for HDMI outputs l Product registration changes l Pairing to AV Studio changes l Original Livestream and Wowza Cloud streaming presets removed Release 4 7 1 l AFU to SFTP server stability improvement l BIOS update to resume status after a power cycle Release 4 7 0 l Integration with Kaltu...

Page 572: ...g option l Improved the recognition of AV io SDI capture cards when they are first plugged in l Fixed a hot plug issue affecting the detection of interlaced 1080i signals from certain camera models for example Sony HDR CX180 HDRCX190 and Panasonic HC VX980M Release 4 4 0 l Constant frame rate l Audio VU meter l Epiphan Live preview on HTTPS networks l AFU to an SCP server remote directory creation...

Page 573: ...delay control l Epiphan Live recordings management Release 4 0 1 l Launch of Pearl 2 Rackmount models l 4K add on Release 4 0 0 l Inaugural release of Pearl 2 with the following features l Capture 6 video sources at once l Epiphan Live l Switch video sources live l Pro video inputs and outputs l Pro audio inputs l 512 GB data storage SSD l Touchscreen ...

Page 574: ...ment Agreement means this Epiphan Systems Inc Software License API means an application programming interface Documentation means the technical publications delivered to You with the Software relating to the installation and operation of the Software and or Hardware such as reference user installation and technical guides and release notes Epiphan means Epiphan Systems Inc Epiphan Hardware Product...

Page 575: ...ree software i e software licensed under the GNU Lesser General Public License or other free software licenses for which the applicable free software license may also require that the source code for such free software be made available to those receiving only executable versions of such free software If the source code for any free software distributed with the Software is not provided with the S...

Page 576: ... S RESELLERS OR DISTRIBUTORS NEITHER LICENSOR NOR ANY OF ITS AFFILIATES NOR ANY OF ITS OR THEIR LICENSORS SUPPLIERS SUBCONTRACTORS RESELLERS AND OR DISTRIBUTORS MAKE ANY REPRESENTATIONS OR PROVIDE ANY CONDITIONS AND OR WARRANTIES ABOUT THE SUITABILITY OF THE EPIPHAN HARDWARE PRODUCTS SOFTWARE SERVICES AND OR DOCUMENTATION NEITHER LICENSOR NOR ANY OF ITS AFFILIATES NOR ANY ITS OR THEIR LICENSORS SU...

Page 577: ...ensor may terminate this Agreement immediately by providing You with written notice if a You are in material breach of any provision of this Agreement which breach if capable of being cured is not cured within thirty 30 days after Licensor gives You written notice thereof or b You have committed a non curable material breach of this Agreement Upon termination You shall destroy all copies of the So...

Page 578: ...ration of nuclear facilities aircraft navigation systems air traffic control or direct life support machines Licensor its licensors suppliers subcontractors resellers and distributors specifically disclaim any express or implied representations warranties and or conditions for such uses 12 U S Government End Users The Software and Documentation are each a commercial item as that term is defined at...

Page 579: ...ssary to make them enforceable under such circumstances This Agreement shall be governed by the laws of the Province of Ontario and the laws of Canada applicable therein No choice or conflict of laws rules of any jurisdiction shall apply to this Agreement You shall only be entitled to bring any action or proceeding arising out of or relating to this Agreement the Epiphan Hardware Products Software...

Page 580: ...FCC CAUTION Changes or modifications not expressly approved by the party responsible for compliance could void the user s authority to operate the equipment Note This equipment has been tested and found to comply with the limits for a Class A digital device pursuant to part 15 of the FCC Rules These limits are designed to provide reasonable protection against harmful interference when the equipmen...

Page 581: ...acknowledges the originality of any submission communicated to Epiphan and accepts responsibility for its accuracy appropriateness and legality Third Parties and Links to Third Party Web Sites Mention of non Epiphan Systems Inc products or services on their website or this document site is for informational purposes and does not constitute an endorsement or recommendation This document may contain...

Page 582: ...the arbitrator All decisions of the arbitrator shall be final and binding on both parties and enforceable in any court of competent jurisdiction Notwithstanding this application may be made to any court for a judicial acceptance of the award or order of enforcement Notwithstanding the foregoing Epiphan shall be entitled to seek injunctive relief security or other equitable remedies from any court ...

Page 583: ... and 2021 Epiphan Systems Inc ...

Reviews: