Setup and Registration
6-35
6
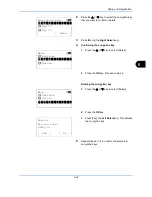
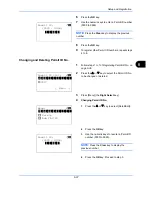
Changing and Deleting Reject FAX No.
1
Follow steps 1 to 7 of
Registering Reject FAX No.
on page 6-34
.
2
Press the
or
key to select the Reject FAX No.
to be changed or deleted.
3
Press [Menu] (the
Right Select
key).
4
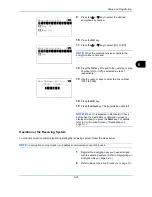
Changing Reject FAX No.
1
Press the
or
key to select [Detail/Edit].
2
Press the
OK
key.
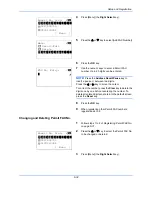
3
Use the numeric keys to reenter the Reject
FAX number. Up to 20 digits can be entered.
NOTE:
Press the
Address Recall/Pause
key to
insert a pause (-) between two digits.
Press the
or
key to move the cursor.
To correct the number, press the
Clear
key to
delete the digits one by one before reentering the
number. To delete all entered digits and return to
the default screen, press the
Reset
key.
4
Press the
OK
key. Proceed to step 5.
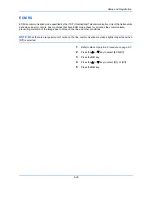
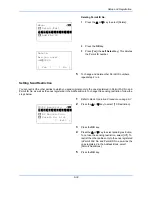
Deleting Reject FAX No.
1
Press the
or
key to select [Delete].
2
Press the
OK
key.
Reject No. List:
a
b
*********************
0667643755
0120123456
[ Menu
]
0667640001
Menu:
a
b
*********************
2
Delete
3
Add FAX Number
1
Detail/Edit
FAX No. Entry:
C
b
0667640001
*
S
Menu:
a
b
1
Detail/Edit
*********************
3
Add FAX Number
2
Delete
Summary of Contents for M6526cdn Type B
Page 1: ...FAX OPERATION GUIDE ECOSYS M6526cdn ECOSYS M6526cdn Type B ...
Page 2: ......
Page 16: ...xiv ...
Page 22: ...Part Names and Functions 1 6 ...
Page 30: ...Preparation Before Use 2 8 ...
Page 60: ...FAX Operation Basic 3 30 ...
Page 114: ...FAX Operation Advanced 4 54 ...
Page 128: ...Checking Transmission Results and Registration Status 5 14 ...
Page 182: ...Troubleshooting 8 8 ...
Page 198: ...Appendix 16 ...
Page 202: ...Index 4 ...
Page 203: ......
Page 206: ...2MBKMEN002 Rev 2 2013 11 ...


