74
8 Operating
Mounting and Operating Instructions CEAG Central Battery System ZB-S 40071860179 (L) November 2018 www.ceag.de
1
)
2
)
3
)
Graphic display (main screen during normal operation)
Starting point:
Main screen
<Menu>
Selecting the main menu:
/
:
Select Basic settings in the main menu
Menu selection
Test & status menu
Block,reset
Basic settings
DLS/TLS setup
Circuit setup
Luminaire setup
Memory card
Send ServicePinMsg
<Menu> key: back to main screen (cancel)
<ok> key: confirm selection, show selected menu
(with the Function test selection)
Lanuage
Date & time
Function test
Battery duration test
etc...
1
) visible area of the main menu (with screen roll (scroll-)
function)
2
) currently non-visible area
3
) highlighting of a selection
The <ok> key is used to confirm a selection. Pressing
the menu key exits the corresponding menu item and
the changes are not stored in the controller´s nonvolatile
memory; the controller software usually returns to the
next higher menu.
The <ESC> key is used to cancel changes entered in a
menu; the controller software returns to the next higher
menu without saving the changes.
Selections within a menu of the controller software are
made with the cursor keys
on the keypad.
O
O
The arrow keys
are used to select a menu line
(up/down) or to move between input boxes.
O
O
The arrow keys
are used to select settings or
to increment or decrement parameters by a certain
change value. These selection options are displayed on
the LC display (5) with their icon.
An action is initiated by jogging a key several times;
continuous pressing of a key (for more than approx.
1 second) speeds up the jog function.
The next double page shows an overview of the basic
menu structure and further information about operating
the system and setting parameters.
1
4
3
6
7
2
5
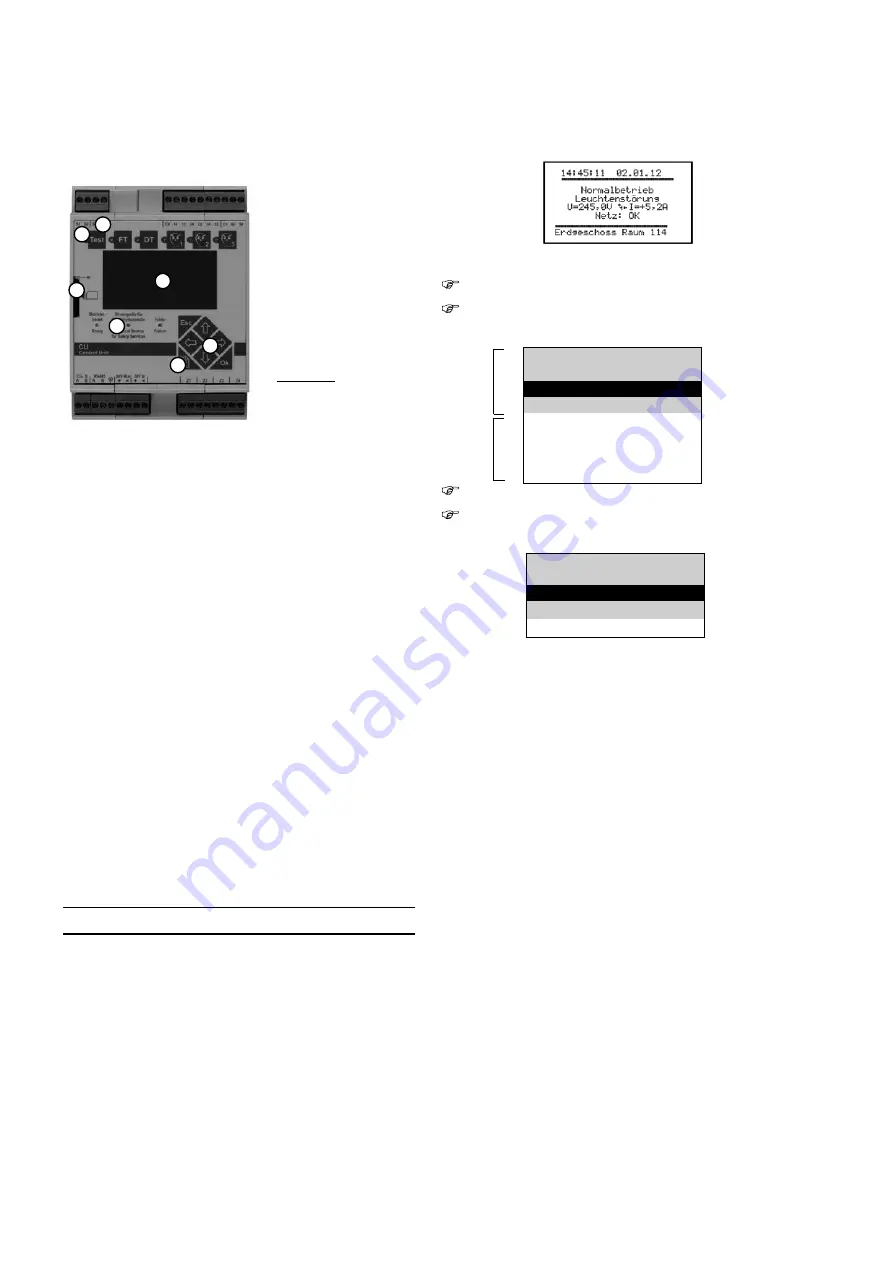
8.4 Operating the CU CG-S control module
LEDs (1) in the top
row indicate running
functions that
were initiated with
theFunction buttons (2)
aside.
The 3 left-hand buttons
initiate present functions
of the controller
software for the CU
CG-S control module:
O
O
<Test> activates
a simulated mains
failure for testing the
emergency lighting
equipments while the
button is pressed. A short button press simulates a 5
second mains failure.
O
O
<FT> activates the menu option F-Test start / cancel
The controller software performs a function test whose
progress and results are output on the display (5). An F-Test
tests the final circuits and the luminaires connected to them.
You will find further information about this in the description
of the related program function in the following section.
O
O
<DT> activates the menu option B-Test start / cancel
The controller software performs an operating duration
test whose progress and results are output on the display
(5). An operating duration test tests wether the connected
batteries guarantee the programmed minimum operating
duration of the emergency lighting as required by statute
in the event of a mains failure. Further details about the
system´s operating status and faults can be requested
in the Test- & Status menu. The control module can be
programmed to assign functions to the 3 right-hand function
buttons F1 ... F3; e. g. the first button F 1 can be assigned
the function manual reset.
The other LEDs (3) indicate:
O
O
Ready for operation
O
O
Feed from the power source for safety purposes (battery
operation with failed mains power supply or FT/BT),
O
O
Failures that can be further analysed using the control
module´s menu options.
PLEASE NOTE
Please misinterpret a short light up of the yellow LED
“Electrical Source of Safety Services” not as failure, or as
a relevant battery discharging. The short light up of this
LED is the effect of an automatic battery circuit test with
is realized in constant intervals.
By internal dynamic measurings this LED lights for short
time without mains failure or a function test resp. a
duration test was set. The control keys on the keypad
(6) are used to initiate the program functions on the
controller software or change their parameter settings.
The Main Menu of the controller software is opened from
the main screen with the key (7), refered to in the the
current test as <menu>. This key is also used to return to
the previous menu level until the main screen appears on
the graphic display (5).


