background image


16


Notification Setting 

In this section, you can select to enable e-mail and/or FTP notification when an alarm or a 
motion happened. 

Item 

Description 

Method 

Email 

When this option is checked, the network camera will send the captured video clip or image to the 

assigned E-mail address(s) once motion or alarm recording happened. 

FTP 

When this option is checked, the network camera will upload the captured video clip or image to the 

specified FTP site once motion or alarm recording happened. 

SMS 

When this option is checked, the network camera will send a text message to the specified mobile 

phone number once motion or alarm recording happened. For details, please refer to “4.2.6 SMS” at 

page 18. 

Video Type 

Select the file type of the notification files: H264 (video) / MPEG4 (video) / JPEG (image).   

Total 

Set the record time of the notification video clip (1 ~ 5 seconds). 

Guard 

Select “Enable” to activate iPhone Push Notification function. When the event specified in “Guard Rule” 

happens, the camera will send a push notification to your iPhone within 5 seconds. 

Note: To use this function, your iPhone needs to have our mobile surveillance program, 

EagleEyes, installed. For details, please refer to “6.2.1 For iPhone” at page 31. 

Guard Rule 

Set the event type to “Motion”. 

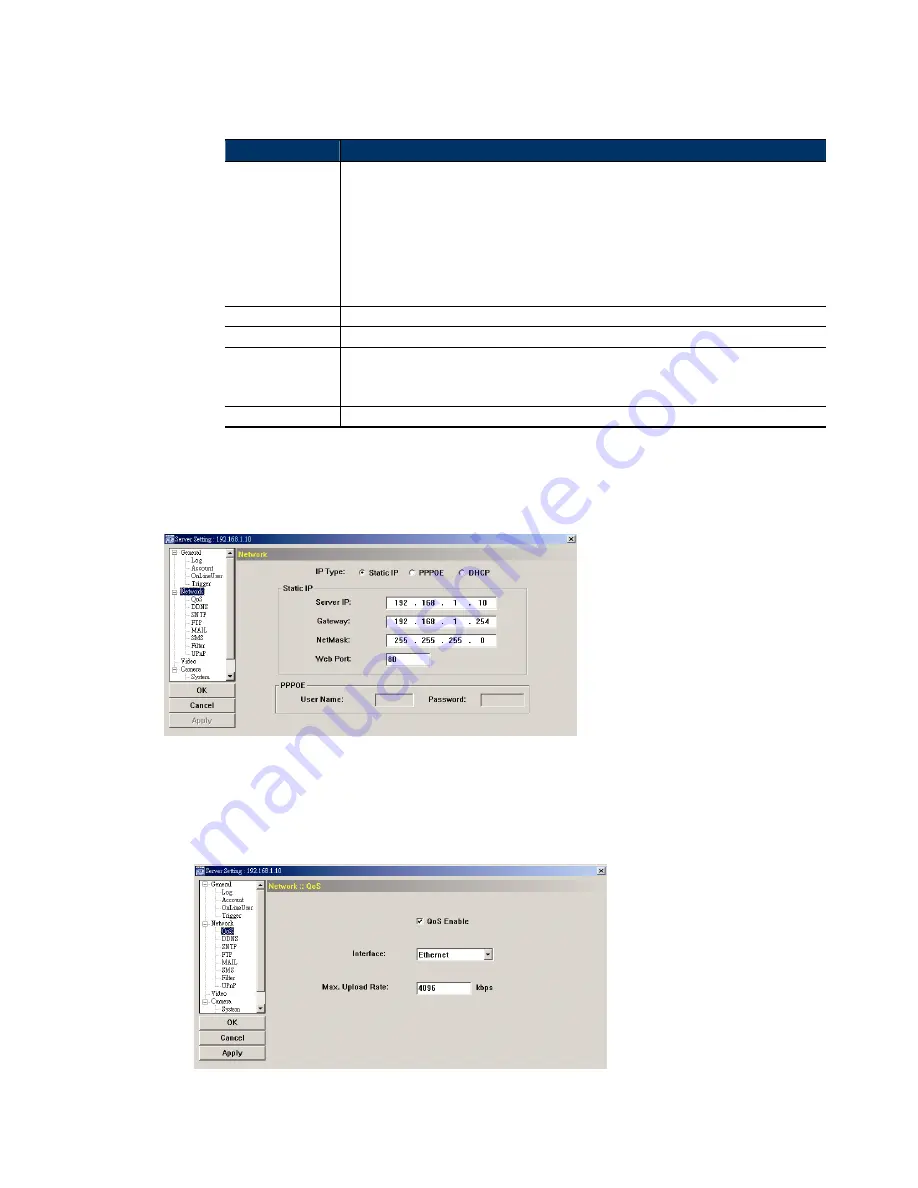
4.2 Network 

You can set the network configuration of the network camera depending on your network type. For 
details, please refer to your installation guide. 


4.2.1 QoS 

QoS, Quality of Service, is the ability to control the data flow for real-time streaming. This 
function is important if your network bandwidth is insufficient and you have other devices to 
share the network bandwidth.   
Check “QoS Enable”, and set the max. upload rate from 256 to 10240 kbps. 


4.2.2 DDNS 

Select “On” when the selected network type in “Network” is “PPPOE” or “DHCP”. For details, 

Summary of Contents for PTZ NETWORK CAMERA SERIES

Page 1: ...N244_245_system_V0 9 PTZ NETWORK CAMERA SERIES USER MANUAL Please read instructions thoroughly before operation and retain it for future reference...

Page 2: ...es installed b For web browsers Internet Explorer Mozilla Firefox Safari and Google Chrome are supported c Apple s media player QuickTime is also one tool you can use To monitor and control multiple n...

Page 3: ...y completeness or usefulness of this manual The content of this manual is subject to change without notice Trademark Acknowledgements Internet Explorer Microsoft Windows Mozilla QuickTime are register...

Page 4: ...4 1 3 OnLineUser 15 4 1 4 Trigger 15 4 2 Network 16 4 2 1 QoS 16 4 2 2 DDNS 16 4 2 3 SNTP 17 4 2 4 FTP 17 4 2 5 MAIL 17 4 2 6 SMS 18 4 2 7 Filter 19 4 2 8 UPnP 19 4 3 Video 20 4 4 Camera 20 4 4 1 Syst...

Page 5: ...to follow moving objects Rigid high speed pan tilt mechanism with two million rotation test passed for longer operating lifetime Up to 16 preset points four sequence groups and Auto Scan Motion detect...

Page 6: ...th suitable length for your connection Reset wires Remove the insulating coating of these two wires and twist them together to reset default This will reset all parameters including the IP address to...

Page 7: ...nternet Explorer or Mozilla Firefox depending on different using situations To check or configure up to 16 surveillance devices simultaneously with the record function please use Video Viewer For deta...

Page 8: ...k panel will be displayed on the right side of the control panel Step2 Click to select the IP address of the camera you intend to connect and double click it Step3 The live view is displayed in the Vi...

Page 9: ...rd when activating this program The changes will take effect when this program is closed and executed again Log Click to view all event and recording logs search the desired log s by date or playback...

Page 10: ...capacity in Free MB When Manual is checked click or on the main control panel to start the manual recording immediately and the recordings will be saved in the location specified in Record Path When M...

Page 11: ...after system upgrade upgrade system bin Step4 Click Upgrade Firmware to start firmware upgrade Note It takes a few minutes to finish the upgrade process Do not disconnect the power during firmware upg...

Page 12: ...ied Version Default at page 4 and 3 2 2 Full Function Version at page 5 STEP2 Right click to show the shortcut menu on the top left panel and select the E Map group you want to add There are three E M...

Page 13: ...or any motion or alarm event it will appear on the screen to catch your attention To know what s happening quickly double click the device icon on the E Map to show the live view How to Edit Remove an...

Page 14: ...n the group name to show the shortcut menu list and select Edit E MAP or Remove E MAP as needed For Building E Map Group Right click on the group name to show the shortcut menu list and select Edit Bu...

Page 15: ...at page 24 Zoom In Out Click to zoom in out the image Focus Near Far Click to adjust the focus of the image Max Zoom In Out Click to zoom in the image to the largest zoom out the image to its origina...

Page 16: ...ion support Network Configure network settings QoS Limit the data flow for live streaming DDNS Enter DDNS information when the network type is PPPOE or DHCP SNTP Synchronize your camera time with the...

Page 17: ...1 1 Log To quickly search the system log you want by event type click the drop down list to select the system log type you want to check and click Reload to refresh the list To clear all system event...

Page 18: ...ions There are four user levels Supervisor Power User Normal User and Guest Life Time Select how long this account is allowed to stay online 1 MIN 5 MIN 10 MIN 1 HOUR 1 DAY INFINITE Step2 Then click A...

Page 19: ...etection Area Setting When Enable is selected click Setting to enter the motion detection area setting page as follows Sensitivity Set the detection sensitivity High Normal Low Area Setting Motion Set...

Page 20: ...et the record time of the notification video clip 1 5 seconds Guard Select Enable to activate iPhone Push Notification function When the event specified in Guard Rule happens the camera will send a pu...

Page 21: ...w or change to another server with which users are familiar Sync Period Select Daily to synchronize the camera time with the network time every day or None to turn off this function Sync Server Time C...

Page 22: ...r to APPENDIX 2 API ID APPLICATION FOR SMS MESSAGING at page 34 Enter the detailed information needed for text messaging and click Apply to confirm The information you set here will be applied when SM...

Page 23: ...mmand request Filter Choose to enable YES or disable NO the filter function If YES is selected choose whether you want to permit Allow or block Deny the IP address list below To add an item to the IP...

Page 24: ...view the changes click Apply Item Description Backlight Enabling backlight compensation makes the subject clearer if the image background is too bright or if the subject is too dark Auto Gain Control...

Page 25: ...ent of panning tilting Auto Focus Zooming Adjusts the image focus only when the PTZ camera is under the movement of zooming IRIS IRIS level is used to adjust the amount of light reaching the image sen...

Page 26: ...se the value to slower the focus speed 1 255 default value is 129 4 4 1 Preset Set a preset point that can be used to quickly move the camera to the specific location Up to 16 preset points can be set...

Page 27: ...r set the left right end of surveillance area from 0 360 The current value is displayed on the right Pan Speed By clicking and dragging the slider set the speed from 1 255 The current value is display...

Page 28: ...illance area the camera returns to the point it originally monitors after the preset tracking timeout By clicking and dragging the slider set the left end of the surveillance area from 0 360 Limit 2 W...

Page 29: ...click Apply to confirm the change To restore the default values click Default and click Apply to confirm the change 4 4 5 Time Set daylight saving time and the current time Function Description Daylig...

Page 30: ...1 Accessing the camera Step1 Open your web browser and key in http ipaddress portnum in the URL address box For example for IP address 60 121 46 236 and port No 888 please key in http 60 121 46 236 88...

Page 31: ...tion is enabled the supported buttons will turn to blue Ex If the value of the turbo step is set to 5 one mouse click will function as 5 mouse clicks when you click the arrow keys To use this function...

Page 32: ...rent view and a new browser window will be opened to display the captured image Media Type Supervisor Power User Normal User Guest Select the web transmission format from the drop down list H 264 MPEG...

Page 33: ...29...

Page 34: ...ig Camera General General Custom Setting Server Log Remote Config General Log Login Remote Config General Account Account Remote Config General Account Trigger Remote Config General Trigger Video Remo...

Page 35: ...rand with the operating system of Windows Mobile 5 Packet PC 6 0 Professional Please check with your distributor for details 6 2 Program Download Installation 6 2 1 For iPhone STEP1 Go to App Store vi...

Page 36: ...screen instructions after downloading For mobile phones the program will be saved to the location you specified For WinCE Based PDA the program will be saved to Programs 6 3 Program Setup STEP1 Get th...

Page 37: ...Optical Zoom Max Zoom Speed Approx 7s Tele Wide Approx 10s Tele Wide Shutter Speed 1 60 1 50 to 1 100 000 sec Min Illumination 0 3 Lux F1 6 BLC On Off Color Adjustment Brightness Contrast Saturation...

Page 38: ...lease follow the steps below for application Step1 Go to http www clickatell com login php In New Customers select Clickatell Central API from the drop down list Step2 Fill in your information to crea...

Page 39: ...ll send an activation code to that number for verification Check if you receive a text message from Clickatell Step4 Go back to Clickatell and click the tab Manage my Products Then select HTTP from th...

Reviews: