background image


VigorIPPBX 2820 Series User’s Guide 


77

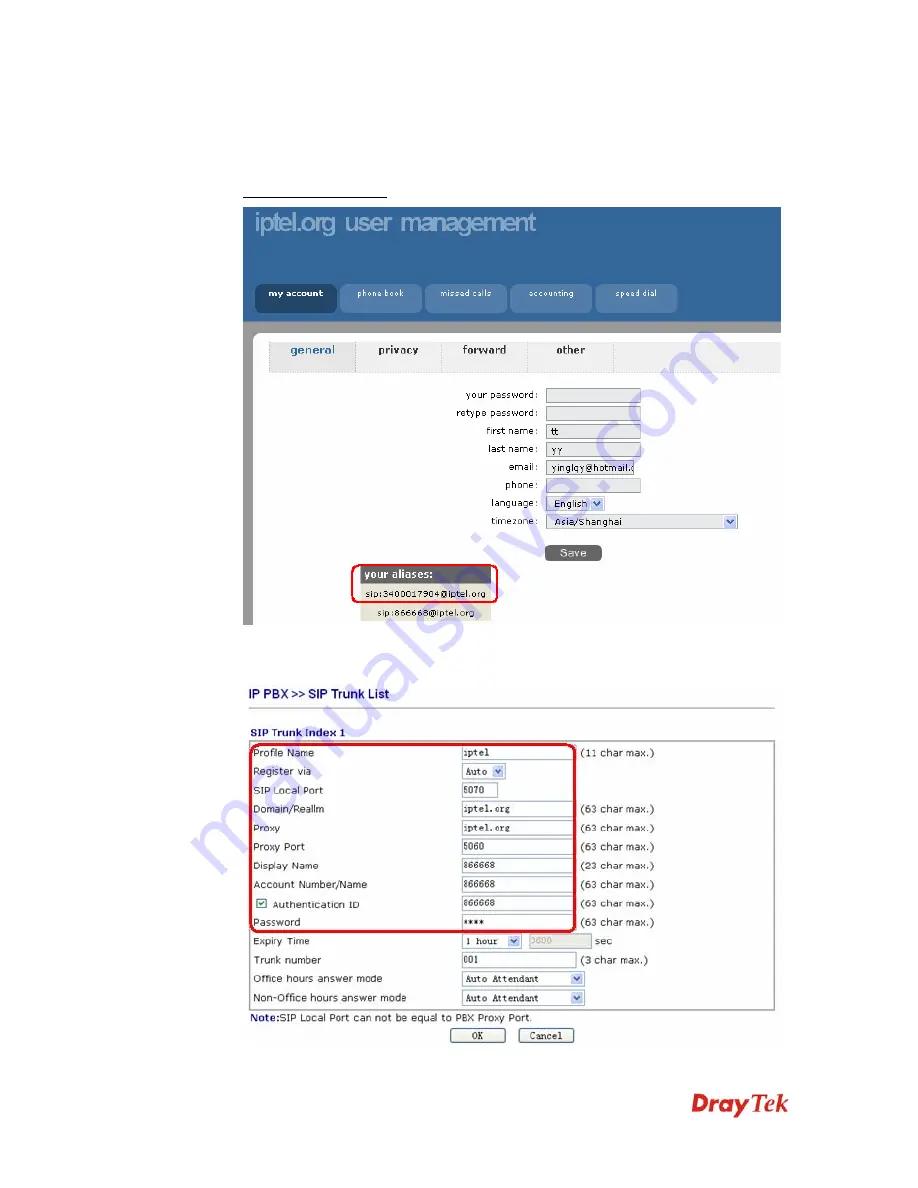
Follow the steps below to setup SIP Alias and achieve DID. 

1.


Create a SIP Alias. First of all, make sure your VoIP Service Provider supports SIP 
Alias. For example, iptel.org provides such service. When you register an SIP account 

[email protected]

 on

 iptel.org

, you will be provided with a sip alias 

[email protected] as well. See below. 


2.


Setup SIP account on VigorIPPBX 2820. Open the 

IP PBX>>Line Setting>>SIP 

Trunk

 page and configure the SIP account as follows. 


Summary of Contents for VigorIPPBX 2820 Series

Page 1: ......

Page 2: ......

Page 3: ...VigorIPPBX 2820 Series User s Guide Version 2 6 Based on Firmware Version V3 5 5 Date 21 03 2011 ...

Page 4: ...lations on conservation of the environment Warranty We warrant to the original end user purchaser that the router will be free from any defects in workmanship or materials for a period of two 2 years from the date of purchase from the dealer Please keep your purchase receipt in a safe place as it serves as proof of date of purchase During the warranty period and upon proof of purchase should the p...

Page 5: ...an radiate radio frequency energy and if not installed and used in accordance with the instructions may cause harmful interference to radio communications However there is no guarantee that interference will not occur in a particular installation If this equipment does cause harmful interference to radio or television reception which can be determined by turning the equipment off and on the user i...

Page 6: ...rvice Activation Wizard 27 2 5 Online Status 30 2 6 Saving Configuration 33 Chapter 3 Applications 35 3 1 The Registration of 50 IP based Telephone Extensions 35 3 2 The IP Registration from Remote Site through WAN Connection 36 3 3 The Integration IP Registration with SIP Server 37 3 4 The Integration VoIP Communications via SIP Server 38 3 5 The Integration with PSTN telephony 39 3 6 The Added I...

Page 7: ...820 106 4 16 How to configure and use ISDN S0 MSN on VigorIPPBX 2820 112 4 17 Creating an Account for MyVigor 115 4 17 1 Creating an Account via Vigor Router 115 4 17 2 Creating an Account via MyVigor Web Site 118 4 18 How to use mOTP feature through the router and iPhone 121 4 19 How to use call pickup via IPPBX router 126 4 20 How to Configure Hunt Group in VigorIPPBX Series 128 4 21 How to make...

Page 8: ...3 Quality of Service 222 5 8 Applications 229 5 8 1 Dynamic DNS 229 5 8 2 Schedule 231 5 8 3 RADIUS 233 5 8 4 UPnP 234 5 8 5 IGMP 236 5 8 6 Wake on LAN 237 5 9 VPN and Remote Access 238 5 9 1 Remote Access Control 238 5 9 2 PPP General Setup 239 5 9 3 IPSec General Setup 240 5 9 4 IPSec Peer Identity 241 5 9 5 Remote Dial in User 243 5 9 6 LAN to LAN 247 5 9 7 Connection Management 256 5 10 Certif...

Page 9: ...45 5 15 6 Time and Date 347 5 15 7 Management 348 5 15 8 Reboot System 349 5 15 9 Firmware Upgrade 350 5 16 Diagnostics 352 5 16 1 Dial out Trigger 353 5 16 2 Routing Table 353 5 16 3 ARP Cache Table 354 5 16 4 DHCP Table 354 5 16 5 NAT Sessions Table 355 5 16 6 Ping Diagnosis 355 5 16 7 Data Flow Monitor 356 5 16 8 Traffic Graph 358 5 16 9 Trace Route 358 Chapter 6 Trouble Shooting 361 6 1 Checki...

Page 10: ......

Page 11: ...e unlimited free calls through Internet Moreover VigorIPPBX 2820 is able to establish multiple networking architectures corresponding to your current desire and future needs of growing communication Its ISDN PSTN compatibility lets you move from simple VoIP solution such as IP phone and Softphone to integrate with comprehensive networking infrastructure such as ISDN and Analog phone line any time ...

Page 12: ...s s f fo or r I IS SD DN N P Po or rt ts s Below shows the names that displayed on front panel of the device and the WEB UI of this device Both ISDN1 and ISDN2 port on front panel of the device are configurable for connecting phone or accessing Internet according to the settings that you adjust on WEB UI ISDN1 TE ISDN2 TE shown on WEB UI is a port that used to connect ISDN line ISDN1 S0 ISDN2 S0 s...

Page 13: ...he phone connected to this port is off hook Off The phone connected to this port is on hook Phone Blinking A phone call comes QoS On The QoS function is active LED on Connector On ISDN S0 ISDN NT mode is active configured from IP PBX PBX System Phone Settings and an ISDN phone adapter is connected Blinking ISDN S0 ISDN NT mode configured from IP PBX PBX System Phone Settings is active and an ISDN ...

Page 14: ...ault settings Usage Turn on the router ACT LED is blinking Press the hole and keep for more than 5 seconds When you see the ACT LED begins to blink rapidly than usual release the button Then the router will restart with the factory default configuration ISDN1 2 Connecter for ISDN line or ISDN phone adapter in particular condition Refer to section 2 2 for more details Phone Connecter for PSTN phone...

Page 15: ...N2 connection is ready WAN 2 Blinking It will blink while transmitting data On A PSTN phone call comes in and out However when the phone call is disconnected the LED will be off about six seconds later Line Off There is no PSTN phone call On The phone connected to this port is off hook Off The phone connected to this port is on hook Phone Blinking A phone call comes QoS On The QoS function is acti...

Page 16: ...ected with 100Mbps WAN 2 Right LED Green Off The port is connected with 10Mbps Interface Description Factory Reset Restore the default settings Usage Turn on the router ACT LED is blinking Press the hole and keep for more than 5 seconds When you see the ACT LED begins to blink rapidly than usual release the button Then the router will restart with the factory default configuration ISDN1 2 Connecte...

Page 17: ...s of the router and the other end of the cable RJ 45 into the Ethernet port on your computer Note It is strongly recommended to connect to Ethernet port on your computer with a shielding cable provided with the router 3 Connect the telephone sets with phone lines for using VoIP function For the model without phone ports skip this step 4 Connect one end of the power adapter to the router s power po...

Page 18: ... When the user configures ISDN port as NT mode in IP PBX PBX System Phone Settings the orange LED will light on to indicate ISDN NT is selected And by using ISDN phone adapters coming from the router package the user can connect several phones to the router for communication Refer to the following figure for reference Yet if the user configures ISDN port as TE Mode in IP PBX PBX System Phone Setti...

Page 19: ... at ti io on n You can install a printer onto the router for sharing printing All the PCs connected this router can print documents via the router The example provided here is made based on Windows XP 2000 For Windows 98 SE please visit www draytek com Before using it please follow the steps below to configure settings for connected computers or wireless clients 1 Connect the printer with the rout...

Page 20: ...Add a New Computer A welcome dialog will appear Please click Next 4 Click Local printer attached to this computer and click Next 5 In this dialog choose Create a new port Type of port and use the drop down list to select Standard TCP IP Port Click Next ...

Page 21: ...the following dialog type 192 168 1 1 router s LAN IP in the field of Printer Name or IP Address and type IP_192 168 1 1 as the port name Then click Next 7 Click Standard and choose Generic Network Card 8 Then in the following dialog click Finish ...

Page 22: ...tion click Next 10 For the final stage you need to go back to Control Panel Printers and edit the property of the new printer you have added 11 Select LPR on Protocol type p1 number 1 as Queue Name Then click OK Next please refer to the red rectangle for choosing the correct protocol and LPR name The printer can be used for printing now Most of the printers with different manufacturers are compati...

Page 23: ...not know whether your printer is supported or not please visit www draytek com to find out the printer list Open Support FAQ find out the link of Printer Server and click it then click the What types of printers are compatible with Vigor router link Note 2 Vigor router supports printing request from computers via LAN ports but not WAN port ...

Page 24: ...VigorIPPBX 2820 Series User s Guide 14 This page is left blank ...

Page 25: ... 1 C Ch ha an ng gi in ng g P Pa as ss sw wo or rd d To change the password for this device you have to access into the web browse with default password first 1 Make sure your computer connects to the router correctly Notice You may either simply set up your computer to get IP dynamically from the router or set up the IP address of the computer to be the same subnet as the default IP address of Vi...

Page 26: ...e with the router you have 4 Go to System Maintenance page and choose Administrator Password 5 Enter the login password the default is blank on the field of Old Password Type New Password Then click OK to continue 6 Now the password has been changed Next time use the new password to access the Web Configurator for this router ...

Page 27: ...quickly The first screen of Quick Start Wizard is entering login password After typing the password please click Next On the next page as shown below please select the WAN interface WAN 1 or WAN2 that you use If DSL interface is used please choose WAN1 if WAN2 interface is used please choose WAN2 Choose Auto negotiation as the physical type for your router Then click Next for next step In this sec...

Page 28: ...The router supports the DSL WAN interface for Internet access 2 2 2 2 1 1 P PP PP Po oE E P PP PP Po oA A PPPoE stands for Point to Point Protocol over Ethernet It relies on two widely accepted standards PPP and Ethernet It connects users through an Ethernet to the Internet with a common broadband medium such as a single DSL line wireless device or cable modem All the users over the Ethernet can s...

Page 29: ...age will be shown User Name Assign a specific valid user name provided by the ISP Password Assign a valid password provided by the ISP Confirm Password Retype the password Click Next for viewing summary of such connection Click Finish A page of Quick Start Wizard Setup OK will appear Then the system status of this protocol will be shown ...

Page 30: ...d d I IP P Click 1483 Bridged IP as the protocol Type in all the information that your ISP provides for this protocol Click Next for viewing summary of such connection Click Finish A page of Quick Start Wizard Setup OK will appear Then the system status of this protocol will be shown ...

Page 31: ... 1483 Routed IP as the protocol Type in all the information that your ISP provides for this protocol After finishing the settings in this page click Next to see the following page Click Finish A page of Quick Start Wizard Setup OK will appear Then the system status of this protocol will be shown ...

Page 32: ...outer within several steps All the settings also can be configured by using IP PBX menu However the wizard is the most convenient and easy method for users 2 2 3 3 1 1 E Ex xt te en ns si io on n G Gr ro ou up p S Se et tu up p Click IPPBX Wizard You can get the first screen as shown below Extension Group Name Type a name as a display for this extension group ...

Page 33: ... for such group Extension Password in this group Type the password for this extension group which will be used in registration done by IP Phone When you finish the settings of group name group number start number number of extension fields please click OK to save them The new added group will be displayed on the screen You can set 10 groups for using in different conditions Then click Next to acce...

Page 34: ...count Number Name Enter your account name of SIP Address e g every text before Password Type the password which will be used in registration for SIP service for this profile Trunk Number There are two ways to dial outside lines for an extension number First dial a short number and wait for a while When dial tone appears please dial the real outside line number Second dial a short number and then t...

Page 35: ...the drop down menu to choose the time as the starting point in the morning When do you have a rest at noon Use the drop down menu to choose the time as the ending point in the morning When do you start working in the afternoon Use the drop down menu to choose the time as the starting point in the afternoon When do you leave the office Use the drop down menu to choose the time as the ending point i...

Page 36: ...VigorIPPBX 2820 Series User s Guide 26 When you finish the settings click Finish to save the settings and exit the wizard ...

Page 37: ...to the server MyVigor located on http myvigor draytek com For using Web Content Filter Profile please refer to section 5 6 3 Web Content Filter Profile for detailed information Now please follow the steps listed below to activate WCF feature for your router 1 Open Service Activation Wizard 2 The screen of Service Activation Wizard will be shown as follows Choose the one you need and click Next In ...

Page 38: ...ck Next 4 Setting confirmation page will be displayed as follows please click Next 5 Wait for a moment till the following page appears When such page appears you can enable or disable these services for your necessity Then click Finish Note The service will be activated and applied as the default rule configured in Firewall General Setup ...

Page 39: ...ated according to your selection s The valid time for the free trial of these services is one month Later if you need to extend the license valid time you can also use the Service Activation Wizard again to reach your goal by clicking the radio button of Formal edition with license key and clicking Next ...

Page 40: ...tatus shows the system status WAN status ADSL Information and other status related to this router within one page If you select PPPoE PPPoA as the protocol you will find out a link of Dial PPPoE or Drop PPPoE in the Online Status web page Online status for PPPoE WAN2 Online status for PPTP for WAN2 ...

Page 41: ...VigorIPPBX 2820 Series User s Guide 31 Online status for Static IP for WAN1 Online status for DHCP WAN1 ...

Page 42: ...set in WAN1 WAN web page Mode Displays the type of WAN connection e g PPPoE Up Time Displays the total uptime of the interface IP Displays the IP address of the WAN interface GW IP Displays the IP address of the default gateway TX Packets Displays the total transmitted packets at the WAN interface TX Rate Displays the speed of transmitted octets at the WAN interface RX Packets Displays the total n...

Page 43: ...e WAN connection of that interface WAN1 WAN2 is ready for accessing Internet the words in red mean that the WAN connection of that interface WAN1 WAN2 is not ready for accessing Internet 2 2 6 6 S Sa av vi in ng g C Co on nf fi ig gu ur ra at ti io on n Each time you click OK on the web page for saving the configuration you can find messages showing the system interaction with you Ready indicates ...

Page 44: ...VigorIPPBX 2820 Series User s Guide 34 This page is left blank ...

Page 45: ...urposes 3 3 1 1 T Th he e R Re eg gi is st tr ra at ti io on n o of f 5 50 0 I IP P b ba as se ed d T Te el le ep ph ho on ne e E Ex xt te en ns si io on ns s z The establishment through DSL Internet z Flexible second WAN for back up z IP based telephones are connected to LAN ports and set with ext no 101 102 103 z The IP based telephones 101 102 and 103 are registered on the VigorIPPBX 2820 ...

Page 46: ... gh h W WA AN N C Co on nn ne ec ct ti io on n z The establishment through DSL Internet z Flexible second WAN for back up z IP based telephones are connected to LAN ports and set with ext no 101 102 103 z The IP based telephones 101 102 and 103 and remote IP based phone are registered on the VigorIPPBX 2820 z The IP based phone with ext no 201 is at remote site ...

Page 47: ... through DSL Internet z Flexible second WAN for back up z IP based telephones are connected to LAN ports and set with ext no 101 102 103 z The IP based telephones 101 102 and 103 and remote IP based phone are registered on the VigorIPPBX 2820 z The IP based phone with ext no 201 is at remote site z The VigorIPPBX 2820 seamlessly integrate with ITSP services allow you to register at a SIP server ...

Page 48: ...e second WAN for back up z IP based telephones are connected to LAN ports and set with ext no 101 102 103 z The IP based telephones 101 102 and 103 and remote IP based phone are registered on the VigorIPPBX 2820 z The IP based phone with ext no 201 is at remote site z The VigorIPPBX 2820 seamlessly integrate with ITSP services allow you to register at a SIP server z The remote IP based phone with ...

Page 49: ...01 102 103 z The IP based telephones 101 102 and 103 and remote IP based phone are registered on the VigorIPPBX 2820 z The IP based phone with ext no 201 is at remote site z The VigorIPPBX 2820 seamlessly integrate with ITSP services allow you to register at a SIP server z The remote IP based phone with ext 301 is registered at a SIP server z The analog land line is connected to the Line port z Th...

Page 50: ...ith ext no 101 102 103 z The IP based telephones 101 102 and 103 and remote IP based phone are registered on the VigorIPPBX 2820 z The IP based phone with ext no 201 is at remote site z The VigorIPPBX 2820 seamlessly integrate with ITSP services allow you to register at a SIP server z The remote IP based phone with ext 301 is registered at a SIP server z The ISDN phones with ext no 601 and 602 are...

Page 51: ...IP based telephones 101 102 and 103 and remote IP based phone are registered on the VigorIPPBX 2820 z The IP based phone with ext no 201 is at remote site z The VigorIPPBX 2820 seamlessly integrate with ITSP services allow you to register at a SIP server z The remote IP based phone with ext 301 is registered at a SIP server z The ISDN line is connected to TE interface of the VigorIPPBX 2820 z The ...

Page 52: ...LAN ports and set with ext no 101 102 103 z The IP based telephones 101 102 and 103 and remote IP based phone are registered on the VigorIPPBX 2820 z The IP based phone with ext no 201 is at remote site z The VigorIPPBX 2820 seamlessly integrate with ITSP services allow you to register at a SIP server z The remote IP based phone with ext 301 is registered at a SIP server z The two ISDN lines are c...

Page 53: ... the VigorIPPBX 2820 z The IP based phone with ext no 201 is at remote site z The VigorIPPBX 2820 seamlessly integrate with ITSP services allow you to register at a SIP server z The remote IP based phone with ext 301 is registered at a SIP server z The ISDN phone with ext no 701 is connected to NT interface of the VigorIPPBX 2820 z The ISDN PBX is connected to TE interface of the VigorIPPBX 2820 T...

Page 54: ...ones are connected to LAN ports and set with ext no 101 102 103 z The IP based telephones 201 202 and 203 and remote IP based phone are registered on the VigorIPPBX 2820 z The VigorIPPBX 2820 seamlessly integrate with ITSP services allow you to register at a SIP server z The ISDN PBX is connected to S0 interface of the VigorIPPBX 2820 The ISDN phones with ext no 601 and 602 are connected to ISDN P...

Page 55: ... The VigorIPPBX 2820 seamlessly integrate with ITSP services allow you to register at a SIP server z The remote IP based phone with ext 301 is registered at a SIP server z The ISDN phone with ext no 701 is connected to NT interface of the VigorIPPBX 2820 z The ISDN PBX is connected to TE interface of the VigorIPPBX 2820 The ISDN phones with ext no 601 and 602 are connected to ISDN PBX z The ISDN P...

Page 56: ...one with ext no 201 is at remote site z The VigorIPPBX 2820 seamlessly integrate with ITSP services allow you to register at a SIP server z The remote IP based phone with ext 301 is registered at a SIP server z The ISDN phones with ext no 601 and 602 are connected to ISDN PBX z The ISDN PBX also provides analog extensions to allow analog phones to be connected The analog phone with ext no 603 is c...

Page 57: ... and remote IP based phone ext no 201 are registered on the VigorIPPBX 2820 z The IP based phone with ext no 201 is at remote site z The VigorIPPBX 2820 seamlessly integrate with ITSP services allow you to register at a SIP server z The remote IP based phone with ext 301 is registered at a SIP server z The ISDN phones with ext no 601 and 602 are connected to ISDN PBX z The ISDN PBX also provides a...

Page 58: ...VigorIPPBX 2820 Series User s Guide 48 This page is left blank ...

Page 59: ...to connect to network securely such as the remote branch office and headquarter According to the network structure as shown in the below illustration you may follow the steps to create a LAN to LAN profile These two networks LANs should NOT have the same network address Settings in Router A in headquarter 1 Go to VPN and Remote Access and select Remote Access Control to enable the necessary VPN se...

Page 60: ...ou have to set general settings in IPSec General Setup such as the pre shared key that both parties have known 3 Go to LAN to LAN Click on one index number to edit a profile 4 Set Common Settings as shown below You should enable both of VPN connections because any one of the parties may start the VPN connection ...

Page 61: ...ethod If an IPSec based service is selected you should further specify the remote peer IP Address IKE Authentication Method and IPSec Security Method for this Dial Out connection If a PPP based service is selected you should further specify the remote peer IP Address Username Password PPP Authentication and VJ Compression for this Dial Out connection ...

Page 62: ...ected you may further specify the remote peer IP Address IKE Authentication Method and IPSec Security Method for this Dial In connection Otherwise it will apply the settings defined in IPSec General Setup above If a PPP based service is selected you should further specify the remote peer IP Address Username Password and VJ Compression for this Dial In connection ...

Page 63: ...o to VPN and Remote Access and select Remote Access Control to enable the necessary VPN service and click OK 2 Then for using PPP based services such as PPTP L2TP you have to set general settings in PPP General Setup For using IPSec based service such as IPSec or L2TP with IPSec Policy you have to set general settings in IPSec General Setup such as the pre shared key that both parties have known 3...

Page 64: ... of the parties may start the VPN connection 5 Set Dial Out Settings as shown below to dial to connect to Router B aggressively with the selected Dial Out method If an IPSec based service is selected you should further specify the remote peer IP Address IKE Authentication Method and IPSec Security Method for this Dial Out connection ...

Page 65: ...Compression for this Dial Out connection 6 Set Dial In settings to as shown below to allow Router A dial in to build VPN connection If an IPSec based service is selected you may further specify the remote peer IP Address IKE Authentication Method and IPSec Security Method for this Dial In connection Otherwise it will apply the settings defined in IPSec General Setup above ...

Page 66: ...d further specify the remote peer IP Address Username Password and VJ Compression for this Dial In connection 7 At last set the remote network IP subnet in TCP IP Network Settings so that Router B can direct the packets destined to the remote network to Router A via the VPN connection ...

Page 67: ...ure as shown in the below illustration you may follow the steps to create a Remote User Profile and install Smart VPN Client on the remote host Settings in VPN Router in the enterprise office 1 Go to VPN and Remote Access and select Remote Access Control to enable the necessary VPN service and click OK 2 Then for using PPP based services such as PPTP L2TP you have to set general settings in PPP Ge...

Page 68: ...settings to as shown below to allow the remote user dial in to build VPN connection If an IPSec based service is selected you may further specify the remote peer IP Address IKE Authentication Method and IPSec Security Method for this Dial In connection Otherwise it will apply the settings defined in IPSec General Setup above ...

Page 69: ...use Dial up Networking to create the PPTP tunnel to Vigor router For Win2000 XP please use Network and Dial up connections or Smart VPN Client complimentary software to help you create PPTP L2TP and L2TP over IPSec tunnel You can find it in CD ROM in the package or go to www draytek com download center Install as instructed 2 After successful installation for the first time user you should click o...

Page 70: ...ted it should be consistent with the one set in VPN router If a PPP based service is selected you should further specify the remote VPN server IP address Username Password and encryption method The User Name and Password should be consistent with the one set up in the VPN router To use default gateway on remote network means that all the packets of remote host will be directed to VPN server then f...

Page 71: ...ker sometimes works at home and takes care of children When working time he would use Vigor router at home to connect to the server in the headquarter office downtown via either HTTPS or VPN to check email and access internal database Meanwhile children may chat on Skype in the restroom 1 Go to Bandwidth Management Quality of Service 2 Click Setup link of WAN 1 Make sure the QoS Control on the lef...

Page 72: ...er s Guide 62 3 Return to previous page Enter the Name of Index Class 1 by clicking Edit link Type the name E mail for Class 1 4 For this index the user will set reserved bandwidth e g 25 for E mail using protocol POP3 and SMTP ...

Page 73: ...e Name of Index Class 2 by clicking Edit link In this index the user will set reserved bandwidth for HTTPS And click OK 6 Click Setup link for WAN1 7 Check Enable UDP Bandwidth Control on the bottom to prevent enormous UDP traffic of VoIP influent other application Click OK ...

Page 74: ...r has connected to the headquarter using host to host VPN tunnel he may set up an index for it Enter the Class Name of Index 3 In this index he will set reserved bandwidth for 1 VPN tunnel 9 Click Edit to open the following window Check the ACT box first ...

Page 75: ...at te ed d b by y U Us si in ng g N NA AT T An example of default setting and the corresponding deployment are shown below The default Vigor router private IP address Subnet Mask is 192 168 1 1 255 255 255 0 The built in DHCP server is enabled so it assigns every local NATed host an IP address of 192 168 1 x starting from 192 168 1 10 You can just set the settings wrapped inside the red rectangles...

Page 76: ...de 66 To use another DHCP server in the network rather than the built in one of Vigor Router you have to change the settings as show below You can just set the settings wrapped inside the red rectangles to fit the request of NAT usage ...

Page 77: ...your computer Remember the place of storing the execution file 1 Go to www draytek com 2 Access into Support Downloads Please find out Firmware menu and click it Search the model you have and click on it to download the newly update firmware for your router 3 Access into Support Downloads Please find out Utility menu and click it 4 Click on the link of Router Tools to download the file After downl...

Page 78: ...grams and choose Router Tools XXX Firmware Upgrade Utility 8 Type in your router IP usually 192 168 1 1 9 Click the button to the right side of Firmware file typing box Locate the files that you download from the company web sites You will find out two files with different extension names xxxx all keep the old custom settings and xxxx rst reset all the custom settings to default settings Choose an...

Page 79: ...VigorIPPBX 2820 Series User s Guide 69 11 Now the firmware update is finished ...

Page 80: ...uide 70 4 4 6 6 R Re eq qu ue es st t a a c ce er rt ti if fi ic ca at te e f fr ro om m a a C CA A s se er rv ve er r o on n W Wi in nd do ow ws s C CA A S Se er rv ve er r 1 Go to Certificate Management and choose Local Certificate ...

Page 81: ...est Enter the information in the certificate request 3 Copy and save the X509 Local Certificate Requet as a text file and save it for later use 4 Connect to CA server via web browser Follow the instruction to submit the request Below we take a Windows 2000 CA server for example Select Request a Certificate ...

Page 82: ...equest using a base64 encoded PKCS 7 file Import the X509 Local Certificate Requet text file Select Router Offline request or IPSec Offline request below Then you have done the request and the server now issues you a certificate Select Base 64 encoded certificate and Download CA certificate Now you should get a certificate cer file and save it ...

Page 83: ...ertificate Click IMPORT button and browse the file to import the certificate cer file into Vigor router When finished click refresh and you will find the below window showing BEGINE CERTIFICATE 6 You may review the detail information of the certificate by clicking View button ...

Page 84: ... rt ti if fi ic ca at te e a an nd d S Se et t a as s T Tr ru us st te ed d o on n W Wi in nd do ow ws s C CA A S Se er rv ve er r 1 Use web browser connecting to the CA server that you would like to retrieve its CA certificate Click Retrive the CA certificate or certificate recoring list ...

Page 85: ...usted CA Certificate Click IMPORT button and browse the file to import the certificate cer file into Vigor router When finished click refresh and you will find the below illustration 4 You may review the detail information of the certificate by clicking View button Note Before setting certificate configuration please go to System Maintenance Time and Date to reset current time of the router first ...

Page 86: ...s associated with one phone line for calling into a company s PBX system The employees can have their extension numbers respectively and the caller via DID function on Vigor router can dial to any one of the extension numbers directly without passing through auto attendiant Below shows a scenario 866668 iptel org is the main SIP trunk set on VigorIPPBX 2820 and 3400017904 iptel org is set as SIP a...

Page 87: ...VoIP Service Provider supports SIP Alias For example iptel org provides such service When you register an SIP account 866668 iptel org on iptel org you will be provided with a sip alias 3400017904 iptel org as well See below 2 Setup SIP account on VigorIPPBX 2820 Open the IP PBX Line Setting SIP Trunk page and configure the SIP account as follows ...

Page 88: ... page and click on Alias List to enter the SIP Alias setup page 4 Press one index and input the SIP Alias in the Alias Number fields Select the associated SIP account from Alias of SIP Trunk which was created in step 2 Route the call to Jacky by selecting Forward To Extension and the extension profile 1 101 ...

Page 89: ...VigorIPPBX 2820 Series User s Guide 79 5 The configuration is completed Make sure the extension number 101 is registered Next Benson can make a direct call to Jacky by calling 3400017904 iptel org ...

Page 90: ...erring to another phone to continue the conversation To park a call Stephen can perform the following actions on IP Phone A 1 Press the transfer button on IP Phone A 2 Dial the call park number 777 3 Stephen hears an announcement that Your parking number is XXXXX for example 22201 4 Hang Up Please take notice z If there is no transfer button on your phone please try the button Or check the user gu...

Page 91: ...201 the announced new extension to continue the conversation C Ca al ll l P Pa ar rk ki in ng g U Us sa ag ge e Call Parking is similar to Call Transfer But Call Transfer is a blind transfer Sometimes you are required to confirm if a person is available or not before transferring a call For example Mike is manager and Jane is his secretary When there is an incoming call Jane always parks the call ...

Page 92: ...o on ni in ng g DrayTek VigorIPPBX 2820 VigorIPPBX 2820n supports the function of auto provisioning VigorPhone 350 is also capable of auto provisioning it can get a configuration text file from the VigorIPPBX 2820 series The configuration file contains SIP settings that the SIP devices can register with VigorIPPBX 2820 series 1 Configure the extension number and password for each IP phone on Vigor...

Page 93: ...s Click OK to save them The new added group will be displayed on the screen Then click Next to access into next web page 3 In the SIP Trunk Setup page you can set up to six SIP profiles outside lines at one time Type the profile name domain realm proxy account number name password and trunk number fields then click OK to save them The new added profile will be displayed on the screen ...

Page 94: ...Series User s Guide 84 4 Click Next to access into office hours setup page Please specify office hours including starting point and ending point on duty day s Then click Finish to save the settings and exit the wizard ...

Page 95: ...ension to configure the Extension Number and the Password settings 6 Then connect VigorPhone to the network Each user of VigorPhone can get the extension number password respectively 7 The log in request will be displayed on the screen of the phone Please input the extension number Press OK ...

Page 96: ...one can automatically configure itself with settings coming from VigorIPPBX 2820 Successful message will be shown as below Now all the configurations have been done 10 Now the extension number has been registered by VigorPhone successfully See the number on the right side of the arrow ...

Page 97: ...ntially Simultaneously If an incoming call rings on a Hunt Group all extensions belong to this group will ring except for the IP phones which are busy or offline Sequentially If an incoming call rings on a Hunt Group the first extension in the list is tried If the call is not answered within 15 seconds it will move to the next available extension in the list The IP phones which are busy or offline...

Page 98: ...s Guide 88 H Ho ow w t to o s se et tu up p H Hu un nt t G Gr ro ou up p f fo or r E Ex xa am mp pl le e 1 1 a an nd d 2 2 1 Configure extensions for IP phones 2 Open IP PBX PBX System Hunt Group Configure the following two groups ...

Page 99: ...different from all the other extension numbers Select Simultaneously as Hunt Rule For the Hunt Group of RD department Hunt Group Name is locally significant for identification Hunt Group Extension must be different from all the other extension numbers Select Sequentially as Hunt Rule You can use Move Up and Move Down buttons to adjust the sequence of the extensions ...

Page 100: ...ame time When you dial 200 extension 201 rings first then 202 next 203 and finally 204 rings Method 2 With auto attendant after hearing the greeting you may dial 1 The extensions 101 102 and 103 ring simultaneously Or you may dial 2 and extension 201 ring first then 202 next 203 and finally 204 rings Tip If users in the Hunt Group leave their desks they would turn on Do Not Disturb at their extens...

Page 101: ...ze the auto attendant to play greeting messages based on the time and day settings such as office hours after office hours weekends and holidays C Co on nf fi ig gu ur re e A Au ut to o A At tt te en nd da an nt t o on n V Vi ig go or rI IP PP PB BX X 2 28 82 20 0 We will take an example to explain the common configuration In this example we will present callers with options so that they can be di...

Page 102: ...y unavailable to take your call Our business hours are nine to six Monday through Friday If you want to leave a message please press 0 to leave a message for the receptionist If you want to get new product information please press 1 through 9 z When you finish the record press z Dial 1256 to hear the non office hours greeting Prompt 6 that you have recorded z If you are not satisfied with the resu...

Page 103: ... are configured as follows Configure extension for the support department It is a hunt group If the hunt rule is set with Sequentially the extension 201 ring first then 202 205 203 and finally 204 rings one by one when someone calls 200 If the hunt rule is set with Simultaneously extensions 201 202 203 204 and 205 ring at the same time when someone calls 200 ...

Page 104: ...or the SIP trunk In this example when you call 866669 iptel org during the office hours you will hear office hours greeting Prompt 5 during the non office hours you will hear the non office hours greeting Prompt 6 4 Make sure the system time is synchronized from the System Maintenance Time and Date page ...

Page 105: ...iguration the router will configure the settings for the non office hours automatically 6 Open Auto Attendant Wizard and configure the Office hours rule The rule is set as follows z Key 1 for support department Press 1 for technical support z Key 2 for sales department Press 2 for sales z Key 3 for advertisement Press 3 to listen to new products introduction z Key 0 for receptionist Press 0 to spe...

Page 106: ...r Ring Extension and here it is set for receptionist For other keys we let the users to listen to new product introduction 8 Then click OK to finish the auto attendant wizard Note If a caller dials the wrong extension number VigorIPPBX 2820 will play the greeting once more to let he she dials the right extension again ...

Page 107: ...820 is deployed in the office Both Jacky and Graham use IP phones and connect them to VigorIPPBX 2820 with extension numbers 211 and 101 registered to VigorIPPBX 2820 respectively Voice mails are both enabled for these two extension numbers In addition Graham requires VigorIPPBX 2820 to send an email to him when there is a voice message When Graham is busy unable to answer the phone calls or when ...

Page 108: ...word If you want to listen the voice mail by using IP phone you must a voice mail password This can prevent someone else to listen to your voice message Only digit characters 0 9 are accepted as voice mail password Answer Mode Select Voice Mail When Graham is busy unable to answer the phone calls or when his IP phone is off line VigorIPPBX 2820 will ask the caller to leave a message 3 Open Jacky s...

Page 109: ...oice mail via email Voice mail Password If you want to listen the voice mail by IP phone you must setup a voice mail password This can prevent someone else to listen to your voice message Only digit characters 0 9 are accepted as voice mail password Answer Mode Select Voice Mail When Jacky is busy unable to answer the phone calls or when his IP phone is off line VigorIPPBX 2820 will ask the caller...

Page 110: ...ssage after Sending Mail If it is enabled a voice message will be automatically deleted from VigorIPPBX 2820 after an email containing this message has been sent out successfully You can t listen to a message from your IP phone after it is deleted from VigorIPPBX 2820 Day for keeping voice mail It means the time for keeping a voice mail in VigorIPPBX 2820 The default value is 3 days After the time...

Page 111: ...aham can listen to his voice messages via his IP phone as follows 1 Pick up the IP phone which has registered to VigorIPPBX 2820 with the extension number 211 2 Dial 888 This number is defined in IP PBX PBX System Voice Mail Configuration page 3 Enter the Voice mail Password It is defined in IPPXB Extension Profiles 4 A prompt will be played informing if you have any voice messages or not 5 Press ...

Page 112: ...VigorIPPBX 2820 Series User s Guide 102 Since Jacky configures to listen to voice messages from IP Phone no email will be sent to Jacky ...

Page 113: ...ng such special tone you will hear the normal dial tone Then you can choose to listen to the voice message or call someone back E Ex xa am mp pl le e f fo or r u us si in ng g M MW WI I Here we use the following illustration to make an example for using MWI Generally Jacky uses mail client to receive voice mails But it s not convenient to check voice mail via mail client at all times Especially th...

Page 114: ...ord before they listen to the voice mail Notify User who Subscribed Most IP Phones support MWI feature You can enable or disable it for your requirement When Notify User who Subscribed is selected VigorIPPBX 2820 will send MWI to the IP phone with MWI enabled However if the IP phone does not enable MWI function VigorIPPBX 2820 will not send MWI to that IP phone Force Notify User When Force Notify ...

Page 115: ...time this message will be deleted automatically Send Voice Message by Email Tick it to enable the voice mail function Delete Voice Message after Sending Mail If you are using MWI do not enable such option No MWI notification will be sent after a voice message is deleted E Ex xa am mp pl le e E Ex xp pl la an na at ti io on n 1 Mike calls 866669 iptel org and dials extension number 211 2 Jacky is n...

Page 116: ...tw wo or rk k C Co on nn ne ec ct ti io on n f fo or r V Vi ig go or rI IP PP PB BX X 2 28 82 20 0 In this document we will use the scenario illustrated in the following graphic 1 VigorIPPBX 2820 acts as an SIP server with WAN IP 218 242 132 26 and LAN IP 192 168 1 1 2 Stephen uses an IP Phone connected registered to VigorIPPBX 2820 via LAN 3 Jacky uses the software Phone registered to VigorIPPBX ...

Page 117: ...up p t th he e e ex xt te en ns si io on ns s o on n V Vi ig go or rI IP PP PB BX X 2 28 82 20 0 1 Enter the IP PBX Extension Profile setup page and configure the relevant extension profile 2 After finishing the settings you may have the following table ...

Page 118: ...r r e ex xt te en ns si io on ns s z Software based IP Phone e g DrayTek Soft Phone Jacky is using Soft Phone a VoIP softphone for registering his extension 101 to VigorIPPBX 2820 Start the Soft Phone Click the Setting SIP tab from the DrayTek Soft Phone dialog Click Add to open the following dialog Type the information for Jacky ...

Page 119: ...lick the Profiles tab Create a new profile Make sure the Profile type is Call through SIP Proxy Finally press OK You will get the Profile Options window Open the SIP Proxy tab and configure the address of IPPBX The computer is located in the local network of VigorIPPBX 2820 therefore the LAN IP address 192 168 1 1 of VigorIPPBX 2820 must be input in the Proxy domain field Here we use the default S...

Page 120: ...PBX 2820 z Hardware based IP Phone e g VigorPhone 350 Stephen is using VigorPhone 350 a hard IP telephone for registering his extension 222 to VigorIPPBX 2820 The VigorPhone 350 is connected behind VigorIPPBX 2820 therefore the LAN IP address 192 168 1 1 must be set as Registration Server Proxy Server and Realm Address Enter other settings as figure shown below The password must be the same as set...

Page 121: ...ample of VigorIPPBX 2820 must be set as Registrar and Proxy addresses Enter other settings as figure shown below The password must be the same as set in VigorIPPBX 2820 M Mo on ni it to or r t th he e s st ta at tu us s o of f e ex xt te en ns si io on ns s o on n V Vi ig go or rI IP PP PB BX X 2 28 82 20 0 After configuration please check the status on VigorIPPBX 2820 If the extension registered ...

Page 122: ...he ISDN S0 port of Vigor2820VS VigorIPPBX 2820 can connect with two ISDN phones or connect to an ISDN PBX with multiple ISDN devices connected For there are so many ISDN devices we can set different MSN numbers for mapping different ISDN devices Below shows an example of connection structure for your reference Note ISDN Phone adapter must connect to Vigor Router s ISDN S0 port otherwise Vigor Rout...

Page 123: ...820 2 Open IPPBX Extension and click one of the index links to set extension profile 3 Select ISDN1 S0 and relevant MSN from 30 39 for the Type setting It means When someone calls ext 1001 VigorIPPBX 2820 will forward such call to the device connected to VigorIPPBX 2820 ISDN S0 port with MSN number 30 The MSN number for the connected ISDN device also must be set with 30 ...

Page 124: ...on nn ne ec ct te ed d I IS SD DN N p po or rt t To dial out an SIP call please dial the trunk number for SIP Trunk e g dial 001 if you want to use iptel SIP account first and then dial the SIP number of the peer To dial out an ISDN call please dial the extension number e g 904 for ISDN TE port first and then the ISDN number of the peer ...

Page 125: ... the web pages for protecting your system To access into MyVigor for getting more information please create an account for MyVigor 4 4 1 17 7 1 1 C Cr re ea at ti in ng g a an n A Ac cc co ou un nt t v vi ia a V Vi ig go or r R Ro ou ut te er r 1 Click CSM Web Content Filter Profile The following page will appear Or Click System Maintenance Activation to open the following page 2 Click the Activat...

Page 126: ...ries User s Guide 116 4 Check to confirm that you accept the Agreement and click Accept 5 Type your personal information in this page and then click Continue 6 Choose proper selection for your computer and click Continue ...

Page 127: ...k START 8 Check to see the confirmation email with the title of New Account Confirmation Letter from myvigor draytek com 9 Click the Activate my Account link to enable the account that you created The following screen will be shown to verify the register process is finished Please click Login ...

Page 128: ...ow click Login Your account has been activated You can access into MyVigor server to activate the service e g WCF that you want 4 4 1 17 7 2 2 C Cr re ea at ti in ng g a an n A Ac cc co ou un nt t v vi ia a M My yV Vi ig go or r W We eb b S Si it te e 1 Access into http myvigor draytek com Find the line of Not registered yet Then click the link Click here to access into next page ...

Page 129: ...ries User s Guide 119 2 Check to confirm that you accept the Agreement and click Accept 3 Type your personal information in this page and then click Continue 4 Choose proper selection for your computer and click Continue ...

Page 130: ...om 7 Click the Activate my Account link to enable the account that you created The following screen will be shown to verify the register process is finished Please click Login 8 When you see the following page please type in the account and password that you just created in the fields of UserName and Password Then type the code in the box of Auth Code according to the value displayed on the right ...

Page 131: ...d to authenticate VPN connections To generate a one time password the user has to enter his personal PIN code into the device The authentication is based on two factors the token device and the PIN code There are many one time password clients for the iPhone such as mOTP iOTP or CitrusOTP Here we will introduce mOTP mobile OneTimePasswords which may be downloaded from the following links http apps...

Page 132: ...TP has been successfully installed on your iPhone we will not introduce the installation here Open it and press the button Generate Secret to initialize your secret key Don t do this if there already is a secret key existed otherwise it will re initialize your secret key 2 Shake your iPhone to generate a random secret key ...

Page 133: ... one time password For the administrator please do the following 1 Setup a remote dial in VPN profile and check Enable Mobile One Time Passwords mOTP Setup a username Setup a PIN code e g 1111 which can be 4 to 7 numbers Enter the secret key e g e759bb6f0e94c7ab4fe689ebf00c5202 which is generated and got from the end user Note Both the PIN Code and Secret will be hidden with after you press the OK...

Page 134: ... Each time you start a new VPN connection you must perform the following steps to generate a valid password 1 Open mOTP Enter the PIN code In this example it is 1111 Then press Generate Password Note Each time you enter the PIN code you will get a different password 2 Here the password is 3dcecd ...

Page 135: ...the connection is dropped you must generate a new password then redial the connection S Su um mm ma ar ry y 1 End user generates a secret key and reports it to the administrator 2 Administrator enters this secret key in a teleworker profile 3 Administrator setups a username and PIN code and provides them to the end user 4 End user uses the PIN code to generate a password ...

Page 136: ...kup in practical use z Group Call Pickup There are three extension numbers 201 202 and 203 for sales department and there are two extension numbers 204 and 205 for engineering department When the extension 202 is ringing people e g 201 and 203 in the same department can pick up the phone call by pressing 1 z Direct Call Pickup If people in engineering department want to pick up the incoming call o...

Page 137: ...VigorIPPBX 2820 Series User s Guide 127 The default value for call pickup number is 1 in VigorIPPBX Users can modify the number by accessing into IPPBX PBX System SIP Proxy Setting whenever they want ...

Page 138: ...can be grouped within one hunt group represented by 200 in this case in VigorIPPBX When someone dials 200 these three extensions will ring at the same time Here we will introduce how to configure the Hunt Group in VigorIPPBX series In this document VigorIPPBX 3510 is taken as an example 1 Open the web configurator of VigorIPPBX 3510 Access into IPPBX PBX System Hunt Group 2 Type a name as Hunt Gro...

Page 139: ... following action will be determined by Overflow Rule There are five selections for people to choose z Terminate Time is up and no one answers the phone call will be hung up automatically z Keep Ringing If no one answers the phone call will ring continuously till someone lifts it z Forward To Group If no one answers the phone call will be forwarded to another hunt group z Forward To Extension If n...

Page 140: ...gister an SIP trunk of VigorIPPBX 3510 to VigorIPPBX 2820 with an account of 101 2820PBX register an SIP trunk of VigorIPPBX 2820 to VigorIPPBX 3510 with an account of 201 3510PBX C Co on nf fi ig gu ur re e S Se et tt ti in ng gs s i in n V Vi ig go or rI IP PP PB BX X 3 35 51 10 0 V Vi ig go or rI IP PP PB BX X 2 28 82 20 0 1 Access into the web configuration interface of VigorIPPBX 3510 2 Open ...

Page 141: ...After finished the configuration VigorIPPBX 3510 will be registered to VigorIPPBX 2820 as an extension 101 Press OK to save the settings 6 If the registration is successfully the field of Status in IP PBX SIP Trunk List will be displayed with R ...

Page 142: ...e as used in VigorIPBPX 3510 However the registration must be done with the web configuration interface of VigorIPPBX 2820 The Way of Operation After finished the above configuration there are three ways to make a phone call between VigorIPPBX 3510 and VigorIPPBX 2820 Take the extension 202 of VigorIPPBX 3510 calling the extension 102 of VigorIPPBX 2820 as an example ...

Page 143: ...VigorIPPBX 3510 Make all the dialing number with prefix number 1 will be dialed out from SIP trunk 1 After finished the digit map setting simply dial 102 from 202 in IPPBX 3510 both extensions can communicate with each other Such method will be easier than above two methods for only one step must be taken As for the configuration of Digit Map please open IPPBX DialPlan and choose Digit Map Check E...

Page 144: ...or the extension registered from VPN However if it is required please untick the Disable registration from WAN option then register the extension via VPN tunnel for higher security You can achieve the following requests z Disable registration from WAN and VPN for all extensions z Enable registration from WAN and VPN for all extensions z Enable registration from WAN and VPN for some extensions disa...

Page 145: ... from the IP PBX PBX System SIP Proxy Setting page 2 Then open IP PBX Extension Click any one of the index numbers 3 Now you will get the following setup page for an extension Note that the Allow Registration from option has two check boxes one for WAN and the other for VPN These two options are disabled by default which means this extension is not allowed registration from the interface you choos...

Page 146: ...VigorIPPBX 2820 Series User s Guide 136 This page is left blank ...

Page 147: ...resses and are listed in the following ranges From 10 0 0 0 to 10 255 255 255 From 172 16 0 0 to 172 31 255 255 From 192 168 0 0 to 192 168 255 255 W Wh ha at t a ar re e P Pu ub bl li ic c I IP P A Ad dd dr re es ss s a an nd d P Pr ri iv va at te e I IP P A Ad dd dr re es ss s As the router plays a role to manage and further protect its LAN it interconnects groups of host PCs Each of them has a ...

Page 148: ... be regarded as the second WAN port However the original Ethernet WAN1 still can be used and Load Balance can be done in the router Besides 3G USB Modem in WAN2 also can be used as backup device Therefore when WAN1 is not available the router will use 3 5G for supporting automatically The supported 3G USB Modem will be listed on DrayTek web site Please visit www draytek com for more detailed infor...

Page 149: ... yet the physical connection for WAN2 is done through an Ethernet port P1 or USB port You cannot change it To use 3G network connection through 3G USB Modem choose 3G USB Modem as the physical mode in WAN2 Next go to WAN Internet Access 3G USB Modem is available for WAN2 You can enable PPP as the access mode and complete further configuration Physical Type This setting is available for WAN2 only Y...

Page 150: ...ge of WAN Internet Access In addition there are three selections for you to choose for different purposes WAN2 Fail It means the connection for WAN1 will be activated when WAN2 is failed WAN2 Upload speed exceed XX kbps It means the connection for WAN1 will be activated when WAN2 Upload speed exceed certain value that you set in this box for 15 seconds WAN2 Download speed exceed XX kbps It means t...

Page 151: ...t WAN interface for accessing into the Internet WAN2 is the optional WAN interface for accessing into the Internet when WAN 1 is inactive for some reason Display Name It shows the name of the WAN1 WAN2 that entered in general setup Physical Mode It shows the physical port for WAN1 WAN2 Config Information It shows brief configuration information for WAN1 WAN2 interface WAN1 and WAN2 support differe...

Page 152: ... Set up the DSL parameters required by your ISP These are vital for building DSL connection to your ISP Multi PVC channel The selections displayed here are determined by the page of Internet Access Multi PVCs Select M PVCs Channel means no selection will be chosen VPI Type in the value provided by ISP VCI Type in the value provided by ISP Encapsulating Type Drop down the list to choose the type pr...

Page 153: ...le for the routers supporting ISDN function only Before utilizing the ISDN dial backup feature you must create a dial backup profile first Please click ISDN Dialing to a Single ISP to create the backup profile Note This feature is available for ISDN 2 port only None Disable the backup function Packet Trigger The backup line is not on until a packet from a local host triggers the router to establis...

Page 154: ... Mode is selected in WAN General Setup page IP Address From ISP Usually ISP dynamically assigns IP address to you each time you connect to it and request In some case your ISP provides service to always assign you the same IP address whenever you request In this case you can fill in this IP address in the Fixed IP field Please contact your ISP before you want to use this function WAN IP Alias If y...

Page 155: ...e set in that web page After finishing all the settings here please click OK to activate them M MP Po oA A f fo or r W WA AN N1 1 MPoA is a specification that enables ATM services to be integrated with existing LANs which use either Ethernet token ring or TCP IP protocols The goal of MPoA is to allow different LANs to send packets to each other via an ATM backbone To use MPoA as the accessing prot...

Page 156: ... The backup line is not on until a packet from a local host triggers the router to establish a connection Always On If the broadband connection is no longer available the backup line will be activated automatically and always on until the broadband connection is restored We recommend you to enable this feature if you host a web server for your customers access WAN Connection Detection Such functio...

Page 157: ... have multiple public IP addresses and would like to utilize them on the WAN interface please use WAN IP Alias You can set up to 8 public IP addresses other than the current one you are using Notice that this setting is available for WAN1 only Type the additional WAN IP address and check the Enable box Then click OK to exit the dialog IP Address Type in the private IP address Subnet Mask Type in t...

Page 158: ...according to the information provided by your ISP If you want to connect to Internet all the time you can check Always On Username Type in the username provided by ISP in this field Password Type in the password provided by ISP in this field Index 1 15 in Schedule Setup You can type in four sets of time schedule for your request All the schedules can be set previously in Application Schedule web p...

Page 159: ...le Timeout Set the timeout for breaking down the Internet after passing through the time without any action This setting is active only when the Active on demand option for Active Mode is selected in WAN General Setup page IP Address Assignment Method IPCP Usually ISP dynamically assigns IP address to you each time you connect to it and request In some case your ISP provides service to always assi...

Page 160: ...e click OK to activate them S St ta at ti ic c o or r D Dy yn na am mi ic c I IP P f fo or r W WA AN N2 2 For static IP mode you usually receive a fixed public IP address or a public subnet namely multiple public IP addresses from your DSL or Cable ISP service providers In most cases a Cable service provider will offer a fixed public IP while a DSL service provider will offer a public subnet If yo...

Page 161: ...ure is available for ISDN 2 port only None Disable the backup function Packet Trigger The backup line is not on until a packet from a local host triggers the router to establish a connection Always On If the broadband connection is no longer available the backup line will be activated automatically and always on until the broadband connection is restored We recommend you to enable this feature if ...

Page 162: ...net command RIP Protocol Routing Information Protocol is abbreviated as RIP RFC1058 specifying how routers exchange routing tables information Click Enable RIP for activating this function WAN IP Network Settings This group allows you to obtain an IP address automatically and allows you type in IP address manually WAN IP Alias If you have multiple public IP addresses and would like to utilize them...

Page 163: ...fy a MAC Address and enter the MAC address in the MAC Address field DNS Server IP Address Type in the primary IP address for the router if you want to use Static IP mode If necessary type in secondary IP address for necessity in the future P PP PT TP P L L2 2T TP P f fo or r W WA AN N2 2 To use PPTP L2TP as the accessing protocol of the Internet select PPTP L2TP mode The following web page will ap...

Page 164: ...uter to establish a connection PPP Setup PPP Authentication Select PAP only or PAP or CHAP for PPP Idle Timeout Set the timeout for breaking down the Internet after passing through the time without any action This setting is active only when the Active on demand option for Active Mode is selected in WAN General Setup page IP Address Assignment Method IPCP Usually ISP dynamically assigns IP address...

Page 165: ...on and type in a fixed IP address in the box of Fixed IP Address Fixed IP Address Type a fixed IP address WAN IP Network Settings Obtain an IP address automatically Click this button to obtain the IP address automatically Specify an IP address Click this radio button to specify some data IP Address Type the IP address Subnet Mask Type the subnet mask ...

Page 166: ...me is provided by your ISP for identifying different access points Simply click Apply to apply such name Finally you have to click OK to save the setting Apply Activate the function of identification Modem Dial String Such value is used to dial through USB mode Please use the default value If you have any question please contact to your ISP PPP Username Type the PPP username optional PPP Password ...

Page 167: ... as the first PVC line that will be used as multi PVCs Enable Check this box to enable that channel The channels that you enabled here will be shown in the Multi PVC channel drop down list on the web page of Internet Access Though you can enable eight channels in this page yet only one channel can be chosen on the web page of Internet Access VPI Type in the value provided by your ISP VCI Type in t...

Page 168: ...SP and then click WAN link of Channel 3 4 or 5 to configure your router WAN for Router borne Application Choose the router service for channel 3 4 or 5 Management It can be specified for general management Web configuration telnet TR069 If you choose Management the configuration for this PVC will be effective for Web configuration telnet TR069 VoIP It can be specified for VoIP only If you choose V...

Page 169: ... On Username Type in the username provided by ISP in this field Password Type in the password provided by ISP in this field PPP Authentication Select PAP only or PAP or CHAP for PPP Idle Timeout Set the timeout for breaking down the Internet after passing through the time without any action This setting is active only when the Always On option is note selected IP Address from ISP Fixed IP Click Ye...

Page 170: ...contact with your ISP for detailed information QoS Type Select a proper QoS type for the channel according to the information that your ISP provides PCR It represents Peak Cell Rate The default setting is 0 SCR It represents Sustainable Cell Rate The value of SCR must be smaller than PCR MBS It represents Maximum Burst Size The range of the value is 10 to 50 ...

Page 171: ...pe Normally service type is used for the service of video stream e g IPTV It can divide the packets from remote control and from video stream into different PVC In general the protocol used by remote control is IGMP Normal It means that the PVC can accept all packets except IGMP IGMP It means that the PVC can accept packets of IGMP only Add Tag To identify the usage of PVC check this box to invoke...

Page 172: ...t to go to dedicate network interface based on the following web page setup Twenty policies of load balance are supported by this router Note Load Balance Policy is running only when both WAN1 and WAN2 are activated Index Click the number of index to access into the load balance policy configuration web page Enable Check this box to enable this policy Protocol Use the drop down menu to change the ...

Page 173: ...er of the policy Click Index 1 to access into the following page for configuring load balance policy Enable Check this box to enable this policy Protocol Use the drop down menu to choose a proper protocol for the WAN interface Binding WAN interface Choose the WAN interface WAN1 or WAN2 for binding Auto failover to other WAN Check this button to lead the data passing through other WAN automatically...

Page 174: ...AN N Local Area Network LAN is a group of subnets regulated and ruled by router The design of network structure is related to what type of public IP addresses coming from your ISP 5 5 2 2 1 1 B Ba as si ic cs s o of f L LA AN N The most generic function of Vigor router is NAT It creates a private subnet of your own As mentioned previously the router will talk to other public hosts on the Internet ...

Page 175: ... exchange routing information with neighboring routers using the RIP to accomplish IP routing This allows users to change the information of the router such as IP address and the routers will automatically inform for each other W Wh ha at t i is s S St ta at ti ic c R Ro ou ut te e When you have several subnets in your LAN sometimes a more effective and quicker way for connection is the Static rou...

Page 176: ...ate IP address for connecting to a local private network Default 192 168 1 1 1st Subnet Mask Type in an address code that determines the size of the network Default 255 255 255 0 24 For IP Routing Usage Click Enable to invoke this function The default setting is Disable 2nd IPAddress Type in secondary IP address for connecting to a subnet Default 192 168 2 1 24 2nd Subnet Mask An address code that...

Page 177: ...the host one by one and click Add to create a list of hosts to be assigned deleted or edited IP address from above pool Set a list of MAC Address for 2nd DHCP server will help router to assign the correct IP address of the correct subnet to the correct host So those hosts in 2nd subnet won t get an IP address belonging to 1st subnet RIP Protocol Control Disable deactivates the RIP protocol It will...

Page 178: ...erver The value is usually as same as the 1st IP address of the router which means the router is the default gateway DHCP Server IPAddress for Relay Agent Set the IP address of the DHCP server you are going to use so the Relay Agent can help to forward the DHCP request to the DHCP server DNS Server Configuration DNS stands for Domain Name System Every Internet host must have a unique IP address al...

Page 179: ...pter to get more information for your necessity 5 5 2 2 3 3 S St ta at ti ic c R Ro ou ut te e Go to LAN to open setting page and choose Static Route Index The number 1 to 10 under Index allows you to open next page to set up static route Destination Address Displays the destination address of the static route Status Displays the status of the static route Viewing Routing Table Displays the routin...

Page 180: ... Setup select 1st Subnet as the RIP Protocol Control Then click the OK button Note There are two reasons that we have to apply RIP Protocol Control on 1st Subnet The first is that the LAN interface can exchange RIP packets with the neighboring routers via the 1st subnet 192 168 1 0 24 The second is that those hosts on the internal private subnets ex 192 168 10 0 24 can access the Internet via the ...

Page 181: ...atic Route Setup page Click on another Index Number to add another static route as show below which regulates all packets destined to 211 100 88 0 will be forwarded to 192 168 1 3 4 Go to Diagnostics and choose Routing Table to verify current routing table ...

Page 182: ... them based on the physical ports You can also manage the in out rate of each port Go to LAN page and select VLAN The following page will appear Click Enable to invoke VLAN function To add or remove a VLAN please refer to the following example 1 If VLAN 0 is consisted of hosts linked to P1 and P2 and VLAN 1 is consisted of hosts linked to P3 and P4 ...

Page 183: ... function is used to bind the IP and MAC address in LAN to have a strengthening control in network When this function is enabled all the assigned IP and MAC address binding together cannot be changed If you modified the binding IP or MAC address it might cause you not access into the Internet Click LAN and click Bind IP to MAC to open the setup page Enable Click this radio button to invoke this fu...

Page 184: ...lected item will be removed from the IP Bind List Note Before you select Strict Bind you have to bind one set of IP MAC address for one PC If not no one of the PCs can access into Internet And the web configurator of the router might not be accessed 5 5 3 3 N NA AT T Usually the router serves as an NAT Network Address Translation router NAT is a mechanism that one or more private IP addresses can ...

Page 185: ... 1 1 P Po or rt t R Re ed di ir re ec ct ti io on n Port Redirection is usually set up for server related service inside the local network LAN such as web servers FTP servers E mail servers etc Most of the case you need a public IP address for each server and this public IP address domain name are recognized by all users Since the server is actually located inside the LAN the network well protecte...

Page 186: ...P of private IP automatically Service Name Enter the description of the specific network service Protocol Select the transport layer protocol TCP or UDP WAN IP Select the WAN IP used for port redirection There are eight WAN IP alias that can be selected and used for port redirection The default setting is All which means all the incoming data from any port will be redirected to specified range of ...

Page 187: ...ntry you have defined Note that the router has its own built in services servers such as Telnet HTTP and FTP etc Since the common port numbers of these services servers are all the same you may need to reset the router in order to avoid confliction For example the built in web configurator in the router is with default port 80 which may conflict with the web server in the local network http 192 16...

Page 188: ...Host that maps ALL unsolicited data on any protocol to a single host in the LAN Regular web surfing and other such Internet activities from other clients will continue to work without inappropriate interruption DMZ Host allows a defined internal user to be totally exposed to the Internet which usually helps some special applications such as Netmeeting or Internet Games etc The inherent security pr...

Page 189: ...P address of the DMZ host or click Choose PC to select one Choose PC Click this button and then a window will automatically pop up as depicted below The window consists of a list of private IP addresses of all hosts in your LAN network Select one private IP address in the list to be the DMZ host When you have selected one private IP from the above dialog the IP address will be shown on the followi...

Page 190: ... the relative number for the particular entry that you want to offer service in a local host You should click the appropriate index number to edit or clear the corresponding entry Comment Specify the name for the defined network service WAN Interface Display the WAN interface for the entry Local IP Address Display the private IP address of the local host offering the service Status Display the sta...

Page 191: ... or click Choose PC to select one Choose PC Click this button and subsequently a window having a list of private IP addresses of local hosts will automatically pop up Select the appropriate IP address of the local host in the list Protocol Specify the transport layer protocol It could be TCP UDP or none for selection Start Port Specify the starting port number of the service offered by the local h...

Page 192: ...Ps are recorded in WAN IP alias You want that private IP 192 168 1 10 can use 86 123 123 2 as source IP when it sends packet out to Internet You can use address mapping function to achieve this demand Simply type 192 168 1 10 as the Private IP and type 86 123 123 2 as the WAN IP Protocol Display the protocol used for this address mapping Public IP Display the public IP address selected for this en...

Page 193: ...ss for incoming packets Subnet Mask Select a value of subnet mask for private IP address 5 5 3 3 5 5 P Po or rt t T Tr ri ig gg ge er r Port Trigger is a variation of open ports function the difference is that the port trigger has the dynamic characteristics It is more secure comparing to open ports In Open Ports setting once we setup the ports be opened all traffic can go through these open ports...

Page 194: ... application of this rule Trigger Protocol Select the protocol TCP UDP or TCP UDP for such trigger profile Trigger Port Type the port or port range for such trigger profile Incoming Protocol When the trigger packets received it is expected the incoming packets will use the selected protocol Select the protocol TCP UDP or TCP UDP for the incoming data of such trigger profile Incoming Port Type the ...

Page 195: ...pection SPI tracks packets and denies unsolicited incoming data z Selectable Denial of Service DoS Distributed DoS DDoS attacks protection I IP P F Fi il lt te er rs s Depending on whether there is an existing Internet connection or in other words the WAN link status is up or down the IP filter architecture categorizes traffic into two Call Filter and Data Filter z Call Filter When there is no exi...

Page 196: ...system s resource while the vulnerability attacks will try to paralyze the system by offending the vulnerabilities of the protocol or operation system The DoS Defense function enables the Vigor router to inspect every incoming packet based on the attack signature database Any malicious packet that might duplicate itself to paralyze the host in the secure LAN will be strictly blocked and a Syslog m...

Page 197: ...Data Filter Action Profile Select Pass or Block for the packets that do not match with the filter rules APP Enforcement Select one of the APP Enforcement Profile settings created in CSM APP Enforcement Profile for applying with this router Please set at least one profile for choosing in CSM APP Enforcement Profile web page first For troubleshooting needs you can specify to record information for A...

Page 198: ...ection System Maintenance Syslog Mail Alert for more detailed information Syslog For troubleshooting needs you can specify the filter log and or CSM log here by checking the box The log will be displayed on Draytek Syslog window Advance Setting Click Edit to open the following window However it is strongly recommended to use the default settings here Codepage This function is used to compare the c...

Page 199: ...low which matched with the firewall rule Some on line games for example Half Life will use lots of fragmented UDP packets to transfer game data Instinctively as a secure firewall Vigor router will reject these fragmented packets to prevent attack unless you enable Accept Incoming Fragmented UDP Packets By checking this box you can play these kinds of on line games If security concern is in higher ...

Page 200: ...k the Filter Rule index button to enter the Filter Rule setup page Check to enable the Filter Rule Check this box to enable the filter rule Comments Enter filter set comments description Maximum length is 14 character long Index 1 15 Set PCs on LAN to work at certain time interval only You may choose up to 4 schedules out of the 15 schedules pre defined in Applications Schedule setup The default s...

Page 201: ...cts as the Address Type From the IP Group drop down list choose the one that you want to apply Or use the IP Object drop down list to choose the object that you want Service Type Click Edit to access into the following dialog to choose a suitable service type To set the service type manually please choose User defined as the Service Type and type them in this dialog In addition if you want to use ...

Page 202: ...ragmented Apply the rule to unfragmented packets Fragmented Apply the rule to fragmented packets Too Short Apply the rule only to packets that are too short to contain a complete header Filter Specifies the action to be taken when packets match the rule Block Immediately Packets matching the rule will be dropped immediately Pass Immediately Packets matching the rule will be passed immediately Bloc...

Page 203: ...nt Filter web page first For troubleshooting needs you can specify to record information for Web Content Filter by checking the Log box It will be sent to Syslog server Please refer to section System Maintenance Syslog Mail Alert for more detailed information SysLog For troubleshooting needs you can specify the filter log and or CSM log here Check the corresponding box to enable the log function T...

Page 204: ...ng All the packets while transmitting through Vigor router will be filtered by firewall settings configured by Vigor router if Strict Security Firewall is enabled If the firewall system does not have any response pass or block for these packets such as no response coming from Anti Spam server then the router s firewall will block the packets directly In addition you can restrict the strict securit...

Page 205: ...n of two IP filters call filter or data filter You may preset 12 call filters and data filters in Filter Setup and even link them in a serial manner Each filter set is composed by 7 filter rules which can be further defined After that in General Setup you may specify one set for call filter and one set for data filter to execute first ...

Page 206: ...ts attempt to exhaust the limited resource of Vigor router By default the threshold and timeout values are set to 50 packets per second and 10 seconds respectively Enable UDP flood defense Check the box to activate the UDP flood defense function Once detecting the Threshold of the UDP packets from the Internet has exceeded the defined value the Vigor router will start to randomly discard the subse...

Page 207: ... will ignore any broadcasting ICMP echo request Block trace router Check the box to enforce the Vigor router not to forward any trace route packets Block SYN fragment Check the box to activate the Block SYN fragment function The Vigor router will drop any packets having SYN flag and more fragment bit set Block Fraggle Attack Check the box to activate the Block fraggle Attack function Any broadcast...

Page 208: ...running over the upper layer However the protocol types greater than 100 are reserved and undefined at this time Therefore the router should have ability to detect and reject this kind of packets Warning Messages We provide Syslog function for user to retrieve message from Vigor router The user as a Syslog Server shall receive the report sending from Vigor router which is a Syslog Client All the w...

Page 209: ...hem with groups for using conveniently Later we can select that object group that can apply it For example all the IPs in the same department can be defined with an IP object a range of IP address 5 5 5 5 1 1 I IP P O Ob bj je ec ct t You can set up to 192 sets of IP Objects with different conditions Set to Factory Default Clear all profiles Click the number under Index column for settings in deta...

Page 210: ...pe for the IP address Select Single Address if this object contains one IP address only Select Range Address if this object contains several IPs within a range Select Subnet Address if this object contains one subnet for IP address Select Any Address if this object contains any IP address Start IP Address Type the start IP address for Single Address type End IP Address Type the end IP address if t...

Page 211: ...nder Index column for settings in detail Name Type a name for this profile Maximum 15 characters are allowed Interface Choose WAN LAN or Any to display all the available IP objects with the specified interface Available IP Objects All the available IP objects with the specified interface chosen above will be shown in this box Selected IP Objects Click button to add the selected IP objects in this ...

Page 212: ...t to Factory Default Clear all profiles Click the number under Index column for settings in detail Name Type a name for this profile Protocol Specify the protocol s which this profile will apply to Source Destination Port Source Port and the Destination Port column are available for TCP UDP protocol It can be ignored for other protocols The filter rule will filter out any port number ...

Page 213: ...and last values are different it indicates that all the ports except the range defined here are available for this service type the port number greater than this value is available the port number less than this value is available for this profile Below is an example of service type objects settings 5 5 5 5 4 4 S Se er rv vi ic ce e T Ty yp pe e G Gr ro ou up p This page allows you to bind several...

Page 214: ...Type Object will be shown in this box Selected Service Type Objects Click button to add the selected IP objects in this box 5 5 5 5 5 5 K Ke ey yw wo or rd d O Ob bj je ec ct t You can set 200 keyword object profiles for choosing as black white list in CSM URL Web Content Filter Profile Set to Factory Default Clear all profiles Click the number under Index column for setting in detail ...

Page 215: ...formation will be watched out and be passed blocked based on the configuration on Firewall settings 5 5 5 5 6 6 K Ke ey yw wo or rd d G Gr ro ou up p This page allows you to bind several keyword objects into one group The keyword groups set here will be chosen as black white list in CSM URL Web Content Filter Profile Set to Factory Default Clear all profiles Click the number under Index column for...

Page 216: ...ted Keyword Objects Click button to add the selected Keyword objects in this box 5 5 5 5 7 7 F Fi il le e E Ex xt te en ns si io on n O Ob bj je ec ct t This page allows you to set eight profiles which will be applied in CSM URL Content Filter All the files with the extension names specified in these profiles will be processed according to the chosen action Set to Factory Default Clear all profile...

Page 217: ...20 Series User s Guide 207 Profile Name Type a name for this profile Type a name for such profile and check all the items of file extension that will be processed in the router Finally click OK to save this profile ...

Page 218: ... URL strings or some of HTTP data hiding in the payload of TCP packets while legacy firewall inspects packets based on the fields of TCP IP headers only On the other hand Vigor router can prevent user from accidentally downloading malicious codes from web pages It s very common that malicious codes conceal in the executable objects such as ActiveX Java Applet compressed files and other executable ...

Page 219: ...ellaneous application Such profile will be used in Firewall General Setup and Firewall Filter Setup pages Set to Factory Default Clear all profiles Profile Display the number of the profile which allows you to click to set different policy Name Display the name of the APP Enforcement Profile Click the number under Index column for settings in detail There are four tabs IM P2P Protocol and Misc dis...

Page 220: ...ed Users will not access into related web pages or use the applications Pass All the items selected in this page will not be blocked User can access into related web pages or use the applications Select All Click it to choose all of the items in this page The profiles configured here can be applied in the Firewall General Setup and Firewall Filter Setup pages as the standard for the host s to foll...

Page 221: ...VigorIPPBX 2820 Series User s Guide 211 The items categorized under P2P Below shows the items which are categorized under Protocol ...

Page 222: ...gers At office URL Content Filter can also provide a job related only environment hence to increase the employee work efficiency How can URL Content Filter work better than traditional firewall in the field of filtering Because it checks the URL strings or some of HTTP data hiding in the payload of TCP packets while legacy firewall inspects packets based on the fields of TCP IP headers only On the...

Page 223: ... the malicious code Click CSM and click URL Content Filter Profile to open the profile setting page You can set eight profiles as URL content filter Simply click the index number under Profile to open the following web page Profile Name Type the name for such profile Priority It determines the action that this router will apply Both Pass The router will let all the packages that match with the con...

Page 224: ...cuted For this one the router will process the packages with the conditions set below for web feature first then URL second Log None There is no log file will be recorded for this profile Pass Only the log about Pass will be recorded in Syslog Block Only the log about Block will be recorded in Syslog All All the actions Pass and Block will be recorded in Syslog URL Access Control Enable URL Access...

Page 225: ...The keyword could be a noun a partial noun or a complete URL string Multiple keywords within a frame are separated by space comma or semicolon In addition the maximal length of each frame is 32 character long After specifying keywords the Vigor router will decline the connection request to the website whose URL string matched to any user defined keyword It should be noticed that the more simplifie...

Page 226: ...nance Activation Service Activation Wizard allows you to use trial version or update the license of WCF directly without accessing into the server MyVigor located on http myvigor draytek com However if you use the Web Content Filter Profile page to activate WCF feature it is necessary for you to access into the server MyVigor located on http myvigor draytek com Therefore you need to register an ac...

Page 227: ...ctory settings Cache None the router will check the URL that the user wants to access via WCF precisely however the processing rate is normal Such item can provide the most accurate URL matching L1 the router will check the URL that the user wants to access via WCF If the URL has been accessed previously it will be stored for a short time about 1 second in the router to be accessed quickly if requ...

Page 228: ...owing web page The items listed in Categories will be changed according to the different service providers If you have and activate another web content filter license the items will be changed simultaneously All of the configuration made for web content filter will be deleted automatically Therefore please backup your data before you change the web content filter license If the Web Content Filter ...

Page 229: ...ing webpage with the characters listed on Group Object Selections If the web pages do not match with the specified feature set here they will be processed with the categories listed on the box below Block block accessing into the corresponding webpage with the characters listed on Group Object Selections If the web pages do not match with the specified feature set here they will be processed with ...

Page 230: ...ces which might result in important accesses impacted To solve the problem you can use limit session to limit the session procession for specified Hosts In the Bandwidth Management menu click Sessions Limit to open the web page To activate the function of limit session simply click Enable and set the default session limit Enable Click this button to activate the function of limit session Disable C...

Page 231: ...ts of time schedule for your request All the schedules can be set previously in Application Schedule web page and you can use the number that you have set in that web page 5 5 7 7 2 2 B Ba an nd dw wi id dt th h L Li im mi it t The downstream or upstream from FTP HTTP or some P2P applications will occupy large of bandwidth and affect the applications for other programs Please use Limit Bandwidth t...

Page 232: ... you can use the number that you have set in that web page 5 5 7 7 3 3 Q Qu ua al li it ty y o of f S Se er rv vi ic ce e Deploying QoS Quality of Service management to guarantee that all applications receive the service levels required and sufficient bandwidth to meet performance expectations is indeed one important aspect of modern enterprise network One reason for QoS is that numerous TCP based...

Page 233: ... DS domain owners to define the service level provided toward traffic from different domains Then each DS node in these domains will perform the priority treatment This is called per hop behavior PHB The definition of PHB includes Expedited Forwarding EF Assured Forwarding AF and Best Effort BE AF defines the four classes of delivery or forwarding classes and three levels of drop precedence in eac...

Page 234: ...n nt te er rf fa ac ce e When you click Setup you can configure the bandwidth ratio for QoS of the WAN interface There are four queues allowed for QoS control The first three Class 1 to Class 3 class rules can be adjusted for your necessity Yet the last one is reserved for the packets which are not suitable for the user defined class rules WAN 1 WAN2 Enable the QoS Control The factory default for ...

Page 235: ...width to downstream speed Enable UDP Bandwidth Control Check this and set the limited bandwidth ratio on the right field This is a protection of TCP application traffic since UDP application traffic such as streaming video will exhaust lots of bandwidth Outbound TCP ACK Prioritize The difference in bandwidth between download and upload are great in ADSL2 environment For the download speed might be...

Page 236: ...r delete the class rule please click the Edit link of that one After you click the Edit link you will see the following page Now you can define the name for that Class In this case Test is used as the name of Class Index 1 For adding a new rule click Add to open the following page ACT Check this box to invoke these settings Local Address Click the Edit button to set the local IP address on LAN for...

Page 237: ...he packets of data will be divided with different levels and will be processed according to the level type by the system Please assign one of the levels of the data for processing with QoS control Service Type It determines the service type of the data for processing with QoS control It can also be edited You can choose the predefined service type from the Service Type drop down list Those types a...

Page 238: ...er Service Type field After you click the Edit link you will see the following page For adding a new service type click Add to open the following page Service Name Type in a new service for your request Service Type Choose the type TCP UDP or TCP UDP for the new service Port Configuration Click Single or Range as the Type If you select Range you have to type in the starting port number and the end...

Page 239: ...erver Once the router is online you will be able to use the registered domain name to access the router or internal virtual servers from the Internet It is particularly helpful if you host a web server FTP server or other server behind the router Before you use the Dynamic DNS feature you have to apply for free DDNS service to the DDNS service providers The router provides up to three accounts fro...

Page 240: ... block Enable Dynamic DNS Account Check this box to enable the current account If you did check the box you will see a check mark appeared on the Active column of the previous web page in step 2 WAN Interface Select the WAN interface order to apply settings here Service Provider Select the service provider for the DDNS account Service Type Select a service type Dynamic Custom or Static If you choo...

Page 241: ...me button to set the Vigor router s clock to current time of your PC The clock will reset once if you power down or reset the router There is another way to set up time You can inquiry an NTP server a time server on the Internet to synchronize the router s clock This method can only be applied when the WAN connection has been built up Set to Factory Default Clear all profiles and recover to factor...

Page 242: ...ver up again during the schedule Idle Timeout Specify the duration or period for the schedule How often Specify how often the schedule will be applied Once The schedule will be applied just once Weekdays Specify which days in one week should perform the schedule Example Suppose you want to control the PPPoE Internet access connection to be always on Force On from 9 00 to 18 00 for whole week Other...

Page 243: ...sist the remote dial in user or a wireless station and the RADIUS server in performing mutual authentication It enables centralized remote access authentication for network management Enable Check to enable RADIUS client feature Server IP Address Enter the IP address of RADIUS server Destination Port The UDP port number that the RADIUS server is using The default value is 1812 based on RFC 2138 Sh...

Page 244: ...SN Messenger to allow full use of the voice video and messaging features Enable UPNP Service Accordingly you can enable either the Connection Control Service or Connection Status Service After setting Enable UPNP Service setting an icon of IP Broadband Connection on Router on Windows XP Network Connections will appear The connection status and control status will be able to be activated The NAT Tr...

Page 245: ...function on your network may incur some security threats You should consider carefully these risks before activating the UPnP function Some Microsoft operating systems have found out the UPnP weaknesses and hence you need to ensure that you have applied the latest service packs and patches Non privileged users can control some router functions including removing and adding port mappings The UPnP f...

Page 246: ... The application of multicast will be executed through WAN port you specified Enable IGMP Snooping Check this box to enable this function The application of multicast will be executed for the clients in LAN Group ID This field displays the ID port for the multicast group The available range for IGMP starts from 224 0 0 0 to 239 255 255 254 P1 to P4 It indicates the LAN port used for the multicast ...

Page 247: ...able on the BIOS setting Wake by Two types provide for you to wake up the binded IP If you choose Wake by MAC Address you have to type the correct MAC address of the host in MAC Address boxes If you choose Wake by IP Address you have to choose the correct IP address IP Address The IP addresses that have been configured in Firewall Bind IP to MAC will be shown in this drop down list Choose the IP a...

Page 248: ...n a manner that emulates the properties of a point to point private link Below shows the menu items for VPN and Remote Access 5 5 9 9 1 1 R Re em mo ot te e A Ac cc ce es ss s C Co on nt tr ro ol l Enable the necessary VPN service as you need If you intend to run a VPN server inside your LAN you should disable the VPN service of Vigor Router to allow VPN tunnel pass through as well as the appropri...

Page 249: ...algorithm the router will transmit no MPPE encrypted packets Otherwise the MPPE encryption scheme will be used to encrypt the data Require MPPE 40 128bits Selecting this option will force the router to encrypt packets by using the MPPE encryption algorithm In addition the remote dial in user will use 40 bit to perform encryption prior to using 128 bit for encryption In other words if 128 bit MPPE ...

Page 250: ...re tunnel for IKE Phase 2 Phase 2 negotiation IPSec security methods including Authentication Header AH or Encapsulating Security Payload ESP for the following IKE exchange and mutual examination of the secure tunnel establishment There are two encapsulation methods used in IPSec Transport and Tunnel The Transport mode will add the AH ESP payload and use original IP header to encapsulate the data ...

Page 251: ...andard DES Triple DES 3DES and AES 5 5 9 9 4 4 I IP PS Se ec c P Pe ee er r I Id de en nt ti it ty y To use digital certificate for peer authentication in either LAN to LAN connection or Remote User Dial In connection here you may edit a table of peer certificate for selection As shown below the router provides 32 entries of digital certificates for peer dial in users Set to Factory Default Click ...

Page 252: ...ture to accept the peer with matching value The field can be IP Address Domain or E mail Address The box under the Type will appear according to the type you select and ask you to fill in corresponding setting Accept Subject Name Click to check the specific fields of digital signature to accept the peer with matching value The field includes Country C State ST Location L Organization O Organizatio...

Page 253: ...S server through the built in RADIUS client function The following figure shows the summary table Set to Factory Default Click to clear all indexes Index Click the number below Index to access into the setting page of Remote Dial in User User Display the username for the specific dial in user of the LAN to LAN profile The symbol represents that the profile is empty Status Display the access state ...

Page 254: ...e dial in user to make a PPTP VPN connection through the Internet You should set the User Name and Password of remote dial in user below IPSec Tunnel Allow the remote dial in user to make an IPSec VPN connection through Internet L2TP Allow the remote dial in user to make a L2TP VPN connection through the Internet You can select to use L2TP alone or with IPSec Select from below None Do not apply th...

Page 255: ... you select ISDN PPTP or L2TP with or without IPSec policy above Password This field is applicable when you select ISDN PPTP or L2TP with or without IPSec policy above Enable Mobile One Time Password mOTP Check this box to make the authentication with mOTP function PIN Code Type the code for authentication e g 1234 Secret Use the 32 digit secret number generated by mOTP in the mobile phone e g e75...

Page 256: ...ck Function The callback function provides a callback service only for the ISDN dial in user The remote user will be charged the connection fee by the telecom Check to enable Callback function Enables the callback function Specify the callback number The option is for extra security Once enabled the router will ONLY call back to the specified Callback Number Check to enable callback budget control...

Page 257: ...ultaneously The following figure shows the summary table Set to Factory Default Click to clear all indexes Name Indicate the name of the LAN to LAN profile The symbol represents that the profile is empty Status Indicate the status of individual profiles The symbol V and X represent the profile to be active and inactive respectively Click each index to edit each profile and you will get the followi...

Page 258: ...inquiry for data transmission between the hosts located on both sides of VPN Tunnel while connecting Block When there is conflict occurred between the hosts on both sides of VPN Tunnel in connecting such function can block data transmission of Netbios Naming Packet inside the tunnel VPN Dial Out Through Use the drop down menu to choose a proper WAN interface for this profile This setting is useful...

Page 259: ...e This function is to help the router to determine the status of IPSec VPN connection especially useful in the case of abnormal VPN IPSec tunnel disruption For details please refer to the note below Check to enable the transmission of PING packets to a specified IP address PING to the IP Enter the IP address of the remote host that located at the other end of the VPN tunnel Enable PING to Keep Ali...

Page 260: ...ypes provided here for different purpose Disable disables the LAN to LAN dial out function 64Kbps allows you to use one channel for Internet access 128Kbps allows you to use both channels for Internet access BOD stands for bandwidth on demand The router will use only one channel in low traffic situations Once the single channel bandwidth is fully used the other channel will be activated automatica...

Page 261: ...D5 or SHA 1 authentication algorithm 3DES without Authentication Use triple DES encryption algorithm and not apply any authentication scheme 3DES with Authentication Use triple DES encryption algorithm and apply MD5 or SHA 1 authentication algorithm AES without Authentication Use AES encryption algorithm and not apply any authentication scheme AES with Authentication Use AES encryption algorithm a...

Page 262: ...security reason the lifetime of key should be defined The default value is 3600 seconds You may specify a value in between 600 and 86400 seconds Perfect Forward Secret PFS The IKE Phase 1 key will be reused to avoid the computation complexity in phase 2 The default value is inactive this function Local ID In Aggressive mode Local ID is on behalf of the IP address while identity authenticating with...

Page 263: ...he User Name and Password of remote dial in user below IPSec Tunnel Allow the remote dial in user to trigger an IPSec VPN connection through Internet L2TP Allow the remote dial in user to make a L2TP VPN connection through the Internet You can select to use L2TP alone or with IPSec Select from below None Do not apply the IPSec policy Accordingly the VPN connection employed the L2TP without IPSec p...

Page 264: ... address of the remote node The only exception is Digital Signature X 509 can be set when you select IPSec tunnel either with or without specify the IP address of the remote node Pre Shared Key Check the box of Pre Shared Key to invoke this function and type in the required characters 1 63 as the pre shared key Digital Signature X 509 Check the box of Digital Signature to invoke this function and ...

Page 265: ...ress is fixed by remote side specify the fixed IP address here Do not change the default value if you do not select ISDN PPTP or L2TP Remote Network IP Remote Network Mask Add a static route to direct all traffic destined to this Remote Network IP Address Remote Network Mask through the VPN connection For IPSec this is the destination clients IDs of phase 2 quick mode More Add a static route to di...

Page 266: ... connections You may disconnect any VPN connection by clicking Drop button You may also aggressively Dial out by using Dial out Tool and clicking Dial button Dial Click this button to execute dial out function Refresh Seconds Choose the time for refresh the dial information among 5 10 and 30 Refresh Click this button to refresh the whole connection status ...

Page 267: ... 509 Any entity wants to utilize digital certificates should first request a certificate issued by a CA server It should also retrieve certificates of other trusted CA servers so it can authenticate the peer with certificates issued by those trusted CA servers Here you can manage generate and manage the local digital certificates and set trusted CA certificates Remember to adjust the time of Vigor...

Page 268: ...ain Import Click this button to import a saved file as the certification information Refresh Click this button to refresh the information listed below View Click this button to view the detailed settings for certificate request After clicking Generate the generated information will be displayed on the window below ...

Page 269: ...e click IMPORT to open the following window Use Browse to find out the saved text file Then click Import The one you imported will be listed on the Trusted CA Certificate window Then click Import to use the pre saved file For viewing each trusted CA certificate click View to open the certificate detail information window If you want to delete a CA certificate choose the one and click Delete to rem...

Page 270: ...ted services digital network that is an international communications standard for sending voice video and data over digital telephone lines or normal telephone wires Below shows the menu items for ISDN Data call function is supported only when ISDN2 port is configured as ISDN TE mode In normal case the ISDN2 port is configured as ISDN TE mode in default If it is configured as ISDN S0 mode the data...

Page 271: ...N settings such as enabling the ISDN port or not MSN numbers and blocked MSN numbers etc ISDN Port Click Enable to open the ISDN port and Disable to close it Country Code For proper operation on your local ISDN network you should choose the correct country code D Channel Mode It allows you to configure ISDN layer2 protocol as ...

Page 272: ... fields for MSN numbers Note that MSN services must be acquired from your local telecommunication operators By default MSN function is disabled If you leave the fields blank all incoming calls will be accepted without number matching Answer mode Specify the way to process incoming phone calls which matched the MSN number for router Auto Attendant The incoming call would be picked by router automat...

Page 273: ...r IVR voice to remind you to dial the extension number you want to reach c If someone dials to the router with 5972728 the call would be forwarded to extension 100 directly d If someone dials to the router with 5972729 the call would be forwarded to group extension 300 e If you use a phone with extension 100 to dial an ISDN call the remote ISDN phone would see the caller ID 5972728 for the Phone C...

Page 274: ...detailed configuration PPP MP Setup Link Type There are three link types provided here for different purpose Link Disable disables the ISDN dial out function Dialup 64Kbps allows you to use one ISDN B channel for Internet access Dialup 128Kbps allows you to use both ISDN B channels for Internet access Dialup BOD stands for bandwidth on demand The router will use only one B channel in low traffic s...

Page 275: ...ch cases dialing to two ISPs can increase the bandwidth utilization of the ISDN channels to 128kbps data speed Common Settings Enable Dual ISPs Function Check to enable the Dual ISPs function Require ISP Callback CBCP If your ISP supports the callback function check this box to activate the Callback Control Protocol during the PPP negotiation PPP MP Setup Link Type There are three link types provi...

Page 276: ...PCP for primary ISP setup In most environments you should not change these settings as most ISPs provide a dynamic IP address for the router when it connects to the ISP If your ISP provides a fixed IP address check Yes and enter the IP address in the field of Fixed IP Address Secondary ISP Setup ISP Name Enter the secondary ISP name Dial Number Enter the ISDN access number provided by the ISP User...

Page 277: ...uter will dial 5 times until it is connected to the ISP or remote access router Dial Delay Interval It specifies the interval between dialup retries By default the interval is 0 second Remote Activation It can help users who would like to access the server which is off the Internet in the head office To remotely make the server to be available on the Internet i e make the router in the head office...

Page 278: ... is being used over the High Water Time the additional channel will be activated Thus the total link speed will be 128kbps two B channels Low Water Mark and Low Water Time These parameters specify the situation in which the second channel will be dropped In terms of the two B channels if their utilization is under the Low Water Mark and these two channels are being used over the High Water Time th...

Page 279: ...ws menu items for IP PBX 5 5 1 12 2 1 1 E Ex xt te en ns si io on n The system allows you to set 50 extension numbers for ISDN SIP Phone call Please open IP PBX Extension to get the following page There are 50 extension profiles that you can configure Please click any number under Index to set detailed configuration ...

Page 280: ...nsion registration For getting the highest network security please check VPN only In addition refer to section 3 14 How to enhance the security for extensions registration for detailed information Type Determine the type for such extension profile SIP Choose this type to make such extension profile available for general IP phone ISDN Choose this type to make such extension profile available for IS...

Page 281: ...of MWI for users to choose Please click the one according to the real application Notify User who Subscribed The user needs to send out SUBSCRIBE message first When IPPBX detects new voice message from some extension number or the condition of the voice message is changed it will transfer NOTIFY message to the users within the valid time subscribed Force Notify User The user does not send out SUBS...

Page 282: ...e the way you want to process Forward To SIP Trunk If you choose Forward To SIP Trunk as the Answer Mode setting you have to specify one of the SIP Trunk numbers from 001 to 006 and type an external number in the field of dial to Later the internal phone calls will be transferred to such specified external number if they match the conditions of such profile Note The fiftieth extension profile is d...

Page 283: ...VigorIPPBX 2820 Series User s Guide 273 ...

Page 284: ...l main SIP accounts or sub accounts via VigorIPPBX 2820 5 5 1 12 2 2 2 1 1 S SI IP P T Tr ru un nk k This page allows you to set profiles for 6 SIP outside lines main account at one time with 50 alias names sub account Profile Name Display the name for such main account Domain Realm Display domain name or IP address of the SIP Registrar server Proxy Display the domain name or IP address of SIP pro...

Page 285: ... Auto is recommended The system will select a proper way for your VoIP call SIP Port Set the port number for sending receiving SIP message for building a session The default value is 6060 Your peer must set the same value in his her Registrar Domain Realm Set the domain name or IP address of the SIP Registrar server Proxy Set domain name or IP address of SIP proxy server By the time you can type p...

Page 286: ...ial outside lines for an extension number First dial a short number and wait for a while When dial tone appears please dial the real outside line number Second dial a short number and then the real outside line number without waiting for dial tone The short number is defined here as Trunk Number Out going call CLI Determine which phone number will be shown to the remote end Main number Choose this...

Page 287: ...he selected answer mode for office hours Non Office Hours Display the selected answer mode for non office hours Active Display current activation status for such account enabled or disabled Trunk Display the SIP Trunk for such sub account attached You can set 50 profiles as alias for SIP Trunk list Click the number under Index to set detailed configuration Active Click Enable to activate this entr...

Page 288: ...ny Extension or Group directly Non office hours answer mode Set the answering mode for such outside line in non office time You can specify it with Auto Attendant AA or forward it to any Extension or Group directly 5 5 1 12 2 2 2 2 2 I IS SD DN N T Tr ru un nk k This page allows you to set profile for ISDN outside line ISDN 1 Trunk Number Set the trunk number for extension to access when they want...

Page 289: ...t When both ISDN ports set to TE mode you can specify an auto hunt number When people want to dialing to I SDN network via this number by using extension the router will auto hunt an available line for it 5 5 1 12 2 2 2 3 3 P PS ST TN N T Tr ru un nk k This page allows you to set profile for PSTN line Trunk Number Type the PSTN Trunk number in this field When an extension wants to access the PSTN ...

Page 290: ...all he has to input the PIN code number to do the authentication for checking if the call is off net or not Select Enable and type the number as a Pin Code On Net PIN Code If a user needs to do on net from PSTN to VoIP call he has to input the PIN code number to do the authentication for checking if the call is on net or not Select Enable and type the number as a Pin Code Disconnect PSTN Trunk Pre...

Page 291: ...ipping number or replacing number It is used to help user having a quick and easy way to dial out through VoIP interface Enable Check this box to invoke this setting Match Prefix It is used to match with the number you dialed and can be modified with the OP Number by the mode add strip or replace Mode None No action Add When you choose this mode the OP number will be added before the prefix number...

Page 292: ...to SIP server OP Number The front number you type here is the first part of the account number that you want to execute special function according to the chosen mode by using the prefix number Min Len Set the minimal length of the dial number for applying the prefix number settings Take the above picture Prefix Table Setup web page as an example if the dial number is between 7 and 9 that number ca...

Page 293: ...5 5 1 12 2 3 3 2 2 P Ph ho on ne e B Bo oo ok k In this section you can set your VoIP contacts in the phonebook It can help you to make calls quickly and easily by using Speed Dial Number There are total 20 index entries in the phonebook for you to store all your friends and family members phone numbers Enable Check the box to enable the entry ...

Page 294: ...o dial out Route Choose the interface from VoIP 1 to VoIP 6 for the phone call to dial out 5 5 1 12 2 3 3 3 3 C Ca al ll l B Ba ar rr ri in ng g Call barring is used to block phone calls coming from the one that is not welcomed Click any index number to display the dial plan setup page Enable Click this to enable this entry Call Direction Determine the direction for the phone call IN incoming call...

Page 295: ...cluding ISDN1 2 SIP will be blocked with such mechanism Or you can specify certain port set in IP PBX Line Setting SIP Trunk to be blocked by choosing from the drop down list Index 1 15 in Schedule Enter the index of schedule profiles to control the call barring according to the preconfigured schedules Refer to section Application Schedule for detailed configuration Additionally you can set advanc...

Page 296: ...on preconfigured schedules 5 5 1 12 2 4 4 P PB BX X S Sy ys st te em m This page allows you to set relational advanced settings for PBX 5 5 1 12 2 4 4 1 1 S SI IP P P Pr ro ox xy y S Se et tt ti in ng g To make the IP phone to be registered in IP PBX device successfully it is necessary for the users to configure settings in this page SIP Local Port Set a port number as SIP local port The default s...

Page 297: ...ion number for group pickup just press pickup number For example pickup number is 1 and 101 105 are set in the same hunt group When an incoming call rings extension 101 the extension 102 105 can just dial 1 to pickup the call However if the extension 106 wants to pickup that call it needs to dial 1101 RTP Local Port Start RTP Local Port End If your VoIP service provider gave you such information p...

Page 298: ...es all the extension numbers under such group will ring Index You can set 10 groups for using in different conditions Simply click the number under Index to specify detailed information Group Name Display the name of such group Group Extension Display the extension number of such group Hunt List Display the members inside the group Click any index number to display the hunt group setup page ...

Page 299: ...ing one by one while receiving incoming calls Timeout Set the timeout for such group The default setting is 60 seconds After timeout the system will execute overflow rule selected below Overflow Rule When the hunt group does not have any response to an incoming call the call will be processed with the way chosen here such as being terminated keeping ringing forwarding to certain group forwarding t...

Page 300: ...e all of the items in Available area to Chosen area Remove Click this button to move the selected item in Chosen area to Available area Remove All Click this button to clear all of the selections in Chosen area Move Up Click this button to move the selected item to the upper place Move Down Click this button to move the selected item to the lower place ...

Page 301: ...d the voice mail to the specified e mail address for the incoming call directly and delete the temporary file in IP PBX if you check this box Days for keeping voice mail Type the days for keeping each voice mail Maximum message time Type the recording length for each voice mail SMTP Server Type IP address or domain name for the server specified for receiving voice messages SMTP Port Type the port ...

Page 302: ... drop down menu to choose the time as the starting point Office Hour End Use the drop down menu to choose the time as the ending point Weekdays Check the day s to apply the office hour for that index Date Specify date s for applying the office hour settings in holiday for example type 2 4 6 7 in the field of Date for Month 1 It means January 2 4 6 7 will apply the office hour settings configured i...

Page 303: ... rd d The first page is configured for phone calls in office hours Click Next The second page is configured for phone calls in non office hours Key 0 9 Key 0 is fixed with Ring Extension Key 1 9 can be set with different actions Action Drop down menu 1 contains Ring Extension Plays Prompt Ring Hunt Group Not Used ...

Page 304: ...automatically Ring Hunt Group Only the extension number within the Hunt Group will ring Not Used Nothing will be done for the key Drop down menu 2 contains extension name ex Tom Mike or prompt Prompt 1 Prompt 10 audio files or Hunt Group Name ex Sales RD2 It will be changed according to drop down menu 1 Finally the following window will appear ...

Page 305: ...iles and upload to router or download to PC However the file format of the audio file must follow the rule stated on the web page Users can record the audio files through a phone set connected to the router or use audio record program on PC Download The audio file can be saved with IVR file format or WAV file format In general it will be saved in the router s memory after you record it To back up ...

Page 306: ...by router firmware Upload System Prompt file is provided by router firmware To use such audio file you have to upload it to flash memory of the router after finishing firmware update Click this Browse button to browse and choose other audio files Restore Click this button to save the file to the router Next time the audio file will be played in IP PBX system ...

Page 307: ...hart for using a phone set to record audio file 1151 1160 1251 1260 1351 1360 14 1 Save 2 Review 3 Re record Cancel 1 Confirm 1 Cancel 1 Confirm 1 Cancel Record user defined prompt file within sec 20 Play user defined prompt file Delete user defined prompt file Clear all user defined prompt files IVR Greeting ...

Page 308: ...on or choose ISDN1 2 S0 ISDN intern for ISDN phone In addition you can connect six phones to this router in certain case Please refer to Section 1 4 for detailed information of ISDN phone network connection Call Feature A brief description for call feature will be shown in this field for your reference Codec The default Codec setting for each port will be shown in this field for your reference You...

Page 309: ... not misleading due to IP lost for example sending data from the public IP of remote router to the private IP of local router you can check this box to solve this problem Dynamic RTP Port Start Specifies the start port for RTP stream The default value is 10050 Dynamic RTP Port End Specifies the end port for RTP stream The default value is 15000 RTP TOS It decides the level of VoIP package Use the ...

Page 310: ...tone Index 1 15 in Schedule Enter the index of schedule profiles to control the DND mode according to the preconfigured schedules Refer to section Applications Schedule for detailed configuration CLIR hide caller ID Check this box to hide the caller ID on the display panel of the phone set Call Waiting Check this box to invoke this function A notice sound will appear to tell the user new phone cal...

Page 311: ...o something to save the bandwidth for other using Click On to invoke this function click off to close the function In addition you can press the Advanced button to configure tone settings volume gain MISC and DTMF mode Advanced setting is provided for fitting the telecommunication custom for the local area of the router installed Wrong tone settings might cause inconvenience for users To set the s...

Page 312: ...page If you cannot find out a suitable one please choose User Defined and fill out the corresponding values for dial tone ringing tone busy tone congestion tone by yourself for VoIP phone Also you can specify each field for your necessity It is recommended for you to use the default settings for VoIP communication Volume Gain Mic Gain 1 10 Speaker Gain 1 10 Adjust the volume of microphone and spea...

Page 313: ... Vigor will send the DTMF tone as audio directly when you press the keypad on the phone OutBand Choose this one then the Vigor will capture the keypad number you pressed and transform it to digital form then send to the other side the receiver will generate the tone according to the digital form it receive This function is very useful when the network traffic congestion occurs and it still can rem...

Page 314: ...tone Index 1 15 in Schedule Enter the index of schedule profiles to control the DND mode according to the preconfigured schedules Refer to section Applications Schedule for detailed configuration CLIR hide caller ID Check this box to hide the caller ID on the display panel of the phone set Call Waiting Check this box to invoke this function A notice sound will appear to tell the user new phone cal...

Page 315: ...ething to save the bandwidth for other using Click On to invoke this function click off to close the function In addition you can press the Advanced button to configure tone settings volume gain MISC DTMF mode and MSN number Advanced setting is provided for fitting the telecommunication custom for the local area of the router installed Wrong tone settings might cause inconvenience for users To set...

Page 316: ...tone and Congestion tone will be shown automatically on the page If you cannot find out a suitable one please choose User Defined and fill out the corresponding values for dial tone ringing tone busy tone congestion tone by yourself for VoIP phone Also you can specify each field for your necessity It is recommended for you to use the default settings for VoIP ...

Page 317: ...ne then the Vigor will capture the keypad number you pressed and transform it to digital form then send to the other side the receiver will generate the tone according to the digital form it receive This function is very useful when the network traffic congestion occurs and it still can remain the accuracy of DTMF tone SIP INFO Choose this one then the Vigor will capture the DTMF tone and transfer...

Page 318: ... configuration CLIR hide caller ID Check this box to hide the caller ID on the display panel of the phone set Codecs Prefer Codec Select one of five codecs as the default for your VoIP calls The codec used for each call will be negotiated with the peer party before each session and so may not be your default choice The default codec is G 729A B it occupies little bandwidth while maintaining good v...

Page 319: ...users To set the sound pattern of the phone set simply choose a proper region to let the system find out the preset tone settings and caller ID type automatically Or you can adjust tone settings manually if you choose User Defined TOn1 TOff1 TOn2 and TOff2 mean the cadence of the tone pattern TOn1 and TOn2 represent sound on TOff1 and TOff2 represent the sound off Region Select the proper region w...

Page 320: ... a pin code for the router to authenticate which one is allowed to dial VoIP to ISDN call The figure that you can type in this field is limited from three to eight with digits from zero to nine DTMP DTMF mode There are four selections provided here InBand Choose this one then the Vigor will send the DTMF tone as audio directly when you press the keypad on the phone OutBand Choose this one then the...

Page 321: ...isturbing by VoIP phone call During the period the one who dial in will listen busy tone yet the local user will not listen any ring tone Index 1 15 in Schedule Enter the index of schedule profiles to control the DND mode according to the preconfigured schedules Refer to section Applications Schedule for detailed configuration CLIR hide caller ID Check this box to hide the caller ID on the display...

Page 322: ... click off to close the function In addition you can press the Advanced button to configure tone settings volume gain MISC and DTMF mode Advanced setting is provided for fitting the telecommunication custom for the local area of the router installed Wrong tone settings might cause inconvenience for users To set the sound pattern of the phone set simply choose a proper region to let the system find...

Page 323: ...Congestion tone will be shown automatically on the page If you cannot find out a suitable one please choose User Defined and fill out the corresponding values for dial tone ringing tone busy tone and congestion tone by yourself for VoIP phone Also you can specify each field for your necessity It is recommended for you to use the default settings for VoIP communication ...

Page 324: ...end the DTMF tone as audio directly when you press the keypad on the phone OutBand Choose this one then the Vigor will capture the keypad number you pressed and transform it to digital form then send to the other side the receiver will generate the tone according to the digital form it receive This function is very useful when the network traffic congestion occurs and it still can remain the accur...

Page 325: ...m the web page LAN users can connect to four ISDN phones at one time through ISDN PBX system Follow the steps below to configure the phone ports with features of ISDN TE 1 Open IP PBX PBX System 2 Click Phone Settings to open the configuration page 3 Choose ISDN1 TE as the Port setting in index 2 and ISDN2 TE as the Port setting in index 3 4 Click OK to save the change 5 Next click index 2 link in...

Page 326: ... to open another dialog for saving configuration as a file 2 In Save As dialog the default filename is v2820pbx_SIPTrunk_Setting_2010XXXX for SIP Trunk or v2820pbx_Ext_Setting_2010XXX for extension settings You could give it another name by yourself 3 Click Save button the configuration will download automatically to your computer as a file named v2820pbx_SIPTrunk_Setting_2010XXXX for SIP Trunk or...

Page 327: ... Ca al ll l D De et ta ai il l R Re ec co or rd ds s This page displays call records of IP PBX such as failed call successful call no answer call date of the call and the duration of each call and so on Such records can be exported as a file with file format csv and stored in the host Simply click Export ...

Page 328: ...r conference without laying a clot of LAN cable or drilling holes everywhere Wireless LAN enables high mobility so WLAN users can simultaneously access all LAN facilities just like on a wired LAN as well as Internet access The Vigor wireless routers are equipped with a wireless LAN interface compliant with the standard IEEE 802 11n protocol To boost its performance further the Vigor Router is also...

Page 329: ... data encryption while WPA2 applies AES The WPA Enterprise combines not only encryption but also authentication Since WEP has been proved vulnerable you may consider using WPA for the most secure connection You should select the appropriate security mechanism according to your needs No matter which security suite you select they all will enhance the over the air data protection and or privacy on y...

Page 330: ...tings a new web page will appear so that you could configure the SSID and the wireless channel Please refer to the following figure for more information Enable Wireless LAN Check the box to enable wireless function Mode At present the router can connect to 11b Only 11g Only 11n Only Mixed 11b 11g Mixed 11g 11n and Mixed ...

Page 331: ...r wireless router while site surveying The system allows you to set four sets of SSID for different usage In default the first set of SSID will be enabled You can hide it for your necessity SSID Means the identification of the wireless LAN SSID can be any text numbers or various special characters The default SSID is default We suggest you to change it Isolate Member Check this box to make the wir...

Page 332: ...sion about 40 for 11g 5 for 11n by checking Tx Burst It is active only when both sides of Access Point and Station in wireless client invoke this function at the same time That is the wireless client must support this feature and invoke the function too Note Vigor N61 wireless adapter supports this function Therefore you can use and install it into your PC for matching with Packet OVERDRIVE refer ...

Page 333: ...correct settings please click OK to save and invoke it By clicking the Security Settings a new web page will appear so that you could configure the settings of WEP and WPA Mode There are several modes provided for you to choose Disable Turn off the encryption mechanism WEP Accepts only WEP clients and the encryption key should be entered in WEP Key WEP 802 1x Only Accepts only WEP clients and the ...

Page 334: ...Mixed WPA WPA2 802 1x only is selected WPA The WPA encrypts each frame transmitted from the radio using the key which either PSK Pre Shared Key entered manually in this field below or automatically negotiated via 802 1x authentication Either 8 63 ASCII characters such as 012345678 or 64 Hexadecimal digits leading by 0x such as 0x321253abcde Type Select from Mixed WPA WPA2 or WPA2 only Pre Shared K...

Page 335: ... control filter type to be applied to wireless LAN identified with SSID 1 to 4 respectively MAC Address Filter Display all access control entries that were inserted before Client s MAC Address Manually enter the MAC address of wireless client Apply SSID After entering the client s MAC address check the box of the SSIDs desired to insert this MAC address into their access control list Attribute s I...

Page 336: ...ong encryption passphrase to setup a wireless client every time He she only needs to press the WPS button on AP and selects that AP on the utility of wireless station Then WPS will connect for client and router automatically There are two methods to do network connection through WPS between AP and Stations pressing the Start PBC button or using PIN Code z On the side of VigorIPPBX 2820 series whic...

Page 337: ...d in WPA PSK or WPA2 PSK mode if you do not choose such mode in Wireless LAN Security you will see the following message box Please click OK and go back Wireless LAN Security to choose WPA PSK or WPA2 PSK mode and access WPS again Below shows Wireless LAN WPS web page Enable WPS Check this box to enable WPS setting WPS Status Display related system information for WPS SSID Display the SSID1 of the...

Page 338: ...de Please input the PIN code specified in wireless client you wish to connect and click Start PIN button The WLAN LED on the router will blink fast when WPS is in progress It will return to normal condition after two minutes You need to setup WPS within two minutes 5 5 1 13 3 6 6 W WD DS S WDS means Wireless Distribution System It is a protocol for connecting two access points AP wirelessly Usuall...

Page 339: ...et in Bridge mode packets received from a WDS link will only be forwarded to local wired or wireless hosts In other words only Repeater mode can do WDS to WDS packet forwarding In the following examples hosts connected to Bridge 1 or 3 can communicate with hosts connected to Bridge 2 through WDS links However hosts connected to Bridge 1 CANNOT communicate with hosts connected to Bridge 3 through B...

Page 340: ...hoose here will make the following WEP or Pre shared key field valid or not Choose one of the types for the router WEP Check this box to use the same key set in Security Settings page If you did not set any key in Security Settings page this check box will be dimmed Pre shared Key Type Display the type of the PSK used by such device Key Type 8 63 ASCII characters or 64 hexadecimal digits leading b...

Page 341: ...ed settings such as operation mode channel bandwidth guard interval and aggregation MSDU for wireless data transmission Operation Mode Mixed Mode the router can transmit data with the ways supported in both 802 11a b g and 802 11n standards However the entire wireless transmission will be slowed down if 802 11g or 802 11b wireless client is connected Green Field to get the highest throughput pleas...

Page 342: ...r usage Also it can be used to facilitate finding an AP for a WDS link Notice that during the scanning process about 5 seconds no client is allowed to connect to Vigor This page is used to scan the existence of the APs on the wireless LAN Yet only the AP which is in the same channel of this router can be found Please click Scan to discover all the connected APs Scan It is used to discover all the ...

Page 343: ...t ta at ti io on n L Li is st t Station List provides the knowledge of connecting wireless clients now along with its status code There is a code summary below for explanation For convenient Access Control you can select a WLAN station and click Add to Access Control below Refresh Click this button to refresh the status of station list Add Click this button to add current selected MAC address into...

Page 344: ... in ng gs s This page will determine the number of concurrent FTP connection default charset for FTP server and enable Samba service At present the Vigor router can support USB storage disk with formats of FAT16 and FAT32 only Therefore before connecting the USB storage disk into the Vigor router please make sure the memory format for the USB storage disk is FAT16 or FAT32 It is recommended for yo...

Page 345: ...name and a host name A workgroup name must not be the same as the host name The workgroup name can have as many as 15 characters and the host name can have as many as 23 characters Both them cannot contain any of the following Workgroup Name Type a name for the workgroup Host Name Type the host name for the router 5 5 1 14 4 2 2 U US SB B U Us se er r M Ma an na ag ge em me en nt t This page allow...

Page 346: ...pgrade usage Note FTP Passive mode is not supported by Vigor Router Please disable the mode on the FTP client Password Type the password for FTP Samba users for accessing FTP server Later you can open FTP client software and type the password specified here for accessing into USB storage disk Confirm Password Type the password again to make confirmation Home Folder It determines the folder for the...

Page 347: ...Create and Remove for such profile Before you click OK you have to insert a USB diskette into the USB interface of the Vigor router Otherwise you cannot save the configuration 5 5 1 14 4 3 3 F Fi il le e E Ex xp pl lo or re er r To review the content of USB diskette via USB port of the router please open USB Application Explorer to browse the files Refresh Click this icon to refresh files list Bac...

Page 348: ...20 Series User s Guide 338 Current Path Display current folder Upload Click this button to upload the selected file to the USB diskette The uploaded file in the USB diskette can be shared for other user through FTP ...

Page 349: ...if such USB disk is protected data not allowed to be written in or not Disk Capacity It displays the total capacity of the USB diskette Free Capacity It displays the free space of the USB diskette Click Refresh at any time to get new status for free capacity Index It displays the number of the client which connecting to FTP server Service It displays the server FTP or SMB that the client wants to ...

Page 350: ... 1 1 S Sy ys st te em m S St ta at tu us s The System Status provides basic network settings of Vigor router It includes LAN and WAN interface information Also you could get the current running firmware version or firmware related information from this presentation Model Name Display the model name of the router Firmware Version Display the firmware version of the router Build Date Time Display th...

Page 351: ...eway Display the assigned IP address of the default gateway SIP Trunk Index Profile Status Display current status for SIP profiles WAN side registration Display the status for WAN side registration Disable the SIP device is not allowed to register from WAN side Wireless LAN MAC Address Display the MAC address of the WLAN Interface Frequency Domain It can be Europe 13 usable channels USA 11 usable ...

Page 352: ...figuration Server you want to link Please refer to Auto Configuration Server user s manual for detailed information CPE Client It is not necessary for you to type them Such information is useful for Auto Configuration Server Enable Disable Sometimes port conflict might be occurred To solve such problem you might want to change port number for CPE Please click Enable and change the port number Peri...

Page 353: ... When you click OK the login window will appear Please use the new password to access into the web configurator again 5 5 1 15 5 4 4 C Co on nf fi ig gu ur ra at ti io on n B Ba ac ck ku up p B Ba ac ck ku up p t th he e C Co on nf fi ig gu ur ra at ti io on n Follow the steps below to backup your configuration 4 Go to System Maintenance Configuration Backup The following windows will be popped up...

Page 354: ...ent windows but the backup function is still available Note Backup for Certification must be done independently The Configuration Backup does not include information of Certificate R Re es st to or re e C Co on nf fi ig gu ur ra at ti io on n 3 Go to System Maintenance Configuration Backup The following windows will be popped up as shown below 4 Click Browse button to choose the correct configurat...

Page 355: ...slog protocol Enable syslog message Check the box listed on this web page to send the corresponding message of firewall VPN User Access Call WAN Router DSL information to Syslog Enable Alert Setup Check Enable to activate function of mail alert Send a test e mail Make a simple test for the e mail address specified in this page Please assign the mail address first and click this button to execute a...

Page 356: ...s you specify here Click OK to save these settings For viewing the Syslog please do the following 1 Just set your monitor PC s IP address in the field of Server IP Address 2 Install the Router Tools in the Utility within provided CD After installation click on the Router Tools Syslog from program menu 3 From the Syslog screen select the router you want to monitor Be reminded that in Network Inform...

Page 357: ...or PC host as router s system time Use Internet Time Select to inquire time information from Time Server on the Internet using assigned protocol Time Protocol Select a time protocol Server IP Address Type the IP address of the time server Time Zone Select the time zone where the router is located Enable Daylight Saving Check this box to enable daylight saving Such function is useful for certain ar...

Page 358: ...vers provided by the system to allow you managing the router from Internet Check the box es to specify Disable PING from the Internet Check the checkbox to reject all PING packets from the Internet For security issue this function is enabled by default Access List You could specify that the system administrator can only login from a specific host or network defined in the list A maximum of three I...

Page 359: ... Configurator may be used to restart your router Click Reboot System from System Maintenance to open the following page Index 1 15 in Schedule Setup You can type in four sets of time schedule for performing system reboot All the schedules can be set previously in Applications Schedule web page and you can use the number that you have set in that web page If you want to reboot the router using the ...

Page 360: ...ll guide you to upgrade firmware by using an example Note that this example is running over Windows OS Operating System Download the newest firmware from DrayTek s web site or FTP site The DrayTek web site is www draytek com or local DrayTek s web site and FTP site is ftp draytek com Click System Maintenance Firmware Upgrade to launch the Firmware Upgrade Utility Click OK The following screen will...

Page 361: ...uter Click System Maintenance Activation to open the following page for accessing http myvigor draytek com Note Such service mechanism is powered by Commtouch Activate via Interface Choose WAN interface used by such device for activating Web Content Filter Activate The Activate link brings you accessing into www vigorpro com to finish the activation of the account and the router Authentication Mes...

Page 362: ...splay the starting date of WCF license activated successfully Expire Date Display the ending date of WCF license activated successfully Activate Click this link to access into http myvigor draytek com for activating WCF function 5 5 1 16 6 D Di ia ag gn no os st ti ic cs s Diagnostic Tools provide a useful way to view or diagnose the status of your Vigor router Below shows the menu items for Diagn...

Page 363: ... g ISDN PPPoE PPPoA etc is triggered by a package sending from the source IP address Decoded Format It shows the source IP address local destination IP remote address the protocol and length of the package Refresh Click it to reload the page 5 5 1 16 6 2 2 R Ro ou ut ti in ng g T Ta ab bl le e Click Diagnostics and click Routing Table to open the web page Refresh Click it to reload the page ...

Page 364: ...DH HC CP P T Ta ab bl le e The facility provides information on IP address assignments This information is helpful in diagnosing network problems such as IP address conflicts etc Click Diagnostics and click DHCP Table to open the web page Index It displays the connection item number IP Address It displays the IP address assigned by this router for specified PC MAC Address It displays the MAC addre...

Page 365: ...t of the router used for NAT Peer IP Port It indicates the destination IP address and port of remote host Interface It displays the representing number for different interface Refresh Click it to reload the page 5 5 1 16 6 6 6 P Pi in ng g D Di ia ag gn no os si is s Click Diagnostics and click Ping Diagnosis to pen the web page Ping through Use the drop down list to choose the WAN interface that ...

Page 366: ...e running procedure for the IP address monitored and refreshes the data in an interval of several seconds The IP address listed here is configured in Bandwidth Management You have to enable IP bandwidth limit and IP session limit before invoke Data Flow Monitor If not a notification dialog box will appear to remind you enabling it Click Diagnostics and click Data Flow Monitor to open the web page ...

Page 367: ... the monitored device TX rate kbps Display the transmission speed of the monitored device RX rate kbps Display the receiving speed of the monitored device Sessions Display the session number that you specified in Limit Session web page Action Block can prevent specified PC accessing into Internet within 5 minutes Unblock the device with the IP address will be blocked in five minutes The remaining ...

Page 368: ...w the graph at any time 5 5 1 16 6 9 9 T Tr ra ac ce e R Ro ou ut te e Click Diagnostics and click Trace Route to open the web page This page allows you to trace the routes from router to the host Simply type the IP address of the host in the box and click Run The result of route trace will be shown on the screen Trace through Use the drop down list to choose the WAN interface that you want to pin...

Page 369: ... s Guide 359 Protocol Choose a protocol ICMP or UDP for such route Host IP Address It indicates the IP address of the host Run Click this button to start route tracing work Clear Click this link to remove the result on the window ...

Page 370: ...VigorIPPBX 2820 Series User s Guide 360 This page is left blank ...

Page 371: ...e OK or not z Backing to factory default setting if necessary If all above stages are done and the router still cannot run normally it is the time for you to contact your dealer for advanced help 6 6 1 1 C Ch he ec ck ki in ng g I If f t th he e H Ha ar rd dw wa ar re e S St ta at tu us s I Is s O OK K o or r N No ot t Follow the steps below to verify the hardware status 1 Check the power line and...

Page 372: ... After trying the above section if the link is stilled failed please do the steps listed below to make sure the network connection settings is OK F Fo or r W Wi in nd do ow ws s The example is based on Windows XP As to the examples for other operation systems please refer to the similar steps or find support notes in www draytek com 1 Go to Control Panel and then double click on Network Connection...

Page 373: ...utomatically and Obtain DNS server address automatically F Fo or r M Ma ac cO Os s 1 Double click on the current used MacOs on the desktop 2 Open the Application folder and get into Network 3 On the Network screen select Using DHCP from the drop down list of Configure IPv4 ...

Page 374: ... router correctly F Fo or r W Wi in nd do ow ws s 1 Open the Command Prompt window from Start menu Run 2 Type command for Windows 95 98 ME or cmd for Windows NT 2000 XP Vista The DOS command dialog will appear 3 Type ping 192 168 1 1 and press Enter If the link is OK the line of Reply from 192 168 1 1 bytes 32 time 1ms TTL 255 will appear 4 If the line does not appear please check the IP address s...

Page 375: ...VigorIPPBX 2820 Series User s Guide 365 ...

Page 376: ...f f You have to wait about 15 seconds after inserting 3G USB Modem into your Vigor2820 Later the USB LED will light on which means the installation of USB Modem is successful If the USB LED does not light on please remove and reinsert the modem again If it still fails restart Vigor2820 U US SB B L LE ED D l li ig gh ht ts s o on n b bu ut t t th he e n ne et tw wo or rk k c co on nn ne ec ct ti io...

Page 377: ...ed by returning to the default settings Try to reset the router by software or hardware Warning After pressing factory default setting you will loose all settings you did before Make sure you have recorded all useful settings before you pressing The password of factory default is null S So of ft tw wa ar re e R Re es se et t You can reset the router to factory default via Web page Go to System Mai...

Page 378: ...or the router again to fit your personal request 6 6 7 7 C Co on nt ta ac ct ti in ng g Y Yo ou ur r D De ea al le er r If the router still cannot work correctly after trying many efforts please contact your dealer for further help right away For any questions please feel free to send e mail to support draytek com ...

Page 379: ...Ap pp pe en nd di ix x H Ha ar rd dw wa ar re e S Sp pe ec ci if fi ic ca at ti io on ns s Operating 0 C 45 C Temperature Storage 25 C 70 C Humidity 10 90 non condensing Max Power Consumption 10 Watt Dimension L241 W165 H44 mm Power DC 12V 15V ...

Reviews: