VigorIPPBX 2820 Series User’s Guide
7
1
1
.
.
3
3
H
H
a
a
r
r
d
d
w
w
a
a
r
r
e
e
I
I
n
n
s
s
t
t
a
a
l
l
l
l
a
a
t
t
i
i
o
o
n
n
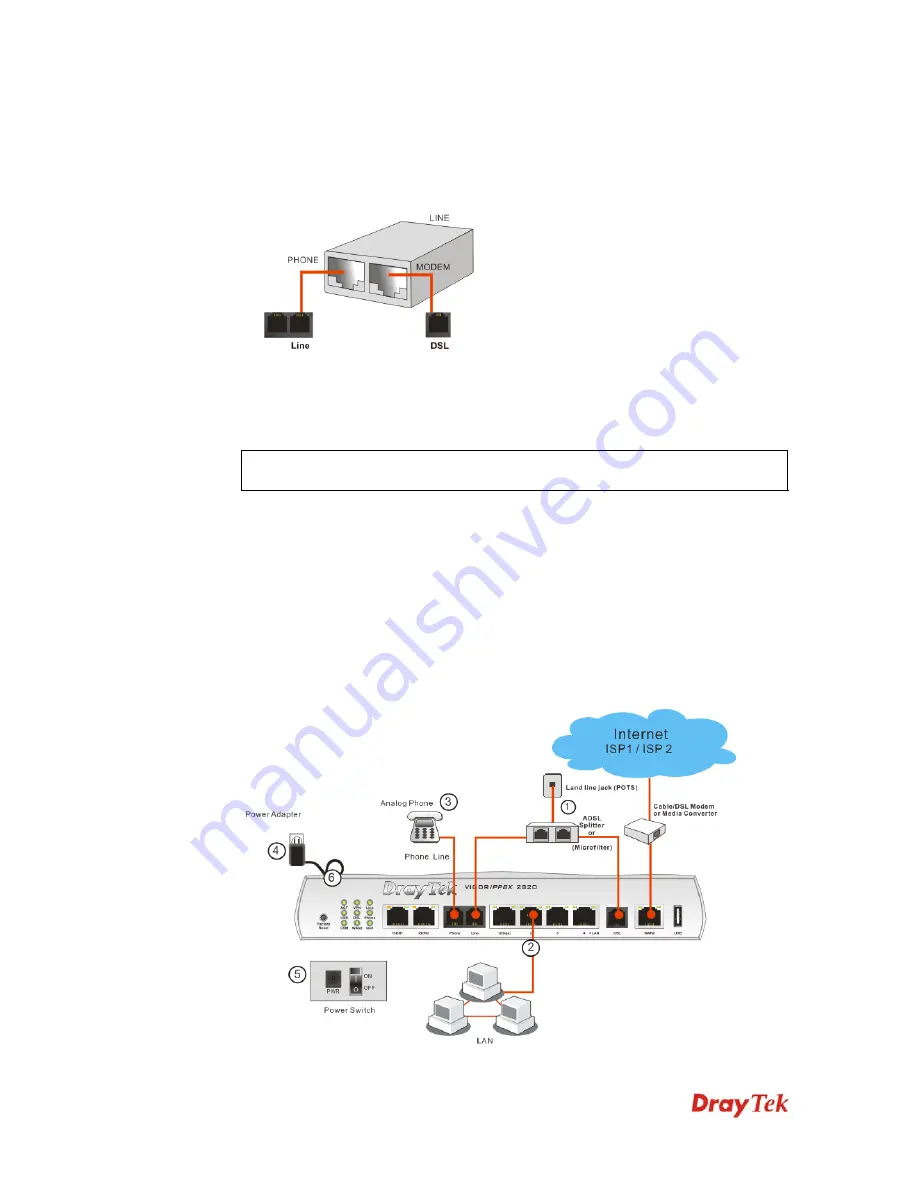
Before starting to configure the router, you have to connect your devices correctly.
1.
Connect the ADSL interface to the external ADSL splitter with an ADSL line cable.
Also, connect Line interface to an external ADSL splitter.
For second WAN, connect the cable Modem/DSL Modem/Media Converter to WAN2
port of router with Ethernet cable (RJ-45).
2.
Connect one end of an Ethernet cable (RJ-45) to one of the
LAN
ports of the router and
the other end of the cable (RJ-45) into the Ethernet port on your computer.
Note:
It is strongly recommended to connect to Ethernet port on your computer with
a shielding cable provided with the router.
3.
Connect the telephone sets with phone lines (for using VoIP function). For the model
without phone ports, skip this step.
4.
Connect one end of the power adapter to the router’s power port on the rear panel, and
the other side into a wall outlet.
5.
Power on the device by pressing down the power switch on the rear panel.
6.
The system starts to initiate. After completing the system test, the
ACT
LED will light
up and start blinking.
(For the detailed information of LED status, please refer to section 1.2.)
Summary of Contents for VigorIPPBX 2820 Series
Page 1: ......
Page 2: ......
Page 10: ......
Page 24: ...VigorIPPBX 2820 Series User s Guide 14 This page is left blank ...
Page 44: ...VigorIPPBX 2820 Series User s Guide 34 This page is left blank ...
Page 58: ...VigorIPPBX 2820 Series User s Guide 48 This page is left blank ...
Page 79: ...VigorIPPBX 2820 Series User s Guide 69 11 Now the firmware update is finished ...
Page 146: ...VigorIPPBX 2820 Series User s Guide 136 This page is left blank ...
Page 283: ...VigorIPPBX 2820 Series User s Guide 273 ...
Page 370: ...VigorIPPBX 2820 Series User s Guide 360 This page is left blank ...


