


Vigor3220 Series User’s Guide
78
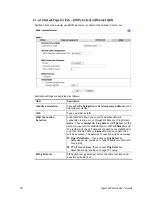
Open WAN Interface for
this Channel
Check the box to enable relating function.
WAN Application –
Management – It can be specified for general management
(Web configuration/telnet/TR069). If you choose
Management, the configuration for this VLAN will be
effective for Web configuration/telnet/TR069.
IPTV - The IPTV configuration will allow the WAN interface to
send IGMP packets to IPTV servers.
WAN Connection
Detection
Such function allows you to verify whether network
connection is alive or not through ARP Detect or Ping Detect.
Mode – Choose ARP Detect or Ping Detect for the system to
execute for WAN detection.
Ping IP – If you choose Ping Detect as detection mode, you
have to type IP address in this field for pinging.
TTL (Time to Live) – Displays value for your reference. TTL
value is set by telnet command.
WAN Setup
It is available only when VDSL or Ethernet (WAN2) is
selected as WAN Type. Choose PPPoE/PPPoA Client or
Static or Dynamic IP as the WAN mode for such channel.
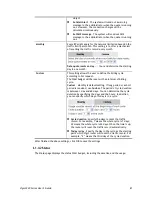
If PPPoE/PPPoA Client is selected as WAN Setup, you
have to configure the settings listed under ISP Access
Setup. Enter your allocated username, password and
authentication parameters according to the information
provided by your ISP.
ISP Name – Type in the name of your ISP.
Username – Type in the username provided by ISP in this
field. The maximum length of the name you can set is 80
characters.
Password – Type in the password provided by ISP in this
field. The maximum length of the password you can set is
48 characters.
PPP Authentication – Select PAP only or PAP or CHAP for
PPP.
Always On – Check it to keep the network
connection always.
Idle Timeout – Set the timeout for breaking down
the Internet after passing through the time without
any action.
Fixed IP – Click Yes to use this function and type in a
fixed IP address in the box of Fixed IP Address.
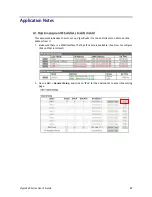
If Static or Dynamic IP is selected as WAN Setup, you
have to configure the settings listed under WAN IP
Network Settings .
Obtain an IP address automatically – Click this button to
obtain the IP address automatically.
Router Name – Type in the router name provided by
ISP.
Domain Name – Type in the domain name that you
have assigned.
Specify an IP address – Click this radio button to specify
some data.
IP Address – Type in the private IP address.
Subnet Mask – Type in the subnet mask.
Summary of Contents for VIGOR3220 SERIES
Page 1: ......
Page 12: ......
Page 56: ...Vigor3220 Series User s Guide 44 This page is left blank ...
Page 87: ...Vigor3220 Series User s Guide 75 ...
Page 97: ...Vigor3220 Series User s Guide 85 ...
Page 130: ...Vigor3220 Series User s Guide 118 ...
Page 147: ...Vigor3220 Series User s Guide 135 ...
Page 198: ...Vigor3220 Series User s Guide 186 This page is left blank ...
Page 224: ...Vigor3220 Series User s Guide 212 This page is left blank ...
Page 294: ...Vigor3220 Series User s Guide 282 This page is left blank ...
Page 313: ...Vigor3220 Series User s Guide 301 ...
Page 357: ...Vigor3220 Series User s Guide 345 ...
Page 434: ...Vigor3220 Series User s Guide 422 4 Click OK to save the settings ...
Page 484: ...Vigor3220 Series User s Guide 472 This page is left blank ...
Page 530: ...Vigor3220 Series User s Guide 518 This page is left blank ...
Page 558: ...Vigor3220 Series User s Guide 546 ...
Page 565: ...Vigor3220 Series User s Guide 553 ...
Page 569: ...Vigor3220 Series User s Guide 557 ...
Page 571: ...Vigor3220 Series User s Guide 559 P Pa ar rt t I IX X D Dr ra ay yT Te ek k T To oo ol ls s ...
Page 576: ...Vigor3220 Series User s Guide 564 This page is left blank ...


