background image

 Installation 

DLoG MPC 6 

Manual 

63 


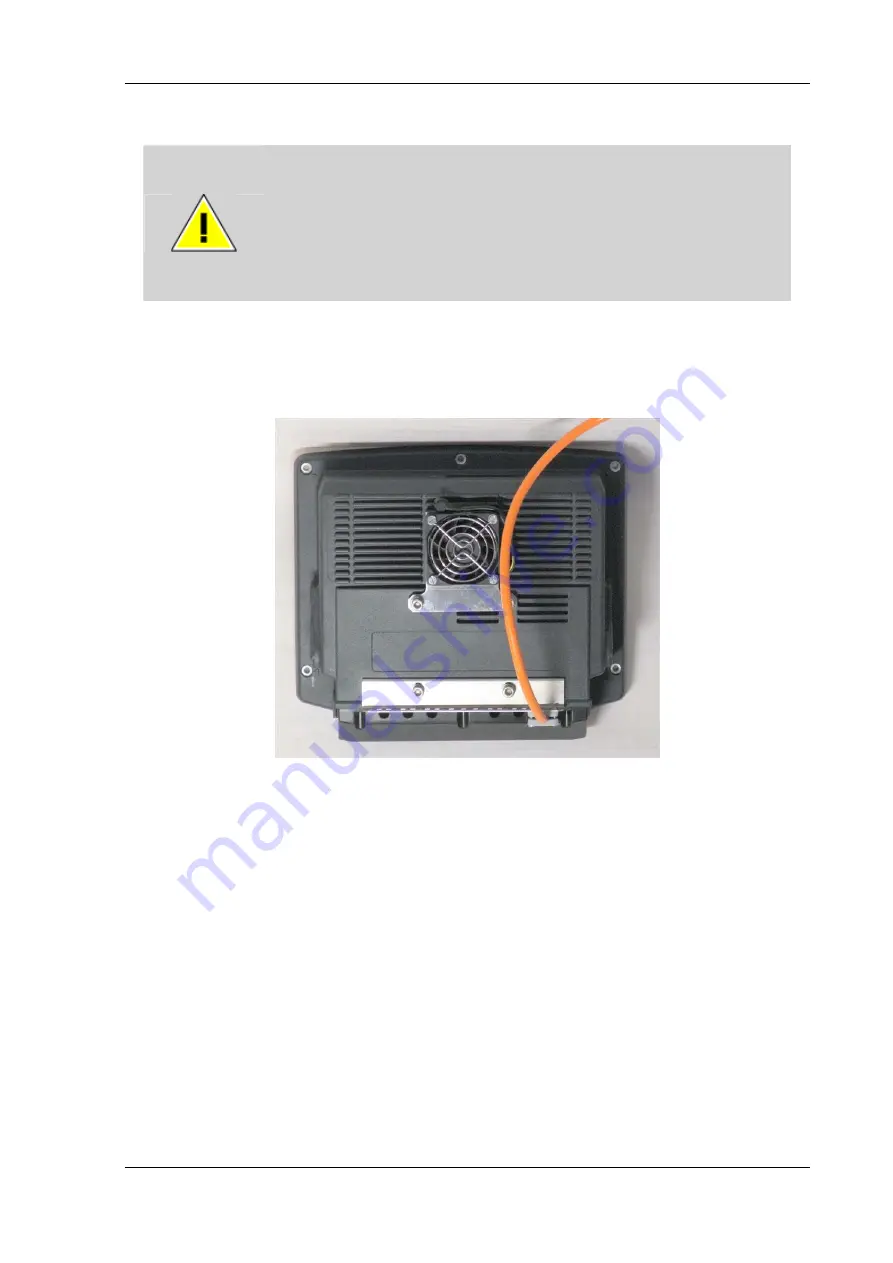
Take care not to damage the opening seal of the cable cover! It 
should be possible to attach the cable cover  to the cable duct  
without using force. The neck collar screws  should be screwed 
firmly, preferably diagonally and always using 5 rotations. The 
screws need to be retightened after 2 days. 


Figure 7.5: DLoG MPC 6 with cable cover mounted 

Summary of Contents for MPC 6

Page 1: ...DLoG MPC 6 Manual 1 01 ...

Page 2: ...r damages caused directly or indirectly by the delivery performance or usage of this material The software and hardware designations used in this documentation are in most cases also registered trademarks and are thus subject to law Windows is a registered trademark of Microsoft Corporation in the United States US and other countries This documentation is protected by copyright Duplication in whol...

Page 3: ......

Page 4: ......

Page 5: ...ing and extending modules 10 2 6 CE Marking 12 2 7 RTTE Directive 1999 5 EC 12 2 7 1 Special regulations in France 12 2 8 FCC user information 13 2 8 1 Interference declaration of the Federal Communications Commission 13 2 8 2 Transmission of radio frequencies 14 3 Device description 15 3 1 General 15 3 2 Intended usage 16 3 3 The models DLoG MPC 6 110 and DLoG MPC 6 112 16 3 4 Abbreviations used ...

Page 6: ...packing the DLoG MPC 6 37 4 1 Scope of delivery 37 4 2 Packaging 37 4 3 Returning your device 37 5 Putting your DLoG MPC 6 in operation 38 5 1 Cooling through the supply of fresh air 38 5 2 Pin configuration 39 5 3 External connectors 39 5 3 1 AC voltage supply connector 41 5 3 2 DC voltage supply connector 41 5 4 Connecting external devices 43 5 4 1 Powering down the DLoG MPC 6 44 5 5 WLAN settin...

Page 7: ... Follow and retain the installation instructions 56 7 4 Mechanical dynamic loading 56 7 5 Power supply 57 7 5 1 AC power pack 57 7 5 2 DC power pack 58 7 5 3 Installing connecting cables 59 7 6 Vehicle applications such as forklifts 59 7 7 Cable cover splash guard 61 7 7 1 Protection class IP65 61 7 7 2 Protection class IP54 62 8 Operation 64 8 1 4 key front panel 64 8 2 10 key front panel 65 8 3 ...

Page 8: ...erating systems 75 9 3 1 MS DOS 75 9 3 2 Windows XP Embedded 75 9 3 3 Linux 75 10 Software applications 76 10 1 Displaying the configuration of the DLoG MPC 6 76 10 2 Fine tuning the operating system parameters 76 10 3 Environment controller settings 77 11 Serial ports 79 11 1 Resources 79 11 2 COM1 options 79 11 3 COM1 as a power supply 79 11 4 COM2 options 80 11 5 COM2 as electrically isolated R...

Page 9: ...r drivers Win XP 91 12 5 Touch screen 93 12 5 1 MS DOS installation and calibration for driver version 5 06 94 12 6 Touch Serial for Windows XP Prof and XP Embedded 96 12 6 1 Installation 96 12 6 2 Calibration 98 12 7 Touch PS2 for Windows XP Prof and XP Embedded 99 12 7 1 Installation 99 12 7 2 Calibration 100 12 8 Resistance of the touch screen 101 12 9 Plug in cards 103 12 9 1 Riser card with 1...

Page 10: ...115 16 Appendix A System resources 116 16 1 Part 1 116 16 2 Part 2 118 17 Appendix B Terminal assignment Pins 119 17 1 External connectors 119 17 1 1 Keyboard and Mouse 119 17 1 2 USB 120 17 1 3 Serial port COM1 120 17 1 4 Serial port COM2 121 17 1 5 Network connector 122 17 2 Internal connectors motherboard MPC6 20 123 17 2 1 Cardbus connector 124 17 2 2 Input voltage connector 126 17 2 3 Ignitio...

Page 11: ...Card socket 142 18 Appendix C Jumper 143 18 1 Warnings 143 18 2 Standard jumper settings 143 18 3 Jumper layout view motherboard 144 18 3 1 Battery 145 18 3 2 Ethernet configuration 145 18 3 3 Compact Flash configuration 145 18 3 4 Touch enable 146 18 3 5 Touch configuration 146 18 3 6 COM1 configuration 147 18 3 7 LCD configuration 147 18 3 8 Compact Flash DMA configuration 148 18 3 9 Touch inter...

Page 12: ... setup program 164 21 3 Setup menu and navigation 165 21 4 Main setup screen 166 21 5 Advanced setup 168 21 5 1 ACPI configuration submenu 169 21 5 2 PCI configuration submenu 170 21 5 3 Graphics configuration submenu 172 21 5 4 CPU configuration submenu 174 21 5 5 Chipset configuration submenu 174 21 5 6 I O Interface configuration submenu 175 21 5 7 IDE configuration submenu 176 21 5 8 USB confi...

Page 13: ...Additional BIOS features 195 21 9 1 Updating the BIOS 195 21 10 BIOS recovery 543H199 246H21 11 BIOS security features 544H199 247H21 12 Hard disk security features 545H200 248H22 Return packing slip 546H201 249HIndex 547H202 ...

Page 14: ...ctors 24 48 VDC 100 W version 40 Figure 5 4 External connectors 12 VDC 100 W version 40 Figure 5 5 Exterior view of the AC power supply connector 41 Figure 5 6 Exterior view of the DC power supply connector 41 Figure 5 7 Cable diagrams of the DC device s supply connection 42 Figure 6 1 SMALL keyboard on the DLoG MPC 6 48 Figure 6 2 24 key keypad on the DLoG MPC 6 49 Figure 7 1 Permitted mounting p...

Page 15: ... 12 8 Files Needed touch installation dialog 97 Figure 12 9 Setup Message touch installation dialog 99 Figure 12 10 Automatic shutdown program flowchart part 1 107 Figure 12 11 Automatic shutdown program flowchart part 2 108 Figure 17 1 Internal connectors riser card 1 x PCI 135 Figure 18 1 Jumper layout motherboard MPC6 20 06 2006 144 Figure 19 1 DLoG MPC 6 toolkit 150 Figure 19 2 Mounting bracke...

Page 16: ......

Page 17: ...nstructions in this manual Within this manual DLoG GmbH strives to provide all the information required for using your DLoG MPC 6 However because this is a versatile product that can be used in many different scenarios we cannot guarantee that the information contained in this manual will cover every single aspect Should you require further information or if you have questions or issues needing cl...

Page 18: ...s symbol warns you of any dangers or hazards that could potentially cause damage to the terminal or system such as malfunctions data loss equipment damage etc This symbol indicates hazards that pose a risk to life and limb such as contacting the power supply You must heed this information 1 3 2 Additional design elements Lists are indicated with bullet points for example DC power packs AC power pa...

Page 19: ...re shown in angle brackets F1 Ctrl Insert Home etc Menu options commands dialog fields Examples In the Edit menu you will find the command Paste Values Click OK to finish Entries Any text that needs to be entered is shown in Courier font for example 1 Enter the text abcdefg Other methods for emphasis Any other emphasized text elements are highlighted in bold or underlined References to other chapt...

Page 20: ...ents in regards to safety accident prevention regulations work protection are to be followed 2 1 Initial operation of the device Area of application The device is not designed for use in life support systems or critical safety systems where system malfunction can lead to the direct or indirect endangerment of human life The operator shall take full responsibility for using the device in these situ...

Page 21: ...wer which is specified by each separate country DLoG MPC 6 users must verify this themselves Risk of injury The unit could fall during transit or installation and cause injury Always ensure that there are two persons available when installing or removing the device Supply of fresh air The DLoG MPC 6 is based on a passive cooling concept As a result the waste heat which is produced inside the devic...

Page 22: ...ction 3 6 11 Danger of electrocution when cleaning servicing the device In order to avoid electrocution always disconnect the DLoG MPC 6 from the power supply before cleaning or servicing the device When charging the car battery please note While charging the car battery the DLoG MPC 6 has to be either disconnected from the battery or it has to be determined that the maximum allowed input voltage ...

Page 23: ...rnal peripheral devices with their own power supply are switched on at the same time or after you start the DLoG MPC 6 If this is not possible please ensure that the DLoG MPC 6 is adequately protected from power leakage caused by an external device 2 3 Repairs only through DLoG As a rule never carry out repairs on the device yourself Always contact DLoG s technical support and send in your unit fo...

Page 24: ...pening and closing the device pay attention to the following Note that the penetration of even extremely small metallic splinters or small amounts of moisture can put the DLoG MPC 6 out of service Always open the device in a weather protected environment that is as dust free as possible The surface of the touch screen should always be kept free of dirt dust fingerprints and so on to ensure full vi...

Page 25: ...with protection class IP65 yourself This will instantly void all present and future guarantees and liability claims even during the agreed warranty period Closing the device The front is attached to the base unit with hexagonal screws M5 x 20 with an inside diameter of 3 mm These screws must be retightened with a torque wrench in all devices Retighten all the hexagonal screws in a cross wise patte...

Page 26: ...hich is fixed to the motherboard This battery should not be replaced under any circumstances as this requires soldering Should a battery replacement be necessary the device must be sent to DLoG Changing the battery yourself will instantly void all present and future guarantee and liability claims Using an unsuitable battery type or incorrectly installing it may cause the battery to explode Extendi...

Page 27: ...l components in a non ESD protected area as this may cause damage to the motherboard Before physically touching motherboards or electrical components make sure that you are working within an ESD protected area System overloads To avoid system overloads check the sum load of all components installed Make sure that the input current for each consumer falls within the appropriate boundaries see the t...

Page 28: ... RTTE Directive 1999 5 EC With regard to the RTTE Directive 1999 5 EC the statements in the declaration of conformity for the DLoG MPC 6 see page 2 of this handbook apply 2 7 1 Special regulations in France Due to restrictions imposed by the French government the DLoG MPC 6 with WLAN 802 11b is only permitted for use indoors On private property the product is allowed to be used outdoors however on...

Page 29: ... the unit on and off the user should eliminate the disturbance using the following measures Readjust the receiving antenna or place it in a different location Increase the distance between the unit and the receiver Plug the unit into a different electrical circuit to the receiver Contact your dealer or an experienced radio or TV technician This device complies with the provisions of section 15 of ...

Page 30: ...e of the DLoG MPC 6 is only permitted if authorization is obtained Caution with pacemakers Do not use the DLoG MPC 6 near pacemakers The DLoG MPC 6 can affect the function of medically implanted devices such as pacemakers and create interference Do not place the DLoG MPC 6 near such devices Keep a minimum distance of 20cm between such a device and the DLoG MPC 6 in order to reduce the risk of inte...

Page 31: ...ion against mechanical electrical and chemical influences and extreme ambient temperatures It is designed without an external fan to reduce maintenance requirements The particular advantage offered by the DLoG MPC 6 is the extreme diversity of functions combined with its compact design By applying ultramodern technologies for display and touch screen the DLoG MPC 6 combines excellent image quality...

Page 32: ...mpliance with the contents of the safety guidelines is particularly important for the proper use of this device 3 3 The models DLoG MPC 6 110 and DLoG MPC 6 112 This manual applies to the following models of the DLoG MPC 6 for the DLoG MPC 6 110 with 10 4 display and for the DLoG MPC 6 112 with 12 1 display Any differences between the devices will be clearly noted in this manual 3 4 Abbreviations ...

Page 33: ...s 1 9 indicate the exact type of power supply with input voltage H H stands for heating further letters denote other device options e g 24 48 V with 6 2 A Input voltage of the DC power supply with nominal current or AC power supply with additional frequency display e g 800 MHz Clock rate of the CPU S N 11 or 12 digit serial number composed of DLoG specific device code 29 stands for the DLoG MPC 6 ...

Page 34: ...Device description 18 Manual DLoG MPC 6 Example of a device type plate Figure 3 2 Example of a device type plate ...

Page 35: ...g depending on configuration Display panel 10 4 SVGA 230 cd m2 optional 4 wire resistive touch screen with brightness adjustment 10 4 SVGA 400 cd m2 optional 4 wire resistive touch screen with brightness adjustment 12 1 SVGA 350 cd m2 optional 8 wire resistive touch screen with brightness adjustment 12 1 XGA 400 cd m2 optional 8 wire resistive touch screen with brightness adjustment Bottom Cable c...

Page 36: ... with ACPI PnP Programmable in the system BIOS POST self test Slots for standard plug in cards A riser card is available for expansions 1 PCI slot 32 bit 5 V Real time clock Real time clock with a power reserve of up to 10 years IDE interface Supports up to two IDE devices from PIO Mode 3 4 to UDMA 33 Connection via a 44 pin connector 2 mm grid Connectable devices 2 5 hard drives enquire which cap...

Page 37: ...s FIFO supports RS 232 on an external 9 pin D Sub connection ESD level 4 protected acc to EN 61000 4 2 3rd serial port 115 200 Baud max 16550A compatible 16 bytes FIFO internal for the integrated environment controller 4th serial port 115 200 Baud max 16550A compatible 16 bytes FIFO internal for integrated touch controller Keyboard mouse connection Keyboard mouse 6 pin mini DIN connector combinati...

Page 38: ...epending on which LCD is used Simultaneous use of LCD CRT Multiple LCDs are supported Drivers available for Windows XP Professional XP Embedded and Linux 3 6 4 Touch screen optional Analog touch controller 12bit touch controller for 4 5 8 wire resistive touch screens with RS232 and PS 2 interface Drivers available for MS DOS 6 2x Windows XP Professional XP Embedded and Linux Analog touch screens A...

Page 39: ...3 6 6 ADC MDC interface optional Properties 4 electrically isolated outputs 16 electrically isolated inputs PCI bus Drivers available for Windows XP Professional and XP Embedded ADC MDC connection A 37 pin D Sub connector 3 6 7 Cardbus interface optional Cardbus controller Ricoh R5C485 PCI Ver 2 2 Driver support through Windows XP Professional XP Embedded and Linux only operating system support pl...

Page 40: ...PCI Express MiniCard slot 1 USB 2 0 High Speed 1x x1 PCI Express Lane No SIM card mounts available therefore for example no GSM UMTS etc cards can be used Driver support through Windows XP Professional XP Embedded and Linux only operating system support plug in card drivers from the manufacturer ...

Page 41: ...tage range 18 to 60 VDC Covers power outages up to 5 ms Electrically isolated Maximum output 60 W Optional automatic shutdown software supports Windows and Linux Optional temperature display Withstands bursts up to 2 kV Nominal current of 3 7 A Connection to SELV circuit2 only DC power pack 24 48 VDC 100 W internal type DC 3 24 48 VDC nominal down to 11 V for 20 s max Voltage range 18 60 VDC Cover...

Page 42: ...G MPC 6 110 SVGA with Compact Flash Max 100 W DLoG MPC 6 110 VGA with Compact Flash in heating mode Standby 1W DLoG MPC 6 110 SVGA with DC power pack in standby mode 1 2 3 The SELV circuit is a secondary circuit that is designed and protected so that its voltages will not exceed a safe value both when operating correctly or if a single error occurs 3 6 10 Maximum power available for peripheral dev...

Page 43: ...IBA 7000135 16A 250V or similar devices produced by other manufacturers DC 2 5x20mm T 6 3A H 250V Bussman S505 6 3A Wickmann 181 6 3A Littelfuse 215 06 3 Schurter 0001 2512 Siba 70 007 65 6 3A Elu 179200 6 3A or similar devices produced by other manufacturers DC 3 DC 4 5x20mm T 12 5A L 250V Wickmann 195 2125 12 5 A 250 V Siba 179120 SIBA Nr 7000135 12 5 A 250 V or similar devices produced by other...

Page 44: ...30cd 0 to 35 no heating possible 10 4 SVGA 400cd 0 to 50 30 to 50 12 1 SVGA 0 to 50 30 to 50 12 1 XGA 0 to 50 30 to 50 Storage temperature All specifications in accordance with EN 60068 2 1 2 The permissible ambient temperature depends on the display used Display Storage temperature C 10 4 VGA 35 to 65 10 4 SVGA 230cd 20 to 60 10 4 SVGA 400cd 20 to 80 12 1 SVGA 20 to 80 12 1 XGA 20 to 80 Note The ...

Page 45: ... noise and 36 vibrations with 30 g peaks or US highway truck according to MIL STD 810F 2000 Department of Defense 3 hrs with 1 g effective noise and 600 vibrations with 20 g peaks in operation with Flash disk 3 6 13 Test marks CE EN 55022 Class B EN 55024 EN 61000 3 2 EN61000 3 3 EN 61000 6 2 IEC 60950 1 EN 60950 1 UL 60950 1 EN 300328 1 and EN 301489 17 in case DLoG data transmission devices oper...

Page 46: ...Device description 30 Manual DLoG MPC 6 3 6 14 Dimensions 1 DLoG MPC 6 110 SVGA Front view Dimensions without add ons in mm Figure 3 3 DLoG MPC 6 110 SVGA front view ...

Page 47: ...Device description DLoG MPC 6 Manual 31 Side view Dimensions without add ons in mm Figure 3 4 DLoG MPC 6 110 SVGA side view ...

Page 48: ...Device description 32 Manual DLoG MPC 6 Top view Dimensions without add ons in mm Figure 3 5 DLoG MPC 6 110 SVGA top view ...

Page 49: ...Device description DLoG MPC 6 Manual 33 2 DLoG MPC 6 112 Front view Dimensions without add ons in mm Figure 3 6 DLoG MPC 6 112 front view ...

Page 50: ...Device description 34 Manual DLoG MPC 6 Side view Dimensions without add ons in mm Figure 3 7 DLoG MPC 6 112 side view ...

Page 51: ...Device description DLoG MPC 6 Manual 35 Top view Dimensions without add ons in mm Figure 3 8 DLoG MPC 6 112 top view ...

Page 52: ...e description 36 Manual DLoG MPC 6 3 6 15 VESA drill holes The VESA drill holes on the DLoG MPC 6 are visible on this diagram Dimensions without add ons in mm Figure 3 9 DLoG MPC 6 110 with VESA drill holes ...

Page 53: ...ultaneously offering the best possible ecological compatibility We therefore kindly request that you store the original packaging material or ensure it is used for another suitable purpose such as transporting the unit or returning shipment If you repack the device please ensure that the cling wrap in the cardboard frame is positioned towards the front of the device so that it can provide the prop...

Page 54: ...nerated inside the device is emitted from the surface of the housing For this system to function properly sufficient fresh air circulation is required Never install the system in a closed environment where the cooling air is unable to dissipate accumulated heat to the outside If the DLoG MPC 6 does not have access to fresh cooling air it may result in overheating and severe damage to the unit The ...

Page 55: ...ration This section describes the pin configuration for all DLoG MPC 6 plug in connectors The pin configuration is based on the MPC6 20 06 2006 motherboard 5 3 External connectors Figure 5 1 External connectors AC version Figure 5 2 External connectors 24 48 VDC 60 W version ...

Page 56: ...Putting your DLoG MPC 6 in operation 40 Manual DLoG MPC 6 Figure 5 3 External connectors 24 48 VDC 100 W version Figure 5 4 External connectors 12 VDC 100 W version ...

Page 57: ...of the AC power supply connector 5 3 2 DC voltage supply connector Version Phoenix Combicon 3 pin External view Figure 5 6 Exterior view of the DC power supply connector Explanation Ignition on means that a control signal has to be routed to this connection e g ignition of a vehicle that matches the supply voltage level and is able to supply at least 2 W to the DLoG MPC 6 The signal reference is D...

Page 58: ...C 6 in operation 42 Manual DLoG MPC 6 3 DLoG MPC 6 supply cable The following diagrams show the DC device s supply cable 12 V supply cable 24 48 V supply cable Figure 5 7 Cable diagrams of the DC device s supply connection ...

Page 59: ...disconnecting peripheral devices exception USB devices the DLoG MPC 6 must be disconnected from the power supply If the DLoG MPC 6 is equipped with an optional UPS battery only open the device after the power LED has gone out Otherwise this could seriously damage both the DLoG MPC 6 and the connected devices Make sure that external peripheral devices with their own power supply are switched on at ...

Page 60: ...our device has an AC power pack and automatic shutdown software power it down using the power button 3 Remove the cable cover 4 Disconnect the device from the DC or AC supply voltage pull the plug The DLoG MPC 6 is only shutdown once the Power LED has gone out Powering up the DLoG MPC 6 Only power up the DLoG MPC 6 when all devices have been connected and the DLoG MPC 6 has been closed correctly r...

Page 61: ...t exceed the maximum permissible transmitting power which is specified by each separate country DLoG MPC 6 users must verify this themselves Please keep in mind the configuration for the transmitting power Wireless card programmed driver capacity Connecting cables Antenna Help table for the correct setting ...

Page 62: ...way the maximum permissible transmitting power EIRP equivalent isotropically radiated power in the 2 4 GHz frequency band is set at 20 dBm The transmitting power of the two integrated DLoG antennas DLoG 4 dBi or DLoG 5 dBi must be set to 30 mW 15 dBm so that the EIRP limit value is adhered to when using the antenna To set the transmitting power of the wireless card please read the documentation on...

Page 63: ...is is because with a still image the liquid crystal molecules align themselves in a certain way and become inert if they are not moved Like burning in the effect is irreversible but can be avoided by regularly turning off the display or by using a screensaver with changing content Define in the power management center of the utilized operating system that the displays of the DLoG MPC 6 should be t...

Page 64: ... the keyboard controller are pre defined in the system architecture and automatically managed by the BIOS All keyboards can be used with all operating systems No additional drivers are required 6 1 1 SMALL keyboard A mountable SMALL keyboard German English is available for the DLoG MPC 6 protection class IP 65 Figure 6 1 SMALL keyboard on the DLoG MPC 6 ...

Page 65: ... version SMALL keyboard English and German this add on version can be attached to a stationary or mobile mounting bracket with a mounting kit 6 1 2 24 key keypad A 24 key keypad which can be mounted onto the device with a protection class IP 65 is available for the DLoG MPC 6 Figure 6 2 24 key keypad on the DLoG MPC 6 ...

Page 66: ... mouse or a RS 232 mouse can always be used in combination with touch mode Resources for the PS 2 mouse controller are pre defined in the system architecture and automatically managed by the BIOS This is also the case for RS 232 and USB mouse devices Drivers for MS DOS operation need to be supplied by the control device manufacturer order if necessary Support for the USB mouse under MS DOS can be ...

Page 67: ...CD ROM is a proper USB CD ROM drive Only use devices approved by DLoG to ensure the device is fully compatible Operation The CD ROM drive port is provided via USB The drive which is supplied in a separate housing is connected to one of the sockets on the back of the DLoG MPC 6 Depending on the model the external drive is powered either via the DLoG MPC 6 connecting cable or via a separate external...

Page 68: ...f the sockets on the underside of the DLoG MPC 6 Power is supplied to the external drive by the DLoG MPC 6 via the USB connecting cable If USB has been activated in the BIOS the floppy disk drive is automatically recognized and made available by the BIOS The floppy disk drive is bootable once it has been installed correctly To boot from drive A Insert a bootable floppy disk and start the system In...

Page 69: ...that have been approved by DLoG 6 7 WLAN cards PC card cardbus PCIe minicard WLAN cards are plugged in to the PC card cardbus slot or at the PCIe minicard slot according to the specified option which cannot be changed If you received the WLAN card from DLoG the correct driver will already be installed If you want to use other WLAN cards the correct driver must be installed Generally only drivers f...

Page 70: ...ating panels Roof mounting is also possible for example under the vehicle roof Depending on the vibration resistance and pivoting demands mounting brackets clamp foots or RAM mount elements can also be used to attach the device Please contact your DLoG sales office to find out more about the whole range of installation options on offer Risk of injury The unit could fall during transit or installat...

Page 71: ...positions The permitted mounting positions of the DLoG MPC 6 have been defined as follows From a maximum of 90 Up to a maximum of 90 Figure 7 1 Permitted mounting positions of the DLoG MPC 6 The DLoG MPC 6 can only be mounted in a range of 180 as illustrated ...

Page 72: ...re that you retain the installation instructions Pay careful attention to the important safety notices included in the beginning of this manual 7 4 Mechanical dynamic loading Since the DLoG MPC 6 is a weighted structure it is invariable that the unit will be subject to mechanical dynamic effects Therefore optimizing the mounting can be very helpful Please refer to Appendix E Mechanical dynamic loa...

Page 73: ...leaves approx 20 W for plug in cards and or external devices 7 5 1 AC power pack An integrated electrically isolated AC power pack is available for the DLoG MPC 6 This automatically adapts to the mains voltages 115 VAC or 230 VAC 50 60 Hz Its maximum output is 60 W Power is connected on the underside of the device via a standard plug for non heating devices There is no power switch Ensure that the...

Page 74: ...ch In DC applications the DLoG MPC 6 must only be connected to a SELV Safety Extra Low Voltage circuit 4 Ensure that there is a suitable disconnecting device such as a power switch or circuit breaker in the power supply circuit Ensure that the disconnecting device isolates all supply voltage lines See Appendix B Pin configuration The DC connecting cables must be protected by a fuse 30 AT max The i...

Page 75: ...PU Cable shielding the housing and the ground conductor in AC powered units are connected to the shield ground Carefully read the following warnings Never connect a 12 VDC device to a 24 48 VDC vehicle The device model is written on the device type plate a warning sticker on the front of the unit and on the external connector strip Some forklifts have a chassis that is connected to DC Therefore th...

Page 76: ...MPC 6 to large electrical loads such as converters for the forklift motor may result in random restarts malfunctions and or irreparable damage to the device If you want to connect devices fed by other power sources to the DLoG MPC 6 such as certain PS 2 Wedges printers and so on be sure to power up the peripheral devices at the same time or after the DLoG MPC 6 Otherwise you may encounter start up...

Page 77: ...DLoG MPC 6 7 7 1 Protection class IP65 In order to comply with protection class IP65 please use the optionally available IP65 assembly kit from DLoG Please observe the installation instructions included with this assembly kit After finishing the mounting process the cables must be affixed using the included strain relief rail Figure 7 3 DLoG MPC 6 with strain relief ...

Page 78: ... 1 Place the cables connected to and from the device next to each other Avoid crossing the cables 2 Attach the cables to the strain relief rail using the enclosed strain relievers Ensure that the cables are attached exactly where the cable cover s cable opening is located Figure 7 4 DLoG MPC 6 without cable cover 3 Now attach the sealing ends onto the cables ...

Page 79: ...le cover It should be possible to attach the cable cover to the cable duct without using force The neck collar screws should be screwed firmly preferably diagonally and always using 5 rotations The screws need to be retightened after 2 days Figure 7 5 DLoG MPC 6 with cable cover mounted ...

Page 80: ...ont panel 8 1 4 key front panel The DLoG MPC 6 with a 4 key front panel has the following controls POWER ON OFF for turning the unit on and off Manual brightness control with or As well as turning the backlighting on or off lightbulb symbol You can find details on the functionality of these keys in section 8 3 25 key front panel Figure 8 1 DLoG MPC 6 front panel with 4 keys ...

Page 81: ... controls POWER ON OFF for turning the unit on and off Manual brightness control with or As well as turning the backlighting on or off lightbulb symbol Arrow keys Esc and Enter You can find details on the functionality of these keys in section 8 3 25 key front panel Figure 8 2 DLoG MPC 6 front panel with 10 keys ...

Page 82: ...10 4 and 12 1 displays Units with brightness control Note for all units featuring a brightness control Even after manually turning off the backlighting the DLoG MPC 6 will continue to respond to interaction via the keyboard mouse or touch screen This means that you can continue to enter commands and data even if the display lighting is off ...

Page 83: ...own software Power key is used to power up the unit If the button is pressed while the unit is operating this results in a HARD shutdown This may lead to data loss DLoG MPC 6 with AC power supply and automatic shutdown software Power key is used to power up the unit If the button is pressed while the unit is operational all applications are quit and the DLoG MPC 6 is properly shut down DLoG MPC 6 ...

Page 84: ...trol optional button for manual brightness control optional Turning the backlighting ON OFF 8 3 3 LEDs Temp red LED indicates an excessively high or low temperature inside the unit HD green LED indicates access of the hard drive Compact Flash drive Power green LED indicates an available internal power supply ...

Page 85: ...ion key F10 if the Shift key is pressed F11 decimal point or function key F11 if the Shift key is pressed Í F12 BACKSPACE or F12 if the Shift key is pressed 8 3 5 Special keys S1 Special key Pressing this key has the same effect as simultaneously pressing the Ctrl and key on the keypad S2 Special key Pressing this key has the same effect as simultaneously pressing the Ctrl and key on the keypad ...

Page 86: ... called the Return key Ï PgUp Cursor Up or Page Up when pressing the Shift key Ð PgDn Cursor Down or PageDown when pressing the Shift key Í Home Cursor Left or all the way left on that line when pressing the Shift key Î End Cursor Right or all the way right on that line when pressing the Shift key ...

Page 87: ...itch off no power supply OFF FLASHING Temperature sensor malfunctioning OFF ON Heating is on at temperatures 0 C or overheating warning at temperatures 62 C The computer will not start until the temperature inside the unit is between 0 and 62 C again ON OFF Computer is starting up normal operational state shutdown delay time is running ON ON Temp 25 C or Temp 70 C ON FLASHING Temperature sensor ma...

Page 88: ...and touch screens are also pre installed Refer to the relevant operating system manual for specific operating instructions In DLoG MPC 6 units with a pre installed operating system the system is located on the C partition The size of this partition will not always be the same as the size of the entire hard drive Compact Flash It is up to you to organize the usage of the remaining hard drive Compac...

Page 89: ...ems supplied on CD ROM There are two ways to install operating systems which are supplied on CD ROM Using an external CD ROM drive connected to a USB port This drive can be used to install for example Windows XP SP1 and SUSE Linux 10 1 Initialize the hard drive Compact Flash using a bootable floppy disk and then copying the operating system CD and driver CD contents onto the hard drive Compact Fla...

Page 90: ...rive and a bootable disk with the right network driver The operating system image can then be installed from the network server 9 2 3 Operating systems on floppy disk Operating systems supplied on floppy disk can be installed from an external USB floppy disk drive There are three ways to install additional system specific device drivers such as those for display and network adapters or touch scree...

Page 91: ...f the DLoG MPC 6 is running Windows XP Embedded not all USB devices will be supported 9 3 3 Linux Linux is an operating system that is gaining more and more ground in the industrial environment due to its stability and open access to the source code The DLoG MPC 6 was successfully tested with the SUSE distribution version 10 1 and Fedora Core 5 Most likely other distributions will also be compatib...

Page 92: ...86 or higher 80387 Installed Memory 64MB Size of fixed disk 0 1 122MB 1MB DLoG PC model MPC 6 DLoG Serial Number 290002200000H DLoG BIOS Version M6I00C00 Chipset Intel 915 10 2 Fine tuning the operating system parameters The free program TweakUI from Microsoft is used to fine tune the Windows user interface Operating parameters that are otherwise inaccessible can be changed with this program For e...

Page 93: ...nt panel power button is to be interpreted Set whether the DLoG MPC 6 is to constantly monitor the ignition signal during operation Operation Launching MPPCOM EXE h generates the following messages MPCCOM d time0 set power key time time0 time to wait before keypress is recognized in 100ms valid values 1 255 MPCCOM h show this help MPCCOM info i readout a lot of info stored in EEPROM MPCCOM p value...

Page 94: ...Switchoff time 180s Brightness value 0 Switchoff automatic yes Brightness control yes Heating automatic no BKL off while on Accu no Accu option no Use delay while on Accu no Shift key state saved no Backlight key off no keys off no Power key off no Shift key off no Act brightness saved no Use switchoff auto yes Wait for powerkey no Wait for ignition yes Switch on device count 70 Powerkey time 2 0s...

Page 95: ...Interrupt IRQ3 COM3 Address 0x3E8 0x3EF hexadecimal Interrupt IRQ10 COM4 Address 0x2E8 0x2EF hexadecimal Interrupt IRQ11 11 2 COM1 options The following section describes what needs to be observed when using the COM1 port to supply power to external equipment The resources required for the COM1 controller module are automatically reserved by the BIOS 11 3 COM1 as a power supply The COM1 port can o...

Page 96: ...tomatically reserved by the BIOS 11 5 COM2 as electrically isolated RS 422 485 An electrically isolated RS 422 485 port is optionally available for the COM2 of the DLoG MPC 6 This option provides increased data transfer reliability in environments with a lot of interference and extreme differences in ground potential This function requires special adapter cables This can be ordered from your DLoG ...

Page 97: ...le for the use of more COM ports Other operating systems support more serial ports 11 6 2 RS 4xx operation This operating mode is not supported by any of the available operating systems Applications need to provide their own routines for this mode 11 7 Serial port printers Printers with a serial port can be connected to the DLoG MPC 6 ...

Page 98: ...bility 2 Select the General tab 3 Select Support accessibility options 4 Click Settings 5 Configure the desired COM port and BAUD rate 6 Confirm the change with OK 7 Click OK again for the changes to take effect Please note that you have to configure the scanner correctly to RS 232 and the above set BAUD rate following the scanner manufacturer s guidelines Otherwise the software wedge will not fun...

Page 99: ...unctions in the RS 232 connections are frequently caused by ground loops If both end devices establish a ground connection via RS 232 but do not share the same ground potential in their power supply circuits then compensation currents may result This is particularly noticeable with long cables These compensation currents which are also present at the ground point of the RS 232 connection may signi...

Page 100: ...system via this chipset Resources The chipset does not require any resources for its core functions unlike the internal peripheral units which are also described in this manual 12 1 1 Installing chipset drivers under MS DOS No drivers are required for MS DOS operation 12 1 2 Installing chipset drivers under Windows XP Install the chipset drivers before all other drivers otherwise the system will n...

Page 101: ... as follows to install the chipset driver 1 Open the corresponding folder and run Setup exe Figure 12 1 Welcome screen for chipset driver installation 3 Click Next 4 In the following window click Yes 5 Click Next again 6 Then restart your computer ...

Page 102: ...a Plug and Play component for the PCI bus All resource allocation and management is therefore performed by the BIOS 12 2 1 VGA driver installation under MS DOS No drivers are required for MS DOS operation 12 2 2 VGA driver installation under Windows XP The graphic card driver to be used can be found by default on the Compact Flash or hard drive under Util vga verNR In addition you will find the DL...

Page 103: ...l 87 Proceed as follows to install the VGA driver 1 Open the corresponding folder and run Setup exe Figure 12 2 Welcome screen for the VGA driver installation 2 Click Next 3 In the following window click Yes 4 Now restart your computer ...

Page 104: ...rdware to the network The RJ45 connection port features two integrated status LEDs They display the following messages Left LED green Right LED orange LED off not connected no activity LED off 10 Mbit network LED on connected no activity LED on 100 Mbit network LED flashes connected activity RJ45 network port Figure 12 3 RJ45 network port Resources The network adapter is a true Plug and Play compo...

Page 105: ...ation under Windows XP The network drivers to be used can be found by default on the Compact Flash or hard drive under Util Lan verNR In addition you will find the DLoG drivers on the included driver CD or on the Internet under www dlog com Proceed as follows to install the network drivers 1 Open the corresponding folder and run Setup exe Figure 12 4 Network driver installation license agreement ...

Page 106: ...ion I accept the terms in the license agreement and click Next In the following window click Next Figure 12 5 Start screen for network driver installation 3 Now click Install Drivers 4 After the installation click Exit 5 Next the computer needs to be restarted ...

Page 107: ...efore performed by the BIOS 12 4 1 Installation of the onboard sound adapter drivers Win XP The sound card drivers to be used can be found by default on the Compact Flash or hard drive under Util Sound verNR In addition you will find the DLoG drivers on the included driver CD or on the Internet under www dlog com Proceed as follows to install the onboard sound adapter drivers 1 Open the correspond...

Page 108: ...Internal devices 92 Manual DLoG MPC 6 2 Click Next Figure 12 7 Warning message for the onboard sound adapter drivers 3 In the following window click Continue Anyway 4 Now restart your computer ...

Page 109: ...The touch screen controller calculates and formats this data and then sends it to the touch screen software driver via the COM4 port or optionally the mouse PS 2 port interrupt controlled The driver converts the data into pointer commands The analog touch screen controller used for analysis provides a resolution of 4096 x 4096 pixels 12 bit horizontal and vertical 4 wire touch screen 10 4 front pa...

Page 110: ...ire touch screen driver under MS DOS 1 Create the directory C HAMMOUSE This directory name must not be modified 2 Copy the DOS files for the touch screen into this directory These DOS files can be found in the directory C Util on the hard drive Compact Flash of the DLoG MPC 6 or on the driver CD ROM 3 Enter the following command line in the batch file Autoexec bat for example using EDIT Serial tou...

Page 111: ...also enter the following calling parameters Tx Touch Mode TS Stream TU Pen UP TD Pen Down Sx Touch Sound SN Sound ON SF Sound OFF Cxx Cal Mode C3 3 point C4 4 point C20 20 point V Video Mode VTEXT Calibrate Text mode V640x200 Calibrate 640x200 mode V640x350 Calibrate 640x350 mode V640x480 Calibrate 640x480 mode V800x600 Calibrate 800x600 mode V1024x768 Calibrate 1024x768 Vcustom Calibrate custom m...

Page 112: ...m 1 Open the corresponding folder and run Setup exe 2 On the Welcome dialog click Next 3 In the Software License Agreement window select I accept all of the terms of the above License Agreement and then click Next 4 On the Select Controller dialog choose serial RS 232 and click Next 5 On the Serial Configuration dialog choose COM4 and 9600 Baud and click Next 6 Deselect the option on the Configura...

Page 113: ...to navigate to the installation folder indicated above then choose the Serial folder and click OK Figure 12 8 Files Needed touch installation dialog 9 Confirm the final message Setup is now complete by clicking OK The computer does not need to be restarted ...

Page 114: ...ams Hampshire TSHARC Control Panel 2 Select the Calibration tab and click the Touch field 3 Once calibration is complete finish by clicking Accept 4 Select the Click Settings tab and select Enable right click emulation and enter the following values Right Click Area Double Click Area each to 13 Right Click Delay Double Click Delay each to the third line 5 Exit the tool with OK ...

Page 115: ...g com 1 Open the corresponding folder and run Setup exe 2 On the Welcome dialog click Next 3 In the Software License Agreement window select I accept all of the terms of the above License Agreement and then click Next 4 On the Select Controller dialog select PS 2 and click Next 5 Deselect the option in the Configuration Complete dialog and end by clicking Finish 6 In the following window confirm t...

Page 116: ... Hampshire TSHARC Control Panel 2 Select the Calibration tab and click the Touch field 3 Once calibration is complete finish by clicking Accept 4 Select the Click Settings tab and select Enable right click emulation and enter the following values Right Click Area Double Click Area each to 13 Right Click Delay Double Click Delay each to the third line 5 Exit the tool with OK ...

Page 117: ...als react more intensely at higher temperatures the screen has been designed for normal room temperatures as well as extreme operating temperatures The data listed here applies exclusively to DLoG s resistive touch screens Household chemicals Reaction time 24 hours Visible effect at 29 C 90 relative humidity RH Visible effect at 50 C dry Coffee none none Ketchup none none Cleaning agents liquid no...

Page 118: ...isopropanol 50 50 none none Gasoline none none Concentrated sulfuric acid none none Petrol based oil none none Mineral oil none none 40 sodium hydroxide none Slight corrosion 111 trichlorethane none none Turpentine none none Vm P Naphtha none none Pencil hardness test ASTM D 3363 74 The resistive DLoG touch screens have a hardness 4H Test scale from softest to hardest 6B 5B 4B 3B 2B B HB F H 2H 3H...

Page 119: ...ansion card s slot bracket The riser card routes the onboard PCI bus signals from the P22 of the motherboard to a standard plug in slot Resources The riser card itself does not require any system resources You need to be familiar with the plug in card s resource requirements to avoid conflicts with standard system resources Even in worst case operating scenarios the power consumption of all added ...

Page 120: ... maximum length of the plug in card must not exceed 141 mm Drivers The riser card is fully transparent for all operating systems i e no drivers are required Some plug in cards which are inserted into riser cards may require additional drivers These drivers need to be supplied by the respective card manufacturers 12 9 2 TerraTec 128i PCI sound card Follow the manual supplied with the sound card 12 ...

Page 121: ...he power supply of the vehicle the connection is of course run through fuses see section 7 5 2 DC power pack Therefore make sure that the cables are connected directly to the battery and not to high interference supply lines for example motor supply or to supply lines already used by other consumers The supply voltage connected is then linked to the DLoG MPC 6 s ignition input via a switch for exa...

Page 122: ...nternal temperature of the unit and the status of the Ignition input are checked continuously If the inner temperature of the DLoG MPC 6 reaches a critical range the operating system is shut down normally and the computer remains switched off until the temperature is back in the permitted range If the Ignition input is switched to earth potential or a potential free source during normal operation ...

Page 123: ...Internal devices DLoG MPC 6 Manual 107 12 10 2 Program flowchart Figure 12 10 Automatic shutdown program flowchart part 1 ...

Page 124: ...Internal devices 108 Manual DLoG MPC 6 Figure 12 11 Automatic shutdown program flowchart part 2 ...

Page 125: ...onsists of the two I O ports described above Parameter settings in the registry Using the Registry Editor REGEDIT EXE supplied with Windows the parameters of the DLoG port driver can be configured via the following path HKEY_LOCAL_MACHINE SYSTEM CurrentControlSet Services d logpwr parameters 0 Key name Key type Value of key IpcType REG_DWORD 0 The computer type is automatically detected 8 The PC i...

Page 126: ...impending shutdown Now every application has to respond within the time that is set in the registry see the DLoG Config manual If a response is not sent in the specified time the application is forced to quit If there are any open programs with unsaved changes it may not be possible to automatically quit them for example an unsaved document in WORDPAD EXE a program supplied with Windows In this ca...

Page 127: ...g the electronics or display 13 2 Touch screen cleaning The touch screen s surface should always be kept clean of dirt dust fingerprints etc to ensure full display visibility Abrasive cleaning agents may scratch the surface and lead to a deterioration in image quality The best results are obtained using a damp non abrasive cloth with any commercially available window cleaner that does not contain ...

Page 128: ...f the DLoG MPC 6 s power switch varies depending on how the device is configured depending on the power supply and integrated automatic shutdown Only disconnect the computer from the power supply after the computer has been properly shut down and switched off Otherwise file errors may occur on the storage device in operating systems that have no activated write protection filter 14 3 Cable cover T...

Page 129: ...ult in operating states where it may be necessary to optimize the mounting process Carefully follow the Appendix E Mechanical dynamic loading When mounting peripheral devices follow the manufacturer s instructions This is particularly important when welding or drilling supporting parts To avoid any accidents make sure your field of vision is not restricted in any way when mounting peripheral devic...

Page 130: ... use sharp or abrasive objects on the DLoG MPC 6 s touch screen Do not use abrasive cleaning agents to clean the front of the device The best results are obtained using a damp non abrasive cloth with any commercially available window cleaner that does not contain ammonia Apply the window cleaner to the cloth instead of spraying it directly onto the touch screen surface Do not use sulfurous agents ...

Page 131: ...Disposal DLoG MPC 6 Manual 115 15 Disposal The DLoG GmbH general terms and conditions set out the obligations for disposal in accordance with official electronics regulations ...

Page 132: ...uting PCI ISA PnP 0F000000 0F000FFF PCIe MiniCard slot IRQ 05 per PCI routing PCI ISA PnP Network controller Intel ICH6M with PHY Intel 82562 IRQ 05 per PCI routing PCI ISA PnP EE000000 EE0000FF C000 C0FF Onboard Audio IRQ 05 per PCI routing PCI ISA PnP 1 IDE controller IRQ 14 per PCI routing PCI ISA PnP 01F0 01F7 03F6 03F7 C400 C407 Numeric coprocessor IRQ 13 PCI ISA PnP 00F0 00FF PS 2 Analog Tou...

Page 133: ...log Touch IRQ 11 legacy ISA 02E8 02EF COM3 IRQ 10 legacy ISA 03E8 03EF COM2 IRQ 03 legacy ISA 02F8 02FF COM1 IRQ 04 legacy ISA 03F8 03FF SMBus controller IRQ 05 per PCI routing PCI ISA PnP 0400 Interrupt controller IRQ 02 0020 0021 00A0 00A1 Keyboard IRQ 01 0060 0060 0064 0064 System timer IRQ 00 0040 0043 ...

Page 134: ...FFF EC000000 EC00FFFF ED000000 ED07FFFF 03B0 03BB 03C0 03DF DMA controller 4 16 bit 0000 000F 0080 0090 0094 009F 00C0 00DF I O read for ISA PnP 0A00 0A0F PCI bus 0CF8 0CFF 4000 407F 4080 40FF 5000 500F 6000 607F Motherboard resources E0000 FFFFF CC000 DFFFF A0000 CBFFF 9FC00 9FFFF TOM 192kB TOM TOM 8MB 192kB TOM 192kB 1024kB TOM 8MB 192kB E0000000 EFFFFFFF FED1C000 FED1FFFF 04D0 04D1 0CF8 0CFF 00...

Page 135: ... pin numbers and the appropriate signals The following abbreviations will be used n c not connected 17 1 External connectors 17 1 1 Keyboard and Mouse Version Mini DIN PS2 6 pin motherboard reference P12 Keyboard only or keyboard and mouse connected via a Y cable Pin Signal 1 KBDATA 2 MSDATA 3 GND 4 5V fused 5 KBCLOCK 6 MSCLOCK ...

Page 136: ...USB Version 8 pin motherboard reference P13 Pin Signal 1 5V fused 2 USB0 3 USB0 4 GND 5 5V fused 6 USB1 7 USB1 8 GND 17 1 3 Serial port COM1 Version D SUB D 9 pin MALE motherboard reference P15 Pin Signal 1 5V fused 2 USB0 3 USB0 4 GND 5 5V fused 6 USB1 7 USB1 8 GND ...

Page 137: ...Data Carrier Detect 2 RxD Receive Data 3 TxD Transmit Data 4 DTR Data Terminal Ready 5 GND Signal Ground 6 DSR Data Set Ready 7 RTS Request to Send 8 CTS Clear to Send 9 RI Ring Indicate RS422 version optional Pin Signal Name 1 Connected to Pin2 2 Connected to Pin1 3 RXD Receive Data 4 TXD Transmit Data 5 GND Signal Ground 6 Connected to Pin7 7 Connected to Pin6 8 RXD Receive Data 9 TXD Transmit D...

Page 138: ...ceive Transmit Data 5 GND Signal Ground 6 Connected to Pin7 7 Connected to Pin6 8 not connected 9 RXD TXD Receive Transmit Data 17 1 5 Network connector Version RJ 45 8 pin motherboard reference P14 Pin Signal Name 1 TxP Transmit 2 TxN Transmit 3 RxP Receive 4 CTTD Transmit Center Termination 5 CTRD Receive Center Termination 6 RxN Receive 7 n c 8 TERM Termination ...

Page 139: ...Appendix B Terminal assignment Pins DLoG MPC 6 Manual 123 17 2 Internal connectors motherboard MPC6 20 Overview Figure 17 1 Connectors motherboard version 06 2006 ...

Page 140: ...21 via the top slot Pin Signal Pin Signal 1 GND 24 5 V 2 D3 25 GND 3 D4 26 GND 4 D5 27 VPP 5 D5 28 A16 6 D6 29 GND 7 GND 30 A15 8 D7 31 A12 9 CE1 32 GND 10 GND 33 A07 11 A10 34 A06 12 OE 35 GND 13 GND 36 A05 14 A11 37 A04 15 A09 38 GND 16 GND 39 A03 17 A08 40 A02 18 A13 41 GND 19 GND 42 A01 20 A14 43 A00 21 WE 44 GND 22 GND 45 D0 23 RDY BSY 46 D1 ...

Page 141: ... VPP 51 GND 78 A22 52 CD1 79 GND 53 D11 80 A23 54 GND 81 A24 55 D12 82 GND 56 D13 83 A25 57 GND 84 VSS2 58 D14 85 GND 59 D15 86 RESET 60 GND 87 WAIT 61 CE2 88 GND 62 VSS1 89 INPACK 63 GND 90 REG 64 IORD 91 GND 65 IOWR 92 BVD2 66 GND 93 BVD1 67 A17 94 GND 68 A18 95 D8 69 GND 96 D9 70 A19 97 GND 71 A20 98 D10 72 GND 99 CD2 73 A21 100 GND ...

Page 142: ...or Version 1 row pin strip 3 96 mm grid 4 pin motherboard reference P1 Pin Signal 1 12V 2 12V 3 GND 4 GND 17 2 3 Ignition signal connector Version AMP Quick pin strip 5 pin motherboard reference P3 Pin Signal 1 IGNITEP 2 DCM 3 n c 4 n c 5 SUPP_LP 6 VP12_SB 7 GND 8 GND 9 SDAacc 10 SCLacc ...

Page 143: ...Pin strip 3 96mm grid 2 pin motherboard reference P6 P7 P6 Pin Signal 1 HEATVCC 2 HEATGND P7 Pin Signal 1 HEATVCC 2 HEATGND 17 2 5 Serial port COM2 Version AMP MicroMatch socket strip 10 pin motherboard reference P16 Pin Signal 1 DCD2 2 DSR2 3 RXD2 4 RTS2 5 TXD2 6 CTS2 7 DTR2 8 RI2 9 SGND2 10 VCC_FC ...

Page 144: ... assignment Pins 128 Manual DLoG MPC 6 17 2 6 Audio port Version Hirose DF13 12 pin motherboard reference P17 Pin Signal 1 AUXAR 2 AUXAL 3 SNDR 4 SNDL 5 MIC 6 5 V 7 5 V 8 12 V 9 GND 10 ASGND 11 SPEAKER_VCC 12 SPEAKER_GND ...

Page 145: ...gnal Pin Signal 1 RESET 2 GND 3 DD7 4 DD8 5 DD6 6 DD9 7 DD5 8 DD10 9 DD4 10 DD11 11 DD3 12 DD12 13 DD2 14 DD13 15 DD1 16 DD14 17 DD0 18 DD15 19 GND 20 n c 21 DMARQ 22 GND 23 DIOW 24 GND 25 DIOR 26 GND 27 IORDY 28 CSELL 29 DMACK 30 GND 31 INTRQ 32 n c 33 DA1 34 PDIAG 35 DA0 36 DA2 37 CS0 38 CSI 39 DASP 40 GND 41 5 V 42 5 V 43 GND 44 5 V n c not connected ...

Page 146: ...1 GND 2 D3 3 D4 4 D5 5 D6 6 D7 7 CS0 8 GND 9 GND 10 GND 11 GND 12 GND 13 VCC0 14 GND 15 GND 16 GND 17 GND 18 A2 19 A1 20 A0 21 D0 22 D1 23 D2 24 n c 25 n c 26 n c 27 D11 28 D12 29 D13 30 D14 31 D15 32 CS1 33 n c 34 IORD 35 IOWR 36 WE 37 INTRQ 38 VCC1 39 CSEL 40 n c 41 RESET 42 IORDY 43 NC INPACK 44 VCC REG 45 DASP 46 PDIAG 47 D8 48 D9 49 D10 50 GND n c not connected ...

Page 147: ...T0 6 n c 26 Ch2 TXOUT0 7 n c 27 Ch2 TXOUT1 8 n c 28 Ch2 TXOUT1 9 n c 29 Ch2 TXOUT2 10 n c 30 Ch2 TXOUT2 11 GND 31 Ch2 TXCLK 12 GND 32 Ch2 TXCLK 13 Ch1 TXOUT0 33 Ch2 TXOUT3 14 Ch1 TXOUT0 34 Ch2 TXOUT3 15 Ch 1 TXOUT1 35 GND 16 Ch1 TXOUT1 36 GND 17 Ch1 TXOUT2 37 3 3 or 5 V depending on J10 switched 18 Ch1 TXOUT2 38 3 3 or 5 V depending on J10 switched 19 Ch1 TXCLK 39 3 3 or 5 V depending on J10 20 Ch...

Page 148: ...ignal 1 SHIFT_LED_CON 10 SWITCH 2 2 GND 11 SWITCH 1 3 LEDTEMP_CON 12 SWD2 4 HDLED_CON 13 SWD3 5 LEDPWR_CON 14 SWITCH 0 6 SWITCH 5 15 SWD1 7 SWD0 16 SWD4 8 SWITCH 4 17 SWD5 9 SWITCH 3 17 2 11 Inverter connector Version Hirose DF13 12 pin motherboard reference P5 Pin Signal Pin Signal 1 GND 7 BKLEN 2 VDIMM 8 GND 3 GND 9 GND 4 BKLPWM 10 12V 5 5V 11 12V 6 5V 12 12V ...

Page 149: ... assignment Pins DLoG MPC 6 Manual 133 17 2 12 Touch connector Version Hirose DF13 8 pin motherboard reference P20 Pin Signal Pin Signal 1 IN_TS_Y 5 IN_TS_X 2 IN_TS_SY 6 IN_TS_SX 3 IN_TS_SY 7 IN_TS_SX 4 IN_TS_Y 8 IN_TS_X ...

Page 150: ...Q3 GNT3 GND GND 7 GND GND n c n c n c n c GND 8 GND GND GNT2 GNT1 REQ2 REQ1 GND 9 GND GND GND 3 3V 3 3V 3 3V GND 10 GND AD31 AD30 AD29 AD28 AD27 GND 11 GND AD26 AD25 AD24 CBE3 AD23 GND 15 GND AD22 AD21 AD20 AD19 AD18 GND 16 GND AD17 AD16 CBE2 FRAME IRDY GND 17 GND GND GND 3 3V 3 3V GND GND 18 GND TRDY DEVSEL STOP LOCK SERIRQ GND 19 GND PERR PME SERR PAR AD15 GND 20 GND GND GND 3 3V 3 3V GND GND 21...

Page 151: ...Appendix B Terminal assignment Pins DLoG MPC 6 Manual 135 17 2 14 Internal connectors riser card Figure 17 1 Internal connectors riser card 1 x PCI ...

Page 152: ...1 A1 TRST TCK B2 A2 12V GND B3 A3 TMS TDO B4 A4 TDI 5V B5 A5 5V 5V B6 A6 INT A INT B B7 A7 INT C INT D B8 A8 5V PRSNT1 B9 A9 reserved reserved B10 A10 5V I O PRSNT2 B11 A11 reserved GND B12 A12 GND GND B13 A13 GND Reserved B14 A14 reserved GND B15 A15 RST CLK B16 A16 5V I O GND B17 A17 GNT REQ B18 A18 GND 5V I O B19 A19 reserved AD31 B20 A20 AD30 AD29 B21 A21 3 3V GND B22 A22 AD28 ...

Page 153: ...A28 AD22 AD21 B29 A29 AD20 AD19 B30 A30 GND 3 3V B31 A31 AD18 AD17 B32 A32 AD16 C BE2 B33 A33 3 3V GND B34 A34 FRAME IRDY B35 A35 GND 3 3V B36 A36 TRDY DEVSEL B37 A37 GND GND B38 A38 STOP LOCK B39 A39 3 3V PERR B40 A40 SDONE 3 3V B41 A41 SBO SERR B42 A42 GND 3 3V B43 A43 PAR C BE1 B44 A44 AD15 AD14 B45 A45 3 3V GND B46 A46 AD13 AD12 B47 A47 AD11 AD10 B48 A48 GND GND B49 A49 AD09 ...

Page 154: ...nal mechanical code B50 A50 mechanical code mechanical code B51 A51 mechanical code AD08 B52 A52 C BE0 AD07 B53 A53 3 3V 3 3V B54 A54 AD06 AD05 B55 A55 AD04 AD03 B56 A56 GND GND B57 A57 AD02 AD01 B58 A58 AD00 5V I O B59 A59 5V I O ACK64 B60 A60 REQ64 5V B61 A61 5V 5V B62 A62 5V ...

Page 155: ...al assignment Pins DLoG MPC 6 Manual 139 17 2 16 VGA Interface for service purposes only Version AMP MicroMatch 2x5 pin reference P18 Pin Signal 1 GND 2 VGA_R 3 VGA_G 4 VGA_B 5 GND 6 GND 7 VGA_HSY 8 VGA_VSY 9 5 V 10 5 V ...

Page 156: ...gnment Pins 140 Manual DLoG MPC 6 17 2 17 COM4 connection Version JST BM10B SRSS TB 1x10 pin P31 All signals have TTL levels Pin Signal 1 TOU_DCD 2 TOU_DSR 3 TOU_RX 4 TOU_RTS 5 TOU_TX 6 TOU_CTS 7 TOU_DTR 8 TOU_RI 9 GND 10 5 V ...

Page 157: ...Appendix B Terminal assignment Pins DLoG MPC 6 Manual 141 17 2 18 USB post 3 and 4 Version Hirose 12 pin motherboard reference P26 Pin Signal 1 GND 2 USBP3P 3 USBP3M 4 5 V 5 GND 6 USBP4P 7 USBP4M 8 5 V ...

Page 158: ... 29 GND 4 GND 30 SMB_CLK 5 n c 31 PETn0 6 VCC15 32 SMB_DATA 7 CLKREQ 33 PETp0 8 n c 34 GND 9 GND 35 GND 10 n c 36 USB_D 11 REFCLK 37 n c 12 n c 38 USB_D 13 REFCLK 39 n c 14 n c 40 GND 15 GND 41 n c 16 n c 42 LEDWWAN 17 n c 43 n c 18 GND 44 LEDWLAN 19 n c 45 n c 20 W_DISABLE 46 LEDWPAN 21 GND 47 n c 22 PERST 48 VCC15 23 PERn0 49 n c 24 VP3 3 50 GND 25 PERp0 51 n c 26 GND 52 VP3 3 ...

Page 159: ...ions do not need to be changed Changing the jumper positions can impair the function of the DLoG MPC 6 or destroy the unit If the jumper settings are changed DLoG GmbH is no longer liable for warranty claims 18 2 Standard jumper settings The default jumper settings are marked with an asterisk Take note of the markings for the jumper position Jumper closed Jumper open ...

Page 160: ...Appendix C Jumper 144 Manual DLoG MPC 6 18 3 Jumper layout view motherboard J10 J9 J1 Figure 18 1 Jumper layout motherboard MPC6 20 06 2006 J12 J5 J11 J7 J6 J13 J2 ...

Page 161: ... factory setting 18 3 2 Ethernet configuration Version 1 row pin strip 2 00 mm grid 3 pin Motherboard reference J2 Jumper Function 1 2 3 Davicom ETH controller 1 2 3 Intel ETH controller factory setting 18 3 3 Compact Flash configuration Version 1 row pin strip 2 mm grid 2 pin Motherboard reference J5 Jumper Function 1 2 Compact Flash is master 1 2 Compact Flash is slave factory setting ...

Page 162: ... grid 2 pin Motherboard reference J6 Jumper Function 1 2 Touch deactivated 1 2 Touch activated factory setting 18 3 5 Touch configuration Version 1 row pin strip 2 mm grid 2 pin Motherboard reference J7 Jumper Function 1 2 8 wire touch controller 1 2 4 wire touch controller factory setting ...

Page 163: ... 1 Pin9 is RI 6 4 2 not required factory setting Jumper Function 5 3 1 Pin9 is the voltage supply 6 4 2 5 V on Pin9 Jumper Function 5 3 1 Pin9 is the voltage supply 6 4 2 12 V on Pin9 18 3 7 LCD configuration Version 1 row pin strip 2 00 mm grid 3 pin Motherboard reference J10 Jumper Function 1 2 3 5 0 V LCD supply 1 2 3 3 3 V LCD supply factory setting ...

Page 164: ...1 and J12 Jumper Pin Function J11 1 2 J12 1 2 Compact Flash PIO Jumper Pin Function J11 1 2 J12 1 2 Compact Flash DMA factory setting 18 3 9 Touch interface selection Version 1 row pin strip 2 mm grid 2 pin Motherboard reference J13 Jumper Function 1 2 PS 2 interface 1 2 RS232 interface factory setting 18 3 10 External shield connection Via screws ...

Page 165: ... 149 19 Appendix D Tools 19 1 Please follow the safety notices Pay careful attention to the Important safety notices included at the start of this manual Observe the relevant accident prevention regulations when using tools of any kind ...

Page 166: ...ble the DLoG MPC 6 3 mm hexagonal screwdriver Phillips screwdriver size 1 Screwdriver size 2 Screwdriver size 4 Socket wrench size 5 mm Socket wrench size 5 5 mm Figure 19 1 DLoG MPC 6 toolkit You will also need a 0 5 to 4 0 Nm torque wrench with the following replacement blades or bits Cross slot PH1 Hexagonal 3 mm ...

Page 167: ... for positioning the DLoG MPC 6 s mounting bracket Figure 19 2 Mounting bracket toolkit For mounting and positioning the stationary mounting bracket Hexagonal socket wrench Allen key sizes 5 mm and 6 mm For mounting and positioning the mobile mounting bracket Hexagonal socket wrench Allen key size 6 mm ...

Page 168: ...3 5M2 and 5M1 on the basis of standards previous measurements and experience The following standards offer a practical means of reference DIN EN 60721 3 5 1998 classification of environmental conditions part 3 section 5 Use on and in ground vehicles Military standard MIL STD 810F 2000 5 M3 Mobile use Operational environments with high energy vibrations and high energy shocks as well as rough handl...

Page 169: ... or equivalent Category US Highway Truck according to MIL STD 810F Examples Vehicles with shock absorption Driver s cab in a tractor standing machines Machine tools 5 M1 Stationary use Operational environments with low energy vibrations and medium energy shocks as well as very careful handling transport compliant with Operation class 5M1 according to DIN EN 60721 3 5 Examples Vehicles with very go...

Page 170: ...udes resonance effects The goal is therefore to remove resonance points of this kind or at least to tune the system to such a high frequency that they fall within the range of low excitation amplitudes For an initial assessment you can test the device by hand Bring the system to excitation by gently hitting it with your hand If the DLoG MPC 6 starts to visibly oscillate and if the vibrations take ...

Page 171: ... frequency All excitations with a frequency greater than 1 4 times the natural frequency would then be dampened by a counter phase effect This is practically impossible if you consider that excitation accelerations within the range of around 10 Hz to 200 Hz or more may occur Furthermore the springs of the DLoG MPC 6 would strongly deflect while static or visibly swivel while resonating blurred dis...

Page 172: ...of the mounting bracket and the assembly surface in the vehicle so that the depth can be adjusted The point of resonance for the spatial axis with the greatest deflection should be 20 Hz Which elastomer springs are suitable Which insulating effects can be expected for different excitation frequencies Mounting example for table top attachment with elastomer springs DLoG MPC 6 110 with mobile mounti...

Page 173: ...Appendix E Mechanical dynamic loading DLoG MPC 6 Manual 157 Figure 20 1 Table top attachment with elastomer springs ...

Page 174: ...rs of the 6 possible degrees of freedom we will only consider those with the greatest deflection in the case of the DLoG MPC 6 110 In other words We observe the display as it oscillates towards or away from us a combination of rotational and longitudinal oscillation Comparative measurements for precisely the arrangement displayed in figure 20 5 construction of the mounting bracket quantity and pos...

Page 175: ... A 70 This value lies below the default value What is the natural frequency The following formula can be used to calculate the natural frequency Where fe natural frequency in Hz c total spring constant 539 N mm calculated from datasheet values 3 springs 22 5 factor 71 9 N mm m oscillatory mass 5 kg This theoretical value of 19 1 Hz lies in the range of 20 Hz 5 Hz as measured in practice The calcul...

Page 176: ...activates approx 13 Hz However if the resonance deflections are too high 10 mm and more the natural frequency should be increased For example using 3 elastomer springs with a diameter of 40 instead of 30 mm or using 4 instead of 3 springs The number form material type and arrangement of the elastomer springs can be used to control the natural frequency As a rule constructions with vulcanized fitti...

Page 177: ...arning Resonance approx 500 and greater High amplification Approx 28 Hz 20 Hz 2 0 no insulation 40 Hz 20 Hz 2 66 60 Hz 20 Hz 3 88 80 Hz 20 Hz 4 93 Based on this table we can clearly expect very good insulation for excitation frequencies that are twice as high as the system s natural frequency Consequently the amplitude of the reaction accelerations of the DLoG MPC 6 still only reaches 66 of the am...

Page 178: ...ed machines with relatively constant and correspondingly high operating speed Random samples of fork lift rotors were taken and the field excitations measured Track Warehouses with loading thresholds potholes and pallet splinters Amplitude of the excitation accelerations Mean value 1 g to 2 g for all three spatial axes with peak values 5 g approximately twice each minute and 8 g to 13 g occasional...

Page 179: ...ate results for all spatial axes Calculating the known static spring deflection using the following quantity equation minimal measurement work very good approximation Where fe natural frequency in Hz xst static spring deflection in mm deflection of the center of gravity in the direction of the gravitational force for example using a mechanical timer Further technical information can be found in th...

Page 180: ...ection describes the BIOS setup program The BIOS setup program can be used to view and change the BIOS settings for the module Only experienced users should change the default BIOS settings 21 2 Entering the BIOS setup program The BIOS setup program can be accessed by pressing the Del key during POST ...

Page 181: ...p program uses a key based navigation system Most of the keys can be used at any time while in setup The table below explains the supported keys Key Description Left Right Select a setup menu e g Main Boot Exit Up Down Select a setup item or sub menu Plus Minus Change the field value of a particular setup item Tab Select setup fields e g in date and time F1 Display general help screen F2 F3 Change...

Page 182: ...ter the BIOS setup you will enter the main setup screen You can always return to the main setup screen by selecting the main tab Figure 21 1 BIOS main setup screen The main screen reports BIOS processor memory and board information and is for configuring the system date and time ...

Page 183: ...rsion No option Displays the production BIOS version Processor No option Displays the processor type System Memory No option Displays the total amount of system memory Product Revision No option Displays the hardware revision of the board Serial Number No option Displays the serial number of the board BC Firmware Rev No option Displays the revision of the CPU board controller Boot Counter No optio...

Page 184: ...Appendix F BIOS 168 Manual DLoG MPC 6 21 5 Advanced setup Select the advanced tab from the setup menu to enter the advanced BIOS setup screen Figure 21 1 BIOS advanced setup ...

Page 185: ...l ACPI Advanced Configuration and Power Interface Set to NO for non ACPI aware operating system like DOS and Windows NT Set to YES if your OS complies with the ACPI specification e g Windows 2000 XP ACPI 2 0 Features No Yes Enable RSDP pointers to 64 bit fixed system description tables ACPI APIC support Enabled Disabled Set to enable to include the APIC support table to ACPI ...

Page 186: ...ll devices in the system Select YES to let the operating system configure PnP devices that are not required for booting PCI Latency Timer 32 64 96 248 This option allows you to adjust the latency timer of all devices on the PCI bus Allocate IRQ to PCI VGA Yes No Allow or restrict the BIOS from giving the VGA controller an IRQ resource PCI IRQ Resource Exclusion Submenu Opens PCI IRQ resource exclu...

Page 187: ...llow or restrict the BIOS from giving IRQ resource to PCI PNP devices PCI interrupt routing submenu Feature Options Description PIRQ xx devices Auto 3 4 14 15 Select fixed IRQ for PCI interrupt line or set to AUTO to let the BIOS and operating system route an IRQ Note Make sure that the selected IRQ is not assigned to legacy I O ...

Page 188: ...mount of DVMT memory selected is always allocated by the DVMT graphics driver DVMT mode The DVMT driver only allocates as much memory as required for the current video mode but may allocate memory up to the limit specified in the following node Combo mode The DVMT graphics driver allocates at least 64MB but may allocate up to 128MB if required DVMT Dynamic Video Memory Technology DVMT FIXED Memory...

Page 189: ... Auto detection is performed by reading an EDID data set via the video I C bus Note Customized EDID utilizes an OEM defined EDID data set stored in the BIOS flash device VGA 640x480 SVGA 800x600 XGA 1024x768 SXGA 1280x1024 Use the following settings for VGA 1x18 013h for Hosiden HLD1045AE SVGA 1x18 004h for Optrex T 51944D104J FW A AA NEC NL8060BC31 28D and AUO G104SN03 V0 XGA 1x18 006h for NEC NL...

Page 190: ...hipset configuration submenu Feature Options Description Memory Hole Disabled 15MB 16MB Enable or disable the memory hole between 15MB and 16MB If enabled accesses to this range are forwarded to the LPC PCI bus IOAPIC Disabled Enabled Enable Disable ICH6M IOAPIC function APIC ACPI SCI IRQ Disabled Enabled If set to disabled IRQ9 is used for the SCI If set to enabled IRQ20 is used for the SCI C4 On...

Page 191: ...d Ethernet Controller Enabled Disabled Enable Disable the ICH6M onboard Ethernet controller Serial Port 1 2 Configuration Disabled 3F8 IRQ4 2F8 IRQ3 3E8 IRQ4 2E8 IRQ3 Specifies the I O base address and IRQ of serial port 1 2 Parallel Port Address Disabled 378 278 3BC Specifies the I O base address used by the parallel port Serial Port 3 4 Configuration Disabled 3F8 IRQ11 2F8 IRQ10 3E8 IRQ11 2E8 IR...

Page 192: ...d IDE device Primary IDE Slave Submenu Reports type of connected IDE device Hard Disk Write Protect Disabled Enabled If enabled protects the hard disk from being erased Disabled allows the hard disk to be used normally Read write and erase functions can be performed to the disk IDE Detect Time Out s 0 5 10 30 35 Set this option to stop the BIOS from searching for IDE devices within the specified n...

Page 193: ...nsferred Only 512 bytes of data can be transferred per interrupt if block mode is not used Block mode allows transfers of up to 64 KB per interrupt PIO Mode 0 1 2 3 4 IDE PIO mode programs timing cycles between the IDE drive and the programmable IDE controller As the PIO mode increases the cycle time decreases Async DMA No option This indicates the highest asynchronous DMA mode that is supported U...

Page 194: ...BA mode Block Multi Sector Transfer Disabled Auto Set to AUTO to let the BIOS auto detect device support for multisector transfer The data transfer to and from the device will occur multiple the number of sectors see above sectors at a time Set to Disabled to prevent the BIOS from using block mode The data transfer to and from the device will occur one sector at a time PIO Mode Auto 0 1 2 3 4 Set ...

Page 195: ...9 Feature Options Description using SMART feature Set to Enabled to allow the BIOS to use SMART feature on supported hard disk drives 32 Bit Data Transfer Disabled Enabled Enable Disable 32 bit data transfers on supported hard disk drives ...

Page 196: ...hed USB device will not become available until a USB compatible operating system is booted However legacy support for USB keyboard will be present during POST When this option is Enabled those USB devices can control the system even when there is no USB driver loaded AUTO disables legacy support if no USB devices are connected USB Keyboard Legacy Support Disabled Enabled Enable Disable USB keyboar...

Page 197: ...bps or full speed 12Mbps BIOS EHCI Hand Off Disabled Enabled Enable workaround for OSes without EHCI hand off support USB Beep Message Disabled Enabled Enable Disable the beep during USB device enumeration USB Stick Default Emulation Auto Hard disk Select default USB Stick emulation type Auto selects floppy or hard disk emulation based on the storage size of the USB Stick but the emulation type ca...

Page 198: ...down Slow sets a rate of under 8 times per second Fast sets a rate of over 20 times per second PS 2 Mouse Support Disabled Enabled Auto Disabled will prevent the PS 2 mouse port from using system resources and will prevent the port from being active Enabled activates the PS 2 port and the BIOS offers PS 2 mouse support Use this setting if you always need PS 2 mouse support even when the mouse is n...

Page 199: ...e baud rate transmitted bits per second you want the serial port to use for console redirection Note The terminal program used with serial redirection must be set to use exact the same set of communication parameters Flow Control None Hardware Software Select the flow control for serial redirection Redirection After BIOS POST Disabled Boot Loader Always With Disabled serial redirection functionali...

Page 200: ...I VT100 VT UTF8 Select the target terminal type Escape sequences representing keystrokes are sent to the remote terminal based on these settings VT UTF8 Combination Key Support Disabled Enabled This option enables VT UFT8 combination key support for ANSI VT100 terminals Sredir Memory Display Delay No Delay Delay 1 Sec Delay 2 Sec Delay 4 Sec Set the delay in seconds to display memory information i...

Page 201: ... device and display the readings Board Temperature No option Current board temperature CPU Temperature No option Current processor die temperature Fan1 Speed No option Current fan speed VcoreA No option Current Core A reading VcoreB No option Current Core A reading 3 3Vin No option Current 3 3V reading 5Vin No option Current 5V reading VBAT No option Current VBAT reading ...

Page 202: ...stem starts booting If set to One time trigger the watchdog will be disabled after the first trigger If set to Single event every stage will be executed only once then the watchdog will be disabled If set to Repeated event the last stage will be executed repeatedly until a reset occurs Delay See Post watchdog Select the delay time before the runtime watchdog becomes active This ensures that an ope...

Page 203: ...e type of event that will be generated when timeout 3 is reached Timeout 1 0 5sec 1sec 2sec 5sec 10sec 30sec 1min 2min Selects the timeout value for the first stage watchdog event Timeout 2 See above Selects the timeout value for the second stage watchdog event Timeout 3 See above Selects the timeout value for the third stage watchdog event ...

Page 204: ...he boot tab from the setup menu to enter the boot setup screen In the upper part of the screen the boot setup allows you to prioritize the available boot devices The lower part of this setup screen shows options related to the BIOS boot Figure 21 3 BIOS boot setup ...

Page 205: ...menu is static and can only be changed by the user 1st 2nd 3rd Boot Device Up to 12 boot devices can be prioritized if device based priority list control is selected If Type Based priority list control is enabled only 8 boot devices can be prioritized Disabled Primary master Primary slave Secondary master Secondary slave Legacy floppy USB hard disk USB CDROM USB removable Dev Onboard LAN External ...

Page 206: ...found AddOn ROM Display Mode Force BIOS Keep current Set display mode for option ROM Halt On Error Disabled Enabled Determines whether the BIOS halts and displays an error message if an error occurs If set to Enabled the BIOS waits for user input Hit DEL Message Display Disabled Enabled Allows Prevents the BIOS to display the Hit Del to enter setup message Interrupt 19 Capture Disabled Enabled All...

Page 207: ...Appendix F BIOS DLoG MPC 6 Manual 191 21 7 Security setup Select the security tab from the setup menu to enter the security setup screen Figure 21 2 BIOS security setup ...

Page 208: ...s Protection Disabled Enabled Select Enabled to enable boot sector protection The BIOS displays a warning when any program or virus issues a disk format command or attempts to write to the boot sector of the hard disk drive If enabled the following appears when a write is attempted to the boot sector You may have to type N several times to prevent the boot sector write Boot Sector Write Possible V...

Page 209: ...o lock using the new password Both user and master password can be set independently however the drive will only lock if a user password is installed Hard disk security user password Feature Options Description Primary Master Slave HDD User Password Enter password Set or clear the user password for the hard disk Note This option will be shaded if the hard drive does support the Security Mode Featu...

Page 210: ...anges and Exit Exit setup and reboot so the new system configuration parameters can take effect Discard Changes and Exit Exit setup without saving any changes made in the BIOS setup program Discard Changes Discard changes without exiting setup The option values presented when the computer was turned on are used Load CMOS Defaults Load the CMOS defaults of all the setup options ...

Page 211: ...p screen identifying the BIOS project name and a revision code The initial production BIOS is identified as M6IxxCyy where M6 means MPC6 xx means the revision of the VGA BIOS and yy is the version of the BIOS 21 9 1 Updating the BIOS The hardware of the MPC 6 lets you update the system BIOS without opening the unit You should only update the BIOS if the BIOS in your DLoG MPC 6 is serverely corrupt...

Page 212: ... current binary file to this RAM disk 4 Start the update with the following command cgutlcmd bflash name of the binary file c The update is carried out without further confirmation and the computer is restarted After completing the update the settings described below need to be configured in the BIOS Setup Utility menu Page Item Setting Exit Load CMOS Defaults No setting possible Main Setup Page S...

Page 213: ...DLoG MPC 6 Manual 197 Updating the BIOS under Windows 1 Boot up MS Windows 2 Start the CGUTLGUI EXE Figure 21 4 BIOS updating under Windows 1 3 Select Board CGOS on the Select Operation Target menu 4 Select Bios Update ...

Page 214: ...e 6 Select Update Bios 7 The update is carried out without further confirmation 8 Then restart the DLoG MPC 6 After completing the update the settings described below need to be configured in the BIOS Setup Utility menu Page Item Setting Exit Load CMOS Defaults No setting possible Main Setup Page Save and Exit with F10 OK No setting possible ...

Page 215: ...o as described here will not be possible In this situation the unit needs to be sent in for repair 21 11 BIOS security features The BIOS provides both a supervisor and user password If you use both passwords the supervisor password must be set first The system can be configured so that all users must enter a password every time the system boots or when setup is executed The two passwords activate ...

Page 216: ...ers to enable disable hard disk security for each hard drive in setup A master password is available if the user can not remember the user password Both passwords can be set independently however the drive will only lock if a user password is installed The max length of the passwords is 32 bytes During POST each hard drive is checked for security mode feature support In case the drive supports the...

Page 217: ...r Type s of unit s returned Serial number s of the unit s returned The units have not been returned as they are currently being used However the following parts are missing Unit was already damaged on delivery please enclose a copy of the delivery note Delivery was incomplete Missing parts The following error occurs when operating the unit Separate error report is enclosed ...

Page 218: ... 105 Backlight 66 68 Backspace key 69 Barcode scanners 82 Battery 20 60 Battery replacement 10 Baud rate 82 BIOS 20 164 BIOS boot setup screen 188 BIOS EHCI Hand Off 181 BIOS exit setup screen 194 BIOS ID 167 BIOS main setup screen 166 BIOS navigation 165 BIOS PCI Configuration Submenu 170 BIOS recovery 199 BIOS security features 199 BIOS Security Settings 192 BIOS setup program 164 BIOS updating ...

Page 219: ...5 26 Disconnecting device 47 Display 46 47 Display and temperature 28 Display configuration 76 DLoG Config program 110 DLoG drivers 84 86 89 DLoG MPC 6 toolkit 150 DLoGPwr sys driver 109 DMA Mode 178 DSYSINFO 76 DVMT Mode Select 172 DVMT FIXED Memory 172 EIRP 46 Elastomer springs 155 158 159 160 Electrically isolated input outputs 23 Electrocution 6 7 Elu 27 Emergency operation 6 Emergency shut of...

Page 220: ...CD ROM 74 IRQ xx 171 Jumper battery 145 Jumper COM1 configuration 147 Jumper Compact Flash configuration 145 Jumper Ethernet configuration 145 Jumper external shield connection 148 Jumper LCD configuration 147 Jumper positions 143 Jumper touch configuration 146 Jumper touch enable 146 148 Jumper warnings 143 Key switch of the ignition 105 Keyboard 43 48 119 Keyboard connection 21 Large electrical ...

Page 221: ...ystem 72 Primary IDE Master 176 Primary IDE Slave 176 Primary Video Device 172 Primary Master Slave HDD User Password 193 Printers 60 81 Processor Info Block 174 Protection class 4 Protection class IP65 9 61 112 Protective film 46 PS 2 48 PS 2 mouse 50 PS 2 Mouse Support 182 PS 2 Wedges 60 PXE Boot to LAN 190 Qualified personnel 1 Quick Boot 190 Quiet Boot 190 Radio frequencies 14 Radio frequency ...

Page 222: ...ardness test 102 Touch screen resistance 101 Touch screen resistance to chemical substances 101 Touch screen surface 111 Transmission function 161 Transmitting power 5 45 TTL levels 140 Turning off the display 47 TweakUI 76 Twisted pair cable 83 Type identification 17 Type of Device 177 Type plate 7 Typematic Rate 182 UDMA 33 20 Ultra DMA 177 Ultra short cards 103 ULV 20 UMTS 24 Unbalanced machine...

Page 223: ...Index DLoG MPC 6 Manual 207 WORDPAD EXE 110 Y cable 50 119 Y cable for PS 2 keyboard and mouse 21 ...

Reviews: