background image


Page 71

Chapter 5

Reference

T

ROUBLESHOOTING

 T

ABLES

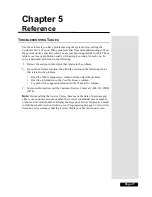
Use these tables if you have problems using the system before calling the 
Customer Service Center. Many problems arise from misunderstandings of how 
the system works, especially when you are just becoming familiar with it. These 
tables cover many problems, usually with a simple solution for each one. To 
solve a particular problem, do the following:

1. Review the section in this Guide that relates to the problem.

2.

If you cannot find a solution, then find the section in the following tables 
that relates to the problem.

Read  the  What’s Happening column until you find the problem.

Read the information in the Possible Reason column.

Try each of the suggested solutions in the What to Do column.

3.

For more information, call the Customer Service Center at 1-800-333-DISH 
(3474).

Note:

 Before calling the Service Center, have ready the date of purchase and 

either your customer account number, the receiver conditional access number, 
or the receiver model number. Display the Important System Information menu 
to find these numbers (See Ordering your Programming on page 2). Also, write 
down any error messages that the receiver displays on the television screen.

Summary of Contents for DP111

Page 1: ...re controlled products unexpected behavior could arise if the user tries to perform operations in a non routine manner This product like almost any other high tech product is subject to bugs and hence...

Page 2: ...20 Using the Program Banner 22 Using the Browse Banner 22 Ordering Pay Per View Programs 24 Using Themes 25 Using Search 25 Using Favorites Lists 27 Using Timers 29 Using Locks 36 Using Caller ID 44 R...

Page 3: ...Contents Page iv Reference 71 Troubleshooting Tables 71 Device Codes 81 Appendix A 83 Appendix B 85 Limited Warranty 85 Residential Customer Agreement 87 Staying Legal 93 FCC Compliance 93 Index 95...

Page 4: ...afety If the provided plug does not fit into your outlet consult an electrician for replacement of the obsolete outlet 10 Protect the power cord from being walked on or pinched particularly at plugs c...

Page 5: ...y kind into the receiver through openings as the objects may touch dangerous voltage points or short out parts This could cause fire or electrical shock Make sure that the outdoor parts of the antenna...

Page 6: ...and follow the instructions in Chapter 4 your receiver will automatically get this software For information on the system read Chapter 2 Parts of the System beginning on page 5 For information on any...

Page 7: ...se channels until you order programming TO ORDER PROGRAMMING 1 Display the Important System Information screen on your TV by pressing SYS INFO on the remote Note You can also display the Important Sys...

Page 8: ...Press SELECT to watch the program ABOUT SATELLITE TELEVISION Satellite television uses a satellite in a stationary orbit over the Earth to deliver television and audio programming This type of orbit...

Page 9: ...e beginning of autumn The period of solar interference lasts for a few minutes at about the same time everyday for a few days during the spring and autumn so do not be alarmed when it happens This is...

Page 10: ...ther the UP or DOWN ARROW button on the receiver front panel IR SENSOR AND IR BLASTER The IR Sensor receives IR signals from the remote control For information on the IR Blaster see page 35 Setting Up...

Page 11: ...nput The SATELLITE IN connection is color coded blue TV SET OUT Connect the coaxial cable between the receiver and TV using this input The TV SET OUT connection is color coded white TV ANTENNA CABLE I...

Page 12: ...satellite receiver If you lose or damage the remote control you will not be fully able to control the receiver If this happens call the Customer Service Center at 1 800 333 DISH 3474 to order a replac...

Page 13: ...om tab back into the slot at the bottom of the battery case and slide the cover back into place USING THE REMOTE CONTROL The following section describes how to use the remote control with your satelli...

Page 14: ...you the receiver volume MUTE BUTTON Press this button to turn off the receiver sound Press it again to restore the receiver sound To use the VOLUME and MUTE buttons with the receiver 1 Press MENU 2 Se...

Page 15: ...BUTTON Press the SELECT button to select a highlighted option or program in a menu NUMBER BUTTONS When watching a program or with the Program Guide open use these buttons to enter a channel number to...

Page 16: ...ormation on that program VIEW TV BUTTON Press this button to return to watching a program If you are watching a program press this button to briefly display the Program Banner While using any menu pre...

Page 17: ...a one quarter screen video window option that shows the last program you were viewing THEME CATEGORIES MENU The Theme Categories menu allows you to choose programs based on their contents This menu al...

Page 18: ...you to set and use locks SYSTEM SETUP MENU The System Setup menu provides several features that help you set up and maintain the system Tip This menu is where you set up lists of your favorite chan n...

Page 19: ...ave a VCR connected to the receiver you can set up a timer to start recording a program on the VCR DISH HOME With Dish Home you can order channels check the news and weather and even play games Tip Th...

Page 20: ...You can use the Browse Banner press the RIGHT ARROW on the remote control to change channels or to see what other programs are available without changing the program that you are watching The receive...

Page 21: ...Page 16 Chapter 2 Parts of the System Notes...

Page 22: ...easy Use the menus to control the receiver and to use its features such as setting locks choosing a program or creating a Favorites List OPENING THE MENUS You can open the menus in either of two ways...

Page 23: ...hen you make a choice in a list the receiver does not apply the change until you select the Save or OK option If you do not want to save any changes select the Cancel option to discard all the changes...

Page 24: ...LIFE 108 option is highlighted When you select a choice in a list it looks like this CANCELING A PROCEDURE To cancel a procedure you must press the remote control CANCEL or VIEW TV button before you...

Page 25: ...o option If you prefer a bigger guide with no video displayed select the Full Guide Without Video option and select the Save option When you first display the inset there may be a brief delay before a...

Page 26: ...press the INFO button for more information about the highlighted program Press the CANCEL button to return to the Program Guide 4 Press the SELECT button to change to the new channel You may skip the...

Page 27: ...grams are playing on the channels above or below the one you are viewing Information on these programs appears at the bottom of the TV screen Note The Browse Banner only displays the channels in the a...

Page 28: ...ou press the RIGHT ARROW it will display information on the program that is on next on the same channel It does not display information for any other programs in the future and cannot display programs...

Page 29: ...the pay per view program press the UP or DOWN ARROW button or select the No or Cancel option At the confirmation menu 4 Select the Yes option to confirm the purchase The pay per view fee will be added...

Page 30: ...ed program in the program list 4 Press the SELECT button to watch the program Note If the program you highlighted is on some time in the future the receiver will open the Create An Event Timer menu Se...

Page 31: ...MBER PAD For example if you are searching for Rudy Fremmel Presents enter the first few letters in the title as follows Press three times for an R Press twice for a U Press once for a D Press three ti...

Page 32: ...r DOWN ARROW button to change channels The All Chan Favorites List contains all the channels You cannot make any changes to the All Chan list The All Sub Favorites List contains all the channels in yo...

Page 33: ...channel 7 Repeat steps 5 and 6 until you have added all the channels that you want 8 To delete a channel from the Favorites Lists select the channel in the list The check mark next to the channel dis...

Page 34: ...program listed with start and stop times in the Program Guide A manual event timer allows you to set custom start and stop times for a timer EVENT TIMER TYPES Reminder Reminds you that a program is a...

Page 35: ...an 24 hours the timer will not operate BEFORE AN EVENT TIMER OPERATES Five minutes before an event timer operates the receiver displays a small blinking clock symbol on the TV screen This symbol disap...

Page 36: ...AL EVENT TIMER 1 Press the MENU button 2 Select the Timers option 3 Select the Create option The receiver displays the Create a Manual Event Timer menu 4 Select a Timer Type option 5 Select a Timer Fr...

Page 37: ...gain Note You cannot set a manual event timer for a pay per view event OVERLAPPING EVENT TIMERS If you try to create event timers for overlapping programs the receiver displays a menu with the dates a...

Page 38: ...timer Select the Edit option 5 You may change the Timer Type Timer Frequency or Channel To do this select each option that you want 6 If you want to change the Start Time the End Time or the Date sele...

Page 39: ...r that you want to delete A check mark appears in the box next to the event timer 5 Move to Delete and press SELECT on the remote Do this again for any other timer s that you want to delete REVIEWING...

Page 40: ...U button 2 Select the System Setup option 3 Select the Installation option 4 Select the VCR Setup option 5 Find the brand name of the VCR in the table on page 81 6 Set the code for the VCR using one o...

Page 41: ...assword entry menu If you have set a VCR Event Timer the VCR will record only that menu POWER OFF AND EVENT TIMERS If the receiver is OFF at the time an Auto Tune or VCR Event Timer is scheduled to op...

Page 42: ...for information on PINs CREATING A PASSWORD You must lock the receiver for any receiver Parental Locks you set to take effect To lock the receiver you must first create a password If you forget your p...

Page 43: ...programs 1 Press the MENU button 2 Select the Locks option If the receiver is locked enter the password using the number pad buttons The receiver displays stars as you enter the digits of the passwor...

Page 44: ...umber pad buttons 5 Press the SELECT button to lock or unlock the highlighted channel If the checkbox next to the channel has a checkmark the channel is locked 6 Select the Save option to save the cha...

Page 45: ...rs as Lock System instead the receiver is already unlocked LOCKING THE RECEIVER FRONT PANEL CONTROL BUTTONS This keeps anyone from changing the channel but it does not lock the remote control buttons...

Page 46: ...pay per view channels Remember that you must lock the receiver for this lock to take effect You also can lock one or more pay per view channels by using channel locks or rating locks 1 Press the MENU...

Page 47: ...NU button 2 Select the Locks option If the receiver is locked enter the password using the number pad buttons The receiver displays stars as you enter the digits of the password As soon as you enter t...

Page 48: ...enter the fourth digit of the password the receiver highlights the OK option 3 Press the SELECT button 4 Select the Change Password option 5 Enter the current password using the number pad buttons As...

Page 49: ...sure that you are authorized to make changes to your account USING CALLER ID Caller ID displays on your TV the names of people as they call you if you subscribe to Caller ID from your local phone com...

Page 50: ...O TURN THE CALLER ID ON AND OFF 1 Press MENU 2 Select the System Setup option 3 Select the Installation option 4 Select the Caller ID option The following screen will display 5 Highlight Enable Caller...

Page 51: ...set the receiver to bypass a receiver lock 1 Press the MENU button 2 Select the System Setup option 3 Select the Installation option 4 Select the Factory Defaults option The receiver displays a Warnin...

Page 52: ...l the test is done If the telephone connection is correct the receiver displays a Phone Connection OK message Select the Dial Out option so the receiver can make a toll free call to the Customer Servi...

Page 53: ...he TV If you need to change the channel your TV uses do the following 1 Press the MENU button 2 Select System Setup 3 Select 3 4 Modulator The Select Output Channel screen displays 4 Select either Cha...

Page 54: ...lation of a satellite system which includes your DISH Pro receiver included with this manual and a DISH Pro antenna system that can be identified by the DISH Pro logo shown below Connecting Your TV an...

Page 55: ...he receiver comes preset to channel 3 See Setting Up the Receiver For Channel 3 or 4 on page 48 Installing a DISH 500 Antenna Note If you have a Dish antenna system already installed and the dish has...

Page 56: ...is menu 4 Select Peak Angles 5 Enter your ZIP code in the ZIP Code field 6 Select the Dish 500 option 7 The menu displays the azimuth elevation and skew angles Write down these numbers in the blanks p...

Page 57: ...move or be bumped out of adjustment Keep in mind that physical and environmental conditions can block your satellite dish s ability to receive a clear satellite signal The conditions to be aware of ar...

Page 58: ...ly to keep the dish from rotating Once the skew is set do not try to fine tune this angle when aiming the dish 6 Set the elevation by tilting the dish mounting bracket to align the red edge with the r...

Page 59: ...other satellite TV systems not rated for 950 2150 MHz These other cables may cause signal loss Do not use existing cables such as RG 59 Also be sure that any outdoor connections are made using waterpr...

Page 60: ...win LNBF is working The Transponder line may show two Xs This is OK and does not indicate a problem with the receiver 16 Select Cancel or OK to return to the Point Dish Signal screen Make sure the che...

Page 61: ...nal tighten both mast clamp bolts Then loosen both elevation bolts just enough so you can tilt the dish Tilt the dish up and down just a little to where the signal strength bar shows the strongest sig...

Page 62: ...trongest possible signal from both satellites 22 Select Cancel to exit the Point Dish Signal menu An Attention screen will open asking the mounting and positioning of your dish is complete with a Lock...

Page 63: ...such as RG 59 Also be sure that any outdoor connections are made using waterproof F connectors Once you have installed the DISH 500 with its DishPro Twin LNBF using the preceding instructions you can...

Page 64: ...start on page 60 12 Connect any switches in your system using the instructions which came with the switch es 13 Select Check Switch from the Point Dish Signal menu When the Check Switch menu opens Te...

Page 65: ...Pro Receivers This diagram leaves out grounding to be clear Make sure you ground the system per the National Electrical Code NEC and all local electrical codes When you set up your system following th...

Page 66: ...ves out grounding to be clear Make sure you ground the system per the National Electrical Code NEC and all local electrical codes When you set up your system following this diagram and run Check Switc...

Page 67: ...leaves out grounding to be clear Make sure you ground the system per the National Electrical Code NEC and all local electrical codes When you set up your system following this diagram and run Check Sw...

Page 68: ...round the system per the National Electrical Code NEC and all local electrical codes When you set up your system following this diagram and run Check Switch the Installation Summary screen should look...

Page 69: ...ical codes When you set up your system following this diagram and run Check Switch the Installation Summary screen should look similar to the one shown below When using a DishPro compliant splitter to...

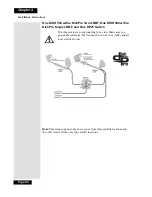
Page 70: ...you set up your system following this diagram and run Check Switch the Installation Summary screen should look similar to the one shown below When using a DishPro compliant splitter to split the signa...

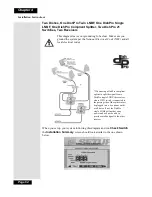
Page 71: ...Single LNBF and One DP21 Switch This diagram leaves out grounding to be clear Make sure you ground the system per the National Electrical Code NEC and all local electrical codes Note This setup suppo...

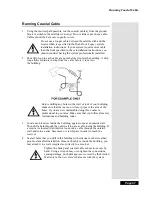
Page 72: ...uilding make sure that there are no wires or pipes in the area of the holes If you are not comfortable doing this contact a professional in your area Make sure that you follow all safety instructions...

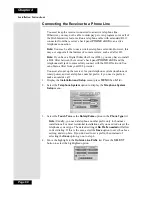
Page 73: ...btain a filter from your DSL provider You must also set up the receiver for your telephone system touchtone or rotary pulse and set a telephone number prefix if you need a prefix to make an outside ca...

Page 74: ...x for example dial 9 to get an outside line select the Prefix Code option The receiver displays the same number of boxes highlighting the first box where you must enter the digits Use the Number Pad t...

Page 75: ...Page 70 Chapter 4 Installation Instructions Notes...

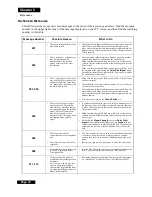
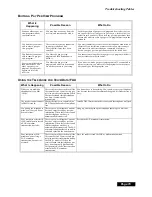
Page 76: ...find the section in the following tables that relates to the problem Read the What s Happening column until you find the problem Read the information in the Possible Reason column Try each of the sug...

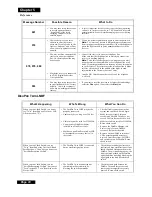
Page 77: ...ables are in place and check that all cable connections are tight and dry for outdoor cables If this does not work do the Check Switch test 005 The receiver may not yet have been authorized The satell...

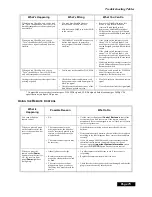
Page 78: ...sight to the satellite Check whether branches or leaves have grown into the line of sight Check that the Signal Strength bar in the Point Dish Signal menu is green and displays the word Locked If not...

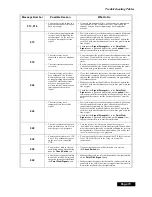
Page 79: ...actory If you want to reset the receiver to its factory default settings select the Yes option If not select the No option What s Happening What s Wrong What You Can Do When you run Check Switch you d...

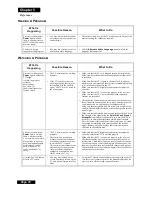
Page 80: ...growth on trees Wait for weather to clear up and restore signal Clear obstructions from the signal path Compatible accessory devices must pass 2150 MHz signals 22 KHz signals both directions per DiSEq...

Page 81: ...clear line of sight to the satellite Check whether branches or leaves have grown into the line of sight Make sure that the satellite dish is aimed at the satellite Check the strength of the signal us...

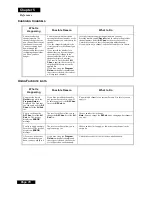
Page 82: ...ended These features cannot display a time earlier than the present Contact the program providers for details on past programs When you are using the Program Guide or Browse Banner some channels are...

Page 83: ...e active Favorite List Unlock the receiver so that it does not skip adult channels If you want to buy a channel call the Customer Service Center What Is Happening Possible Reason What to Do You press...

Page 84: ...r the program once What Is Happening Possible Reason What to Do While you are making a telephone call you hear clicks The receiver may have tried to call the Customer Service Center to send pay per vi...

Page 85: ...tes just one time A Mon Fri event timer operates Monday through Friday on the same channel at the same time A Daily event timer does the same Monday through Sunday A Weekly event timer operates once a...

Page 86: ...538 539 540 541 553 588 595 596 597 Instant Replay 553 ITT 518 JC Penney 530 554 580 591 594 600 601 Jenson 560 JVC 561 562 563 564 592 594 600 601 Brand Code Kenwood 562 581 592 594 600 601 Lloyd 58...

Page 87: ...nsui 532 544 562 600 621 Sanyo 549 581 582 583 608 SBR 565 Schneider 589 Scott 508 559 590 Sears 548 549 581 584 608 610 Sentra 546 Brand Code Sharp 585 607 609 625 Shintom 589 Sony 500 501 502 503 50...

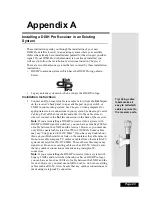
Page 88: ...lose to where it connect to the SAT IN connection on the back of the receiver Note If you are installing a DISH Pro receiver into a system with DISH Pro LNBFs and or switches you can have as much as 2...

Page 89: ...nd retighten by hand the cable connections between your receiver LNBFs and switches in your system Then press Test to rerun Check Switch again 7 Select OK to return to the Point Dish Signal Strength s...

Page 90: ...bill of sale For your nearest JVC factory service center please call toll free 1 800 252 5722 If service is not available locally box the product carefully preferably in the original carton and ship...

Page 91: ...ANTIES OF MERCHANTABILITY AND FITNESS FOR PARTICULAR PURPOSE ARE LIMITED TO THE WARRANTY PERIOD SET FORTH ABOVE Some states do not allow the exclusion of incidental or consequential damages or limitat...

Page 92: ...hnetwork com DISH Network is a trademark of EchoStar Satellite Corporation 1 THE DISH NETWORK SERVICE A Services Defined DISH Network offers a wide variety of video and audio programming and other ser...

Page 93: ...iver would be authorized to receive the same Services as your initial receiver DISH Network will charge you a reduced monthly fee Additional Receiver Authorization Fee for each additional receiver add...

Page 94: ...reconnect your Services Deposits will not be held segregated from other funds and shall not earn or accrue interest C If you at any time fail neglect or refuse to make timely payments hereunder or if...

Page 95: ...certain early termination fees may apply C DISH Network has the right to terminate your Services at any time without providing notice to you if i you fail to pay your bill when it is due ii we receive...

Page 96: ...proper operation of your Equipment DISH Network requires that you connect each DISH Network receiver on your account to a telephone line For accounts containing multiple receivers each receiver must b...

Page 97: ...n viewing by you other members of your household or guests and we shall have no liability to anyone due to or based on the content of any of the Services furnished to you 8 WARNING AGAINST PIRACY It i...

Page 98: ...mited pay per view uses only unless otherwise authorized by Macrovision Reverse engineering or disassembly is prohibited U S Patent No s 4631603 4577216 4819098 are licensed for limited pay per view o...

Page 99: ...repairable parts inside Any attempts to repair the receiver will void your authorization to use it Radio Interference This device complies with Part 15 of the FCC Rules Operation is subject to the fo...

Page 100: ...0 Changing Program Languages 46 Channel Locks 39 Channels Changing 17 Closing the Menus 17 Closing the Program Guide 21 Coaxial Cable Connections 6 Control Buttons Receiver Front Panel 5 Control Remot...

Page 101: ...or Opening the Locks Menu 37 43 Changing the Receiver Password 40 43 Creating or Changing Channel Locks 39 Creating or Changing Rating Content Code Locks 38 Entering the Password 37 Hiding Adult Chann...

Page 102: ...rsonal Identification Number 44 Power Light 5 Problems and Solutions Tables 71 Using the Remote Control 75 Program Banner Using the Program Banner 22 Program Guide 12 Closing the Program Guide 21 Open...

Page 103: ...12 Themes Theme Categories Using Themes 25 Timers Event Locks Blacked Out Programs and Event Timers 36 Power Off and Event Timers 36 Troubleshooting Problems and Solutions Tables 71 Troubleshooting Ta...

Page 104: ...Page 99 Index Notes...

Page 105: ...Index Page 100 Notes...

Page 106: ...you call the Service Center To get the Conditional Access Numbers display the Important System Information menu see Ordering Your Program Packages on page 2 Purchase Location Name Purchase Location T...

Reviews: