background image

Installing System Components

85

6

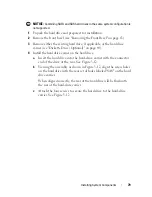
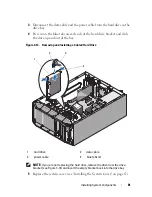
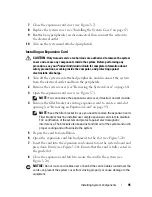
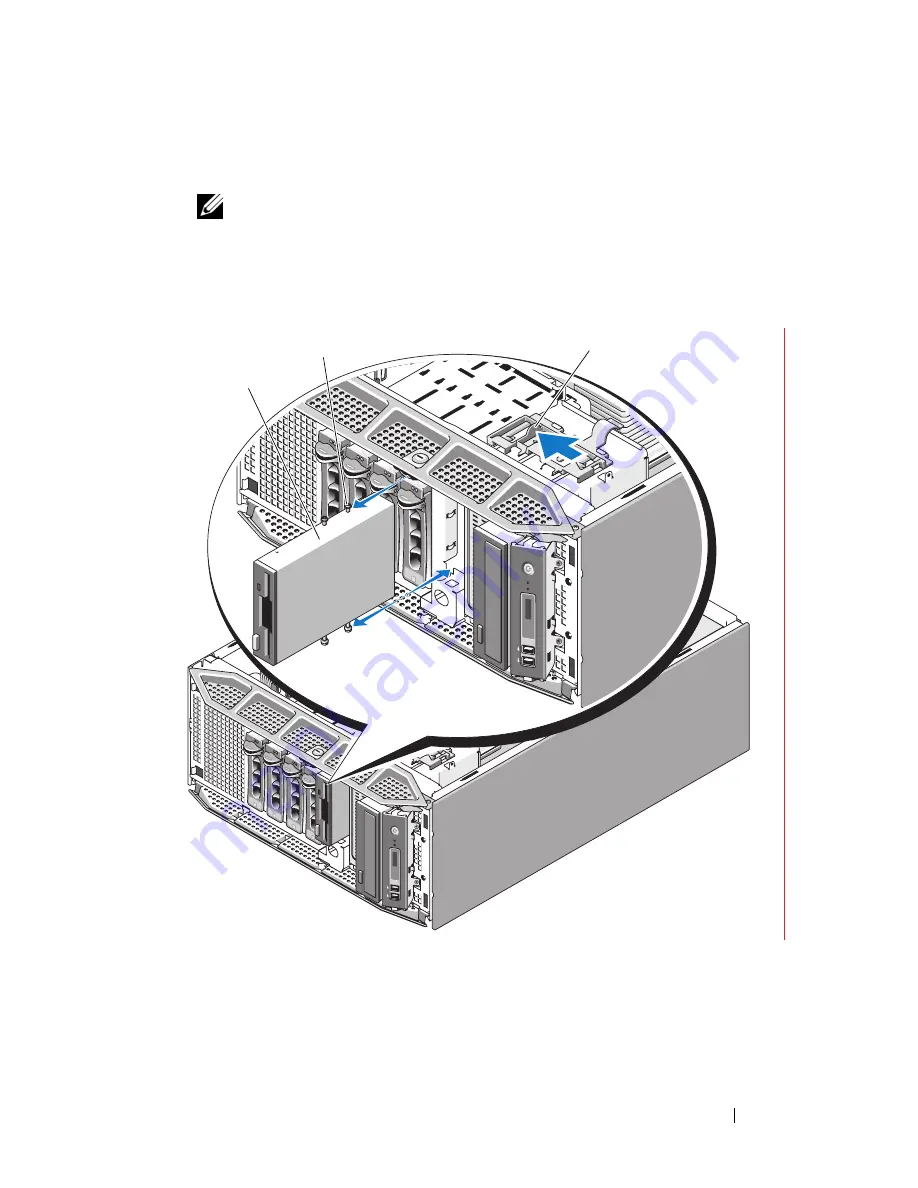
Slide the drive release latch towards the base of the system to release the 
shoulder screw, then slide the diskette drive out of the drive bay. See .


NOTE: 

If you are permanently removing the diskette drive, replace the 

3.5-inch EMI filler (see "Installing an EMI Filler" on page 69) and the 3.5-inch 
insert on the front bezel (see "Installing a Front Bezel Insert" on page 66).

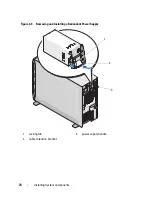
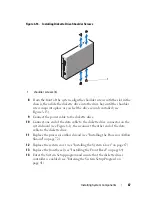
Figure 3-15.

Removing and Installing a Diskette Drive

1

diskette drive

2

shoulder screw

3

drive release latch

1

2

3

Summary of Contents for POWEREDGE T300

Page 1: ...w w w d e l l c o m s u p p o r t d e l l c o m Dell PowerEdge T300 Systems Hardware Owner s Manual ...

Page 2: ...Dell Inc is strictly forbidden Trademarks used in this text Dell the DELL logo PowerEdge and Dell OpenManage are trademarks of Dell Inc Intel is a registered trademarks of Intel Corporation Microsoft Windows Windows Server and MS DOS are either trademarks or registered trademarks of Microsoft Corporation in the United States and or other countries UNIX is a registered trademark of The Open Group i...

Page 3: ...el Features and Indicators 16 Connecting External Devices 16 Power Indicator Codes 17 NIC Indicator Codes 18 LCD Status Messages 19 Solving Problems Described by LCD Status Messages 29 Removing LCD Status Messages 29 System Messages 30 Warning Messages 39 Diagnostics Messages 40 Alert Messages 40 2 Using the System Setup Program 41 Entering the System Setup Program 41 ...

Page 4: ...t Screen 52 System and Setup Password Features 53 Using the System Password 53 Using the Setup Password 56 Disabling a Forgotten Password 57 Baseboard Management Controller Configuration 57 Entering the BMC Setup Module 58 BMC Setup Module Options 58 3 Installing System Components 59 Recommended Tools 60 Inside the System 60 Front Bezel 62 Removing the Front Bezel 63 Installing the Front Bezel 64 ...

Page 5: ...wer Supply 73 Installing a Redundant Power Supply 75 Removing a Non redundant Power Supply 75 Installing a Non Redundant Power Supply 77 Hard Drives 77 Removing a Hot Pluggable Hard Drive 77 Installing a Hot Pluggable Hard Drive 78 Removing a Cabled Hard Drive 80 Installing a Cabled Hard Drive 82 Configuring the Boot Device 84 Diskette Drive Optional 84 Removing the Diskette Drive 84 Installing a ...

Page 6: ...the RAC Card 101 Installing a RAC Card 103 Internal USB Memory Key Connector 104 Installing the Optional Internal USB Memory Key 104 Cooling Fans 106 Removing the Expansion Card Fan 106 Installing the Expansion Card Fan 107 Removing the System Fan 108 Installing the System Fan 109 System Memory 110 Memory Module Installation Guidelines 110 Removing Memory Modules 111 Installing Memory Modules 113 ...

Page 7: ...oving the SAS Backplane 124 Installing the SAS Backplane 126 Control Panel Service only Procedure 126 Removing the Control Panel 126 Installing the Control Panel 128 System Board Service Only Procedure 128 Removing the System Board 128 Installing the System Board 130 4 Troubleshooting Your System 133 Safety First For You and Your System 133 Start Up Routine 133 Checking the Equipment 134 Troublesh...

Page 8: ...ms 145 Troubleshooting a Fan 145 Troubleshooting System Memory 146 Troubleshooting an Internal USB Memory Key 148 Troubleshooting a Diskette Drive 149 Troubleshooting an Optical Drive 151 Troubleshooting a SCSI Tape Drive 152 Troubleshooting a Hard Drive 153 Troubleshooting a Hot pluggable Hard Drive 155 Troubleshooting a SAS or SAS RAID Controller 157 Troubleshooting Expansion Cards 159 Troublesh...

Page 9: ...s 165 Using the Custom Test Options 165 Selecting Devices for Testing 165 Selecting Diagnostics Options 166 Viewing Information and Results 166 6 Jumpers and Connectors 167 System Board Connectors 167 Jumper Settings 170 SAS Backplane Board Connectors 171 Disabling a Forgotten Password 173 7 Getting Help 175 Contacting Dell 175 Glossary 177 Index 189 ...

Page 10: ...10 Contents ...

Page 11: ...type of message lists the possible causes and provides steps to resolve any problems indicated by a message The system indicators and features are illustrated in this section Other Information You May Need CAUTION The Product Information Guide provides important safety and regulatory information Warranty information may be included within this document or as a separate document The Getting Started...

Page 12: ...tem to finish booting and then restart your system and try again Table 1 1 Keystrokes for Accessing System Features Keystroke Description F2 Enters the System Setup program see Entering the System Setup Program on page 41 F10 Opens the utility partition allowing you to run the system diagnostics see Running the System Diagnostics on page 163 F11 Enters the boot mode selection screen allowing you t...

Page 13: ... Figure 1 1 Front Panel Features and Indicators Ctrl S If you have PXE support enabled through the System Setup Program see Integrated Devices Screen on page 48 this keystroke allows you to configure NIC settings for PXE boot For more information see the documentation for your integrated NIC Table 1 1 Keystrokes for Accessing System Features continued Keystroke Description 8 1 2 4 5 3 6 7 ...

Page 14: ...is turned off If the system is not running an ACPI compliant operating system the power is turned off immediately after the power button is pressed 5 NMI button Used to troubleshoot software and device driver errors when using certain operating systems This button can be pressed using the end of a paper clip Use this button only if directed to do so by qualified support personnel or by the operati...

Page 15: ... the LCD to flash blue to identify a particular system The LCD lights amber when the system needs attention and the LCD panel displays an error code followed by descriptive text NOTE If the system is connected to AC power and an error has been detected the LCD lights amber regardless of whether the system has been powered on 8 USB connectors 2 Connects USB 2 0 compliant devices to the system Table...

Page 16: ...ese guidelines Most devices must be connected to a specific connector and device drivers must be installed before the device operates properly Device drivers are normally included with your operating system software or with the device itself See the documentation that accompanied the device for specific installation and configuration instructions 1 expansion card slots 5 2 USB connectors 4 3 NIC c...

Page 17: ...er to the system from the system s power supplies The power indicator lights green when the system is on The indicators on the redundant power supplies show whether power is present or whether a power fault has occurred see Figure 1 3 Table 1 3 lists the power supply indicator codes Table 1 3 Redundant Power Supply Indicators Indicator Function Power supply status Green indicates that the power su...

Page 18: ...s an indicator that provides information on network activity and link status see Figure 1 4 For a list of NIC indicator codes see Table 1 4 Figure 1 4 NIC Indicators 1 power supply status DC out is operational 2 power supply fault 3 AC line status AC in is operational 1 link indicator 2 activity indicator 3 2 1 1 2 ...

Page 19: ...see the systems management software documentation CAUTION Only trained service technicians are authorized to remove the system cover and access any of the components inside the system See your Product Information Guide for complete information about safety precautions working inside the computer and protecting against electrostatic discharge NOTE If your system fails to boot press the System ID bu...

Page 20: ...nge See Troubleshooting System Cooling Problems on page 145 E1115 Temp Planar Planar system temperature is out of acceptable range See Troubleshooting System Cooling Problems on page 145 E1118 CPU Temp Interface The BMC is unable to determine the CPU s temperature status Consequently the BMC increases the CPU fan speed to maximum as a precautionary measure Turn off power to the system and restart ...

Page 21: ...oblems on page 145 E1311 FAN MOD RPM RPM of specified cooling fan module is out of acceptable operating range See Troubleshooting System Cooling Problems on page 145 E1313 Fan Redundancy One or more cooling fans has failed Cooling fan redundancy has been lost See Troubleshooting System Cooling Problems on page 145 E1410 CPU IERR Specified microprocessor is reporting an internal error See your syst...

Page 22: ...rce or the SEL is cleared using either Server Assistant or the BMC Management Utility See the Dell OpenManage Baseboard Management Controller User s Guide for information about these utilities E1418 CPU Presence Specified processor is missing or bad and the system is in an unsupported configuration See Troubleshooting the Microprocessor on page 161 E141C CPU Mismatch Processors are in an unsupport...

Page 23: ...lled or faulty See Troubleshooting Redundant Power Supplies on page 143 E1614 PS Status No power is available from the specified power supply specified power supply is improperly installed or faulty See Troubleshooting Redundant Power Supplies on page 143 E1618 PS Predictive Power supply voltage is out of acceptable range specified power supply is improperly installed or faulty See Troubleshooting...

Page 24: ... Help on page 175 PCI PERR Slot The system BIOS has reported a PCI parity error on a component that resides in the specified PCIe slot E1712 PCI SERR B D F The system BIOS has reported a PCI system error on a component that resides in PCI configuration space at bus device function Remove and reseat the PCIe expansion cards If the problem persists see Troubleshooting Expansion Cards on page 159 If ...

Page 25: ...Drive on page 153 E1811 HDD Rbld Abrt Specified hard drive has ended rebuild before completion See Troubleshooting a Hard Drive on page 153 E1812 HDD Removed The specified hard drive has been removed from the system Information only E1913 CPU Firmware Mismatch The BMC firmware does not support the CPU Update to the latest BMC firmware See the BMC User s Guide for more information on setup and use ...

Page 26: ...l The system BIOS failed to copy its flash image into memory See Troubleshooting System Memory on page 146 E2014 CMOS Fail CMOS failure CMOS RAM not functioning properly See Getting Help on page 175 E2015 DMA Controller DMA controller failure See Getting Help on page 175 E2016 Int Controller Interrupt controller failure See Getting Help on page 175 E2017 Timer Fail Timer refresh failure See Gettin...

Page 27: ...re that RAC cables and connectors are properly seated If problem persists see your RAC documentation E2020 CPU Config CPU configuration failure Check screen for specific error messages E2021 Memory Population Incorrect memory configuration Memory population order incorrect Check screen for specific error messages see Troubleshooting System Memory on page 146 E2022 POST Fail General failure after v...

Page 28: ...bleshooting System Memory on page 146 I1910 Intrusion System cover has been removed Information only I1911 3 ERRs Chk Log LCD overflow message A maximum of three error messages can display sequentially on the LCD The fourth message displays as the standard overflow message Check the SEL for details on the events I1912 SEL Full System Event Log is full of events and is unable to log any more events...

Page 29: ...oes out of range the LCD displays the fault when the temperature returns to the acceptable range the message is removed from the LCD For other faults you must take action to remove the message from the display Clear the SEL You can perform this task remotely but you will lose the event history for the system Power cycle Turn off the system and disconnect it from the electrical outlet wait approxim...

Page 30: ...e the system See your Product Information Guide for complete information about safety precautions working inside the computer and protecting against electrostatic discharge NOTE If you receive a system message that is not listed in Table 1 3 check the documentation for the application that is running when the message appears or the operating system s documentation for an explanation of the message...

Page 31: ...update If the problem persists see Getting Help on page 175 Caution NVRAM_CLR jumper is installed on system board NVRAM_CLR jumper is installed CMOS has been cleared Remove the NVRAM_CLR jumper See Figure 6 1 for jumper location Decreasing available memory Faulty or improperly installed memory modules See Troubleshooting System Memory on page 146 Diskette drive 0 seek failure Faulty or improperly ...

Page 32: ...e mouse is defective Ensure that the mouse cable is properly connected to the system If the problem persists try another mouse Fatal Error caused a system reset Please check the system event log for details A fatal system error occurred and caused the system to reboot Check the SEL for information that was logged during the error See the applicable troubleshooting section in Troubleshooting Your S...

Page 33: ...em is in manufacturing mode Reboot to take the system out of manufacturing mode Memory address line failure at address read value expecting value Memory double word logic failure at address read value expecting value Memory odd even logic failure at address read value expecting value Memory write read failure at address read value expecting value Faulty or improperly installed memory modules See T...

Page 34: ...e hard drive configuration settings in the System Setup program see Using the System Setup Program on page 41 If necessary install the operating system on your hard drive see your operating system documentation No timer tick interrupt Faulty system board See Getting Help on page 175 Not a boot diskette No operating system on diskette Replace with a bootable diskette PCI BIOS failed to install PCIe...

Page 35: ... Requested sector not found The operating system cannot read from the hard drive or USB device the system could not find a particular sector on the disk or the requested sector is defective Replace the USB medium or device Ensure that the USB or hard drive cables are properly connected See Troubleshooting a USB Device on page 138 or Troubleshooting a Hard Drive on page 153 for the appropriate driv...

Page 36: ...module may be faulty If memory has been added or removed this message is informative and can be ignored If memory has not been added or removed check the SEL to determine if single bit or multi bit errors were detected and replace the faulty memory module see Troubleshooting System Memory on page 146 Time of day clock stopped Faulty battery or faulty chip See Troubleshooting the System Battery on ...

Page 37: ...controller chip has failed Reseat the DIMMs See Troubleshooting System Memory on page 146 If the problem persists see Getting Help on page 175 Unsupported DIMM detected in the RAID DIMM slot DIMM installed in RAID DIMM slot is not supported See Troubleshooting System Memory on page 146 If the problem persists see Getting Help on page 175 Unsupported RAID key detected The RAID key installed in the ...

Page 38: ...D DIMM missing when system is in RAID mode Information only Warning Detected mode change from SCSI to RAID on channel x of the embedded RAID subsystem The embedded RAID subsystem configuration has changed in System Setup See Using the System Setup Program on page 42 Warning Detected mode change from RAID to SCSI on channel n of the embedded RAID subsystem The embedded RAID subsystem configuration ...

Page 39: ...rmation on valid memory configurations please see the system documentation on support dell com Invalid memory configuration The system will run but at a reduced functionality Ensure that the memory modules are installed in a valid configuration see Memory Module Installation Guidelines on page 110 If the problem persists see Troubleshooting System Memory on page 146 Write fault Write fault on sele...

Page 40: ...System Diagnostics on page 163 for more information about system diagnostics Alert Messages Systems management software generates alert messages for your system Alert messages include information status warning and failure messages for drive temperature fan and power conditions For more information see the systems management software documentation ...

Page 41: ...on or restart your system 2 Press F2 immediately after you see the following message F2 System Setup If your operating system begins to load before you press F2 allow the system to finish booting and then restart your system and try again NOTE To ensure an orderly system shutdown see the documentation that accompanied your operating system Responding to Error Messages You can enter the System Setu...

Page 42: ... but do not take effect until you restart the system Table 2 1 System Setup Program Navigation Keys Keys Action Up arrow or Shift Tab Moves to the previous field Down arrow or Tab Moves to the next field Spacebar left and right arrows Cycles through the settings in a field In many fields you can also type the appropriate value Esc Exits the System Setup program and restarts the system if any chang...

Page 43: ...ure 2 1 Figure 2 1 Main System Setup Program Screen Table 2 2 lists the options and descriptions for the information fields that appear on the main System Setup program screen NOTE The options for the System Setup program change based on the system configuration NOTE The System Setup program defaults are listed under their respective options where applicable ...

Page 44: ...led a RAC additional options such as virtual diskette and virtual CD ROM may be present NOTE System boot is not supported from an external device attached to a SAS or SCSI adapter See support dell com for the latest support information about booting from external devices Hard Disk Drive Sequence Determines the order in which the system searches the hard drives during system startup The selections ...

Page 45: ...e Using the System Password on page 53 and Using the Setup Password on page 56 Keyboard NumLock On default Determines whether your system starts up with the NumLock mode activated on 101 or 102 key keyboards does not apply to 84 key keyboards Report Keyboard Errors Report default Enables or disables reporting of keyboard errors during the POST Select Report for host systems that have keyboards att...

Page 46: ...Virtualization Technology Disabled default NOTE Disable this feature if your system will not be running virtualization software Displays when the processor supports Virtualization Technology Enabled permits virtualization software to use Virtualization Technology incorporated in the processor design This feature can only be used by software that supports Virtualization Technology Adjacent Cache Li...

Page 47: ...2 5 SATA Configuration Screen Option Description Port A Auto default Displays the model number drive type and size of the device attached to Port A When set to Auto default the port is enabled if devices are attached to the port Port B Off default Displays the model number drive type and size of the device attached to Port B When set to Auto the port is enabled if devices are attached to the port ...

Page 48: ...rnal USB port Embedded Gb NICx NIC1 default Enabled with PXE Other NICs Enabled Enables or disables the system s integrated NIC Options are Enabled Enabled with PXE Enabled with iSCSI Boot and Disabled PXE support allows the system to boot from the network Changes take effect after the system reboots MAC Address Displays the MAC address for the integrated 10 100 1000 NIC This field does not have u...

Page 49: ... Serial Communication Screen Options Option Description Serial Communication On without Console Redirection default Options are On without Console Redirection On with Console Redirection via COM1 On with Console Redirection via COM2 and Off External Serial Connector COM1 default Specifies whether COM1 COM2 or Remote Access Device has access to the external serial connector for serial communication...

Page 50: ...ou restrict access to your system using the system password feature NOTE See Using the Setup Password on page 56 for instructions on assigning a setup password and using or changing an existing setup password Password Status Setting the Setup Password option to Enabled prevents the system password from being changed or disabled at system start up To lock the system password assign a setup password...

Page 51: ... reports the TPM to the operating system and stores the pre boot measurements compliant with Trusted Computing Group standards to the TPM during POST When set to On without Pre boot Measurements the system reports the TPM to the operating system and bypasses pre boot measurements TPM Activation Changes the operational state of the TPM When set to Activate the TPM is enabled and activated at defaul...

Page 52: ...system the system performs an orderly shutdown before power is turned off The button is enabled in the System Setup program When disabled the button can only turn on system power NOTE You can still turn on the system by using the power button even if the Power Button option is set to Disabled NMI Button Disabled default NOTICE Use the NMI button only if directed to do so by qualified support perso...

Page 53: ...te your system or change settings in the System Setup program until a trained service technician changes the password jumper setting to disable the passwords and erases the existing passwords This procedure is described in Disabling a Forgotten Password on page 173 Using the System Password After a system password is assigned only those who know the password have full use of the system When the Sy...

Page 54: ...alid If you enter one of these combinations the system beeps To erase a character when entering your password press Backspace or the left arrow key NOTE To escape from the field without assigning a system password press Enter to move to another field or press Esc at any time prior to completing step 5 4 Press Enter 5 To confirm your password type it a second time and press Enter The setting shown ...

Page 55: ...you to re enter your password You have three attempts to enter the correct password After the third unsuccessful attempt the system displays an error message showing the number of unsuccessful attempts and that the system has halted and will shut down This message can alert you to an unauthorized person attempting to use your system Even after you shut down and restart the system the error message...

Page 56: ...use the system beeps NOTE The setup password can be the same as the system password If the two passwords are different the setup password can be used as an alternate system password However the system password cannot be used in place of the setup password You can use up to 32 characters in your password As you press each character key or the spacebar for a blank space a placeholder appears in the ...

Page 57: ... option to protect the system password from unauthorized changes Deleting or Changing an Existing Setup Password 1 Enter the System Setup program and select the System Security option 2 Highlight the Setup Password option press Enter to access the setup password window and press Enter twice to clear the existing setup password The setting changes to Not Enabled 3 If you want to assign a new setup ...

Page 58: ...ntegrated NIC1 For additional information on using BMC see the documentation for the BMC and systems management applications Entering the BMC Setup Module 1 Turn on or restart your system 2 Press Ctrl E when prompted after POST If your operating system begins to load before you press Crtl E allow the system to finish booting and then restart your system and try again BMC Setup Module Options For i...

Page 59: ...cessor airflow shroud Power supplies and power distribution board Hard drives Diskette drive Optical and tape drives Expansion cards SAS controller card RAID battery RAC card Internal USB memory key connector System fan and expansion card fan Memory Processor System battery Chassis intrusion switch power supply distribution module SAS backplane Control panel System board ...

Page 60: ... procedures in this section may require one or more of the following tools Small Phillips screwdriver Small flat blade screwdriver Wrist grounding strap Inside the System Figure 3 1 shows the system cover removed to provide an interior view of the system ...

Page 61: ... System 1 system cover 2 processor airflow shroud 3 system fan 4 power supplies 5 power distribution board shroud 6 system memory modules 6 7 processor and heat sink 8 drive release latch 9 control panel 10 optical drive 2 1 3 4 14 5 8 15 9 11 12 10 7 16 17 13 6 ...

Page 62: ...pherals through a pair of redundant power supplies or a single non redundant power supply Front Bezel The front bezel covers the front of the system In order to remove or install any devices in the front drive bays the front bezel must first be removed NOTE If you are removing or installing a hot pluggable hard drive the system may remain turned on and in the upright position during removal of the...

Page 63: ...k the front bezel if locked Figure 3 2 Locking and Unlocking the System 2 Slide the bezel release latch to the right away from the power button then rotate the top of the bezel away from the chassis 3 Lift the bezel up and away from the system removing the tabs from the bezel tab slots ...

Page 64: ...Bezel 1 Insert the tabs on the front bezel into the bezel tab slots on the system see Figure 3 3 2 Rotate the top of the bezel towards the chassis until the bezel locks into place see Figure 3 3 3 Using the system key lock the bezel see Figure 3 2 1 lever 2 front bezel 3 tabs 2 4 bezel tab slots 2 3 1 2 4 ...

Page 65: ...zel inserts may contain screws on the inside You can attach the screws to new drives as needed 1 Remove the front bezel see Removing the Front Bezel on page 63 2 Press inward on one of the insert tabs then pull the insert away from the bezel from the back of the bezel See Figure 3 4 Figure 3 4 Removing and Installing the Front Bezel Insert 1 front bezel 2 front bezel insert 3 tab notch 4 insert ta...

Page 66: ...n about safety precautions working inside the computer and protecting against electrostatic discharge 1 Ensure that your work surface is flat and clean to prevent the system cover from being scratched 2 Turn off the system and all attached peripherals 3 Disconnect the system from the electrical outlet then disconnect all peripherals from the system 4 Press the power button to ground the system boa...

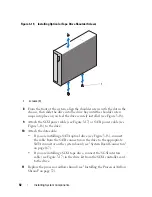
Page 67: ...he system 3 Ensure that the cover release latch is in the up open position 4 Align the metal hooks on the cover with the hook slots on the system chassis then lower the cover until the cover is flush with the system see Figure 3 5 5 Rotate the cover release latch towards the front of the system then press the latch into place to secure the cover 1 cover release latch lock 2 system cover 3 hook slo...

Page 68: ...m and attached peripherals EMI Fillers Depending on the configuration of your system an EMI filler may be installed in one or more of the 5 25 inch optical drive bays or the 3 5 inch diskette drive bay at the front of the system EMI fillers are essential for airflow efficiency and for electromagnetic interference EMI protection To install an optical drive or optional diskette drive the correspondi...

Page 69: ...ller into the empty 5 25 inch or 3 5 inch drive bay on the front of the chassis until the filler tabs lock into place see Figure 3 6 2 Replace the front bezel see Installing the Front Bezel on page 64 Processor Airflow Shroud The processor airflow shroud directs airflow over the system processor and memory modules NOTICE Never operate your system with the processor airflow shroud removed Overheati...

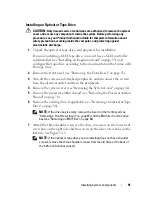
Page 70: ...ecautions working inside the computer and protecting against electrostatic discharge 1 Remove the system cover see Removing the System Cover on page 66 2 Press the release tab on the expansion card cover and pivot the cover open NOTE You can remove the expansion card cover if desired and set it aside Figure 3 7 Opening and Closing the Expansion Card Cover 3 Remove the cable s from the cable guides...

Page 71: ...d the SAS cable away from the processor airflow shroud 5 Press the release tabs on the airflow shroud then lift the shroud up and out of the chassis Figure 3 8 Removing and Installing the Processor Shroud 1 processor airflow shroud 2 alignment tabs 2 3 release tab 4 tab slots 2 6 1 5 7 4 2 3 ...

Page 72: ...cover down until the cover snaps into place see Figure 3 7 5 Replace the system cover see Installing the System Cover on page 67 Redundant and Non Redundant Power Supplies Depending on your configuration your system supports up to two hot pluggable redundant 528 W power supplies or a single non redundant 490 W power supply In redundant mode the system distributes the power load across both power s...

Page 73: ...nd the AC line status LEDs are green before removing the power supply see Figure 1 3 If one or both of the LEDs are not green see Troubleshooting Redundant Power Supplies on page 143 1 Disconnect the power cable from the electrical outlet 2 Disconnect the power cable from the power supply and remove the power cable from the cable retention bracket 3 Press the locking tab in toward the center of th...

Page 74: ...74 Installing System Components Figure 3 9 Removing and Installing a Redundant Power Supply 1 locking tab 2 power supply handle 3 cable retention bracket 1 2 3 ...

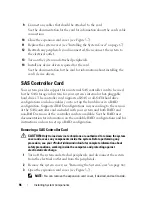
Page 75: ...is functioning properly see Figure 1 3 Removing a Non redundant Power Supply CAUTION Only trained service technicians are authorized to remove the system cover and access any components inside the system Before performing any procedure see your Product Information Guide for complete information about safety precautions working inside the computer and protecting against electrostatic discharge 1 Tu...

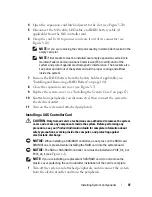
Page 76: ... secures the power supply to the system 6 Press the power supply release tab and slide the power supply out of the system Figure 3 10 Removing and Installing a Non redundant Power Supply 1 non redundant power supply 2 power supply release tab 3 screw 1 2 3 ...

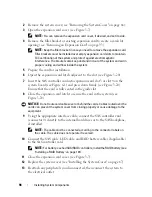
Page 77: ...ation your system supports up to four 3 5 inch SATA or SAS hard drives installed internally see Figure 3 13 or at the front of the system see Figure 3 11 Hard drives installed in your system are connected to the system board an optional controller card or to the SAS backplane requires a SAS controller card Only hard drives installed in the hard drive bays at the front of the system can be used as ...

Page 78: ...ve remove the drive from the drive carrier see Figure 3 12 and insert the empty carrier back into the drive bay Figure 3 11 Removing and Installing a Hot Pluggable Hard Drive Installing a Hot Pluggable Hard Drive NOTICE It is recommended that you use only hard drives that have been tested and approved for use with the SAS SATA backplane NOTICE Not all operating systems support hot pluggable hard d...

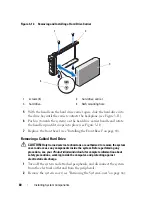
Page 79: ...Drive Optional on page 84 4 Install the hard drive carrier on the hard drive a Insert the hard drive into the hard drive carrier with the connector end of the drive at the rear See Figure 3 12 b Viewing the assembly as shown in Figure 3 12 align the screw holes on the hard drive with the rear set of holes labeled SAS on the hard drive carrier When aligned correctly the rear of the hard drive will ...

Page 80: ...on page 64 Removing a Cabled Hard Drive CAUTION Only trained service technicians are authorized to remove the system cover and access any components inside the system Before performing any procedure see your Product Information Guide for complete information about safety precautions working inside the computer and protecting against electrostatic discharge 1 Turn off the system and attached periph...

Page 81: ... and slide the drive up and out of the bay Figure 3 13 Removing and Installing a Cabled Hard Drive NOTE If you are not replacing the hard drive remove the drive from the drive bracket see Figure 3 14 and insert the empty bracket back into the drive bay 5 Replace the system cover see Installing the System Cover on page 67 1 hard drive 2 data cable 3 power cable 4 blue tabs 2 3 4 2 1 ...

Page 82: ...ystem and attached peripherals and disconnect the system from the electrical outlet and from the peripherals 3 Remove the system cover see Removing the System Cover on page 66 4 Remove the existing hard drive if applicable see Removing a Cabled Hard Drive on page 80 If there is a hard drive bracket in the empty hard drive bay press in on the blue tabs on each side of the bracket and slide the brac...

Page 83: ...le to the appropriate SATA connector on the system board see Figure 6 1 For connection to a SAS or SAS RAID controller card SAS or SATA hard drives connect the data cable to the appropriate connector on the card For information on installing a SAS controller card see Installing a SAS Controller Card on page 97 9 Replace the system cover see Installing the System Cover on page 67 10 Reattach any pe...

Page 84: ...primary boot controller The device from which the system boots is determined by the boot order specified in the System Setup program see Using the System Setup Program on page 41 Diskette Drive Optional Removing the Diskette Drive CAUTION Only trained service technicians are authorized to remove the system cover and access any components inside the system Before performing any procedure see your P...

Page 85: ...out of the drive bay See NOTE If you are permanently removing the diskette drive replace the 3 5 inch EMI filler see Installing an EMI Filler on page 69 and the 3 5 inch insert on the front bezel see Installing a Front Bezel Insert on page 66 Figure 3 15 Removing and Installing a Diskette Drive 1 diskette drive 2 shoulder screw 3 drive release latch 1 2 3 ...

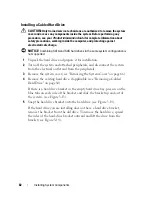
Page 86: ...k the diskette drive and prepare it for installation 2 Remove the front bezel see Removing the Front Bezel on page 63 3 Turn off the system and attached peripherals and disconnect the system from the electrical outlet and from the peripherals 4 Remove the system cover see Removing the System Cover on page 66 5 Remove the processor airflow shroud see Removing the Processor Airflow Shroud on page 70...

Page 87: ...10 Connect one end of the data cable to the diskette drive connector on the system board see Figure 6 1 then connect the other end of the data cable to the diskette drive 11 Replace the processor airflow shroud see Installing the Processor Airflow Shroud on page 72 12 Replace the system cover see Installing the System Cover on page 67 13 Replace the front bezel see Installing the Front Bezel on pa...

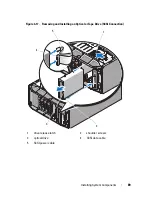
Page 88: ...disconnect the system from the electrical outlet and from the peripherals 2 Remove the front bezel see Removing the Front Bezel on page 63 3 Remove the system cover see Removing the System Cover on page 66 4 Remove the processor airflow shroud see Removing the Processor Airflow Shroud on page 70 5 Disconnect the power and data cables from the back of the drive See Figure 3 17 for disconnecting SCS...

Page 89: ...lling System Components 89 Figure 3 17 Removing and Installing an Optical or Tape Drive SCSI Connection 1 drive release latch 2 shoulder screws 3 optical drive 4 SCSI data cable 5 SCSI power cable 2 4 1 5 3 ...

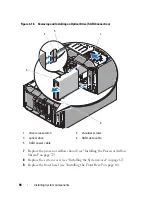
Page 90: ...ocessor airflow shroud see Installing the Processor Airflow Shroud on page 72 8 Replace the system cover see Installing the System Cover on page 67 9 Replace the front bezel see Installing the Front Bezel on page 64 1 drive release latch 2 shoulder screws 3 optical drive 4 SATA data cable 5 SATA power cable 5 4 1 3 2 ...

Page 91: ... page 63 3 Turn off the system and attached peripherals and disconnect the system from the electrical outlet and from the peripherals 4 Remove the system cover see Removing the System Cover on page 66 5 Remove the processor airflow shroud see Removing the Processor Airflow Shroud on page 70 6 Remove the existing drive if applicable see Removing an Optical or Tape Drive on page 88 NOTE If the drive...

Page 92: ...e Figure 3 17 or SATA power cable see Figure 3 18 to the drive 10 Attach the data cable If you are installing a SATA optical drive see Figure 3 18 connect the cable from the SATA connector on the drive to the appropriate SATA connector on the system board see System Board Connectors on page 167 If you are installing a SCSI tape drive connect the SCSI interface cable see Figure 3 17 in the drive ki...

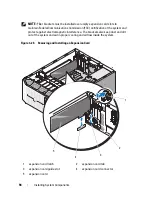
Page 93: ... Removing an Expansion Card CAUTION Only trained service technicians are authorized to remove the system cover and access any components inside the system Before performing any procedure see your Product Information Guide for complete information about safety precautions working inside the computer and protecting against electrostatic discharge 1 Turn off the system and attached peripherals and di...

Page 94: ...ication of the system and protect against electromagnetic interference The brackets also keep dust and dirt out of the system and aid in proper cooling and airflow inside the system Figure 3 20 Removing and Installing an Expansion Card 1 expansion card latch 2 expansion card tab 3 expansion card guide slot 4 expansion card connector 5 expansion card 4 3 5 1 2 ...

Page 95: ...e 3 7 NOTE You can remove the expansion card cover if desired and set it aside 4 Remove the filler bracket or existing expansion card to create a card slot opening see Removing an Expansion Card on page 93 NOTE Keep the filler bracket in case you need to remove the expansion card Filler brackets must be installed over empty expansion card slots to maintain FCC certification of the system and prote...

Page 96: ...ables you to set up the hard drives in a RAID configuration Supported RAID configurations vary according to the version of the SAS controller card included with your system and both RAID and non RAID versions of the controller card are available See the RAID user documentation for information on the available RAID configurations and for instructions on how to set up a RAID configuration Removing a...

Page 97: ...em cover see Installing the System Cover on page 67 10 Reattach any peripherals you disconnected then connect the system to the electrical outlet 11 Turn on the system and attached peripherals Installing a SAS Controller Card CAUTION Only trained service technicians are authorized to remove the system cover and access any components inside the system Before performing any procedure see your Produc...

Page 98: ...system board see Figure 6 1 and press down firmly see Figure 3 20 Ensure that the card is fully seated in the guide slot 8 Close the expansion card latch to secure the card in the system see Figure 3 20 NOTICE Do not route card cables over or behind the cards Cables routed over the cards can prevent the system cover from closing properly or cause damage to the equipment 9 Using the appropriate int...

Page 99: ... procedure see your Product Information Guide for complete information about safety precautions working inside the computer and protecting against electrostatic discharge 1 Turn off the system and attached peripherals and disconnect the system from the electrical outlet and from the peripherals 2 Remove the system cover see Removing the System Cover on page 66 3 Disconnect the cable between the RA...

Page 100: ...tem Components Figure 3 21 Installing and Removing a RAID Battery 1 RAID battery 2 battery carrier release tab 3 battery carrier 4 battery carrier slots 2 5 battery carrier retention tabs 6 battery cable slot 3 1 4 6 2 5 ...

Page 101: ...cover and access any components inside the system Before performing any procedure see your Product Information Guide for complete information about safety precautions working inside the computer and protecting against electrostatic discharge 1 Turn off the system and attached peripherals and disconnect the system from the electrical outlet and from the peripherals 2 Remove the system cover see Rem...

Page 102: ... its top corners and ease it out of its connector see Figure 3 20 NOTE If you are removing the card permanently install a filler bracket in the empty card slot 1 RAC card 2 RAC card cable 3 RAC_CONN connector 4 RAC card slot slot 1 5 RAC card cable connectors 2 but only connector 2 is used 1 3 5 2 4 ...

Page 103: ... against electrostatic discharge 1 Turn off the system and attached peripherals and disconnect the system from the electrical outlet and from the peripherals 2 Remove the system cover see Removing the System Cover on page 66 3 Open the expansion card cover see Figure 3 7 NOTE You can remove the expansion card cover if desired and set it aside 4 Remove the filler bracket or existing expansion card ...

Page 104: ...vice security key or mass storage device To use the internal USB connector the Internal USB Port option must be enabled in the Integrated Devices screen of the System Setup program To boot from the USB memory key you must configure the USB memory key with a boot image and then specify the USB memory key in the boot sequence in the System Setup program see System Setup Options on page 43 For inform...

Page 105: ...er see Figure 3 7 7 Replace the system cover see Installing the System Cover on page 67 8 Reattach any peripherals you disconnected then connect the system to the electrical outlet 9 Turn on the system and attached peripherals 10 Enter the System Setup program and verify that the USB key has been detected by the system see Using the System Setup Program on page 41 Figure 3 23 Installing an Interna...

Page 106: ...about safety precautions working inside the computer and protecting against electrostatic discharge 1 Turn off the system and attached peripherals and disconnect the system from the electrical outlet and from the peripherals 2 Remove the system cover see Removing the System Cover on page 66 3 Open the expansion card cover see Figure 3 7 4 If present remove the RAID battery and battery carrier see ...

Page 107: ...e Expansion Card Fan 1 Hold the fan with the fan cable on the top side and align the edges of the fan with the securing slots on the chassis 2 Slide the fan down into the securing slots until the fan release tab locks into place see Figure 3 24 1 fan release tab 2 expansion card fan 3 securing slots 1 2 3 ...

Page 108: ...and access any components inside the system Before performing any procedure see your Product Information Guide for complete information about safety precautions working inside the computer and protecting against electrostatic discharge 1 Turn off the system and attached peripherals and disconnect the system from the electrical outlet and from the peripherals 2 Remove the system cover see Removing ...

Page 109: ... the fan cable on the left side opposite the power supply and align the edges of the fan with the securing slots 2 Slide the fan into the securing slots until the fan release tab locks into place see Figure 3 25 3 Connect the cable to the FAN2 connector on the system board see Figure 6 1 1 system fan 2 fan release tab 3 securing slots 3 1 2 ...

Page 110: ... 5300 compliant for your system Memory Module Installation Guidelines The memory module sockets are arranged in three banks 1 2 and 3 on two channels A and B The memory module banks are identified as follows Bank 1 DIMM1_A and DIMM1_B Bank 2 DIMM2_A and DIMM2_B Bank 3 DIMM3_A and DIMM3_B Memory modules must be installed in memory module banks in identical pairs for configurations with more than on...

Page 111: ...e the computer and protecting against electrostatic discharge 1 Turn off the system and attached peripherals and disconnect the system from the electrical outlet and from the peripherals 2 Remove the system cover see Removing the System Cover on page 66 3 Remove the processor airflow shroud see Removing the Processor Airflow Shroud on page 70 Table 3 1 Sample Memory Module Configurations Total Mem...

Page 112: ...he memory module pops out of the socket Figure 3 26 Installing and Removing a Memory Module NOTICE Never operate your system with the processor airflow shroud removed Overheating of the system can develop quickly resulting in shutdown of the system and loss of data 5 Replace the processor airflow shroud see Installing the Processor Airflow Shroud on page 72 6 Replace the system cover see Installin...

Page 113: ...odule s edge connector with the alignment key on the memory module connector and insert the memory module into the connector see Figure 3 26 NOTICE To avoid damage to the memory module press the module straight down into the connector while applying equal force to each end of the module 6 Press down on the memory module with your thumbs until the module is firmly seated in the connector see Figure...

Page 114: ... system board Removing the Processor CAUTION Only trained service technicians are authorized to remove the system cover and access any components inside the system Before performing any procedure see your Product Information Guide for complete information about safety precautions working inside the computer and protecting against electrostatic discharge 1 Prior to upgrading your system download th...

Page 115: ...ease the heat sink Figure 3 27 Installing and Removing the Heat Sink 6 Wait 30 seconds for the heat sink to loosen from the processor NOTICE Lay the heat sink on its side to avoid contaminating the thermal adhesive on the bottom of the heat sink 7 Gently lift the heat sink off of the processor and set the heat sink aside NOTICE The processor is held in its socket under strong pressure Be aware tha...

Page 116: ...alling and Removing a Processor NOTICE Be careful not to bend any of the pins on the ZIF socket when removing the processor Bending the pins can permanently damage the system board 9 Gently lift the processor out of the socket Leave the release lever up so that the socket is ready for processor to be replaced 1 notch in processor 2 2 processor 3 ZIF socket 4 socket key 2 5 socket release lever 1 2...

Page 117: ...th the processor and the socket keys aligned set the processor lightly in the socket 5 When the processor is fully seated in the socket close the processor cover see Figure 3 28 6 Rotate the socket release lever back down until it snaps into place securing the processor see Figure 3 28 7 Install the heat sink NOTE If you did not receive a replacement heat sink re use the heat sink that you removed...

Page 118: ...ssor and automatically changes the system configuration information in the System Setup program 13 Enter the System Setup program and check that the processor information matches the new system configuration see Entering the System Setup Program on page 41 14 Run the system diagnostics to verify that the processor operates correctly NOTE You can test the processor if desired by running the system ...

Page 119: ...t with a blunt object be careful not to touch the system board with the object Ensure that the object is inserted between the battery and the socket before you attempt to pry out the battery Otherwise you may damage the system board by prying off the socket or by breaking circuit traces on the system board NOTICE To avoid damage to the battery connector you must firmly support the connector while ...

Page 120: ...eripherals you disconnected then connect the system to the electrical outlet 9 Turn on the system and attached peripherals 10 Enter the System Setup program to confirm that the battery is operating properly see Entering the System Setup Program on page 41 11 Enter the correct time and date in the System Setup program s Time and Date fields 12 Exit the System Setup program NOTE To test the newly in...

Page 121: ...SION connector on the system board see Figure 3 30 5 Slide the chassis intrusion switch out of the securing bracket notch then remove the switch and its attached cable from the system Figure 3 30 Removing and Installing the Chassis Intrusion Switch Installing the Chassis Intrusion Switch 1 Align the chassis intrusion switch with the securing bracket notch see Figure 3 30 2 Slide the switch into th...

Page 122: ...tion Module 1 Turn off the system including any attached peripherals and disconnect the system from the electrical outlet 2 Remove the redundant power supplies see Removing a Redundant Power Supply on page 73 3 Remove the system cover see Removing the System Cover on page 66 4 Remove the processor airflow shroud see Removing the Processor Airflow Shroud on page 70 5 Disconnect all power supply dis...

Page 123: ...upply distribution module so that the securing tabs are fully inserted into the securing slots on the chassis wall see Figure 3 31 2 Slide the power supply distribution module down until the blue release pin locks into place securing the board 3 Connect all power cables to the connectors on the system board 1 power cables 2 power supply distribution module 3 release tab 1 2 3 ...

Page 124: ...mation Guide for complete information about safety precautions working inside the computer and protecting against electrostatic discharge 1 Turn off the system and attached peripherals and disconnect the system from the electrical outlet and from the peripherals 2 Remove the front drive bezel see Removing the Front Bezel on page 63 3 Remove the system cover see Removing the System Cover on page 66...

Page 125: ...ackplane board until the securing slots are free from the securing tabs and lift the board from the chassis Figure 3 32 Removing and Installing the SAS Backplane 1 backplane release pin 2 securing tabs 4 3 securing slots 4 4 SAS connector 5 backplane connector 6 SAS backplane 7 SAS cable connector 8 power cable 1 8 4 7 5 3 2 6 ...

Page 126: ...ssor airflow shroud see Installing the Processor Airflow Shroud on page 72 6 Replace the system cover see Installing the System Cover on page 67 Control Panel Service only Procedure Removing the Control Panel CAUTION Only trained service technicians are authorized to remove the system cover and access any components inside the system Before performing any procedure see your Product Information Gui...

Page 127: ...the metal tabs on the ends of the cable connector b Gently work the connector out of the socket Figure 3 33 Removing and Installing the Control Panel 5 Remove the two screws that secure the control panel to the system and remove the panel see Figure 3 33 1 control panel cable 2 screw holes 2 3 screws 2 4 control panel 4 3 2 1 ...

Page 128: ...the system has sufficient time to cool before removing the system board NOTICE If you are using the Trusted Platform Module TPM with an encryption application you may be prompted to create a recovery key during system or application setup Be sure to create and safely store this recovery key If you ever need to replace the system board you must supply the recovery key when you restart your system o...

Page 129: ...t sink can become extremely hot Allow sufficient time for the processor and heat sink to cool before handling NOTICE To prevent damaging the processor do not pry the heat sink off of the processor 10 Remove the processor see Removing the Processor on page 114 11 Remove the SAS backplane if applicable see Removing the SAS Backplane on page 124 12 Carefully route any loose cables away from the edges...

Page 130: ... with the chassis so that the securing tabs on the chassis fully insert into system board securing slots 2 Slide the system board towards the back of the system until the blue release pin locks into place see Figure 3 34 3 Replace the SAS backplane if applicable see Installing the SAS Backplane on page 126 4 Replace the processor see Installing the Processor on page 117 1 system board release pin ...

Page 131: ...troller card if applicable see Installing a SAS Controller Card on page 97 8 Replace the RAC card if applicable see Installing a RAC Card on page 103 9 Replace all expansion cards that you removed and any attached cables see Installing an Expansion Card on page 95 10 Replace any cables that you removed from the system board 11 Replace the processor airflow shroud see Installing the Processor Airfl...

Page 132: ...132 Installing System Components ...

Page 133: ...ecautions working inside the computer and protecting against electrostatic discharge Start Up Routine Look and listen during the system s start up routine for the indications described in the table below Table 4 1 Start Up Routine Indications Look listen for Action A status or error message displayed on the front panel LCD See LCD Status Messages on page 19 An error message displayed on the monito...

Page 134: ...ice Ensure that all external cables are securely attached to the external connectors on your system See Front Panel Features and Indicators on page 13 and Back Panel Features and Indicators on page 16 for the front and back panel connectors on your system Troubleshooting the Video Subsystem Problem Monitor is not working properly Video memory is faulty The USB CD drive activity indicator See Troub...

Page 135: ...problem is not related to video hardware If the tests fail see Getting Help on page 175 Troubleshooting the Keyboard or Mouse Problem System message indicates a problem with the keyboard and or mouse Keyboard and or mouse is not functioning or is functioning improperly Action 1 Disconnect the keyboard and mouse cables from the system for 10 seconds and then reconnect them If the problem is not res...

Page 136: ... use a remote host to access the system s System Setup program and enable the USB ports If remote access is not available proceed to the next step If enabling the USB ports does not resolve the problem see Getting Help on page 175 6 If you do not have remote access to your system use the following procedure to set the NVRAM_CLR jumper inside your system and restore the BIOS to its default settings...

Page 137: ...eave all USB ports enabled Troubleshooting Serial I O Problems Problem Error message indicates a problem with a serial port Device connected to a serial port is not operating properly Action 1 Enter the System Setup program and ensure that the serial port is enabled and configured correctly for your application see Entering the System Setup Program on page 41 2 If the problem is confined to a part...

Page 138: ...Turn on the system and the serial device If the problem is resolved replace the serial device see Getting Help on page 175 If the problem persists see Getting Help on page 175 Troubleshooting a USB Device Problem System message indicates a problem with a USB device One or more USB devices are not operating properly Action 1 If a single USB device is experiencing a problem perform the following pro...

Page 139: ...ions If the problem is not resolved proceed to the next step 4 Reset the system BIOS to the default settings by setting the NVRAM _CLR jumper inside your system Use the following procedure CAUTION Only trained service technicians are authorized to remove the system cover and access any of the components inside the system Before performing any procedure see your Product Information Guide for comple...

Page 140: ...ck the appropriate indicator on the NIC connector see NIC Indicator Codes on page 18 If the link indicator does not light check all cable connections If the activity indicator does not light the network driver files might be damaged or missing Remove and reinstall the drivers if applicable See the NIC s documentation Change the autonegotiation setting if possible Use another connector on the switc...

Page 141: ...uide for complete information about safety precautions working inside the computer and protecting against electrostatic discharge 1 Turn off the system and attached peripherals and disconnect the system from the electrical outlet 2 Open the system see System Cover on page 66 3 Remove all expansion cards installed in the system see Removing an Expansion Card on page 93 4 Let the system dry thorough...

Page 142: ... Guide for complete information about safety precautions working inside the computer and protecting against electrostatic discharge 1 Open the system see System Cover on page 66 2 Ensure that the following components are properly installed Expansion cards Power supplies Fans Processor and heat sink Memory modules Drive carrier connections to the SAS SATA backplane if applicable 3 Ensure that all c...

Page 143: ...r at least one hour 3 Reconnect the system to the electrical outlet and turn on the system 4 Enter the System Setup program see Entering the System Setup Program on page 41 If the date and time are not correct in the System Setup program replace the battery see System Battery on page 118 If the problem is not resolved by replacing the battery see Getting Help on page 175 NOTE Some software may cau...

Page 144: ...d for the system to operate The system is in the redundant mode when two power supplies are installed Remove and install only one power supply at a time in a system that is powered on Operating the system with only one power supply installed for extended periods of time can cause the system to overheat 4 Ensure that the power supply is properly installed by removing and reinstalling it see Install...

Page 145: ...indicates a problem with the fan Action CAUTION Only trained service technicians are authorized to remove the system cover and access any components inside the system Before performing any procedure see your Product Information Guide for complete information about safety precautions working inside the computer and protecting against electrostatic discharge 1 Run the appropriate diagnostic test see...

Page 146: ... service technicians are authorized to remove the system cover and access any components inside the system Before performing any procedure see your Product Information Guide for complete information about safety precautions working inside the computer and protecting against electrostatic discharge 1 If the system is operational run the appropriate online diagnostic test see Using Dell PowerEdge Di...

Page 147: ...es on page 110 If the memory modules are populated correctly continue to the next step 8 Reseat the memory modules in their sockets see Installing Memory Modules on page 113 9 Close the system see Installing the System Cover on page 67 10 Reconnect the system to its electrical outlet and turn on the system and attached peripherals 11 Enter the System Setup program and check the system memory setti...

Page 148: ... are authorized to remove the system cover and access any components inside the system Before performing any procedure see your Product Information Guide for complete information about safety precautions working inside the computer and protecting against electrostatic discharge 1 Enter the System Setup program and ensure that the USB key port is enabled see Entering the System Setup Program on pag...

Page 149: ...message indicates a diskette drive problem Action CAUTION Only trained service technicians are authorized to remove the system cover and access any components inside the system Before performing any procedure see your Product Information Guide for complete information about safety precautions working inside the computer and protecting against electrostatic discharge 1 Enter the System Setup progra...

Page 150: ...utlet 13 Open the system see System Cover on page 66 14 Remove the processor airflow shroud see Removing the Processor Airflow Shroud on page 70 15 Remove all expansion cards installed in the system see Removing an Expansion Card on page 93 16 Replace the processor airflow shroud see Installing the Processor Airflow Shroud on page 72 17 Close the system see Installing the System Cover on page 67 1...

Page 151: ...nstalled or one of the expansion cards causes the tests to fail If the problem is not resolved see Getting Help on page 175 Troubleshooting an Optical Drive Problem System cannot read data from a CD or DVD in an optical drive Optical drive indicator does not blink during boot Action CAUTION Only trained service technicians are authorized to remove the system cover and access any components inside ...

Page 152: ...ape backup software or tape drive device driver Defective SCSI controller Action 1 Remove the tape cartridge you were using when the problem occurred and replace it with a tape cartridge that you know works 2 Ensure that the SCSI device drivers for the tape drive are installed and are configured correctly see Installing an Optical or Tape Drive on page 91 3 Reinstall the tape backup software as in...

Page 153: ...page 70 10 Ensure that the SCSI controller card is firmly seated in its connector see Installing an Expansion Card on page 95 11 Replace the processor airflow shroud see Installing the Processor Airflow Shroud on page 72 12 Close the system see Installing the System Cover on page 67 13 Reconnect the system to the electrical outlet and turn on the system and attached peripherals 14 If the problem i...

Page 154: ...em has a SAS RAID controller perform the following steps a Restart the system and press Ctrl R to enter the host adapter configuration utility program See the documentation supplied with the host adapter for information about the configuration utility b Ensure that the hard drive has been configured correctly for the RAID c Exit the configuration utility and allow the system to boot to the operati...

Page 155: ...ver error One or more hard drives not recognized by the system Action CAUTION Only trained service technicians are authorized to remove the system cover and access any components inside the system Before performing any procedure see your Product Information Guide for complete information about safety precautions working inside the computer and protecting against electrostatic discharge NOTICE This...

Page 156: ...etup Program on page 41 NOTICE Do not perform the following step if you have a SAS RAID controller 8 If you have a non RAID SAS controller remove the hard drive and swap its drive bay location with another hard drive that is functioning properly If the problem is resolved reinstall the hard drive in the original bay see Installing a Hot Pluggable Hard Drive on page 78 If the hard drive functions p...

Page 157: ...ing a SAS or SAS RAID Controller NOTE When troubleshooting a SAS or SAS RAID controller also see the documentation for your operating system and the controller Problem Error message indicates a problem with the SAS or SAS RAID controller SAS or SAS RAID controller performs incorrectly or not at all Action CAUTION Only trained service technicians are authorized to remove the system cover and access...

Page 158: ... 70 8 Ensure that the controller card is firmly seated into the system board connector see Installing an Expansion Card on page 95 9 If you have a SAS RAID controller ensure that the following RAID components are properly installed and connected Memory module Battery 10 Verify that the cable connections between the hard drives and the SAS controller are correct see Hard Drives on page 77 Ensure th...

Page 159: ...formation about safety precautions working inside the computer and protecting against electrostatic discharge 1 Run the appropriate online diagnostic test for the expansion card which is exhibiting issues see Using Dell PowerEdge Diagnostics on page 163 Follow any recommended actions provided by the diagnostics If the problem persists go to the next step 2 Turn off the system and attached peripher...

Page 160: ...hroud on page 72 14 Close the system see Installing the System Cover on page 67 15 Reconnect the system to the electrical outlet and turn on the system and attached peripherals 16 Run the appropriate online diagnostic test If the tests fail see Getting Help on page 175 17 For each expansion card you removed in step 12 perform the following steps a Turn off the system and attached peripherals and d...

Page 161: ... Product Information Guide for complete information about safety precautions working inside the computer and protecting against electrostatic discharge 1 If possible run the appropriate online diagnostics test see Using Dell PowerEdge Diagnostics on page 163 2 Turn off the system and attached peripherals and disconnect the system from the electrical outlet 3 Open the system see System Cover on pag...

Page 162: ...diagnostic test see Running the System Diagnostics on page 163 If the tests fail or the problem persists replace the processor see Getting Help on page 175 10 If you have replaced the processor and the problem persists the system board is faulty see Getting Help on page 175 ...

Page 163: ...nications and printer ports NICs CMOS and more If you are unable to identify the problem using the PowerEdge Diagnostics then use the system diagnostics The files required to run PowerEdge Diagnostics for systems running supported Microsoft Windows and Linux operating systems are available at support dell com and on the CDs that came with your system For information about using diagnostics see the...

Page 164: ... on your hard drive NOTICE Use the system diagnostics to test only your system Using this program with other systems may cause invalid results or error messages In addition use only the program that came with your system or an updated version of that program 1 As the system boots press F10 during POST 2 From the utility partition main menu select Run System Diagnostics or select Run Memory Diagnos...

Page 165: ...on you select Click the next to a device or module to view its components Click on any component to view the tests that are available Clicking a device rather than its components selects all of the components of the device for testing NOTE After you select all the devices and components that you want to test highlight All Devices and then click Run Tests Table 5 1 System Diagnostics Testing Option...

Page 166: ...Iterations Selects the number of times the test is run Log output file pathname When checked enables you to specify where the test log file is saved Viewing Information and Results The tabs in the Customize window provide information about the test and the test results The following tabs are available Results Displays the test that ran and the result Errors Displays any errors that occurred during...

Page 167: ...rds in the system System Board Connectors CAUTION Only trained service technicians are authorized to remove the system cover and access any of the components inside the system Before performing any procedure see your Product Information Guide for complete information about safety precautions working inside the computer and protecting against electrostatic discharge ...

Page 168: ...cription 1 PCIX_5 PCI X connector slot 5 2 PCIE_X8_4 PCIe x8 connector slot 4 3 PCIE_X8_3 PCIe x8 connector slot 3 4 PCIE_X4_2 PCIe x4 connector slot 2 5 PCIE_X4_1 DRAC SLOT PCIe x8 connector slot 1 reserved for RAC card 9 17 18 19 20 1 2 3 4 5 6 7 8 25 24 22 23 10 11 16 15 14 13 12 21 33 32 31 34 26 27 28 30 29 35 ...

Page 169: ...4 16 DIMM3_A Memory module connector slot 5 17 DIMM3_B Memory module connector slot 6 18 FLOPPY Diskette drive connector 19 PWR_CONN Main power connector 20 12V Power connector 21 PSU_12C Power distribution board connector 22 CTRL_PNL Control panel connector 23 CPU Microprocessor connector 24 BP_12C Backplane connector 25 USB_CONN Internal USB connector 26 SATA_B SATA drive connector 27 SATA_D SAT...

Page 170: ...gs 31 SATA_E SATA drive connector 32 SATA_C SATA drive connector 33 SATA_A SATA drive connector 34 HDD_LED SAS hard drive activity LED connector 35 BATTERY System battery Table 6 1 System Board Connectors continued Item Connector Description ...

Page 171: ...nt loading hot plug hard drive bay when available Figure 6 2 shows the locations of the SAS backplane connectors Table 6 2 System Board Jumper Settings Jumper Setting Description NVRAM_CLR Pins 3 5 default The configuration settings in NVRAM are retained at next system boot Pins 1 3 The configuration settings are cleared at the next system boot If the configuration settings become corrupted to the...

Page 172: ...172 Jumpers and Connectors Figure 6 2 SAS Backplane Connectors 1 release pin 2 SAS SATA connector 3 backplane connector 4 power connector 5 SAS SATA drive connectors 4 front back 2 3 1 4 5 ...

Page 173: ...d 4 Close the system see Installing the System Cover on page 67 5 Reconnect the system to the electrical outlet and turn on the system The existing passwords are not disabled erased until the system boots with the password jumper plug removed However before you assign a new system and or setup password you must install the jumper plug NOTE If you assign a new system and or setup password with the ...

Page 174: ...174 Jumpers and Connectors ...

Page 175: ...based support and service options Availability varies by country and product and some services may not be available in your area To contact Dell for sales technical support or customer service issues 1 Visit support dell com 2 Verify your country or region in the Choose A Country Region drop down menu at the bottom of the page 3 Click Contact Us on the left side of the page 4 Select the appropriat...

Page 176: ...176 Getting Help ...

Page 177: ...a program or data file As a precaution back up your system s hard drive on a regular basis Before making a change to the configuration of your system back up important start up files from your operating system backup battery A battery that maintains system configuration date and time information in a special section of memory when the system is turned off beep code A diagnostic message in the form...

Page 178: ... that is in the cache the disk cache utility can retrieve the data from RAM faster than from the disk drive CD Compact disc CD drives use optical technology to read data from CDs cm Centimeter s cmos Complementary metal oxide semiconductor component As they relate to DMI components include operating systems computer systems expansion cards and peripherals that are compatible with DMI Each componen...

Page 179: ...directory are called subdirectories Subdirectories may contain additional directories branching off them DMA Direct memory access A DMA channel allows certain types of data transfer between RAM and a device to bypass the processor DMI Desktop Management Interface DMI enables the management of your system s software and hardware by collecting information about the system s components such as the op...

Page 180: ...al programming equipment format To prepare a hard drive or diskette for storing files An unconditional format deletes all data stored on the disk FSB Front side bus The FSB is the data path and physical interface between the processor and the main memory RAM ft Feet FTP File transfer protocol g Gram s G Gravities Gb Gigabit s 1024 megabits or 1 073 741 824 bits GB Gigabyte s 1024 megabytes or 1 07...

Page 181: ...of two drives Integrated mirroring functionality is provided by the system s hardware See also mirroring internal processor cache An instruction and data cache built into the processor IP Internet Protocol IPX Internet package exchange IRQ Interrupt request A signal that data is about to be sent to or received by a peripheral device travels by an IRQ line to the processor Each peripheral connectio...

Page 182: ...ong with technical support and training are available for a fee from vendors such as Red Hat Software local bus On a system with local bus expansion capability certain peripheral devices such as the video adapter circuitry can be designed to run much faster than they would with a traditional expansion bus See also bus LVD Low voltage differential m Meter s mA Milliampere s MAC address Media Access...

Page 183: ...tion to a network NMI Nonmaskable interrupt A device sends an NMI to signal the processor about hardware errors ns Nanosecond s NTFS The NT File System option in the Windows 2000 operating system NVRAM Nonvolatile random access memory Memory that does not lose its contents when you turn off your system NVRAM is used for maintaining the date time and system configuration information parity Redundan...

Page 184: ...PXE Preboot eXecution Environment A way of booting a system via a LAN without a hard drive or bootable diskette RAC Remote Access Controller RAID Redundant array of independent disks A method of providing data redundancy Some common implementations of RAID include RAID 0 RAID 1 RAID 5 RAID 10 and RAID 50 See also guarding mirroring and striping RAM Random access memory The system s primary tempora...

Page 185: ...ng system where each processor has equal access to I O devices SNMP Simple Network Management Protocol A standard interface that allows a network manager to remotely monitor and manage workstations spanning Spanning or concatenating disk volumes combines unallocated space from multiple disks into one logical volume allowing more efficient use of all the space and all drive letters on a multiple di...

Page 186: ...vices by changing jumper or switch settings on the devices or by changing settings in the configuration software for the devices TOE TCP IP offload engine UNIX Universal Internet Exchange UNIX the precursor to Linux is an operating system written in the C programming language uplink port A port on a network hub or switch used to connect to other hubs or switches without requiring a crossover cable...

Page 187: ...Watt hour s win ini file A start up file for the Windows operating system When you start Windows it consults the win ini file to determine a variety of options for the Windows operating environment The win ini file also usually includes sections that contain optional settings for Windows application programs that are installed on the hard drive Windows 2000 An integrated and complete Microsoft Win...

Page 188: ...188 Glossary ...

Page 189: ... C CD DVD drive installing 91 removing 88 troubleshooting 151 chassis intrusion switch installing 121 removing 120 checking equipment 134 closing the system 67 connecting external devices 16 connectors back panel 16 front panel 13 NIC 16 serial port 16 USB 13 16 video 16 contacting Dell 175 control panel assembly installing 128 removing 126 cooling fans installing expansion card fan 107 installing...

Page 190: ...installing 66 removing 65 DVD drive See CD DVD drive E error messages 41 expansion cards 93 installing 95 removing 93 troubleshooting 159 external devices connecting 16 F features back panel 16 front panel 13 G guidelines installing memory 110 H hard drive configuring the boot device 84 installing 84 troubleshooting 153 hard drives cabled installing 82 removing 80 hard drives hot pluggable install...

Page 191: ...card 103 RAID battery 99 101 SAS controller card 97 system board 130 system fan 109 tape drive 91 USB memory key 104 J jumpers 167 170 K keyboard troubleshooting 135 M memory troubleshooting 146 memory key connector USB 104 memory modules DIMMs configuring 110 installing 113 removing 111 messages alert 40 diagnostics 40 error messages 41 status LCD 19 system 30 warning 39 microprocessor See proces...

Page 192: ...g 99 recommended tools 60 removing 5 25 inch drive 88 CD DVD drive 88 chassis intrusion switch 120 control panel assembly 126 diskette drive 84 expansion card fan 106 expansion cards 93 front drive bezel 63 hard drive cabled 80 hard drives hot pluggable 77 memory 111 power supply 73 75 power supply distribution module 122 processor 114 RAC card 101 RAID battery 99 SAS controller card 96 system boa...

Page 193: ...ons 46 entering 41 integrated devices options 48 keystroke 41 memory options 45 serial communications options 49 system security options 50 T tape drive installing 91 removing 88 troubleshooting 152 telephone numbers 175 TPM security 50 troubleshooting CD DVD drive 151 cooling fans 145 damaged system 142 diskette drive 149 expansion cards 159 external connections 134 hard drive 153 internal USB me...

Page 194: ...onnector for memory key 104 USB device connectors back panel 16 connectors front panel 13 troubleshooting 138 USB memory key troubleshooting 148 V video connector 16 troubleshooting 134 W warning messages 39 warranty 11 wet system troubleshooting 141 ...

Reviews: