background image

Steps

NOTE:

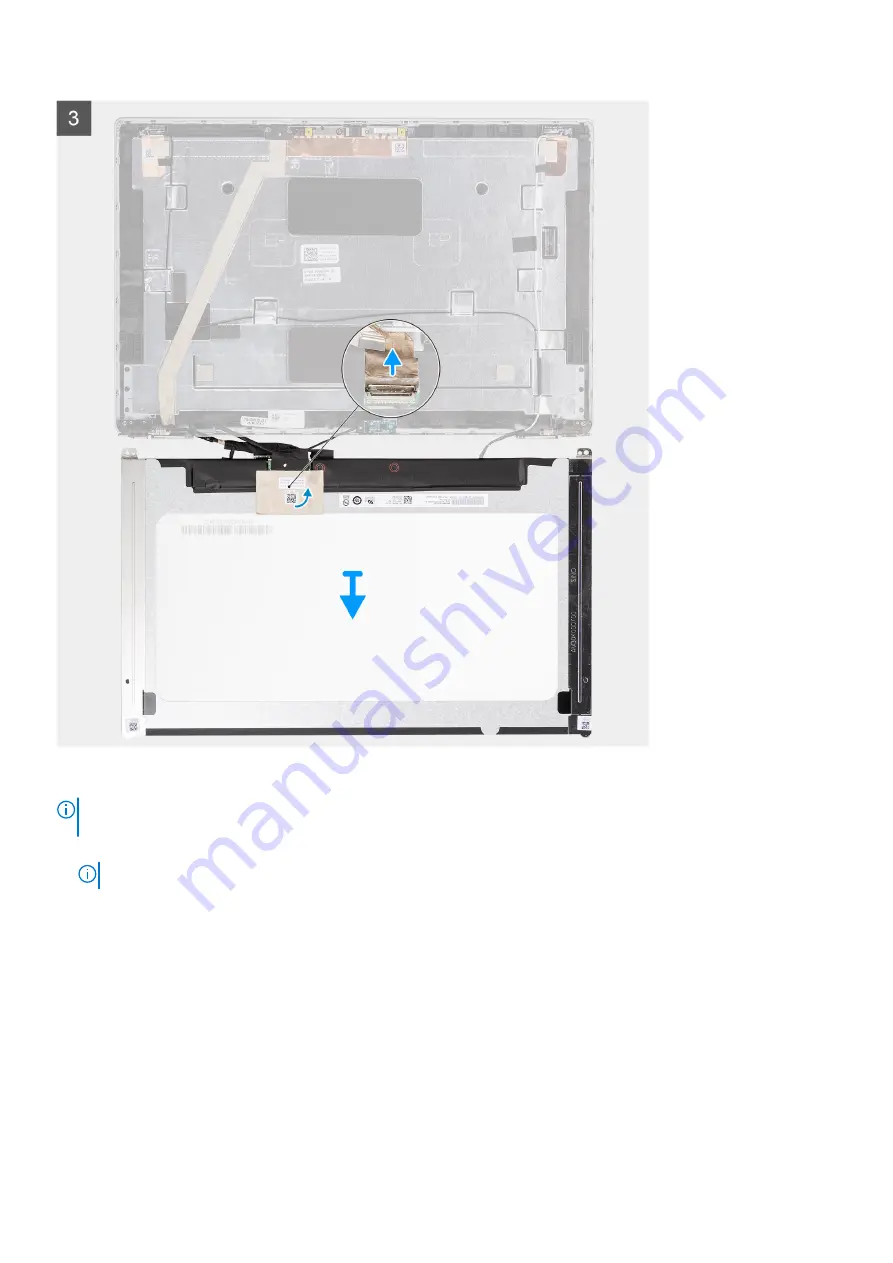
 The display panel is preassembled with the display brackets as a single service part. Do not pull the Stretch Release

(SR) tapes and separate the brackets from the display panel.

1. Remove the two screws (M2.5x3) that secure the display panel to the display back cover.

NOTE:

 While removing the display panel, disengage the display panel tabs from the display cover before flipping it over.

2. Lift and open the display panel to access the display cable.
3. Peel the conductive tape on the display cable connector.
4. Peel the clear tape covering the display cable connector.
5. Open the latch and disconnect the cable from the connector on the display panel.
6. Lift the display panel away from the display back cover.

Installing the display panel

Prerequisites

If you are replacing a component, remove the existing component before performing the installation procedure.

80

Removing and installing components

Summary of Contents for Inspiron 5421

Page 1: ...Latitude 5421 Service Manual Regulatory Model P137G Regulatory Type P137G003 P137G004 July 2021 Rev A01 ...

Page 2: ...ential damage to hardware or loss of data and tells you how to avoid the problem WARNING A WARNING indicates a potential for property damage personal injury or death 2021 Dell Inc or its subsidiaries All rights reserved Dell EMC and other trademarks are trademarks of Dell Inc or its subsidiaries Other trademarks may be trademarks of their respective owners ...

Page 3: ...r 20 Wireless card 22 Removing the wireless card 22 Installing the wireless card 23 Wireless Wide Area Network WWAN Card 25 Removing the WWAN card 25 Installing the WWAN card 26 Solid state drives 27 Removing the 2230 solid state drive 27 Installing the 2230 solid state drive 28 Removing the 2280 solid state drive 30 Installing the 2280 solid state drive 30 Memory 32 Removing the memory module 32 ...

Page 4: ... button board 57 Smart card reader 58 Removing the smart card reader 58 Installing the smart card reader 60 Coin cell battery 61 Removing the coin cell battery 61 Installing the coin cell battery 62 Keyboard assembly 63 Removing the keyboard assembly 63 Installing the keyboard assembly 65 Keyboard bracket 66 Removing the keyboard bracket 66 Installing the keyboard bracket 68 Display assembly 69 Re...

Page 5: ...BIOS in Windows 116 Updating the BIOS in Linux and Ubuntu 117 Updating the BIOS using the USB drive in Windows 117 Updating the BIOS from the F12 One Time boot menu 117 System and setup password 118 Assigning a system setup password 118 Deleting or changing an existing system setup password 119 Clearing CMOS settings 119 Clearing BIOS System Setup and System passwords 120 Chapter 5 Troubleshooting...

Page 6: ...Chapter 6 Getting help 127 Contacting Dell 127 6 Contents ...

Page 7: ...d by Dell is not covered by your warranty See the safety instructions that is shipped with the product or at www dell com regulatory_compliance CAUTION Before touching anything inside your computer ground yourself by touching an unpainted metal surface such as the metal at the back of the computer While you work periodically touch an unpainted metal surface to dissipate static electricity which co...

Page 8: ...ailures means that most of the time when damage occurs it is not immediately recognizable The DIMM receives a static shock but the tracing is merely weakened and does not immediately produce outward symptoms related to the damage The weakened trace may take weeks or months to melt and in the meantime may cause degradation of memory integrity intermittent memory errors etc The more difficult type o...

Page 9: ...meters away from sensitive parts before physically handling any hardware components ESD Packaging All ESD sensitive devices must be shipped and received in static safe packaging Metal static shielded bags are preferred However you should always return the damaged part using the same ESD bag and packaging that the new part arrived in The ESD bag should be folded over and taped shut and all the same...

Page 10: ...on the computer Your computer will automatically return to normal functioning mode After working inside your computer About this task CAUTION Leaving stray or loose screws inside your computer may severely damage your computer Steps 1 Replace all screws and ensure that no stray screws remain inside your computer 2 Connect any external devices peripherals or cables you removed before working on you...

Page 11: ...ry Battery cable Assembly inner frame LED board Heat sink and fan assembly Speakers USB type C bracket System board Power button board Smart card reader Coin cell battery Keyboard assembly Keyboard bracket Display assembly Display bezel Display panel Camera microphone module eDP display cable Sensor board Display hinges Display back cover Dummy SIM card slot filler Palm rest assembly Recommended t...

Page 12: ...y vary with the configuration ordered Table 1 Screw list Component Screw type Quantity Screw image Base cover Captive screws 8 N A Wireless card Captive screws 1 N A Wireless Wide Area Network WWAN Card M2x3 1 M 2 2230 solid state drive M2x3 4 M 2 2280 solid state drive M2x3 2 Assembly inner frame M2x3 M2x5 7 2 4 cell battery M2x3 2 Heat sink with fan assembly UMA M2x3 M2x5 for fan 4 2 Heat sink w...

Page 13: ...uantity Screw image Keyboard assembly M2x2 18 Keyboard bracket M2x2 5 Display assembly M2 5x5 display hinges to palm rest assembly 4 Display hinge M2 5x3 display hinges to display back cover 4 Display panel M2 5x3 2 Removing and installing components 13 ...

Page 14: ...Major components of your system 1 Base cover 14 Removing and installing components ...

Page 15: ...ct your Dell sales representative for purchase options SIM card tray Removing the SIM card tray Prerequisites Follow the procedure in Before working inside your computer NOTE SIM card or SIM card tray removal is only available on systems that are shipped with WWAN module The procedure for removal is only applicable for systems that are shipped with a WWAN module CAUTION Removing the SIM card with ...

Page 16: ...k into the slot Installing the SIM card Prerequisites If you are replacing a component remove the necessary component before the installation procedure NOTE SIM card or SIM card tray removal is only available on systems that are shipped with WWAN module Hence removing procedure is only applicable for systems that are shipped with WWAN module About this task The following image provides a visual re...

Page 17: ... the computer and carefully slide it in 5 Slide the SIM card tray into the slot until it clicks into place Next steps Follow the procedure in After working on your computer Micro Secure Digital SD Card Removing the microSD card Prerequisites Follow the procedure in Before working inside your computer About this task T The following images indicate the location of the microSD card and provide a vis...

Page 18: ...microSD card Prerequisites If you are replacing a component remove the existing component before performing the installation procedure About this task The following image indicates the location of the microSD card and provides a visual representation of the installation procedure 18 Removing and installing components ...

Page 19: ... procedure in After working inside your computer Base cover Removing the base cover Prerequisites 1 Follow the procedure in Before working inside your computer 2 Enter Service Mode 3 Remove the SIM card 4 Remove the microSD card About this task The following images provide a visual representation of the removal procedure Removing and installing components 19 ...

Page 20: ...e to work on the sides to release the base cover from the palm rest and keyboard assembly 3 Lift the base cover off the palm rest and keyboard assembly Installing the base cover Prerequisites If you are replacing a component remove the existing component before performing the installation procedure About this task The following images provide a visual representation of the installation procedure 2...

Page 21: ...Removing and installing components 21 ...

Page 22: ...Install the SIM card 3 Exit Service Mode 4 Follow the procedure in After working inside your computer Wireless card Removing the wireless card Prerequisites 1 Follow the procedure in Before working inside your computer 2 Enter Service Mode 3 Remove the SIM card 4 Remove the microSD card 5 Remove the base cover About this task The following images indicate the location of the wireless card and prov...

Page 23: ... the wireless card 3 Disconnect the antenna cables from the wireless card 4 Using a plastic scribe pry the wireless card from the adhesive pad 5 Slide and remove the wireless card from the wireless card slot Installing the wireless card Prerequisites If you are replacing a component remove the existing component before performing the installation procedure About this task The following image indic...

Page 24: ...eless card with the tab on the wireless card slot on the system board 3 Slide and insert the wireless card at an angle into the wireless card slot on the system board 4 Adhere the wireless card to the adhesive pad 5 Align the screw hole on the wireless card bracket to the screw hole on the wireless card and system board 6 Tighten the captive screw that secures the wireless card bracket to the wire...

Page 25: ... 5 Remove the microSD card About this task The following images indicate the location of the WWAN card and provide a visual representation of the removal procedure Steps 1 Remove the single M2x3 screw that secures the WWAN card bracket to the WWAN card 2 Lift the WWAN card bracket out of the computer 3 Disconnect the antenna cables from the connectors on the WWAN card 4 Slide and remove the WWAN c...

Page 26: ...s IMEI International Mobile Station Equipment Identity number see the knowledge base article 000143678 at www dell com support Steps 1 Connect the antenna cables to the WWAN card The following table provides the antenna cable color scheme Table 3 Antenna cable color scheme Connectors on the wireless card Antenna cable color Silkscreen marking Main White MAIN white triangle Auxiliary Black AUX blac...

Page 27: ...e fragile Exercise care when handling the solid state drive NOTE To avoid data loss do not remove the solid state drive while the computer is in sleep or on state 2 Enter Service Mode 3 Remove the SIM card 4 Remove the microSD card 5 Remove the base cover About this task NOTE Depending on the configuration ordered your computer may support a 2230 solid state drive or a 2280 solid state drive in M ...

Page 28: ...r 6 Slide and remove the solid state drive from the M 2 slot Installing the 2230 solid state drive Prerequisites If you are replacing a component remove the existing component before performing the installation procedure About this task NOTE Solid state drives are fragile Exercise care when handling the solid state drive NOTE Depending on the configuration ordered your computer may support a 2230 ...

Page 29: ...et to form a solid state drive assembly 3 Align the notch on the 2230 solid state drive with the tab on the solid state drive slot 4 Place the solid state drive assembly in the slot 5 Place the thermal plate on the solid state drive 6 Replace the two M2x3 screws that secure the thermal plate and solid state drive to the palm rest assembly Next steps 1 Install the microSD card 2 Install the SIM car...

Page 30: ...TE This procedure applies only to computers shipped with a 2280 solid state drive installed in M 2 slot The following image indicates the location of the 2280 solid state drive that is installed in M 2 slot and provides a visual representation of the removal procedure Steps 1 Remove the two M2x3 screws that secures the solid state drive thermal plate to the palm rest and keyboard assembly 2 Remove...

Page 31: ...edure Steps 1 Align the notch on the 2280 solid state drive with the tab on the solid state drive slot 2 Slide the 2280 solid state drive firmly into the solid state drive slot at an angle 3 Place the solid state drive thermal plate over the solid state drive 4 Align the screw holes on the solid state drive and thermal plate with the screw hole on the palm rest and keyboard assembly 5 Replace the ...

Page 32: ... of the memory module and provide a visual representation of the removal procedure Steps 1 Pry the retention clips securing the memory module until the memory module pops up 2 Remove the memory module from the memory module slot NOTE Repeat step 1 to step 2 to remove any other memory modules installed in your computer Installing the memory module Prerequisites If you are replacing a component remo...

Page 33: ...ry module slot 3 Press the memory module down until it clicks into place NOTE If you do not hear the click remove the memory module and reinstall it NOTE Repeat step 1 to step 4 to install any other memory modules in your computer Next steps 1 Install the microSD card 2 Install the SIM card 3 Install the base cover 4 Exit Service Mode 5 Follow the procedure in After working inside your computer Ba...

Page 34: ...s If the battery gets stuck inside your computer as a result of swelling do not try to release it as puncturing bending or crushing a lithium ion battery can be dangerous In such an instance contact Dell technical support for assistance See www dell com contactdell Always purchase genuine batteries from www dell com or authorized Dell partners and resellers Swollen batteries should not be used and...

Page 35: ...installation procedure About this task The following image indicates the location of the 4 cell 64 Wh battery and provides a visual representation of the installation procedure Steps 1 Align and place the battery from the left side on the computer 2 Replace the two M2x3 screws that secure the battery to the palm rest and keyboard assembly 3 Connect the battery cable to the system board Next steps ...

Page 36: ...ergoes RTC battery reset About this task The following images indicate the location of the battery cable and provide a visual representation of the removal procedure Steps 1 Flip the battery and remove the battery cable from the routing guides on the battery 2 Disconnect the battery cable from the connector on the battery 3 Lift the battery cable off the battery Installing the battery cable Prereq...

Page 37: ... Install the battery 2 Install the base cover 3 Install the microSD card 4 Install the SIM card 5 Exit Service Mode 6 Follow the procedure in After working inside your computer Assembly inner frame Removing the assembly inner frame Prerequisites 1 Follow the procedure in Before working inside your computer 2 Remove the SIM card 3 Remove the microSD card 4 Remove the base cover 5 Remove the battery...

Page 38: ...the antenna cables from the routing guides on the assembly inner frame 2 Disconnect the speaker cable from the connector on the system board and unroute the cable from the routing guides on the assembly inner frame 3 Remove the two screws M2x5 that secures the assembly inner frame to the system board and the palm rest assembly 38 Removing and installing components ...

Page 39: ... the palm rest assembly Installing the assembly inner frame Prerequisites If you are replacing a component remove the existing component before performing the installation procedure About this task The following image indicates the location of the assembly inner frame and provides a visual representation of the installation procedure Removing and installing components 39 ...

Page 40: ...le to the connector on the system board 5 Route the antennas cable through the routing guides on the assembly inner frame Next steps 1 Install the WWAN card 2 Install the WLAN card 3 Install the 2280 solid state drive or 2230 solid state drive 4 Install the battery 5 Install the base cover 6 Install the microSD card 7 Install the SIM card 8 Follow the procedure in After working inside your compute...

Page 41: ...Remove the single screw M2x3 that secures the LED board to the palm rest assembly 4 Lift the LED board and cable away from the palm rest assembly Installing the LED board Prerequisites If you are replacing a component remove the existing component before performing the installation procedure About this task The following image indicates the location of the LED board and provides a visual represent...

Page 42: ...me 2 Install the battery 3 Install the WWAN card 4 Install the WLAN card 5 Install the 2280 solid state drive or 2230 solid state drive 6 Install the base cover 7 Install the microSD card 8 Install the SIM card 9 Exit Service Mode 10 Follow the procedure in After working inside your computer Heat sink and fan assembly Removing the heat sink and fan assembly UMA configuration Prerequisites 1 Follow...

Page 43: ...an assembly to the system board 2 Lift the heat sink and fan assembly off the system board Installing the heat sink and fan assembly UMA configuration Prerequisites If you are replacing a component remove the existing component before performing the installation procedure CAUTION Incorrect alignment of the heat sink can damage the system board and processor NOTE If either the system board or the h...

Page 44: ...sites 1 Follow the procedure in Before working inside your computer CAUTION For maximum cooling of the processor do not touch the heat transfer areas on the heat sink The oils in your skin can reduce the heat transfer capability of the thermal grease NOTE The heat sink may become hot during normal operation Allow sufficient time for the heat sink to cool before you touch it 2 Enter Service Mode 3 ...

Page 45: ...the existing component before performing the installation procedure CAUTION Incorrect alignment of the heat sink can damage the system board and processor NOTE If either the system board or the heat sink is replaced use the thermal pad paste provided in the kit to ensure that thermal conductivity is achieved About this task The following image indicates the location of the heat sink and fan assemb...

Page 46: ... Install the SIM card 3 Install the base cover 4 Exit Service Mode 5 Follow the procedure in After working inside your computer Speakers Removing the speakers Prerequisites 1 Follow the procedure in Before working inside your computer 2 Remove the base cover 3 Remove the microSD card 4 Remove the SIM card 5 Remove the battery About this task The following images indicate the location of the speake...

Page 47: ... palm rest and keyboard assembly 4 Lift the speakers along with the cable off the palm rest and keyboard assembly Installing the speakers Prerequisites If you are replacing a component remove the existing component before performing the installation procedure About this task The following image indicates the location of the speaker and provides a visual representation of the installation procedure...

Page 48: ...oSD card 3 Install the SIM card 4 Install the base cover 5 Follow the procedure in After working inside your computer USB type C bracket Removing the USB type C bracket Prerequisites 1 Follow the procedure in Before working inside your computer 2 Enter Service Mode 3 Remove the SIM card 4 Remove the microSD card 5 Remove the base cover 6 Remove the heat sink UMA or discrete based on the system con...

Page 49: ...talling the USB type C bracket Prerequisites If you are replacing a component remove the existing component before performing the installation procedure About this task The following image indicates the location of the USB type C bracket and provides a visual representation of the installation procedure Removing and installing components 49 ...

Page 50: ... 5 Exit Service Mode 6 Follow the procedure in After working inside your computer System board Removing the system board Prerequisites 1 Follow the procedure in Before working inside your computer 2 Enter Service Mode 3 Remove the SIM card 4 Remove the microSD card 5 Remove the base cover 6 Remove the memory module 7 Remove the 2280 solid state drive or 2230 solid state drive 8 Remove the WLAN car...

Page 51: ...or 5 Touch and sensor cable connector 6 Memory modules 7 Battery cable connector 8 Clickpad cable connector 9 USH board connector 10 WLAN connector 11 Solid state drive slot 12 Coin cell battery cable connector 13 Speaker cable connector 14 System fan connector 15 Battery LED cable connector The following images indicate the location of the system board and provide a visual representation of the r...

Page 52: ...eat sink attached in order to simplify the procedure and preserve the heat sink between the system board and heat sink In order to do so technicians must also remove the two M2x5 screws the secure the system fan to the system board 52 Removing and installing components ...

Page 53: ...connector on the system board 8 Open the latch and disconnect the touchpad cable from the connector on the system board 9 Open the latch and disconnect the LED cable from the connector on the system board 10 Disconnect the coin cell battery cable from the connecter on the system board NOTE When you disconnect the coin cell battery cable from the connecter on the system board the CMOS setting is cl...

Page 54: ...ery cable connector 8 Clickpad cable connector 9 USH board connector 10 WLAN connector 11 Solid state drive slot 12 Coin cell battery cable connector 13 Speaker cable connector 14 System fan connector 15 Battery LED cable connector The following image indicates the location of the system board and provides a visual representation of the installation procedure 54 Removing and installing components ...

Page 55: ...al module attached in order to simplify the procedure and preserve the thermal bond between the system board and heat sink In order to do so technicians must also remove the two M2x5 screws the secure the system fan to the system board Removing and installing components 55 ...

Page 56: ...ctor on the system board 12 Connect the display cable to the connector on the system board 13 Adhere the tape that secures the display cable to the system board 14 Align the screw holes on the eDP display cable bracket with the screw holes on the system board 15 Replace the two M2x3 screws that secure the eDP display cable bracket to the system board Next steps 1 Install the assembly inner frame 2...

Page 57: ... and provide a visual representation of the removal procedure Steps 1 Remove the two screws M2x2 5 that secure the power button board to the palm rest assembly 2 Lift the power button board off the palm rest assembly Installing the power button board About this task The following images indicate the location of the power button board and provide a visual representation of the installation procedur...

Page 58: ...mbly inner frame 3 Install the heat sink UMA or discrete based on the system configuration 4 Install the battery 5 Install the WWAN card 6 Install the WLAN card 7 Install the 2280 solid state drive or 2230 solid state drive 8 Install the memory module 9 Install the base cover 10 Install the microSD card 11 Install the SIM card 12 Exit Service Mode 13 Follow the procedure in After working inside yo...

Page 59: ...e About this task The following images indicate the location of the smart card reader and provide a visual representation of the removal procedure Steps 1 Open the latch and disconnect the smart card reader cable from the connector on the USH board 2 Remove the three screws M2x2 5 that secure the smart card reader to the palm rest assembly 3 Lift the smart card reader off the palm rest assembly Re...

Page 60: ...entation of the installation procedure Steps 1 Align and place the smart card reader on the palm rest assembly 2 Replace the three screws M2x2 5 that secure the smart card reader to the palm rest assembly 3 Connect the smart card reader cable to the connector on the USH board Next steps 1 Install the assembly inner frame 2 Install the battery 3 Install the 2280 solid state drive or 2230 solid stat...

Page 61: ...6 Remove the memory module 7 Remove the 2280 solid state drive or 2230 solid state drive 8 Remove the WLAN card 9 Remove the WWAN card 10 Remove the battery 11 Remove the heat sink UMA or discrete based on the system configuration 12 Remove the assembly inner frame 13 Remove the system board NOTE The system board can be removed with the heat sink attached in order to simplify the procedure and pre...

Page 62: ...ng the coin cell battery Prerequisites If you are replacing a component remove the existing component before performing the installation procedure About this task The following image indicates the location of the coin cell battery and provides a visual representation of the installation procedure 62 Removing and installing components ...

Page 63: ...crete based on the system configuration 7 Install the battery 8 Install the WWAN card 9 Install the WLAN card 10 Install the 2280 solid state drive or 2230 solid state drive 11 Install the memory module 12 Install the base cover 13 Install the microSD card 14 Install the SIM card 15 Exit Service Mode 16 Follow the procedure in After working inside your computer Keyboard assembly Removing the keybo...

Page 64: ...sembly inner frame 13 Remove the system board NOTE The system board can be removed with the heat sink attached in order to simplify the procedure and preserve the thermal bond between the system board and heat sink About this task The following images indicate the location of the keyboard assembly and provide a visual representation of the removal procedure Steps 1 NOTE For models shipped with a U...

Page 65: ...palm rest assembly Installing the keyboard assembly Prerequisites If you are replacing a component remove the existing component before performing the installation procedure About this task NOTE The system board can be installed with the heat sink attached in order to simplify the procedure and preserve the thermal bond between the system board and heat sink The following image indicates the locat...

Page 66: ...llow the procedure in After working inside your computer Keyboard bracket Removing the keyboard bracket Prerequisites 1 Follow the procedure in Before working inside your computer 2 Enter Service Mode 3 Remove the SIM card 4 Remove the microSD card 5 Remove the base cover 6 Remove the memory module 7 Remove the 2280 solid state drive or 2230 solid state drive 8 Remove the WLAN card 9 Remove the WW...

Page 67: ...Steps 1 Remove the five M2x2 screws that secure the keyboard to the keyboard bracket 2 Remove the keyboard from the keyboard bracket Removing and installing components 67 ...

Page 68: ...bout this task NOTE The system board can be installed with the heat sink attached in order to simplify the procedure and preserve the thermal bond between the system board and heat sink The following image indicates the location of the keyboard bracket and provides a visual representation of the installation procedure 68 Removing and installing components ...

Page 69: ...ate drive 9 Install the memory module 10 Install the base cover 11 Install the microSD card 12 Install the SIM card 13 Exit Service Mode 14 Follow the procedure in After working inside your computer Display assembly Removing the display assembly Prerequisites 1 Follow the procedure in Before working inside your computer 2 Enter Service Mode 3 Remove the SIM card 4 Remove the microSD card 5 Remove ...

Page 70: ...70 Removing and installing components ...

Page 71: ... the system board for models shipped with a touchscreen 8 Peel the adhesive tape partially and unroute the WLAN and WWAN antenna cables from the routing guides on the system board 9 Open the display assembly to a 180 degrees and flip over the system and then place the system on a flat surface 10 Remove the four M2 5x5 screws that secure the display hinges to the system board 11 Remove the display ...

Page 72: ...72 Removing and installing components ...

Page 73: ...Removing and installing components 73 ...

Page 74: ...d eDP cable through the routing guide on the system board 6 Connect the eDP cable to the connector on the system board 7 Connect the display cable to the connector on the system board 8 Adhere the tape that secures the display cable to the system board 9 Connect the IR camera cable from its connector on the system board for models shipped with an IR camera 10 Connect the touchscreen cable from its...

Page 75: ...side your computer Display bezel Removing the display bezel Prerequisites 1 Follow the procedure in Before working inside your computer 2 Enter Service Mode 3 Remove the SIM card 4 Remove the microSD card 5 Remove the base cover 6 Remove the WLAN card 7 Remove the WWAN card 8 Remove the display assembly About this task The following images indicate the location of the display bezel and provide a v...

Page 76: ...l 2 Pry along the outside edge of the display bezel and work your way around the entire display bezel until the display bezel is separated from the display cover 3 Lift the display bezel from the display assembly Installing the display bezel Prerequisites If you are replacing a component remove the existing component before performing the installation procedure About this task The following image ...

Page 77: ...n Before working inside your computer 2 Enter Service Mode 3 Remove the SIM card 4 Remove the microSD card 5 Remove the base cover 6 Remove the WLAN card 7 Remove the WWAN card 8 Remove the display assembly 9 Remove the display bezel About this task The following images indicate the location of the display panel and provide a visual representation of the removal procedure Removing and installing c...

Page 78: ...78 Removing and installing components ...

Page 79: ...Removing and installing components 79 ...

Page 80: ... the display cover before flipping it over 2 Lift and open the display panel to access the display cable 3 Peel the conductive tape on the display cable connector 4 Peel the clear tape covering the display cable connector 5 Open the latch and disconnect the cable from the connector on the display panel 6 Lift the display panel away from the display back cover Installing the display panel Prerequis...

Page 81: ...About this task The following images indicate the location of the display panel and provide a visual representation of the installation procedure Removing and installing components 81 ...

Page 82: ...82 Removing and installing components ...

Page 83: ...Removing and installing components 83 ...

Page 84: ...emble NOTE Ensure that the display panel tabs are inserted into the slots on the display cover 5 Replace the two M2 5x3 screws to secure the display panel to the display back cover Next steps 1 Install the display bezel 2 Install the display assembly 3 Install the WWAN card 4 Install the WLAN card 5 Install the base cover 6 Install the microSD card 7 Install the SIM card 8 Exit Service Mode 9 Foll...

Page 85: ...tation of the removal procedure Steps 1 Peel the tape that secures the camera cable NOTE An abrupt peeling may also remove the camera shutter from the display bezel and damage the camera shutter 2 Lift the latch and disconnect the camera cable from the connector on the camera module 3 Carefully pry up the camera module starting from the prying point at the bottom edge of the camera module 4 Carefu...

Page 86: ...ssembly 5 Install the base cover 6 Install the microSD card 7 Install the SIM card 8 Exit Service Mode 9 Follow the procedure in After working inside your computer Removing the infrared camera Prerequisites 1 Follow the procedure in Before working inside your computer 2 Enter Service Mode 3 Remove the SIM card 4 Remove the microSD card 5 Remove the base cover 6 Remove the display assembly 7 Remove...

Page 87: ...the camera module starting from the prying point at the bottom edge of the camera module 4 Carefully lift the camera module from the display back cover Installing the infrared camera Prerequisites If you are replacing a component remove the existing component before performing the installation procedure About this task The following image indicates the location of the infrared camera and provides ...

Page 88: ...y assembly 5 Install the base cover 6 Install the microSD card 7 Install the SIM card 8 Exit Service Mode 9 Follow the procedure in After working inside your computer eDP display cable Removing the eDP cable Prerequisites 1 Follow the procedure in Before working inside your computer 2 Enter Service Mode 3 Remove the SIM card 4 Remove the microSD card 5 Remove the base cover 6 Remove the WLAN card ...

Page 89: ...tape and unroute the eDP display cable to release it from adhesive and lift the eDP display cable from the display back cover Installing the eDP cable Prerequisites If you are replacing a component remove the existing component before performing the installation procedure About this task The following image indicates the location of the eDP cable and provides a visual representation of the install...

Page 90: ...play cable to the display back cover Next steps 1 Install the display panel 2 Install the display bezel 3 Install the display assembly 4 Install the WWAN card 5 Install the WLAN card 6 Install the base cover 7 Install the microSD card 8 Install the SIM card 9 Exit Service Mode 10 Follow the procedure in After working inside your computer 90 Removing and installing components ...

Page 91: ...OTE This procedure applies only to computers shipped with a sensor board The following images indicate the location of the sensor board and provide a visual representation of the removal procedure Steps 1 Open the latch and disconnect the display cable from connector on the sensor board 2 Gently lift the sensor board away from the display back cover Installing the sensor board About this task The ...

Page 92: ...cover 7 Install the microSD card 8 Install the SIM card 9 Exit Service Mode 10 Follow the procedure in After working inside your computer Display hinges Removing the display hinges Prerequisites 1 Follow the procedure in Before working inside your computer 2 Enter Service Mode 3 Remove the SIM card 4 Remove the microSD card 5 Remove the base cover 6 Remove the WLAN card 7 Remove the WWAN card 8 Re...

Page 93: ... cover 3 Remove the two M2 5x5 screws that secure the left hinge to the display back cover 4 Lift and remove the left hinge from the display back cover Installing the display hinges Prerequisites If you are replacing a component remove the existing component before performing the installation procedure About this task The following images indicate the location of the display hinges and provides a ...

Page 94: ...e display back cover 4 Replace the two M2 5x5 screws to secure the right hinge to the display back cover Next steps 1 Install the display panel 2 Install the display bezel 3 Install the display assembly 4 Install the WWAN card 5 Install the WLAN card 6 Install the base cover 7 Install the microSD card 8 Install the SIM card 9 Exit Service Mode 10 Follow the procedure in After working inside your c...

Page 95: ...e display assembly 9 Remove the display bezel 10 Remove the display panel 11 Remove the camera microphone module 12 Remove the eDP display cable 13 Remove the sensor board 14 Remove the display hinges About this task The following images indicate the location of the display back cover and provide a visual representation of the removal procedure Steps After performing the steps in the pre requisite...

Page 96: ...lace the display back cover on a flat surface Next steps 1 Install the display hinges 2 Install the sensor board 3 Install the eDP display cable 4 Install the camera microphone module 5 Install the display panel 6 Install the display bezel 7 Install the display assembly 8 Install the WWAN card 9 Install the WLAN card 10 Install the base cover 11 Install the microSD card 12 Install the SIM card 13 ...

Page 97: ...with the heat sink attached in order to simplify the procedure and preserve the thermal bond between the system board and heat sink 15 Remove the power button board 16 Remove the LED board 17 Remove the smart card reader 18 Remove the keyboard assembly 19 Remove the display assembly 20 Remove the palm rest assembly About this task NOTE For models shipped with WLAN antennas only the dummy SIM card ...

Page 98: ...ing the dummy SIM card slot filler Prerequisites If you are replacing a component remove the necessary component before the installation procedure About this task The following image indicates the location of the dummy SIM card slot filler and provides a visual representation of the dummy SIM card slot filler installation procedure 98 Removing and installing components ...

Page 99: ...nstall the smart card reader 5 Install the LED board 6 Install the power button board 7 Install the system board 8 Install the assembly inner frame 9 Install the speakers 10 Install the heat sink UMA or discrete based on the system configuration 11 Install the battery 12 Install the WWAN card 13 Install the WLAN card 14 Install the 2280 solid state drive or 2230 solid state drive 15 Install the me...

Page 100: ...n 12 Remove the speakers 13 Remove the assembly inner frame 14 Remove the system board NOTE The system board can be removed with the heat sink attached in order to simplify the procedure and preserve the thermal bond between the system board and heat sink 15 Remove the SIM card slot filler for models shipped without a WWAN card 16 Remove the power button board 17 Remove the LED board 18 Remove the...

Page 101: ...lm rest assembly Prerequisites If you are replacing a component remove the existing component before performing the installation procedure About this task The following image indicates the palm rest assembly and provides a visual representation of the installation procedure Removing and installing components 101 ...

Page 102: ...D board 5 Install the power button board 6 Install the SIM card slot filler for models shipped without a WWAN card 7 Install the system board 8 Install the assembly inner frame 9 Install the speakers 10 Install the heat sink UMA or discrete based on the system configuration 11 Install the battery 12 Install the WWAN card 13 Install the WLAN card 14 Install the 2280 solid state drive or 2230 solid ...

Page 103: ...20 Follow the procedure in After working inside your computer Removing and installing components 103 ...

Page 104: ... for browser specific instructions 8 Click View Drivers for My System 9 Click Download and Install to download and install all driver updates detected for your computer 10 Select a location to save the files 11 If prompted approve requests from User Account Control to make changes on the system 12 The application installs all drivers and updates identified NOTE Not all files can be installed autom...

Page 105: ...S overview Entering BIOS setup program Navigation keys One time boot menu System setup options Updating the BIOS System and setup password Clearing CMOS settings Clearing BIOS System Setup and System passwords BIOS overview The BIOS manages data flow between the computer s operating system and attached devices such as hard disk video adapter keyboard mouse and printer Entering BIOS setup program S...

Page 106: ... available NOTE XXX denotes the SATA drive number Optical Drive if available SATA Hard Drive if available Diagnostics The boot sequence screen also displays the option to access the System Setup screen System setup options NOTE Depending on your computer and its installed devices the items listed in this section may or may not appear Table 5 System setup options System information menu Overview BI...

Page 107: ...ilable Displays the total computer memory available Memory Speed Displays the memory speed Memory Channel Mode Displays single or dual channel mode Memory Technology Displays the technology used for the memory DIMM_SLOT B Displays the DIMM B memory size DIMM_SLOT A Displays the DIMM A memory size Devices Information Panel Type Displays the Panel Type of the computer Privacy Screen Displays whether...

Page 108: ...or disable the integrated audio controller By default all the options are enabled USB Thunderbolt Configuration Enable or disable booting from USB mass storage devices connected to external USB ports By default the Enable External USB Ports option is enabled Enable or disable booting from USB mass storage devices such as external hard drive optical drive and USB drive By default the Enable USB Boo...

Page 109: ...n is enabled Unobtrusive Mode Enable Unobtrusive Mode Enable or disable all the computer light and sound By default the Enable Unobtrusive Mode option is disabled Table 8 System setup options Storage menu Storage SATA NVMe Operation Sets the operating mode of the integrated storage device controller By default the RAID ON option is not enabled Storage Interface Allows onboard drive to be enabled o...

Page 110: ...N Bus Mode Set the interface type of the Wireless Wan WWAN card By default the Bus Mode PCIe option is enabled WLAN Enable or disable the internal WLAN device By default the option enabled Bluetooth Enable or disable the internal Bluetooth device By default the option enabled Contactless smartcard NFC Enable or disable the internal Contactless smartcard NFC device By default the option enabled Ena...

Page 111: ...he USB PowerShare By default the Enable USB PowerShare option is disabled Thermal Management Enables to cool the fan and processor heat management to adjust the computer performance noise and temperature By default the Optimized option is enabled USB Wake Support Wake on Dell USB C Dock When enabled connecting a Dell USB C Dock will wake the computer from standby By default the Wake on Dell USB C ...

Page 112: ...ty Mitigation Enable or disable SMM Security Mitigation By default the option is enabled Data Wipe on Next Boot Start Data Wipe Enable or disable the data wipe on next boot By default the option is disabled Absolute Enable or disable or permanently disable the BIOS module interface of the optional Absolute Persistence Module service from Absolute software By default the option Enable Absolute is e...

Page 113: ...urity ID PSID revert of NVMe hard drives from the Dell Security Manager prompt By default the option is disabled Table 14 System setup options Update Recovery menu Update Recovery UEFI Capsule Firmware Updates Enable or disable BIOS updates through UEFI capsule update packages By default the option is enabled BIOS Recovery from Hard Drive Enables the user to recover from certain corrupted BIOS con...

Page 114: ...ables or disable the Intel Active Management Technology Enable Intel AMT Capability By default the Restrict MEBx Access option is selected MEBx Hotkey Enables or disable the MEBx Hotkey By default the option is disabled USB Provision Enables or disable the Intel Active Management Technology to be provisioned using the local provisioning file using a USB storage device Enable USB Provision By defau...

Page 115: ...able 18 System setup options Virtualization menu Virtualization Intel Virtualization Technology Enable Intel Virtualization Technology VT Specify whether a Virtual Machine Monitor VMM can utilize the additional hardware capabilities provided by Intel Virtualization Technology By default the option is enabled VT for Direct I O Enable Intel VT for Direct I O Specify whether a Virtual Machine Monitor...

Page 116: ...g capabilities based on detected workloads By default the option is disabled Table 20 System setup options System Logs menu System Logs BIOS Event Log Clear Bios Event Log Display BIOS events By default the Keep Log option is enabled Thermal Event Log Clear Thermal Event Log Display Thermal events By default the Keep Log option is enabled Power Event Log Clear Power Event Log Display power events ...

Page 117: ...boot If the recovery key is not known this can result in data loss or an unnecessary operating system re install For more information on this subject see Knowledge Article https www dell com support article sln153694 Steps 1 Follow the procedure from step 1 to step 6 in Updating the BIOS in Windows to download the latest BIOS setup program file 2 Create a bootable USB drive For more information se...

Page 118: ...may not boot if you turn off your computer Steps 1 From a turn off state insert the USB drive where you copied the flash into a USB port of the computer 2 Turn on the computer and press F12 to access the One Time Boot Menu select BIOS Update using the mouse or arrow keys then press Enter The flash BIOS menu is displayed 3 Click Flash from file 4 Select external USB device 5 Select the file and dou...

Page 119: ...r Setup password You cannot delete or change an existing System or Setup password if the Password Status is Locked About this task To enter the System Setup press F12 immediately after a power on or reboot Steps 1 In the System BIOS or System Setup screen select System Security and press Enter The System Security screen is displayed 2 In the System Security screen verify that Password Status is Un...

Page 120: ...OS System Setup and System passwords About this task To clear the system or BIOS passwords contact Dell technical support as described at www dell com contactdell NOTE For information on how to reset Windows or application passwords refer to the documentation accompanying Windows or your application 120 System setup ...

Page 121: ... Discharge the battery before removing it from the system To discharge the battery unplug the AC adapter from the system and operate the system only on battery power When the system will no longer power on when the power button is pressed the battery is fully discharged Do not crush drop mutilate or penetrate the battery with foreign objects Do not expose the battery to high temperatures or disass...

Page 122: ...logo appears 3 On the boot menu screen select the Diagnostics option 4 Click the arrow at the bottom left corner Diagnostics front page is displayed 5 Click the arrow in the lower right corner to go to the page listing The items detected are listed 6 To run a diagnostic test on a specific device press Esc and click Yes to stop the diagnostic test 7 Select the device from the left pane and click Ru...

Page 123: ...For cases when a 2 8 error code is shown replace the system board LCD Built in Self Test BIST Dell laptops have a built in diagnostic tool that helps you determine if the screen abnormality you are experiencing is an inherent problem with the LCD screen of the Dell laptop or with the video card GPU and PC settings When you notice screen abnormalities like flickering distortion clarity issues fuzzy...

Page 124: ... board 1 2 Unrecoverable SPI flash failure Replace the system board 1 5 EC unable to program i Fuse Replace the system board 1 6 Generic catch all for ungraceful EC code flow errors Disconnect all power source AC battery coin cell and drain flea power by pressing holding down power button 2 1 CPU failure Run the Intel CPU diagnostics tools If problem persists replace the system board 2 2 System Bo...

Page 125: ...diagnose and troubleshoot issues that may occur before your computer boots to the operating system It enables you to diagnose hardware issues repair your computer back up your files or restore your computer to its factory state You can also download it from the Dell Support website to troubleshoot and fix your computer when it fails to boot into their primary operating system due to software or ha...

Page 126: ...tery is removed For your safety and to protect the sensitive electronic components in your computer you are requested to drain residual flea power before removing or replacing any components in your computer Draining residual flea power also known as a performing a hard reset is also a common troubleshooting step if your computer does not power on or boot into the operating system To drain residua...

Page 127: ...and telephone based support and service options Availability varies by country and product and some services may not be available in your area To contact Dell for sales technical support or customer service issues Steps 1 Go to Dell com support 2 Select your support category 3 Verify your country or region in the Choose a Country Region drop down list at the bottom of the page 4 Select the appropr...

Reviews: