background image

Installing the SA7x
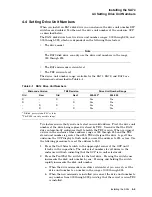
4.4 Setting Drive Unit Numbers

3. Repeat Steps 1 and 2 until all drive unit numbers have been set.
4. Restore the OCP to normal operation by pressing the Unit Select switch.
5. When you are changing the address to correct an error condition that caused

the unit select numbers to flash, you must press the drive dc power switch to

turn the drive off. After the drive has spun down, press the drive dc power

switch to spin up the drive and place it on line.

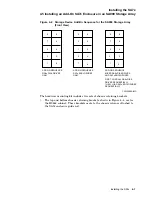
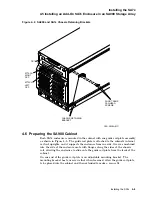
4.5 Installing an Add-On SA7x Enclosure in an SA900 Storage

Array

WARNING

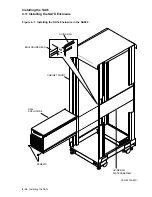
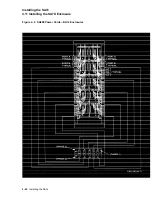
To maintain cabinet stability, always install components in the order

shown in Figure 4–2.

4.5.1 General Installation Considerations

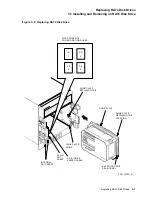
Internal SDI cables and power cords are installed in SA900 storage arrays only

when a storage device is installed. The internal SDI cables and power cords are

shipped with each add-on and you must install them. The contents of the SA7x

add-on kit are:
• SA7x enclosure
• Guide rail plate assembly
• Hardware mounting kit
• Internal SDI cables
• Power cord

4–6 Installing the SA7x

Summary of Contents for SA7 Series

Page 1: ...plains how to operate the SA7x family of enclosures the SA70 SA71 SA72 and SA73 This guide also includes installation procedures that can be performed only by trained Digital Multivendor Customer Serv...

Page 2: ...res may be required to correct the interference WARNING This is a Class A product In a domestic environment this product may cause radio interference in which case the user may be required to take ade...

Page 3: ...ive On Line 2 7 2 4 2 Taking a Drive Off Line 2 8 3 Replacing RA7x Disk Drives 3 1 Installing and Removing an RA7x Disk Drive 3 2 3 1 1 Recording RA7x Disk Drive Serial Numbers 3 3 3 1 2 Reversing the...

Page 4: ...ing the OCP 5 6 A Environmental Stabilization B RA7x Error Rates B 1 RA7x Error Rates B 1 C Revision Support Index Figures 1 1 SA7x Enclosure 1 2 1 2 RA70 Disk Drive 1 3 1 3 RA71 Through RA73 Disk Dri...

Page 5: ...SA7x Switch and Indicator Functions 2 3 2 2 OCP Controls and Indicators 2 4 2 3 Power Supply Controls and Indicators 2 5 3 1 Authorized Disk Drives Installations 3 1 4 1 RA7x Drive Unit Numbers 4 5 4...

Page 6: ......

Page 7: ...es one to four RA71 disk drives 700 MB each The SA72 accommodates one to four RA72 disk drives 1 GB each The SA73 accommodates one to four RA73 disk drives 2 GB each Conventions Special terminology us...

Page 8: ...ocumentation related to the SA7x enclosure Table 2 Related Documentation Title Order Number DSA Troubleshooting Flowchart EK DSATF TM Disk Drive Technical Description Manual EK ORA70 TD BA72 Field Mai...

Page 9: ...ion of an SA7x enclosure Table 1 1 lists the the types of disk drives that are authorized for installation in each SA7x enclosure Table 1 1 Authorized Disk Drive Installations Enclosure RA70 RA71 RA72...

Page 10: ...OUNTING SCREWS REAR COVER NOT SHOWN You can combine SA7x enclosures into shadow sets When using shadow sets remember that when replacing the power supply or transition boards 1 or 2 you need to remove...

Page 11: ...OE PLATE SHOE PLATE ELECTRONIC CONTROL MODULE ECM SET J1 8 PIN SDI CONNECTOR PORT A J2 8 PIN SDI CONNECTOR PORT B J3 20 PIN REMOTE OPERATOR CONTROL PANEL CONNECTOR J4 4 PIN POWER CXO 1878B_S HDA SERIA...

Page 12: ...losure 1 1 SA7x Enclosure Overview Figure 1 3 RA71 Through RA73 Disk Drives FRONT VIEW BOTTOM VIEW REAR VIEW CXO 3518A MC SHOE PLATE 8 PIN SDI PORT A 8 PIN SDI PORT B 20 PIN OCP 4 PIN POWER 1 4 Introd...

Page 13: ...rear positions and the second two drives in the front positions Caution The SA7x enclosure will accommodate a single RA7x disk drive However if only one drive is installed in the enclosure a drive po...

Page 14: ...n of the RA7x configuration table contains the following information Authorized installation Factory installation Only installed at the factory Field add on Only installed in the field Enclosure Enclo...

Page 15: ...0 0 70 GB SA71 EK Field add on SA900 120 240 Vac 50 60 Hz 0 1 0 0 0 70 GB SA71 FK Field add on SA900 120 240 Vac 50 60 Hz 0 4 0 0 2 8 GB SA71 GK Factory installation SA900 120 240 Vac 50 60 Hz 0 1 0 0...

Page 16: ...0 0 4 0 4 0 GB SA72 LK Field add on SA600 SA800 120 240 Vac 50 60 Hz 0 0 0 1 1 0 GB SA72 MK Field add on SA600 SA800 120 240 Vac 50 60 Hz 0 0 4 0 4 0 GB SA73 CK Field add on SA550 SA650 SA850 120 240...

Page 17: ...ture step change 5 4 3 Degrees per hour Fahrenheit Degrees per hour Celsius Operating relative humidity 40 60 Percent relative humidity noncondensing Operating relative humidity rate of change 10 Perc...

Page 18: ...1 C 1 8 F Nominal airflow through the enclosure Between 45 and 65 cubic ft per minute Input power requirements 47 to 63 Hz 4 6 A 100 to 120 Vac 60 Hz 2 3 A 220 to 240 Vac 50 Hz 1 4 User Precautions Di...

Page 19: ...ization see Appendix A 1 4 3 Electrostatic Discharge Protection Electrostatic discharge ESD is caused by the buildup and release of static electricity An electrical charge from a person or object can...

Page 20: ...r Precautions Figure 1 4 Using the ESD Grounding Strap OPERATOR S ESD GROUNDING STRAP ESD GROUNDING STRAP GROUNDED TO SA7x ENCLOSURE CHASSIS CXO 2609B_S ESD GROUNDING STRAP SUPPLIED WITH 60 INCH CABIN...

Page 21: ...ure and contains the Unit Select switch and four identical sets of switches and indicators Each set of switches and indicators is dedicated to one of the four disk drive positions in the enclosure Dri...

Page 22: ...Select Run Run Fault Fault Set No Set No Ready Ready Unit No Unit No Write Write Protect Protect A A B B DRIVE POWER SWITCHES PORT SWITCHES PORT SWITCHES All switches except the Fault Set No switch ar...

Page 23: ...one Displays the drive unit number Write Protect yellow Press to enable write protect On when write protect enabled Port A yellow Press to enable Port A for controller selection On when Port A is on l...

Page 24: ...ring normal operations but may blink or go out during heavy disk accesses The Ready indicator must light within 60 seconds after you press the Run switch failure to do so indicates a problem in the dr...

Page 25: ...losure Press the side of the switch labeled 0 off to remove power from the enclosure Line Voltage Selector switch As you face the rear panel the Line Voltage Selector switch is located to the right of...

Page 26: ...TAGE CONNECTOR POWER SUPPLY TABS CXO 2658C 2 3 Applying Power to the SA7x Enclosure CAUTION Before applying power to the SA7x enclosure ensure that the Line Selector Voltage switch on the enclosure lo...

Page 27: ...cs without detecting a fault all indicators go out c If the Fault Set No indicator remains lit the drive has detected a fault Press the Fault Set No switch to obtain a blinking OCP error code The ligh...

Page 28: ...y while their respective ports are selected by the system controller 2 4 2 Taking a Drive Off Line Taking a disk off line first requires you to dismount the drive as described in Steps 1 and 2 of the...

Page 29: ...the major subassemblies of the SA7x enclosure Except for the RA70 disk drive designation this illustration is accurate for all the SA7x enclosures CAUTION Do not attempt to install a disk drive unless...

Page 30: ...only one drive is installed in the enclosure a drive position filler is required to route cooling air and prevent overheating If you are adding a second drive to an enclosure and the drive position f...

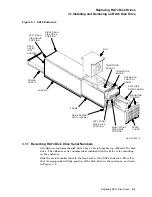
Page 31: ...RAME CHASSIS POWER SUPPLY CXO 1845D_S TRANSITION BOARD 1 MOUNTING SCREWS REAR COVER NOT SHOWN 3 1 1 Recording RA7x Disk Drive Serial Numbers All add on or replacement disk drives have a serial number...

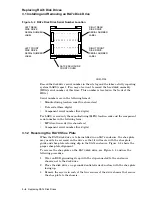
Page 32: ...r LARS record only the manufacturing MFG location code and the component serial number in the following form MFG location code two characters Component serial number five digits 3 1 2 Reversing the RA...

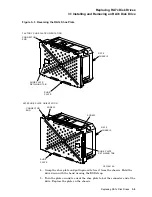
Page 33: ...EW CXO 2610A RA70 CHASSIS CONNECTOR END FACTORY SHOE PLATE ORIENTATION SA70 SHOE PLATE ORIENTATION SHOE PLATE RETAINING TAB 4 Grasp the shoe plate and pull upward to free it from the chassis Hold the...

Page 34: ...t the cover up and outward to clear the enclosure See Figure 3 1 3 Use the ESD grounding strap furnished with the cabinet or connect your ESD grounding strap to the enclosure chassis 4 Orient the disk...

Page 35: ...ng RA70 Disk Drive SHOE PLATE RETAINING CLIP SHOE PLATE RA70 DISK DRIVE REAR PANEL SHOE PLATE GUIDE INTERNAL SDI CABLES CXO 1870D_S LR 1 RR 2 LF 4 RF 3 CONFIGURATION RULES SILK SCREEN OF SHOE PLATE RE...

Page 36: ...filler is required to route cooling air and prevent overheating If you are adding a second drive to an enclosure and the drive position filler is already installed you must remove it The drive positio...

Page 37: ...wall of the chassis disk position The retaining clip locks with a tab on the drive shoe plate Refer to Figures 3 3 and 3 4 Release this retaining clip and pull straight out on the drive position fill...

Page 38: ......

Page 39: ...to verify that the site has adequate power reserves to support the planned number of SA7x enclosures WARNING Hazardous voltages are present inside the storage array cabinet and enclosures You must be...

Page 40: ...the SA7x enclosure It is best to perform this procedure after all disk drives are installed in all the enclosures in the storage array cabinet but not yet connected to power CAUTION Before performing...

Page 41: ...cs and is ready for operation If the Fault light comes on see Chapter 5 for more information 10 Set the drive unit number Refer to Section 4 4 for this procedure 11 Select Port A or Port B and Write P...

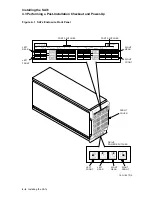
Page 42: ...ont Panel FRONT COVER LEFT FRONT LEFT REAR RIGHT REAR RIGHT FRONT CXO 1867D_S RIGHT REAR RIGHT FRONT LEFT REAR LEFT FRONT Unit Select Run Run Fault Fault Set No Set No Ready Ready Unit No Unit No Writ...

Page 43: ...rive unit number of the drive being replaced is stored by TB2 Second is that the RA7x drive automatically configures itself to match the TB2 version When you insert a drive in the enclosure whose addr...

Page 44: ...witch to spin up the drive and place it on line 4 5 Installing an Add On SA7x Enclosure in an SA900 Storage Array WARNING To maintain cabinet stability always install components in the order shown in...

Page 45: ...NCLOSURES ONLY 8 9 7 6 5 4 3 2 1 0 ADD ON SEQUENCE MIXED RA9x DISK DRIVES AND SA7x ENCLOSURES FIRST LOAD ALL RA9x DISK DRIVES SEQUENTIALLY THEN LOAD SA7x ENCLOSURES SEQUENTIALLY CXO 3568A MC The hardw...

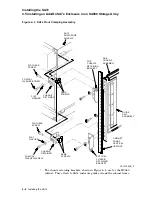
Page 46: ...TAINER TOP CHASSIS RETAINING BRACKET RAIL CHASSIS ASSEMBLY GUIDE RAIL ASSEMBLY BOTTOM CHASSIS RETAINING BRACKET FLAT WASHER CHASSIS RETAINER CONICAL WASHER SCREW FLATHEAD SCREW CXO 2442B_S SEMS SCREWS...

Page 47: ...Figure 4 5 The guide rail plate is attached to the cabinet s internal vertical uprights and it supports the enclosure from one side Grooves machined into the side of the enclosure mate with flanges al...

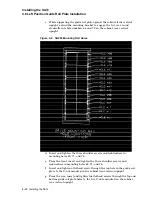
Page 48: ...If the cabinet is installed and operating spin down all disk drives and halt tape drives in the cabinet Switch the circuit breaker on the front of the cabinet power controller to the off position Fig...

Page 49: ...urn the cabinet power off as described in Section 4 6 2 This procedure installs an enclosure in add on sequence position 3 Refer to Figure 4 2 to select the optimum add on sequence position for your i...

Page 50: ...and tighten the three shoulder screws and lockwashers in mounting holes 65 71 and 78 e From the front insert and tighten the three shoulder screws and lockwashers in mounting holes 65 71 and 78 f Ins...

Page 51: ...iller to the door b Remove the bezel filler WARNING Use care in supporting the guide rail plate It is heavy and awkward to position within the cabinet If possible use two persons to support and positi...

Page 52: ...the front insert and tighten a flathead screw through the top hole in the guide rail plate to the U nut mounted on the cabinet front vertical upright i Tighten the four flathead mounting bracket screw...

Page 53: ...t available two people are required to lift and install the enclosure One person can install the enclosure if the disk drives and power supply are removed to lighten the load Refer to the SA7x Enclosu...

Page 54: ...7x 4 11 Installing the SA7X Enclosure Figure 4 7 Installing the SA7x Enclosure in the SA900 GUIDE RAIL PLATE ASSEMBLY CXO 3574A MC SCREWS SA7x ENCLOSURE CABINET FRONT ENCLOSURE REAR GUIDE RAIL 4 16 In...
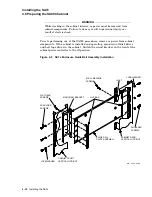
Page 55: ...hey are ordered separately and shipped at the same time the add on is shipped Table 4 2 lists the external SDI cables Table 4 2 H9A00 External SDI Cables External SDI Cables Standard Part Number Fire...

Page 56: ...Connections 2 Install cables from drives and enclosures on the left side of the cabinet to the left vertical I O bulkhead install cables from drives and enclosures on the right side of the cabinet to...

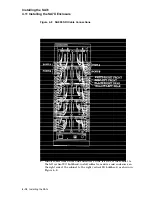
Page 57: ...connector shown in Figure 4 9 8 Coil any excess power cord in front of the power controller 9 Connect the external SDI cables in the SA900 storage array Be sure to tighten the captive screws when con...

Page 58: ...Installing the SA7x 4 11 Installing the SA7X Enclosure Figure 4 9 SA900 Power Cords SA7x Enclosures 4 20 Installing the SA7x...
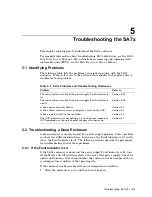
Page 59: ...rors or displays a fault on the OCP Section 5 4 A drive is not visible to the controller Section 5 6 The OCP indicators are not lighting a drive does not respond to OCP commands or the unit number cha...

Page 60: ...Transition board 2 TB2 e The enclosure assembly See the appropriate storage array guide for instructions 5 2 2 If the Fault Indicator Is Not Lit If the enclosure is dead and the power supply Fault ind...

Page 61: ...he drive c Repeat this step for all disk drives in the enclosure 2 Remove power to the disk drives by pressing each of the drive power switches 3 Restore power to the disk drives by pressing each of t...

Page 62: ...t Panel FRONT COVER LEFT FRONT LEFT REAR RIGHT REAR RIGHT FRONT CXO 1867D_S RIGHT REAR RIGHT FRONT LEFT REAR LEFT FRONT Unit Select Run Run Fault Fault Set No Set No Ready Ready Unit No Unit No Write...

Page 63: ...e determines if the problem is with the the SA7x enclosure or an RA7x disk drive HSC console log If the RA7x disk drives are connected to an HSC controller check the HSC console log Refer to the HSC d...
Page 64: ...he I O bulkhead 5 If the preceding conditions are met replace the FRUs in the following order until the problem is corrected a RA7x electronic control module ECM See the RA7x Disk Drive Service Manual...

Page 65: ...7x Disk Drive Service Manual for instructions 2 If the disk drive is not at fault replace the FRUs in the following order until the problem is corrected a OCP b The two OCP ribbon cables c TB1 d TB2 e...

Page 66: ......

Page 67: ...ert the disk drive into the SA7x enclosure until it is fully stabilized If condensation is not visible on the drive see Table A 1 for the correct thermal stabilization time CAUTION The disk drive can...

Page 68: ......

Page 69: ...ionally report recoverable disk errors in the host error log The rate of these errors depends upon specific applications and the resulting I O rates If error rates are no more than those listed in Tab...

Page 70: ......

Page 71: ...and Table C 4 lists the SDI controllers for the RA71 through RA73 disk drives Table C 1 VAX Diagnostics for RA71 RA73 Drives Diagnostic Supervisor Description Minimum Version EVRAE Generic MSCP Exerci...

Page 72: ...2 VAXsimPLUS 1 6 2 0 ULTRIX 32 4 2 4 3 VAXELN 4 3 4 3 x VAX System 5 3 2 1 Not planned 1The Error Log Formatter ERF version 5 4 2 must be upgraded to version 5 4 2 0001 to support RA71 RA72 Version 5...

Page 73: ...plying power to the SA7x enclosure 2 6 placing RA7x drives on line and off line 2 7 Operation cont d using SA7x front panel switches and indicators 2 1 using SA7x rear panel switches and indicators 2...

Page 74: ......

Reviews: